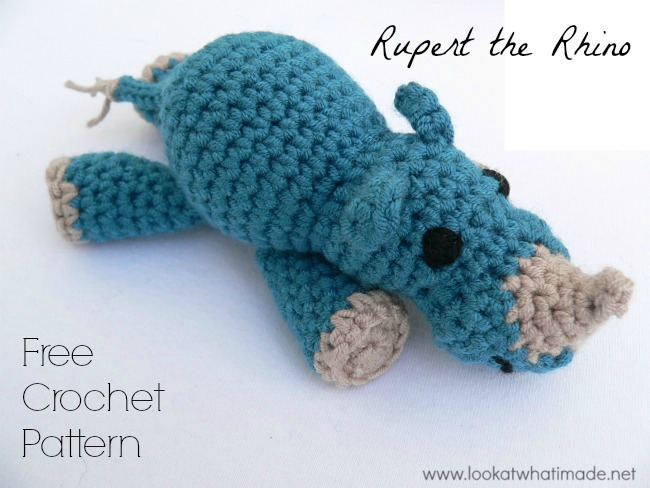
 I bring you the first official Little Zoo pattern: Rupert the crochet rhinoceros. Technically there are already 2 Little Zoo animals, Meimei the Baby Elephant and Napolion the Lion, but Rupert is the first Little Zoo pattern that Anette Bak and I will be collaborating on.
And here I have to take a little time-out to tell you that Anette has been amazing. I had this notion of slowly but surely creating a whole bunch of Little Zoo animals, but I am busy with a book for Annie’s (gasp, yes!), I work, I have 3 kooky boys and one charming husband…so before I could even think of my next little critter, Anette had already designed the heads for 3 more.
Luckily Anette agreed to let me collaborate with her so that we could bring you the Little Zoo (and soon Little Farm) crochet patterns.
Rupert the Crochet Rhinoceros
© Anette Bak and Dedri Uys 2014. All Rights Reserved.
You may in no way replicate this crochet rhinoceros pattern or put it forward as your own work.
For details about selling items created from this pattern, see this post.
Difficulty
This is an Intermediate pattern.
Materials
- Double knit yarn (light worsted weight/#3 OR worsted weight/#4) in 2 colours (less than 40 meters/44 yards in total)
- 4 mm crochet hook (US G/6 UK 8)
- Yarn needle
- Stuffing
- Safety eyes or buttons
Abbreviations
US Terminology used. (US/UK Comparison Chart)
| CC | Contrasting Colour |
| Ch | Chain |
| MC | Main Colour |
| Sc | Single crochet |
| Sc inc | Single crochet increase – work 2 sc’s in the same stitch |
| Sc2tog | Single crochet 2 together (single crochet decrease) |
| Sl st | Slip stitch |
| St/St’s | Stitch/Stitches |
| * | Repeat all instructions between asterisks the amount of times specified. For example: “*Sc inc, 3 x sc* x 2” will mean sc inc in the next st, sc in the next 3 st’s, sc inc in the next st, sc in the next 3 st’s. |
Notes
- Because you will be turning at the end of each short row, I have indicated with (inside) and (outside) whether the inside of the horn/head should be facing you, or the outside. This is just to help you keep track of which short row you are on. Please see this tutorial if you would like to know more about short rows. The tutorial is a partial walk-through of my Rhinosaur head (NOT the rhinoceros featured below).
- The slip stitches at the end of the short rows are NOT included in the stitch counts in parentheses.
- Please use a running stitch marker to mark the beginning of each round. Because this pattern is worked in a spiral (and contains short rows) you will NEED this as a visual aid that you have worked all the stitches in a specific round and that you have done them correctly. A running stitch marker is just a piece of scrap yarn that you flick forward/backward over your work at the beginning of each full round (not at the beginning of the short rows – unless indicated).
- See this tutorial if you would like to know more about running stitch markers and how to use them.
- If you would like to PRINT THIS PATTERN, please use the PrintFriendly button at the bottom of this page. You can choose to exclude whichever photos you do not need. Clicking “Remove Images” will remove all of them. If you do decide to print this pattern sans photos, please be aware that you will have to refer back to photos for the step-by-step instructions for attaching the ears as they contain the instructions too.
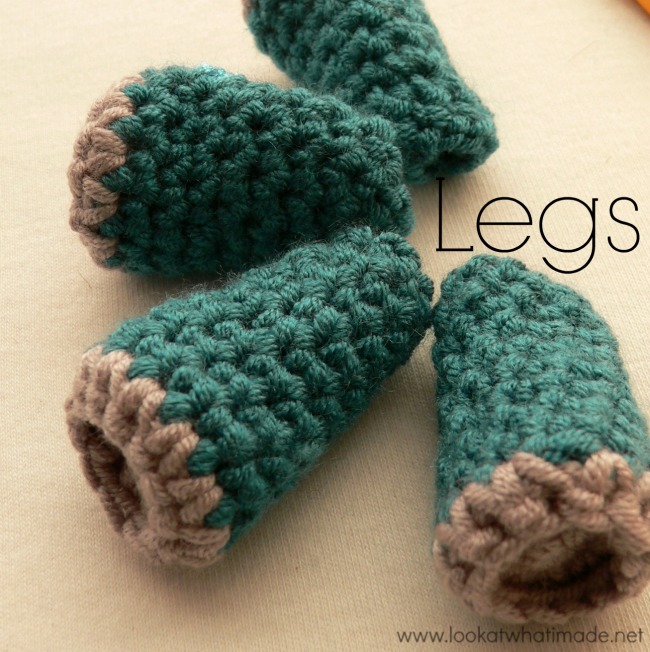
Legs
Before you start, you will need to make 4 legs by following this pattern. Make your legs in your main colour.
Head
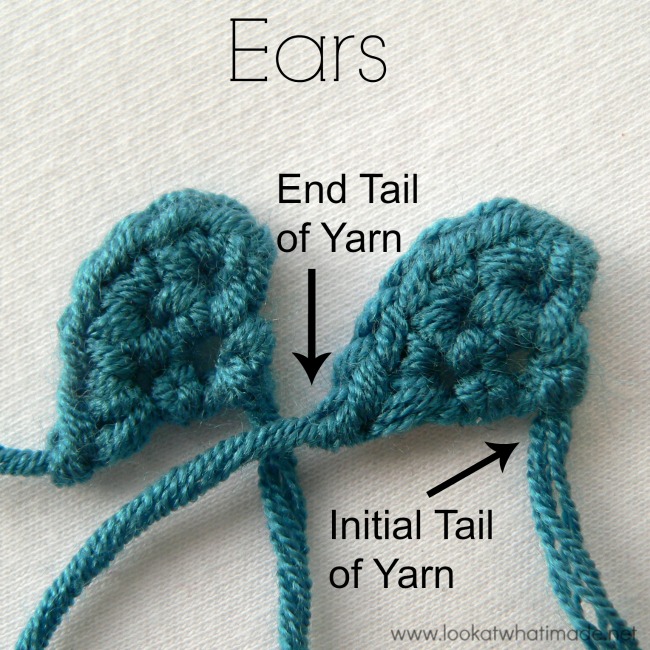
Ears
Using MC:
- Into a magic ring: ch 1, sc. Ch 1 and turn. (1)
- 3 x sc into the only st of Row 1. Turn. Note that you are not chaining one before turning. (3)
- 3 x sc inc. It will be a bit tricky to get into the first st because you have not made a turning ch-1. When you have finished this row, ch 1 and bind off. (6)
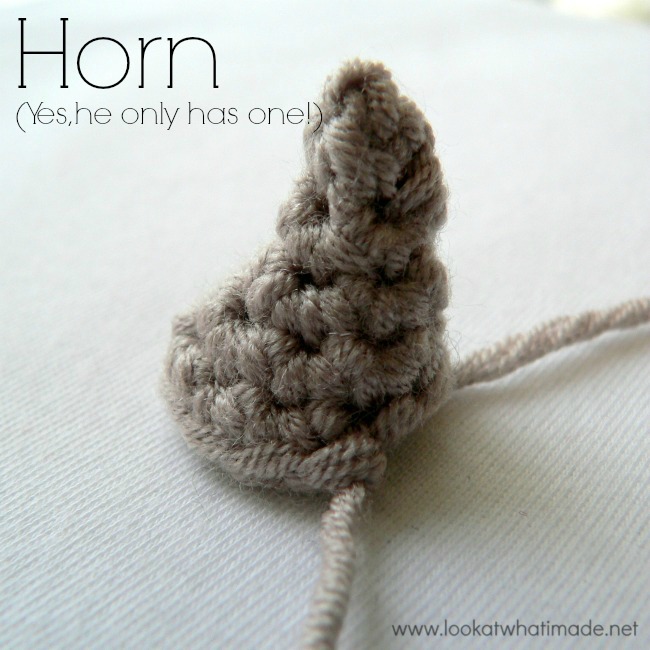
Horn
With CC:
- Into a magic ring: ch 1, 3 x sc. Continue around in a spiral, making the first st of the next round in the first st of this round.
- Sc, 2 x sc inc. (5)
- 3 x sc, 2 x sc inc. (7)
- 3 x sc, *sc inc, sc* x 2. (9)
- 3 x sc, *sc inc, 2 x sc* x 2. (11)
Sl st in the next st (this sl st counts as the last st of your horn), ch 1 and bind off.
Please Note: Although there are only 11 stitches in the last round of the horn, when making the head you will be working into the slip stitch on the horn AND the stitch containing the slip stitch, effectively adding another stitch. So if you get to the end of Round 7 of the head and you only have 2 stitches left when you should have 3, check to make sure that you have worked into the last stitch (the slip stitch) of the horn at the end of Short row 2 of the head.
Head
With MC and a slip knot already on your hook:
- Short Row (inside): Skip the sl st (Photo 3). Sc inc in the only 2 st’s of Row 1 of the head (Photo 4). Sl st in the next st of the horn, which will be the last st (the sl st) of the horn (Photo 5). Turn. Make sure that you pull your tails of yarn to the inside of the horn, because that will save you having to work them away later on. (4)
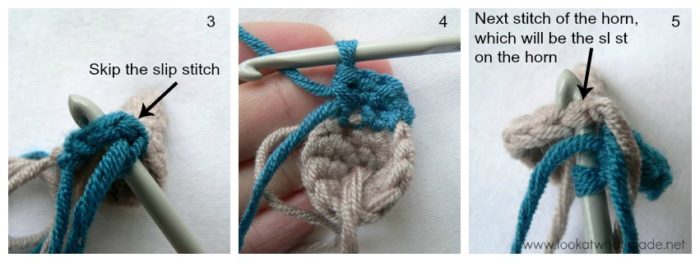
- Short Row (outside): Skip the sl st. Sc inc, 2 x sc, sc inc. This will bring you to the “step” at the beginning of the previous short row (Photo 6). Sl st in the next st of the horn (indicated with an arrow in Photo 6) and turn. (6)
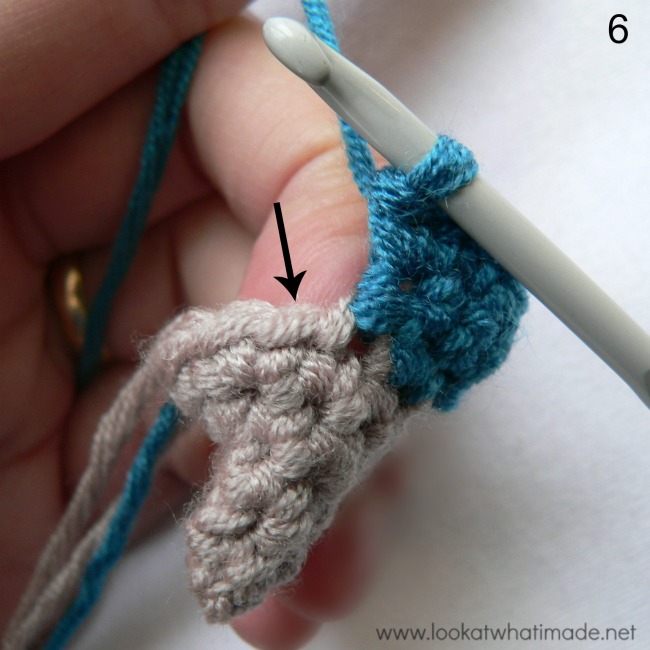
- Short Row (inside): Skip the sl st. Sc inc, 4 x sc, sc inc. This will bring you to the “step” at the beginning of the previous short row. Sl st in the next st of the horn and turn. (8)
- Short Row (outside): Skip the sl st. Sc inc, 6 x sc, sc inc. This will bring you to the “step” at the beginning of the previous short row. Sl st in the next st of the horn and turn. (10)
- Short Row (inside): Skip the sl st. 2 x sc inc, 2 x sc, sc2tog, 2 x sc, 2 x sc inc. This will bring you to the “step” at the beginning of the previous short row. Sl st in the next st of the horn and turn. (13)
- Short Row (outside): Skip the sl st. 2 x sc inc, 9 x sc, 2 x sc inc. This will bring you to the “step” at the beginning of the previous short row. Sl st in the next st of the horn and turn. At this point, there should be 3 st’s of the horn still left unworked (see Photo 7). (17) Photos 8 and 9 show you what the head should look like at this point.
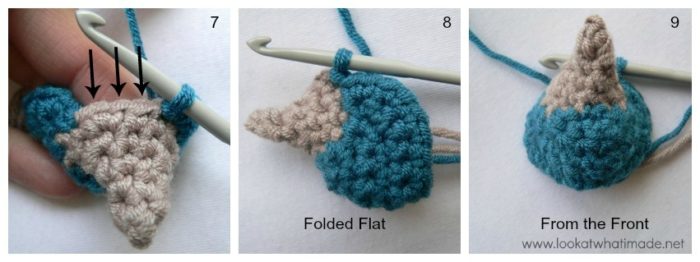
- Short Row (inside): Skip the sl st. 4 x sc, 2 x sc2tog, sc, 2 x sc2tog, 4 x sc. This will bring you to the “step” at the beginning of the previous short row. Sl st in the next st of the horn and turn. (13)
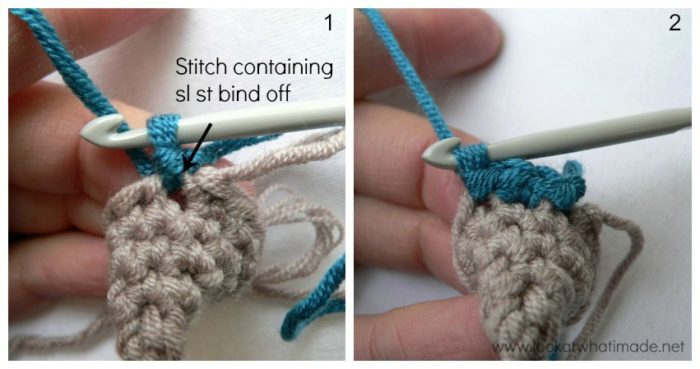
- Outside: Skip the sl st. 13 x sc. This will bring you to the step at the beginning of the previous short row. You should now have 2 st’s of the horn left unworked (Photo 10). Sc in the remaining 2 st’s of the horn (Photo 11). (15)
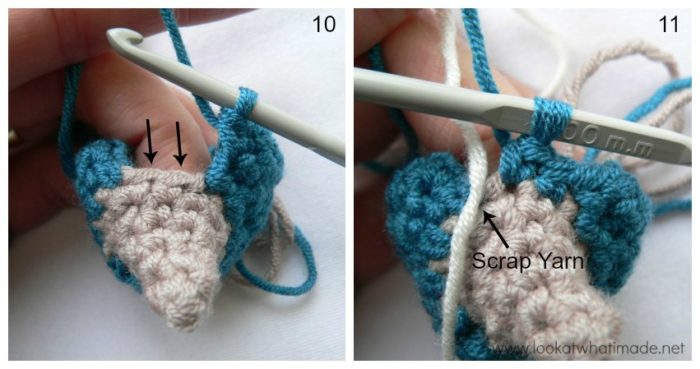
- Place a piece of scrap yarn over your work to mark the beginning of this round (see Photo 11 above). Starting in the first st of the previous round (Photo 12): sc, sc2tog, 3 x sc, sc inc, 3 x sc, sc2tog, 3 x sc. The last stitch should fall in the stitch before the stitch marker/scrap yarn (Photo 13). Feel free to stuff the horn at this point. (14)
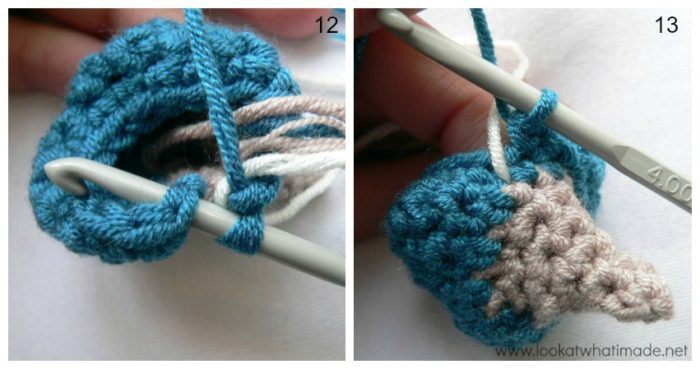
- Short Row (outside): Flip the piece of scrap yarn back over your work before starting this short row (Photo 13). 2 x sc. Sl st in the next st and turn. Just to give you an idea of where you should be right now: if you fold the head flat with the horn pointing towards you, the last st (the sl st) should fall right on the fold on the right side of the rhino’s head (the left side if you are left-handed). (2)
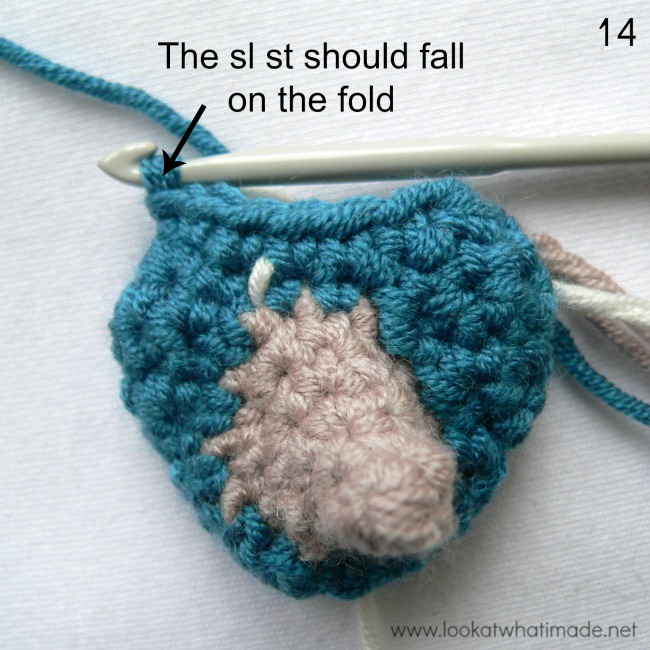
 Short Row (inside): Skip the sl st. 2 x sc, sc inc, 2 x sc. Sl st in the next st and turn. (6)
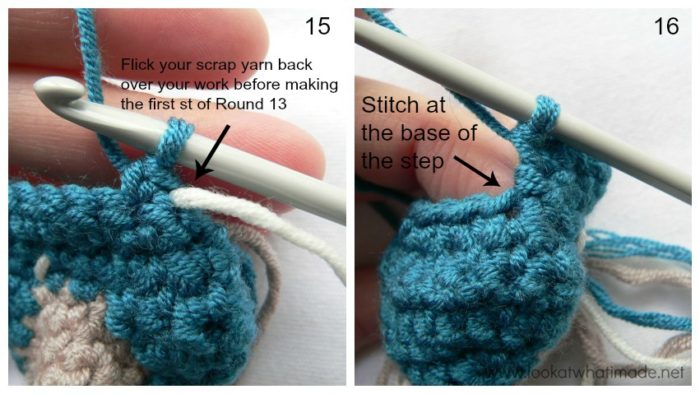
- Outside: Flick the piece of scrap yarn over your work to mark the beginning of this round (Photo 15). Skip the sl st. Sc, sc inc, 2 x sc, sc inc, sc. This will bring you to the “step” at the beginning of the previous short row. Sc in the stitch at the base of the “step”, which already contains a sl st from the beginning of the previous short row. This is the stitch that you would usually skip when coming off the step (Photo 16). 7 x sc, working into the remaining 7 st’s from Round 10. This will bring you to the “step” at the beginning of Round 13 (which will be marked with your running stitch marker). The rest of the pattern will be worked in a spiral, so no more turning at the end of rounds. (16)
- Start in the first st of Round 13 one step up, which is marked with your running stitch marker. 9 x sc, sc inc, 4 x sc, sc inc, sc. (18)
- 10 x sc, sc inc, 5 x sc, sc inc, sc. (20)
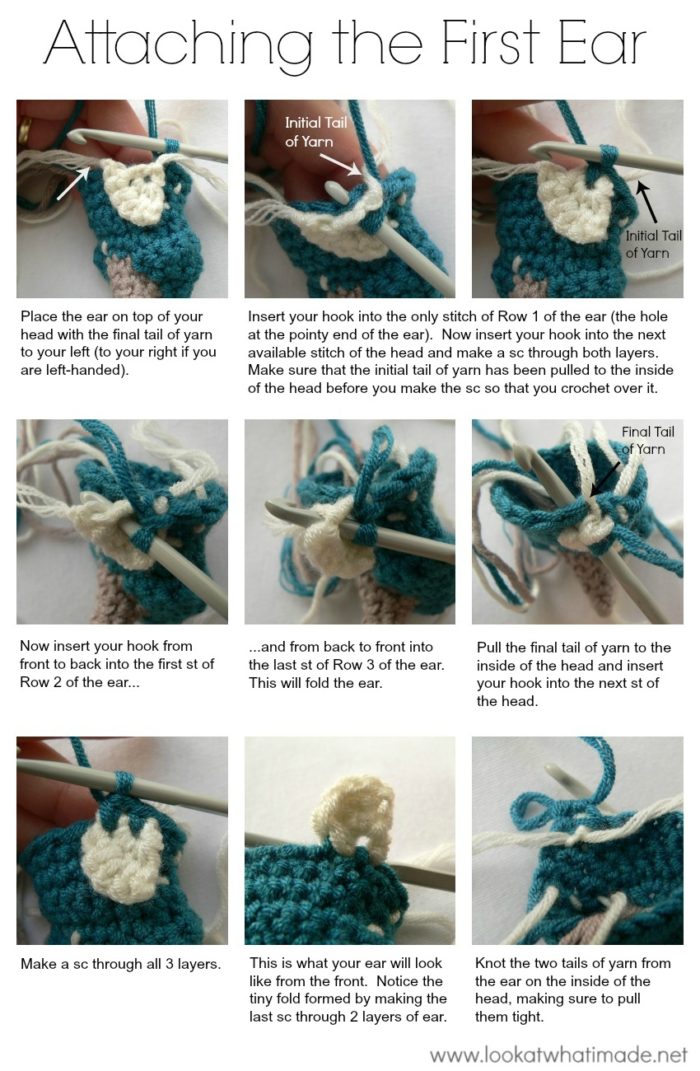
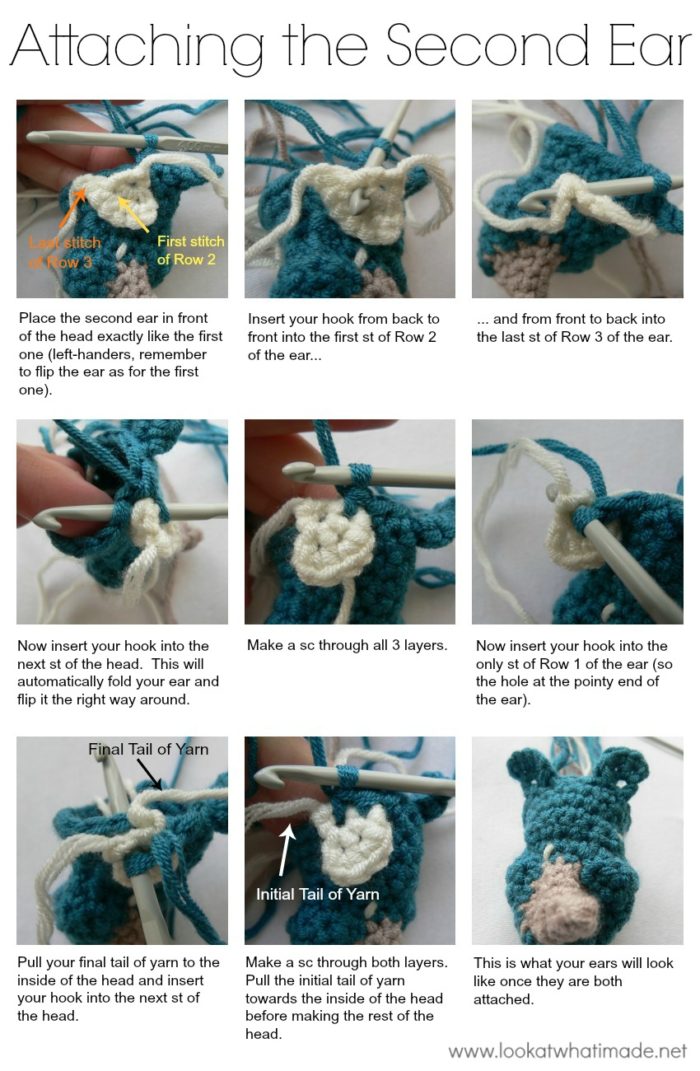
- You will be attaching the ears in this round. 2 x sc, attach the first ear with the next 2 sc’s (see Attaching the First Ear below), 2 x sc, attach the second ear with the next 2 sc’s (see Attaching the Second Ear below). 3 x sc, sc inc, 6 x sc, sc inc, sc. (22)
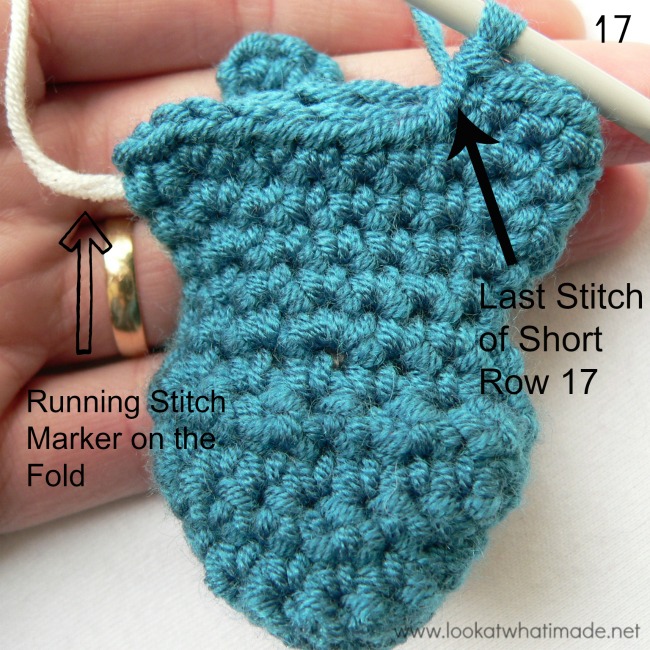
- Short Row (outside): 14 x sc. This will leave 8 st’s of the previous round unworked. Take a good look at your rhino’s head before continuing. Fold the head flat with the horn pointing away from you and the running stitch marker falling on the fold. The last stitch of Short Row 17 should be the fourth stitch from the fold (see Photo 17). This is a good time to stuff the head and add the eyes. Please see the note about adding the eyes and stuffing the head, which you can find after the instructions for the head. (14)
- Once you have stuffed your head, place your scrap yarn/stitch marker over your work after the last st of Short row 17 to mark the beginning of Round 18. 11 x sc2tog. (The first 4 sc2tog’s will fall in the remaining stitches of Round 16.) Do NOT bind off. You will now make the body. If you haven’t already added the eyes and stuffed the head, do so now before continuing. And if you want to add a smile, you can do that now too. (11)
Adding the Eyes and Stuffing the Head
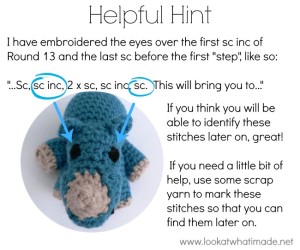
If you are at all concerned about using safety eyes, simply use some black yarn and embroider some eyes onto the rhino once it is all done. I have added my eyes in Round 13. You can scroll back up if you need a reminder of where I’ve placed them.
When stuffing the head, take particular care to push the stuffing all the way into the horn if you have not already stuffed it. Use little bits of stuffing and press them all the way into the horn before adding more.
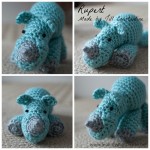
Refer back to the first photo of the head if you are a little bit confused about what the head should look like at this point.
Adding a Smile
You can leave the rhino as is, but he is such a happy creature that I think he deserves a smile. So if you would like to add one, this is a good time to do that too.
To embroider the smile, use any colour yarn you fancy.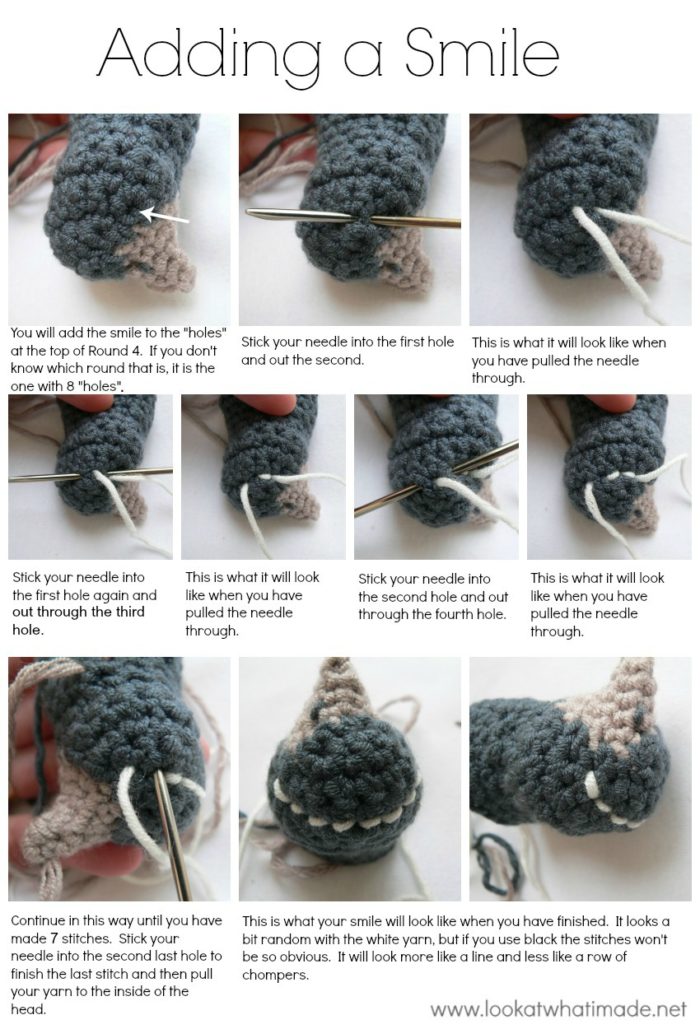
Body
Right, now that you have completed (and stuffed) the head, make a body using these instructions.
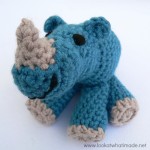
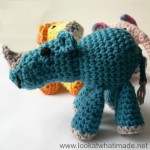
When you have finished making the body, this is what your little gem will look like:
Thank you to these lovely ladies for testing the crochet rhinoceros pattern for us:
Amy Affleck ♥ San Bee ♥ Beth Spaulding ♥ Lesley Lord ♥ Tess McDonald ♥ Haley Slater ♥ Brittany Umbaugh
Kiley Jones ♥ Kimberly Slifer ♥ Connie Gerbrandt ♥ Jill Constantine ♥ Jessica Rettig ♥ Terry Spears
Katheryn Cox ♥ Susan Williams Church ♥ Jessica Marie Oliveira ♥ Pat Irish ♥ Megan Muday ♥ Michele Henson
A special “Thank you” to Venetia Smith for editing the pattern for us!
Remember to subscribe to my newsletter if you would like to be kept in the loop. You can also like my Facebook page or follow me on Bloglovin or Google+.
Happy Hooking!




Meme says
He’s one of the cutest wild animals I’ve seen. I am making a zoo of them for my grandson Hunter but think he’ll be 21 before they are all made. Of course I’ve told my little Hunter that he can’t hurt animals but he can shoot them with his camera. I’ll have to find or create an animal starting with H that I can call Hunter. Maybe Hunter the Hedgehog. M
Dedri Uys says
Thank you, Meme. Hunter the Hedgehog…I will pass that on to Anette for consideration :)
Kara says
Oh my goodness!! He is the cutest!!
Dedri Uys says
Thank you, Kara. I had a quick look at your Shabby Chic Easter Eggs and they are lovely.
Kine says
Pleeeease make more cute mini zoo animals available soon!:) Meimei, Napolion and (soon Rupert) are waiting for new buddies to join them – planning to make a babygym or a mobile for my soon-to-be-born niece or nephew. Thanks so much for your lovely recepies. Greetings from Norway:)
Dedri Uys says
Hehe, we will publish all the animal patterns before the end of the year, unless new ones come along…but at the moment I have a lot of other commitments that keep me from writing up the patterns. The next one will be available beginning May.
Magda de Wet says
Dedri, toe jy in Okt verlede jaar die Iced Pie Square-patroon gedeel het, was dit vir my so mooi én iets anders as die “gewone ou” blokkies. Helaas kon ek nou eers daarmee begin, maar wat ‘n lekkerte! Ek het die mooiste kleure wol gekoop om die kombersie (DNA patroon) vir my dogter vir haar 25ste verjaarsdag in Junie te gee. Van die 128 blokkies wat benodig word, het ek sover agt gemaak: ek wil nou niks anders doen nie: huis- en tuinwerk raak agterweë! Weereens dankie vir die oulike patroon! My mond water vir die pragtige afghan blokke, maar ek sit dit solank op ys.Groete, Magda. Ns: …..all my free crochet patterns and tutorials are now listed on their very own page….. Dankie! Dis baie gerieflik
.
Carrie says
OH MY GOSH, DEDRI!!! I came to your site preoccupied and not rely expecting to see anything new (I check your place far more often than is good for me :0 ), and I found this lovely surprise! All good intensions of finishing my last ten projects before starting another flew out the window and here I am deciding on the yarn I’ll use while I type this. Oh well :) maybe I’ll finish Meimei in the process (yeah I’m that bad).
Dedri Uys says
Hehe…you are a serial project-starter! I am glad you like him. Now finish Meimei! xxx