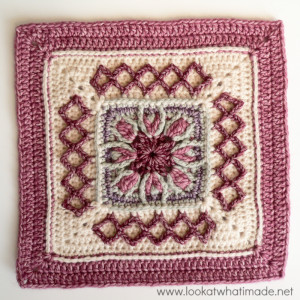
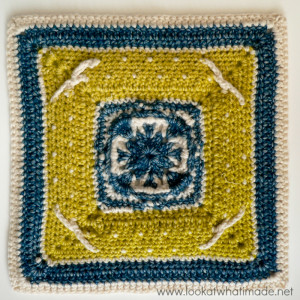
Esme’s Winter Cottage has a busy center, surrounded by less and less ‘busy’. It is like the calm after the storm for me and I wanted something that was busy but also quiet and peaceful, if that makes sense.
I would like to thank Andrea Andres Schultz and Amanda Nelson Bush for providing me with a name for this square. I received so many brilliant suggestions that I now have an arsenal of names clamouring for patterns. In fact, one of the names has already inspired my next big project…well, the big project AFTER my next big project.
Photo tutorials are provided for the tricky rounds, so although this pattern is Intermediate, I am going out on a limb and saying that it is suitable for Adventurous Beginners.
This square is equivalent to four of my 6″ Two-Colour Linen Stitch Squares, so you can use it as the centre for a Linen Stitch Manghan, or you can create a chequer-board design by alternating this square with Linen Stitch Foursquares.
If you would like to use this square as the centre for the Around the Bases CAL, you will need to add one dc round at the end to get to the correct stitch count. To do this, simply repeat Round 17 so that you end up with 46 dc per side.
Enjoy!
Esme’s Winter Cottage Square
© Dedri Uys 2015. All Rights Reserved
Resources
- Printing/PDF: There is a Print-friendly button in the bottom right-hand corner after every post. Please use this print-friendly button to print/save this pattern. Take a look at THIS TUTORIAL if you don’t know how to use the print-friendly button.
- Ravelry: Add this pattern to your Ravelry Queue
- Dutch Translation by Esther Dijkstra from It’s All in a Nutshell
- Video Tutorial: This square was featured as the first square of the Nuts About Squares CAL 2017. You can find the video tutorial by Esther Dijkstra HERE.
Size
12”
Materials
- 120 – 130 meters of Worsted Weight Yarn (#4) – I have used Stonewashed XL Yarn
- 5.5 mm Clover Amour crochet hook (US 9/I UK 5)
Colours
- A: Blue Apatite
- B: Moonstone
- C: Lemon Quartz
For the photo tutorial, I have used different colours:
- Garnet: Rounds 1, 9, and 12
- Crystal Quartz: Rounds 2, 4, and 6
- Corundum Ruby: Rounds 3, 15, 16, and 17
- Deep Amethyst: Round 5
- Moonstone: Rounds 7, 8, 10, 11, 13, and 14
Gauge
At the end of Round 6, your square should measure 12.5cm/5”.
Abbreviations
- BLO – Back loop only
- BPdc – Back post double crochet
- BPhdc – Back post half-double crochet
- Ch – Chain
- Dc – Double crochet
- FPdc – Front post double crochet
- FPsc – Front post single crochet
- Hdc – Half-double crochet
- Sc – Single crochet
- Tr – Treble crochet
- Sl st – Slip stitch
- Sp/sps – Space/spaces
- St/sts – Stitch/stitches
- () – Repeat instructions between parentheses the number of times specified
- * – Repeat instructions between asterisks the number of times specified (hard-core repeat)
Special Stitches
- Tr Bobble: Yarn over twice and insert your hook into the indicated stitch. Yarn over and pull up a loop. (Yarn over and pull through 2 loops) twice – 2 loops on your hook. Yarn over twice and insert your hook into the same stitch. Yarn over and pull up a loop – 5 loops on your hook. (Yarn over and pull through 2 loops) twice – 3 loops on your hook. Yarn over twice and insert your hook into the same stitch. Yarn over and pull up a loop – 6 loops on your hook. (Yarn over and pull through 2 loops) twice – 4 loops on your hook. Yarn over and pull through all 4 loops.
- Puff Stitch: Yarn over and insert your hook into the specified st/sp. Yarn over again and pull up a long loop. (Yarn over and insert your hook into the same st/sp. Yarn over again and pull up a long loop) three more times. Yarn over and pull through all 9 loops on your hook. Ch 1 to close the Puff Stitch. See THIS PUFF STITCH TUTORIAL.
Helpful Tutorials
Notes
Starting Each Round
When changing colour, start with a standing stitch equivalent to the first stitch in the pattern.
Example: If the round starts (Sc, ch 2, sc), use a standing single crochet for the first sc.
Here are the links to the standing stitches:
If you prefer to join your yarn with a sl st and an initial chain instead, see THIS DIAGRAM by Oombawka Design if you don’t know how many turning chains to make for a specific stitch.
Instructions
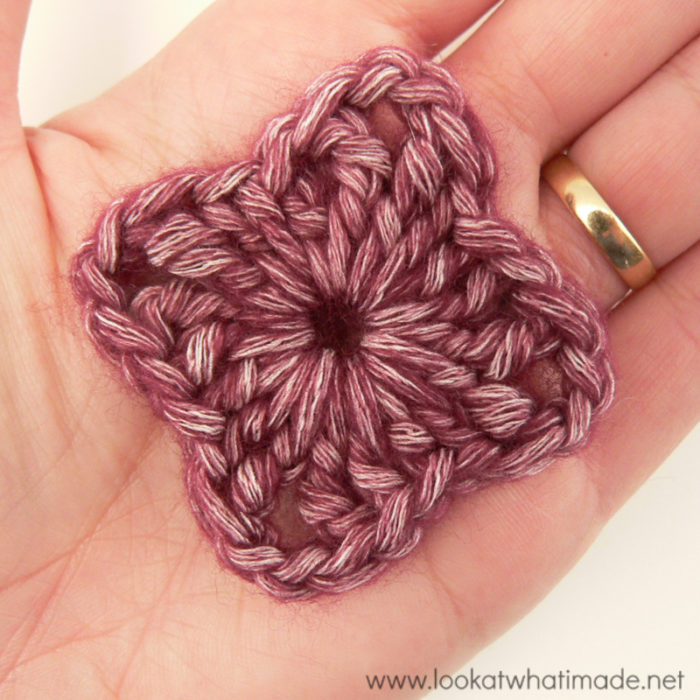
Round 1 {Colour A}
Into a magic ring: ch 2 (counts as your first hdc). (Dc, Tr, Ch 2, Tr, Dc, Hdc) 4 times, omitting the last hdc on the last repeat. Join to the top of the beginning ch-2 with a sl st. Fasten off and work away your ends. Alternatively, use the Invisible Join (here and throughout when changing colours).
Stitch Count: 20 sts and 4 ch-2 corner sps {2 tr, 2 dc, and 1 hdc per side}
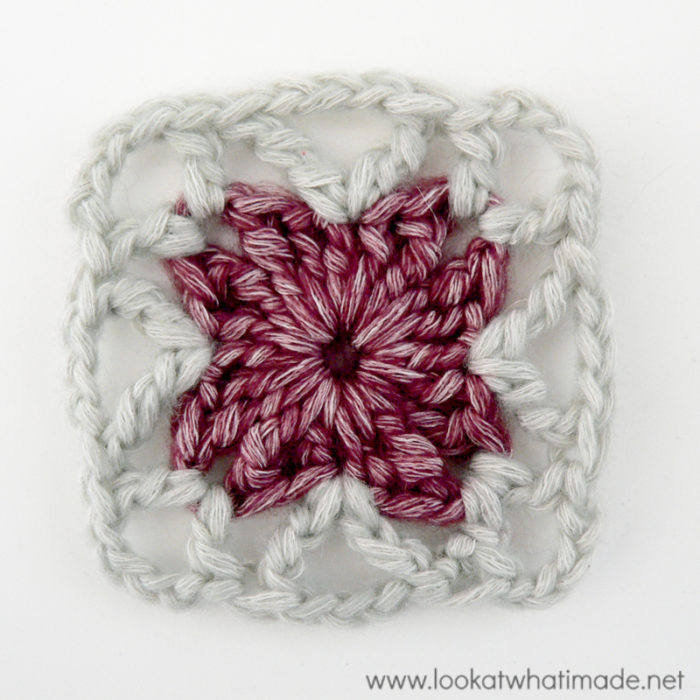
Round 2 {Colour B}
*(Dc, ch 4, dc) in ch-2 corner sp. Skip the first 2 sts. (Tr, ch 3, tr) in the next st. Skip the last 2 sts.*
Repeat from * to * 3 more times. Join to the first dc with a sl st. Fasten off and work away your ends.
Stitch Count: 16 sts, 4 ch-3 sps, and 4 ch-4 corner sps {2 tr, 2 dc, and 1 ch-3 sp per side}
Round 3 {Colour A}
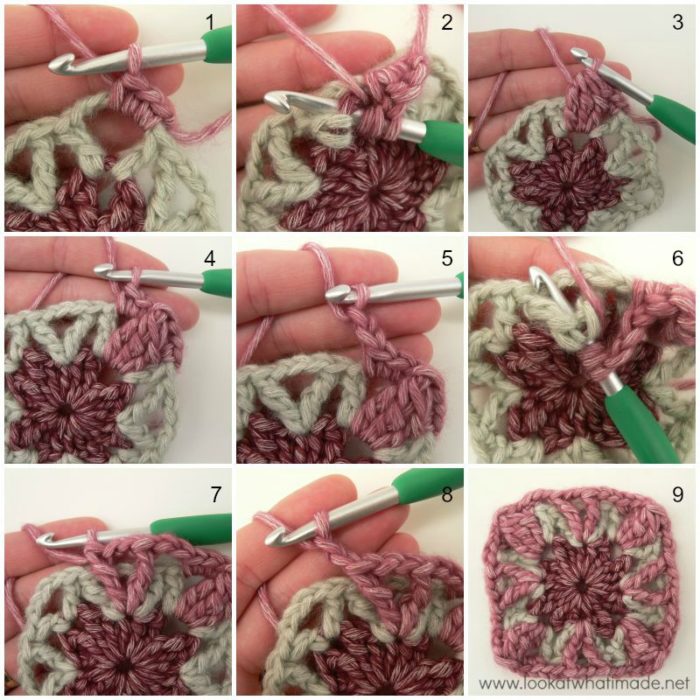
*Make 3 sc into the ch-4 corner sp from Round 2 {Photo 1}. Make a Tr Bobble in the ch-2 corner sp from Round 1, working in front of the ch-4 corner sp from Round 2 and between the 2 dc from Round 2 {Photos 2 and 3}. Make 3 sc into the same ch-4 corner sp from Round 2 {Photo 4}. This is your corner made.
Skip the first 2 sts. Ch 2 {Photo 5}. (Tr, ch 2, tr) into the hdc from Round 1 that already contains the (tr, ch 3, tr), making sure to work between the posts of the tr sts and in front of the ch-3 sp from Round 2. See Photos 6 and 7. Ch 2. Skip the last 2 sts {Photo 8}. *
Repeat from * to * 3 more times. Join to the first sc with a sl st. Fasten off and work away your ends.
Stitch Count: 36 sts, and 12 ch-2 sps {6 sc, 2 tr, and 3 ch-2 sps per side, not including corner Tr Bobble }
Round 4 {Colour B}
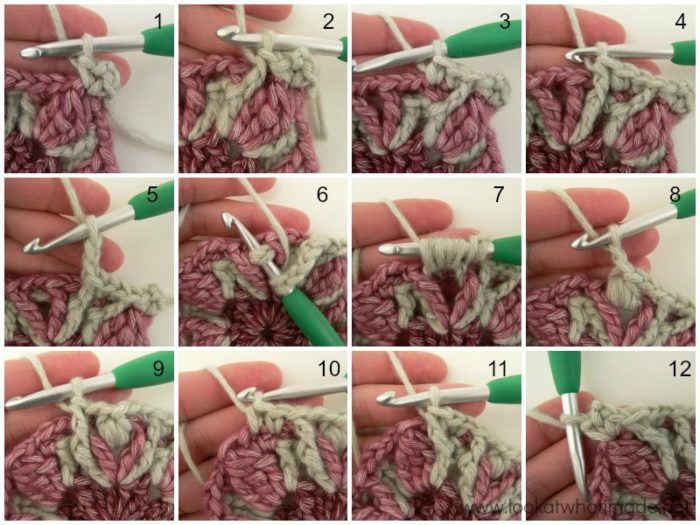
(Sc, ch 2, sc) into any corner Tr Bobble – Photo 1.
*FPdc around the dc from Round 2 directly after the Tr Bobble {Photo 2}. Skip the first sc of Round 3 and sc in the next 2 sts {Photo 3}. FPdc around the next st from Round 2, which will be the tr {Photo 4}. Ch 2 {Photo 5}. Skip the next ch-2 sp and the next tr from Round 3. Pull the ch-3 sp from Round 2 through the ch-2 sp from Round 3. Working in front of the ch-2 sp from Round 3, make a Puff Stitch into the loop formed by the pulled-up ch-3 sp from Round 2 {Photos 6 and 7}. Ch 2 {Photo 8}.
FPdc around the tr from Round 2 {Photo 9}. Skip the next tr and the ch-2 sp from Round 3. Sc in the next 2 sts of Round 3 {Photo 10}. FPdc around the dc from Round 2 directly in front of the Tr Bobble {Photo 11}. Skip the last sc of Round 3. (Sc, ch 2, sc) into the next Tr Bobble {Photo 12}.*
Repeat from * to * 3 more times, omitting the last corner on the last repeat. Join to the first sc with a sl st. Fasten off and work away your ends.
Stitch Count: 44 sts, and 12 ch-2 sps – including ch-2 corner sps {6 sc, 4 FPdc, 1 Puff Stitch, and 2 ch-2 sps per side}
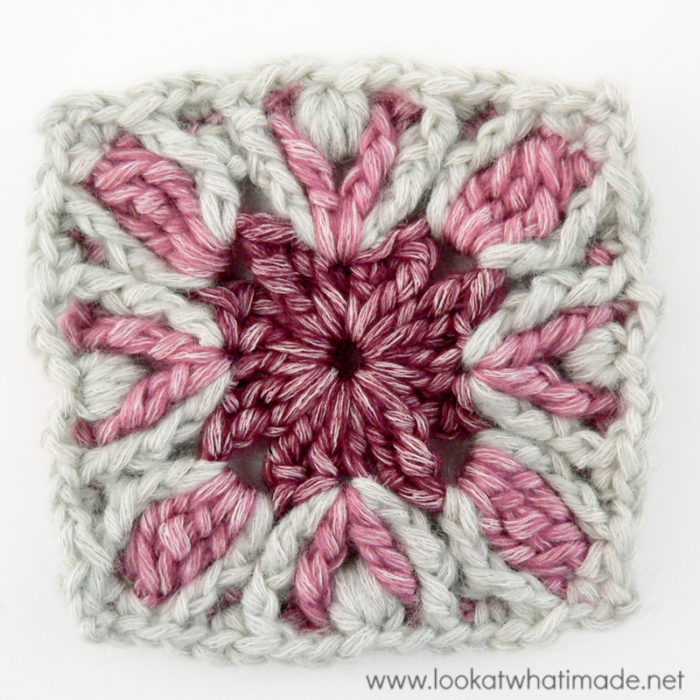
Round 5 {Colour A}
*(Sc, ch 2, sc) into the ch-2 corner sp. Sc in the next 5 sts. The last sc should fall in the FPdc. Sc in the next ch-2 sp. FPsc around the Puff Stitch. Sc in the next ch-2 sp. Sc in the next 5 sts.*
Repeat from * to * 3 more times. Join to the first sc with a sl st. Fasten off and work away your ends.
Stitch Count: 60 sts, and 4 ch-2 corner sps {14 sc and 1 FPsc per side}
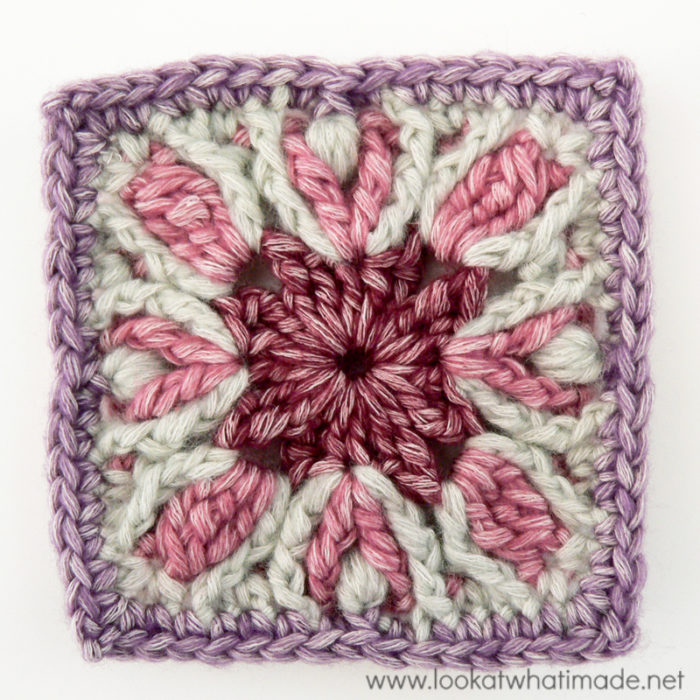
Round 6 {Colour B}
*(Sc, ch 2, sc) into the ch-2 corner sp. Skip the first (hidden) stitch. Sc in the next 5 sts. FPdc around the FPdc from Round 4 and skip the next sc of Round 5. Sc in the next 2 sts of Round 5, which should be the FPsc and the sc. FPdc around the next fPpdc from Round 4 and skip the next sc of Round 5. Sc in the last 5 sts.*
Repeat from * to * 3 more times. Join to the first sc with a sl st. Fasten off and work away your ends.
Stitch Count: 64 sts, and 4 ch-2 corner sps {14 sc and 2 FPdc per side}
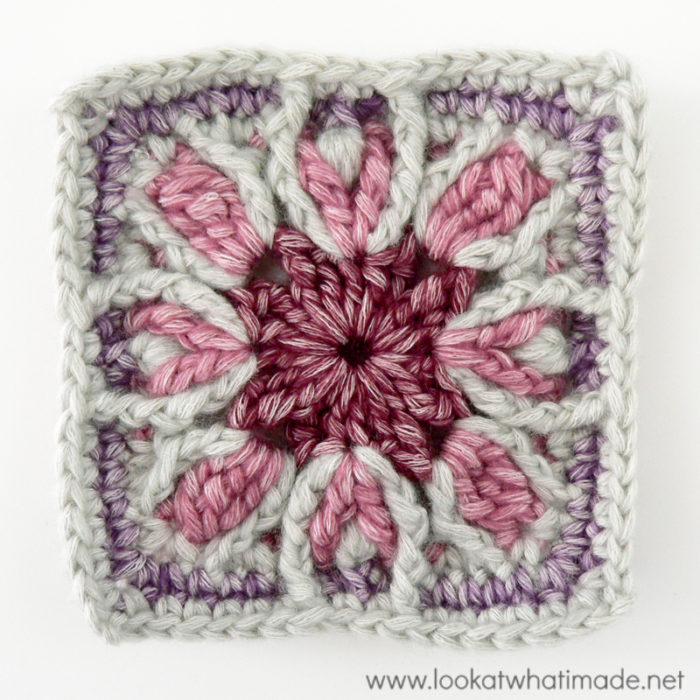
Round 7 {Colour C}
*(2 hdc, ch 2, 2 hdc) into any ch-2 corner sp. BPdc in each of the 16 sts across.*
Repeat from * to * 3 more times. Join to the first hdc with a sl st. Sl st into the next hdc and into the ch-2 corner sp.
Stitch Count: 80 sts, and 4 ch-2 corner sps {4 hdc and 16 BPdc per side}
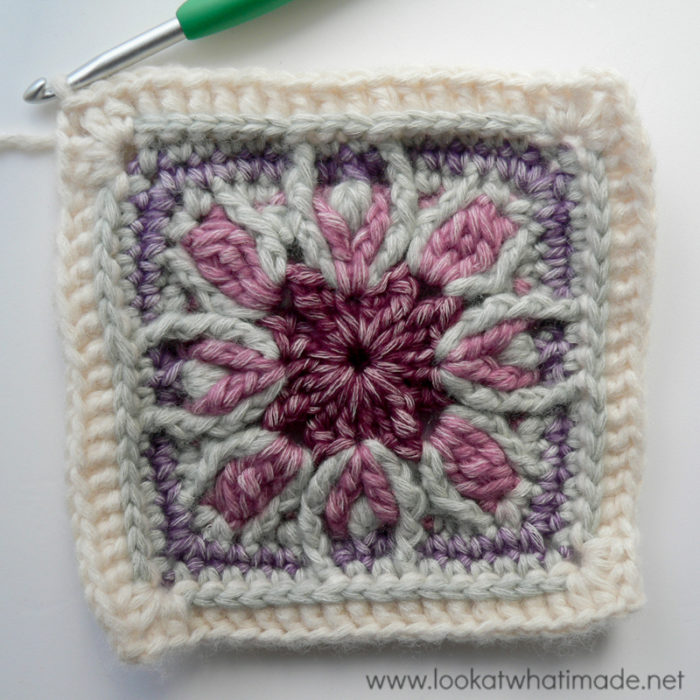
Round 8 {Colour C}
Ch 3 (counts as first dc). (Dc, ch 2, 2 dc) into the same ch-2 corner sp. This is your first corner made.
*Skip the first (hidden) st. Dc in the next st. (Dc in the BLO of the next st, dc in the next 3 sts) 4 times. There should now be 2 sts left before the ch-2 corner sp. Dc in the BLO of the next st. Dc in the last st. (2 dc, ch 2, 2 dc) into the ch-2 corner sp.*
Repeat from * to * 3 more times, omitting the last corner on the last repeat. Join to the top of the beginning ch-3 with a sl st. Fasten off and work away your ends.
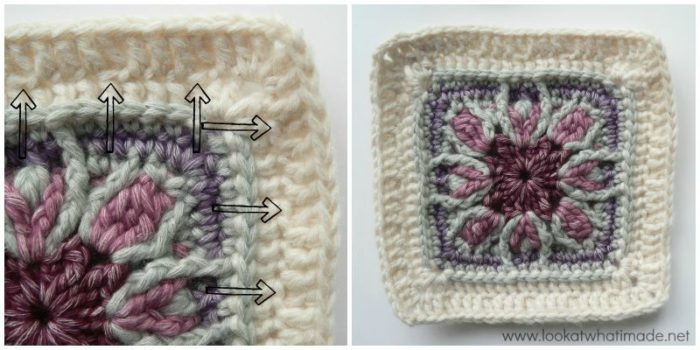
Stitch Count: 92 sts, and 4 ch-2 corner sps {23 dc per side, of which 5 are BLO – see arrows below}
Round 9 {Colour B}
In this round, you will be working primarily around the posts of the stitches from Round 7 that already contain a BLO dc. You will see that the front loops of these stitches form a dotted line across your work, making it easier to identify them – see arrows above. If you need more help, see Round 107 of Sophie’s Universe HERE.
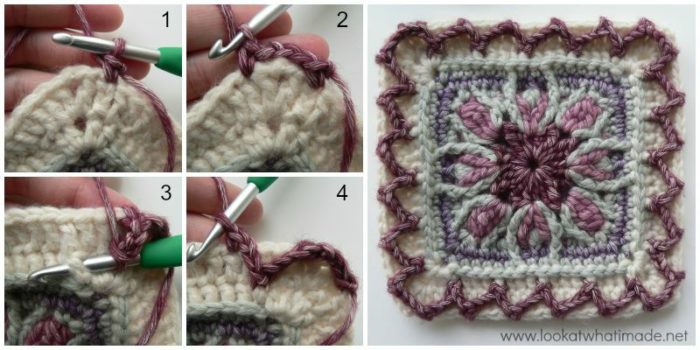
Join your yarn by making a standing single crochet in the second-to-last dc of any side {Photo 1}.
*Ch 3. Skip the last dc, the ch-2 sp, and the first dc of the next side. Sc in the next st {Photo 2}. Ch 3. Working in front of the sts from Round 8, make a sl st around the front post of the first BPdc from Round 7, which already contains a BLO dc {Photo 3}. Ch 3, skip the next 3 sts of Round 8 and make a sc in the next st, which will be the central of the 3 dc between BLO dc {Photo 4}.
(Ch 3. Working in front of Round 8, skip the next 3 sts of Round 7 and make a sl st around the next st, which already contains a BLO dc. Ch 3. Skip the next 3 sts of Round 8 and make a sc in the next st, which will be the central dc of the 3 dc between BLO dc) 4 more times. There should now be one dc left before the ch-2 corner sp.*
Repeat from * to * 3 more times, omitting the last sc on the last repeat. Join to the first sc with a sl st. Fasten off and work away your ends.
Flip the corner ch-3 sps to the back of your work. Note that the zigzags look skew. That is ok.
Stitch Counts:
- Total: 24 sc and 44 ch-3 sps {including ch-3 corner sps}
- Per Side: 6 sc and 10 ch-3 sps {not including ch-3 corner sps}
Round 10 {Colour C}
It is important that you work in front of the ch-3 sps from Round 9 when making your corners. You will be using these ch-3 sps when you make the second part of your diamond pattern in Round 12. If you need more help, see Round 108 of Sophie’s Universe HERE.
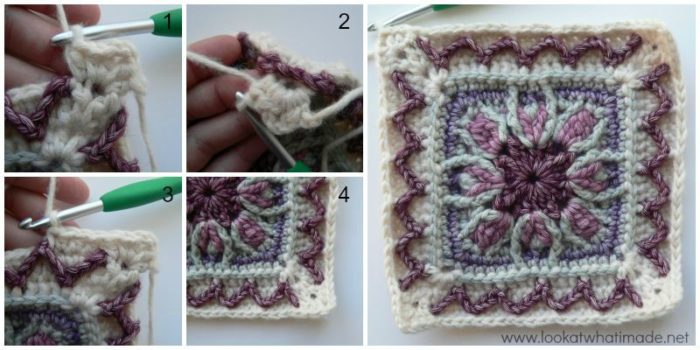
Working in front of the ch-3 sp from Round 9, join your yarn by making a standing half-double crochet in any ch-2 corner from Round 8. (Hdc, ch 2, 2 hdc) in the same corner sp.
*Still working in front of the ch-3 corner sp from Round 9, hdc in the first (hidden) st of Round 8 {Photos 1 and 2}. Skip the first sc from Round 9.
(Hdc in the next 3 sts from Round 8, between the sc sts that form the “zigzag hills”. Make a BPsc around the next sc from Round 9 {Photo 3}) 5 times.
Working in front of the corner ch-3 sp from Round 9, hdc in the last dc from Round 8. Still working in front of the ch-3 corner sp from Round 9, (2 hdc, ch 2, 2 hdc) in the next ch-2 sp from Round 8.*
Repeat from * to * 3 more times, ending with a hdc in the last dc from Round 8 and omitting the last corner on the last repeat. Join to the top of the standing half-double crochet with a sl st. Sl st into the next hdc and into the ch-2 corner sp.
Stitch Count: 104 sts and 4 ch-2 corner sps {5 BPsc and 21 hdc per side}
Round 11 {Colour C}
(Ch 2, hdc, ch 2, 2 hdc) in the same ch-2 sp. This is your first corner made.
*Skip the first (hidden) st. Hdc in the remaining 25 sts across. (2 hdc, ch 2, 2 hdc) in the next ch-2 corner sp).*
Repeat from * to * 3 more times, omitting the last corner on the last repeat. Join to the top of the beginning ch-2 with a sl st. Fasten off and work away your ends.
Stitch Count: 116 hdc and 4 ch-2 corner sps {29 hdc per side}
Round 12 {Colour B}
In this round, you will complete the Diamond Pattern by making some more “zigzag hills”. The first and last “hills” on each side are formed differently to the rest. Pay special attention when making them. If you need more help, see Round 110 of Sophie’s Universe HERE.
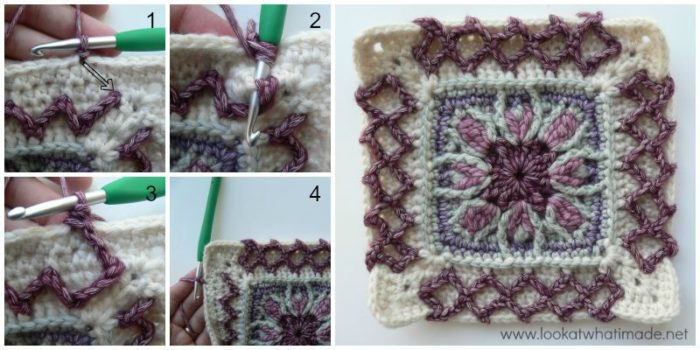
Join your yarn by making a sl st in the eighth hdc at the start of any side. It will look like this stitch is too far over. Don’t worry about it {Photo 1}.
*Make a tr in the st that contains the first sc from Round 9. To do this, insert your hook from top to bottom into the stitch containing the sc (because this is the easiest way), making sure that you work to the left of the first ch-3 from Round 9 (to the right if you are left-handed) – indicated with an arrow in Photo 1 and illustrated in Photos 2 and 3. Ch 3. Make a sl st around the back post of the next sc from Round 9.
(Ch 3, skip the next 3 sts from Round 11 and make a sc in the next st, which will be the hdc made into the BPsc from Round 10. Ch 3. Make a sl st around the front post of the next sc from Round 9) 3 times. Ch 3. Make a tr around the top of the last ch-3 from Round 9. Skip the next 3 sts from Round 11 and sl st in the next st, which should be the hdc made into the BPsc from Round 10. Ch 4. Skip the last 5 hdc of Round 11. Sl st into the ch-3 sp from Round 9, which you will find behind your work. Ch 4. Skip the first 7 hdc of the next side and sl st into the eighth hdc {Photo 4}.*
Repeat from * to * 3 more times, omitting the last sl st on the last repeat. Join to the first sl st with a sl st. Fasten off and work away your ends.
Stitch Counts:
- Total: 20 sts, 32 ch-3 sps, and 8 ch-4 sps behind the corners – not including sl sts
- Per Side: 5 sts and 8 ch-3 sps – not including sl sts {3 sc and 2 tr}
Round 13 {Colour C}
*(2 hdc, ch 2, 2 hdc) in the next ch-2 corner sp. Skip the first (hidden) st. Hdc in the next 6 sts from Round 11. Make a BPsc around the top of the first “zigzag hill” from Round 12. If you need more help, see Round 111 of Sophie’s Universe HERE.
(Hdc in the next 3 sts from Round 11, between the sc sts that form the “zigzag hills”. Make a BPsc around the top of the next “zigzag hill” from Round 12) 4 times. Hdc in the last 5 sts from Round 11.*
Repeat from * to * 3 more times, omitting the last corner on the last repeat. Join to the top of the standing half-double crochet with a sl st. Fasten off and work away your ends.
Stitch Count: 128 sts and 4 ch-2 corner sps {5 BPsc and 27 hdc per side}
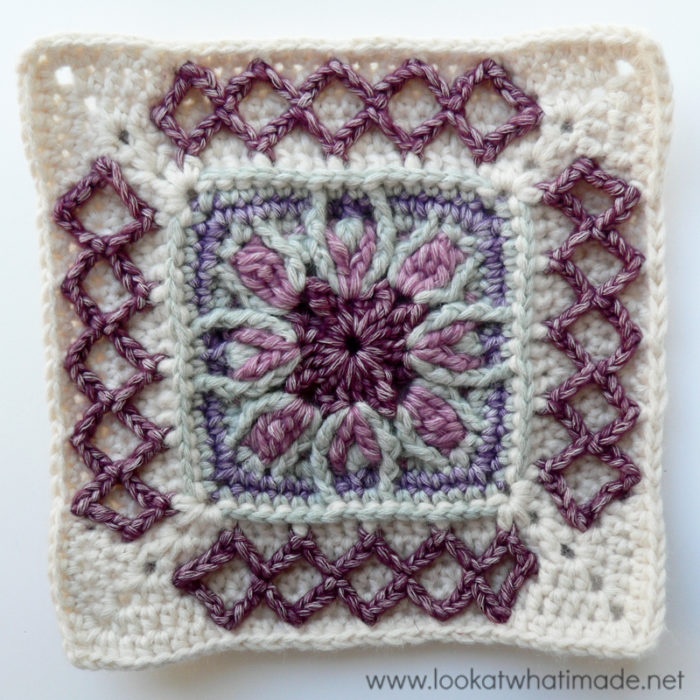
Round 14 {Colour B}
*(Sc, ch 2, sc) in any ch-2 corner sp. Skip the first (hidden) stitch. Sc in each of the 31 sts across.*
Repeat from * to * 3 more times. Join to the first single crochet with a sl st. Fasten off and work away your ends.
Stitch Count: 132 sc and 4 ch-2 corner sps {33 sc per side}
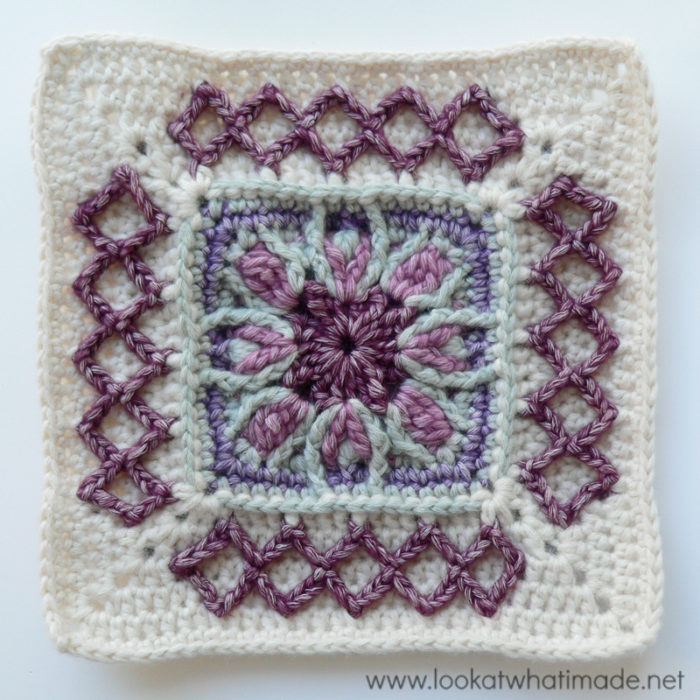
Round 15 {Colour A}
*(Sc, ch 2, sc) in any ch-2 corner sp. BPhdc in each of the 33 sts across.*
Repeat from * to * 3 more times. Join to the first sc with a sl st. Sl st into the ch-2 corner sp.
Stitch Count: 140 sts and 4 ch-2 corner sps {33 BPhdc and 2 sc per side}
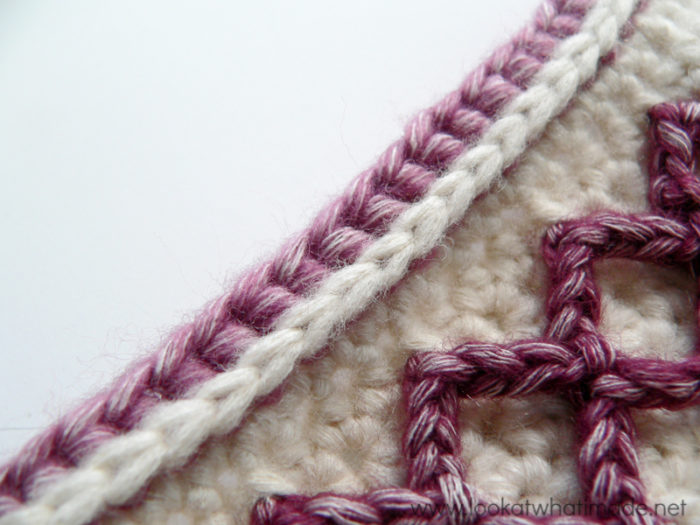
Round 16 {Colour A}
(Ch 3, dc, ch 2, 2 dc) into the same ch-2 sp. This is your first corner made.
*Skip the first (hidden) st. Dc in each of the remaining 34 sts across. (2 dc, ch 2, 2 dc) in the next ch-2 corner sp.*
Repeat from * to * 3 more times, omitting the last corner on the last repeat. Join to the top of the beginning ch-3 with a sl st. Fasten off and work away your ends.
Stitch Count: 152 sts and 4 ch-2 corner sps {38 dc per side}
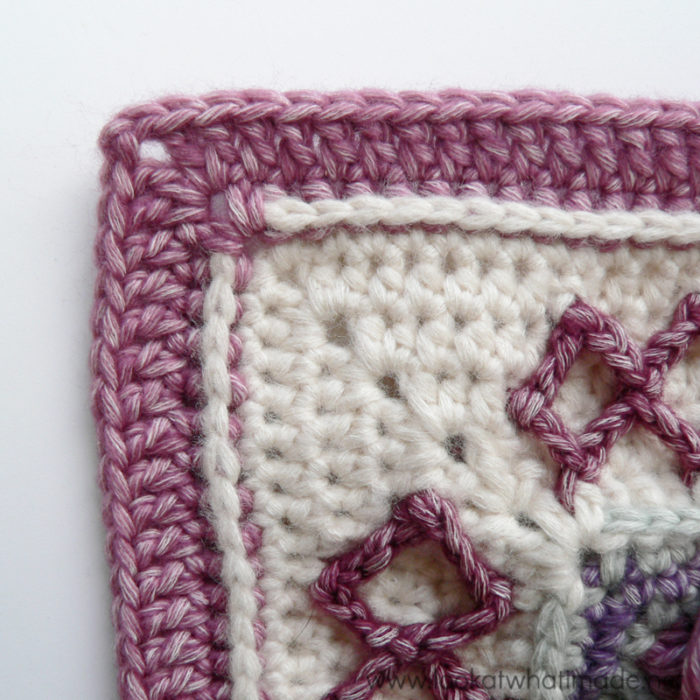
Round 17 {Colour B}
*(2 dc, ch 2, 2 dc) into any ch-2 sp around. This is your first corner made. Dc in each of the 38 sts across.*
Repeat from * to * 3 more times. Join to the first dc with a sl st. Fasten off and work away your ends.
Stitch Count: 168 sts and 4 ch-2 corner sps {42 dc per side}
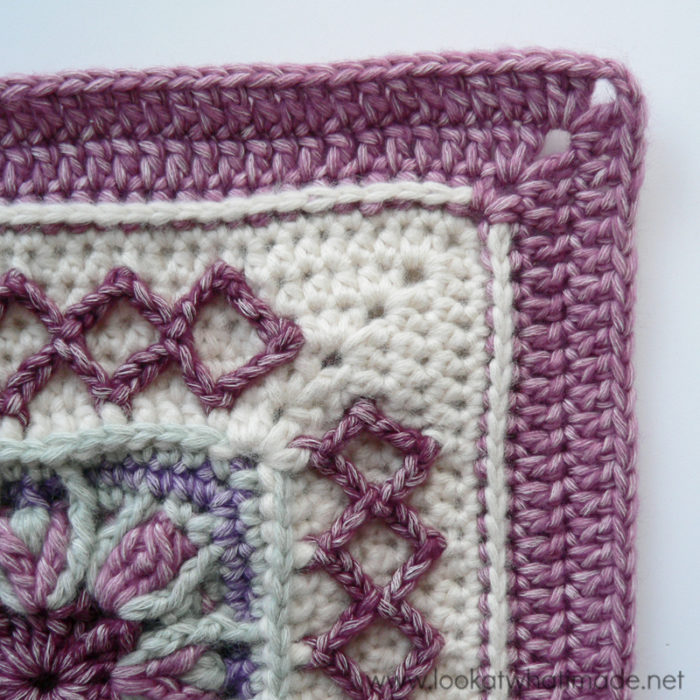
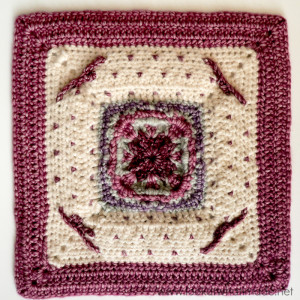
I quite like the back of this square as well. It looks like 4 birds flying around a cross… or am I the only one that sees that?

This blog post contains affiliate links. I only link to products I personally use or would use. All opinions are my own.


Keilah says
What a lovely blanket square! I think both sides are beautiful.
Teresa says
link to print friendly is not working
Dedri Uys says
Teresa, have you tried clearing your browser cookies and trying again? Print-friendly is an external service and occasionally it stops working if there is too high a traffic load. If it doesn’t work for me I always come back later and try again.
Kim Jordan says
Dearest Dedri~
I have been watching quietly in the background through all of your projects…..(No, I am not a lurker, sister- but a humble admirer of quality creativity when I see it!), and I believe it time for me to ‘step out’ of the shadow and speak a word or two with you.
You hear repeated praise for your unique talents and abilities…..and rightly so. There are few that I have seen in my years on this planet that have taken such care to actually “birth” a creation in the manner in which you do. This is a rare and unique gift indeed!
What ‘draws’ people to you Dedri, is not just these magnificent creations- but the honesty with which you explore your “inner self” as you journey through to completion. I can hear myself in your speak, as I’m sure there are many who would also agree. It is a rare ability to be a voice of empathic speech for those who would rather find themselves locked in a room full of yarn with a supply of hooks and good old fashioned imagination! Not too many though, are brave enough to take that last step– and you give us hope.
All these projects I have watched you create, I have done so with an intense desire to just be able to “get my hands on” some of the yarn and get CAL-ing along with you and those that experience you from that perspective- but, alas, that is not my lot. If I had the pennies, I’d use them in a heartbeat, but there just aren’t any pennies to be had. But, if I had to think about it…..there are so, so many with far greater heartbreaks……today, I have a roof over my head. Today, I can type this message. Today, I can see that I have an opportunity to soak up your newest creation “Esmse” (beautiful beyond words, I must say….)– and, be grateful for all of that abundance. Tomorrow, perhaps there will be other gifts to grace my home— chewies for my pups…..and yes, yarn to make a blanket for the cold times. But only when the ‘universe’ (and my ability to act on in) line up in perfect harmony
Thank You for being You, and for allowing me to watch a fellow sister grow and flourish~
Be Well, and Be Happy!! :) <3
Kim
Dedri Uys says
Thank you for your lovely comment, Kim.
When I started crocheting I had no money for yarn, so I used yarn made from plastic bags and even tried my hand at spinning paper yarn. The first blanket I made was made from the cheapest acrylic I could find and even then I had to save to be able to afford the 5 skeins it took, so I understand craving the ‘nice’ stuff and not being able to buy it.
May you be blessed with some pretty yarn soon!
Dedri
Georgina says
thank you thank you great to see you again have missed you
Sharon says
Thank you Dedri for yet again another beautiful pattern. Your tutorial pictures are amazing, they helped me so much with Soffie. You spoilt so many of us for finding patterns to satisfy our inner hooker after Soffie, this new one will definitely work for me. I am so loving overlay crochet now.
Dedri Uys says
Thank you, Sharon :)
Maggie Lewin says
Love it Dedri thank you – I am planning a West Ham football team colours Manghan this will look lovely in the centre. I love your box of Stylecraft colours too. Good luck with the house move – as its only 3 doors down I have visions of you all carrying your stuff down the road :) and your boys trailing behind with their blankets and favourite toys. I hope all goes well.
Dedri Uys says
haha, Maggie. That sounds almost idyllic. I am afraid that reality will be much less lyrical. But I am going to keep that vision in my mind when things start going pear-shaped.
Diane McDonald says
Thank you Dedri, this is a gorgeous square. And so challenging. I’m learning so much from you. I really appreciate all the time and effort you put into these projects that you so generously share with us.
You are an amazing designer.
Dedri Uys says
Thank you, Diane :)
Bonnie says
Gorgeous…such beautiful crochet you do. Just the best! Love it!
Carol D says
Beautiful! We’ve come to expect nothing BUT beautiful from you, Dedri!
And, you are not the only one who sees the back as you do…I saw that before I read your interpretation….
Lovely! I’ll figure out something to do with this one…’cause it’s going to be on my hook soon!
Thank you – again! – for sharing so freely with all of us…
It was your pictures and instructions for Sophie that taught me so many new stitches! You are so very generous!
Thank you!
Dedri Uys says
You always say such nice things, Carol. I am very pleased you like this square :)
Lesley says
Hi Dedri, thank you once again for sharing your new square ‘Esme’ it’s gorgeous. I really don’t think that you realise how many people you have touched through your all your sharing of crochet. I’m sure if there was a ‘World of Crochet Award’ you, without a doubt would be the winner. Thank you so very much lovely lady xx
Dedri Uys says
Lesley, thank you for your lovely comment! It makes me happier than I can say if people find my tutorials useful. I just want everyone to be infected by the crochet-virus :)
Lesley says
Hi Dedri, love ‘Esme’ thank you for sharing all your lovely ideas, I really don’t think you have any idea how many lives you’ve touched through your beautiful work,
Rhondda says
Hi Dedri! I adore this square!! and I love the name you chose – Esme :) Beautiful all around.
Dedri Uys says
Thank you, Rhondda :)
Helen says
Girl,,, please,,,, why in the world have you been nervous about this square? Its a beautiful piece of work!!!! You are a very talented individual and ever so generous to share these wonderful creations with us,,,,, thanks so much. I plan on making two of these for a pillow, one for me and one for special folks at Christmas etc
Dedri Uys says
I’m always nervous when I release a new pattern. My stomach goes all knotty! I hope you share photos of your pillows :)
Rita Miller says
Dedri, this is just gorgeous! Thank you so much for sharing your incredible talent with us!
Dedri Uys says
Thank you, Rita :)
dianne everett says
do they have this on youtube the squares are awesome love them, dianne
Dedri Uys says
This pattern does not have a video at present. But there are plenty of photos to help you out.
Vivian Helton says
When I go to the printer friendly version, it prints blank boxes where pics are in the pattern
Pam H says
You are very kind to share your beautiful patterns with us for free -and make tutorials as well! Can’t thank you enough.
mespetitsriens says
Love it !!! Sure he will be in my second Sophie :)
Thanks
Mino
Samantha says
Oooooooo. I wonder if this would be a good center for the Manghan?
Dedri Uys says
Samantha, I meant to add information about that. Thank you for your question. I have now updated the post to say that it is the same size as 4 linen stitch squares.
Kandi says
Love the name of the square! This is gorgeous! It does look like 4 birds flying around a cross :)
Dedri Uys says
Thank you, Kandi :)