I know this stitch as the Linen Stitch, but have also seen it called the Moss Stitch (although the Moss stitch as I know it is slightly different). It is one of the simplest stitch patterns to master and yields a pretty, woven, dense fabric. The reason it is so simple is that you don’t even have to know how to work into the loops of the single crochet stitches, because you will be working into the ch-1 spaces between single crochet stitches instead.
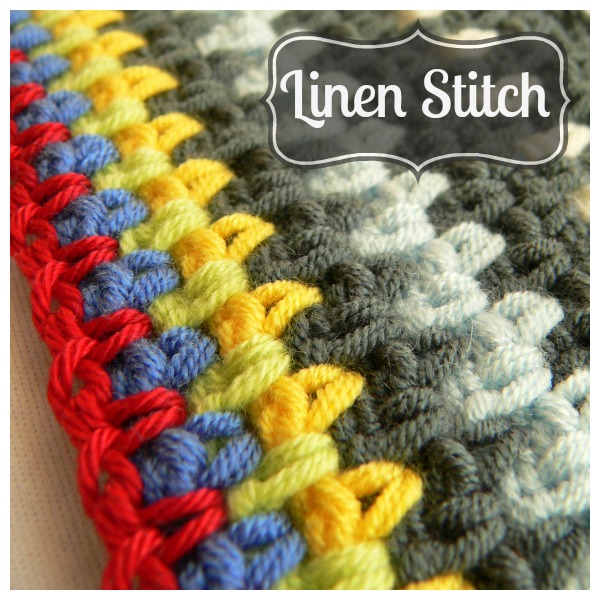
This stitch is excellent for working up a quick and easy chunky baby blanket and it is so much prettier than just regular old single crochet stitches.
You can use any yarn/hook combination your heart desires.
Using a single strand of light worsted weight (double knit) and a 1 cm crochet hook, for example, will yield a very “holey”, loose blanket (you can see this post about my Rainbow Blanket if you want to see what I’m talking about. The pictures are horrendous and the yarn is even worse as I could only afford the cheapest of yarns when I started out, but we still use the blanket often and love it a lot).
This tutorial includes:
- Linen Stitch Chart
- Linen Stitch Tutorial
- Changing Colours When Using The Linen Stitch
- Sample Pattern: Linen Stitch Lovie or Dishcloth
Linen Stitch
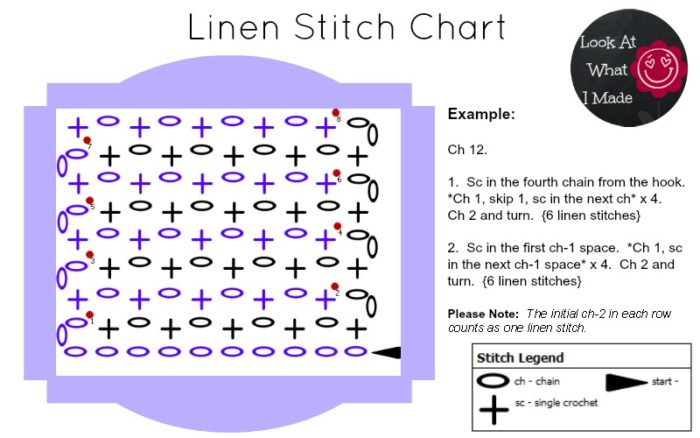
The linen stitch is basically a repetition of *ch,sc*, working into the ch-1 space formed by the ch-1’s in the previous row. You are effectively single crocheting BETWEEN single crochets, giving you a staggered woven look.
Stitches are worked into the ch-1 spaces, NOT the loops of the actual stitches.
One linen stitch = sc + ch into a ch-1 space. The initial Ch 2 at the beginning of each row counts as a ch-1 space (so one linen stitch).
How to Make The Linen Stitch
Linen Stitch Tutorial
Abbreviations
US Crochet Terminology (Find a US/UK conversion chart HERE).
| Ch | Chain |
| Sc | Single crochet |
| St/st’s | Stitch/stitches |
| * | Repeat all instructions between asterisks the amount of times specified. |
Instructions
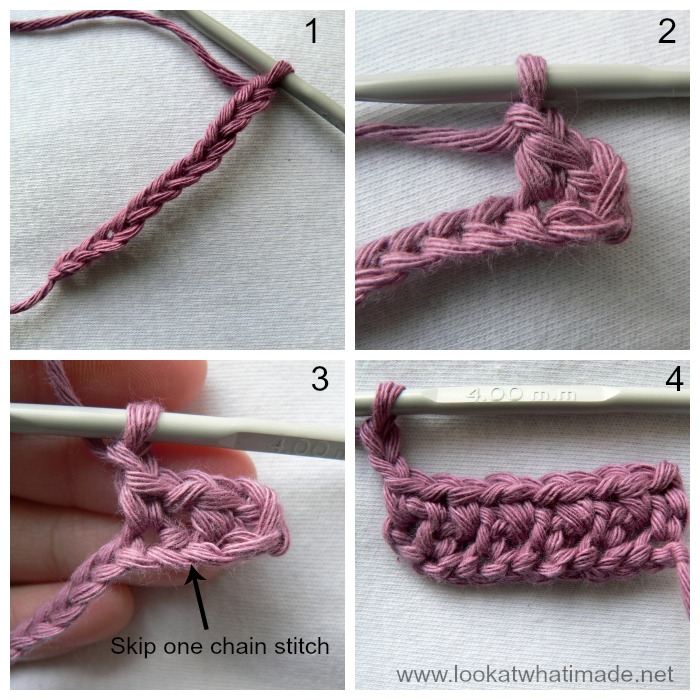
Start with an even number of chains. In this case I have used 12 ch st’s (Photo 1).
Row 1
Sc in the fourth chain from the hook (Photo 2). *Ch 1, skip the next ch and sc in the next ch (Photo 3)*. Repeat the instructions between asterisks until you get to the end of your chain. Ch 2 (Photo 4) and turn. You will have half as many linen stitches (so *ch, sc* clusters) as the number of foundation chain stitches. Remember that the ch-2 turn counts as one linen stitch.
Subsequent Rows
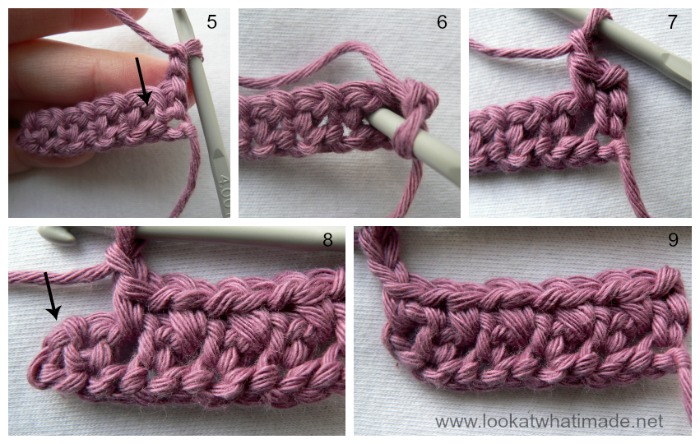
Sc in the first ch-1 space. To do this, insert your hook under the ch st between the first 2 sc’s (indicated with an arrow in Photo 5 and illustrated in Photo 6), and make a sc (Photo 7). *Ch, sc in the next ch-1 space*. Repeat instructions between asterisks until you get to the end. Remember that the turning ch-2 (indicated with an arrow in Photo 8) counts as a stitch and should be worked int0. Ch 2 (Photo 9) and turn.
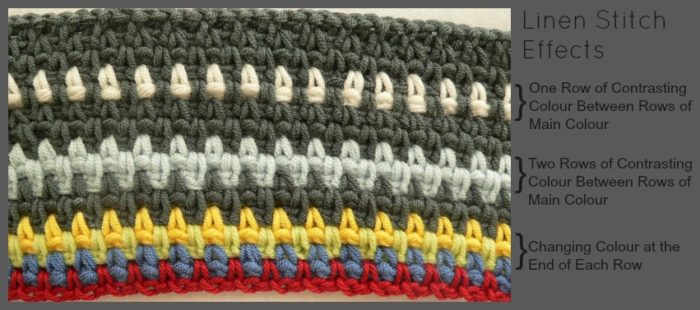
Changing Colours and Working Over Your Yarn Ends
If and when you decide to change colours, it is a good idea to work over your yarn ends as you add each new colour. That way you won’t have a million tails of yarn to work away at the end.
You will need to change colours on the last yarn-over of the last sc of the row BEFORE the colour change. With normal single crochet, you only need to worry about working over your tails of yarn in the first row. With the linen stitch, you need to work over your tails of yarn in the next TWO rows. That will make a bit more sense in a minute.
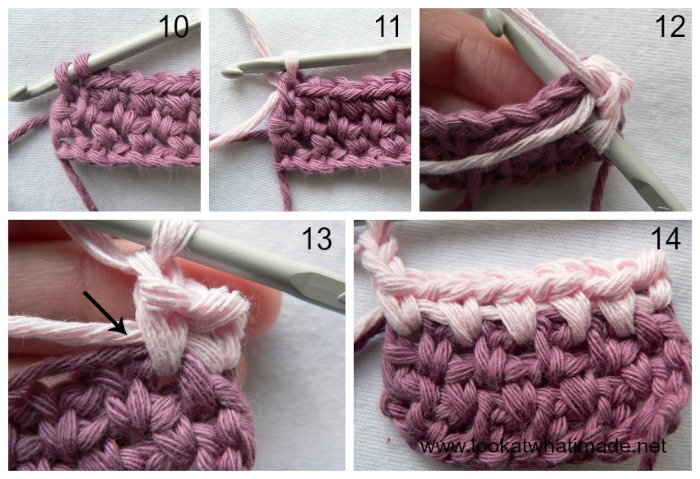
So to change colour on the last yarn over of the row before the colour change, insert your hook into the ch-2 space at the beginning of the previous row. Yarn over and pull up a loop (Photo 10). Yarn over with your new colour and pull through both loops on your hook (Photo 11). Ch 2 and turn.
Hold your tails of yarn in front of the stitches of the last row. Insert your hook into the first ch-1 space, working OVER the tails of yarn (Photo 12). Make your first sc. This will trap the yarn under the sc (indicated with an arrow in Photo 13).
Continue making a linen stitch in each ch-1 space as instructed above. When you get to the end of the row, ch 2 and turn. Photo 14 illustrates the first row worked OVER the tails of yarn. You will notice that the tails of yarn are still quite visible.
To ensure that these tails of yarn won’t be visible on your final piece, we will need to work over them again. More specifically, you will need to trap them under the sc’s of the next row.
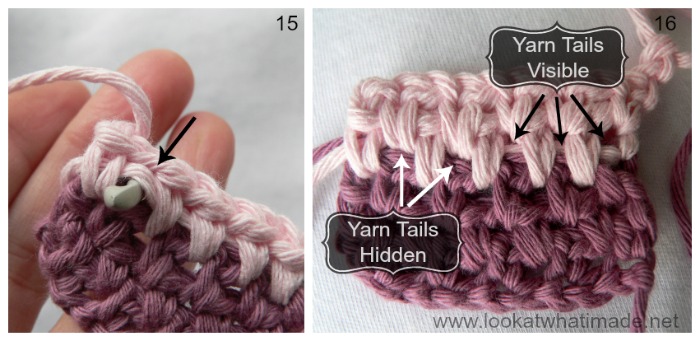
So insert your hook into the first ch-1 space, making sure that you insert your hook UNDER the tails of yarn running through the ch-1 space, and make a sc. Photo 15 shows the hook inserted UNDER the tails of yarn (this photo is taken from the back of the work).
Continue making a linen stitch in each ch-1 space, making sure that you insert your hook UNDER the tails of yarn every time.
Photo 16 illustrates the difference between inserting your hook under the tails of yarn (indicated with white arrows on Photo 16) and NOT inserting them under the tails of yarn (indicated with black arrows in Photo 16).
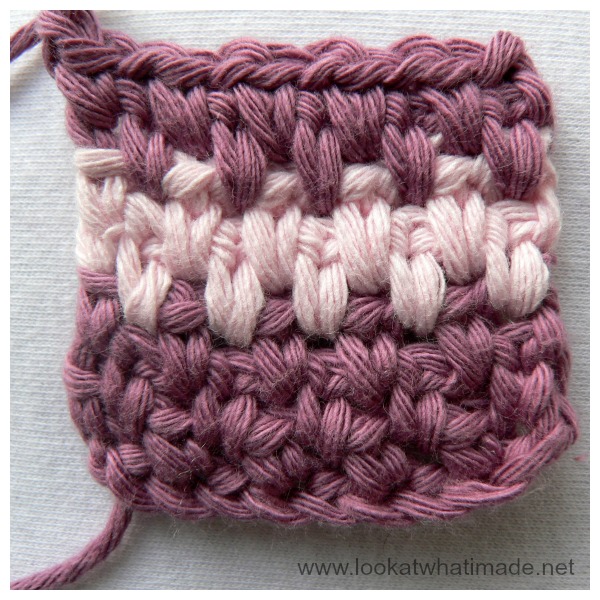
By altering how frequently you change your colours, you can get a variety of different looks.
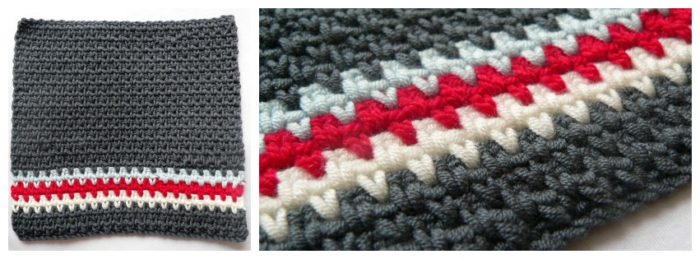
Now that you know how to do the linen stitch, why not try this simple sample pattern below.
Sample Pattern: Crochet Linen Stitch Lovie (or Linen Stitch Dishcloth)
© Dedri Uys 2013. All Rights Reserved.
US Crochet Terminology Used
Abbreviations
| Ch | Chain |
| Sc | Single crochet |
| St/st’s | Stitch/stitches |
| * | Repeat all instructions between asterisks the amount of times specified. |
Materials
If you are going to make a dishcloth, I suggest using cotton yarn (I used mercerized cotton for my Linen Stitch Dishcloths). If you are going to make a Lovie, you can use whichever yarn type your heart desires, as long as it is nice and soft.
- Double knit yarn (light worsted weight/#3) in grey, red, cream and light blue. I am using Patons Smoothie in Slate, Cream, Red, and Pale Blue to create a Lovie.
- 5.5 mm (US I/9 UK 5) crochet hook (I love using Clover Amour hooks)
- Yarn needle
Instructions
With dark grey yarn and a 5.5 mm crochet hook:
1. Ch 42. Sc in the fourth chain from the hook. *Ch 1, skip the next ch, sc in the next ch* x 19. Ch 2 and turn. (21 linen stitches – remember that the initial ch-2 counts as one linen stitch).
2. Sc in the first ch-1 space. *Ch 1, sc in the next ch-1 space* x 19. Ch 2 and turn. (21 linen stitches)
3-4. Repeat row 2. Change to cream yarn at the end of Row 4 (see instructions above). (21 linen stitches)
5-6. Repeat row 2 in cream. Change to red yarn at the end of Row 6. (21 linen stitches)
7-8. Repeat row 2 in red. Change to light blue yarn at the end of Row 8. (21 linen stitches)
9-10. Repeat row 2 in light blue. Change to dark grey yarn at the end of Row 10. (21 linen stitches)
11-36. Repeat row 2 in dark grey. At the end of Row 36, ch 1 and bind off. Work away any remaining tails of yarn. (21 linen stitches)
♥
Related FREE Linen Stitch Patterns
I hope you have found this tutorial useful. If you have any questions, or suggestions on how I can improve this tutorial, please do not hesitate to contact me.
Remember to subscribe to my newsletter if you would like to be kept in the loop. You can also like my Facebook page or follow me on Bloglovin or Google+.
Happy Hooking!



Sheralynn Wilson says
I made a tailored jacket for my mother using this stitch and it was called granite stitch in the pattern. It was a UK pattern so maybe that’s just their name for it
Dedri Uys says
I’ve seen it called by many names (most often moss or granite), so it could be a UK thing :)
LindaP says
Thank you for using such a lovely simple stitch and with it’s versatility, to create beautiful projects. I have put this link into a pattern I wrote. I like to give credit, where credit is due, and it is a little unconventional, as I link up all the wonderful designers that have inspired my stripey blanket.
Thx again, lp
darlus riedt says
Thanks for your tutorial. I am a novice and want to put a linen stitch border on a block stitch afghan. I know this lovely stitch but do not know how to start on the border nor do I know how to turn the corner with this stitch. I will want to make several different colored rows. Do you have some advice for me?
Dedri Uys says
Hi.
You will need an odd number of stitches per side to add a linen stitch border (not including the 4 corner spaces of your afghan). Starting in any corner space, (Sc, ch 1, sc, ch 1) to form your corner. Skip the first stitch. *(Sc, ch 1) in the next st, skip the next st* until you get to the end of the round. Skip the last stitch. This is one side made. Repeat this for every side and join to the first sc with a sl st. Once you have that initial linen stitch round, you can add as many rounds as you wish, always working into the ch-1 spaces from the previous round, and making your corners as (Sc, ch 1, sc, ch 1).
You can find a linen stitch square (worked in the round) HERE. The instructions might help you.
Luara says
I think it is the same as the “granite” stitch I have found recently.
I’ve been colecting stitches recently, hunting for one that is pretty and stiffy to make a tophat. I suppose this one is too soft, with so many chains… am I right?
Anyway, I loved to see how it goes with different colors in different number of rows, I will probably use it for something softer :)
Dedri Uys says
This stitch has many names, yes. It depends on the hook/yarn combo you use. If you use a smaller hook the resulting fabric can be quite stiff. if you use a larger hook the result is light and airy.
susanna says
what a lovely site, and very clear tutorial, thank you.
I had not come across this stitch before, but I love the pattern – I shall be trying this out. Thanks
Julia says
So simple and so effective! I really like this one :-)
Ginny says
Hello, I have also known this as the Afgan Stitch! … Nice Stitch!! Ginny
Ortensia Crum says
This is a great stitch and a clear tutorial. I want to try a rug with home made tee shirt yarn. Thank you.
Dedri Uys says
Thank you :)
Christine Matthews says
Thank you for sharing how to crochet the linen stitch. I was inspired to make a face washer/cloth and a toilet roll cover. I shared a photo on Pinterest with your tutorial link :) http://www.pinterest.com/pin/328410997801803337/
Dedri Uys says
Hi Christine. The top-hat-toilet-roll-cover made me smile :) Thank you for sharing with me. I love that you were inspired to use the stitch. It’s brilliantly versatile :)
Megan says
I know this stitch as the seed stitch.. versatile and looks amazing with different colors!
sarita says
I also know this as “seed stitch”.
Lisa Natterer says
Thank you Becky – being an old but new crocheter, I love your accurate way to explain how to do a piece – very precious for me! With sincere regards from Vienna, Lisa
Cathy says
A publication called the knitting dictionary 800 stitches patterns from Mon Tricot, 1963, includes crochet. One of the stitches is the double grain stitch, worked very like the linen stitch but uses a double stitch.
Ch2 *insert hook into next st wrh draw thru loop, wrh draw thru 1loop, wrh draw thru 2loops, 1ch, miss 1st*, 1dbl st, 2ch, turn
On foll rows work the dbl sts on the 1ch sp of previous row.
My book is nearly falling apart but I love the British instructions (trans. from French.)
Dedri Uys says
Cathy, I’m going to have to try that stitch. Just want to check something. Do you def only draw through 1 loop the first time?
Julie says
Oh I am so happy to have found your beautifully clear instructions. I have been playing around the last few evenings trying to work this out myself and got in a bit of a pickle! Tonight I will be mastering this thanks to you! Just what I have been looking for thanks.
Dedri Uys says
Thank you, Julie. I would love to see your end result :)
Sara Brock says
Thank you! I have learned this stitch from this tutorial and I LOVE it!! Half way thru a scarf already and want to use it for something bigger!! Fun, pretty and easy. Thank you again.
Dedri Uys says
I am so pleased that you like it, Sara. It is such a simple and effective stitch.
Sandy says
I really love this stitch and your work. I want to learn it so I went to you tube, all the tutorials were for knitting. I finally found one called the woven stitch, maybe you could look at it and tell me if it is the same. Watching it being done helps me to understand it better. Thanks Sandy
Dedri Uys says
Hi Sandy…this stitch is called many, many things. If you send me a link to the specific video you are referring to then I can tell you if it is the same stitch. x
Aden says
Hi, thank you for your post! I’ve been looking for a simple but pretty stitch to try for a baby blanket. I’m curious however as to how you achieved a more dense (less hole-y) blanket. Did you use two strands of worsted or just a chunky yarn? Thank you!
Dedri Uys says
Hi, I just used a standard light worsted weight yarn. The linen stitch isn’t actually a holey stitch, unless you use a larger hook (say a 6.5 mm and light worsted weight yarn). If you find it too holey, you can always double up your strands. The yarn I used is a very fluffy, full light worsted weight, almost (but not quite) like a worsted weight.
Have you tried it yet and did yours come out holey?
sally says
Lovely stitch….whatever its name : ) great tutorial, one for me to try when I’ve finished a rather hooge blanket….loving the crochet goodies on your blog….loving reading about your crochet addiction too. Merry Christmas and best wishes for the New Year x
Linda says
Thanks for visiting Night Owl Corner. Just popped by to check out your blog and I’m so glad I did! There are not enough crochet blogs out there! Love your patterns…I’ll definitely be back
Linda
Dedri Uys says
Linda, thank you so much for taking the time to stop by. I was just thinking that I need to go thumb through your posts a little bit more ;)
Dawn says
I hate that I’m going to miss all of your new patterns! :( I’m of of the few who chooses not to have a Facebook page. I follow your regular page though and live it! :)
Dedri Uys says
Dawn, you won’t miss any of my patterns. All the patterns will still be published on my website. Dribs and Drabs is just a crochet-along. The instructions for the completed lovie will be up on my site before Sunday x
Becky Dirlam says
I have always known this as Mile-a-Minute, I love the effect, and how quickly it works up. It is often a go to stitch for things that need full coverage, but not stiff. Well done tutorial.
Dedri Uys says
Becky, I have never heard that name, but I love it! It is so much more inventive and fun than just plain old linen stitch.