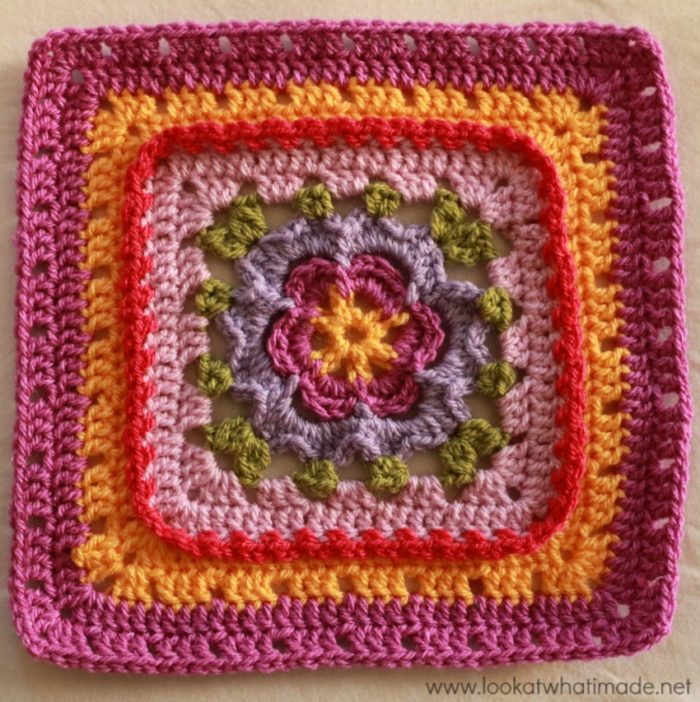
Block 13 of the Block a Week CAL (hosted by Kimberly Slifer) is Melissa Green’s Veronica’s Rose square. It works up quite fast and is pretty straight-forward once you get past the ribbon round. I have to say that I do LOVE the ribbon round and the pretty leaves.
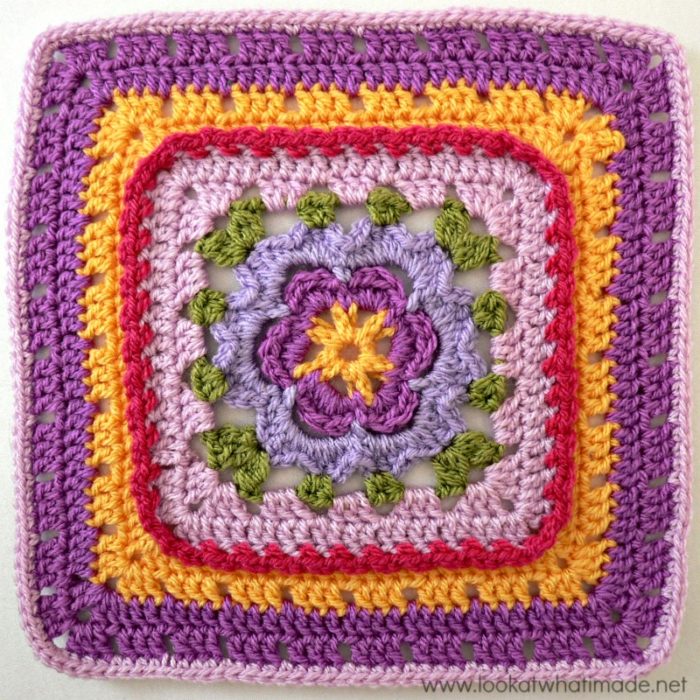
This post is coming to you live from Jeffreys Bay, South Africa, and as soon as I post this I am going to go throw myself down on the couch and not move for an hour! Unless you spot a glaring error, in which case I will drag myself off the couch to come and fix it :)
If this is the first you’ve heard of the CAL (crochet-along), you can read more about it HERE.
Veronica’s Rose Crochet Square
{Pattern © 2013 Melissa Green. Photo tutorial done with kind permission}
Pattern
You can find the pattern here on Ravelry.
Suggested Materials
- 5.5 mm Clover Amour Crochet Hook (US I/9 UK 5)
- Worsted weight yarn
Size
- Using the hook and yarn specified, your square should be a nice even 12″ when you are done.
- Using a 4 mm crochet hook (US G/6 UK 8) and double knit yarn, as I have done, your finished square will be about 7.5″ big.
My Yarn and Colour Choices
I am using the Stylecraft Special DK.
- Saffron (Rounds 1, 8 and 10)
- Magenta (Rounds 2, 11 and 12)
- Wisteria (Rounds 3 and 4)
- Meadow (Round 5)
- Clematis (Rounds 6, 7, and Optional Round 13)
- Pomegranate (Round 9)
Notes
- The initial ch st’s in each round are counted as a stitch, except in Rounds 2 and 4.
- If you prefer to start your rounds with a standing single crochet/standing double crochet, you should join to the top of the standing stitch.
- I have added additional information to the stitch counts.
- US Crochet Terminology used. (See this comparative chart if you need help transcribing from US to UK)
- Please Note: The yarn used in most of the tutorial photos is Drops Paris Cotton.
Corrections
- Rounds 2 and 4: “Ch 1, sc in same sp” should be “Ch 1, sc in same st“.
- Round 9: The last half of the instructions should read: *Sc in 1st unworked loop of next side, ch 2, sk 1 loop, (sc in next unworked loop, sk 1 loop) 10 times, sc in next unworked loop, ch 1, rep from * 2 times more, join in beg sc. Finish off. {The ch-1 in bold above has been omitted from the pattern. This is the ch-1 that will fall over each corner space.}
Speciality Stitches
This pattern makes use of bobble stitches/cluster stitches. See this bobble stitch tutorial if you need a bit of help making the cluster stitches.
Veronica’s Rose Photo Tutorial
This photo-walkthrough is NOT the actual pattern and should not be used instead of the pattern, but rather in conjunction with it.
Thank you very much to Melissa Green for giving us permission to do this photo-tutorial. And a special thank you to Kimberly Slifer for letting me do these tutorials and for obtaining the necessary permission.
Round 1
You can start this round with a magic ring instead of the initial ch-4.
Magic Ring Instructions for Round 1
Into a magic ring: ch1, sc (Photo 1). *Ch 4 (Photo 2), sc (Photo 3)* x 5. Ch 4 (Photo 4) and join to the first sc with a sl st.
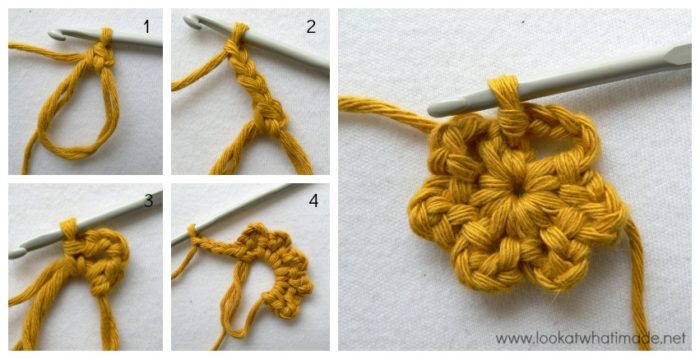
Stitch count: 6 sc’s and 6 ch-4 loops
Round 2
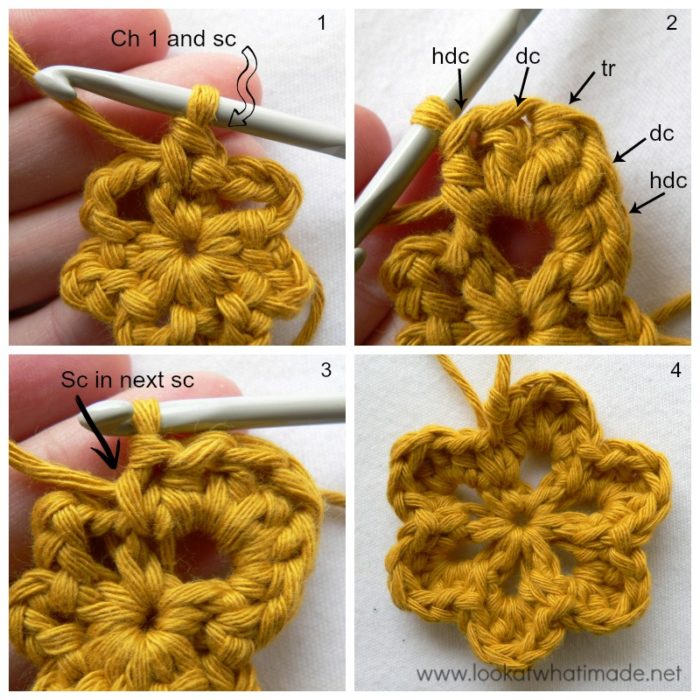
Ch 1 and sc in the same st as the sl st join (Photo 1). *Make a petal in the next ch-4 loop: (hdc, dc, tr, dc, hdc). See Photo 2. Sc in the next sc (Photo 3).* Repeat around until you have made 6 petals (in other words one petal in each ch-4 loop). Omit the last sc and join to the first sc with a sl st.
Stitch count: 6 petals and 6 sc’s {6 sc’s, 12 hdc’s, 12 dc’s, 6 tr’s}
Round 3
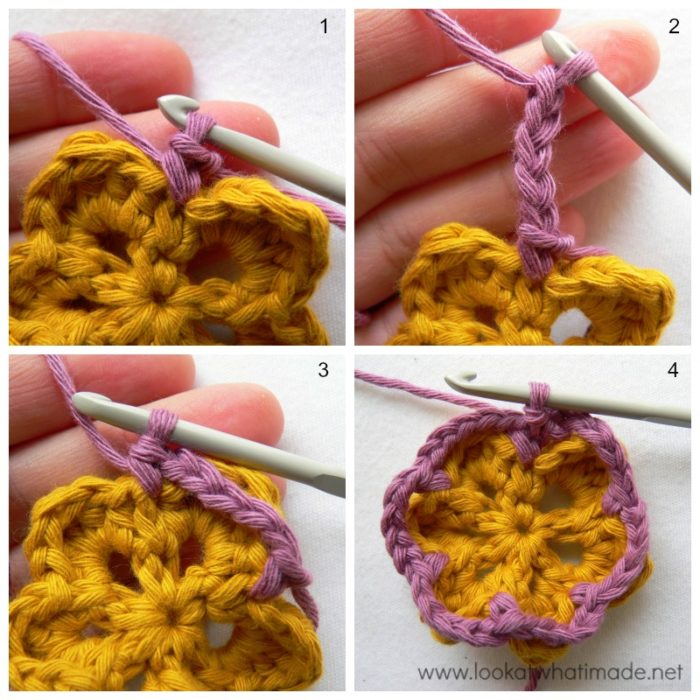
The pattern tells you to start your new colour with a sl st in any sc around, followed by a sc in the same st. I prefer to start with a standing single crochet (in other words, join your new yarn by making a sc in any sc around). See Photo 1. *Ch 5 (Photo 2), sc in next sc (Photo 3)* x 5. Ch 5 and join to the first sc with a sl st (Photo 4).
Stitch count: 6 sc’s and 6 ch-5 loops
Round 4
Ch 1 and sc in the same stitch (Photo 1). Now you will make 2 petals in each ch-5 loop (in other words, a double petal in each ch-5 loop).
*Into the ch-5 loop: (hdc, dc, tr, dc, hdc). This is the first petal made (Photo 2). Sc into the same ch-5 loop (Photo 3). Still working into the same ch-5 loop: (hdc, dc, tr, dc, hdc). This is the second petal of the double petal made (Photo 4). You will have to scootch your stitches up to make them all fit in. Now sc into the next sc, which will be between loops (Photo 5). Photo 6 shows one completed double petal. Repeat around as instructed in the pattern, omitting the last sc.
Stitch count: 6 double petals and 6 sc’s {12 sc’s, 24 hdc’s, 24 dc’s, 12 tr’s}
Round 5
In this round you will be making cluster stitches (also called bobble stitches). Please see this Bobble Stitch Photo Tutorial for help with the beginning cluster stitch and the subsequent cluster stitches. Please note that the tutorial refers to the beginning cluster as the First Bobble and to the cluster stitches as Subsequent Bobbles.
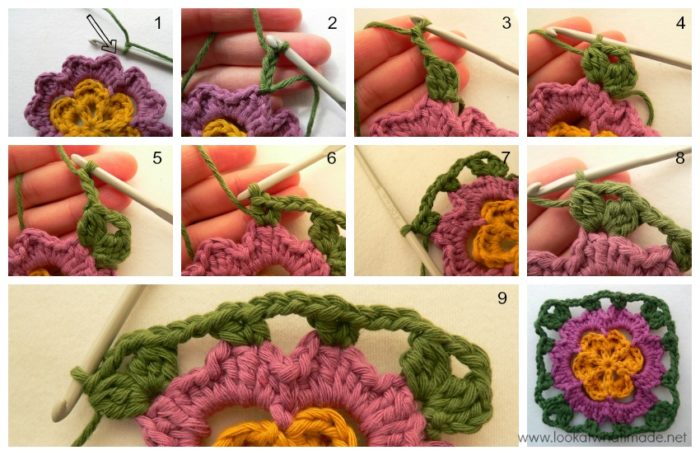
Join your new colour with a sl st in the first tr of any double petal (indicated with an arrow in Photo 1 and illustrated in Photo 2). Into the same stitch: make your first corner, which consists of a beginning cluster, ch-3 (Photo 3) and a cluster stitch (Photo 4).
*Ch 3 (Photo 5). In the next tr: hdc, ch 1, hdc (Photo 6). Ch 3. In the next tr: hdc, ch 1, hdc (Photo 7). Ch 3. In the next tr: (cluster, ch 3, cluster). See Photo 8.* Repeat around as instructed in the pattern.
When you join, remember to join to the top of the beginning cluster, not the top of the ch-3.
Photo 9 shows two corners and one completed side.
Stitch count:
- Total: 8 cluster stitches, 8 ch-1 spaces, 16 hdc’s and 16 ch-3 spaces, 4 of which are corners
- Per Side: 2 cluster stitches, 4 hdc’s, 2 ch-1 spaces and 3 ch-3 spaces per side, not including ch-3 corners
Round 6
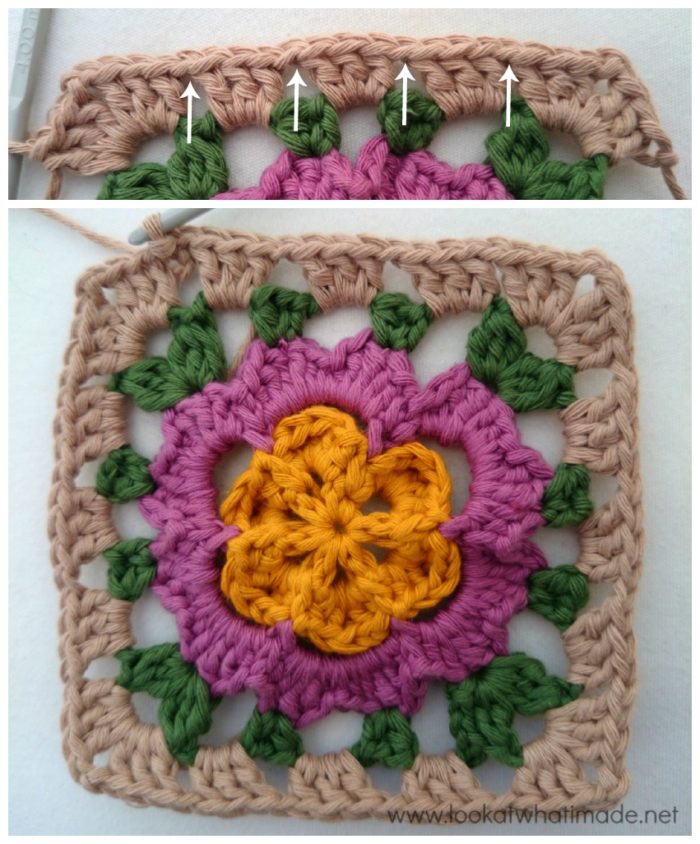
For Round 6, you will be working into the ch-3 spaces from Round 5. This round is pretty straightforward, but I do have a couple of suggestions/hints:
- You can start with a (ch-3, 2 dc, ch 2, 3 dc) as in the pattern, or you can start with a standing double crochet (see this tutorial from Moogly) and do (3 dc, ch 2, 3 dc) as I have done.
- Remember those ch-1’s between 3dc-groupings and corner groupings (indicated with arrows below).
Stitch count:
- Total: 60 dc’s, 16 ch-1 spaces and 4 ch-2 corners
- Per Side: 15 dc’s, 4 ch-1 spaces
Round 7
Round 7 is another straightforward round. There is only one thing to look out for. When you have made your corner, the loops at the top of the first stitch will be hidden by the stitches you just made into the corner (indicated with an arrow in Photo 1). Remember to work into that “hidden” stitch. See this tutorial if you want to know more about corners and the elusive hidden stitch.
Photo 2 shows the first 3 dc’s after the corner. Notice that the 3 dc’s fall into the 3 dc’s of the corner in the previous round. Photo 3 shows the next dc made into the ch-1 space between 3-dc groupings.
Photo 4 shows one completed side (with 2 corners).
Stitch count:
- Total: 92 dc’s and 4 ch-2 corners
- Per Side: 23 dc’s {19 dc’s between corners}
Round 8
Round 8 is worked into the back loops only (blo). Apart from that, it is probably the easiest round so far.
Remember to check for that first “hidden” stitch after the corner. Photo 1 shows the first corner made – you will notice that I started with a standing double crochet instead of a (sl st, ch 3). Photo 2 shows the first dc after the corner, made into the blo. Photo 3 just illustrates the hook inserted into the back loop only, leaving the front loop (indicated with an arrow) free.
When you work into the back loops like this, the front loops form a ridge/line on the front of your work (Photos 4 and 5). You will work the next round into this ridge of front loops.
Photo 5 shows one completed side and two corners. Where the pattern tells you to “dc in each dc across”, it might be helpful to know that you need to make 23 dc’s between corners.
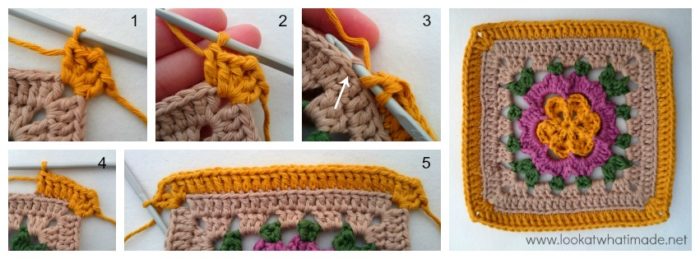
Stitch count:
- Total: 108 dc’s and 4 ch-2 corners
- Per Side: 27 dc’s {23 dc’s between corners}
Round 9
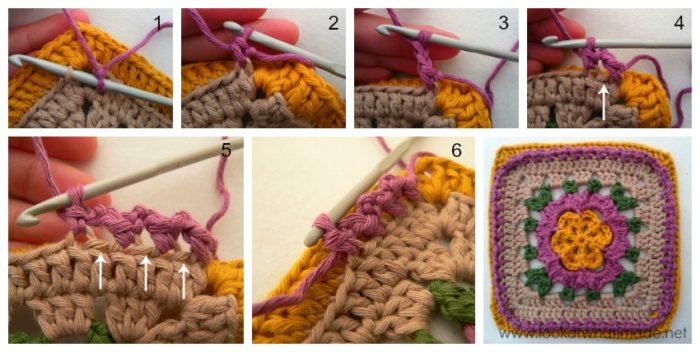
Round 9 is what Melissa calls the Ribbon Round. It will be worked into the unworked front loops from Round 8.
Insert your hook into the unworked loop of the stitch directly to the left of any corner (Photo 1) and make a standing single crochet (Photo 2). Ch 2 (Photo 3) and skip the next st/loop (indicated with an arrow in Photo 4).
*Sc in the next unworked loop (Photo 4), ch 2 and skip the next loop* x 10. Sc in the last unworked loop and ch 1. This ch-1 will fall over the corner space.
Repeat the whole shebang for each side, as instructed in the pattern.
Photo 5 shows the skipped loops between sc’s. Notice that Round 8 is folded out of the way here? It is easier to work into the unworked loops if you fold Round 8 flat against the back of your work like I have done.
Photo 6 illustrates what the ribbonny bit will look like on the completed square.
NOTE: the ch-1 that should fall over the corner space has been omitted from the pattern (see Corrections above). Remember to make a ch-1 over every corner space.
Stitch count:
- Total: 48 sc’s, 44 ch-2 spaces and 4 ch-1 corners
- Per Side: 12 sc’s and 11 ch-2 spaces
Round 10
Round 10 is worked into the stitches of Round 8. I know this seems like a duh! statement, but I’m just making sure everyone is on the same page. Don’t try to make Round 10 into the Ribbon Round!
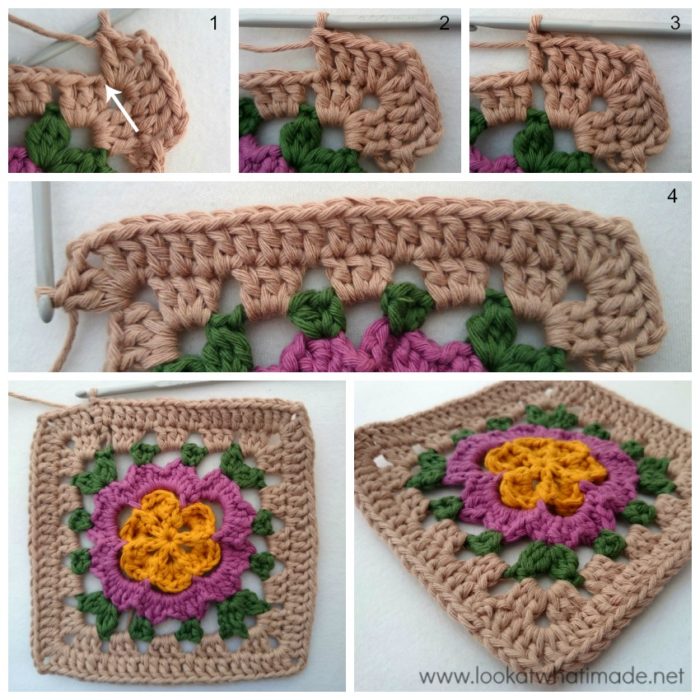
After making your first corner (Photo 1), dc in the first st after the corner (Photo 2). Remember that the first stitch will be “hidden”.
*Ch 1, skip the next dc, dc in the next 3 dc (Photo 3)* x 6. Ch 1, skip the next dc and dc in the last dc before the corner. This is one completed side. Repeat around as instructed in the pattern.
Stitch count:
- Total: 96 dc’s, 28 ch-1 spaces and 4 ch-2 corners
- Per Side: 24 dc’s and 7 ch-1 spaces
Round 11
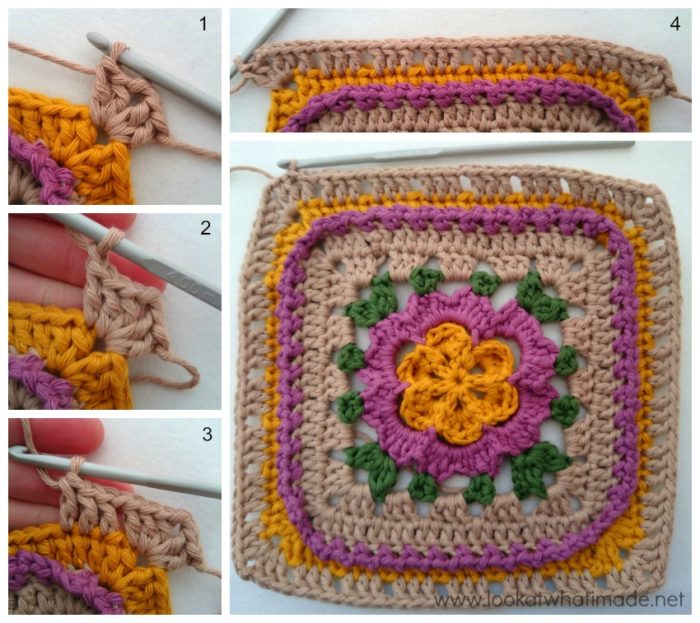
Round 11 is similar to Round 7. You will be working into each dc and ch-1 space around. Apologies for the blurry photo. Camera is still diseased!
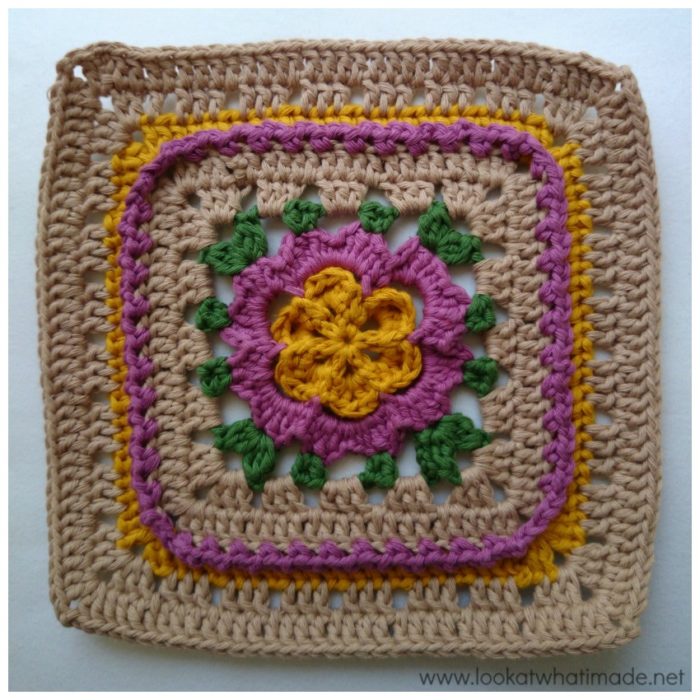
Stitch count:
- Total: 140 dc’s and 4 ch-2 corners
- Per Side: 35 dc’s {31 dc’s between corners}
Round 12
Round 12 is a repeat of Round 10.
- Total: 120 dc’s, 36 ch-1 spaces and 4 ch-2 corners
- Per Side: 30 dc’s and 9 ch-1 spaces
I have added an Optional Additional Round 13 to get my square to the same size as the other squares. You can find the instructions for that HERE.
Join the Block a Week CAL
If you would like to be part of the Block a week CAL on Facebook, please join the Official CCC Social Group (you must be logged into Facebook to do so) so that you can access and utilize the support and encouragement of all the lovely ladies on there.
You can also join the Block a Week CAL Flickr Group so that you can inspire others and be inspired yourself.
For those of you who do not like Facebook, you can always follow along with me here. I will be posting the blocks every week.
Remember to subscribe to my Weekly Newsletter if you would like to be kept in the loop. You can also like my Facebook page or follow me on Bloglovin, Google+, Pinterest, Twitter, or Instagram.
More Blogs Following the CAL
- San from Loopsan – using Stylecraft in sophisticated Parchment, Denim, Mocha and Meadow
- Lou Mander from Tea, Crochet and Me – using Stylecraft in White, Mocha and Raspberry

This blog post contains affiliate links. I only link to products I personally use or would use. All opinions are my own.



Phillipa Godfrey says
Hi again Dedri
Not sure if I am reading the pattern correctly. Should Row 8 be Saffron not Pomegranate
regards
Phillipa
Dedri Uys says
Hi Phillipa. You are correct. I’ve changed it now. Thank you!
Debbie says
For your Block a Week Cal for 2014, if I used the same type yarn and the same needle, would they all end up the same size? So I can make an afghan and attach them as they are done??
Dedri Uys says
Hi Debbie. If you use the same hook and yarn, all the squares will come out a slightly different size, but that is easily remedied by adding the optional additional rounds. It is much easier than swapping hooks between squares. Adding the additional rounds will also mean that your squares will have almost the same stitch count in the last round.
Heather says
So glad I found your blog!! Beautiful work!
Mary says
Hello, I am back at it this morning still trying to catch up. I just wanted to send a quick note to let you know again, how much I appreciate all the work you are putting into your instructions. I am still working on the first few blocks where I do not have the pictures and detail that you have started doing now on the blocks. I am stumbling a bit on them. I can not imagine how long it takes to keep taking all the pictures during each round but they are worth a thousand words. I have completed 10-14, 1-3, and working on block 4 now. I am one who does not have imagination yet with crocheting so I follow the directions closely and struggle without your extra details. Thanks again, Mary
Dedri Uys says
Mary, I hope you got my email. Thank you so much for your encouraging comments. You made me feel special. It does take ages and ages to stop and take photos the whole time, especially if I have to run around finding spots with good enough lighting. But comments like yours makes it all worth the effort.
Cathy Milne says
Hi there,
I want to thank you very much for this tutorial! I have been planning on making a bag for my mom as part of a Mother’s Day gift. This is the greatest square…love it…love it…love it :)
Ta Ta for now, Cathy the Bagg Lady
Dedri Uys says
Thank you, Cathy.
Mary says
Thanks so much. Wonderful help. You have a fantastic way of explaining!!
Carrie says
He-he :). As far as I’m concerned you can stay on the couch :). You did a great job on the tutorial. If you hadn’t said your camera was broken I wouldn’t be able to tell! Mind if I was on vacation I wouldn’t be making a tutorial, broken lens or not! So all the more thanks :). Hope the rest of you time in Jeffreys Bay is fun!!!
Dedri Uys says
Haha, thank you, Carrie. We are having fun. Just very busy. I can’t seem to relax, even on holiday. I’m just not happy if I don’t have 20 things to do at the same time…
Dawndee Roberts says
you always post wonderfully clear tutorials! Thank you!!!
Dedri Uys says
Thank you, Dawndee :)