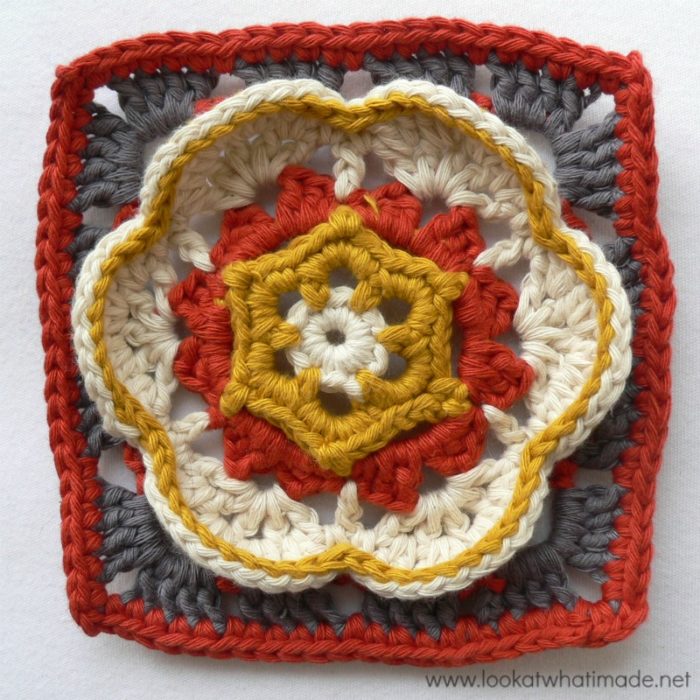
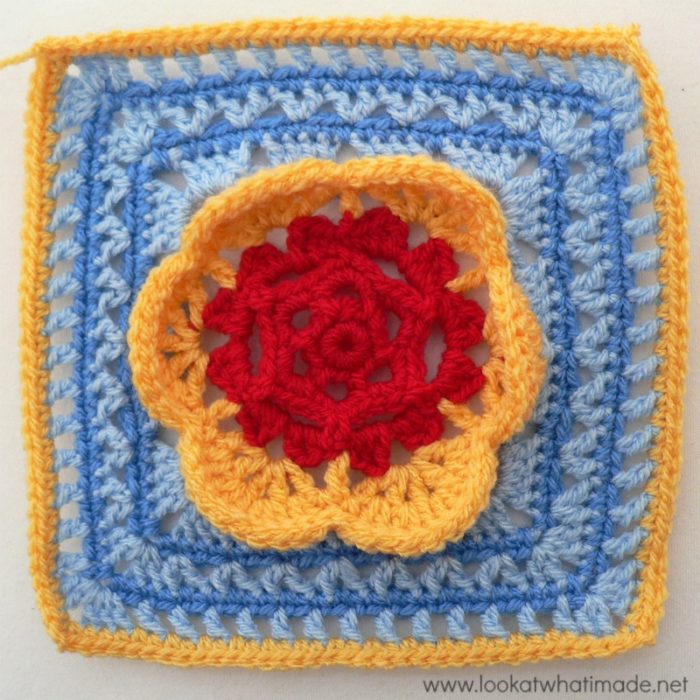
Block 12 of the Block a Week CAL (hosted by Kimberly Slifer) is Chris Simon’s Kaleidoscope Blossom. This square has 16 rounds, which is slightly more than the others, but it still works up quickly. The central flower is three-dimensional and I love the way it pops out of the square.
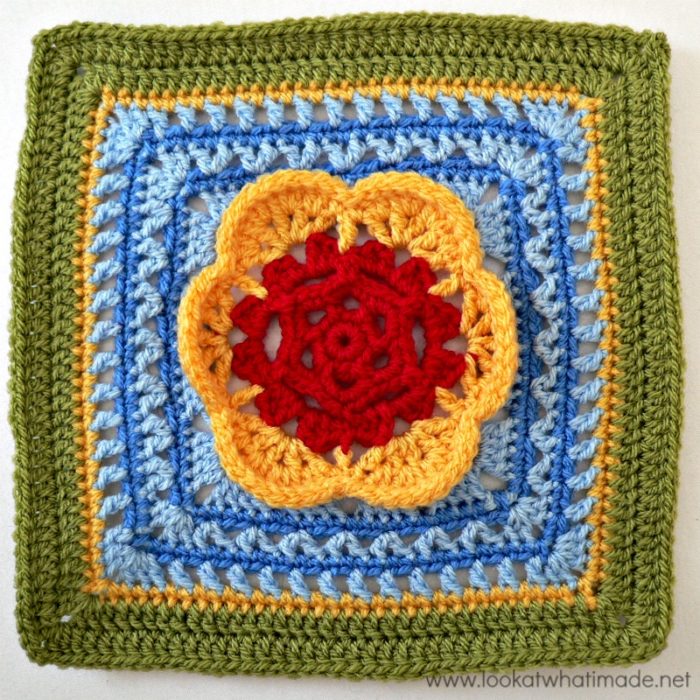
Kaleidoscope Blossom Crochet Square
{Pattern © 2004 Chris Simon. Photo tutorial done with kind permission}
Pattern
You can find the pattern here on Ravelry. If you have any problems printing the Pdf, try this link instead.
Suggested Materials
- 5 mm Clover Amour Crochet Hook (US H/8 UK 6)
- Worsted weight yarn
Size
- Using the hook and yarn specified, your square should be a nice even 12″ when you are done.
- Using a 4 mm crochet hook (US G/6 UK 8) and double knit yarn, as I have done, your finished square will be about 7.5″ big.
My Yarn and Colour Choices
I am using the Stylecraft Special DK.
- Lipstick (Rounds 1 – 5)
- Saffron (Rounds 6 – 8 and 15)
- Cloud Blue (Rounds 9, 10, 12, and 14)
- Aster (Rounds 11 and 13)
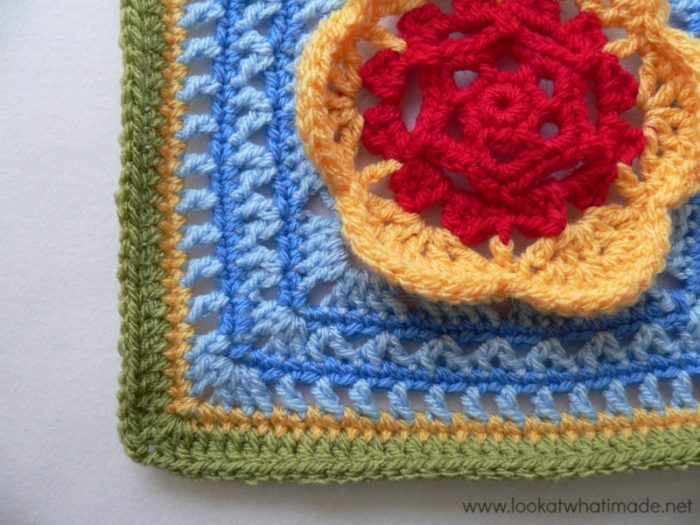
- Meadow (Round 16 and Optional Round 17)
Notes
- The initial ch st’s in each round are counted as a stitch, except in Rounds 2, 4, 11, 13 and 15 because they are sc round.
- Each round is joined with a sl st into the initial chain/first stitch.
- Stitch counts have not been supplied, so I have added them here.
- US Crochet Terminology used. (See this comparative chart if you need help transcribing from US to UK)
- Please Note: The yarn used in most of the tutorial photos is Drops Paris Cotton.
Important: It is easier to make this square if you do Round 9 before doing Rounds 7 and 8. To that end, I have added instructions for both methods.
Kaleidoscope Blossom Photo Tutorial
This photo-walkthrough is NOT the actual pattern and should not be used instead of the pattern, but rather in conjunction with it.
Thank you very much to Chris Simon for giving us permission to do this photo-tutorial for her Kaleidoscope Blossom Square. And a special thank you to Kimberly Slifer for letting me do these tutorials and for obtaining the necessary permission.
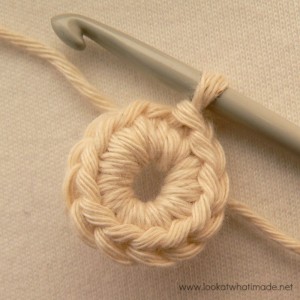 Round 1
You can start this round with a magic ring instead of the initial ch-4. It doesn’t make much of a difference, though, as you will still get a central hole. There is just no way to squeeze 12 sc’s into a magic ring and not get a little hole.
Magic Ring Instructions for Round 1
Into a magic ring: ch 1, 12 x sc. Join to the first sc with a sl st.
If you are not familiar with working into a magic ring, this video tutorial from The Crochet Crowd is very good. Please remember, when working into a magic ring you HAVE to work away your initial tail very well. If you just cut it, your whole square might unravel!
Stitch count: 12 sc’s
Round 2
If you are not going to change colour, ch 1 and sc in the same stitch (Photo 1). If you are going to change colour, consider starting with a standing single crochet instead. *Ch 3 (Photo 2), skip the next sc and sc in the next sc (Photo 3)* x 5. Ch 3 and join to the first sc with a sl st.
Stitch count: 6 sc’s and 6 ch-3 spaces
Round 3
Sc x 5 into each ch-3 space around (Photo 1). Join to the first sc with a sl st (Photo 2).
Stitch count: 30 sc’s {5 sc’s in each ch-3 space}
Round 4
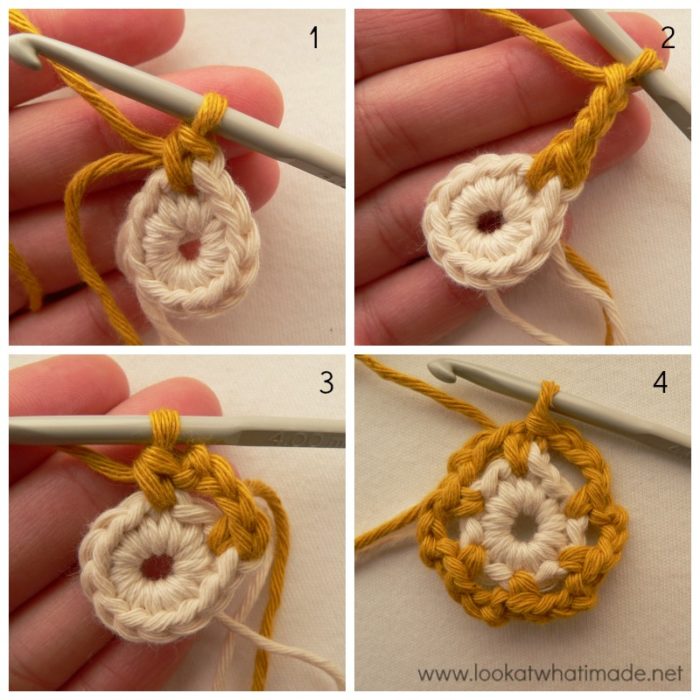
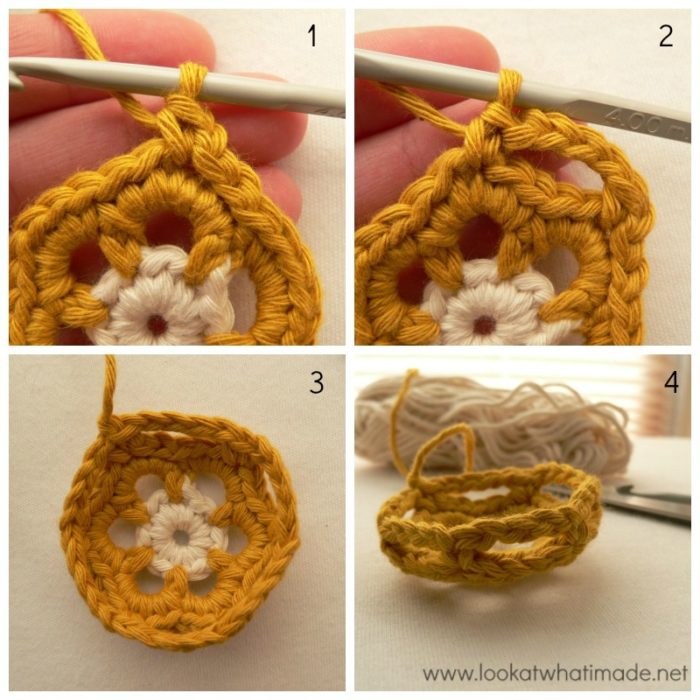
Sl st in the next 2 sc’s. This should put you in the center sc of the 5-sc group. Ch 1, sc in the same stitch (Photo 1). *Ch 4 LOOSELY and sc in the central sc of the next 5-sc group (Photo 2)* x 5. Ch 4 and join to the first sc with a sl st.
If you do not chain loosely, your flower will become a “bowl” (Photo 4). If you scroll down to the last photo of Round 6, you will see what happened to my first flower when I didn’t chain loosely.
Stitch count: 6 sc‘s and 6 ch-4 spaces
Round 5
In this Round Chris tells you to join your new colour with an sc (Photo 1). This is called a standing single crochet and you can find a tutorial for it here.
For this round you will work the following stitches into each ch-4 space: sc, 2 x dc, ch 3, 2 x dc, sc (Photos 2 and 3). Photo 4 shows Round 5 completed.
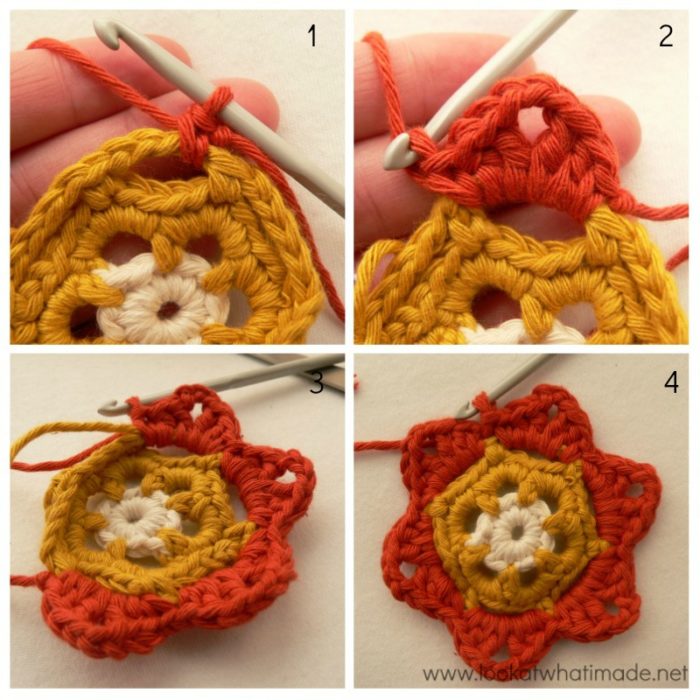 Stitch count: 36 st’s and 6 ch-3 spaces {12 sc’s and 24 dc’s}
Round 6
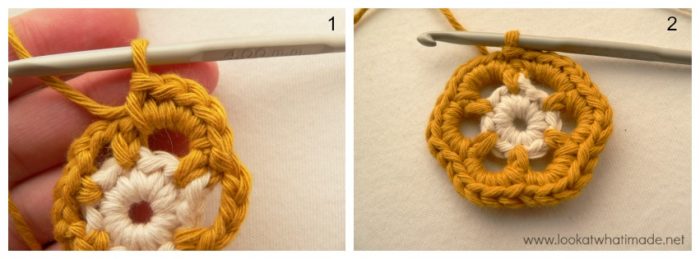
Ch 4. This counts as a dc and ch-1 (Photo 1). *Dc, ch 1* x 5 into the next ch-3 space (Photo 2). Dc, ch 1 into the first sc of the next “petal” (Photo 3). This dc will look like it falls between the 2 sc’s between petals.
Repeat around as in the pattern (Photo 4), omitting the last (dc, ch-1) of the last repeat. Photo 6 shows you what will happen to your flower if you don’t chain loosely when making the ch-4 spaces in Round 4.
Stitch count: 36 dc’s and 36 ch-1 spaces
Round 9 – If Making it Before Rounds 7 and 8
No, that is not a typo. I suggest that you do Round 9 BEFORE you do Rounds 7 and 8. Why? Because Round 9 is worked into the back loops of some of the stitches from Round 6 and it can get very frustrating trying to identify (and get into) those stitches once you’ve made Round 7.
I do appreciate, though, that some people might already have made Rounds 7 and 8 by the time they sneak a peek at this tutorial, so if you scroll down a little, you will find the tutorial for making Round 9 AFTER Rounds 7 and 8.
If you are going to make Round 9 before making Rounds 7 and 8, pull up a nice long loop at the end of Round 6 and remove your hook. Move the working tail of the yarn (from Round 6) to the front of your work. Make sure that this working tail of yarn stays in front of your work, otherwise you will have a hard time making Round 7 later. Photo 4 below shows the working yarn from Round 6 lying in front of the work.
All stitches for this round are worked into the back loops only (blo).
Take the yarn you are going to use for Round 9 and join it to your work by making a sc in the blo of the central dc of the 5-dc fan (in other words, the dc at the “top” of the fan). Photo 1 shows the fan. Photo 2 shows the first sc made.
Ch 5, sc in the blo of the dc between fans (Photo 3). Please note that Photo 3 shows the sc made into the joining stitch from Round 6, so it doesn’t look like I’ve worked into the back loop, but I have!
Ch 5 and sc in the blo of the dc at the top of the fan (Photo 4).
Repeat around as per the pattern (Photo 5). When you get to the end of the round, pull up a loop and remove your hook so that you can continue on to Round 7 (Photo 6).
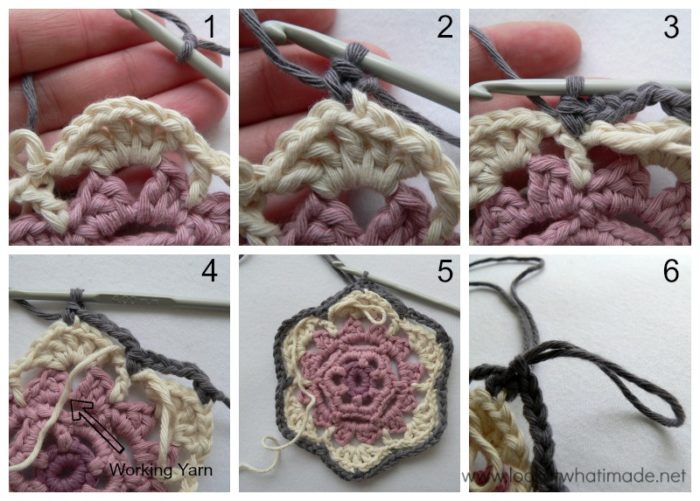
Stitch count: 12 sc’s and 12 ch-5 spaces
Round 7
I am including two sets of instructions here. The first one will tell you how to make Round 7 AFTER Round 9. The second one will tell you how to make Round 7 BEFORE Round 9.
Making Round 7 After Round 9
Pick up the loop from the end of Round 6 and tighten it on your hook (Photo 1). Make sure to fold the loops from Round 9 out of the way. You don’t want to crochet over them. You want to crochet in front of them.
Sc in the the ch-1 space to the right of the “fan” (Photo 2). There are 4 ch-1 spaces between the 5 dc’s of the fan. You will be working into these 4 spaces. In the first ch-1 space: 2 x dc (Photo 3). Photo 4 is taken from the back of the work and shows the loop from Round 9 folded down and out of the way to make sure that I didn’t accidentally crochet over it.
In the second ch-1 space: 3 x dc (Photo 5). In the third ch-1 space: 3 x dc (Photo 6). In the last ch-1 space of the fan: 2 x dc (Photo 7). Sc in the next ch-1 space (the space after the fan). See Photo 8.
You have now completed one “petal”. Repeat this around as instructed in the pattern, making sure not to crochet over the loops from Round 9.
Making Round 7 Before Round 9
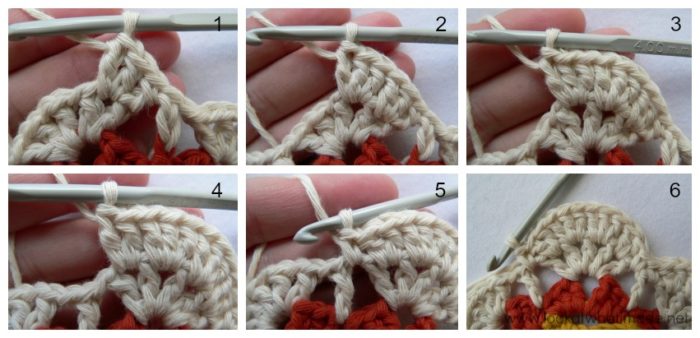
Sc in the the ch-1 space to the right of the “fan”. There are 4 ch-1 spaces between the 5 dc’s of the fan. You will be working into these 4 spaces.
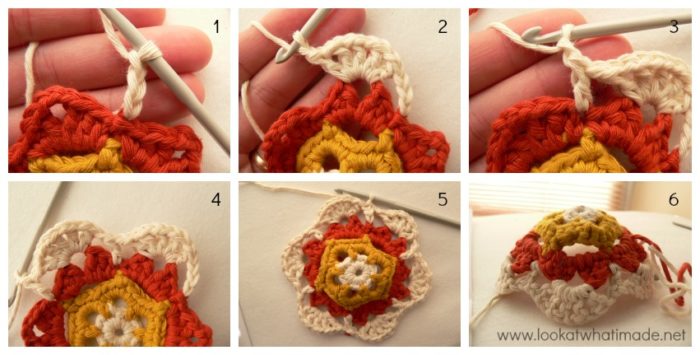
In the first ch-1 space: 2 x dc (Photo 1).
In the second ch-1 space: 3 x dc (Photo 2).
In the third ch-1 space: 3 x dc (Photo 3).
In the last ch-1 space of the fan: 2 x dc (Photo 4).
Sc in the next ch-1 space (the space after the fan). See Photo 5.
You have now completed one “petal” (Photo 6). Repeat this around as instructed in the pattern.
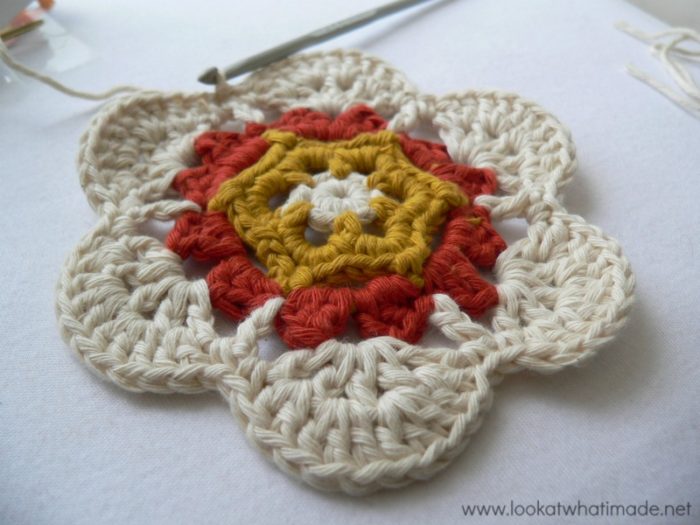
Now isn’t that pretty? And notice how flat it is? Chain loosely in Round 4, girlies!
Stitch counts: 72 st’s {60 dc’s and 12 sc’s}
Round 8
When making Round 8, relax your tension. If you make your slip stitches too tight, your flower will curl into a rose-bud instead of a lovely bloom.
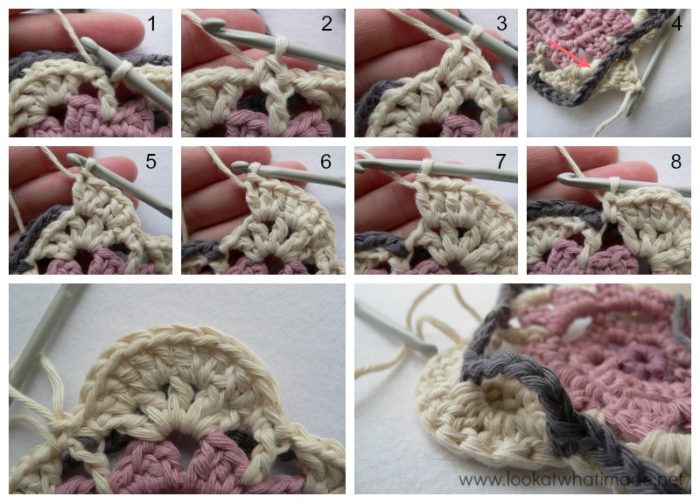
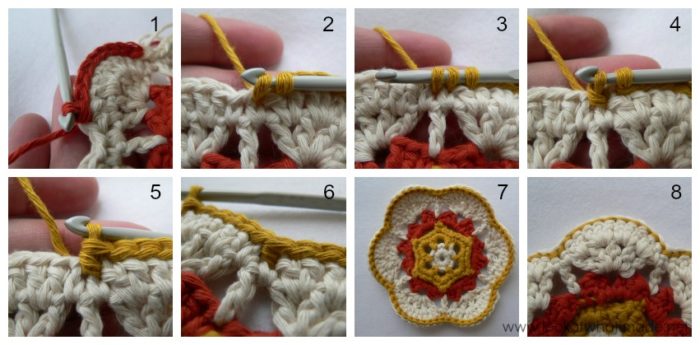
This round is pretty self-explanatory. You will be slip stitching around the top of each petal around (Photo 1). The only thing that you might find a bit fiddly is the sl st decrease.
Sl st Decrease
Insert your hook into the first sc (this is the last st of the petal) and pull up a loop (Photo 2). Insert your hook into the next sc (this is the first st of the next petal) and pull up a loop. You should have 3 loops on your hook (Photo 3). Now pull the third loop through the other two loops on your hook (Photos 4 and 5). Continue around following the pattern.
Photo 7 shows Round 8 completed. Photo 9 shows you what your work should look like from the back.
Round 9 – If Making it After Rounds 7 and 8
All stitches for this round are worked into the back loops only (blo).
If you have decided to disregard my gently warning about making Round 9 before you make Rounds 7 and 8, or you have only just come to sneak a peek at the tutorial, you are going to have to do a bit of digging to find the stitches you need to work into.
So first off I will show you which stitches to work into and how to find them.
You don’t have to mark them with a stitch marker as I have done, but cotton is very unforgiving and it was easier to mark all the stitches before making Round 9 than it was to sit there digging for them. In fact, I should have marked them before making Round 7…
So…
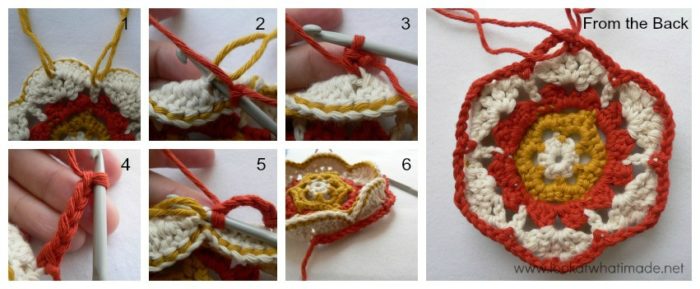
Turn your flower around so that you are looking at the back of the work (Photo 1). Find the central dc of the 5-dc fan and insert your hook into the back loop only of that stitch (Photo 2).
You will have to move the stitches from Round 7 out of the way and dig a bit to find the back loop. Remember that you are looking at the back of the petal, so the loop closest to you is the back loop.
Pull a piece of scrap yarn through the loop to mark the stitch (Photo 3).
Find the back loop of the dc between fans and mark that with a stitch marker as above (Photos 4-6).
Repeat this all the way around, marking the blo of the central dc of each fan and the blo of the dc between fans.
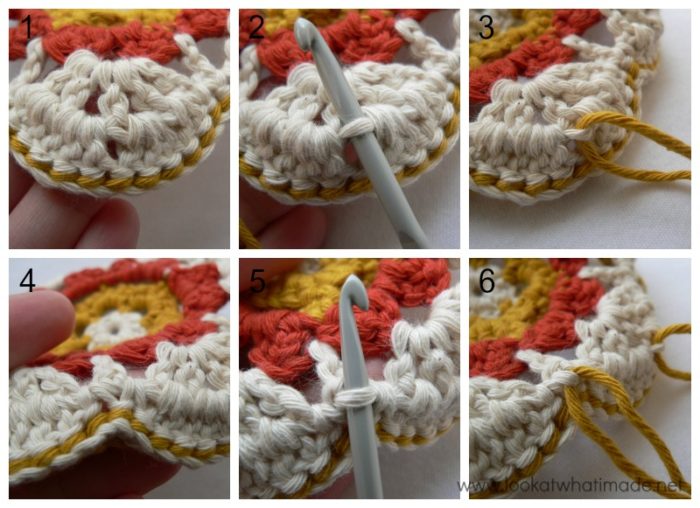
Photo 1 below shows the stitch markers in the back loops.
Turn your flower back around so that the right side if facing you.
Take the yarn you are going to use for Round 9 and join it to your work by making a sc in the blo of the central dc of the 5-dc fan (in other words, the dc at the “top” of the fan that you marked with a st marker). See Photos 2 and 3.
Ch 5 (Photo 4) and sc in the blo of the dc between fans (Photo 5).
Ch 5 and sc in the blo of the dc at the top of the fan (Photo 4).
Repeat around as per the pattern.
Stitch count: 12 sc’s and 12 ch-5 spaces
Round 10
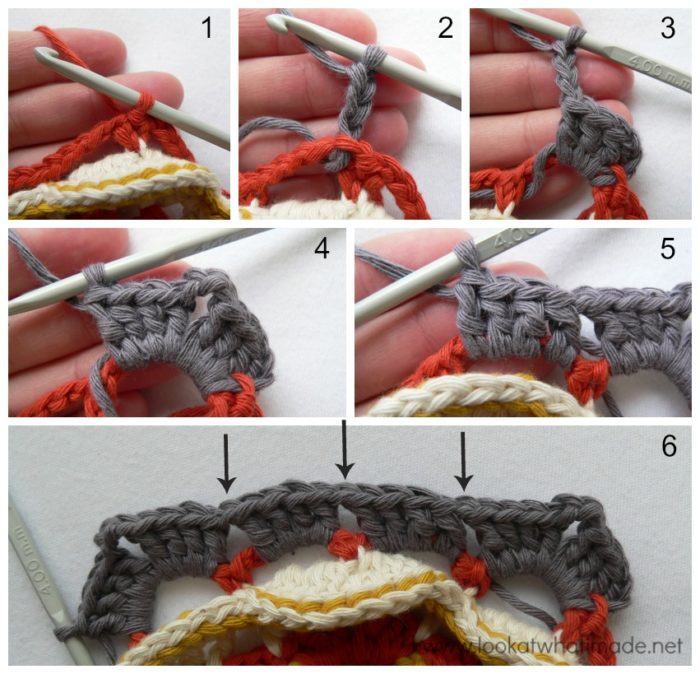
Round 10 is straightforward. Sl st into the ch-5 space and then make a corner – as instructed in the pattern (Photos 2-4). *Ch 1 and make 4 dc’s in the next ch-5 space. Ch 1 and make 4 dc’s in the next ch-5 space (Photo 5). Make a corner as instructed in the pattern. Ch 1.* Repeat around as instructed in the pattern. Remember to make those ch-1 spaces. I kept forgetting :)
Stitch count: 64 dc’s, 12 ch-1 spaces and 4 ch-3 spaces. {16 dc’s per side}
Round 11
Simple sc round.
Stitch count: 84 sc’s and 4 ch-2 spaces. {21 sc’s per side – 19 sc’s between corners}
Round 12
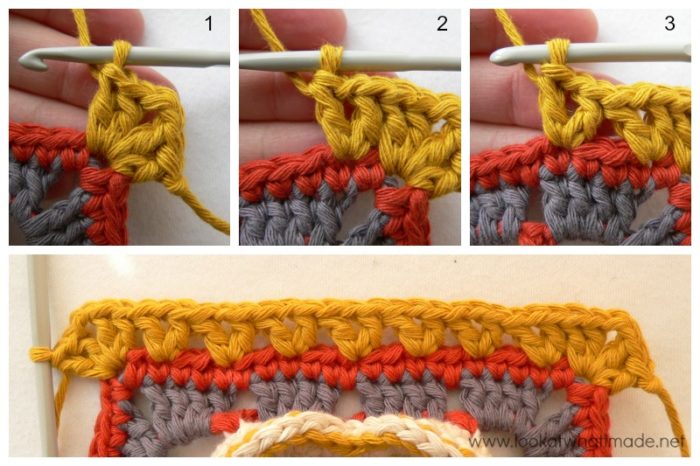
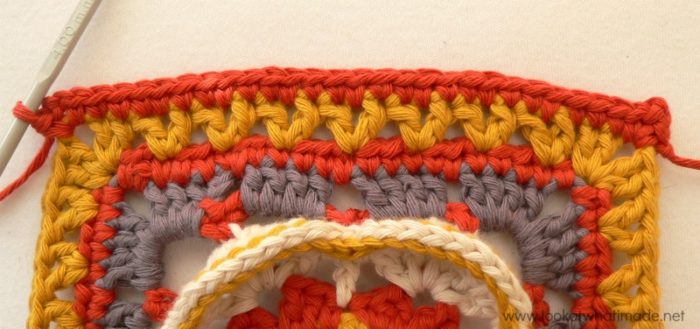
In Round 12 you will be making V-stitches. After making the first corner (Photo 1), skip the first stitch. This stitch will be slightly hidden by the stitches of the corner you just made. See this tutorial if you need some help identifying the first stitch. Make sure you don’t accidentally skip 2 stitches.
After skipping the first stitch, make a V stitch in the next sc: dc, ch 1, dc (Photo 2). Skip the next 2 st’s. V-stitch in the next stitch (Photo 3). Continue around as in the pattern.
Round 12 at it’s sunny best…
Stitch count: 72 dc’s, 28 ch-1 spaces and 4 ch-2 spaces. {18 dc’s and 7 ch-1 spaces per side}
Round 13
Round 13 is another simple sc round. Don’t forget those hidden stitches!
Stitch count: 108 sc’s and 4 ch-2 spaces. {27 sc’s per side – 25 sc’s between corners}
Round 14
Another simple Round. Remember not to skip that first (hidden) stitch (Photo 2).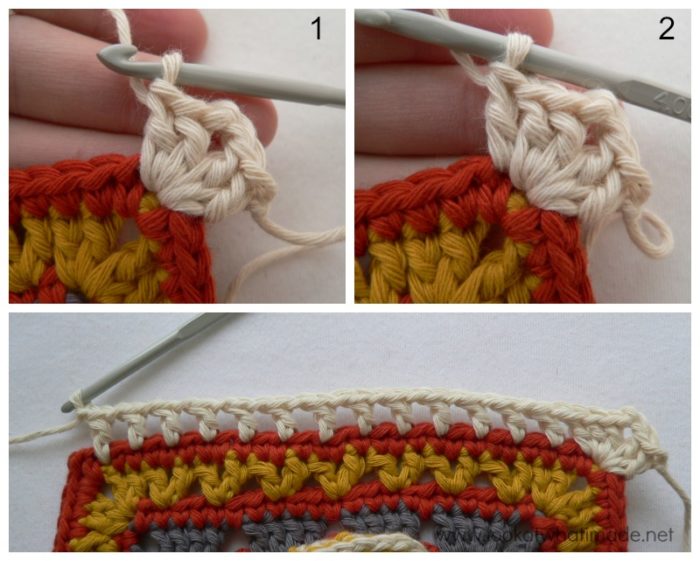
And this is the first peek of my proper square…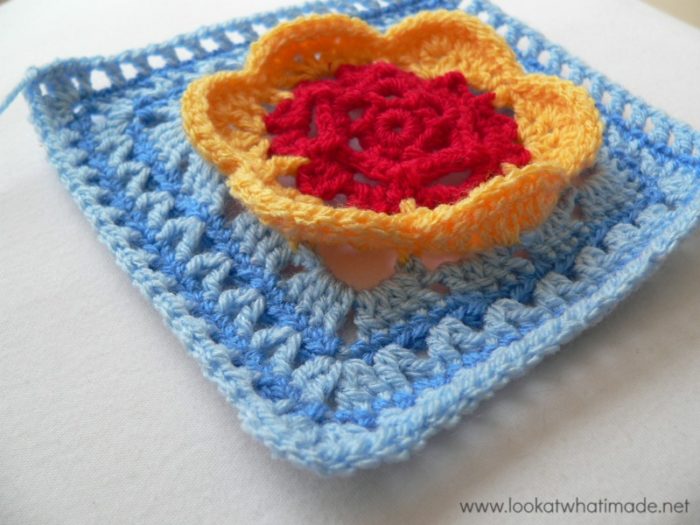
Stitch count: 72 dc’s, 52 ch-1 spaces and 4 ch-2 spaces. {18 dc’s and 13 ch-1 spaces per side}
Round 15
Guess what? Another sc round.
Stitch count: 132 sc’s and 4 ch-2 spaces. {33 sc’s per side – 31 sc’s between corners}
Round 16
And to spice it up a little bit: a delicious dc round.
Stitch count: 148 dc’s and 4 ch-2 spaces. {37 dc’s per side – 33 dc’s between corners}
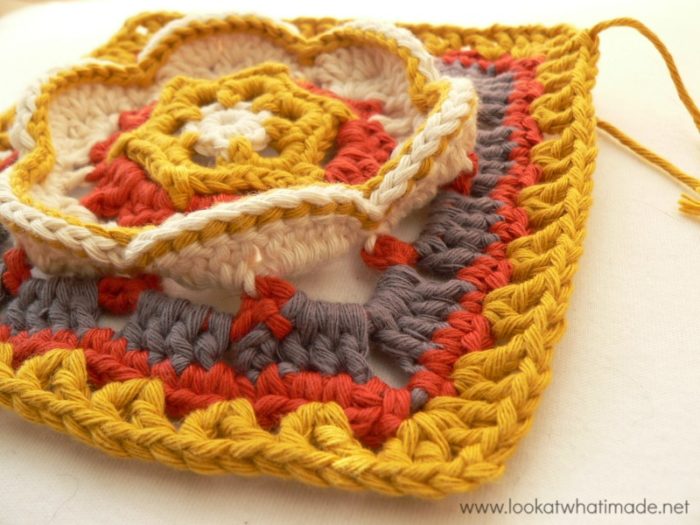
I have added an Optional Additional Round 17 to get my square to the same size as the other squares. You can find the instructions for that HERE.
Join the Block a Week CAL
Remember to subscribe to my Weekly Newsletter if you would like to be kept in the loop. You can also like my Facebook page or follow me on Bloglovin, Google+, Pinterest, Twitter, or Instagram.
More Blogs Following the CAL
- San from Loopsan – using Stylecraft in sophisticated Parchment, Denim, Mocha and Meadow
- Lou Mander from Tea, Crochet and Me – using Stylecraft in White, Mocha and Raspberry
Happy Hooking!



Fakhera Niyazee says
i am a beginner and your designs and color schemes inspires me a lot!!!!!
Tks a lot…
If a video tutorial is available then it will be of great help to beginners like me.
Deb Patchett says
If there is any possible way to print only written instructions, could you let me know? The printable form still takes a lot of color ink. Thank you.
Deb
Dedri Uys says
Deb, when you click PrintFriendly, you have the option of removing all the images from the print-out by clicking on them. D
Suzanne Elliott says
Thank for your easy to follow instructions :) I’m working, slowly, at catching up. Love your colour choices
Dedri Uys says
Just a pleasure, Suzanne. If there is anything you still don’t understand, feel free to ask :)
Minette says
Round 12 at its sunny best…
Dawndee says
A great tuorial – Thank you so much for sharing!!!!
Dedri Uys says
Thank you, Dawndee :)
Carrie says
Ha-ha, that sounds just like me :). I’ve had to pull out entire rows because I forgot to make a ch st between sts. Who wants to bet that’ll happen for this block? :)
Dedri Uys says
Aaand did it happen? Did you ever manage to make a puzzle animal, Carrie?
Carolyn says
You are a jewel, Dedri! Thank you so much!!!
Dedri Uys says
Carolyn, you always make me feel special x