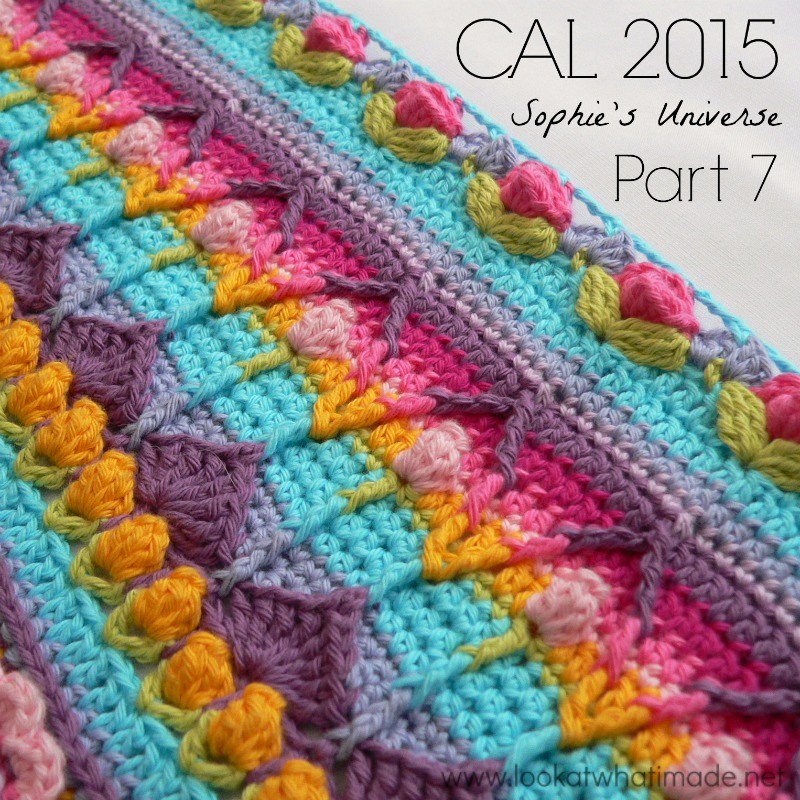
I think every woman loves receiving a bouquet of roses. Sophie is no exception. So this week, in belated honour of Valentine’s day, we are going to give Sophie some roses! The roses are my favourite part of the whole pattern and I have been waiting for 6 months (!!!) to share them with someone. I hope you enjoy them!
Someone sent me flowers yesterday and it made me feel ridiculously special! So this week I have another assignment for you. I would like you to present someone with a flower/flowers. You don’t have to buy them. A single picked flower will do. For those of you who are living in snow at the moment, you’re excused. Although…you can always present someone with a crochet flower (or a drawing of a flower). Go and spread the joy!
Update 23/02/15: Error at the end of Round 58 corrected (I have made it red to make it easy to spot). Thank you Susan Wilkes-Baker.
Sophie’s Universe Part 7
©Dedri Uys 2014. All Rights Reserved.
Resources
- Add this CAL to your Ravelry Queue
- Sophie’s Universe CAL 2015 Information
- Use the Print-friendly button at the bottom (right) of this post to print/save this tutorial. Don’t know how? Find out HERE.
- **Part 7 VIDEO TUTORIAL** by Esther Dijkstra from It’s All in a Nutshell. There’s a 2-minute sound malfunction around the 13-minute mark, but Esther has provided subtitles for that teensy bit.
Translations
- Dutch Photo Tutorial by Dianne Baan
- German Translation by Maja Heidingsfelder
- Spanish Translation by Lynda Hernandez
- Danish Translation by Tina Poulsen
- French Translation by Sandra Larvin
- Russian Translation (with Video) by Natalie V. Alimpieva
- Swedish CAL Information by Emma Vingqvist, Agnetha Magnusson, Åza Karlsson, and Ulrika Larsson
- Arabic Video Tutorial by Banan Felimban
Materials
See the Information Post.
Abbreviations
US Terminology Used (Basic US/UK comparison chart here)
- BLO – Back loop only
- Bpsc – Back post single crochet
- Ch – Chain
- Dc – Double crochet
- FLO – Front loop only
- Fpdc – Front post double crochet
- Fpdtr – Front post double treble crochet
- Fphdc – Front post half-double crochet
- Fptr – Front post treble crochet
- Hdc – Half-double crochet
- Sc – Single crochet
- Sc2tog – Single crochet 2 together (single crochet decrease). See this tutorial.
- Sl st – Slip stitch
- St/st’s – Stitch/stitches
- Tr – Treble crochet
- * – Repeat instructions between asterisks the number of times specified. This is a hardcore repeat and will consist of multiple instructions.
- () – Repeat instructions between parentheses the number of times specified. This is a lower level repeat.
Special Stitches
- Cluster : Dc3tog – see this tutorial.
- Standing Stitches: Standing sc’s, hdc’s, and dc’s are stitches used to start the round without the need for the traditional beginning chain. Links to tutorials are supplied in each relevant round.
- Tr Bobble:
- Beginning Tr Bobble: Ch 4. Yarn over twice and insert your hook into the stitch at the base of the ch-4. Yarn over and pull up a loop. (Yarn over and pull through 2 loops) twice – 2 loops on your hook. Yarn over twice and insert your hook into the same stitch. Yarn over and pull up a loop – 5 loops on your hook. (Yarn over and pull through 2 loops) twice – 3 loops on your hook. Yarn over and pull through all 3 loops. See the photo tutorial at the beginning of Part 6 if you need visual help.
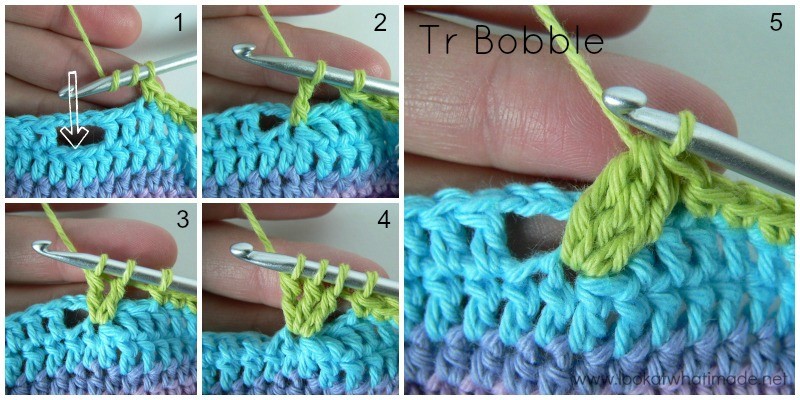
- Tr Bobble: Yarn over twice and insert your hook into the indicated stitch (Photo 1). Yarn over and pull up a loop. (Yarn over and pull through 2 loops) twice – 2 loops on your hook (Photo 2). Yarn over twice and insert your hook into the same stitch. Yarn over and pull up a loop – 5 loops on your hook. (Yarn over and pull through 2 loops) twice – 3 loops on your hook (Photo 3). Yarn over twice and insert your hook into the same stitch. Yarn over and pull up a loop – 6 loops on your hook. (Yarn over and pull through 2 loops) twice – 4 loops on your hook (Photo 4). Yarn over and pull through all 4 loops (Photo 5).
Instructions
Rounds 1 – 53
You can find the links for Rounds 1 – 53 HERE.
Note About Counting
Remember that you will be counting from ch-1 corner space to ch-1 corner space. The only exception will be Round 56, which will be counted as specified. If you are going to have trouble identifying the ch-1 spaces, please use stitch markers or scrap yarn to mark them.
Round 54
- If you are using the same colour, (ch 1, sc, ch 1, sc) in the same stitch as the sl st join. This is your first corner made.
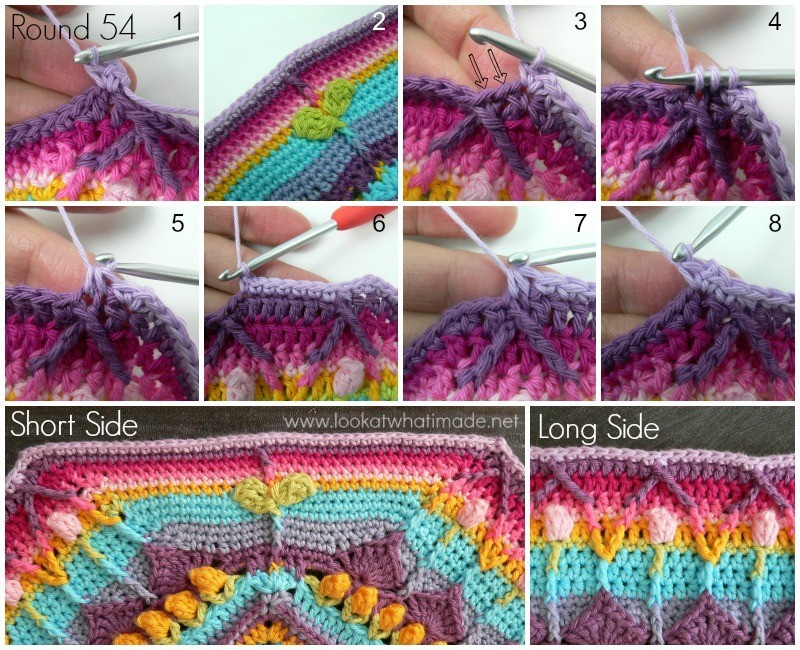
- If you are using a new colour, join your yarn by making a standing single crochet in the first hdc of the (hdc, ch 1, hdc) corner at the start of any short side. (Ch 1, sc) in the same stitch. This is your first corner made (Photo 1).
*Short Side: Sc in the next ch-1 space. Sc in the next 41 st’s. Don’t accidentally skip that first (hidden) stitch. The 21st sc will fall in the fpdc from Round 53. Sc in the next ch-1 space.
Long Side: Skip the first (hidden) stitch. (Sc, ch 1, sc) in the next stitch (Photo 3). Sc2tog, working into the 2 fpdtr’s (indicated with arrows in Photo 3 and illustrated in Photos 4 and 5). (Sc in each of the next 7 dc’s – see Photo 6. Sc2tog, working into the next 2 fpdtr’s) 8 times (Photo 7). Sc in the next dc. (Sc, ch 1, sc) in the next stitch, which should be the first hdc of the (hdc, ch 1, hdc) corner from the previous round (Photo 8).*
Repeat from * to * 3 more times, omitting the last (sc, ch 1, sc) corner on the last repeat. Join to the top of the first sc with a sl st.
Stitch Counts:
- Total: 452 sc’s and 8 ch-1 corner spaces
- Per Short Side: 45 sc’s
- Per Long Side: 68 sc’s
Round 55
- If you are using the same colour, sl st into the next ch-1 space. (Ch 1, sc, ch 1, sc) in the same ch-1 space. This is your first corner made.
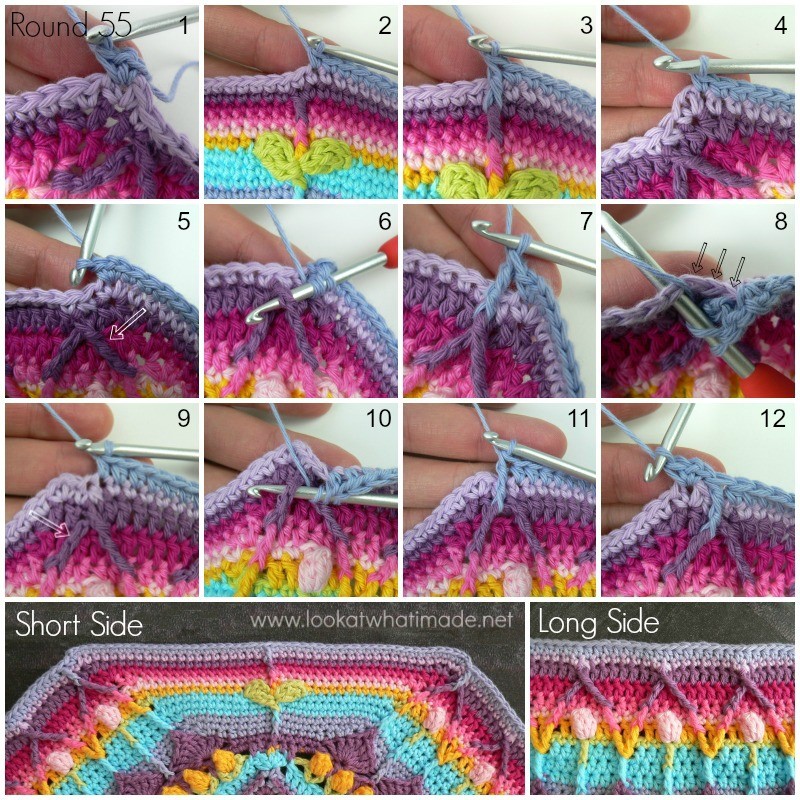
- If you are using a new colour, join your yarn by making a standing single crochet in the ch-1 space at the start of any short side. (Ch 1, sc) in the same ch-1 space. This is your first corner made (Photo 1).
*Short Side: Sc in the next 22 st’s, remembering to work into that first (hidden) stitch (Photo 2). Make a fpdc around the fpdc from Round 53 (Photo 3) and skip the next st of Round 54. Sc in the next 22 st’s (Photo 4). The fpdc in the middle of the short side will be slightly skew. Don’t worry about it.
Long Side: (Sc, ch 1, sc) in the next ch-1 space (Photo 5). Make a fptr around the first fpdtr from Round 53 (Photos 6 and 7). Skip the first (hidden) stitch AND the next 2 st’s of Round 54 (Photo 8). Hdc in the next 63 st’s. The seventh hdc should fall in the next sc2tog, and the last hdc should fall in the top of the last sc2tog from the previous round (Photo 9). Make a fptr around the last fpdtr from Round 53 (indicated with an arrow in Photo 9 and illustrated in Photos 10 and 11). Skip the last 2 st’s of Round 54. (Sc, ch 1, sc) in the next ch-1 space (Photo 12).*
Repeat from * to * 3 more times, omitting the last (sc, ch 1, sc) corner on the last repeat. Join to the first sc with a sl st.
Stitch Counts:
- Total: 456 st’s and 8 ch-1 corner spaces {192 sc’s, 252 hdc’s, 4 fpdc’s, and 8 fptr’s}
- Per Short Side: 47 st’s {46 sc’s and 1 fpdc}
- Per Long Side: 67 st’s {2 sc’s, 63 hdc’s and 2 fptr’s}
Round 56
- If you are using the same colour, sl st into the next ch-1 space. Ch 2 (counts as hdc). Hdc in the same ch-1 space. This is your first 2-hdc corner made.
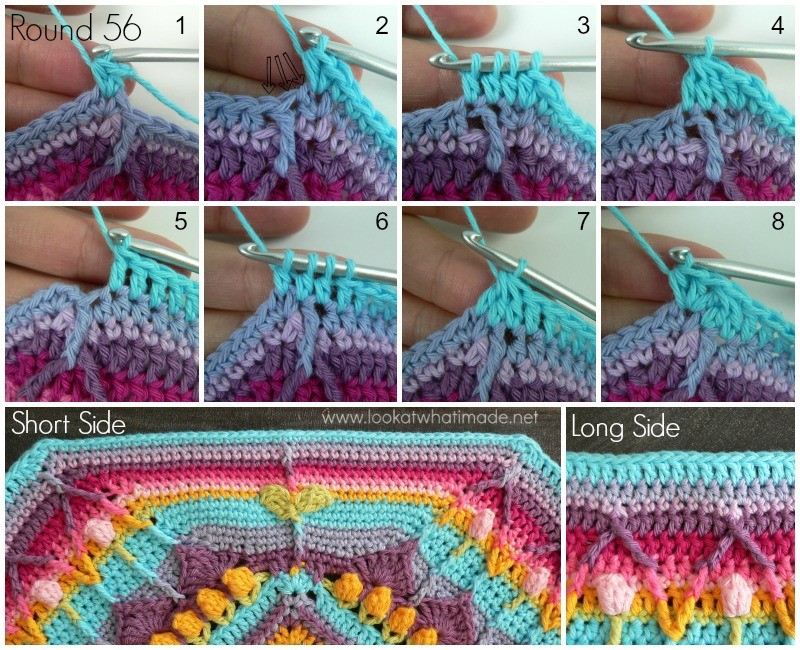
- If you are using a new colour, join your yarn by making a standing half-double crochet in the ch-1 space at the start of any short side. Hdc in the same ch-1 space. This is your first 2-hdc corner made (Photo 1).
Skip the first (hidden) stitch. Sc in the next 46 st’s. The 23rd sc will fall in the fpdc from the previous round. Make 2 hdc’s in the next ch-1 space (Photo 2).
*Long Side: Make a cluster, working into the first (hidden) sc, the fptr, and the next hdc (indicated with arrows in Photo 2 and illustrated in Photos 3 and 4). Dc in the next 62 st’s. I strongly suggest that you mark the second dc after the cluster with a st marker or a piece of scrap yarn. In fact…I insist on it. The last dc should fall in the hdc before the fptr (Photo 5). Make a cluster, working into the fptr, the next sc, and the ch-1 space (Photos 6 and 7).
Short Side: Make 2 hdc’s in the ch-1 space that already contains the last “leg” of the 3-dc cluster (Photo 8). Skip the first (hidden) stitch. Sc in the next 46 st’s. The 23rd sc will fall in the fpdc from the previous round. Make 2 hdc’s in the next ch-1 space.*
Repeat from * to * 3 more times, omitting the last short side on the last repeat. Join to the top of the beginning ch-2 (or the standing half-double crochet) with a sl st. Fasten off and work away your tails of yarn.
Stitch Counts:
- Total: 456 st’s {184 sc’s, 16 hdc’s, 248 dc’s, and 8 clusters}
- Per Short Side: 50 st’s {46 sc’s and 4 hdc’s} – The short side includes both hdc’s of the 2-hdc corners.
- Per Long Side: 64 st’s {62 dc’s and 2 clusters}
Round 57
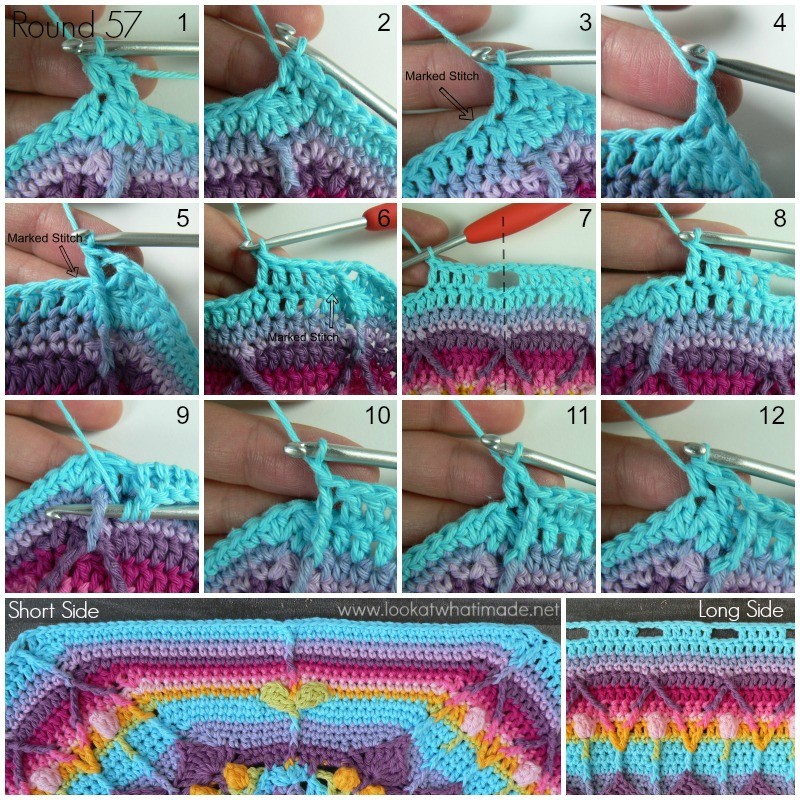
If you want to use the same colour for this round (as I have done) you will still need to bind off at the end of the previous round, because this round starts in the stitch before the sl st join.
There are no clear-cut landmarks on the Long Side, so if didn’t mark the stitches I told you to mark in the previous round, please take a moment and do so now. Do not forget to make the ch-1 spaces at the start and end of each long side, which will count as your ch-1 corner spaces. Mark these ch-1 spaces if you are going to have trouble identifying them later.
Join your yarn by making a standing double crochet in the cluster at the end of any long side.
Hdc in the next st (Photo 1). Sc in the next 24 st’s. The last sc will fall in the sc you made into the fpdc from Round 55. Make a fpdc around the fpdc from Round 55 and skip the next st of Round 56. Sc in the next 24 st’s. The last sc should fall in the second hdc of the 2-hdc corner from the previous round. Hdc in the next stitch, which will be the cluster (Photo 2). Dc in the next st (Photo 3).
*Long Side: Ch 1 and make a fpdtr around the fptr from Round 55 (Photos 4 and 5). Dc in the next st, which should be the marked dc from the previous round. Dc in the next 4 st’s (Photo 6). Ch 3 and skip the next 3 st’s. (Dc in the next 5 st’s. Ch 3 and skip the next 3 st’s) 6 times. Each ch-3 space should fall directly above the tip of one of the petals from Rounds 49-53 (Photo 7). Dc in the last 5 dc’s before the cluster (Photo 8). Make a fpdtr around the fptr from Round 55 (Photos 9 – and 10). Ch 1.
Short Side: Make a dc in the next st, which will be the cluster (Photo 11). Hdc in the next st (Photo 12). Sc in the next 24 st’s. The last sc will fall in the sc you made into the fpdc from Round 55. Make a fpdc around the fpdc from Round 55 and skip the next st of Round 56. Sc in the next 24 st’s. The last sc should fall in the second hdc of the 2-hdc corner from the previous round. Hdc in the next stitch, which will be the cluster. Dc in the next st. *
Repeat from * to * 3 more times, omitting the last short side on the last repeat. Join to the top of the standing double crochet with a sl st.
Fasten off and work away your tails of yarn.
Stitch Counts:
- Total: 380 st’s, 28 ch-3 spaces, and 8 ch-1 corner spaces {192 sc’s, 8 hdc’s, 168 dc’s, 4 fpdc’s, and 8 fpdtr’s}
- Per Short Side: 53 st’s {48 sc’s, 2 hdc’s, 2 dc’s, and 1 fpdc}
- Per Long Side: 42 st’s and 7 ch-3 spaces {40 dc’s and 2 fpdtr’s}
Round 58 {Leaves}
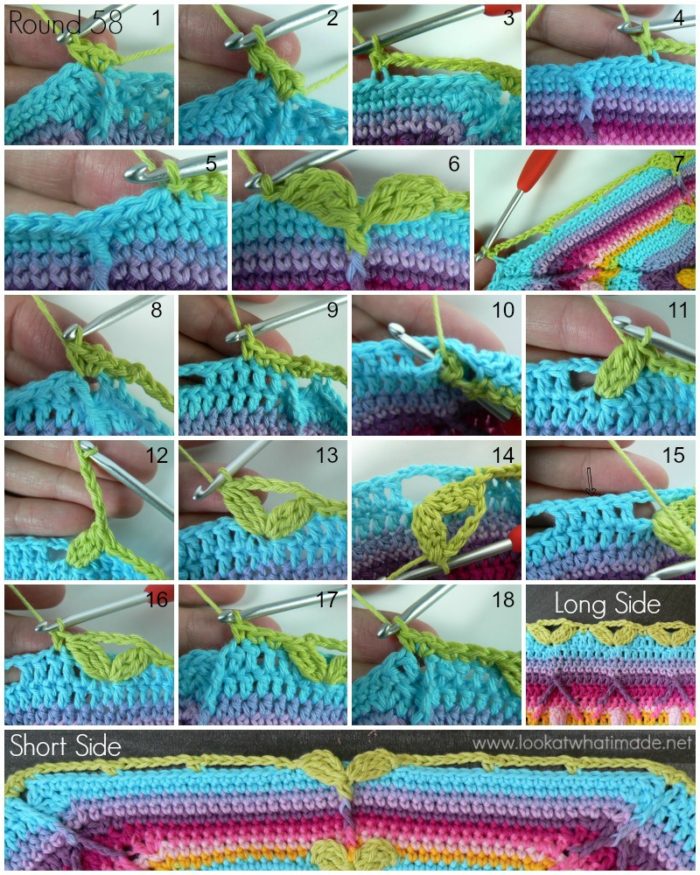
We will be making some more leaves in this round. If you need a reminder of how to make the Beginning Tr Bobbles on the short side, see the Special Stitches at the start of Part 6. On the long sides, you will be making regular Tr Bobbles – see Special Stitches above.
Join your new yarn by making a standing single crochet in the ch-1 space at the start of any short side. (Ch 1, sc) in the same ch-1 space (Photo 1).
*Short Side: Sc in the blo of the next (hidden) st (Photo 2). (Ch 6 and skip the next 6 st’s. Sc in the blo of the next st) 3 times (Photos 3 and 4). Sl st in the next st (Photo 5). There should be 3 st’s left before the fpdc. Now you are going to make your first leaf by making a Beginning Tr Bobble in the same st as the sl st. Anchor the leaf to the “stem” in the middle of the short side by making a sc around the fpdc from Round 55 (in other words, the second fpdc down). To make the second leaf, make a Beginning Tr Bobble in the sc that you made around the base of the “stem”. Skip the next 7 st’s of Round 57 (in other words, the 3 sc’s before the fpdc, the fpdc, and the 3 sc’s after the fpdc). Sl st in the next st (Photo 6). (Sc in the blo of the next st. Ch 6 and skip the next 6 st’s) 3 times. Sc in the blo of the next st, which should be the last dc before the ch-1 space (Photo 7).
Long Side: (Sc, ch 1, sc) in the next ch-1 space (Photo 8). Skip the fpdtr, which will be hidden anyway. Sc in the next 3 st’s (Photo 9).
(Skip the next 2 dc’s. Working in front of the ch-3 space from Round 57, make a Tr Bobble in the central skipped stitch from Round 56 – see Photos 10 and 11. Ch 5 – see Photo 12, and make a Tr Bobble in the same stitch – see Photos 13 and 14. Skip the next 2 dc’s of Round 57 and sc in the next dc – indicated with an arrow in Photo 15 and illustrated in Photo 16) 7 times.
Sc in the next 2 st’s and skip the next fpdtr (Photo 17). (Sc, ch 1, sc) in the next ch-1 space (Photo 18).*
Repeat from * to * 3 more times, omitting the last (sc, ch 1, sc) corner on the last repeat. Join to the top of the standing single crochet with a sl st.
Stitch Counts:
- Total: 168 st’s, 28 ch-5 spaces, 24 ch-6 spaces, and 8 ch-1 corner spaces {96 sc’s, 64 leaves, 56 tr bobbles, and 8 sl st’s}
- Per Short Side: 15 st’s and 6 ch-6 spaces {11 sc’s, of which 8 will be blo and 1 is used to anchor the leaves, 2 sl st’s, and 2 leaves}
- Per Long Side: 28 st’s and 7 ch-5 spaces {14 sc’s and 14 leaves}
Round 59 {Roses and the Start of the Central Flower on the Short Side}
Apart from when you make the corners, you will be working only into the ch-3 and ch-5 spaces along the long sides. You will be working into the stitches from Round 57 on the short sides.
Before we get started with this Round I am going to show you how to make the roses when the pattern calls for them.
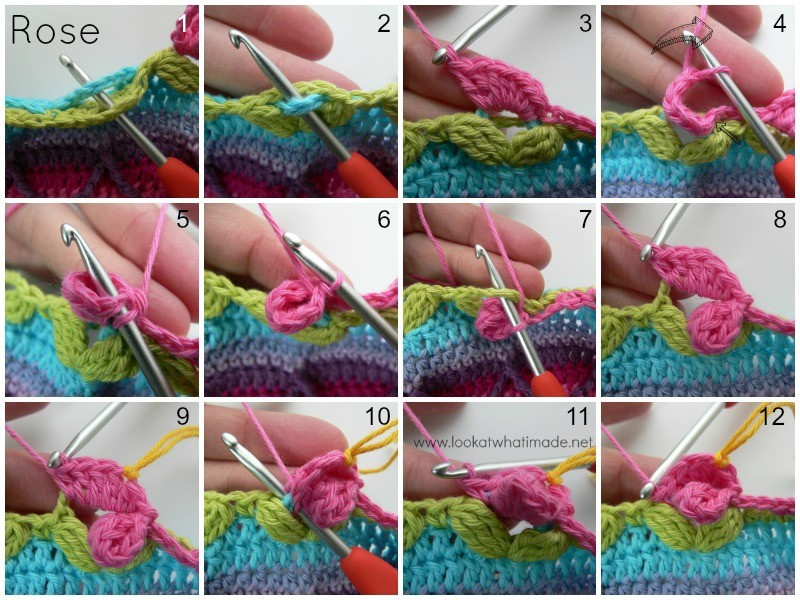
Rose
Pull the ch-3 space from Round 57 through the ch-5 space from Round 58 (Photos 1 and 2). Working only into the ch-3 space, make (2 sc’s, 3 hdc’s, 3 dc’s) – Photo 3. Bring the last stitch around the back of your work (Photo 4) and join to the first sc with a sl st, forming a ring (Photos 5 and 6). Let’s call this a modified popcorn.
(Sc, hdc, 3 dc, hdc) into the ch-5 space from Round 58, which should be behind the modified popcorn (Photos 7 and 8). Mark the first of the 3 dc’s with a piece of scrap yarn if you are going to have trouble identifying it later on (Photo 9). To finish the rose, make a sc into the ch-3 space from Round 57, again making sure to work in front of the ch-5 space (Photos 11 and 12).
Right. Let’s get started with my favourite round of the whole pattern. I hope you are excited!
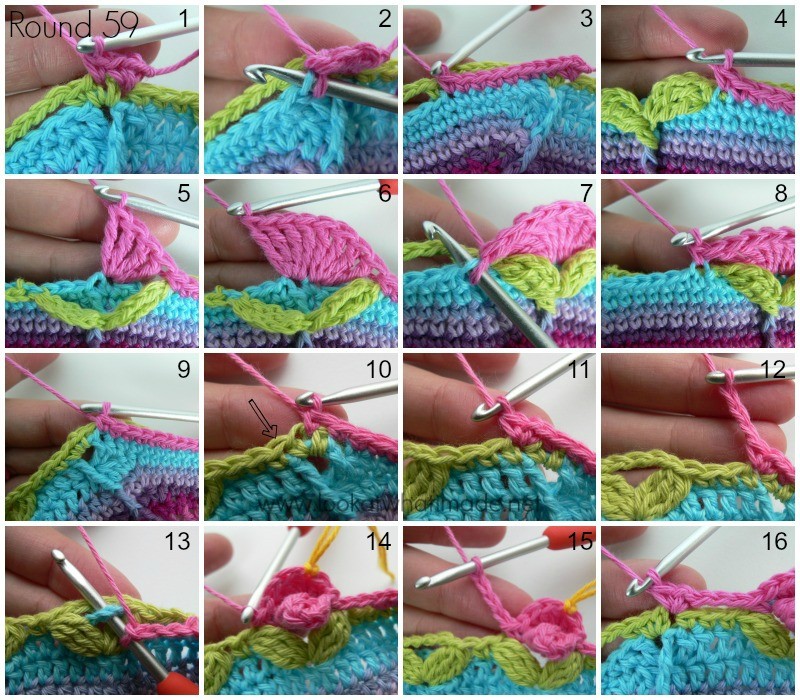
- If you are using the same colour, (ch 1, sc, ch 1, sc) in the same stitch as the sl st join. This is your first corner made.
- If you are using a new colour, join your yarn by making a standing single crochet in the same stitch as the sl st join, which should be the first sc of the (sc, ch 1, sc) corner from the previous round. (Ch 1, sc) in the same stitch. This is your first corner made.
*Short Side: Sc in the ch-1 corner space (Photo 1). Skip the next (hidden) st of Round 58. (Sc in the flo of the next st from Round 57, which already contains the blo sc from Round 58 – Photo 2. Working in front of the next ch-6 space, sc in the next 6 st’s of Round 57 – Photo 3) 3 times.
Sc in the flo of the next st from Round 57, which should be the last st before the leaf (Photo 4). Working behind the leaves, skip the next 2 available st’s from Round 57. Make 4 tr’s in the next st, which will be the sc before the fpdc (Photo 5). Make 4 tr’s in the next st, which should be the fpdc (Photo 6). Skip the next 3 st’s of Round 57 (behind the second leaf).
Sc in the flo of the next available st from Round 57, which already contains the blo sc from Round 58 (Photos 7 and 8). (Working in front of the next ch-6 space, sc in the next 6 st’s of Round 57. Sc in the flo of the next st from Round 57) 3 times (Photo 9). Skip the next st of Round 58 and sc in the ch-1 space (Photo 10).
Long Side: Skip the first (hidden) stitch. (Sc, ch 1, sc) in the next st (indicated with an arrow in Photo 10 and illustrated in Photo 11). Ch 3 and skip the next 3 st’s, which will be the 2 sc’s and the first leaf (Photo 12). Make a rose in the next ch-3/ch-5 space (see Rose at the start of this round) – Photos 13 and 14.
(Ch 4 – Photo 15, and make a rose into the next ch-3/ch-5 space) 6 times. Ch 3 and skip the next 4 st’s, which will be the last leaf and the next 3 sc’s. (Sc, ch 1, sc) in the next st, which will be the first sc of the (sc, ch 1, sc) corner from the previous round (Photo 16).*
Repeat from * to * 3 more times, omitting the last (sc, ch 1, sc) corner on the last repeat. Join to the top of the first sc with a sl st.
Fasten off and work away your tails of yarn.
Stitch Counts:
- Total: 260 st’s, 8 ch-3 spaces, 24 ch-4 spaces, and 8 ch-1 corner spaces {200 sc’s, 32 tr’s, and 28 roses}
- Per Short Side: 56 st’s {48 sc’s, of which 8 are flo, and 8 tr’s}
- Per Long Side: 9 st’s, 2 ch-3 spaces, and 6 ch-4 spaces {2 sc’s and 7 roses}
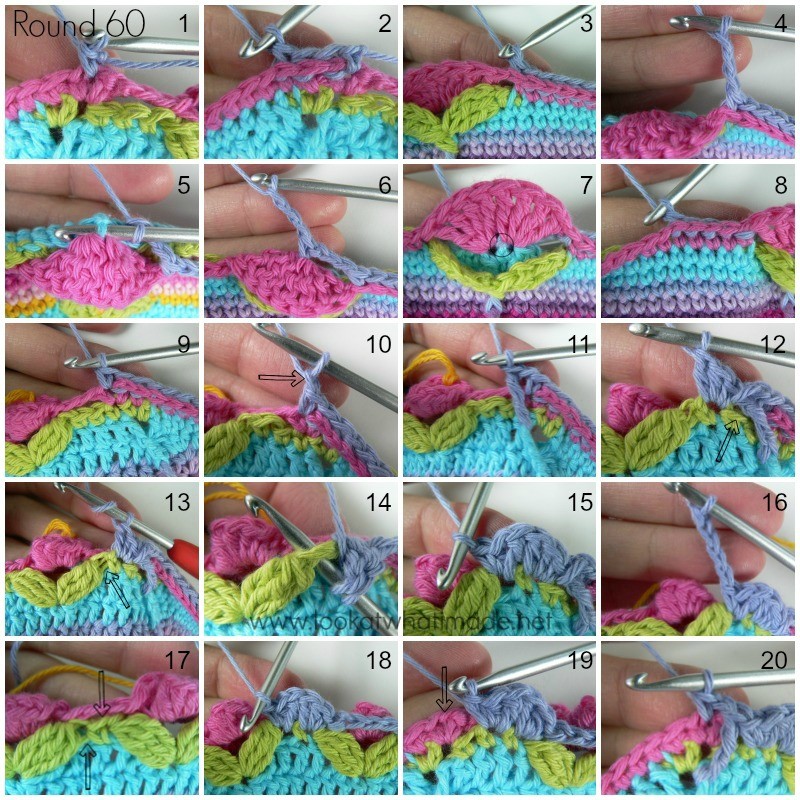
Round 60
Do not forget to make the ch-1 spaces at the start and end of each long side, which will count as your ch-1 corner spaces. Mark these ch-1 spaces if you are going to have trouble identifying them later.
When making the long sides, you can work in front of the ch spaces from Round 59, or over them. It is up to you. I will say that your roses will be slightly neater if you work in front of the ch spaces from Round 59.
- If you are using the same colour, sl st into the next ch-1 space. (Ch 1, sc) in the same ch-1 space.
- If you are using a new colour, join your yarn by making a standing single crochet in the ch-1 space at the start of any short side (Photo 1).
*Short Side: Make a bpsc in each of the next 24 sc’s, including the first (hidden) sc (Photos 2 and 3). Ch 3 (Photo 4). Make a bpsc in the sc from Round 57 that contains the first 4 tr’s of the 8-tr “flower” from Round 59 (Photo 5). Ch 3 (Photo 6). Photo 7 shows the little line formed by the bpsc. Skip the 8 tr’s from Round 59 and make a bpsc in each of the next 24 sc’s (Photo 8).
Long Side: Sc in the next ch-1 space (Photo 9). Ch 1 and make a fptr around the fpdtr from Round 57 (Photos 10 and 11). Skip the first (hidden) stitch of Round 59 and the next available stitch of Round 58, which you will find below the first ch-3 space from Round 59. Photo 12 shows the skipped stitch indicated with an arrow. The ch-3 from Round 59 is not visible, because it is behind my work.
{Sc, hdc, dc} in the next sc from Round 58 (Photo 12). {Dc, hdc, sc} between the same sc and the next Tr Bobble leaf. To work between these 2 st’s, insert your hook under all the loops of the Tr Bobble (indicated with an arrow in Photo 13 and illustrated in Photos 14 and 15). This is one scallop made. Ch 4 (Photo 16), and skip the next rose and both its leaves.
({Sc, hdc, dc} in the next sc from Round 58. {Dc, hdc, sc} between the same sc and the next Tr Bobble leaf – Photos 17 and 18. Ch 4 and skip the next rose and both its leaves) 6 times. At this point you should have 7 scallops.
(Sc, hdc, dc) in the next sc. (Dc, hdc, sc) in the next sc (Photo 19). Make a fptr around the fpdtr from Round 57. Ch 1. Skip the next st of Round 58 and the next st of Round 59. Sc in the next ch-1 space (Photo 20).*
Repeat from * to * 3 more times, omitting the last sc on the last repeat. Join to the top of the first sc with a sl st.
Fasten off and work away your tails of yarn.
Flick all the ch-4’s to the back of your work so that they do not lie in front of your roses.
Stitch Counts:
- Total: 404 st’s, 8 ch-3 spaces, 28 ch-4 spaces, and 8 ch-1 corner spaces {196 bpsc’s, 72 sc’s, 64 hdc’s, 64 dc’s, and 8 fptr’s}
- Per Short Side: 51 st’s and 2 ch-3 spaces {49 bpsc’s and 2 sc’s}
- Per Long Side: 50 st’s and 7 ch-4 spaces {16 sc’s, 16 hdc’s, 16 dc’s, and 2 fptr’s}
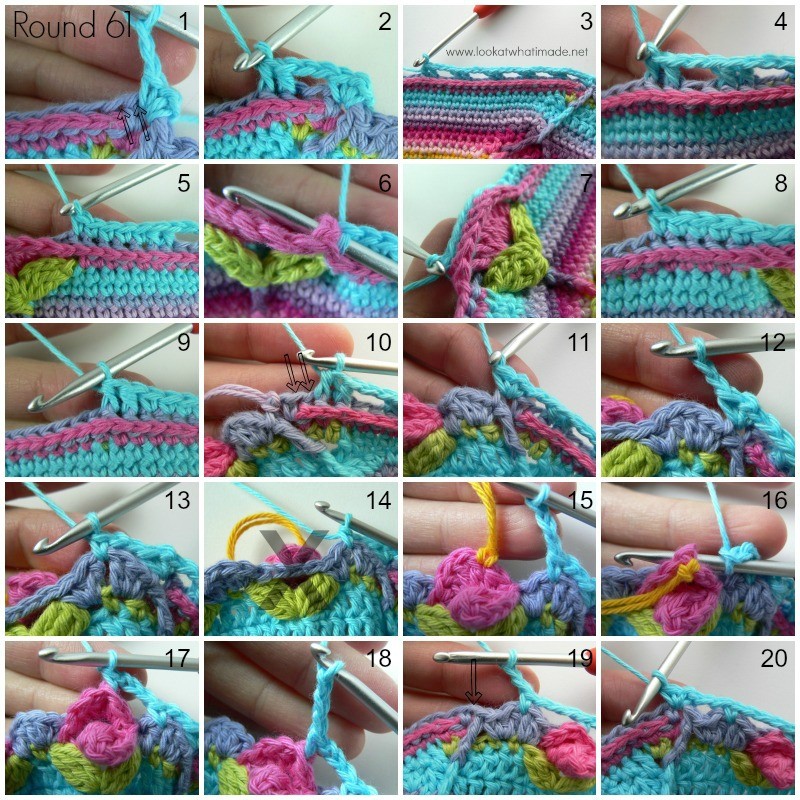
Round 61
In this round, you will be working into the tops of the roses from Round 59 and between the central 2 dc’s of each scallop on the long side. It will be helpful if you familiarise yourself with the “anatomy” of the roses first. Have a look at one of the roses. The “top” of the rose is formed by the (sc, hdc, 3 x dc, hdc) made into the ch-5 space from Round 58. When making your bpsc’s, you will make them into the first of the 3 dc’s.
Make sure that your ch-4 spaces from Round 60 are behind your roses! You will be super annoyed if they aren’t. If you have trouble identifying the stitches when you make the front post stitches on the short sides, have a look at this tutorial to remind yourself which loops (and posts) belong to which stitch. And take it slow.
Join your yarn by making a standing single crochet in the ch-1 space at the start of any short side. (Ch 1, sc) in the same ch-1 space.
*Short Side: (Ch 2 and skip the next 2 st’s. Fphdc around the next 2 st’s) 5 times (Photos 1 – 4). Sc in the last 5 st’s before the first ch-3 space (Photo 5). Make a bpsc around each of the 8 tr’s from Round 59 and skip the (ch-3, bpsc, ch-3) space behind them (Photos 6 and 7). Sc in the next 5 st’s of Round 60, taking care not to accidentally skip the first st (Photo 8). (Fphdc around the next 2 st’s. Ch 2 and skip the next 2 st’s) 5 times (Photos 9 and 10).
Long Side: (Sc, ch 1, sc) in the next ch-1 space (Photo 11). Ch 2 (Photo 12). Skip the fptr and the next 3 st’s.
(Sc between the 2 dc’s at the center of the next scallop – Photo 13. Ch 3 and make sure that your ch-4 space is behind your next rose – Photos 14 and 15. Make a bpsc around the post of the first dc of the 3 dc’s at the top of the rose from Round 59 – Photos 16 and 17. Ch 3 – Photo 18) 7 times. Sc between the 2 dc’s of the last scallop. Ch 2 (Photo 19). Skip the next 3 st’s and the fptr. (Sc, ch 1, sc) in the next ch-1 space (Photo 20).*
Repeat from * to * 3 more times, omitting the last (sc, ch 1, sc) corner on the last repeat. Join to the top of the first sc with a sl st.
Stitch Counts:
- Total: 228 st’s, 48 ch-2 spaces, 56 ch-3 spaces, and 8 ch-1 corner spaces {88 sc’s, 60 bpsc’s, and 80 fphdc’s}
- Per Short Side: 40 st’s and 10 ch-2 spaces {12 sc’s, 8 bpsc’s, and 20 fphdc’s }
- Per Long Side: 17 st’s, 2 ch-2 spaces, and 14 ch-3 spaces {10 sc’s, 7 bpsc’s}
Note About Curling
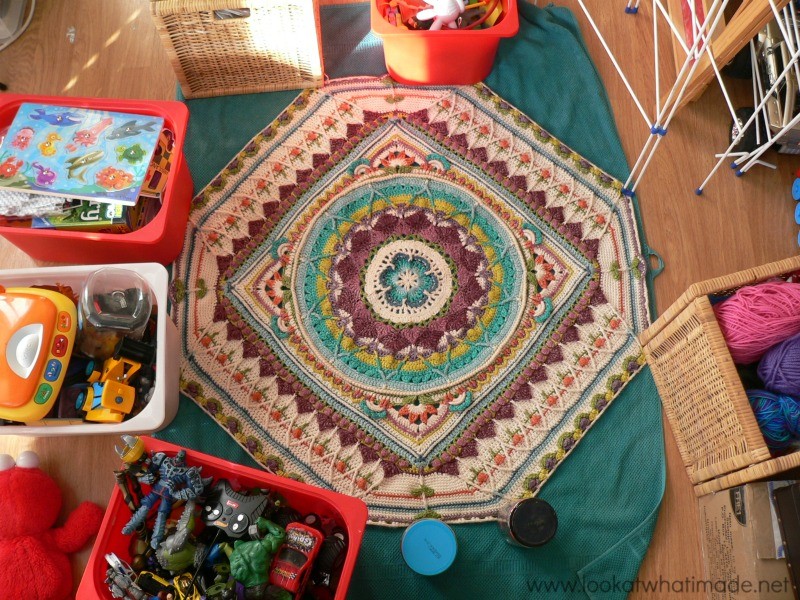
At this point, your edges will curl over quite a bit. Do not worry about this. I do suggest that you block Sophie at the end of Round 61, though. Both so that you can take pretty pictures and so that you can wait for the next part with complete peace of mind. Annie’s has some good advice for Blocking Afghans and Other Large Pieces.
I threw out my blocking squares because our charming cat scratched them to bits, but I have just ordered some more and I hope they arrive soon! If you are going to use foam squares to block on, consider buying these Interlocking Foam Exercise Mats. They are similar to these Knitter’s Pride Lace Blocking Mats, but cheaper. You will also need some of these Clover Fork Blocking Pins
.
In the meantime, I am improvising.
Remember to check the Helpful Tips before starting Part 8.
This part of the pattern was tested by Kimberly Slifer, Claire Martin, Maja Heidingsfelder, Lynda Hernandez, Venetia Smith, and Dianne Baan.

This blog post contains affiliate links. I only link to products I personally use or would use. All opinions are my own.





Nina says
I know it is many years since you published this wonderful pattern, but during the stay at home time because of Covid19 I almost lost my urge to crochet. I somehow saw your pattern and thought, why not? This will take some time to complete. I hope I can still ask questions if I get stuck. Thank you again!
Dedri Uys says
Hi Nina. I am always happy to answer questions relating to Sophie. You will also find a huge online following ready and willing to support you if you have questions. Enjoy every moment!
Dedri
Bec says
I’m doing this too Nina! Enjoy x
Andrea says
Oi amiga,
Estou tecendo seu projeto maravilhoso e estou amando o resultado! Obrigada por compartilhar esta riqueza conosco!
Um beijo enorme! Luz e paz!
Holly says
I was stuck on the leaves in round 58 but have now found my mistake – I was trying to do Beginning Tr Bobbles!
Dedri Uys says
Hi Holly. I am so pleased to hear that you have managed to figure it out x
Dedri
Jayne Stafford says
Hi Dedri
Many thanks for this beautiful pattern. I learned to crochet a few months ago using You tube tutorials and now I’m totally hooked, pardon the pun. I am really enjoying the challenge of making my own Sophie, which is only possible with your amazing and concise instructions and occasionally dipping into the You Tube tutorial, many thanks Esther.
I do struggle with making the standing crochet starts to rounds, finding that my work is a little bulgy and I find that I am mixing up the stitches on the next round. Would it make a huge difference if I started a new round with the chain method?
Also I am intrigued to know what the difference is between Sophies garden and Sophie’s universe. Is anyone able to explain?
Dedri Uys says
Hi Jayne
I am so pleased to hear that you are making Sophie and enjoying the challenge. Esther’s videos are amazing! You can always start with the chain method if that is more comfortable for you. Just start with a sl st and follow the instructions for using the same colour at the start of the round. Sophie’s Garden is the first 4 parts of Sophie’s Universe. It was the square I designed originally, before deciding that I wasn’t ready to stop the journey just yet. So I extended the square (the garden) into the universe.
Enjoy and please share photos so that we can see how you go.
Dedri
Renee Epstein says
Hi Dedri,
I just want to THank You for allowing everyone to enjoy such a beautiful blanket!!! I am a newbie at crocheting, I’m a quick learner all thanks to you showing pics and explaining step by step instructions,
I have watched the videos a few times because I just wanted to make sure I was following along with making mistakes.
Also, I think my family put a missing person report on me, because they have not seen me in weeks, lol.
Sincerely,
Renee E.
Dedri Uys says
haha Renee. I hope they’ve managed to see you since you left that comment. I’m so pleased that you are enjoying the journey x
Janet says
Thank you so much for all the time and effort you have put into this pattern. I am enjoying it so much! I’m making my first one for my first granddaughter, to be born in September!
In round 56 you have a link to your page that shows how to do a cluster. I checked it out, and it said to be sure to chain 2 after you pull through all 4 loops on the hook. Well, I forgot to do the chain 2 on the first cluster, but because I, too, am lazy I looked on the Youtube video and she DIDN’T chain 2 after making the cluster. So, after careful consideration, I will continue on without the extra 2 chains, and hope beyond hope that I don’t have to frog when I come to it in round 57!
I’m taking the time to post this so that you might consider either changing the post where the link leads or add a comment before round 56 to let folks know that the ch. 2 is NOT to be made on Sophie.
Thanks for a super pattern!
Dedri Uys says
Hi Janet. Thank you for getting in touch. There is a note at the start of the Cluster tutorial that says this: “To compensate for the fact that you are decreasing by 2 st’s with every cluster that you make, cluster stitches usually have 2 or more chain stitches between clusters. The only exception to this rule is when you actually want to decrease“, which is what you are doing in that specific round of Sophie. When you look at the charts/diagrams/photos supplied in the cluster stitch tutorial, they all stop before the ch-2 as the ch-2 is not part of the actual stitch, but rather the ‘bridge’ needed to keep the stitch count when making Clusters in a row. I hope that helps.
Dedri
Corinne says
I’m going to follow the photo rather than the words here, but in round 55 it says to Fptr in the first Fpdtr, and the picture shows it done in the second Fpdtr.
Dedri Uys says
Hi Corinne. Technically, it is the second one, but visually it is the first one. We trialled writing it both ways during testing and the way it is written now was the way that made sense to all the testers. Well spotted. You are the first person in thousands to notice/highlight this.
Corinne says
Thanks for the reply. Also, I read the blocking link, but I’m still unsure. If I am doing this with acrylic, should I cold block or not block at all? I had never even heard of blocking in my 20+ years of crochet lol, it would’ve come in handy many times!
Dedri Uys says
You don’t need to block your blanket unless you want to take pretty pictures as you go. The main thing to look out for is whether or not your blanket is bulging at the end of Part 7, because that will mean you need to go up a hook size at the start of Part 8. At the very least, you should lay your blanket out flat and check that it is actually flat before continuing there.
Corinne says
Thanks
Mandy says
Hi on round 59 I’ve misankenly only done 4tr instead of 8! Is this going to be a problem? Should i frog it now?? ☺️ Or can I wing it??
Thanks Mandy
Dedri Uys says
Hi Mandy. Unlike a traditional 4-sided project where you can ‘fudge’ things, this pattern requires exact stitches in order to stop it from warping. I’m afraid you will have to frog!! Sorry :(
Michelle says
Hello, I think I have spotted an error in the pattern on row 58 (leaves) on the long side after the 7th leaf repeat it says skip 2sc and the Fptr (sc, ch1, sc) into Ch1 space on row 57 but should have 3sc between the skipped 2sc and the skipper Fptr?
Dedri Uys says
Hi Michelle. Your comment got lost in my spam folder, sorry!
The repeat ends on a sc, so that is one of the 3 sc’s before the corner made. Then it says: “Sc in the next 2 st’s and skip the next fpdtr (Photo 17). (Sc, ch 1, sc) in the next ch-1 space (Photo 18).*” The 2 sc’s in bold complete the 3 sc’s before the corner.
I hope that makes sense?
Aruna says
Hi Dedri, I am almost done with Part 7. I am using a 4mm hook and I should be blocking my project next. What size should my sophies be after part 7. I do crochet a little tight. It’s a dumb question though. But want to make my blocking easier. I am working with acrylic yarn :)
Thanks <3 ..!!
Dedri Uys says
Hi Aruna. I am a tight crocheter myself :) If you have a look at the information post for Sophie’s Universe, you will find (under Helpful Templates) a document that tells you exactly how much yarn I used for each round, and how large my Sophie was at the end of each part (for future reference). At the end of part 7, my Sophie was 79 cm, measuring through the short sides.
I hope that helps.
D
Nicole says
Hi Dedri,
I am relatively new to crochet and have just finished part 7. I must admit that I and am completely hooked!
I wanted to thank you for making this pattern available. The instructions are so clear and I’m learning tons from it.
So thank you!
Nicole from Israel
Dedri Uys says
Nicole, I am so pleased that you find the instructions clear. I hope the rest of your journey is educational (and not too stressful) :)
Marcelle says
Hi Dedri
I just want to say thank you for the Sophie’s Universe pattern. I am totally enjoying crocheting this blanket. It is my first time crocheting this technique and I must say that your instructions are so clear, it makes it easy to follow. I have just completed the roses and I love them. It was so exciting seeing the stitches form a rose. You are so clever!
Dedri Uys says
Hi Marcelle. Thank you!
Kris says
Agree! I love this pattern. I’ve crocheted before and knit quite a few things but this pattern keeps me interested because every row is so very different from the others. Thank you for putting this where anyone can learn to crochet!
Dedri Uys says
Thank you and you are most welcome :)
DIanne Paternoster says
Hi Dedri…..
I want to also thank you soooooo much for making your stunning pattern available…….I was feeling a bit depressed…..when I stumbled across a pic of Sophie’ s Universe….and then…OMG…..just couldn’t get to wool shop quick enough to get started!
My 28 yr old son….loves it. So now I’m working on 3 at the same time…….one way to reinforce the stitches in my brain.
I have crocheted on and off over many years…….but never been any good at following patterns!.
But not with your design!!,…your pics are soooo clear…and your instructions very understandable!
If I get stuck with a certain stitch……..I go to utube….and check out…..the Squirrel lady…hehehe……she is just awesome too. Thankyou for allowing her to demonstrate your design!
Again I can’t thank you enough………I am thoroughly enjoying the whole process…….and just loving all the stitches!!!……cheerio from Dianne in Australia.
Jenny says
Wow Dianne! 3 Sophies at once? You deserve an award :)
We are so glad you are enjoying your journey. Do share some photos with us via the FaceBook page!
Jenny :)
Melea says
Hi Dedri
I have a question about blocking. I am using the Scheepjeswol stonewashed yarn. What method of blocking do you suggest?
Dedri Uys says
Hi Melea. I wetblock all my projects. I simply wet them and them pin them to exercise mats to dry.