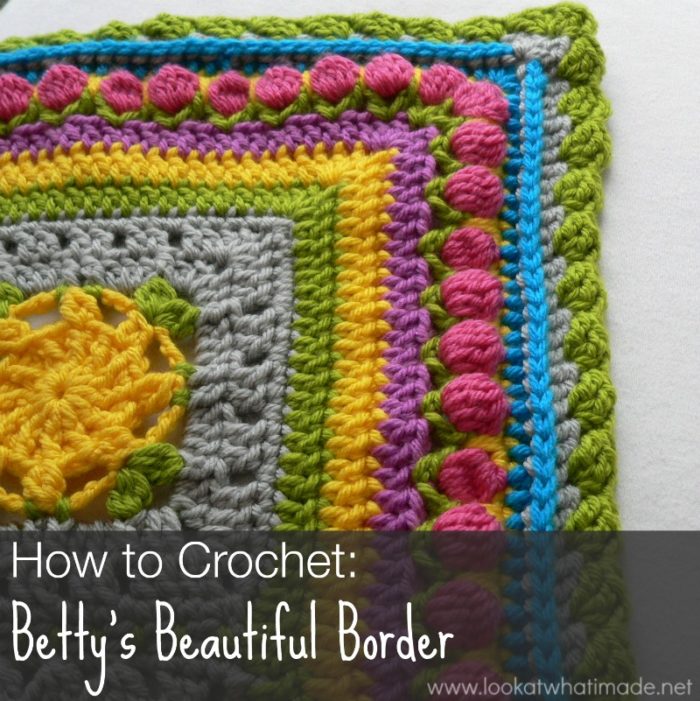
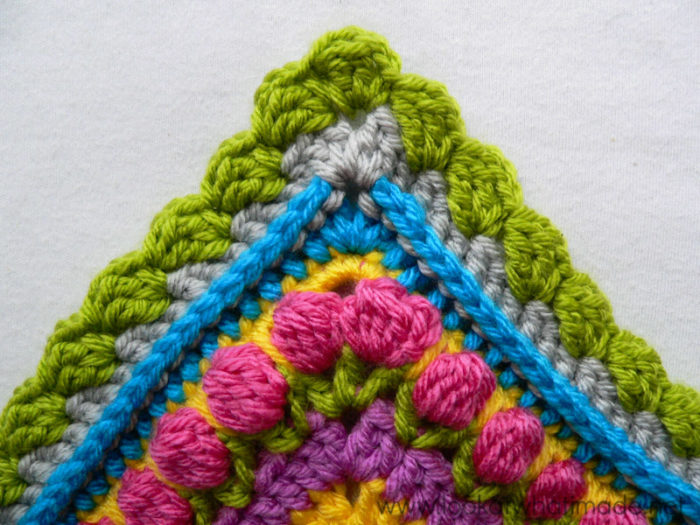
In this tutorial I will be showing you how to make Betty’s Beautiful Border. This border was designed by Betty Byers and I am very excited to be sharing it here on Lookatwhatimade. I will also be sharing Betty’s completed afghan with you some time next week, so if you are curious to see how the CAL squares, Sophie’s Garden, and this border came together, remember to pop back!
Thank you so much for this gorgeous design, Betty! And for letting me do a tutorial for it.
This border was originally designed by Betty Byers for the Block a Week CAL 2014. If you are going to use it to complete the Sophie’s Universe CAL 2015, please read Part 20 of Sophie’s Universe before continuing.
Betty’s Beautiful Border Photo Tutorial
© Betty Byers and Dedri Uys 2014. All Rights Reserved.
Adding a Base Round to Your Afghan Before Adding a Crochet Border
Before you start Round 1 of this border you will need a multiple of 3 + 1 stitches along each side, not including the 4 corner spaces/stitches of your afghan.
I suggest adding a “base” round all the way around your afghan, working into each stitch, “inside corner”, and join (if necessary). Make sure that you end up with multiples of 3 + 1 stitches along each side. This stitch count should include the 2 corner dc’s at the start and end of each side). Skip a stitch or two if you need to to make the stitch count work.
When working into the “inside corners” feel free to use taller stitches (tr’s instead of dc’s in this case) if you feel that the squares “dip” too much at that point.
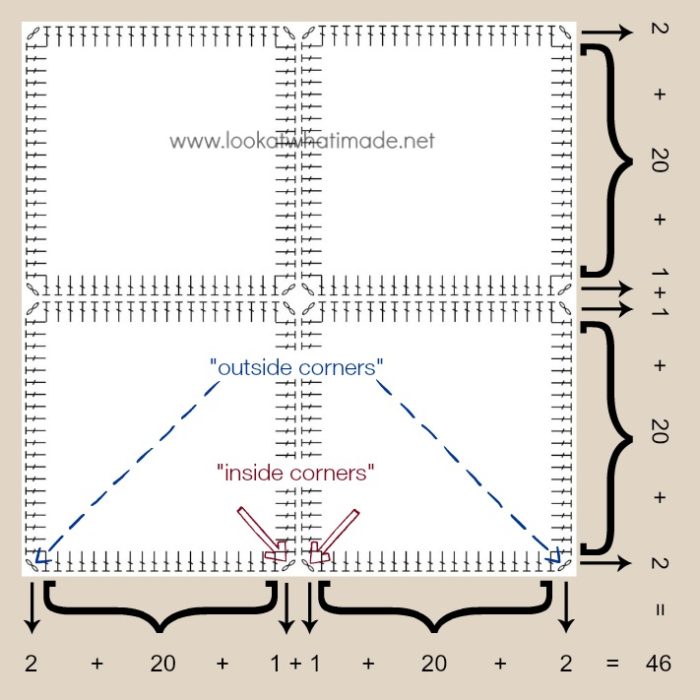
As illustrated in the picture below, my squares each have 20 stitches per side. There are 2 “inside corners” and 2 “outside corners” on each side of my tiny pretend afghan.
I will be making 42 dc’s along each side and (2 dc, ch 2, 2 dc) in each corner.
This breaks down to {2 + 20 + 1 + 1 + 20 + 2 = 46}, so my “base” round will have 46 dc’s along each side and 4 ch-2 corner spaces.
46 = (15 x 3) + 1
Once you have a base round of multiples of 3 + 1 stitches, you can start making your border.
This base round will also help you determine whether or not you should go up or down a hook size for your border.
- If this round becomes wavy, go down a hook size (or possibly two) when you start the border. Unless the waviness is massively obvious there is no need to frog this round. A little bit of waviness will disappear if you go down to the correct hook size.
- If this round puckers, go up a hook size (or two). Unfortunately there is no way to fudge puckering. You will need to frog whatever you have done and try again with a larger hook. If this round then starts being wavy, the hook you have chosen is too large and you will need to find something in between the two.
Special Stitches
- V-stitch – (Dc, ch 1, dc) in the same stitch
- First Bobble stitch – Ch 3. (Yarn over and insert your hook into the same stitch. Yarn over and pull up a loop. Yarn over and pull through 2 loops) twice. There should now be 3 loops on your hook. Yarn over and pull through all 3 loops on your hook – see this tutorial.
- First Dc5tog Bobble – Ch 3. (Yarn over and insert your hook into the same stitch. Yarn over and pull up a loop. Yarn over and pull through 2 loops) 4 times. There should now be 5 loops on your hook. Yarn over and pull through all 5 loops on your hook.
- Subsequent Dc5tog Bobbles – Video Tutorial by Tamara from Moogly
- Modified Treble Bobble – Sc in the indicated stitch/space. Ch 3. Yarn over twice and insert your hook into the stitch/space that already contains your sc. (Yarn over and pull through 2 loops) twice. Yarn over twice and insert your hook into the same stitch/space. (Yarn over and pull through 2 loops) twice. You should now have 3 loops on your hook. Yarn over and pull through all 3 loops on your hook.
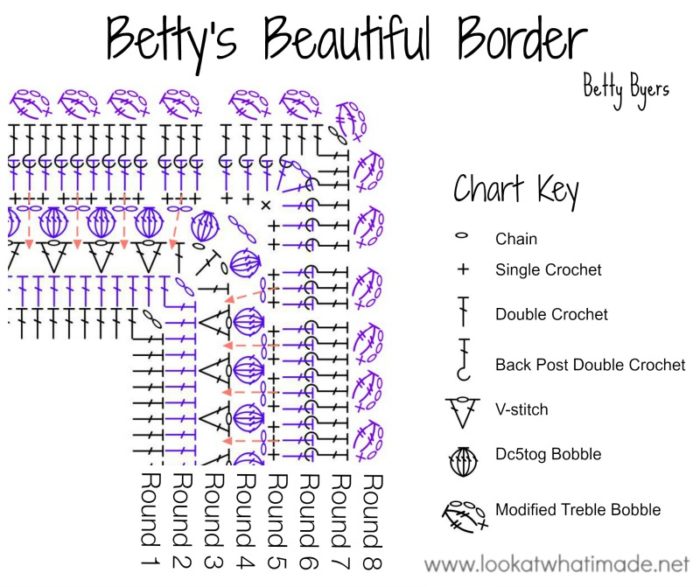
Chart
Translations
- Dutch Translation by Dianne Baan
- German Translation by Maja Heidingsfelder
- Spanish Translation by Lynda Hernandez
Instructions
You can find a written-only pdf for this border HERE. Please note that it only contains the instructions, not any of the abbreviations/special stitch instructions. It also does not contain the base-round information found above.
Round 1
Join your yarn by making a standing double crochet in any ch-2 corner space around. (Dc, ch 2, 2 dc) in the same ch-2 corner space. This is your first corner made. *Dc in each stitch across. Don’t accidentally skip that first (hidden) stitch. (2 dc, ch 2, 2 dc) in the next ch-2 corner space.*
Repeat from * to * 3 more times, omitting the last corner on the last repeat. Join to the top of the standing double crochet with a sl st.
Make sure that you end up with multiples of 3 + 2 stitches along each side.
Fasten off and work away your tails of yarn.
Stitch Count Along Each Side: Multiples of 3 + 2 stitches (not including corner ch-2 spaces)
Round 2
Join your yarn by making a standing double crochet in any ch-2 corner space around. (Dc, ch 2, 2 dc) in the same ch-2 corner space. This is your first corner made. *Dc in each stitch across. Don’t accidentally skip that first (hidden) stitch. (2 dc, ch 2, 2 dc) in the next ch-2 corner space.*
Repeat from * to * 3 more times, omitting the last corner on the last repeat. Join to the top of the standing double crochet with a sl st.
Make sure that you end up with multiples of 3 stitches along each side.
Fasten off and work away your tails of yarn.
Stitch Count Along Each Side: Multiples of 3 stitches (not including corner ch-2 spaces)
Round 3
Join your yarn by making a standing double crochet in any ch-2 corner space around. (Ch 1, dc, ch 1, dc) in the same ch-2 corner space. This is your first corner made.
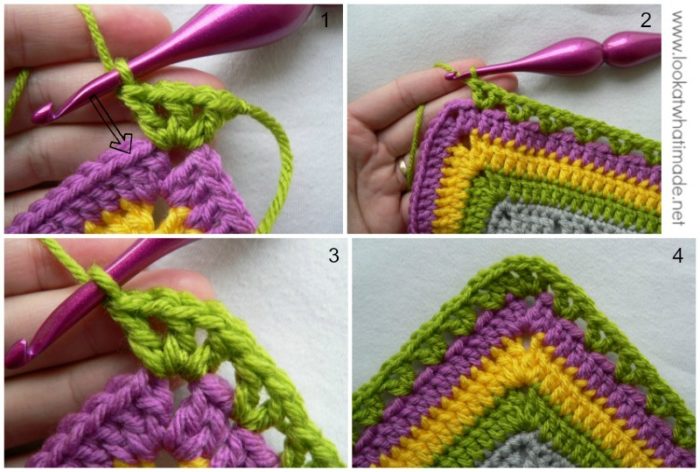
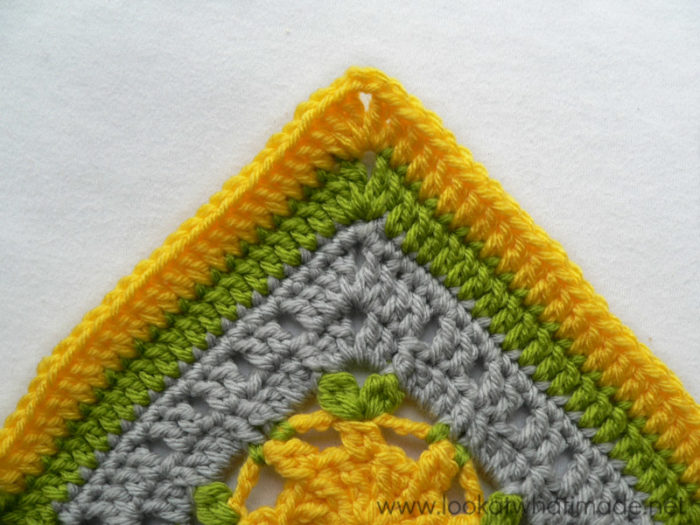
*Skip the first stitch. (Dc, ch 1, dc) in the next stitch (indicated with an arrow in Photo 1). This is your first V-stitch made. (Skip the next 2 st’s. V-stitch in the next stitch) across. The last V-stitch should fall in the second to last stitch of the side (Photo 2). Skip the last stitch. (Dc, ch 1, dc, ch 1, dc) in the next ch-2 corner space (Photo 3).*
Repeat from * to * 3 more times, omitting the last corner on the last repeat. Join to the top of the standing double crochet with a sl st. Fasten off and work away your tails of yarn.
Round 4
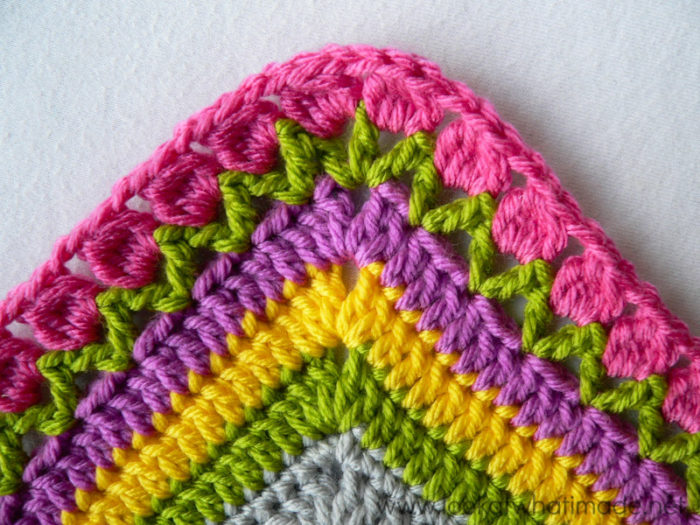
IMPORTANT: I have done this round with the right side facing, but I STRONGLY suggest that you do this round with the wrong side of your blanket facing you. These Dc5tog Bobbles have a natural tendency to pop out to the back, and although you can MAKE the Bobbles pop out to the front, they really, really, really want to pop out to the back. So if you do this round with the wrong side facing you, your bobbles will be GORGEOUS!
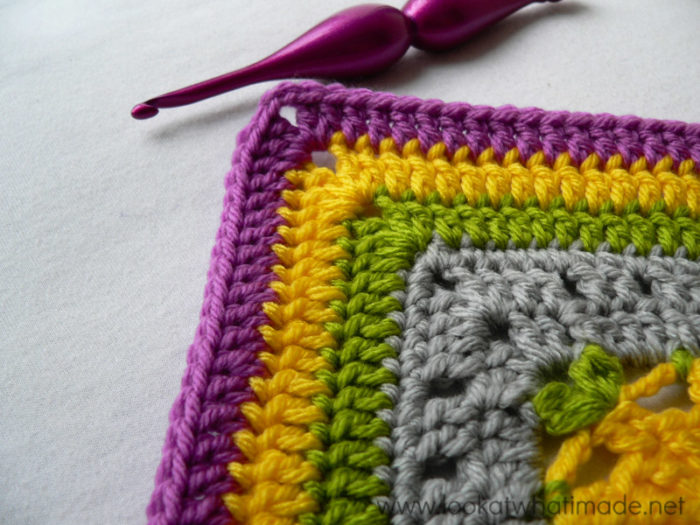
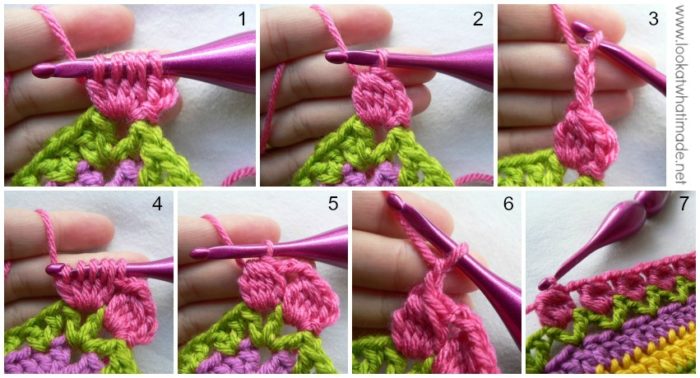
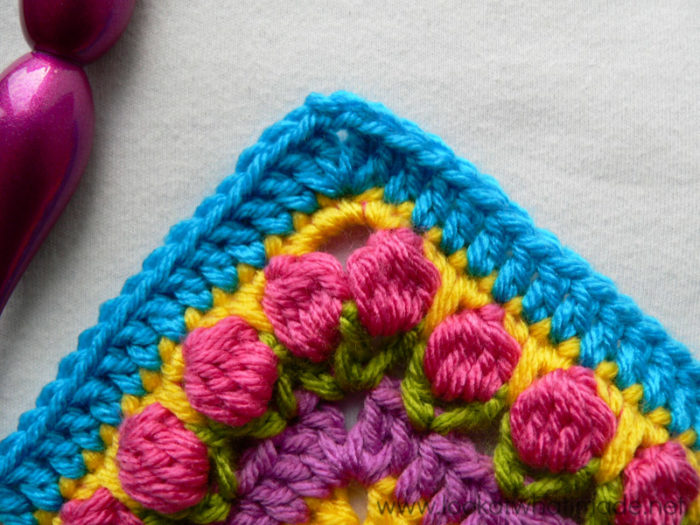
Join your yarn by making a sl st in the first ch-1 space of any corner around. Make a First Dc5tog Bobble (see Special Stitches above) – Photos 1 and 2. Ch 3 (Photo 3) and make a Dc5tog Bobble in the next ch-1 space (Photos 4 and 5). This is your first corner made.
*Ch 2. (Dc5tog Bobble, ch 2) in each ch-1 space across (Photo 7). When you get to the next corner, make a Dc5tog Bobble in the first ch-1 space of the corner. Ch 3 and make a Dc5tog Bobble in the next ch-1 space of the corner.*
Repeat from * to * 3 more times, omitting the last corner on the last repeat. Join to the top of the First Dc5tog Bobble with a sl st. Fasten off and work away your tails of yarn.
Round 5
- If you did Round 4 with the wrong side facing you, remember to turn at the start of this round so that you are again working with the right side facing you.
- When making the extended sc’s, make a sc as normal, but pull the loops up to the height of the Dc5tog Bobbles before completing the sc.
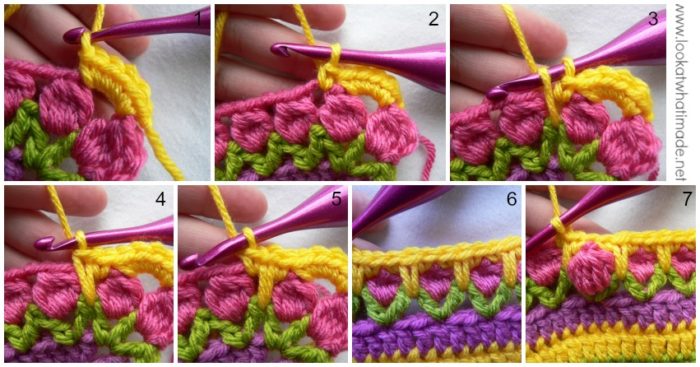
Join your yarn by making a standing single crochet in any ch-3 corner space around. Make 4 more sc’s in the same ch-3 space (Photo 1). This is your first corner made.
*(Sc in the next ch-2 space. Make an extended sc between the 2 dc’s from Round 3, directly below the ch-2 space. Sc in the same ch-2 space) for each ch-2 space across. See Photos 2 – 6. Make 5 sc’s in the next ch-3 corner space.*
Repeat from * to * 3 more times, omitting the last corner on the last repeat. Join to the top of the standing single crochet with a sl st. Fasten off and work away your tails of yarn.
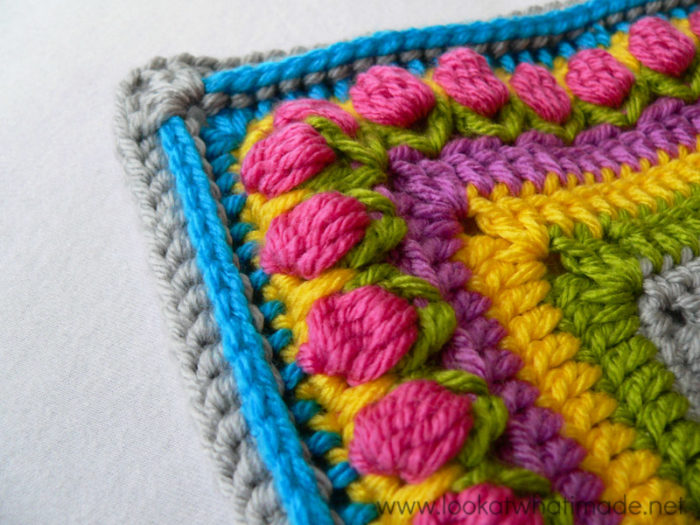
In Photo 6 you will see that the bobbles from Round 4 naturally pop to the back (see the note at the start of Round 4) and in Photo 7 you will see that you CAN push them to the front if you need to.
Stitch Count Along Each Side: Multiples of 3 + 1 stitches (not including the central sc of the 5-sc corner)
Round 6
Join your yarn by making a standing double crochet in the central sc of any 5-sc corner. (Dc, ch 2, 2 dc) in the same stitch. This is your first corner made. *Dc in each stitch across. Don’t accidentally skip that first (hidden) stitch. (2 dc, ch 2, 2 dc) in the central sc of the next 5-sc corner.*
Repeat from * to * 3 more times, omitting the last corner on the last repeat. Join to the top of the standing double crochet with a sl st.
Make sure that you end up with multiples of 3 stitches along each side.
Fasten off and work away your tails of yarn.
Stitch Count Along Each Side: Multiples of 3 + 2 stitches (not including corner ch-2 spaces)
Round 7
Join your yarn by making a standing double crochet in any ch-2 corner space around. (Dc, ch 2, 2 dc) in the same ch-2 corner space. This is your first corner made. *Bpdc in each stitch across. Don’t accidentally skip that first (hidden) stitch. (2 dc, ch 2, 2 dc) in the next ch-2 corner space.*
Repeat from * to * 3 more times, omitting the last corner on the last repeat. Join to the top of the standing double crochet with a sl st.
Make sure that you end up with multiples of 3 stitches along each side.
Fasten off and work away your tails of yarn.
Stitch Count Along Each Side: Multiples of 3 stitches (not including corner ch-2 spaces)
Round 8
Note: In Round 8 I used a Clover Amour 4 mm instead of the Furls 4 mm, because I wanted the stitches in this round to be slightly tighter and the Clover is ever so slightly smaller than the Furls. You do not have to change your hook size. I am just telling you what I did, and why.
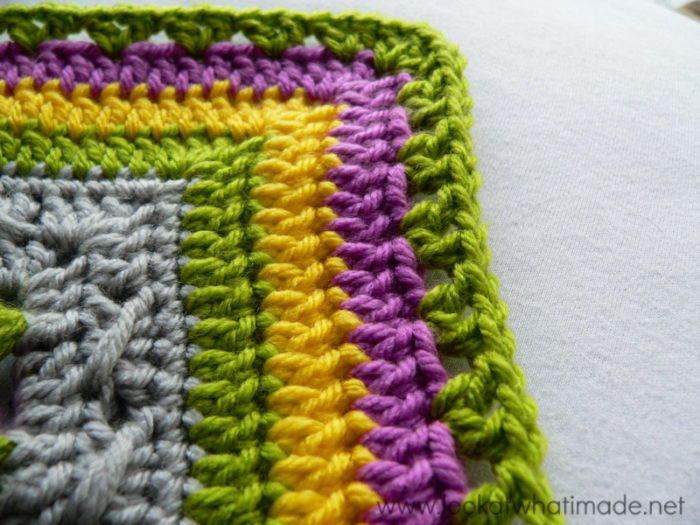
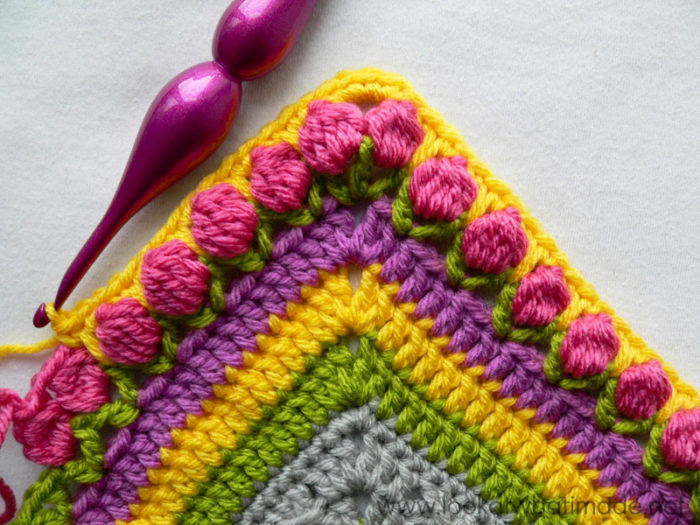
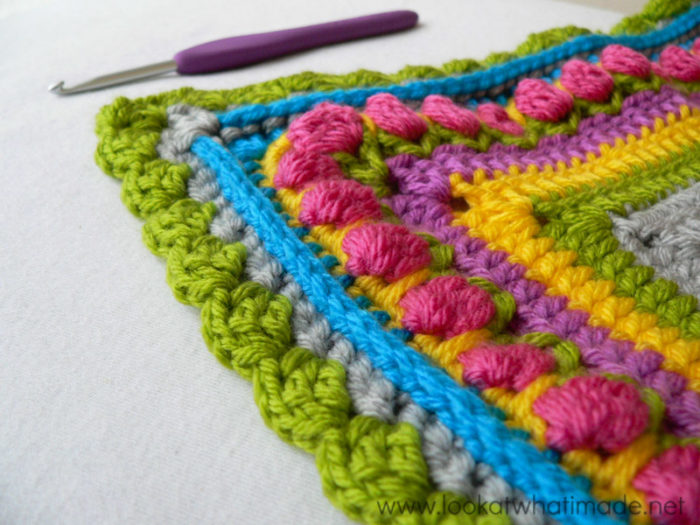
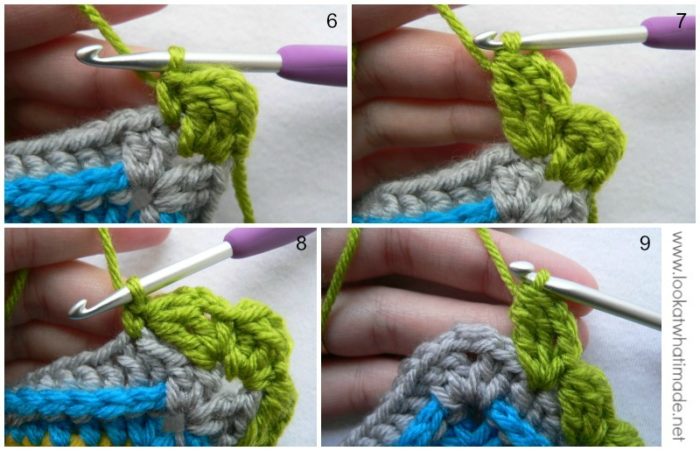
Join your yarn by making a standing single crochet in any ch-2 corner space around (Photo 1). Ch 3 (Photo 2). Yarn over twice and insert your hook into the same ch-2 space. (Yarn over and pull through 2 loops) twice (Photo 3). Yarn over twice and insert your hook into the same ch-2 space. (Yarn over and pull through 2 loops) twice. You should now have 3 loops on your hook (Photo 4). Yarn over and pull through all 3 loops on your hook. This is your first Modified Treble Bobble made – see Photo 5.
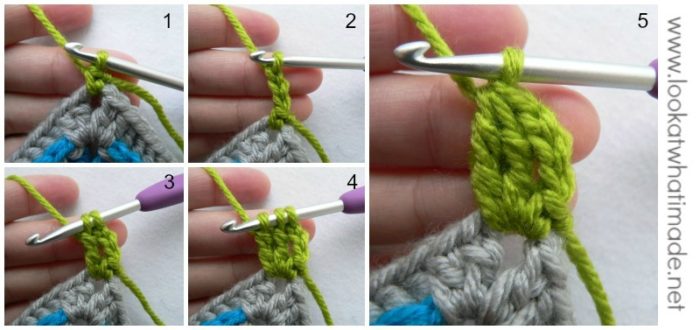
* (Make a Modified Treble Bobble in the next stitch – see Photos 6 and 7. Skip the next 2 st’s) until you get to the next ch-2 corner space (Photo 9). Make a Modified Treble Bobble in the ch-2 corner space (as before).*
Repeat from * to * 3 more times, omitting the last Modified Treble Bobble on the last repeat. Join to the top of the standing single crochet with a sl st. Fasten off and work away your tails of yarn.
If you would like some help with joining your crochet squares and deciding on a layout, have a look at these posts:
Joining Crochet Squares Series:
- Part 1: Preparing to Join Your Afghan
- Part 2: (Sc, ch 1, skip 1) Join
- Part 3: Different ways to Join – a comprehensive list of joining techniques
- Part 4: Joining Squares With Different Stitch Counts
- Part 5: Making Foursquares

This blog post contains affiliate links. I only link to products I personally use or would use. All opinions are my own.


Joana Baden says
Hello Deidre! For using this border for CAL 2014 what colors do you recommend?
Jenny says
Hi Joana.
Have a look here for suggestions
Here.
Hope that helps.
Jenny
Robin Atkins says
Hi Dedri, I am going to try this border on a crocheted hexie quilt. The top and bottom are strait-edged. But the sides are picot shaped, with 60 degree angles at the points. What would you suggest for the outer corners, since it’s not a 90 degree turn as in the squares you did? Do you think 1 dc, ch 2, 1 dc would be enough? Thanks for your reply… I’ll check back soon, or you can email me. You are amazing! BTW, I have used bead embroidery the same, healing, meditative way that you use crochet for 30 years. Now it’s shifting to crochet in the last year. I’d love to send a photo of what I’m doing… Robin
Dedri Uys says
When I border hexie blankets, I make the corners as you suggested: (dc, ch 2, dc). This will affect the repeats in subsequent rounds as you will have less stitches, but you can just fudge the corners.
Dedri Uys says
ps. You can use the contact me tab at the top of this website to send me an email. When I respond, you can send me a photo.
Robin Atkins says
This is absolutely THE BEST photo tutorial I have ever seen… terrific step-by-step photos, great directions. I love it!!! And, I will be using it soon :) THANK YOU!
Dedri Uys says
Thank you, Robin :)
Kt says
Hi there
I am currently working on your fab blanket boarder :) I have got to round 7 your blue and I am going in the back loop of last round but it isn’t looking as exciting as yours :( Your blue sticks out as a stitch mine is looking like another row of DC. I am doing something wrong?
Dedri Uys says
Hi, Round 7 is worked around the back post, not in the back loop. That is what makes it look more prominent. Just have another look and see if it makes more sense now?
Dedri
Linda says
Oh, I’m gonna miss my Sophie, when I’ll be done ;-)
Lucky me, I still have blocks and extra borders to do.
Is there any chance, tha Betty’s Beautiful Border will be translated to danish?
I think I will re-use some of the rounds from the Sophie to extend, but it will be lovely, with a different border as a finish – and this is stunning.
Thank you for the CAL, Dedri. It is absolutely the wildest crochet-work I’ve ever done. And I have to make another ;-)
Jenny says
I am not sure about that Linda. I am sure Dedri will be able to let you know :)
Rona Griffiths says
thank you for this wonderful tutorial Betty and Dedri, I love this border and have used it twice now in different colours on different blankets it looks so lovely when completed, thank uou both again, Rona xxxoo
Dedri Uys says
You’re welcome, Rona :)
Linda says
This is an amazing border.I was stuck on a border for my son’s throw and had put it aside for weeks an then this came up ! Wonderful just wonderful! Thank you so much for sharing.
DIvya says
Hi Dedri,
Thank you for this beautiful pattern. your tutorials have been so accurate and amazing, crocheters of all levels have been very satisfied with the this pattern. God bless you and your imaginative brain for bringing this creative venture to all of us.
A quick question – I plan on doing betty’s border immediately after row 113, do i still have to do a base round?
I’m in the middle of moving from the US to India, I’ll be travelling on the 31st. Between the wrapping up and cleaning, I am unable to focus and calculate this query of mine, hence I am writing to you.
Thank you for all your hardwork!
Dedri Uys says
Hi and thank you for your comment.
Below materials you will find bullet points that tell you what to do for each instance. There you can see that, when continuing straight after Round 113, you will either need to add a base round to get to a stitch count of multiples of 3 + 1, OR skip the first 2 rounds of Betty’s border entirely. Both these options will work. It just depends on how many rounds you want to add.
I hope that helps. Good luck with the move!
Ann says
Diagrams! (Or do you call them charts?) I’m so pleased to see these! I still haven’t finished Sophie’s Universe, and I’m still getting confused in some places. Descriptions and photographs are great, but diagrams can often clarify an awkward point. I appreciate that to do complete diagrams for a pattern as complex as Sophie would be difficult, but they would be SO helpful, and could probably be done more easily section by section. I love this pattern, but have to admit I’ve been tempted to give up on a few occasions! But I haven’t done so yet….
Nanou says
MERCI beaucoup !
COTTEL says
Travail magnifique et merci merci beaucoup de partager votre savoir
Melissa Martin says
Beautiful border! I will definitely bookmark this for later. Thanks for such a great tutorial.
Dedri Uys says
You are most welcome. I love Betty’s design :)
Carmen says
Buen día y gracias por todo. ¿como se hace el centro de este cuadrado?. El gráfico, ¿es la unión de cuatro cuadrados?.
Un saludo,
Carmen
Dedri Uys says
Carmen, the chart is only for the border. The pattern for the squares has not been released yet.
Jodi says
Beautiful! Very inspired to make my squares after seeing everyone’s blankets coming together :)
In a previous post you said that Betty had kept track of the amount of yarn she had used, had this information been released yet?
Thanks in advance Jodi xx
Dedri Uys says
Not yet, Jodi. I will be sharing that when I share Betty’s completed blanket. I am hoping to do that on Wednesday, but it might be later in the week.