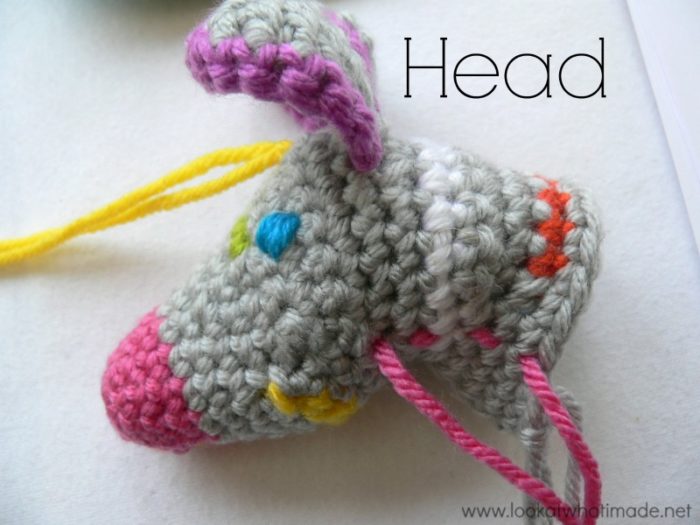
This Zebra head is a collaboration between Anette Bak and myself. It is not a stand-alone pattern and should be used in conjunction with the rest of the Little Zoo Zebra parts.
This is a photo tutorial for making the head only. Find the rest of the parts here.
Crochet Zebra Head
© Anette Bak and Dedri Uys 2014. All Rights Reserved.
Materials
As indicated in the relevant pattern
Abbreviations
US Terminology used. Find the US/UK comparison chart here.
- CC – Contrasting colour (black)
- MC – Main colour (white)
- Ch – Chain
- RSM -Running stitch marker (see below)
- Sc – Single crochet
- Sc Inc – Single crochet increase
- Sc2tog – Single crochet 2 together (single crochet decrease)
- Sl st – Slip stitch
- Standing sc – Standing single crochet (see this tutorial)
- St/st’s – Stitch/stitches
- * – Repeat all instructions between asterisks the amount of times specified. *Sc inc, 3 x sc* x 2, for example, will mean “sc inc in the next st, sc in the next 3 st’s, sc inc in the next st, sc in the next 3 st’s”
- ( ) – Numbers in parentheses at the end of each row/round are stitch counts
Notes
Magic Ring
If you are not familiar with working into a magic ring, see this tutorial by Tamara from Moogly.
Colour Changes
- Change colour on the last yarn over of the last stitch before the colour change.
- Whenever you work in the CC, carry your MC yarn along by crocheting over it.
To make it easier for you to see where the stitches go and which row/round is which, I am using grey for the MC and a whole bunch of colours for the CC parts.
***See the bottom of this post for alternative stripes on neck and body***
Running Stitch Marker (RSM)
I use (and advise you to use) a running stitch marker. This is just a piece of scrap yarn that gets flicked backward/forward over your work before making the first stitch of the next round. The scrap yarn will form a running stitch up the side of your work. This will help you keep track of the first stitch of each round, which will fall over the scrap yarn.
When I say “this will bring you to the scrap yarn”, I mean that your next available stitch should be the one over the scrap yarn.
Only use the running stitch marker where indicated in the pattern with RSM.
Short Rows
This pattern uses short rows. Short rows are just rows that do not begin or end where rows traditionally begin or end and are used for shaping. Because you will turn at the end of most of the short rows, I have indicated with (Inside) or (Outside) whether a specific short row should be worked around the inside of the head or the outside.
Tutorials and Resources
If you need help with working in a spiral (in other words, in rounds that do not end with a sl st join), you can see this tutorial.
Head
(Make 1, unless you are making more than one Zebra, of course.)
Nose
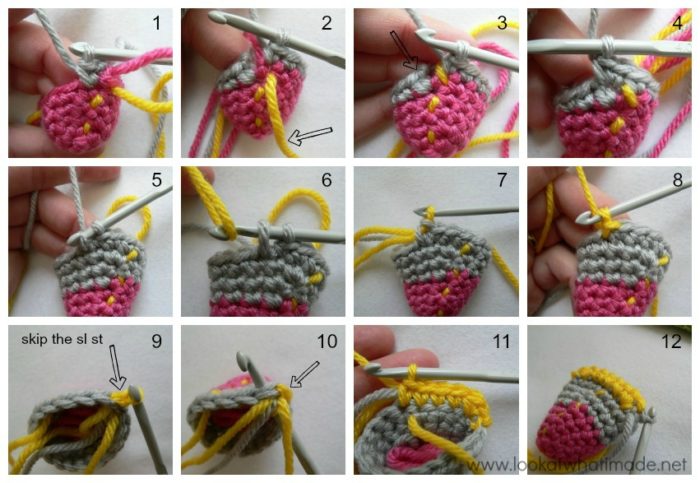
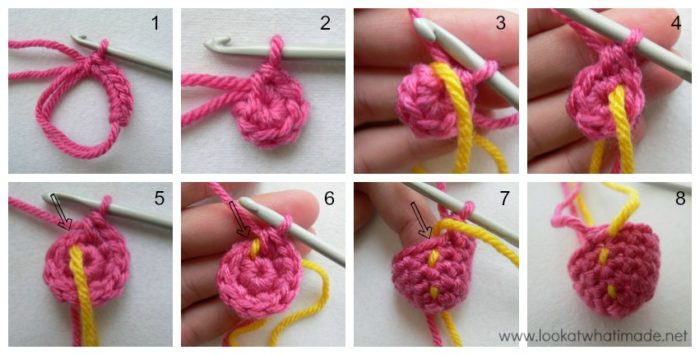
- With CC and working into a magic ring: ch 1, 6 x sc. Place a piece of scrap yarn over your work before making the first stitch of the next round (Photos 1 – 3). Continue on in a spiral, making the first st of the next round in the first st of this round. See Tutorials and Resources above if you are not familiar with working in a spiral. (6)
- 6 x sc inc. The last sc increase of the round should fall in the stitch before the running stitch marker (Photo 5). Flick the RSM back over your work before making the first st of the next round (Photo 6). (12)
- 12 x sc. RSM. (12)
- 12 x sc. RSM. (12)
- 12 x sc. RSM. (12)
Sl st in the next st (indicated with an arrow in Photo 7). Ch 1 and bind off.
Head
- Join your MC yarn by making a standing sc in the same st as the sl st join on the nose (Photo 1). Make 12 more sc’s. The last st should fall in the back of the sl st join from the nose (Photo 2). You are essentially adding a stitch by working into the stitch containing the sl st AND into the back of the sl st. Flick your scrap yarn back over your work (RSM) – see Photo 3. (13)
- Sc inc in the standing sc (indicated with an arrow in Photo 3 and illustrated in Photo 4). 5 x sc, sc inc, 6 x sc. RSM. (15)
- *Sc inc, 4 x sc* x 3. RSM. (18)
- Short Row (Outside): 4 sc, change to CC (Photos 5 – 7). I have used yellow here. Sl st in the next st (Photo 8) and TURN, leaving the remaining st’s of Round 3 unworked. (4)
- Short Row (Inside): skip the sl st (indicated with an arrow in Photos 9 and 10). Sc inc, 4 sc (Photo 11), sc inc, change to MC, sl st in the next st and TURN. Photo 12 illustrates what the head should look like at this point after turning. (8)
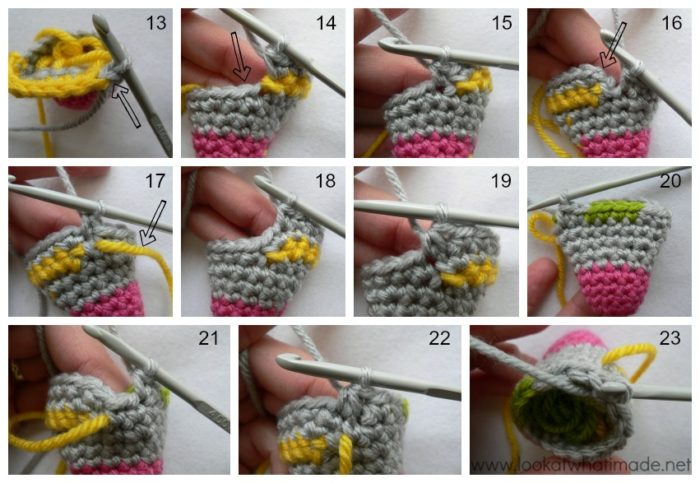
- (Outside): skip the sl st (indicated with an arrow in Photo 13). Sc inc, 6 x sc, sc inc. This will bring you to the “step” at the beginning of the previous short row. Starting in the first available st after the “step” (indicated with an arrow in Photo 14 and illustrated in Photo 15), 10 x sc into the stitches of Round 3. This will bring you to the “step” at the beginning of Round 6. RSM. (20)
- Starting in the first st of Round 6 (in other words, the first st after the “step” – see Photos 16 and 17): 9 x sc (Photo 18), sc2tog (Photo 19), 2 sc. Change to CC. 4 x sc. Change to MC. 2 x sc (Photo 20), sc2tog (Photo 21). Note that the sc2tog will fall in the last stitch of the previous round and the first stitch of this round (in other words, on either side of the running stitch marker – see Photo 22). Sl st in the next st and TURN. Photo 23 shows the end of this round after turning. (19)
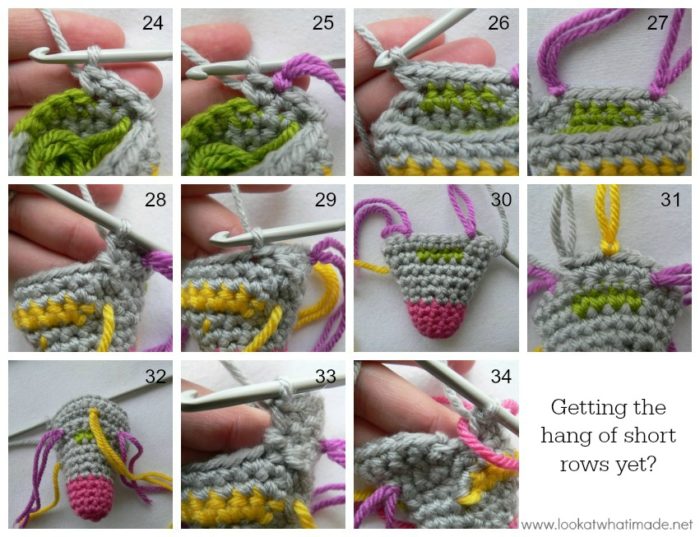
- Short Row (Inside): skip the sl st. 2 x sc, sc inc (this sc inc should fall in the last MC st – see Photo 24). Mark the first sc of the sc inc with a stitch marker (Photo 25) so that you can find it later when attaching the eyes. 3 x sc, sc inc (Photo 26). Mark the last stitch of the sc inc with a stitch marker (Photo 27) so that you can find it later when attaching the eyes. 2 x sc, sl st in next st and TURN (Photo 30 shows this row completed after turning). (11)
- Short Row (Outside): skip the sl st. 4 x sc, 3 x sc inc. Mark the first sc of the second sc increase with a st marker (Photo 31). You will begin adding the mane to this stitch later on. 4 x sc. This will bring you to the “step” at the beginning of the previous short row (Photo 28). Sl st in the next st of Round 7 (Photo 29) and TURN. (14)
- Short Row (Inside): Skip the sl st. 6 x sc, 2 x sc inc, 6 x sc. This will bring you to the “step”. Sl st in the next available st of Round 7 and TURN. (16)
- (Outside): Skip the sl st. 16 x sc (Photo 32). This will bring you to the “step” (Photo 33). Sc in the next 5 st’ of Round 7. This becomes the new beginning of your rounds. Use a new piece of scrap yarn as a running stitch marker and lay it over your work before making the first st of the next round (Photo 34). (21)
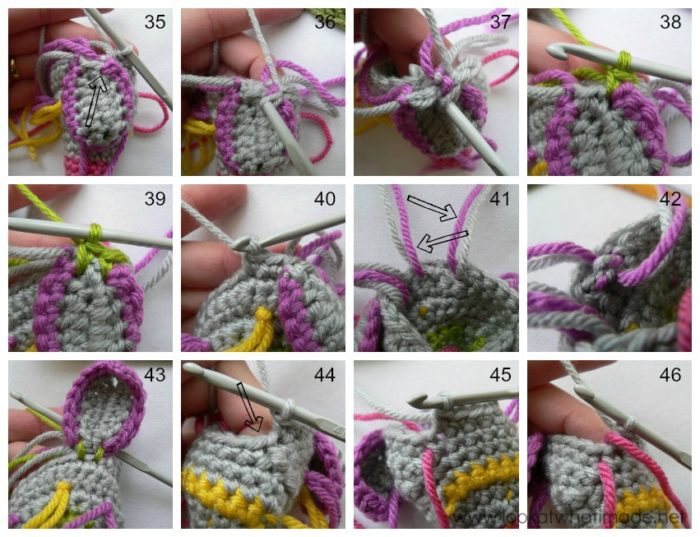
- You will be attaching the ears in this round. Starting in the first st of Round 11: 5 x sc. Attach the first ear to the head by making 2 sc’s through the bottom of the ear AND the next 2 st’s of the head. To do that, place the ear in front of the head, upside down and with the wrong side facing you (Photo 35). Insert your hook into the stitch on the ear that contains the CC standing sc (indicated with an arrow in Photo 35) and into the next st of the head (Photos 36 and 37), and make a sc through both layers (Photo 38). Then, insert your hook into the st on the ear containing the CC sl st and into the next st of the head, and make a sc through both layers (Photo 39). Sc into the next 2 st’s of the head (Photo 40). Attach the second ear by making 2 sc’s through both the ear and the head (as before). 5 x sc, skip the next st (indicated with an arrow in Photo 44), 4 x sc. This will bring you to the new running stitch marker (Photo 45). Flick the RSM back over your work (Photo 46). I usually knot the tails of yarn from each ear together (Photos 41 and 42). (20)
- *4 x sc, sc2tog* x 2. 5 x sc, 2 x sc inc. Change to CC – white in this case. Sc in the last st. RSM. (20)
- Short Row (Outside): 6 sc, sc2tog, 6 sc. Change to MC. Sl st in the next stitch (Photos 47 and 48) and TURN. (13)
- Short Row (Inside): skip the sl st. 11 x sc. Sl st in the next st and TURN. At this point there should be 2 CC st’s from Short Row 14 left unworked (Photo 49). (11)
- Short Row (Outside): skip the sl st. 11 x sc. This will bring you to the “step”. Sc inc in each of the next 3 available st’s of Round 13. Sc in each of the last 2 st’s of Round 13. RSM (Photo 50). (19)
- Sc in the next st (this sc should fall in the unworked CC st before the “step” – see Photo 50). Starting in the first st of Short Row 16 (in other words, the first st after the “step”), 11 x sc. Sc inc, 4 x sc, sc inc, 2 x sc. RSM. (22)

- 2 x sc. Change to CC – orange, in this case. 9 x sc. Change to MC. 11 x sc. RSM (Photo 51). (22)***
- 22 x sc. Don’t bind off. You will continue to make the body in the next round. (22)***
Stuffing the Head and Adding the Eyes
This is a good time to stuff your zebra’s head, making sure that you push the stuffing all the way into the nose.
If you are using safety eyes, this is a good time to attach them. If you are going to embroider your eyes, feel free to do this once you have completed your zebra. See Eye Placement below.
Eye Placement
Insert/embroider your eyes over stitch containing the stitch markers from Short Row 8 (Photo 52). In Photos 53 and 54 you will see that I embroidered the eyes slanting upwards. I have decided that I actually like it more if the eyes slant to the side.
“Aw, shucks, I didn’t bother marking those stitches!”
There is a CC band across the zebra’s nose (Photo 54). In the first and last CC stitches, right above the CC band, you will find two single crochet increases (one on either side). Insert your eyes in the outermost stitch of each increase.
Mane
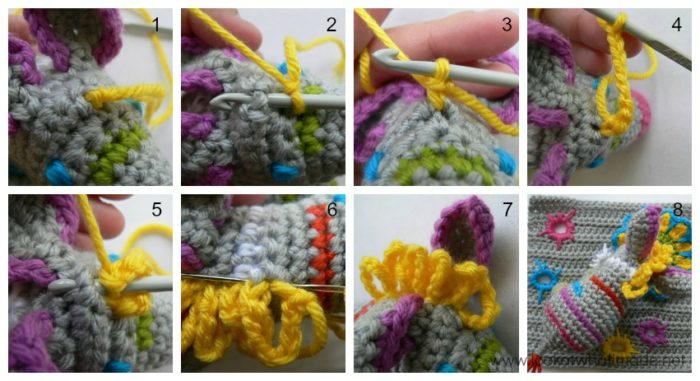
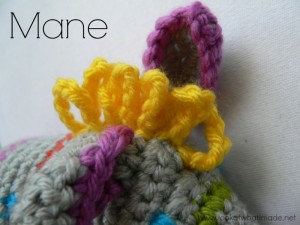 You are going to make the mane by working into the rows up the center of the head, starting in the marked stitch from Short Row 9.
Work away your tail of yarn by threading it in and out of you work along the bottom of the mane (Photo 6). You don’t HAVE to work it away this way, but it gives the mane a cleaner appearance where it meets the head.
***Alternative Stripes For Neck and Body
After making the Zebra numerous times, Anette has changed the placement of the stripes on the neck and the start of the body so that they are more symmetrical. You can apply these changes by following the following instructions instead of the ones supplied in the pattern.
Head
- 22 x sc. RSM (22)
- 21 x sc. Change to CC. Don’t bind off. You will continue to make the body in the next round. (22)
Body
- Bridge Row: 7 x sc. (Ch 3 if you want to make a flower string to attach the Zebra to a mobile). 4 x sc. This will become the new start of your rounds. Place a piece of scrap yarn over your work as before and continue with the next round. (11)
- *Sc inc, sc* x 2. Change to MC. *Sc inc, sc* x 5. Sc inc. 7 x sc. (30)
Remember to subscribe to my newsletter if you would like to be kept in the loop. You can also like my Facebook page or follow me on Bloglovin or Google+.
Happy Hooking!




natali says
4. Short Row (Outside): 4 sc, change to CC (Photos 5 – 7). I have used yellow here. Sl st in the next st (Photo 8) and TURN, leaving the remaining st’s of Round 3 unworked. (4)
I don’t understand this part of the head, I have tried it several times and just can’t it right. Do I turn after row 3? Is that the meaning of (Outside)?
Thank you so much for all your great patterns and for offering them free. I’m a beginner and still struggling a bit.
Dedri Uys says
Hi Natali.
When working in the round, the outside of your work is always facing you, but when working in rows the outside will only face you on alternate rows. The (outside) and (inside) is to tell you if you should be working with the outside of the head facing you, or the inside.
You don’t turn at the end of Round 3. You keep going in the same direction (with the outside facing you as if you are working in a round), but you stop once you have made the sl st in Short Row 4 (which won’t be a complete round) and then you turn. So you will be working round 5 in the opposite direction with the inside of the head facing you.
I hope that helps,
Dedri