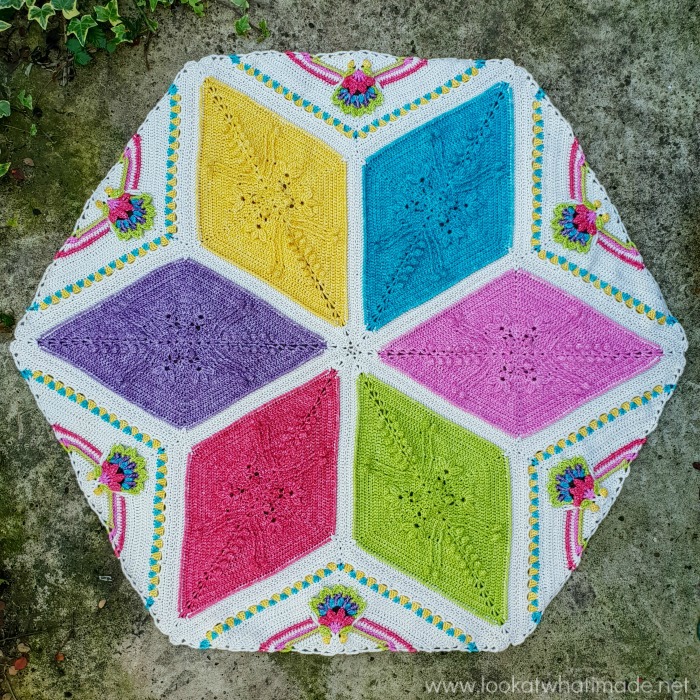
Welcome to Part 7 of the Scheepjes Ubuntu CAL 2018. Last week we completed all our half-diamonds and I have LOVED seeing all the photos of everyone’s pieces laid out in a hexagon. I am so very excited to join and start the border this week :) You will be pleased to know that the rest of the blanket will be worked in rounds, so there will be fewer (!!!) ends :)
The instructions for joining are quite wordy, but that is only because some things are hard to explain quickly (and I do love a thorough explanation)! The joining itself is pretty straightforward once you get into the swing of it.
You will find all the links and information you need under ‘Resources‘ below. If you have stumbled on this post accidentally and don’t know what Ubuntu is, you can read more about it HERE (Information) and HERE (Concept).
Resources
- Part 7 Pattern PDF
- Part 7 Video Tutorial (UK terminology) by Esther Dijkstra from It’s All in a Nutshell
- Official Scheepjes – International Group (English) or the Official Scheepjes – Nederlandse Groep (Dutch). You have to be logged into Facebook in order to access the link to the groups.
- Add the CAL to your Ravelry Queue
- If you are on Instagram, you can find me HERE. Please add your photos using #scheepjesubuntucal2018 or #scheepjesubuntucal.
- Special Stitches and Techniques (including a gauge square)
Ubuntu CAL 2018 Part 7: Joining and Border Part 1
Although this pattern will not have a step-by-step photo tutorial, I will be sharing photos of each completed round (and some of the trickiest bits). Up to this point, I have used a different colour for each round so that you can clearly see stitch placement. For this part, and for the same reason, I have used grey for the joining. Please note that you should be using MC for the joining. I have also done Border Rounds 1 and 2 in MC (as in the pattern).
Joining Motifs
Joining Diamonds
Remember to use Hook B for joining. Using a slightly bigger hook when joining allows for more elasticity in the joins. You will be working through both layers throughout. Tip: If you have gone down a hook size or three to obtain gauge for your motifs, use the next size up for joining (ONLY).
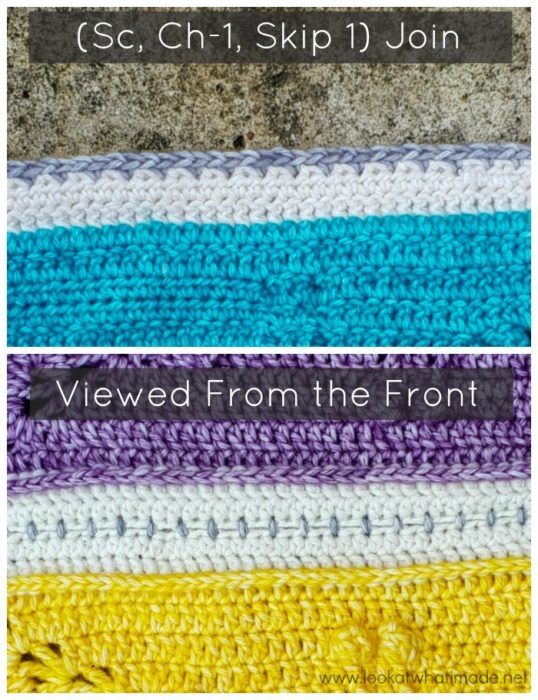
You will be joining the diamonds in two lots of three. You will then join these two ‘halves’ to each other to complete the large central motif. We will be using the (sc, ch 1, skip 1) join my granny taught me. It is my favourite join when attaching pieces that have the same colour in the last round. It blends well and is flat on the front of the work. It creates a lovely helix-like structure when made in the same colour as the last round.
Joining First 3 Diamonds to Each Other
I’m going to do the joining of the first two diamonds as a step-by-step, just so that you understand how the joining works.
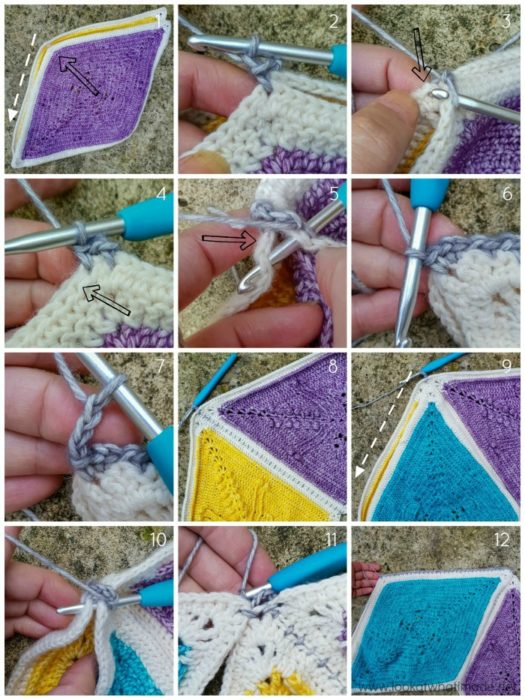
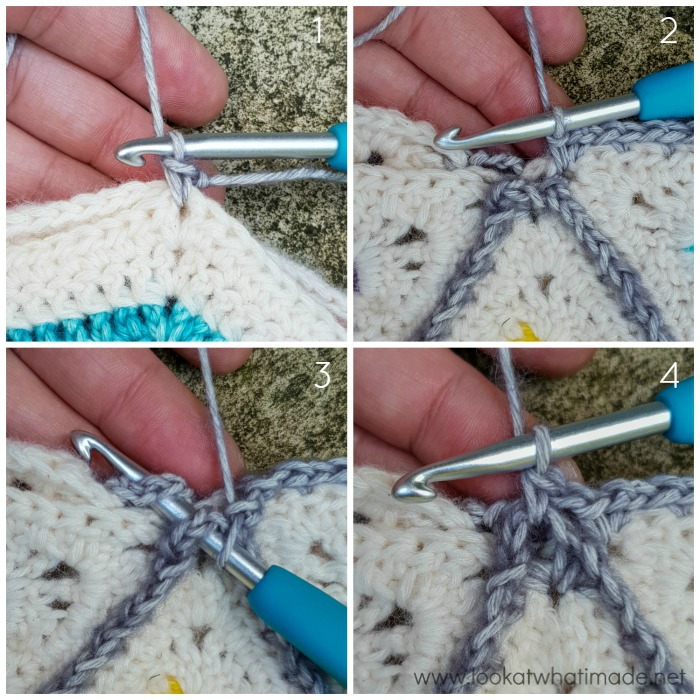
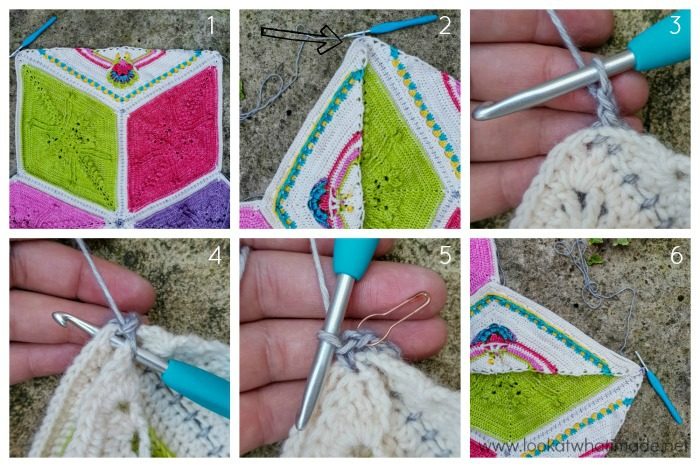
You will start by placing Diamond 6 (in other words, the one made in CC6) on top of Diamond 1 (CC1) with RS facing each other {Photo 1}. Starting in the non-pointy corner {black arrow in Photo 1}, you will use the (sc, ch-1, skip 1) join to join one side of each diamond, ending in the pointy corner {see the white dotted arrow in Photo 1}.
- With MC and Hook B, make a standing sc in the non-pointy ch-1 corner sp {indicated with an arrow in Photo 1 and illustrated in Photo 2}. Ch 1 and sc in the next st, making sure that you are identifying your loops correctly. Remember that the first stitch on the piece to the back will be well and truly hidden {indicated with an arrow in Photo 3}.
- (Ch 1, skip the next st, sc in the next st) until you have worked into each st across. As you go, remember to skip only one st on each piece {indicated with arrows in Photos 4 and 5}.
- Ch 1 and sc in the pointy ch-1 corner sp {Photo 6}.
- Ch 3 {Photo 7}.
Open your work so that the RS is facing you {Photo 8}. Place Diamond 5 on top of Diamond 1, with RS facing each other {Photo 9}.
Sc in the pointy ch-1 corner sp of Diamond 5 and Diamond 1 {Photo 10}. If you open your work up at this point, you will see that Diamond 1 contains two corner joining stitches {Photo 11}. Continue joining as before {Photo 12}. Fasten off and put to one side.
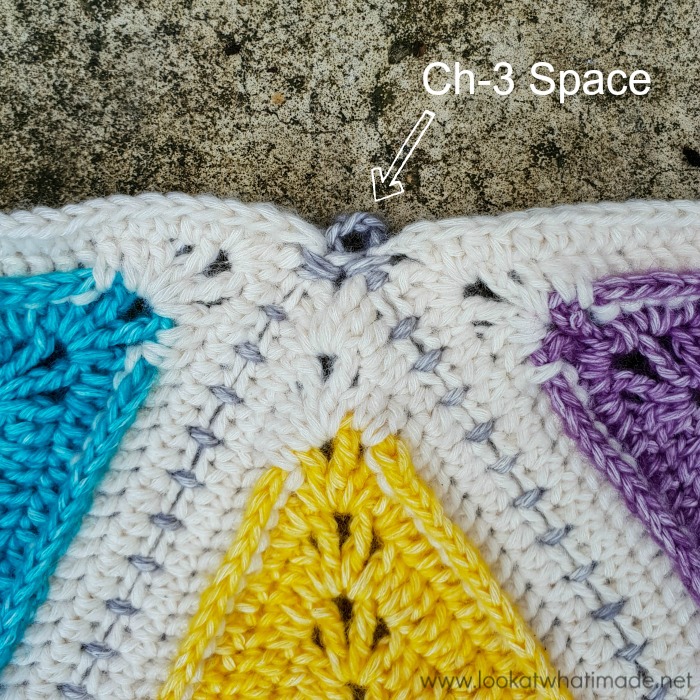
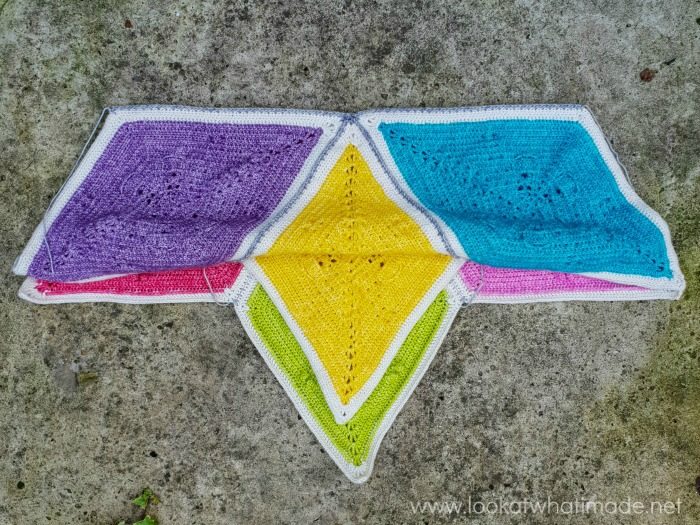
You should now have this intriguing shape.
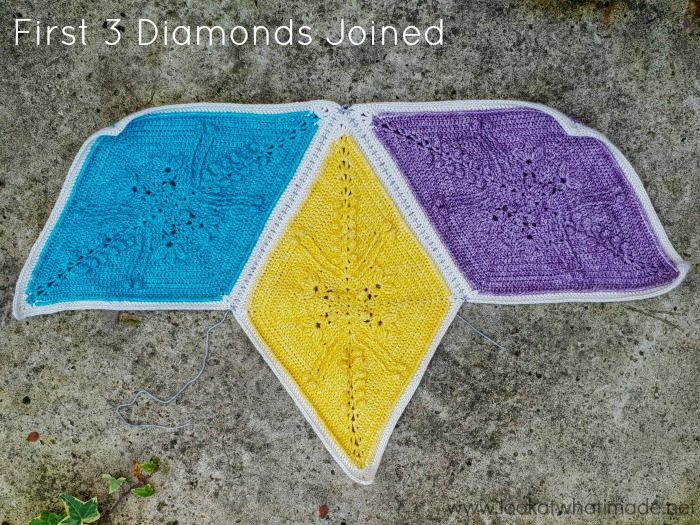
Double-check that you have made a ch-3 space in the middle!
Joining Last 3 Diamonds to Each Other
These diamonds are joined in the same way as the first three.
Place Diamond 2 on top of Diamond 3 with RS facing each other {Photo 1}. Join. Then place Diamond 4 on top of Diamond 3, again with RS facing each other, and join {Photo 2}.
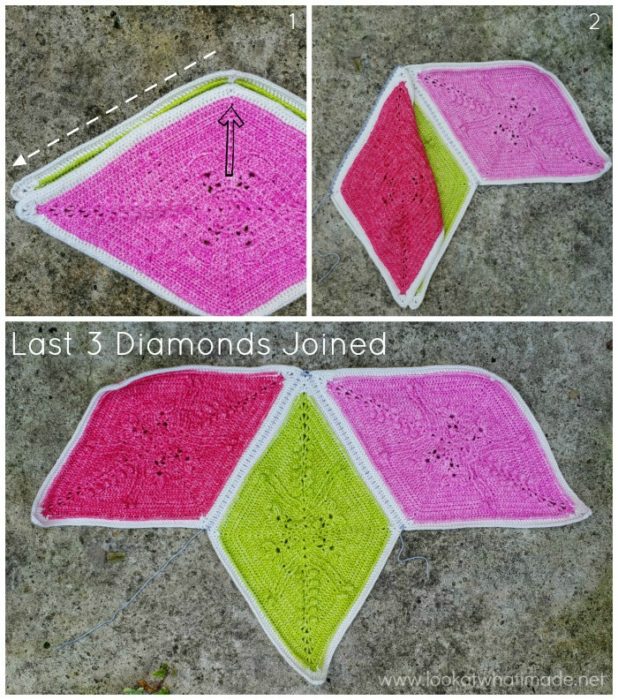
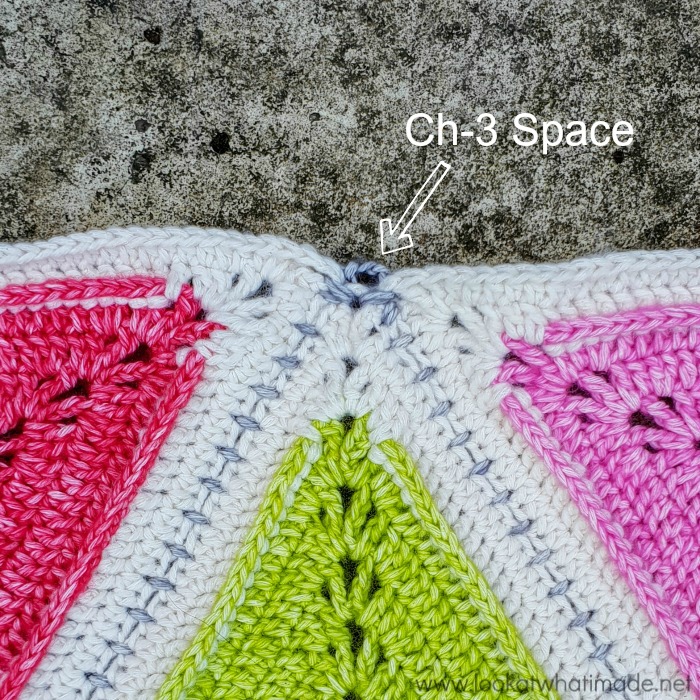
Double-check that this half also has a ch-3 central space!
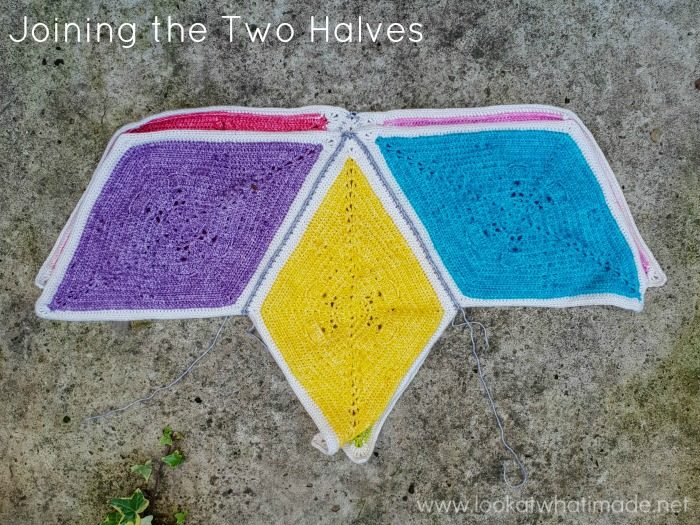
Attaching the Two Halves to Each Other
To join the two halves, place them on top of each other with RS facing each other and the flat edge at the top.
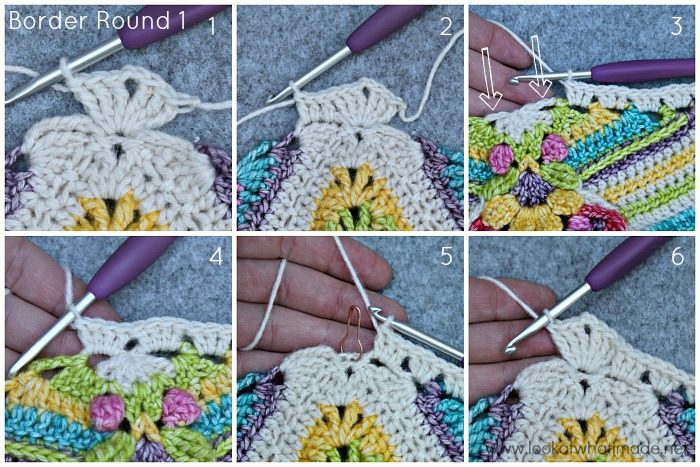
Working into the flat edge, make a standing sc in the non-pointy ch-1 corner sp on the right (left, if you are left-handed) – Photo 1.
- Ch 1 and sc in the next st. (Ch 1, skip the next st, sc in the next st) until you have worked into each st to pointy ch-1 corner sp.
- Ch 1 and sc in the pointy ch-1 corner sp {Photo 2}.
- Ch 1 and sc in the next ch-3 sp {Photos 3 and 4}.
- Ch 1 and sc in the next ch-1 corner sp.
Continue joining as above, finishing in the non-pointy corner sp on the left (right, if you are left-handed). Fasten off and work away ends.
This is what your work should look like at this point.
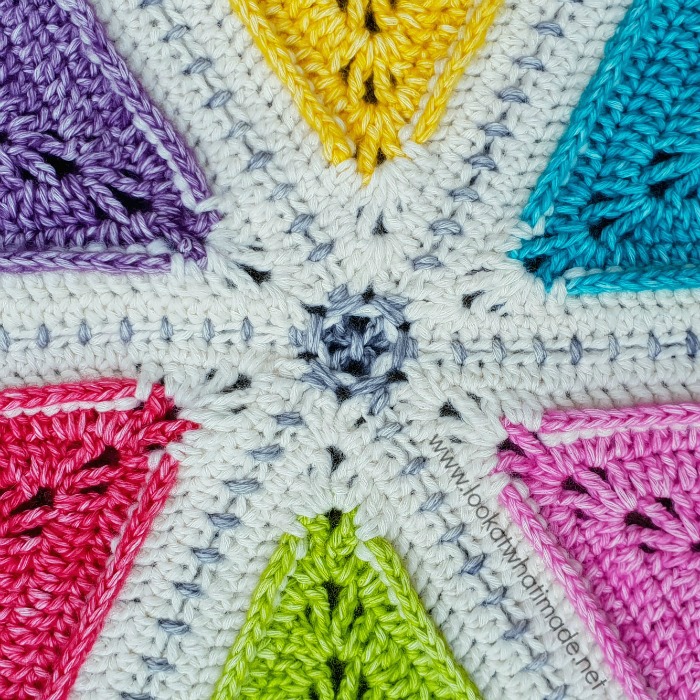
Open it all up and pat yourself on the back for being amazing!

You should now have a large central motif with a pretty central circle. If your centre doesn’t look like this, you’ve forgotten to make the central ch-3 spaces when joining!
Joining Half-diamonds
The first and last st of each half-diamond will count as a pointy ch-1 sp when it comes to joining.
Place a half-diamond on top of the diamond farthest away from you, lining it up with the left side of the diamond (right, if you are left-handed) – Photo 1. When working into the half-diamond, remember that the first/last st of each half-diamond counts as a pointy ch-1 corner sp {Photos 2 and 3}. Join as before, ending just before the non-pointy corner sp. {Photos 4 and 5}.
Ch 1 and sc in the non-pointy ch-1 corner sp {indicated with an arrow in Photo 5 and illustrated in Photo 6}. Flip the half-diamond onto the next diamond, lining it up with the right side of the diamond (left, if you are left-handed) – Photo 8. Ch 1 and sc in the non-pointy ch-1 corner sp {indicated with an arrow in Photo 7 and illustrated in Photos 9 and 10}. Continue joining until you get to the next pointy ch-1 corner sp.
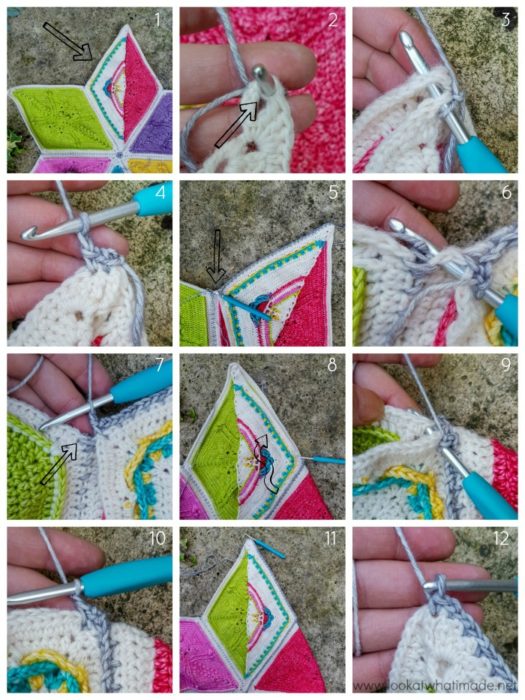
Open your work up {Photo 1} and place the next half-diamond on top of the next diamond as before {Photo 2}. Ch 1. Mark this ch-1 sp with a SM. It will count as your ch-1 corner sp in the next Round {Photo 3}. Starting in the next pointy ch-1 corner sp {Photos 4 and 5}, join the next half-diamond (and the remaining half-diamonds) to your diamonds.
When you are all done, marvel at your work again and go and make yourself a celebratory cup of tea! While you’re at it, may I have one too, please? Milk, one sugar. Ta!
Border
Change back to Hook A for the remainder of the pattern!
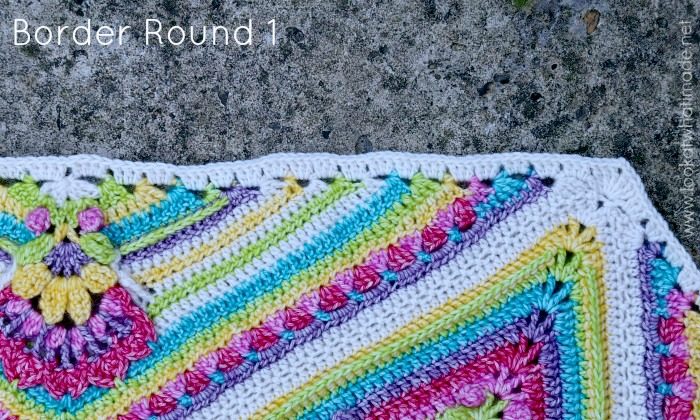
Border Round 1
This round is very straightforward. You will be working into the ch-1 corner spaces created by the join and the ch-spaces created at the start and end of each round of the half-diamonds.
Remember that the ch-sps on either side of the magic ring from the half-diamonds will contain 4 dc, not 3 {Photo 3}.
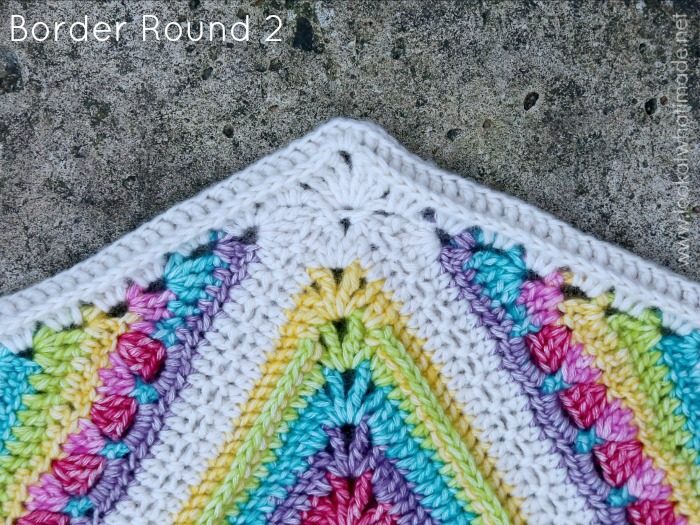
Border Round 2
I know how much you love back post stitches (not)! This round has eleventy million of them. Have fun!
Guys, I can’t believe that we are already past the half-way mark for this crochet-along. I hope this part doesn’t take you long to make, and that you can catch up on some other WIPs while you wait for next week’s instalment. Have a fantastic week!

This blog post contains affiliate links. I only link to products I personally use or would use. All opinions are my own.


Debbie says
rofl eleventy million BP stitches. it made me giggle reading the eleventy million. i think i have now come to enjoy BP stitches ;)
Dedri Uys says
If you do enough of them, it happens. I went from hate to love. Only took me a year!! I stole the eleventy million from someone but I can’t remember who!!