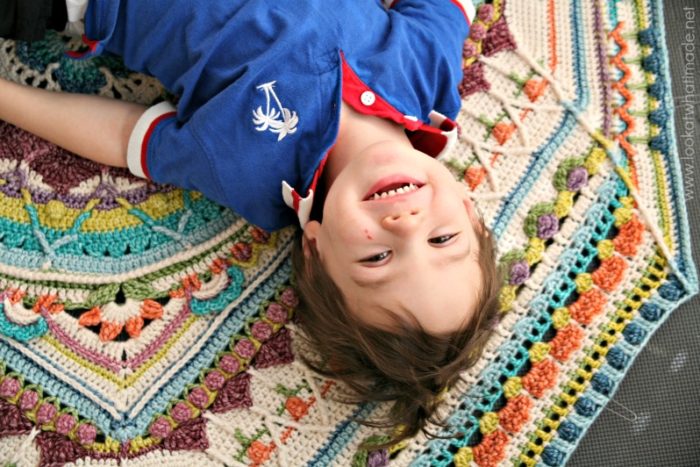
Hi and welcome to Part 9 of Sophie’s Universe. This week I want you to take photos of Sophie with your pet/pets. Most of you already do include your pets in the photos, I know. But for those of you who haven’t shared your furry friends yet, get clicking!
I am absolutely amazed at all the beautiful colour-combinations I am seeing. I would like to encourage you all to keep a list of your colours (per round) on Ravelry so that other people can “copy” them if they feel inspired by your work.
I hope you enjoy this week’s installment. May you have a wonderfully blessed week!
Sophie’s Universe Part 9
©Dedri Uys 2014. All Rights Reserved.
Resources
- Add this CAL to your Ravelry Queue
- Sophie’s Universe CAL 2015 Information
- Use the Print-friendly button at the bottom (right) of this post to print/save this tutorial. Don’t know how? Find out HERE.
- **Part 9 VIDEO TUTORIAL** by Esther Dijkstra from It’s All in a Nutshell
Translations
- Dutch Translation by Dianne Baan
- German Translation by Maja Heidingsfelder
- Spanish Translation by Lynda Hernandez
- French Translation by Sandra Larvin
- Danish Translation by Tina Poulsen
- Russian Translation (with Video) by Natalie V. Alimpieva
- Swedish CAL Information by Emma Vingqvist, Agnetha Magnusson, Åza Karlsson, and Ulrika Larsson
Materials
See the Information Post.
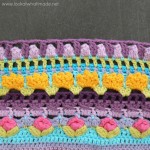
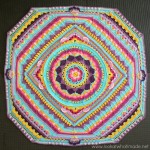
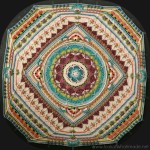
Colours for Part 9 |
|||
 |
 |
 |
|
 |
 |
 |
|
| Cotton 8 | Softfun | Stonewashed XL | |
| Round 69 | Light Purple | Light Blue | Moonstone |
| Round 70 | Turquoise | Dark Turquoise | Canada Jade |
| Round 71 | Light Green | Olive | Lemon Quartz |
| Round 72 | Light Turquoise | Light Blue | Moonstone |
| Round 73 | Violet | Pink | Blue Apatite |
| Round 74 | Moors | Cyclamen | Amazonite |
Abbreviations
US Terminology Used (Basic US/UK comparison chart here)
- Bpsc – Back post single crochet
- Ch – Chain
- Dc – Double crochet
- Fpdtr – Front post double treble crochet
- Fpttr – Front post triple treble (yarn over 4 times – don’t worry, you only need to do this stitch 8 times)
- Hdc – Half-double crochet
- Sc – Single crochet
- Sl st – Slip stitch
- St/st’s – Stitch/stitches
- * – Repeat instructions between asterisks the number of times specified. This is a hardcore repeat and will consist of multiple instructions.
- () – Repeat instructions between parentheses the number of times specified. This is a lower level repeat.
Special Stitches
- Standing Stitches: Standing sc’s, hdc’s, and dc’s are stitches used to start the round without the need for the traditional beginning chain. Links to tutorials are supplied in each relevant round.
- Long Sc (Long Single Crochet): Insert your hook into the indicated stitch/space (Photos 1 and 2) and pull up a loop to the height of your work (Photo 3). Yarn over and pull through both loops on your hook (Photo 4). This stitch is also sometimes referred to as a Spike Stitch – see this tutorial.

- Popcorn Stitch: Make 5 dc’s in the same stitch. Remove your hook from the last stitch. Insert your hook into the first dc of the 5 dc’s. Grab the last stitch with your hook and pull it through the first stitch. Ch 1. See this tutorial.
- Tr2tog Bobble: Yarn over twice (Photo 1) and insert your hook into the indicated stitch/space. Yarn over and pull up a loop. (Yarn over and pull through 2 loops) twice – 2 loops on your hook (Photo 2). Yarn over twice and insert your hook into the same stitch/space. Yarn over and pull up a loop. (Yarn over and pull through 2 loops) twice – 3 loops on your hook (Photo 3). Yarn over and pull through all 3 loops on your hook (Photo 4).

Instructions
Rounds 1 – 68
You can find the links for Rounds 1 – 68 HERE.
Note About Counting and Sides
Remember that you will be counting from ch-1 corner space to ch-1 corner space. Exceptions will be highlighted. If you are going to have trouble identifying the ch-1 spaces, please use stitch markers or scrap yarn to mark them.
Also, remember that your short sides will now be longer than your long sides. It will help to remember that the short sides are the ones with the single central flower.
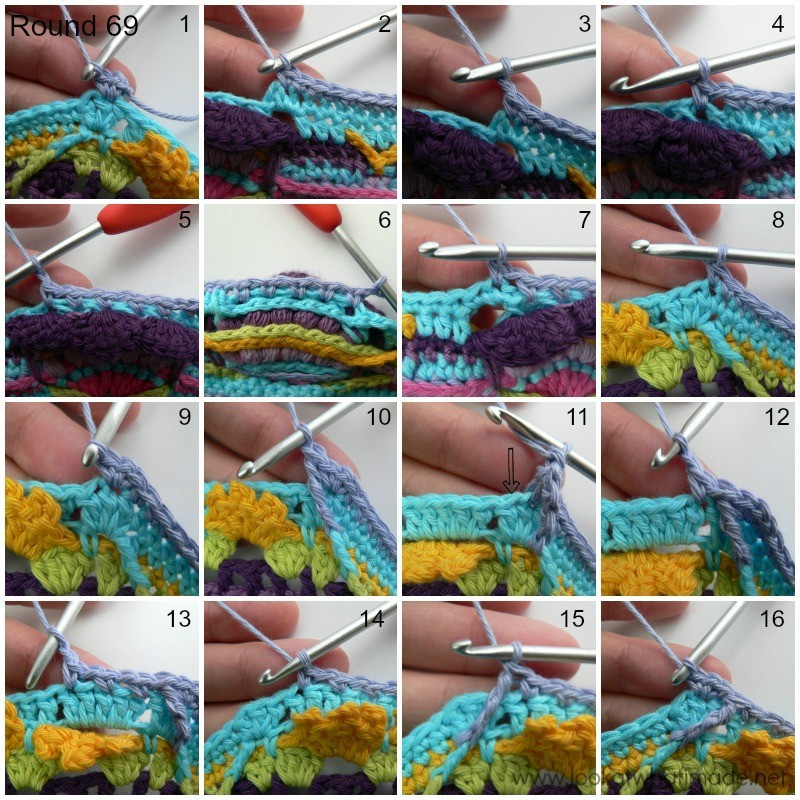
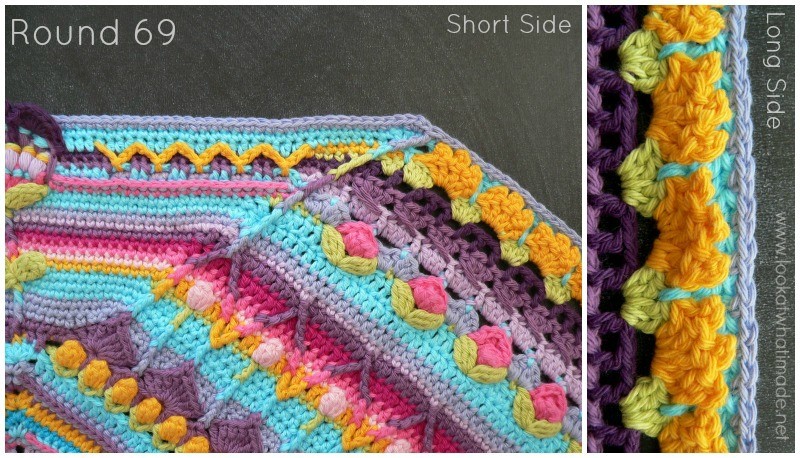
Round 69
On the long sides, the sc’s will fall in the first, third, and fifth dc’s made into the ch-5 spaces.
If you want to “catch” the Ruffle Flowers from Round 66, “catch” them with the sc made into the third dc of each 5-dc group. To do this, insert your hook into the picot of the central picot dc, and into the relevant dc behind it, and make an sc through both layers. I have chosen NOT to “catch” the flowers.
- If you are using the same colour, sl st into the next stitch, which will be the second dc of the 3-dc group at the end of the long side. (Ch 1, sc, ch 1, sc) in the same stitch. This is your first corner made.
- If you are using a new colour, join your yarn by making a standing single crochet in the second dc of the 3-dc group at the end of any long side. (Ch 1, sc) in the same stitch. This is your first corner made (Photo 1).
*Short Side: Sc in the next 33 st’s (Photo 2). (Ch 1, sc – see Photos 3 and 4) in each of the 5 ch-1 spaces from Round 67 or 68 behind the flower. Ch 1 (Photo 5). Photo 6 shows what your work should look like from the back. Sc in the next 33 st’s, being careful not to accidentally skip the first stitch after the ch-2 space from Round 68 (Photo 7). The last sc should fall in the first dc of the 3-dc group at the end of the short side (Photo 8).
Long Side: (Sc, ch 1, sc) in the next stitch (Photo 9). Fpdtr around the fptr from Round 67 (Photo 10). Skip the next st of Round 68 (indicated with an arrow in Photo 11). (Sc in the next st. Ch 1 and skip the next st) 23 times (Photos 12 and 13). Sc in the next st, which should be the last dc of the last 5-dc group (Photo 14). Make a fpdtr around the fptr from Round 67 and skip the next st of Round 68 (Photo 15). (Sc, ch 1, sc) in the next stitch, which should be the second dc of the 3-dc group at the start of the short side (Photo 16).*
Repeat from * to * 3 more times, omitting the last (sc, ch 1, sc) corner on the last repeat. Join to the top of the first sc with a sl st.
Stitch Counts:
- Total: 404 st’s and 124 ch-1 spaces – including the 8 ch-1 corner spaces {396 sc’s and 8 fpdtr’s}
- Per Short Side: 73 sc’s and 6 ch-1 spaces
- Per Long Side: 26 sc’s, 2 fpdtr’s, and 23 ch-1 spaces
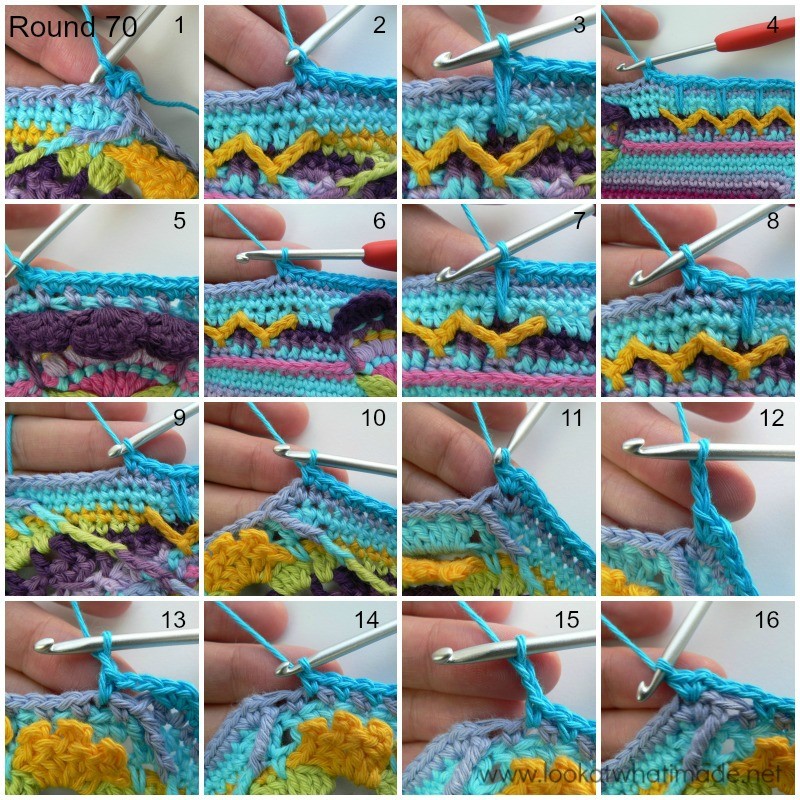
Round 70
Remember to look at the step-by-step photos for the Long Sc under Special Stitches at the start of this tutorial.
- If you are using the same colour, sl st into the next ch-1 space. (Ch 1, sc, ch 1, sc) in the same space. This is your first corner made.
- If you are using a new colour, join your yarn by making a standing single crochet in the ch-1 space at the start of any short side. (Ch 1, sc) in the same space. This is your first corner made (Photo 1).
*Short Side: Sc in the next 11 st’s. Don’t accidentally skip that first (hidden) stitch (Photo 2).
(Make a Long Sc into the sc from Round 64, right above the “V” formed by the “zigzag” hills. This stitch will already contain the central of the 3 hdc’s from Round 67 made between “zigzag” hills – see Photo 3. Skip the next st of Round 69, which will be hidden by the Long Sc, and sc in the next 3 st’s) 5 times (Photo 4). Sc in the next 3 st’s.
(Make 2 sc’s in the next ch-1 space behind the flower) 6 times (Photo 5). Sc in the next 6 st’s. Don’t accidentally skip that first (hidden) stitch (Photo 6).
(Make a Long Sc into the sc from Round 64, right above the “V” formed by the “zigzag” hills, as before – see Photo 7. Skip the next st of Round 69 and sc in the next 3 st’s – see Photo 8) 5 times (Photo 9). Sc in the next 8 st’s (Photo 10).
Long Side: (Sc, ch 1, sc) in the next ch-1 space (Photo 11). Ch 2 (Photo 12) and skip the first 3 stitches, one of which will be hidden. (Sc in the next ch-1 space. Ch 1 and skip the next sc – see Photo 13) 22 times. Sc in the last ch-1 space (Photo 14). Ch 2 (Photo 15) and skip the last 3 st’s. (Sc, ch 1, sc) in the next ch-1 space (Photo 16).*
Repeat from * to * 3 more times, omitting the last (sc, ch 1, sc) corner on the last repeat. Join to the top of the first sc with a sl st.
Stitch Counts:
- Total: 428 st’s, 8 ch-2 spaces, and 96 ch-1 spaces – including the 8 ch-1 corner spaces {388 sc’s and 40 Long Sc’s}
- Per Short Side: 82 st’s {72 sc’s and 10 Long Sc’s }
- Per Long Side: 25 sc’s, 22 ch-1 spaces, and 2 ch-2 spaces
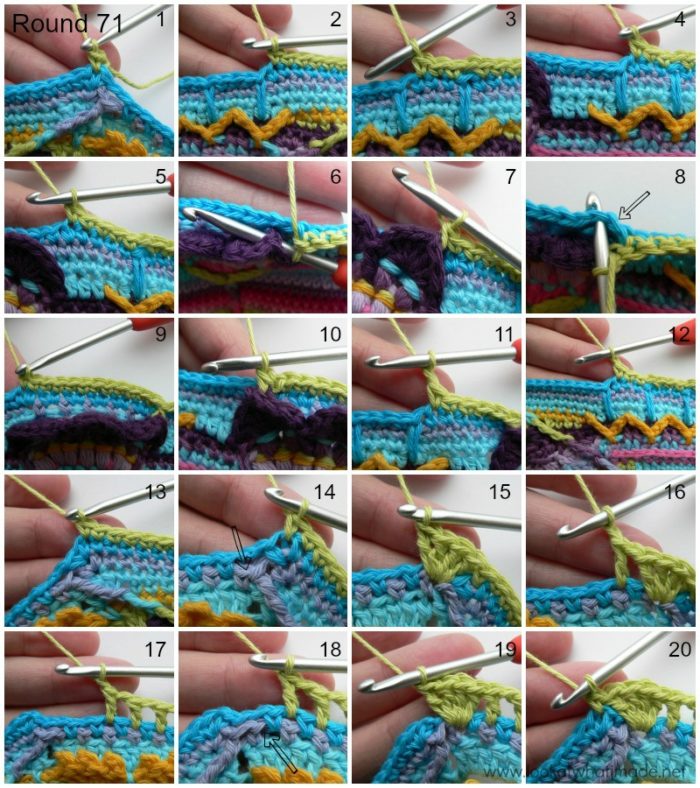
Round 71 {Stems}
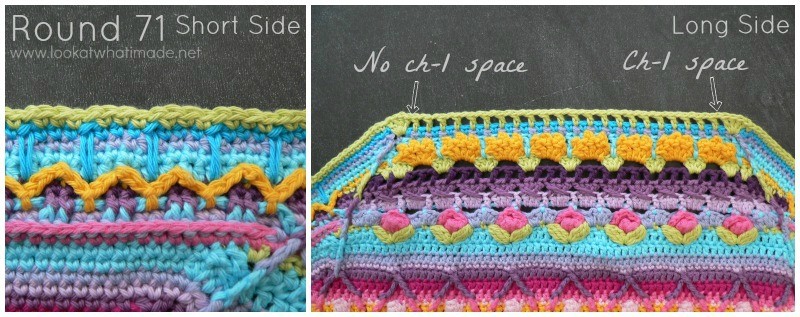
The start and end of the long sides are not symmetric. There is a ch-1 space between the first 4-dc group and the first dc, but there is NO ch-1 space between the last dc and the last 4-dc group (see the photo of the completed Long Side below).
- If you are using the same colour, sl st into the next ch-1 space. (Ch 1, sc) in the same space.
- If you are using a new colour, join your yarn by making a standing single crochet in the ch-1 space at the start of any short side (Photo 1).
*Short Side: Sc in the next 12 st’s (Photo 2). Don’t accidentally skip the first (hidden) stitch. (Ch 1 and skip the next st, which should be the Long Sc. Sc in the next 3 st’s – see Photo 3) 4 times (Photo 4). Ch 1 and skip the last Long Sc.
Sc in the next 5 st’s (Photo 5). Make a bpsc around the fourth dc of the first petal of the large central flower (Photos 6 and 7). Skip the next st of Round 70 (Photo 8) and sc in the next 12 st’s (Photo 9). These 12 sc’s should fall in the 12 sc’s made into the 6 ch-1 spaces from Round 69. Make a bpsc around the fifth dc of the last petal of the large central flower (Photo 10). Skip the next st of Round 70 and sc in the next 5 st’s (Photo 11).
(Ch 1 and skip the next st, which should be the Long Sc. Sc in the next 3 st’s) 4 times (Photo 12). Ch 1 and skip the last Long Sc. Sc in the next 12 st’s (Photo 13).
Long Side: Sc in the next ch-1 corner space (Photo 14). Mark this stitch to help you count later on. Working over the ch-2 space from Round 70, skip the first (hidden) stitches of Rounds 70 and 69. Skip the fpdtr from Round 69. Make 4 dc’s in the next stitch of Round 69, which should be the first sc (indicated with an arrow in Photo 14 and illustrated in Photo 15). Ch 1 and skip the next sc from Round 70.
(Dc in the next ch-1 space. Ch 1 and skip the next sc – see Photo 16) 21 times (Photo 17). Dc in the last ch-1 space (Photo 18). Working over the ch-2 space from Round 70, make 4 dc’s in the next sc from Round 69 (indicated with an arrow in Photo 18 and illustrated in Photo 19). Skip the next 2 st’s from Round 69 and the last sc of Round 70. Sc in the next ch-1 space from Round 70 (Photo 20). Mark this stitch to help you count later on.*
Repeat from * to * 3 more times, omitting the last sc on the last repeat. Join to the top of the first sc with a sl st. Fasten off and work away your tails of yarn.
Stitch Counts:
- Total: 416 st’s and 128 ch-1 spaces {288 sc’s, 8 bpsc’s, and 120 dc’s}
- Per Short Side: 72 st’s and 10 ch-1 spaces {70 sc’s and 2 bpsc’s}
- Per Long Side: 32 st’s and 22 ch-1 spaces {2 sc’s, 30 dc’s} – counting from marked sc to marked sc.
Round 72
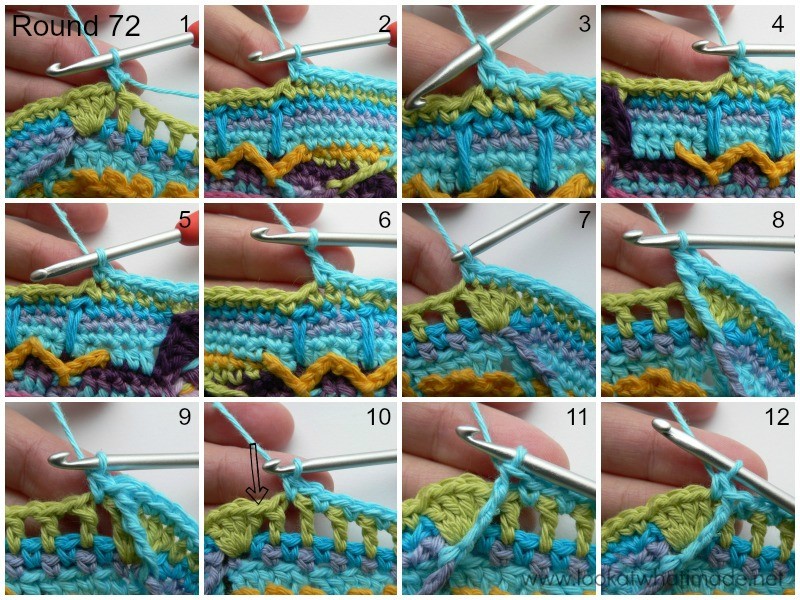
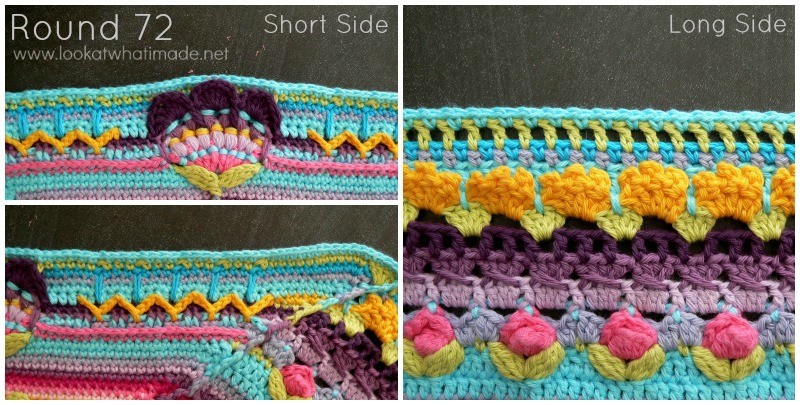
Join your yarn by making a standing single crochet in the first dc of the 4-dc group at the end of any long side (Photo 1).
Sc in the next 16 st’s (Photo 2). (Ch 1 and skip the next ch-1 space. Sc in the next 3 st’s – see Photo 3) 4 times (Photo 4). Ch 1 and skip the next ch-1 space. Sc in the next 24 st’s (Photo 5). (Ch 1 and skip the next ch-1 space. Sc in the next 3 st’s) 4 times (Photo 6). Ch 1 and skip the next ch-1 space. Sc in the next 17 st’s. The last sc should fall in the fourth dc of the 4-dc group at the start of the long side (Photo 7).
*Long Side: Make a fpdtr around the fpdtr from Round 69 (Photo 8). (Sc in the next ch-1 space – see Photo 9. Ch 1 and skip the next dc) 21 times. Sc in the last ch-1 space (Photo 10). Make a fpdtr around the fpdtr from Round 69 (Photo 11) and skip the next dc.
Short Side: Sc in the first dc of the 4-dc group at the end of the long side (indicated with an arrow in Photo 10 and illustrated in Photo 12). Sc in the next 16 st’s. (Ch 1 and skip the next ch-1 space. Sc in the next 3 st’s) 4 times. Ch 1 and skip the next ch-1 space. Sc in the next 24 st’s. (Ch 1 and skip the next ch-1 space. Sc in the next 3 st’s) 4 times. Ch 1 and skip the next ch-1 space. Sc in the next 17 st’s. The last sc should fall in the fourth dc of the 4-dc group at the start of the long side.*
Repeat from * to * 3 more times, omitting the last short side on the last repeat. Join to the top of the first sc with a sl st.
Stitch Counts:
- Total: 424 st’s and 124 ch-1 spaces {416 sc’s and 8 fpdtr’s}
- Per Short Side: 82 sc’s and 10 ch-1 spaces
- Per Long Side: 24 st’s and 21 ch-1 spaces {22 sc’s, 2 fpdtr’s} – counting from fpdtr to fpdtr.
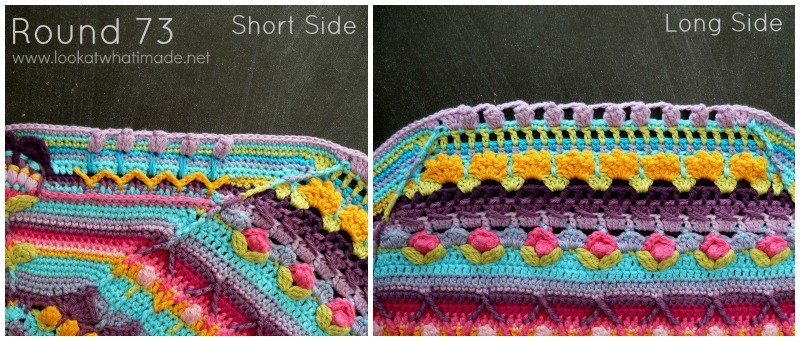
Round 73 {Popcorn Flowers}
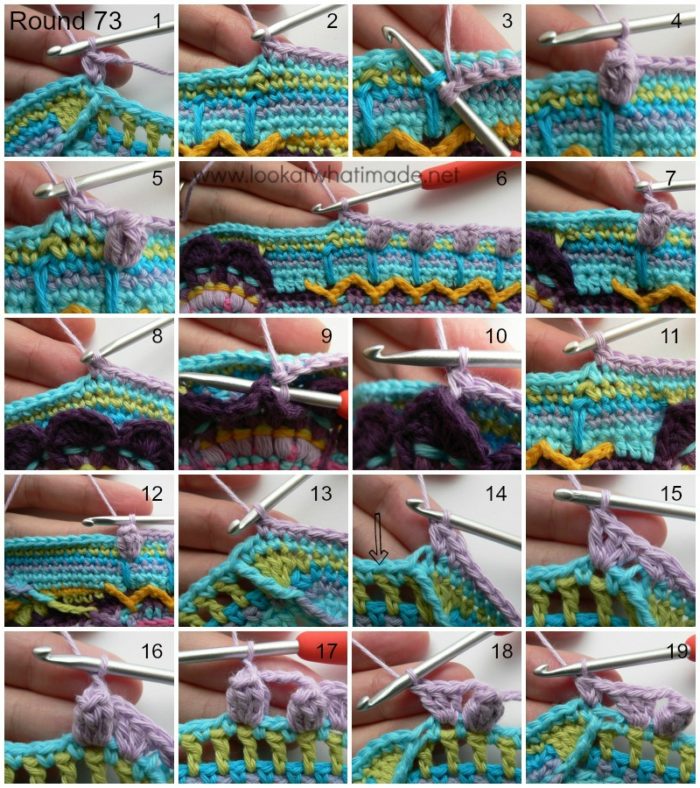
At the end of this round, your popcorns (on the short side) will be slightly skew. Don’t worry about it. Remember that your Popcorn Stitches are closed with a ch-1, which is part of the popcorn stitch.
- If you are using the same colour, ch 2 (counts as your first hdc) and make a hdc in the same stitch. This is your 2-hdc corner made.
- If you are using a new colour, join your yarn by making a standing half-double crochet in the first sc of any short side. Hdc in the same stitch. This is your 2-hdc corner made (Photo 1).
*Short Side: Sc in the next 16 st’s (Photo 2). (Make a Popcorn Stitch in the Long Sc from Round 70, working in front of the ch-1 spaces from Rounds 71 and 72 – see Photos 3 and 4. Sc in the next 3 sc’s – see Photo 5) 4 times (Photo 6). Make a Popcorn Stitch in the next Long Sc from Round 70, again working in front of the ch-1 spaces from the previous 2 rounds (Photo 7). Sc in the next 12 st’s (Photo 8). Make a bpsc around the fifth dc of the central petal of the large central flower (Photos 9 and 10) and skip the next stitch of Round 72. Sc in the next 11 st’s (Photo 11).
(Make a Popcorn Stitch in the Long Sc from Round 70, working in front of the ch-1 spaces from Rounds 71 and 72. Sc in the next 3 sc’s) 4 times. Make a Popcorn Stitch in the next Long Sc from Round 70, again working in front of the ch-1 spaces from the previous 2 rounds (Photo 12). Sc in the next 16 st’s (Photo 13).
Long Side: Make 2 hdc’s in the next st, which should be the last sc of the short side (Photo 14). Skip the fpdtr and the next sc. Make 3 dc’s in the next ch-1 space (indicated with an arrow in Photo 14 and illustrated in Photo 15).
Ch 1. (Make a Popcorn Stitch in the next ch-1 space. Ch 3 and skip the next ch-1 space – see Photos 16 and 17) 9 times. Make a Popcorn Stitch in the next ch-1 space. Ch 1 and make 3 dc’s in the last ch-1 space (Photo 18). Skip the next sc and the fpdtr. Make 2 hdc’s in the next st (Photo 19). *
Repeat from * to * 3 more times, omitting the last 2-hdc corner on the last repeat. Join to the top of the beginning ch-2 (or the standing hdc) with a sl st. Fasten off and work away your tails of yarn.
Stitch Counts:
- Total: 440 st’s, 8 ch-1 spaces, and 36 ch-3 spaces {316 sc’s, 4 bpsc’s, 16 hdc’s, 24 dc’s, and 80 Popcorn Stitches}
- Per Short Side: 90 st’s {79 sc’s, 1 bpsc, and 10 Popcorn Stitches}
- Per Long Side: 20 st’s, 9 ch-3 spaces, and 2 ch-1 spaces {6 dc’s, 4 hdc’s, 10 popcorns} – includes both hdc’s of each 2-hdc corner.
Round 74
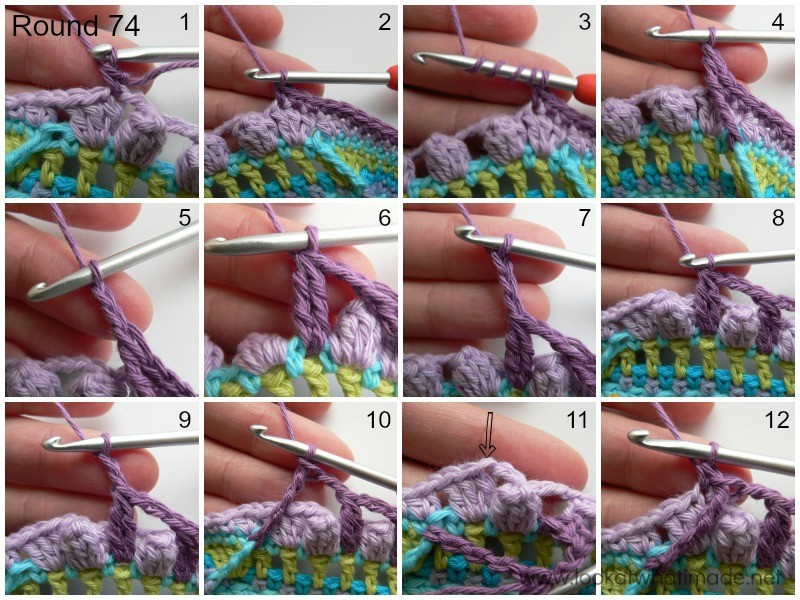
When working into the Popcorn Stitches on the short side, remember to work into the first dc of the 5-dc Popcorn (Photos 1 and 2), not the ch-1 at the top of the Popcorn (Photos 3 and 4). If you work into the ch-1 instead of into the first dc of the 5-dc Popcorn, your Popcorn Stitches will slant even more to the right (to the left if you are left-handed). There is method in the madness! Just trust me :)
And while we are on the subject of those pesky ch-1’s…why even include them when they cause so much headache in this pattern? Because they make the Popcorns “Pop” more. If you look at photo 4 (which shows the top of the Popcorn Stitch) you will see that the Popcorn Stitch is being pushed forward by the skipped ch-1 (visible between the last 2 sc’s made.
Join your yarn by making a standing single crochet in the first dc of the 3-dc group at the END of any long side (Photo 1). Sc in the next 99 st’s – see Hint below. The last sc should fall in the third dc of the 3-dc group at the beginning of the next long side (Photo 2).
*Long Side: On the long side you will be working into the skipped ch-1 spaces from Round 72 and IN FRONT OF the ch-3 spaces from Round 73. Make a fpttr around the fpdtr from Round 72 (Photos 3 and 4). Ch 2 (Photo 5).
(Working in front of the next ch-3 space from Round 73, make a Tr2tog Bobble – see Special Stitches – in the skipped ch-1 space from Round 72. Ch 3) 8 times (Photos 6 and 7). Working in front of the last ch-3 space from Round 73, make a Tr2tog Bobble in the skipped ch-1 space from Round 72 (Photo 8). Ch 2 (Photo 9). Make a fpttr around the fpdtr from Round 72 (Photo 10).
Short Side: Sc in the first dc of the 3-dc group at the end of the long side (indicated with an arrow in Photo 11 and illustrated in Photo 12). Sc in the next 99 st’s. The last sc should fall in the third dc of the 3-dc group at the beginning of the next long side.*
Repeat from * to * 3 more times, omitting the last short side on the last repeat. Join to the top of the first sc with a sl st.
Hint:
Of the 100 sc’s you are making in the short side (the initial sc plus the 99 additional sc’s), stitches 22, 26, 30, 34, and 38 will fall in the top of a Popcorn Stitch (that is in the first dc of the 5-dc popcorn, NOT the ch-1 that closes the popcorn). Stitch 51 will fall in the bpsc that caught the central petal of the large central flower. Stitches 63, 67, 71, 75, and 79 will fall in the top of a Popcorn Stitch.
Stitch Counts:
- Total: 444 st’s, 32 ch-3 spaces, and 8 ch-2 spaces {400 sc’s, 36 Tr2tog Bobbles, and 8 fpttr’s }
- Per Short Side: 100 sc’s
- Per Long Side: 11 st’s, 8 ch-3 spaces, and 2 ch-2 spaces {9 Tr2tog Bobbles, 2 fpttr’s}
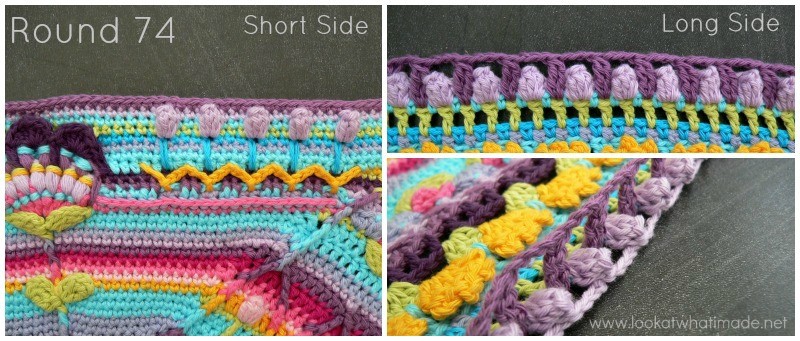
At the end of this part, the Round 74 long sides won’t be attached to the Round 73 long sides at all (see the above photo). We will remedy that next week.
Note About Curling
I am afraid that I will have to suggest blocking yet again. Remember that this isn’t necessary. Your blanket will straighten itself out in the next few weeks. But if you want to take pretty picture, block, block, block.
Annie’s has some good advice for Blocking Afghans and Other Large Pieces.
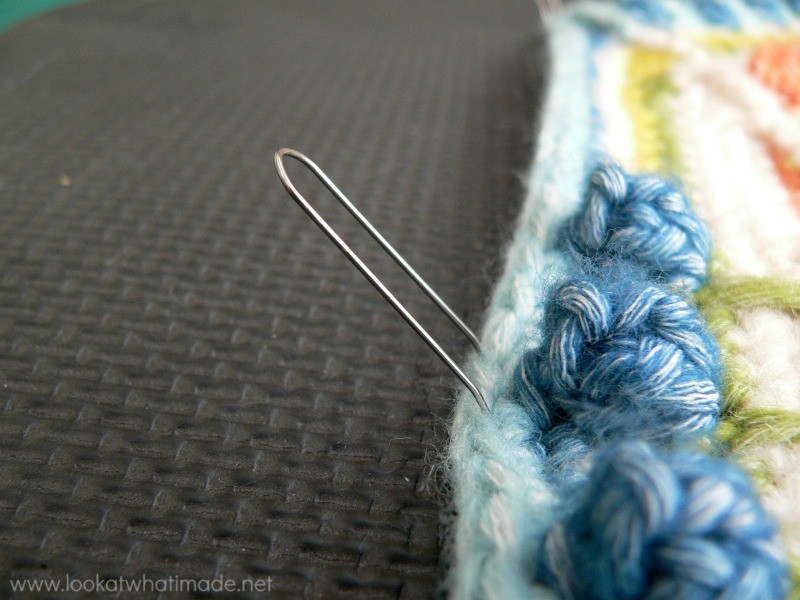
If you are going to use foam squares to block on, consider buying these Interlocking Foam Exercise Mats. They are similar to these Knitter’s Pride Lace Blocking Mats, but cheaper. You will also need some of these Clover Fork Blocking Pins
.
This part of the pattern was tested by Kimberly Slifer, Claire Martin, Maja Heidingsfelder, Lynda Hernandez, Susan Wilkes-Baker, Venetia Smith, and Dianne Baan.

This blog post contains affiliate links. I only link to products I personally use or would use. All opinions are my own.




Sue says
I have been stuck on this one for over two weeks now (I suspect it was some sort of block) but I’ve FINALLY finished! Off to the next.
Anette says
Hey Dedri,
I think there’s an error in round 70 where the short side is ended by 8 SC’s:
“(Make a Long Sc into the sc from Round 64, right above the “V” formed by the “zigzag” hills, as before – see Photo 7. Skip the next st of Round 69 and sc in the next 3 st’s – see Photo 8) 5 times (Photo 9). Sc in the next 8 st’s (Photo 10).”
…At the start of round 70 you start the short side with 11 SC’s. So why suddenly only 8 SC’s, when in round 71 you start and end each short side with 12 SC’s? If there were only 8 SC’s on the short side from round 70, it would be a bit complicated to press 12 SC’s into 8 SC’s from the previous round ;-)
Dedri Uys says
Anette, hi.
The last repeat ends with 3 sc’s. Add to that the 8 sc’s and you do have 11 sc’s at the end, just like at the beginning. I hope that helps.
Dedri
fiona says
Hi Dedri,
I am really enjoying this CAL. This is my first one ever and I have learned so many new techniques with this pattern. Thank you so much!
I was just wondering what the finished size will be?
Denise says
Dedri, I am beyond amazed at all the beautiful Sophie’s you’ve inspired, but most of all, I’m totally flabbergasted at how many people in so many countries are making your Sophie!! That is truly inspiring! Thank you for bringing so many far-flung people together over a common love of crocheting!
Jenny says
Thank you for joining in as well! :)
Suzanne V says
Just wanted to thank u Dedri and all who put this CAL together! I luv it!
Nina says
Hi Dedri,
I’m currently on round 72 and I notice there’s a ‘bubble’ on top of the flower, on the short sides. I’ve seen this with others too, on the Facebook-page. However, if I look at your own picture, it’s much straighter.
My question is: should I try and compensate a bit, with hdc’s on either side of the flower? Or does it – literally – straighten itself out in further rounds?
Thank you so much for all your work. I’m still a newbie and it’s very challenging, but I’m loving every step of the way!
Dedri Uys says
Nina, don’t compensate with hdc’s. It will sort itself out later. The rest of that round will be pulled up to the height of the “bubble” as you call it when we are all square again. Mine looks less pronounced because I know, when I’m blocking, what to aim for, whereas others who are blocking are do so “blindly”, because they don’t yet know what comes next.
I hope that helps.
Nina says
Yes, that does help, thank you!!
Nancy Fiedler says
I am sooo loving this CAL experience! I have felt my skill level challenged in nearly every Part. This pattern is so well designed and written that even the Newbies are having great success with it.
I can cite at least a half dozen new stitches, methods or techniques that I have learned through Part 8.
I appreciate that there are ‘landmarks’ along the way…..that helps to keep me on track or tells me to go back and make it right.
This could be a great stash buster…if I let it. ;-)
I have purchased yarn for another …in décor colors..
Thank you so very much
Dedri Uys says
Thank you very much, Nancy ;)
Joy Costello says
Hi Dedri
Your pattern,stitches, tutorials ans photos are absolutely stunning I love every single stitch of this CAL But you have ruined me for repetitive crochet patterns :( I get so bored once I have the pattern in my head. So I hope there are more patterns to come :) :) :)
Son just bought me your book off Amazon. Waiting for delivery Can’t wait to get started on it
Joy xxxxxx
Petra says
Dedri, once again thank you for your time and effort. This Universe is simply amazing and I am eternally grateful to be part of this wonderful CAL. You are a very talented artist and designer. Thanks for your generosity to share the pattern and for sharing your talent to create such thoughtful designs.
Your gift is most precious and appreciated.
Jan Schluter says
Dedri, I posted this on Facebook, but was afraid you wouldn’t see it.
Wonderful things I’ve learned from the OFFICIAL CCC SOCIAL GROUP:
1. When choosing colors, you don’t always have to choose what matches your decor – just pick colors that you love!
2. One can crochet anything as long as there are two things – a well-written pattern and a great teacher.
3. There are people in this world who share their gifts and passion with others just out of the goodness of their hearts, and not for financial gain. (Dedri Uys and Kimberly Slifer, and all the pattern testers and board monitors).
4. Crochet is not a lost art for old ladies! Lots of men and women of all ages, from all over the globe are doing it!
Thanks to everyone for making me excited about crochet again!
Feel free to add to the list!
Petra says
What an awesome list!
Agree with all points
Angelica C. says
Wow, Dedri! Just a master work of creativity and artistry! Congrats, Dedri!!!
Can’t stop thinking: “I must give this marvel an opportunity” ;) though I had promised myself I’d never-never again crochet or knit a blanket… As soon as shops open I’ll go and get the yarn -let’s hope I find something appropriate- and start working!
Beth M. Honeycutt says
Hi, I just found this CAL recently and am hoping to start work on Sophie when I get all my yarn gathered. I just subscribed to your newsletter and came to read the intructions for this week. Quick question: The pattern references two stitches I haven’t heard of before: Front post double treble crochet and Front post triple treble crochet. Are those UK terms or is there a description somewhere of how to do these stitches? I’m a little nervous about starting the Sophie–it looks so very complex. Gorgeous, though. You’re so talented!
Jenny says
US terms Beth.
FPDTR is yarn over 3 times. 4 times for FPTTR :)
Beth M. Honeycutt says
Thanks for responding, Jenny, I appreciate it. I hadn’t heard of either of those stitches before, maybe because I’ve never tried anything this complex before. Do you still pull through two of the loops on the hook at a time, or are there other differences from a regular double and triple crochet?
Nancy Fiedler says
Yes, pull through two loops at a time….you will find instructions at the beginning of the Part where they are first introduced…LOL…you prob know that by now! or have found the video tutorial….
You are going to love this CAL/project, you will learn so very much and will never be bored with it.
my best advice is to count count count!
Beth M. Honeycutt says
Thanks for responding, Nancy Fiedler. I appreciate the tip!
Hayley McCormack says
I’m pretty sure at the beginning of that particular Part they’re introduced, there is a link showing you how to do those stitches – happy hooking :) x
Beth M. Honeycutt says
Thanks, Hayley! I’ll look through the previous parts and see if I can find it.
Richard Dalton says
I just want to say how much I love this pattern, I start last week because I didn’t know if I was going to like it so wanted to see how it developed first. I started on Sunday and I am half way through part 5 although I am only using cheap double knit it looks superb! I am looking forward to blogging about my experience creating this gorgeous project! I will be making it again in a more luxury yarn also.
Richard x
Lynn vanSickler says
I signed up for the newsletter and received last week’s notice that Part 8 was available. This week my email account has nothing new after 0617 Central Daylight Savings time, USA. So the problem is not your site but Google’s, right? I had to go to w.lookatwhatimade, click on Sophie and then every installment until I reached 9. Has anyone else had this trouble?
Jenny says
I haven’t got a newsletter yet either and I am in the UK, if that is any comfort :)
Dedri Uys says
I am confused, Lynn. If you type in “www.lookatwhatimade.net” Part 9 will be the first post at the top of the page as posts are displayed in reverse order, starting from the most recent. You can also find all the links to date HERE in the information post. If the next part is not at the top of the page (or in the information post) it has not been posted yet.
The newsletter is sent out weekly on a Monday (9 pm GMT). If you would like to access the weekly post earlier (do on s Sunday), you can find it as a pinned post at the top of the Official CCC Social Group, which is hosting the CAL, or as the first post at the top of my website (as previously specified).
I hope that helps you in future.
Dedri
Kim says
Hi Dedri! I just finished round 71 and HOPE you will tell me I will not need more of Lemon Quartz!!!!!??????? I have none left which means I’ll have to get on a fast order from across the pond!
Let me know if I’ll need more!!!!
Dedri Uys says
Kim, there is one more round of Lemon Quartz, so you should have about 20 g left after Round 71. If you don’t, you can use another colour instead, but it indicates that you are using more yarn than me and might therefore need to buy more. Amazonite is the other one that will be running low. There are 3 more Amazonite rounds left, and I will check tonight exactly how much you should have left at the end of Part 9 so that you can compare and prepare.
Next week I will be posting a table of all the yardages (per round) to date so that people can make arrangements if they are using more yarn than I am using.
Dedri
kim ancona says
Thank you so very much! I have to order today because it takes so very long to get to the US! I will just get more of each and maybe you can suggest ways to use our stonewashed xl leftovers!
kim ancona says
Just a note. Once again – all the stonewashed xl is backordered. It took 4 weeks previously to arrive, so who knows how long this will be. I do not feel they were prepared with inventory for the orders! I just got all caught up and now I’ll be waiting and behind the Sunday anticipation!
Dedri Uys says
Hi Kim, I am sorry about that. You won’t need the lemon quartz until Part 12. How is your Amazonite at this point? You should have 22g left over at the end of Part 9, because you will need 20 g for Part 10, but again you can use moonstone for that round instead. I will make work of that table and see if I can publish it earlier than this weekend.
Christoph says
Hi,
I had exact the same question: I’m out off Lemon Quartz. Luckily I read the other posts first before asking. :-)
Just wanted to say that, as a male crocheteer, I just love doing this CAL. I’m following another (Dutch) CAL too, but this one is simply amazing (but very intense because it’s a lot of work in one week…). Keep up this marvelous work! Many thanks from a huge fan!
Love,
Christoph (Flanders – The Dutch speaking part of Belgium)
Ruth says
I’ve printed out the instructions an am now ready to settle in my comfy chair with one or two kitties on my lap and start the next rounds. Thank you so much for sharing your expertise in design and in creating instructions that make it easier to follow along.
Trish Little says
I’m making 3, so I’m behind on all of them. But I am determined to finish all three, and I know they’ll be heirlooms to be treasured by my progeny long after I’m gone. Thank you for sharing this most beautiful pattern with us. I’m deeply grateful for your generosity and amazing creativity!
Dedri Uys says
Thank you, Trish. If I didn’t have to have 3 of them finished each week I would have been behind on all 3 of them as well :)
Jeanette Smith says
I’ve just finished Part 9. Is that some sort of record? My wrists are about to fall off though!
Dedri Uys says
Lol. I’m sure it is!
Crystal Wall says
I am saving this because its the prettiest I have ever seen, I love it in the stonewashed, that’s what I would have chosen IF I had felt my skills were up to par. I'[m afraid I would be way behind so I am saving it. I will be making this. I love seeing the Sunday morning posts. I feel like I am crocheting along with you all because of all the beautiful picture tutorials. I admire all the hard work all this takes. It’s really a lovely idea, and I love the pattern. Thanks for sharing it. I share and follow on Bloglovin. Thanks!
~Crystal
Dedri Uys says
Thank you, Crystal :)
Carol D says
So fun to look forward to a new “Part” Sunday morning!
Thank you, again, Dedri for your fabulous design and step by step tutorials!
I am in process of catching up with the second Sophie – so have to stop that for a bit and get back to Sophie 1. Haven’t done Part 8 on her yet. I’ve learned (after having to frog two rounds of S2) that I can’t do this when I have to jump up and down trying to do other things! Frustrating to have to frog after all that work….but yet another learning experience!
Back to the ‘grindstone’ – which is actually fun – to see my own Sophie shaping up.
Thanks, too, for the heads up on the Clover hooks…I thought they were far more expensive…got the set at Amazon for under $30 (USD). And even bought the blocking squares you recommended…
Dedri Uys says
I’m so pleased that you bought some, Carol. Like I said, I love my Clover Amour hooks. Unfortunately I paid full price for them, but even at that they are worth every penny!