This Ten Stitch Blanket Crochet Pattern is a conversion of Frankie Brown’s Ten Stitch Blanket Knitting Pattern. I think everyone who knits has heard or seen one of these blankets. They are ridiculously popular and quite addictive. I find myself sitting there going: “just one more row, just one more row” and an hour later my husband stumbles into the living-room all bleary-eyed wanting to know if I am ever coming to bed.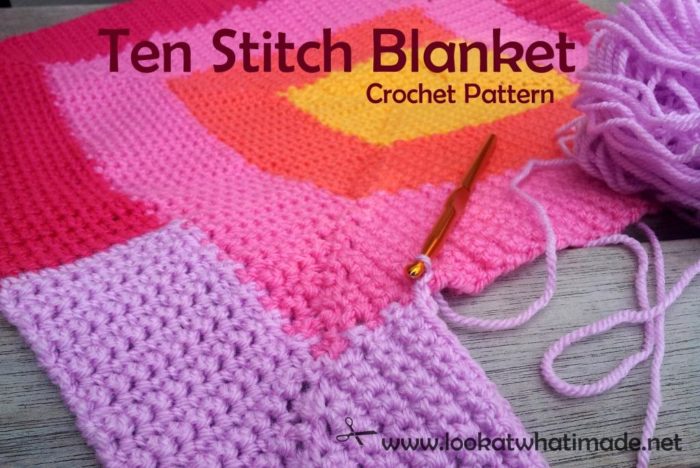
I would like to thank Frankie for giving me permission to write the crochet version of her lovely blanket.
This pattern is FREE, but if you would like to show your appreciation for Frankie and her designs, you are more than welcome to make a donation to the Children’s Liver Disease Foundation through Frankie’s Just Giving Page.
For those of you who have never seen (or heard of) the Ten Stitch Blanket, let me break it down for you:
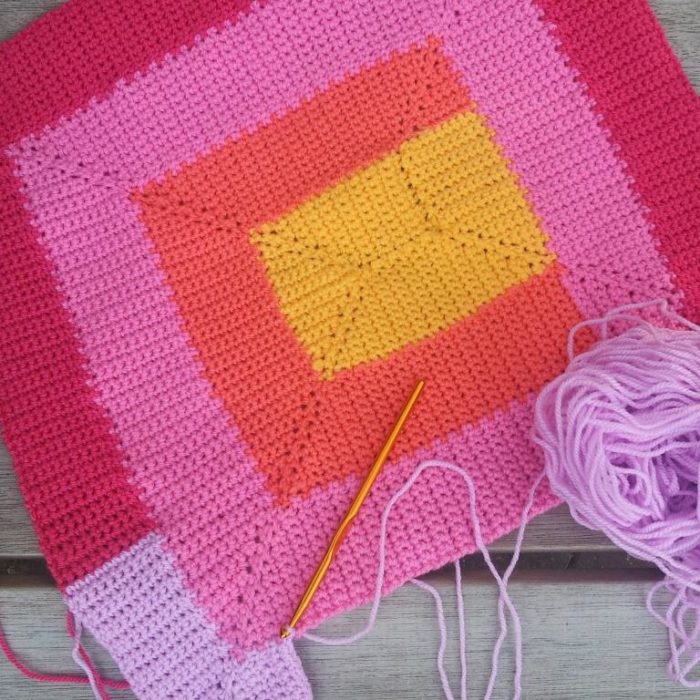
The Ten Stitch Blanket is worked in a spiral (or “rounds of rows”) around a central square of 10 stitches by 10 rows. The beauty of the project is that the short rows (10 stitches per row, less on the corner rows) propel you forward like you wouldn’t believe and it is the perfect pattern for using up any and every scrap of yarn in your house.
If, after reaching baby-blanket size, you decide to put the project aside until another day, simply stop at the end of one of the Middle Sections and USE it as it is, instead of leaving it in a bag all lonely and dejected. And sitting under it on a cold winter’s evening, crochet hook and yarn in hand with a newly finished project beside you, I can bet you that it won’t be very long before you think: “Maybe I should just add another round…I might as well, seeing as I have this hook already in my hand…”
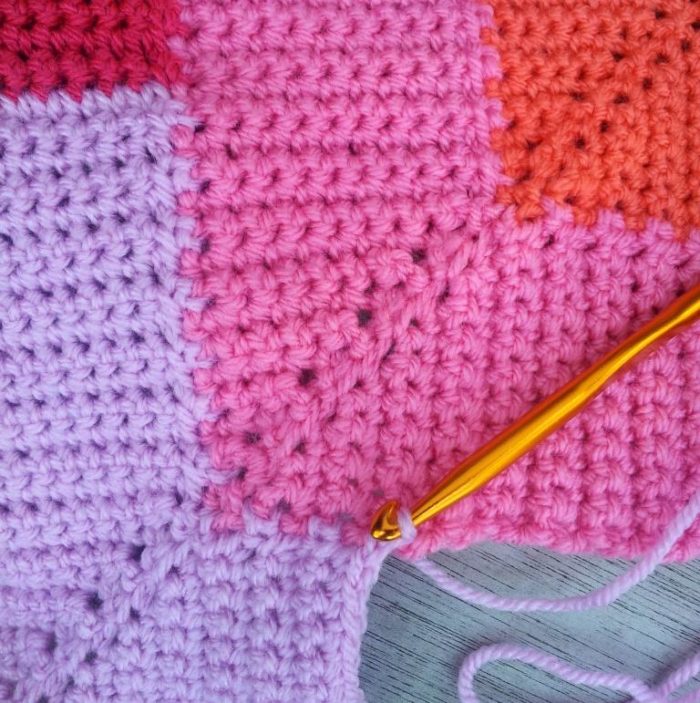
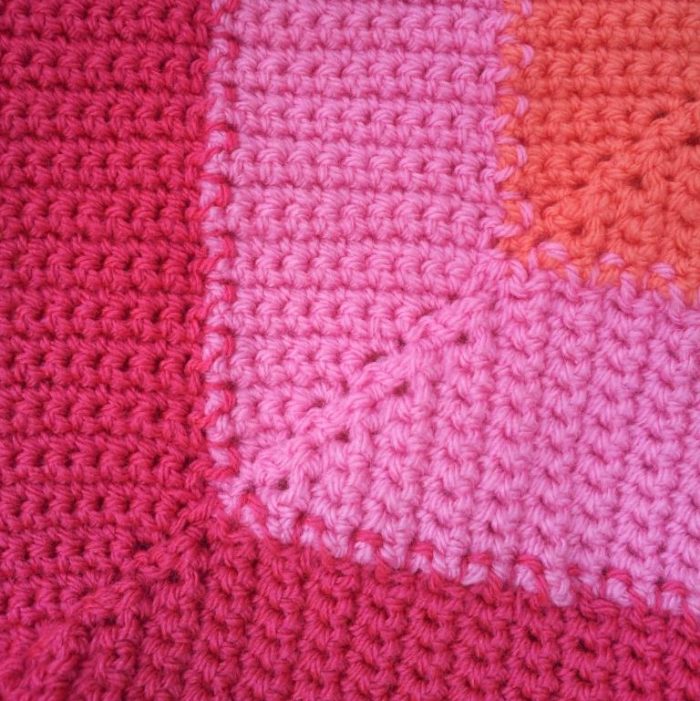
Because you are slip stitching into the rows of each previous “round of rows”, you will notice a little interlocking pattern along each “seam” (on the front of the blanket).
On the back of the blanket the seam will be more prominent.
Ten Stitch Blanket Crochet Pattern
© Dedri Uys 2013. All Rights Reserved.
This pattern was tested by: Korinne Wiese, Venetia Smith, Pam Perkins, Beth Spaulding and Phyllis Haygood.
Resources
- Add this Pattern to your Ravelry Queue
- If you would like to print this pattern, please use the print-friendly button at the bottom of this post, which will allow you to print/save the post. You will also have the option to remove unwanted images.
Materials
- Yarn and hook of your choice – but make sure you use the same yarn and hook for the whole blanket. Gauge is not important as such, but if you are going to use different thicknesses of yarn, you will need to work up your own gauge square and then adjust your hook accordingly when you swap yarn thicknesses. If you do not do this, you’re going to end up with one wonky-looking blanket.
- Loads of tea and a good television series
Abbreviations

US Terminology Used
- Ch – Chain Stitch
- Sl st – Slip Stitch
- Sc – Single Crochet
- Sc Inc – Single Crochet Increase
- Sc Dec – Single Crochet Decrease
Notes
At the bottom of the post you will find Printable Reference Cards for the Ten Stitch Blanket Crochet Pattern. These cards DO NOT contain the whole written-out pattern. They contain instructions for each of the sections in a handy cut-outable format so that you can print them, cut them out and laminate them for quick reference. I’ve left a little space where you can note down the hook and yarn you are using.
I got this idea from my friend Beth, who said that she likes having patterns on laminated cards so that she can use them on the go without ruining them.
I am sure you won’t need the instructions printed out, as it is super easy to memorize the pattern after the first few “rounds of rows”. I have merely included the printables for those among us that will start this blanket furiously…and then leave it lying around for a year before completing it. If that sounds familiar, you might want to print out the reference cards and keep them with the blanket until you pick it up again next year :)
A quick word about Yarn Ends
If you are using scraps of yarn for this Ten Stitch Blanket, it is a good idea to work over your yarn ends as you add each new colour. That way you won’t have a million tails of yarn to work away at the end. If you are not familiar with working over your yarn ends, here is a very clear tutorial by CrochetGuru.
The best place to change colours is on the outside edge of one of the middle sections, so at the end of one of the rows that end in a ch-1. The worst place to change colour is right on the sl st edge. Don’t do it!
Now that that’s done, let’s get started.
Instructions
I have broken the instructions for the Ten Stitch Blanket into 4 Sections: The First Square, The Ending Corners, The Beginning Corners and The Middle Sections.
Below this pattern diagram, you will find instructions and photos for how to work each of these sections.
If you get stuck with the pattern, please refer back to this diagram to see which section you should be working next! 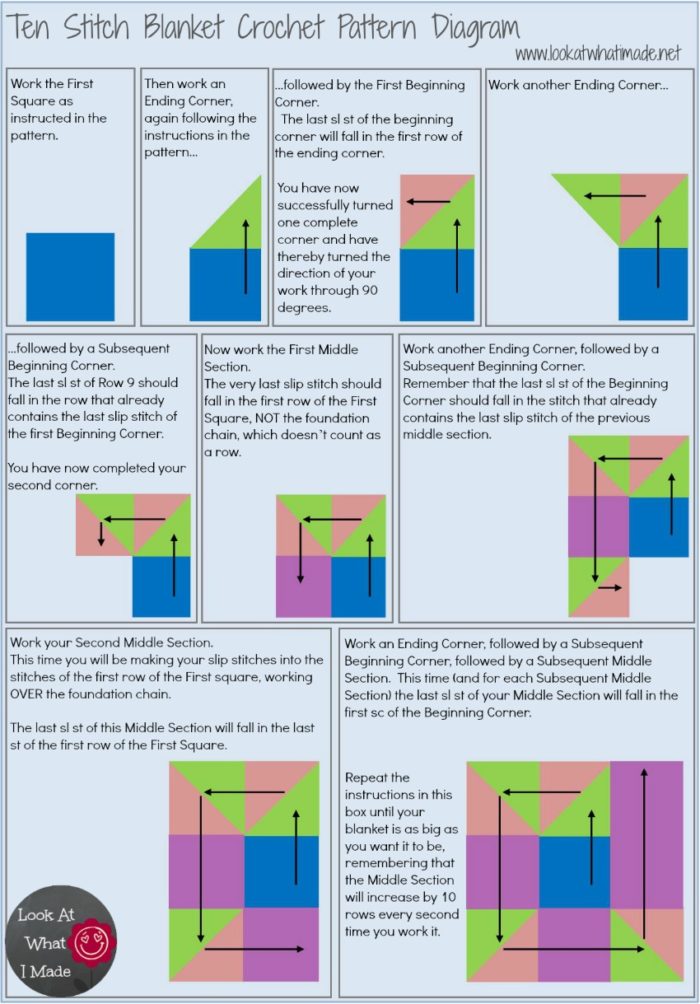
Please remember my warning about not changing yarn thickness/hook size halfway through the blanket (unless you make very sure that the gauge will match what you have been doing up to that point).
Instructions for Each Section
First Square
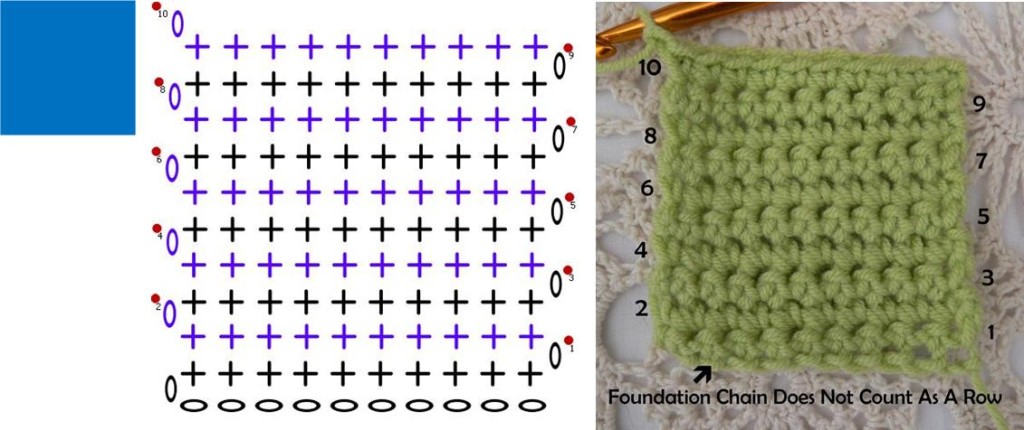
Foundation Chain: Ch 11. This foundation chain does not count as a row and you will work OVER it when the time comes.
Row 1: Sc in one loop only of the second chain from the hook and every chain across. Ch 1 and turn. {10}
Rows 2 – 10: Sc in each of the 10 stitches across. Ch 1 and turn. {10}
Now work an Ending Corner as instructed below.
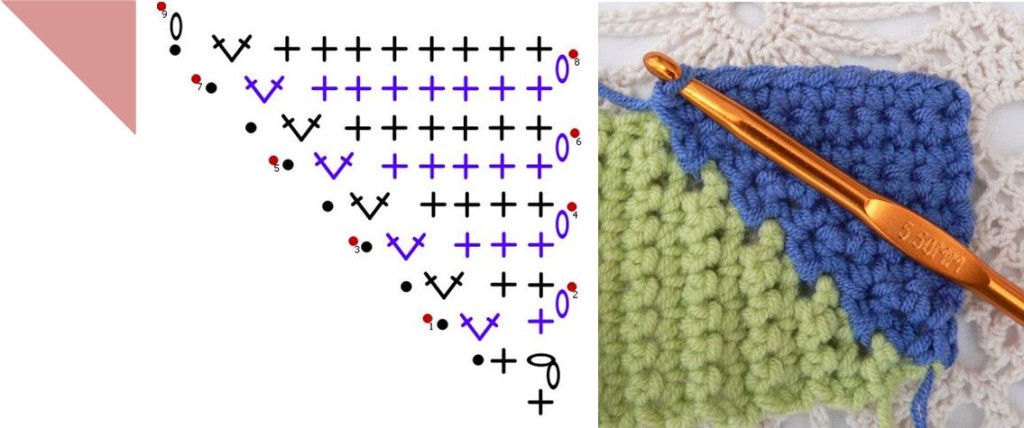
Ending Corners
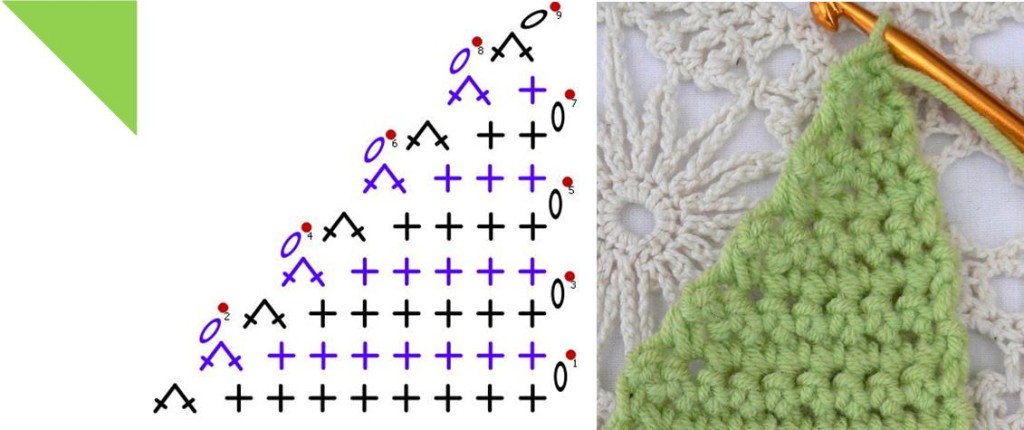
- Sc2tog, sc in the next 8 st’s. Ch 1 and turn. {9}
- Sc in the next 7 st’s, sc2tog. Ch 1 and turn. {8}
- Sc2tog, sc in the next 6 st’s. Ch 1 and turn. {7}
- Sc in the next 5 st’s, sc2tog. Ch 1 and turn. {6}
- Sc2tog, sc in the next 4 st’s. Ch 1 and turn. {5}
- Sc in the next 3 st’s, sc2tog. Ch 1 and turn. {4}
- Sc2tog, sc in the next 2 st’s. Ch 1 and turn. {3}
- Sc in the next 1 st, sc2tog. Ch 1 and turn. {2}
- Sc2tog. Ch 1 and turn. {1}
You have now made half of your corner. To complete the corner, and change the direction of your work by 90 degrees, make a Beginning Corner as instructed below.
You will need to do this after EVERY Ending Corner, otherwise your corners will be incomplete.
Beginning Corners
First Beginning Corner
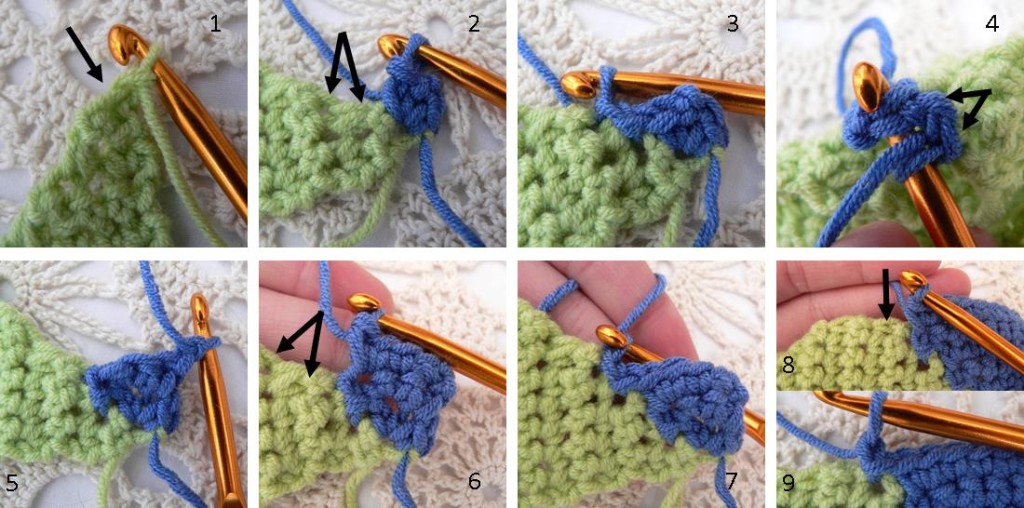
- (Sc, ch 2, sc) all in the only st of Row 9 of the Ending Corner – indicated by an arrow in photo 1 (see Photos 1 and 2). Sl st into the next 2 rows of the Ending Corner (indicated by arrows in Photo 2) and turn. (Photos 2 and 3)
- Skip the 2 sl st’s (photo 4). Sc inc in the next st, sc in the ch-2 space. Ch 1 and turn (Photo 5). {3}
- Sc in the next 2 st’s. Sc inc in the next st. Sl st into the next 2 rows of the Ending Corner and turn (Photos 6 and 7). {4}
- Skip the 2 sl st’s. Sc inc in the next st, sc in the next 3 st’s. Ch 1 and turn. {5}
- Sc in the next 4 st’s. Sc inc in the next st. Sl st into the next 2 rows of the Ending Corner and turn. {6}
- Skip the 2 sl st’s. Sc inc in the next st, sc in the next 5 st’s. Ch 1 and turn. {7}
- Sc in the next 6 st’s. Sc inc in the next st. Sl st into the next 2 rows of the Ending Corner and turn. {8}
- Skip the 2 sl st’s. Sc inc in the next st, sc in the next 7 st’s. Ch 1 and turn. {9}
- Sc in the next 8 st’s. Sc inc in the next st. Sl st into the first row of the Ending Corner. Ch 1 and turn (Photos 8 and 9). {10}
You have successfully completed one corner and changed the direction of your work by 90 degrees. You will now need to change it by 90 degrees again so that you are able to work into the side of the First Square.
So when you have completed the First Beginning Corner, make another Ending Corner and then a Subsequent Beginning Corner (instructions below).
Subsequent Beginning Corners
These corners are exactly the same as the First Beginning Corner, but the sl st at the end of Row 9 will fall in a row that already contains a sl st.
When you have completed your Subsequent Beginning Corner, make a Middle Section as instructed below. From this point onwards each Beginning Corner will be followed by a Middle Section.
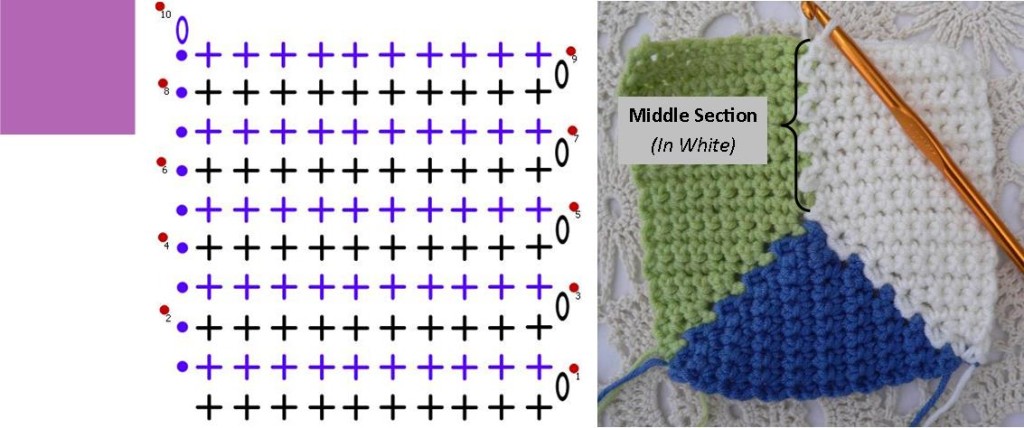
Middle Sections
(The middle section will increase by 10 rows every second time you work it. So that is: 10, 10, 20, 20, 30, 30…)
First Middle Section
- Skip the first st, which will be the sl st. Sc in the next 10 st’s. Ch 1 and turn. {10}
- Sc in the next 10 st’s. Sl st in the next 2 rows of the First Square and turn. {10}
- Skip the 2 sl st’s. Sc in the next 10 st’s. Ch 1 and turn. {10}
- Sc in the next 10 st’s. Sl st in the next 2 rows of the First Square and turn. {10}
- Repeat Row 3. {10}
- Repeat Row 4. {10}
- Repeat Row 3. {10}
- Repeat Row 4. {10}
- Repeat Row 3. {10}
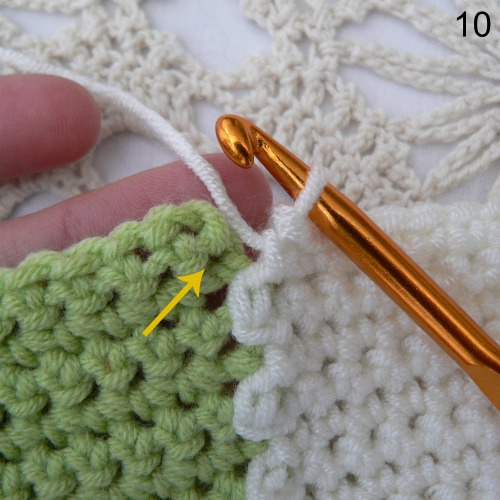
- Sc in the next 10 st’s. Sl st in the next row. This will be the first row of the First Square, NOT the foundation chain (see Photo 10). The foundation chain doesn’t count as a row and you will work over it to minimise the formation of holes. Ch 1 and turn.
Now work another Ending Corner (as instructed above).
Second Middle Section
For the second Middle Section you will be making your slip stitches into the stitches of the first row of the First Square (working over the foundation chain).
- Skip the first st, which will be the sl st. Sc in the next 10 st’s. Ch 1 and turn. {10}
- Sc in the next 10 st’s. Sl st in the next 2 rows of the First Square and turn. {10}
- Skip the 2 sl st’s. Sc in the next 10 st’s. Ch 1 and turn. {10}
- Sc in the next 10 st’s. Sl st in the next 2 rows of the First Square and turn. {10}
- Repeat Row 4. {10}
- Repeat Row 3. {10}
- Repeat Row 4. {10}
- Repeat Row 3. {10}
- Repeat Row 3. {10}
- Sc in the next 10 st’s. Sl st in the last stitch of the first row of the First Square. Ch 1 and turn.
Now work another Ending Corner.
Subsequent Middle Sections
-
- Skip the first st, which will be the sl st. Sc in the next 10 st’s. Ch 1 and turn. {10}
- Sc in the next 10 st’s. Sl st in the next 2 rows of the blanket and turn. {10}
- Skip the 2 sl st’s. Sc in the next 10 st’s. Ch 1 and turn. {10}
- Sc in the next 10 st’s. Sl st in the next 2 rows of the blanket and turn. {10}
- Repeat Row 4. {10}
- Repeat Row 3. {10}
- Repeat Row 4. {10}
- Repeat Row 3. {10}
- Repeat Row 3. {10}
- Sc in the next 10 st’s. Sl st in the first sc of the Beginning Corner of the previous “round of rows” (see Photos 11, 12 and 13). Ch 1 and turn.
Continuing With the Blanket
Continue working an Ending Corner, a Subsequent Beginning Corner and a Subsequent Middle Section (which will increase by 10 rows every second time you work it) until your blanket is as big as you want it to be.
By the time you have worked all the sections illustrated in the diagram at the start of this post, you should be able to do this pattern backwards in your sleep.
Around this time you will also notice that it is becoming a drag to turn the whole thing over every 10 seconds. This can be easily remedied. Simply flick your work back and forth between rows like the pages in a book instead of turning it around in the traditional way. Please note, though, that this will “hide” the last stitch (the stitch next to the slip stitch edge) a little bit, making it easy to miss and subsequently skip. So if you are going to take the path of least resistance with the turning, make sure that you don’t start skipping stitches when you shouldn’t be.
You will notice that the corners won’t be exactly square. In fact, they will look rounded and a bit “curly”. This will correct itself when you work the next “round of rows” into them and they should self block. Even so, you might need to give your work a bit of a tug every now and then and you should definitely block the finished blanket.
Printable Reference Cards for the Ten Stitch Blanket Crochet Pattern
Like I have already mentioned, you might want to make this blanket as a gap-filler between other projects. If you are concerned that you might forget how to work the sections the next time you pick the blanket up, please feel free to print and laminate these reference cards. Remember to note down the hook and/or yarn you will be using for your blanket.
These cards are NOT the completed pattern, only the basic instructions for each section. If you get stuck using them, please refer back to the instructions and diagram above.
I hope you love working on this Ten Stitch Blanket. If you have any questions or suggestions, please do not hesitate to leave me a comment. And I love, love, LOVE seeing your completed (or even in-progress) projects. To brag about your blanket, add a Ravelry Project to the pattern or share a photo on the Lookatwhatimade Facebook timeline.

This blog post contains affiliate links. I only link to products I personally use or would use. All opinions are my own.



Sarah says
Hello? I can’t quite get mine to lie flat. It’s a bit rumpled but almost flat. It looks really gorgeous otherwise. What’s going wrong?
Dedri Uys says
Can you email me a photo to dedri(at)lookatwhatimade(dot)net? I can help you better if I can see exactly what is going on.
Carla says
Can you put the deleted video back? It would be better than having nothing at all
Dedri Uys says
Unfortunately, I no longer have the video.
Janice Starnes says
I just heard of the loom version of this pattern on Facebook in the group GoodKnitKisses Loom Knit & Craft Club. Checked Pinterest for pattern and found your crochet pattern. I’m excited to find it because I’m more of a crocheter than knitter. I also want to try the tunisian pattern. Thank you for this pattern and others on your site.
Teresa Estrade Smith says
I’ve just discovered this blanket, thanks FB, and I love it. Could you tell me how many colours I’ll need to make it? Thank you for all your hard work, We enjoy it a lot.
Dedri Uys says
Hi Teresa. It is a scrap blanket, so however many colours you would like to use and you just keep going for as long as you want to.
Suzie Heyer says
Is the video tutorial still going to be done? I’m so wanting to see a video for this. Ty
Dedri Uys says
Hi Suzie. It will be done when my video guru has time :)
Stephanie Shoff says
Bought some stitch markers as you suggested and it has made things so much easier and my lines so much nicer. So far my only issue is the foundation chain. That will take some practice making it pretty. Wish I could show you my progress. So excited, I have wanted to find this pattern for so long. I knew it had to exist in crochet and now that I can use the pattern I’m so happy it’s coming out so well. Happy Birthday to me, I’ve accomplished this pattern!
Dedri Uys says
I am so glad that you are managing the pattern, Stephanie. I will send you an email and then you can send me a photo if you want x
Sunshne says
Pretty Please post a video soon. I am very new to crocheting and the beginning corner is escaping me. It took me almost an hour to figure out the first square and ending corner, but I cannot grasp that. Please do a video?
Dedri Uys says
Hi,
Esther from It’s All in a Nutshell will be doing a video as soon as her time allows.
Echo says
Something about the joining of the afghan just doesn’t work out. From the large picture, it doesn’t even look like the “X” matches. The left side seems ok, but on the right, it’s way off — doesn’t even meet the other point. Are you sure the directions are correct?
Dedri Uys says
The blanket is worked in a spiral of rows, which is why the points don’t all meet in the center.
Stephanie says
Thank Dedri. I will have to try that.
David Coleman says
Thank you for this project. I have done some in Tunisian but had never thought of it in single crochet. I will have to give it a try.
Stephanie says
oK i am understanding the pattern. takes a little bit of practice and going back and forth between the diagrams and instructions. The problem I am having is trying to figure out how I know where to put my sl st. I know it is supposed to go into the row but I have trouble trying to figure out which stitch to put my hook in. I have always been bad at that, please don’t think it is your instruction. I either go into what I think is a row and end up over my other angle or I don’t do enough and end up with my outer lines rounded. I need to find a way to get my lines and angles as straight as your. Any tips and tricks you could pass along would be a big help. I am so happy you have provided these instruction. The blanket is what I had invisioned for my scrap yarn but just hadn’t quite figured out how I was going to do it . So thank you and I appreciate it. Can’t wait for the video. Im sure it will make my life so much easier.
Dedri Uys says
Hi Stephanie. I am sorry to hear that you are having trouble with the rows. Have you tried making a swatch and putting a stitch marker in the first and last stitch of each row so that you can see what they should look like when you have completed a couple of rows? Once you have trained your eye to recognize the rows, it might be easier to work into them without markers? Apart from that I really don’t know what to suggest. It took me ages to really start looking at my stitches and it was only once i started doing that that my crochet life became infinitely easier.
Norma says
I have been crocheting for over 30 years, and I am not understanding this pattern at all. Maybe the video will help when it is re-posted …. but at this point, I can’t “grasp” it.
Dedri Uys says
I am sorry that you are having trouble with the pattern, Norma. The video for the tunisian version has been done and will be released early in the new year. The video for the regular crochet version will follow.
suzie heyer says
Are the video tutorials available? I’m wanting to watch them so badly… I’m totally not getting the pattern and learn so much better when there is a video. Thanks so much
Dedri Uys says
Hi Suzie. Esther from It’s All in a Nutshell will be doing re-doing the videos early in the new year.
April says
Hi Dedri! I so love this blanket, by any chance do you have the link for the tunisian vídeo or any info on when the vídeo for this one will be available? Thanks!!!
Dedri Uys says
Hi April. The video will be available on the 17th of December.
Dee says
Hi, just wondering when the video will be posted for this pattern? I want to make it for a Christmas gift, I really need help with the different types of stitching, as I am just a beginner! Thanks
Dedri Uys says
Hi Dee. I have found someone to do the video tutorials. She has just made the video for the tunisian ten stitch and that will be available by the end of October. After that she will be doing the video for the regular ten stitch.
Sarah says
The rounded corners and sides aren’t bugging me, but every time I get sections on all sides, the first sections in the middle get all rippled. I’ve frogged a whole skein twice to restart. Is the bulging middle normal and will it work out or am I doing something wrong?
Sarah says
I got it. I think I was skipping the chain 1 after the beginning corner and middle section.
Shannon says
Hello there! Do you know when you’ll get to have a new video up? I feel like I need a visual guide because mine’s coming out a little bit wonky, so I’m hoping following a lot will help. Regardless, thank you so much for this, I do appreciate the pattern! (and in the mean time, I’m just going to keep working on it, practice makes perfect after all!)
Dedri Uys says
It won’t be for at least a month, Shannon. Maybe put it aside for now and do something else? Or keep practising. It DOES make perfect :)
Jess says
Ditto – I keep trying but can’t seem to get the subsequent beginning corner.
Would love to see a video when it’s available. Think I’ll get back to Sophie in the meantime – almost done with part 9!
Thanks again for sharing this pattern!!
Kimberly S. says
Thank you for sharing this! I’m looking forward to having this to break up the color monotony I seem to experience when working on a project non-stop. :) Thanks!
Nina says
Hi I was just wondering if I could get some help. Can someone please explain in a row by row how to do the Subsequent Beginning Corner.
I’m confused as to how it is instrutted.
Dedri Uys says
Hi Nina. For the subesquent beginning corner you follow the first beginning corner instructions. The only difference is where your last sl st goes. In the beginning corner Round 9: Sc in the next 8 st’s. Sc inc in the next st. Sl st into the first row of the Ending Corner. Ch 1 and turn (Photos 8 and 9). {10}
In the subsequent corner Round 9: Sc in the next 8 st’s. Sc inc in the next st. Sl st into the first row of the Ending Corner, which will already contain a stitch. Ch 1 and turn (Photos 8 and 9). {10}
Kathy Peters says
Thank you for your talent and your generosity in sharing yet another pattern. I hope someday you make just a huge fortune on your talent.
Kathy
Dedri Uys says
Thank you, Kathy :)