I designed this crochet Rose on the 4th of February 2024, so today – exactly two years later – felt like the perfect time to finally share the pattern. As most of you know, I’ve spent the last two years focusing mainly on the Universe in Bloom CAL. Now that that is out in the world and living its best life, I’ve decided to prioritise the flower patterns for my Lucy Wall Bouquet crochet flower series – an evolving design that has been quietly waiting its turn. This crochet rose is the fourth flower in the series.
As with the other flowers, I decided to dig into the meaning of roses. I didn’t have to dig very deep, let’s be honest. We all know roses symbolise love.
But then I went down a rabbit hole, remembering The Name of the Rose and some quotes I’d scribbled down decades ago. That meant I had to find the piece of paper with the quotes on it, which took some time too – a beautiful example of how I tend to usefully procrastinate.
Eventually, I found the quotes. And this is the one I wanted to share:
“How peaceful life would be without Love, Adso. How Safe. How Tranquil. And how Dull.”
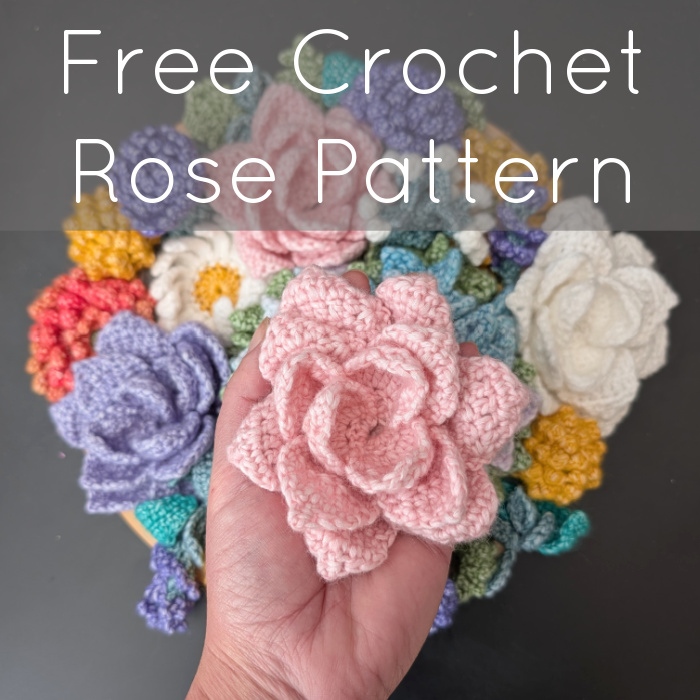
Crochet Rose Pattern
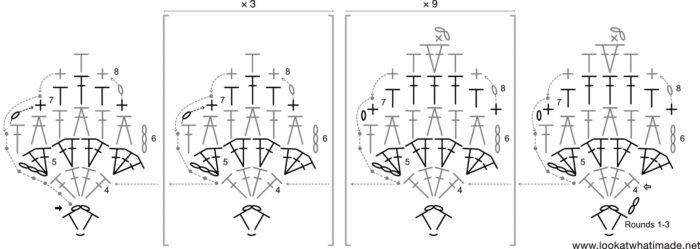
This free crochet rose pattern is presented as a photo tutorial, with charts by the talented Masako Kawahara from Crochethmmm. If you have any problems with the instructions, please look at the Video Tutorials listed below.
Resources
- Other Patterns in this Crochet Flower Series (as they become available)
- Video Tutorials:
- Instagram: #crochetRoseLAWIM
Abbreviations
US Terminology
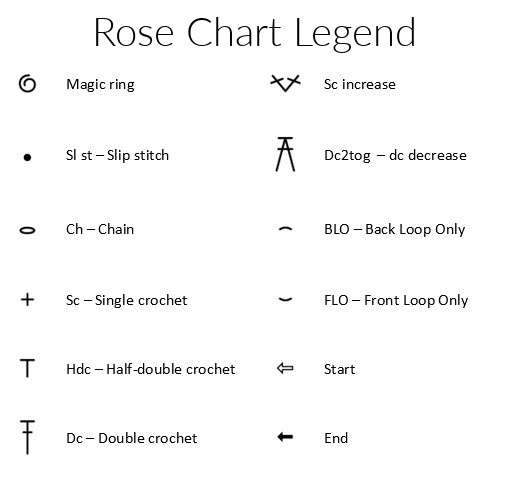
- BLO – Back loop only
- Ch – Chain
- Dc – Double crochet
- FLO – Front loop only
- Hdc – Half-double crochet
- Rem – remaining/remains
- RS – Right side
- Sc – Single crochet
- Sl st – Slip stitch
- SM – Stitch marker
- St/sts – Stitch/stitches
- WS – Wrong side
- [] – Stitches to be worked into the same st/sp
- () – Repeat instructions between parentheses the number of times specified
Special Stitches
Picot dc – Make a dc. Ch 2, complete the Picot by making a sc in the top of the dc just made. To do this, insert your hook into both loops of the dc from the side and complete a sc.
Chart Legend
Materials
- 4mm crochet hook (I use Clover Amour, available HERE on Amazon)
- Yarnsmiths Pebble Haze DK (50g/145m; 33% acrylic, 67% cotton) – available from Wool Warehouse HERE.
- Light Green – 2C120 Titanite
- Light Pink – 2C200 Petalite (please see Notes below)
Notes
- For my Lucy Wall Bouquet, I made 3 Roses. Each Rose used approximately 1g of green and 13.5g of colour, so you will have enough yarn to make all 3 out of one ball if you choose to make them all the same colour.
- I chose to make each one in a different colour: one in Petalite 2C200, one in Marble 2C040, and one in Fluorite 2C170. The Fluorite one is a nod to my favourite lilac rose with the most amazing scent. My granny had one lilac rose bush in the top left-hand corner of her rose garden, and whenever possible, I returned home with one after our visit!
Instructions
Base Part
Worked in a spiral.
Round 1
Into a magic ring, ch 1, make 8 sc, marking the FLO of the first sc with a SM. {8 sc}
Round 2
Make 2 BLO sc in each of the 8 sts. {16 BLO sc}
Round 3
(Make 2 BLO sc in the next st, BLO sc in the next st) 8 times. Make a BLO sl st in the next st. Fasten off and work away your ends. {24 BLO sc} 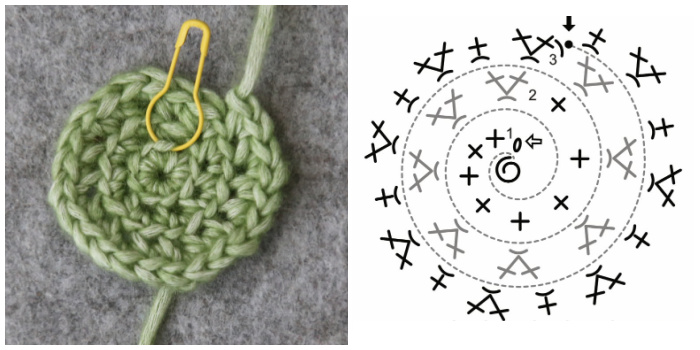
Making the Rose
Rounds 1 – 3 will create the Base Spiral for the Rose. The Petals will be created individually in rows (Rows 4 – 8), starting with 10 Large Petals, followed by 4 Small Petals.
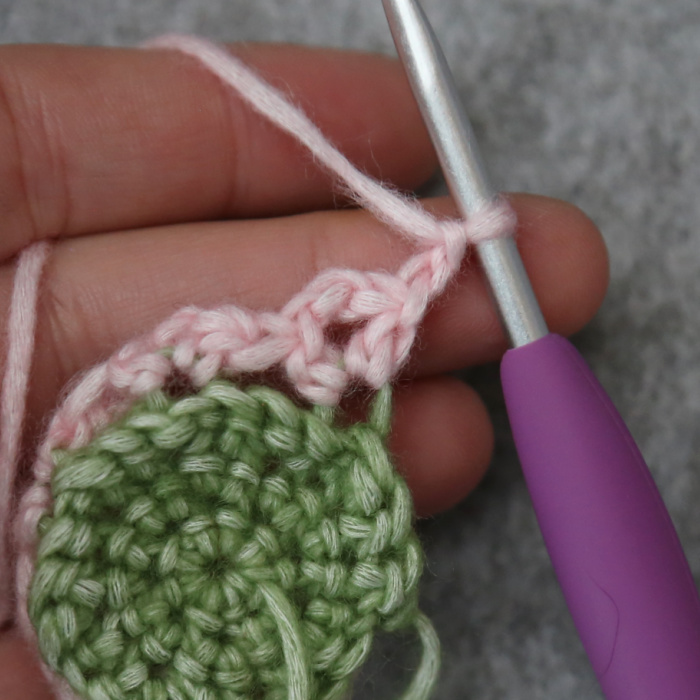
Rounds 1 – 3
I’ve written these three rounds as continuous instructions because it simplifies the instructions and makes them easier to read and execute.
Join your yarn by making a standing hdc in the marked FLO and remove the SM. Ch 2, hdc in the same FLO. (Skip the next st, [hdc, ch 2, hdc] in the FLO of the next st) 4 times. (Skip the next 3 sts, [hdc, ch 2, hdc] in the FLO of the next st) 9 times. TURN, leaving the rem 3 sts unworked.

Ch-2 before starting the first Petal. This doesn’t count as a st.
First Large Petal
You will find the chart for the Large and Small Petals at the end of the pattern.
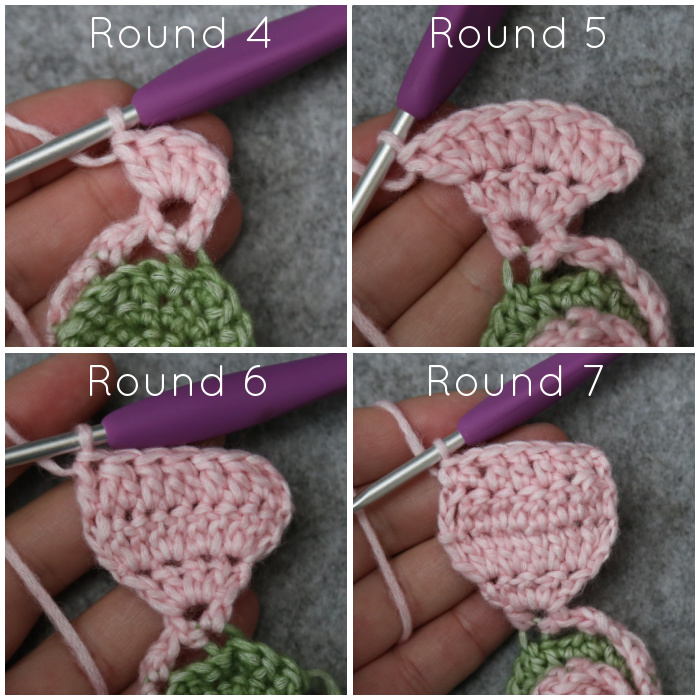
Row 4
With WS facing, make 4 dc in the next ch-2 sp, TURN. {4 dc}
Row 5
With RS facing, ch 3, make 2 dc in the same st. Make 2 dc in each of the next 2 sts, make 3 dc in the last st. TURN. {10 dc}
Row 6
With WS facing, ch 3. (Dc2tog over the next 2 sts, dc in the next st) 3 times. TURN. {3 dc and 3 dc2tog}
Row 7
With RS facing, ch 1 (doesn’t count as a st throughout). Sc in the same st. Hdc in the next st, dc in the next 3 sts, hdc in the next st, sc in the last st. TURN. {2 sc, 2 hdc, and 3 dc}
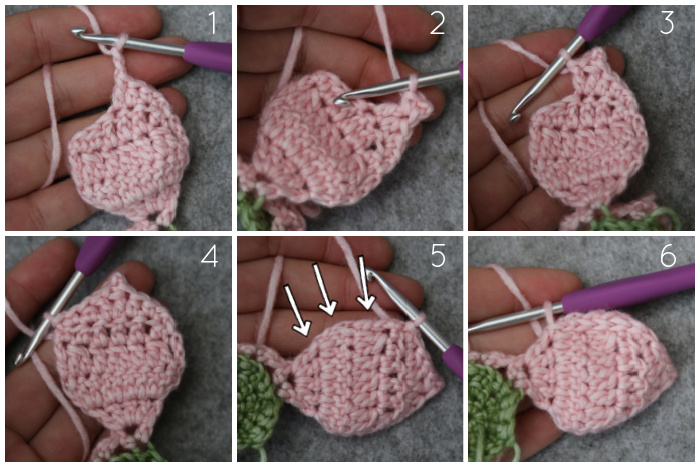
Row 8
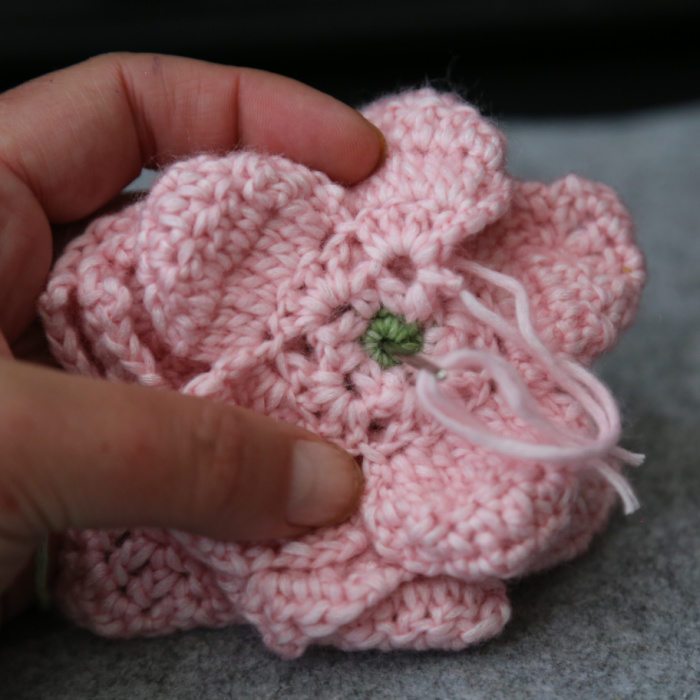
With WS facing, ch 1. Skip the first st, which will be the sc. Sc in the next st, hdc in the next st. [Picot dc, dc] in the next st {Photos 1 – 3}, which should be the central dc. Hdc in the next st, sc in the next st, sl st in the last st {Photo 4}.
Working down the side of the rows, make 2 sl sts in the side of Row 6, make 2 sl sts in the side of Row 5, sl st in the top of the last dc from Row 4 {Indicated with arrows in Photo 5 and illustrated in Photo 6}. {2 sc, 2 hdc, 1 dc, and 1 Picot dc – not including sl sts}
Subsequent Large Petals
Repeat Rows 4 – 8 nine more times so that you have a total of 10 Large Petals.
First Small Petal
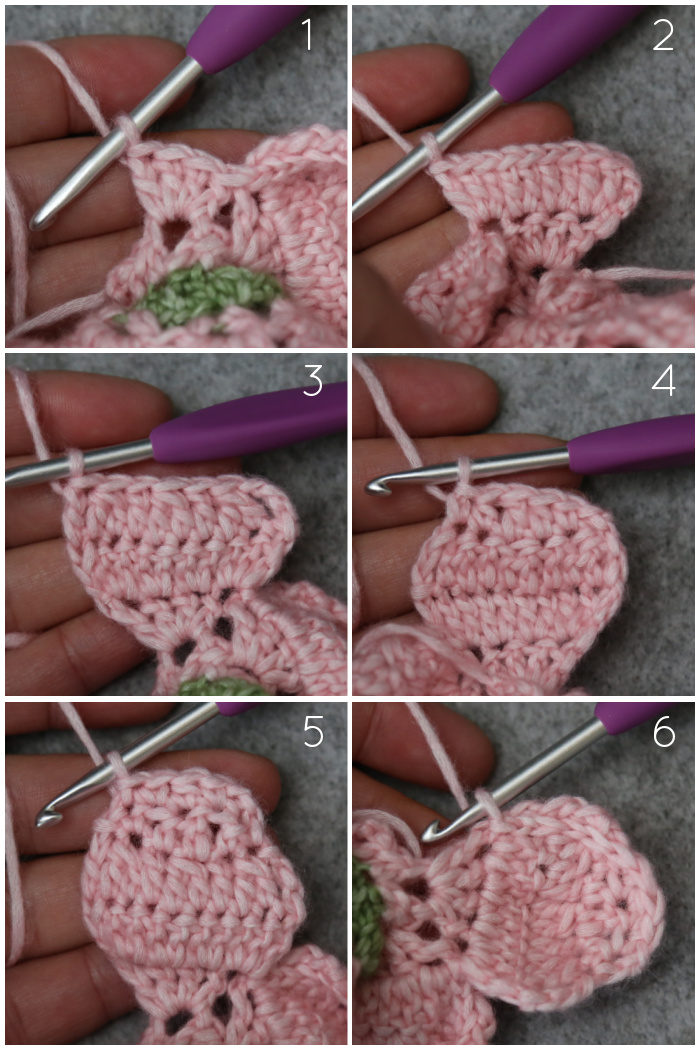
Row 4 (Same as Large Petal Row 4)
With WS facing, make 4 dc in the next ch-2 sp {Photo 1}, TURN. {4 dc}
Row 5 (Same as Large Petal Row 5)
With RS facing, ch 3, make 2 dc in the same st. Make 2 dc in each of the next 2 sts, make 3 dc in the last st {Photo 2}. TURN. {10 dc}
Row 6 (Same as Large Petal Row 6)
With WS facing, ch 3. (Dc2tog over the next 2 sts, dc in the next st) 3 times {Photo 3}. TURN. {3 dc and 3 dc2tog}
Row 7
With RS facing, ch 1. Skip the first st, sc in the next st, which will be the dc2tog. Hdc in the next st, dc in the next st, hdc in the next st, sc in the next st, which will be the last dc2tog {Photo 4}. Skip the last st and TURN. {2 sc, 2 hdc, and 1 dc}
Row 8
With WS facing, ch 1. Skip the first st, which will be the sc. Sc in the next st, hdc in the next st, sc in the next st, sl st in the last st {Photo 5}.
Working down the side of the rows, make 2 sl sts in the side of Row 6, make 2 sl sts in the side of Row 5, sl st in the top of the last dc from Row 4 {Photo 6}. {2 sc and 1 hdc – not including sl sts}
Subsequent Small Petals
Repeat Rows 4 – 8 three more times so that you have a total of 4 Small Petals.
To finish off, sl st in the side of Row 4 of the last Small Petal {Photo 7}, then sl st into the ch-2 sp that contains the last Small Petal {Indicated with an arrow in Photo 7 and illustrated in Photo 8}. Fasten off and work away your ends.
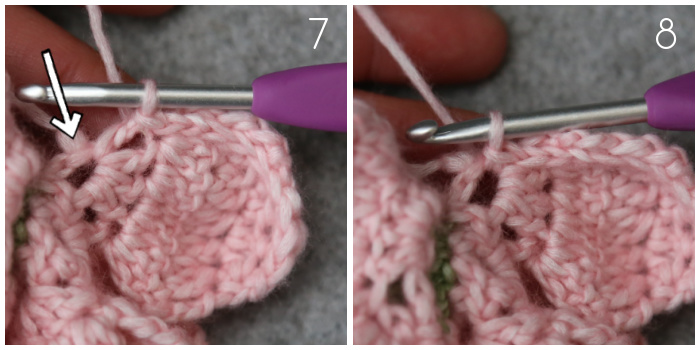
I find it neatest to thread ends through the centre of the magic ring to the back of my work and then work them away. This pulls that last Small Petal into place nicely.
Well done on completing your rose.
If you’re still here reading this, I’d like to share something a little more personal.
I have a habit of shining a spotlight on my flaws, to the exclusion of all else. Someone once told me to step back. “It’s all about perspective“, he used to say. He explained that roses have thorns (those are the flaws, in case that bit isn’t clear), but no one calls a rose bush a thorn bush. They call it a rose bush.
Since then, that small visual reframe has helped me gain perspective many times. And maybe one of you out there needs to hear this today: you are a rose bush, not a thorn bush.

I’ll leave you with the second quote from The Name of the Rose:
“The beauty of the universe consists not only of unity in variety, but also of variety in unity.”
More Crochet Flowers for Your Bouquet
More crochet flowers are on the way!

This blog post contains affiliate links. I only link to products I personally use or would use. All opinions are my own.


