I am very excited to share the pattern for the Memory Lane blanket with you. I hope you have a lot of fun making it, and that it brings back many happy memories.
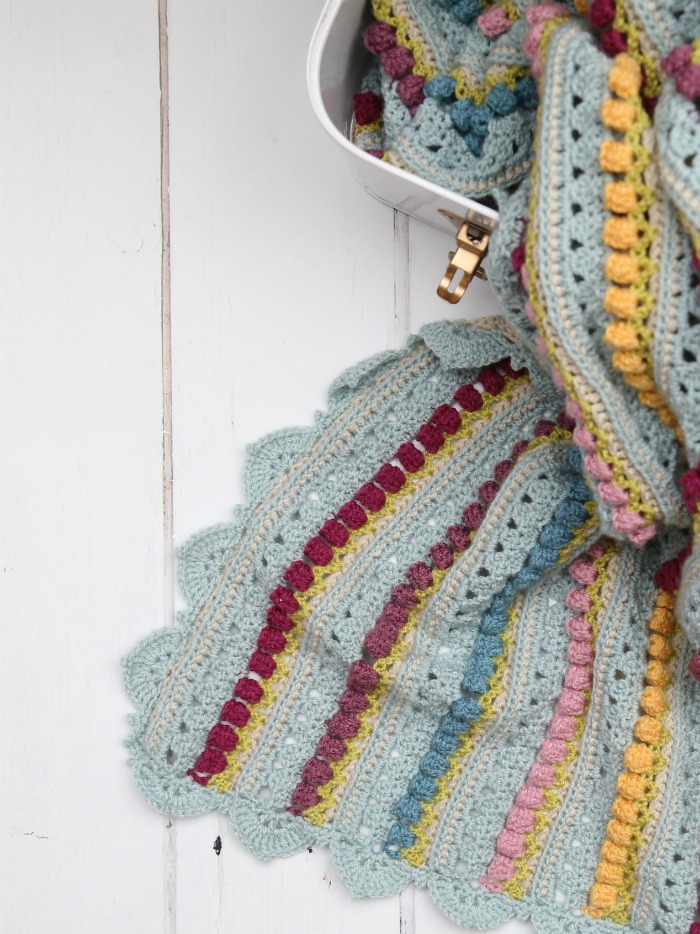
If you would like to read more about the Memory Lane blanket and the journey it has taken me on, you can have a look at my post about Choosing the Colours, my Work in Progress post, and last week’s Reveal.
Memory Lane Blanket Pattern
© Dedri Uys and Scheepjes 2017. All Rights Reserved
Credit to Kay Crone for her help in making up the blanket.
Materials
- 4 mm crochet hook (US 6/G UK 8)
- Scheepjes Colour Crafter:
- Main Colour 1 (MC1) – Zandvoort (1218) – 3 skeins
- Main Colour 2 (MC2) – Delftzijl (1822) – 2 skeins
- Main Colour 3 (MC3) – Goes (1820) – 7 skeins
- Contrasting Colour 1 (CC1) – Gouda (1081) – 1 skein
- Contrasting Colour 2 (CC2) – Venlo (1080) – 1 skein
- Contrasting Colour 3 (CC3) – Alphen (1722) – 1 skein
- Contrasting Colour 4 (CC4) – Hoorn (1067) – 1 skein
- Contrasting Colour 5 (CC5) – Zutphen (1828) – 1 skein
(See Yardages and Colour Changes below for information about which Contrasting Colour to use in which row.)
Memory Lane Blanket Yarn Packs
Yarn packs for this blanket are available from my Wool Warehouse shop and include a written-only (ish) version of the pattern. You can find them HERE.
Individual balls of Colour Crafter are available from Wool Warehouse, Deramores, and Other Scheepjes Retailers.
Abbreviations
US Terminology
- Ch/chs – Chain/chains
- BP – Back post (insert your hook from back to front around the post of the indicated stitch and complete the stitch as normal)
- Dc – Double crochet
- RS – Right side
- Sl st – Slip stitch
- Sp/sps – Space/spaces
- St/sts – Stitch/stitches
- Tr – Treble crochet
- WS – Wrong side
Punctuation
* An asterisk indicates pattern repeats. You will need to repeat all the instructions between asterisks the number of times specified. This is a hard-core repeat and will consist of multiple instructions.
Parentheses () indicate repeats. You will need to repeat the instructions between parentheses the number of times specified. This is a lower level repeat. Parentheses are also used to indicate a group of stitches to be worked into the same stitch/space.
Special Stitches
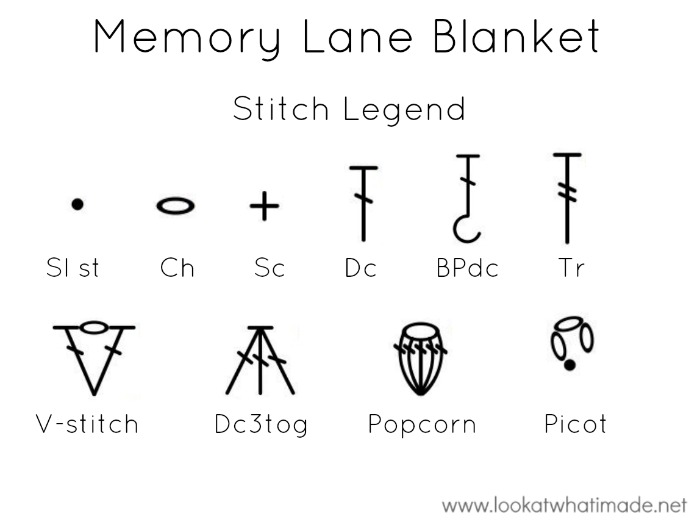
- Popcorn Stitch – Make 5 dc in the same stitch. Remove your hook from the last stitch. Insert your hook into the first dc of the 5 Grab the last stitch with your hook and pull it through the first stitch. If you want to make Really Lazy Popcorns instead (which I thoroughly endorse), please see the photo tutorial HERE.
- Cluster (Dc3tog) – (Yarn over and insert your hook into the next Yarn over and pull up a loop. Yarn over and pull through 2 loops) 3 times. Yarn over and pull through all 4 loops on your hook. See this tutorial.
- Standing Sc – This stitch is the same as a regular sc, but it is made ‘in air’. With a slip knot already on your hook, insert your hook into the indicated st/sp. Yarn over and pull up a loop. Yarn over and pull through both loops on your hook.
- V-Stitch – (Dc, ch 1, dc) in the same stitch
Chart Stitch Legend
Gauge
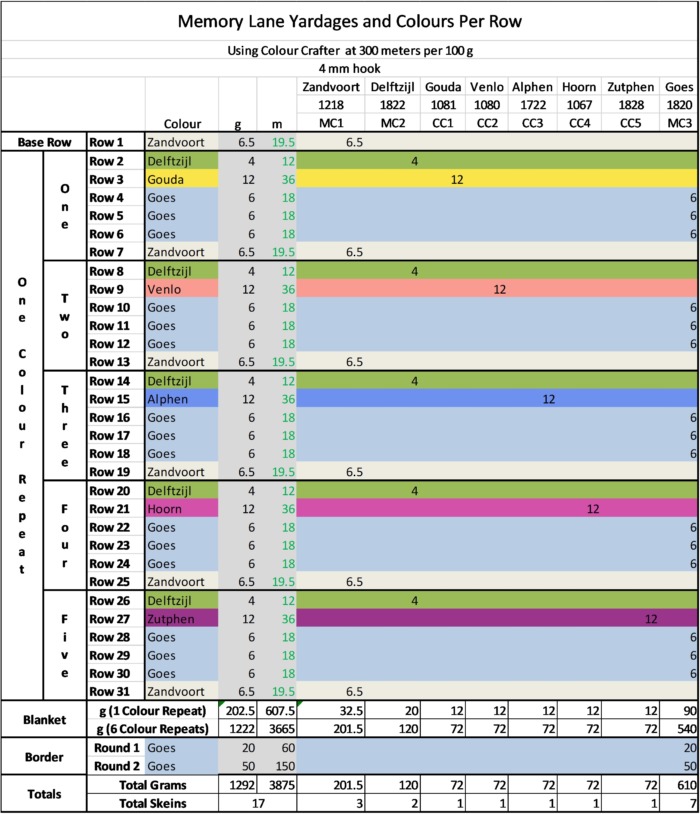
The first 6 rows should measure 6.5 cm (just over 2.5”). You should have 9.5 rows and just over 6 Popcorns per 10 cm (4”) square. I am quite a tight crocheter, so if you know you crochet loosely, you might want to go down to a 3.5 mm hook. Please use the chart supplied below to check your yarn usage against mine.
Size
- Without border: 120 cm x 168 cm (47″ x 66″)
- With border: 126 cm x 174 cm (49.5″ x 58.5″)
This blanket is created by repeating the same six rows over and over again. If you would like to make your blanket bigger or smaller, start with a multiple of 39 + 21 chains (otherwise the border won’t work out) to give you your desired width and then repeat the 6-row repeat until you achieve your desired length.
Notes
- If you have trouble identifying the right side and the wrong side of your work, here’s a handy tip: when the Popcorns from Row 3 are facing you, you are looking at the right side of your work.
- When you change colours, do so on the last yarn-over of the last st of the row.
Yardages and Colour Changes
Please keep in mind that these yardages are dependent on your gauge (see Gauge above).
You have 5 Contrasting Colours (CC). Each 6-Row Repeat will use one of the Contrasting Colours (as set out in the table below). When you have used all five Contrasting Colours, you will have made one Colour Repeat (five 6-Row Repeats). Repeat this Colour Repeat 5 more times. This will give you thirty 6-Row repeats and 6 Colour Repeats. At the end of Row 181, your blanket should be 120cm x 168 cm.
You are welcome to make more or fewer rows as needed, keeping in mind that rows should be increased or decreased in full repeats, otherwise the border won’t work out.
Chart
The charts in this tutorial are smaller (sample) versions of the blanket and do not show all the repeats! They should be used in conjunction with the written pattern. For the border charts, I have included asterisks and parentheses to highlight the repeats in the pattern.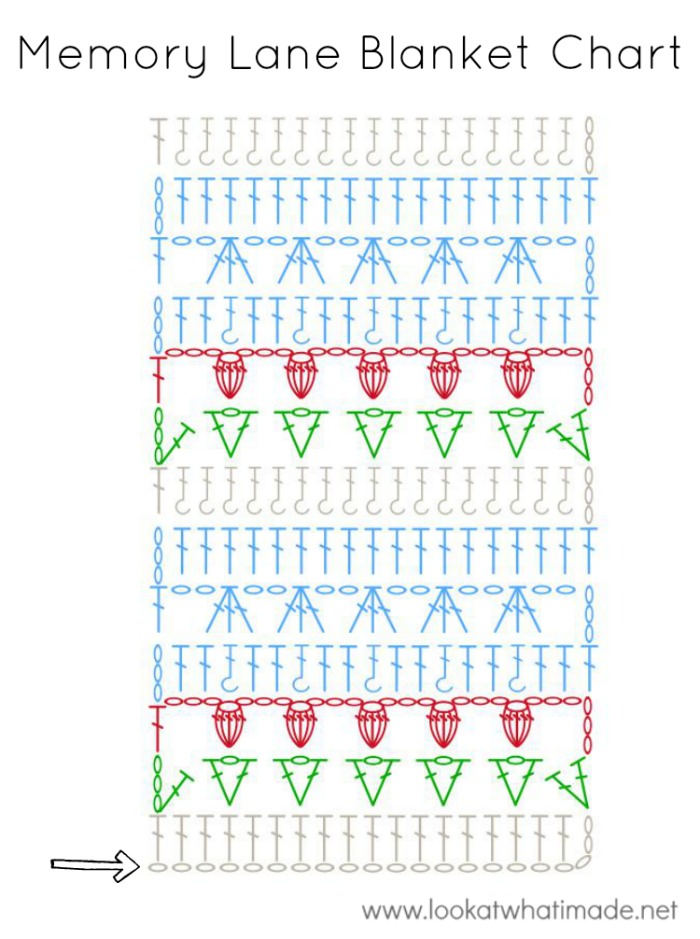
Instructions
For the photo tutorial below, I have used Cahlista (to make the stitches easier to see) and a small very sample of the blanket (to make it easier to photograph).
Blanket
Row 1 {MC1}
If you know that you make your chains very tight, I suggest starting with a 4.5 mm hook for the chains and then moving on to a 4 mm hook for the rest of the blanket.
With MC1, ch 216. Dc in the fourth chain from the hook and each subsequent chain. Change to MC2 and TURN. {214 dc – including beginning ch-3}
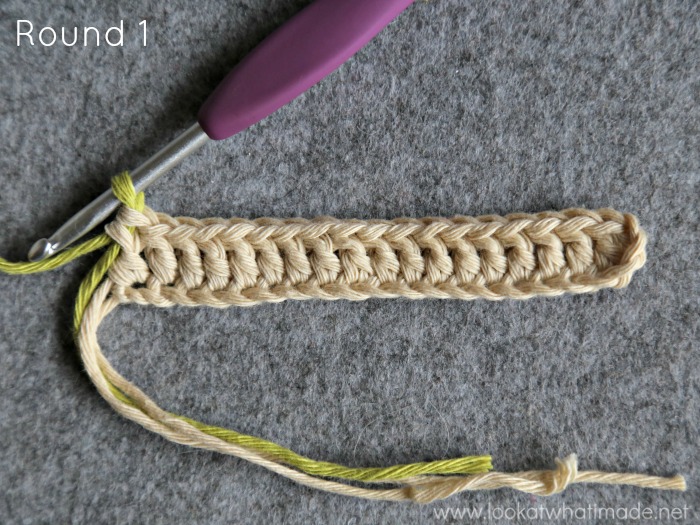
Row 2 {MC2}
With WS Facing: Ch 3 (counts as dc) and dc in the st at the base of the ch-3. Skip the next 2 sts. (Dc, ch1, dc) in the next st. This is your first V-Stitch made. (Skip the next 2 sts, make a V-Stitch in the next st) until you have 3 sts left. Skip the next 2 sts and make 2 dc in the last st, which will be the beginning ch-3 of the previous row. Change to CC (see Yardages and Colour Changes above) and TURN. {4 dc and 70 V-Stitches – including beginning ch-3}
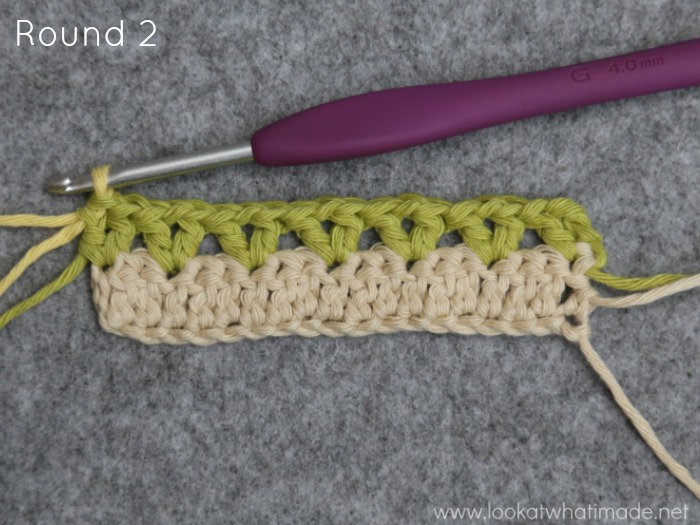
Row 3 {CC}
With RS Facing: Ch 6 (counts as dc and ch-3 space). Skip the next 2 sts and make a Popcorn in the ch-1 space of the first V-Stitch. (Ch 3 and make a Popcorn in the ch-1 space of the next V-Stitch) until you have worked into each V-Stitch. Ch 3, skip the next 2 dc and dc in the last st, which will be the beginning ch-3 of the previous row. Change to MC3 and TURN. {2 dc, 70 Popcorns, and 71 ch-3 spaces – including beginning ch-3}
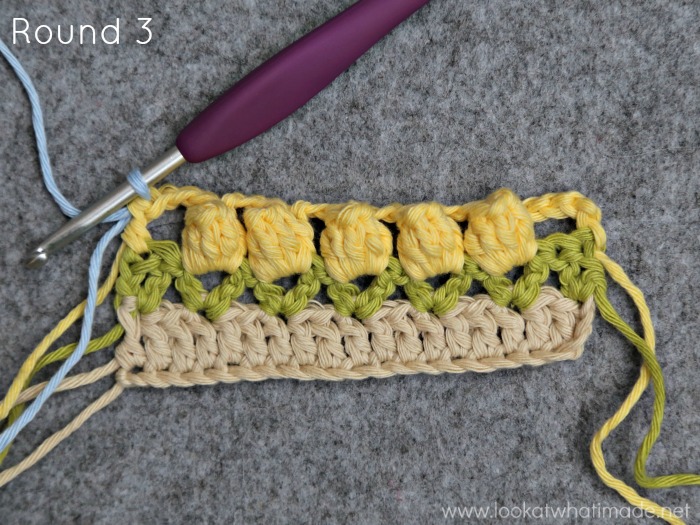
Row 4 {MC3}
With WS Facing: Ch 3 (counts as dc). Make 2 dc in the first ch-3 space {Photo 1}. (BPdc around the next Popcorn {Photos 2 and 3}, make 2 dc in the next ch-3 space) until you have worked into each ch-3 space. Dc in the third ch of the beginning ch-6 from the previous row {see Wrong Side photo below}. TURN. {144 dc and 70 BPdc – including beginning ch-3}
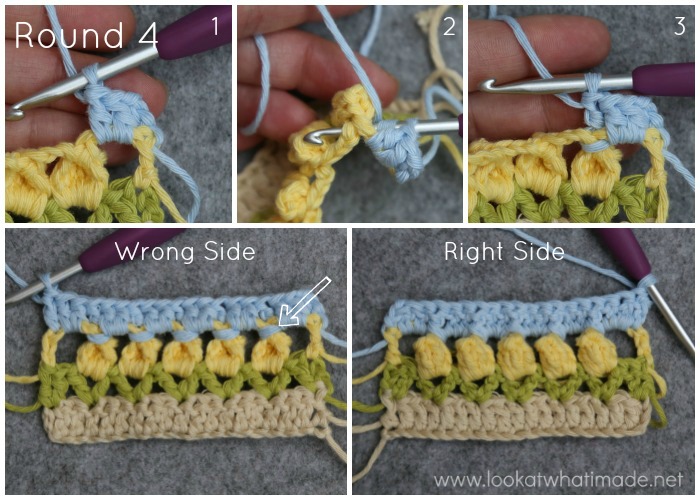
Hint: When the wrong side of the work is facing you, you should see a dotted line running across the top of each Popcorn – arrow in above photo – and the colour from the previous row (yellow in this case) should be visible above it. When you turn the blanket so that the Right Side is facing you, the BPdc should ‘hug’ the top of the Popcorn and no CC (yellow in this case) should be visible above the Popcorn. If the dotted line is on the Right Side of your work, you’ve accidentally made FPdc instead of BPdc and you will need to rip out and redo.
Row 5 {MC3}
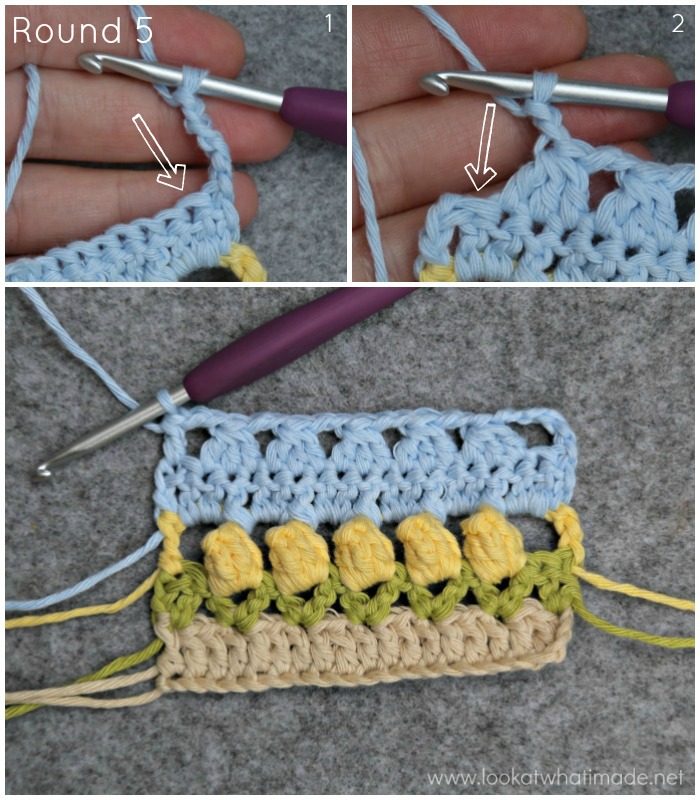
Hint: The central ‘leg’ of each Cluster will fall in the BPdc from Row 4. If your blanket suddenly pulls in at the end of this row, it is an indication that you are making your chains too tight. You can solve this by relaxing your tension when making your chains.
With RS Facing: Ch 5 (counts as dc + ch-2). Skip the next st {indicated with an arrow in Photo 1}. (Make a Cluster over the next 3 sts, ch 2) until there are only 2 sts left. Skip the next st {indicated with an arrow in Photo 2} and dc in the last st, which will be the beginning ch-3 of the previous row. TURN. {2 dc, 70 Clusters, and 71 ch-2 spaces – including beginning ch-3}
Row 6 {MC3}
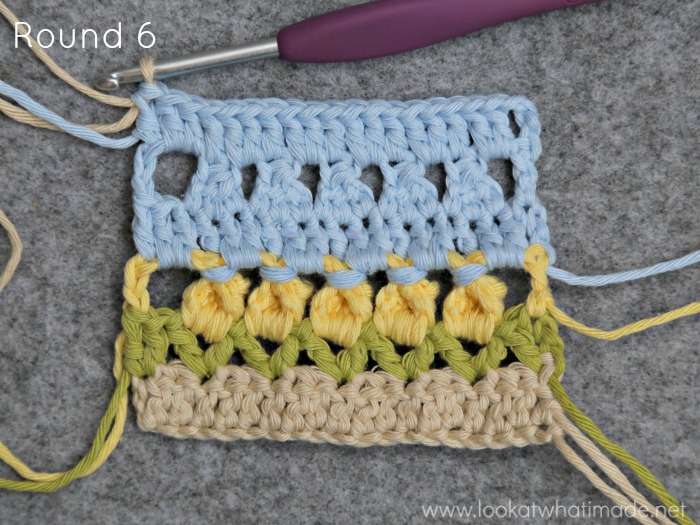
With WS Facing: Ch 3 (counts as dc). (Make 2 dc in the next ch-2 space, dc in the next Cluster) until you have worked into each Cluster. Make 2 dc in the last ch-2 space. Dc in the third ch of the beginning ch-5. Change to MC1 and TURN. {214 dc – including beginning ch-3}
Row 7 {MC1}
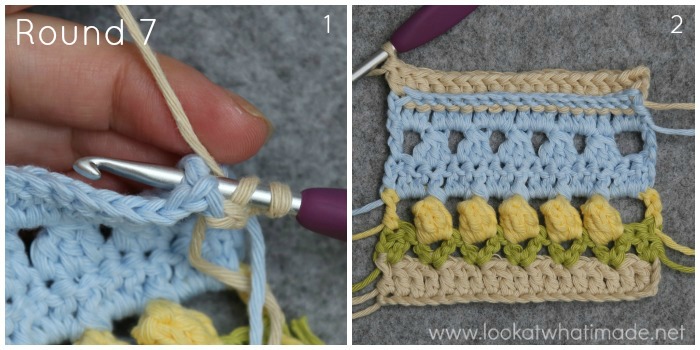
With RS Facing: Ch 3 (counts as dc). BPdc in the next 212 dc. Dc in the last st, which will be the beginning ch-3 of the previous row. Change to MC2 and TURN. {212 BPdc and 2 dc – including beginning ch-3}
Subsequent 6-Row Repeats
Repeat Rows 2 to 7 until you have made 181 rows. Please consult Yardages and Colour Changes to confirm which Contrasting Colours to use in which rows.
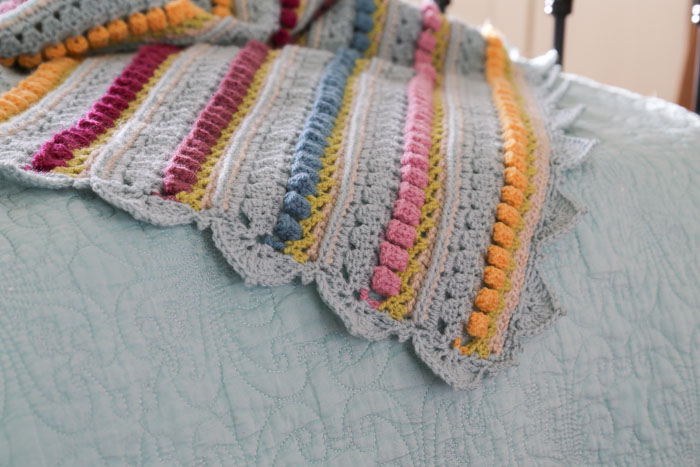
When you get to the end of Row 181, fasten off and work away all your MANY ends.
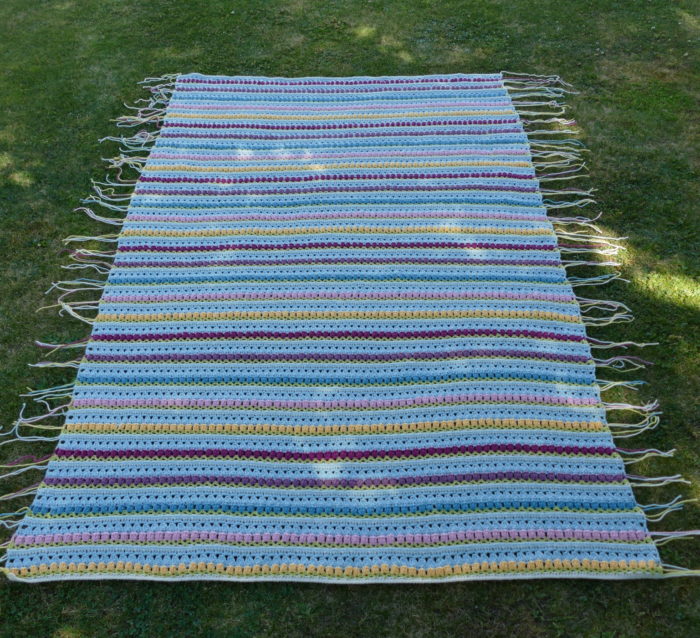
Photo Credit: Kay Crone {Friend and Maker}
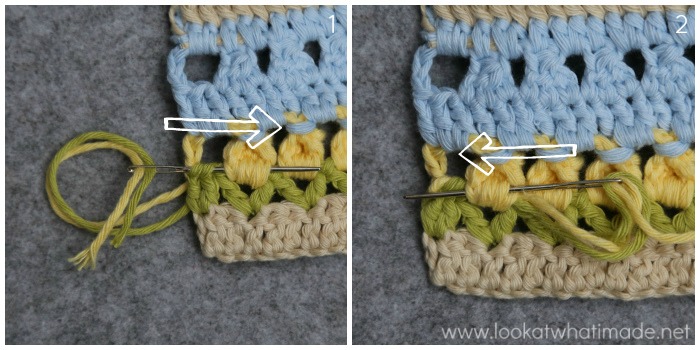
You will notice that the ends are paired. I found it much easier (and quicker!) to work the ends away in two’s, working into the bottoms of Rows 3, 4, and 7.
Working the ends away into the bottom of Row 3 is the trickiest of the lot. The best way to do this is to insert your needle into the back loops of the first 2 dc and through all the stitches of the first popcorn {Photo 1}. Pull tight. Skip the first st of the Popcorn and insert your needle through the rest of the stitches in the opposite direction, working back on yourself {Photo 2}. Pull tight. Insert the needle into the popcorn one more time, again skipping the first st. Pull all the way through and cut your yarn. Workin the ends away 3 times like this will make them much more secure. If you have a method you trust more, please feel free to use it.
Border
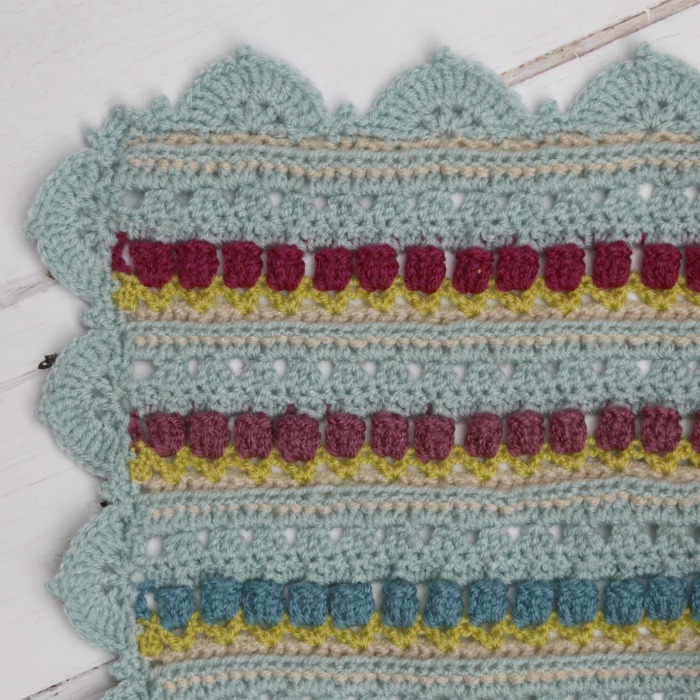
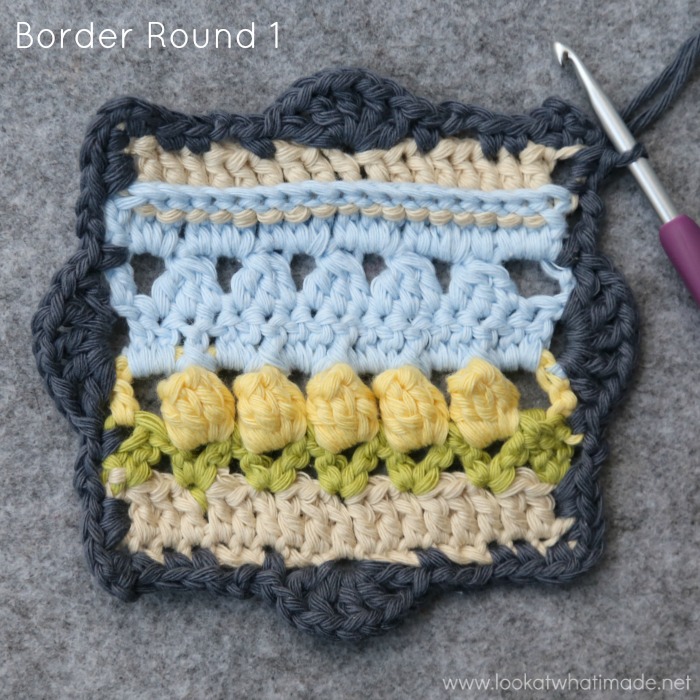
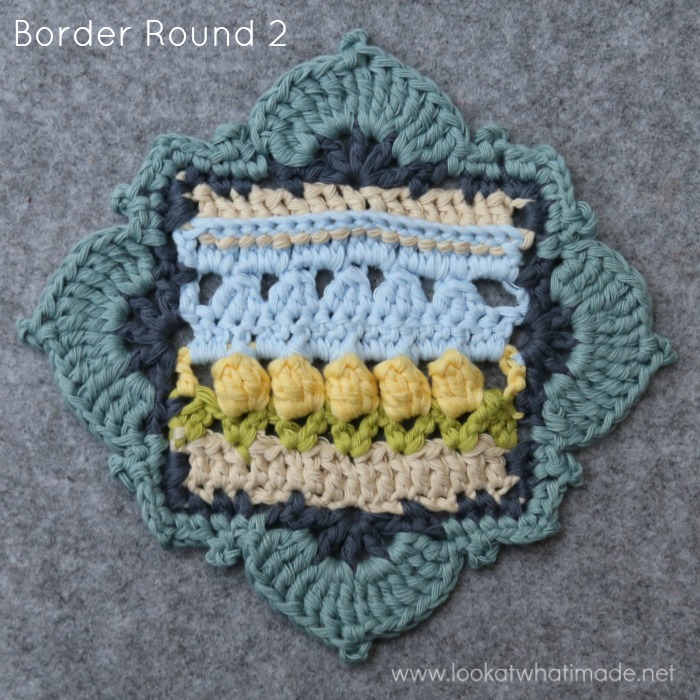
The border consists of 2 rounds. At the end of these 2 rounds, you will have a scalloped edge. Along the sides of the blanket, each complete scallop will fall over a 6-row repeat. To make the instructions easier to follow, I have only referred to Rows 1 – 7 of the blanket, as each subsequent repeat on the blanket will be a repeat of Rows 2 – 7.
Round 1
With the RS of the blanket facing you, start in the top right-hand corner of the blanket (top left-hand corner if you are left-handed).
Top
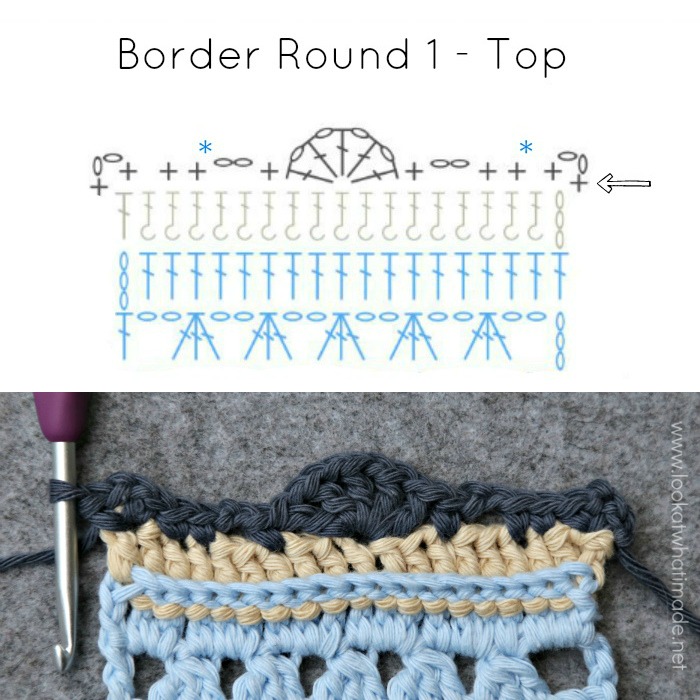
Join your yarn by making a standing sc in the first st of the last row. (Ch 2, sc) in the same st. This is your first corner made. Skip the next st. *Sc in the next 2 sts. Ch 2, skip the next 2 sts. Sc in the next st, skip the next 2 sts. (Dc, ch 1) 4 times in the next st. Dc in the same st to complete the scallop. Skip the next 2 sts and sc in the next st. Ch 2, skip the next 2 sts.* Repeat from * to *15 more times. Sc in the next 2 sts. Skip the next st. (Sc, ch 2, sc) in the last st. This is your corner made.
Stitch Count: 68 sc, 16 Scallops, and 32 ch-2 sps – not including first and last sc, which will be counted in the sides, or the ch-2 corner spaces.
First Side (Working Down the Side of the Blanket)
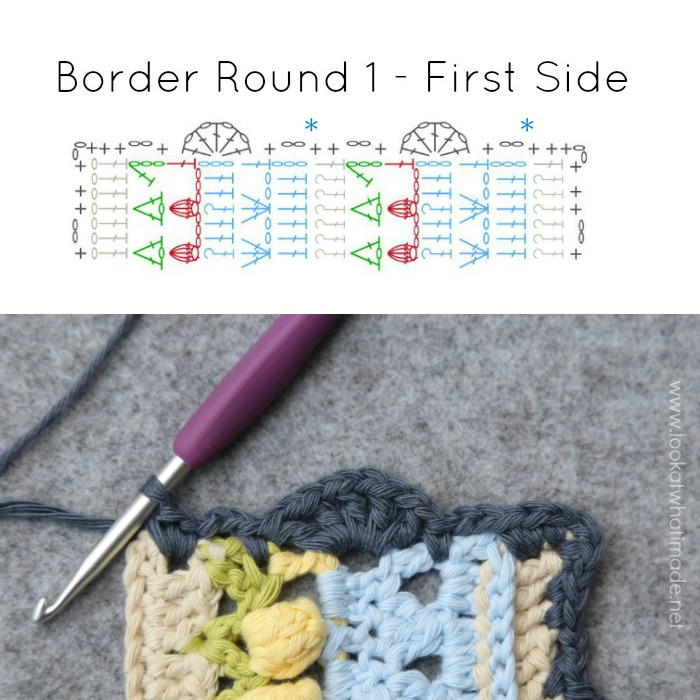
Make 2 sc in the side of Row 7 (MC1). *Ch 2, skip Row 6, and make a sc in the last st of Row 5, which will already contain the first st of Row 6. (Dc, ch 1) 4 times in the side of Row 4 (MC3). Dc in the same sp to complete the scallop. Skip Row 3. Make a sc in the first st of Row 2 (MC2), which will already contain the last st of Row 3 (CC). Ch 2, make 2 sc in the side of Row 7 (MC1).* Repeat from * to * 29 more times.
Stitch Count: 124 sc, 30 Scallops, and 60 ch-2 sps – not including the ch-2 corner spaces.
Bottom
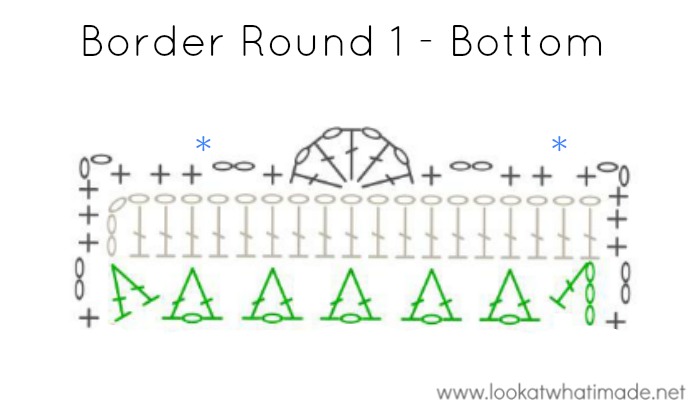
(Sc, ch 2, sc) in the first foundation ch st. This is your corner made. Skip the next ch. *Sc in the next 2 chs. Ch 2, skip the next 2 chs. Sc in the next ch, skip the next 2 chs. (Dc, ch 1) 4 times in the next ch. Dc in the same ch to complete the scallop. Skip the next 2 chs and sc in the next ch. Ch 2, skip the next 2 chs.*
Repeat from * to *15 more times. Sc in the next 2 chs. Skip the next ch. (Sc, ch 2, sc) in the last ch. This is your corner made.
Stitch Count: 68 sc, 16 Scallops, and 32 ch-2 sps – not including first and last sc, which will be counted in the sides, or the ch-2 corner spaces.
Second Side (Working Up the Side of the Blanket)
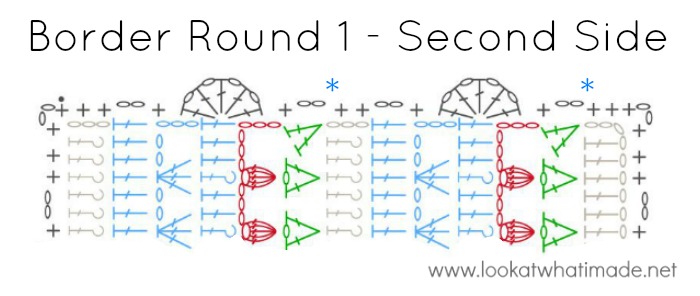
Make 2 sc in the side of Row 1. *Ch 2, make a sc in the last st of Row 2 (MC2), which will already contain the first st of Row 3 (CC). Skip Row 3. (Dc, ch 1) 4 times in the side of Row 4 (MC3). Dc in the same sp to complete the scallop. Sc in the top of the beginning ch-3 from Row 5, which will already contain the last st of Row 6. Ch 2, skip Row 6, and make 2 sc in the side of Row 7 (MC1).*
Repeat from * to * 29 more times. Join to the first sc with a sl st.
Stitch Count: 124 sc, 30 Scallops, and 60 ch-2 sps – not including the ch-2 corner spaces.
Round 2
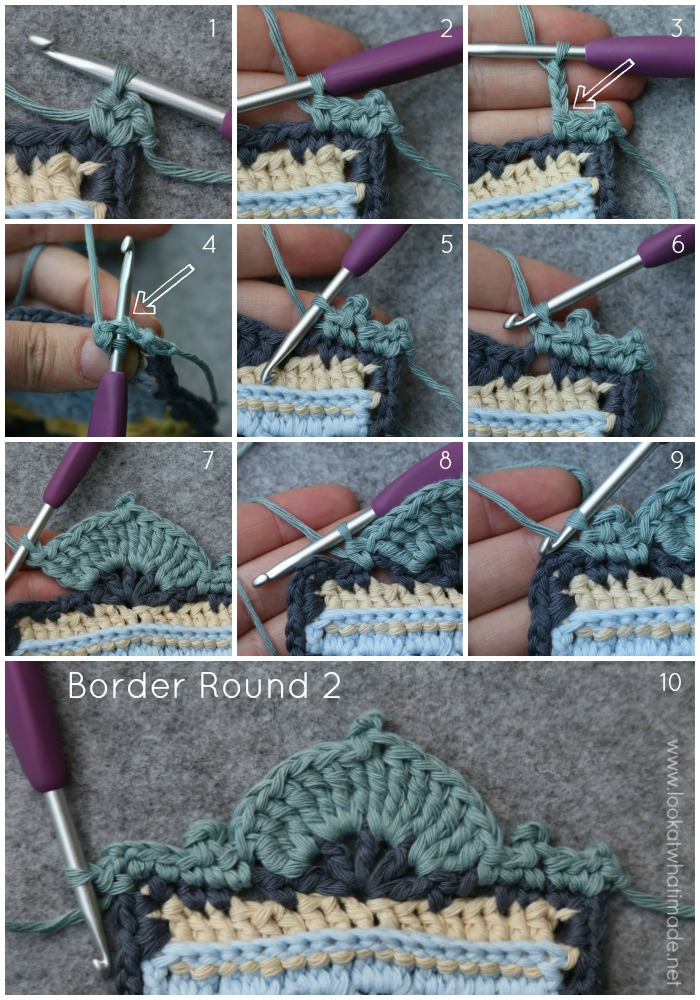
Sl st into the ch-2 corner space. (Ch 1, sc, ch 2, sc) in the same ch-2 sp {Photo 1}. This is your first corner made.
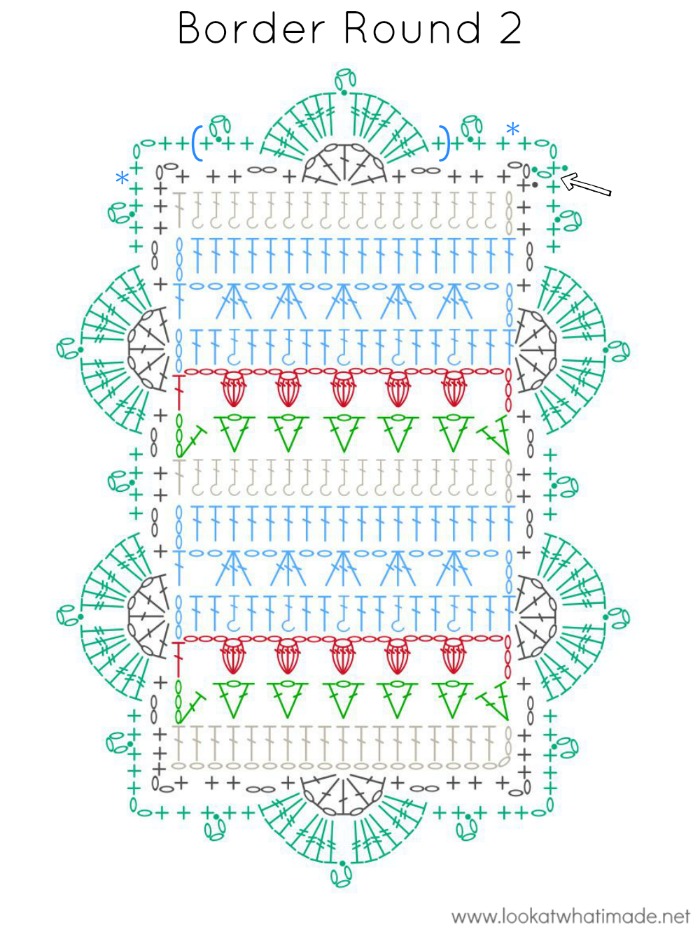
*Sc in the first 2 sts, the first of which will be hidden {Photo 2}. Ch 3, sl st in the last sc made to form a Picot {Photos 3 and 4}. Sc in the next st {Photo 5}. (Sc in the next ch-2 sp {Photo 6}. Skip the next 2 sts. Make 3 tr in the next ch-1 sp. Make 4 tr in the next ch-1 sp. Ch 3, sl st in the last tr made to form a Picot. Make 4 tr in the next ch-1 sp. Make 3 tr in the next ch-1 sp {Photo 7}. Skip the next 2 sts. Sc in the next ch-2 sp {Photo 8}. Sc in the next st, ch 3, sl st in the last sc made to form a Picot, sc in the next st {Photo 9}) until one st remains. Sc in the last st. (Sc, ch 2, sc) in the next ch-2 corner space {Photo 10}.*
Repeat from * to * 3 more times, omitting the last corner on the last repeat. Join to the first sc with a sl st. Fasten off and work away your ends.
Stitch Counts:
- Top and Bottom: 70 sc, 224 tr, and 33 Picots – not including ch-2 corner spaces.
- Sides: 126 sc, 420 tr, and 61 Picots – not including ch-2 corner spaces.
I really hope you like this pattern and look forward to seeing your interpretations. If you do make this blanket, please share photos using #memorylaneblanket so that I can see them :)
You can follow the rest of the journey HERE:
- Memory Lane: Yarn Arrival
- Memory Lane Blanket: Work in Progress
- Memory Lane Blanket: Reveal
- Memory Lane Blanket: Pattern (This Post)

This blog post contains affiliate links. I only link to products I personally use or would use. All opinions are my own.


ISABELLE MAIREY says
bonjour,
j’en suis à ma 3ème Memory Lane Blanket !
la 1 ère idendique au modèle et les 2 suivantes aux dimensions différentes et couleurs choisies par mes petites filles.
Dedri Uys says
Oh wow. Have you shared photos anywhere? I’d love to see!
Donna O’Dell says
I love this! I was just wondering if there is a reason you waited until the blanket was finished to weave in your ends? I always weave in as I go. Was it easier?
Thank you!
Dedri Uys says
When I am making squares or something that is worked in the round, I work my ends away as I go, largely because I use the invisible join and need to use a needle for that anyway so might as well do it. When I am making things in rows with lots of colour changes, I work the ends away at the end. I find it breaks my rhythm less and I quite enjoy sitting down for a session of sewing away ends.
Carol Derbis says
As my own Memory Lane Blanket grows (slowly!) – I have found that coming back and reading your story of the blanket and the color choices so interesting – and motivating. Somehow my own (I bought the kit so am following your colors precisely!) is somehow even prettier than it was before I read this!
Your memories have certainly become part of the person you are today. I feel so sorry for those who try to forget their “roots” and forge their own way – ignoring all that came before. The richness of your own memories can make you a stronger, better person.
This is a lovely blanket – and I’m enjoying the whole process so much! I had put my hooks down for so long – and had no motivation whatsoever to pick them up again. (though I did find that frustrating at the time!) Now that you have encouraged me to pick up hook and yarn again, I am a much happier person – since my hands and mind are occupied with such a lovely project!
When I take up a larger project such as this, I normally just pick my own yarn and colors – using your pattern as a ‘guide’ for when to change colors, etc. But I am delighted that I chose to use your Blanket Kit – which was so reasonably priced!
Thank you again for such a beautiful pattern! I always know when I lack motivation to crochet all I need do is open up your blog and look at your beautiful work – and my own hands start itching once again to hook up a storm!
My best to your whole family! Those boys are growing up so fast! don’t you just wish sometimes that you could keep them little for just a bit longer?
Blessings to all of you…..
Dedri Uys says
Hi Dear Carol. I am delighted to hear that you have picked your hooks up again!! How is your blanket coming along? The boys all send their love. x
Alysia says
Stunning! Thank you for sharing your journey and the pattern!
Belinda Sweeney says
Beautiful! Thank you very much for the patterns
Hugz
Dedri Uys says
Thank you :)
Judy says
Your story of how this blanket and its colors came to be inspired me to start thinking about colors in a different way. Then I considered what colors I would have chosen had I been part of the wonderful group of bloggers Scheepjes asked to design new yarn by choosing six colors. You have helped your blog followers think about crochet in a very different way–it’s not just about making hats and scarves and afghans anymore. It’s about crocheting with heart and soul and love and memories. Of putting a little bit of yourself in every project whether you sell that item or give it to a friend or family member. Thanks for that, Dedri. And thanks, of course, for this beautiful pattern and for sharing its story.
Dedri Uys says
Thank you, Judy. I know that I am a very nostalgic and sentimental creature, but I have decided to embrace that. Life is all about moments and memories, so we should embrace every chance we get to celebrate that and revel in it.
Jennifer says
Thanks for sharing the pattern. I have been following your journey with this blanket and I am intrigued with this. And so, I am looking forward to making this blanket.
Sonia says
Thank you for share this pattern. This is really a very beautiful blanket. Regards.
Nerissa says
Thank you, Dedri! This is a beautiful blanket. Being an “advanced beginner” crocheter, I will work my way through the pattern slowly as I have not done anything this intricate, and hope that my blanket looks as neat as yours. Maybe Sophie’s Universe will be next? :-)
Dedri Uys says
Hi Nerissa. I write my patterns with beginners in mind, and Sophie, especially, is very beginner friendly (even though it is challenging). Please let me know how you get on and how I can help :)
Anne-Marie says
Beautiful concept . Thank you Dedri
Fi says
Lovely!