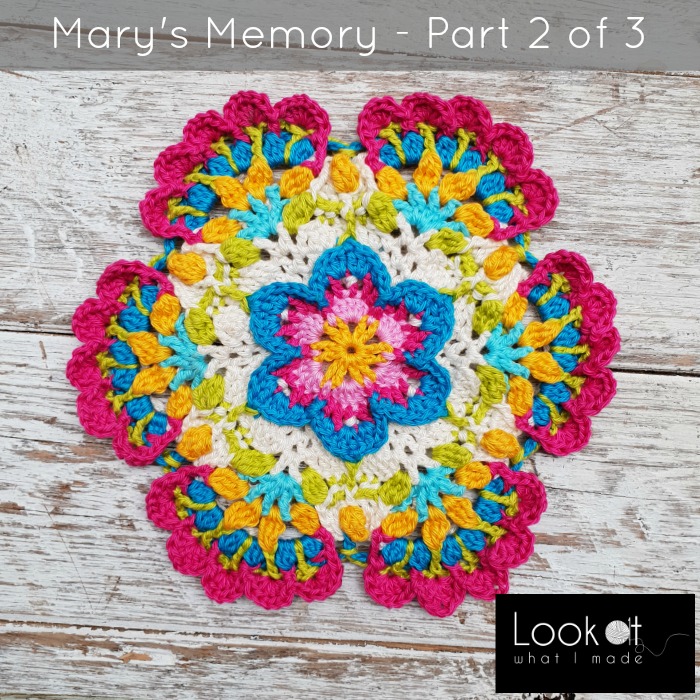
Welcome to Part 2 of Mary’s Memory. The main tip I can give you for this part is to be mindful of when to work in front of chain spaces, when to work behind them, and when to work OVER them.
Before I became crochet-obsessed, I used to bake all the time. In fact, most of my posts back then were either about baking or sewing. One of my favourite weekend treats used to be to pop some bread or cake in the oven before settling down to my crochet. I LOVED the smell of baking as I worked.
Recently, I have found myself baking more often again (despite our dodgy oven. This last week saw me baking something almost daily, culminating in a (double batch) Marmite cake for Mr. LAWIM for Fathers day, which is cooling as I type. That makes the second Marmite cake this week!
Why am I telling you this? Because these are the memories that have attached themselves to working on the photo tutorials for Part 2. For me, they are poignant because they remind me where my crochet journey (and my blogging journey with you) started almost a decade ago.
If you feel like trying the Marmite cake, you can find the recipe HERE. Or you could try some Nutella Brownies. OR bake your granny/aunty/mum’s famous lemon/chocolate/rum cake and then come join us with a slice and a strong cup of tea.
Mary’s Memory Part 2
© Dedri Uys 2019. All Rights Reserved.
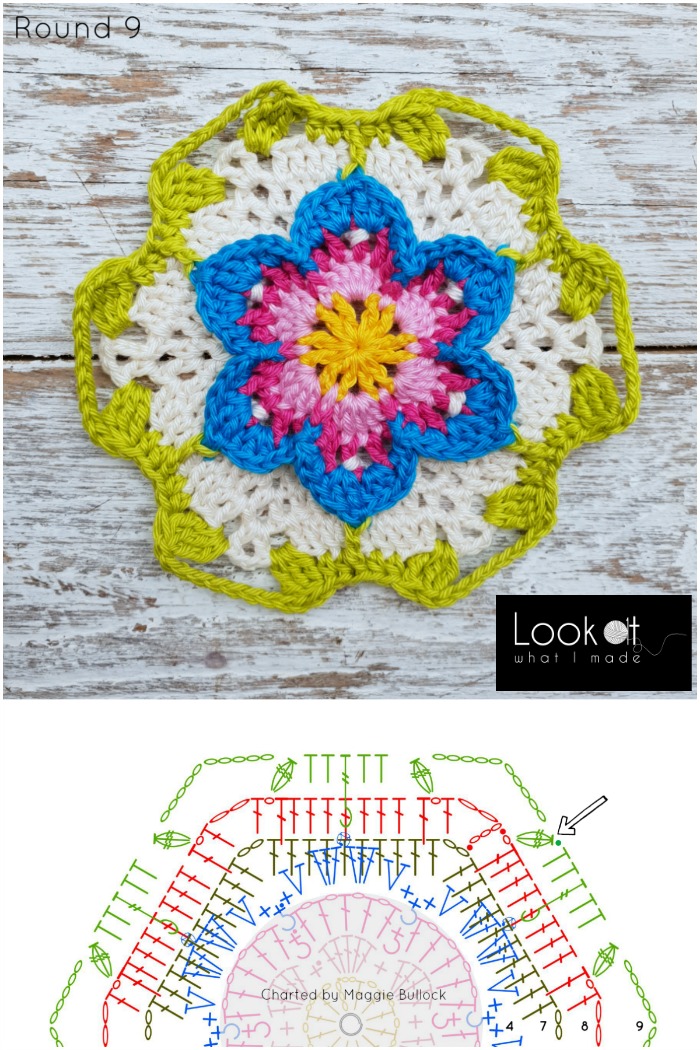
Charted by Maggie Bullock
Designed for the February 2019 Crafty Adventures Cruise.
Tell me, what is it you plan to do with your one wild and precious life?
– Mary Oliver, The Summer Day
Round 9 {Yarn G}
Join your yarn by making a standing Tr Bobble in the last (marked) ch-1 sp of any side.
*Ch 10. Skip the (dc, ch 2, dc) corner and make a Tr Bobble in the first ch-1 sp of the next side {Photo 1}. Skip the next 2 sts, the first of which will be hidden. Hdc in the next 2 sts {Photo 2}. FPtr around the Picot from Round 4 {Photos 3 and 4}. Skip the next st of Round 8 {Arrow in Photo 5}. Hdc in the next 2 sts. Skip the last 2 sts before the next ch-1 sp. Make a Tr Bobble in the last (marked) ch-1 sp {Photo 6}.*
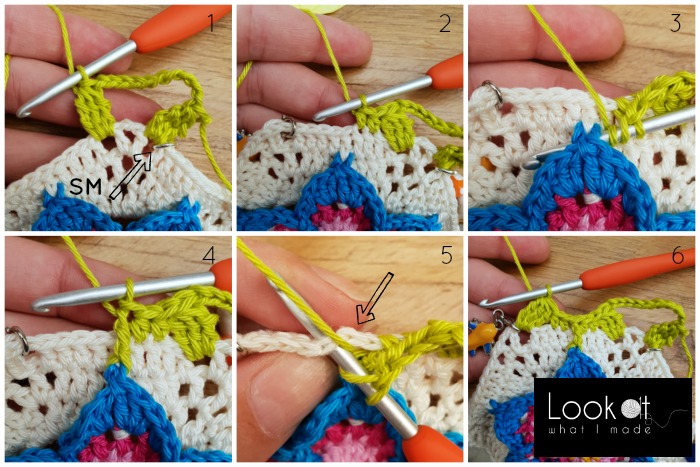
Repeat from * to * 5 more times, omitting the last Tr Bobble on the last repeat. Join to the first Tr Bobble with a sl st. Fasten off and work away your ends.
Stitch Count Per Side: 2 Tr Bobbles, 4 hdc, and 1 FPtr, not including ch-10 corner sps.
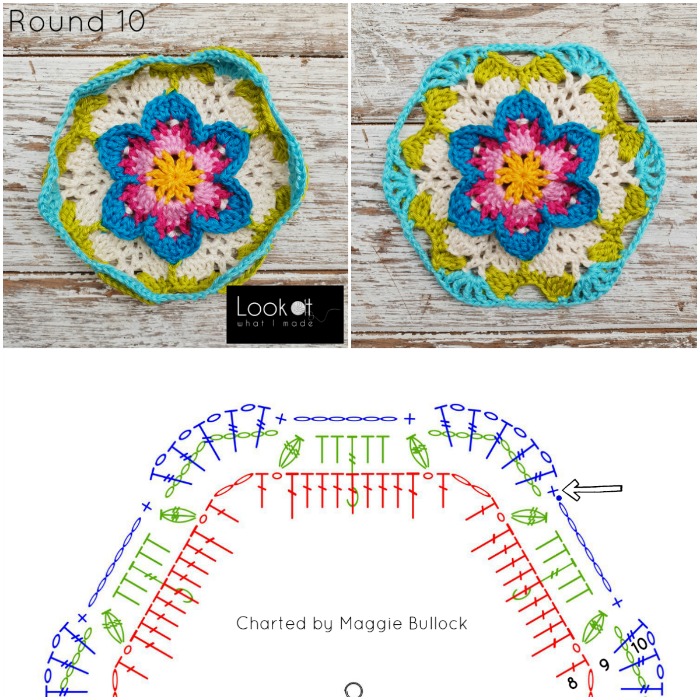
Round 10 {Yarn F}
This round is asymmetrical. The first sc of each rep will fall in a ch-10 sp. The last sc of each rep will fall in the Tr Bobble for neatness.
Join your yarn by making a standing sc in any ch-10 corner sp. Squish this sc to the start of the ch-10 sp (here and throughout).
Working in front of the ch-10 corner sp, (tr, ch 1) 4 times into the ch-2 corner sp from Round 8. Tr in the same sp to complete a Scallop {Photos 1 and 2}. Sc in the next Tr Bobble {Photo 3}. Ch 6.
*Sc in the next ch-10 corner sp {Photo 4}. Working in front of the ch-10 corner sp, (tr, ch 1) 4 times into the ch-2 corner sp from Round 8. Tr in the same sp to complete a Scallop. Sc in the next Tr Bobble. Ch 6.*
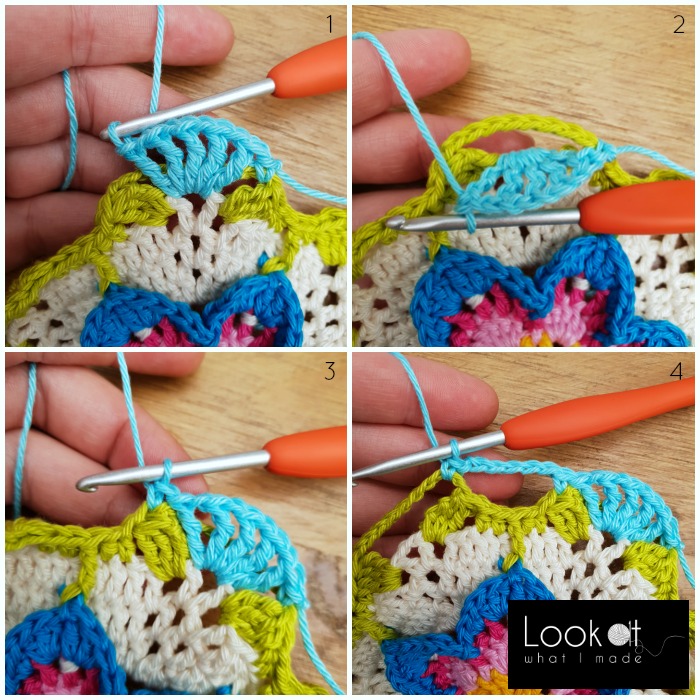
Repeat from * to * 4 more times. Join to the first sc with a sl st. Fasten off and work away your ends.
Stitch Count: 12 sc, 30 tr, 24 ch-1 sps, and 6 ch-6 sps
Don’t be worried if this round pulls in (left below).
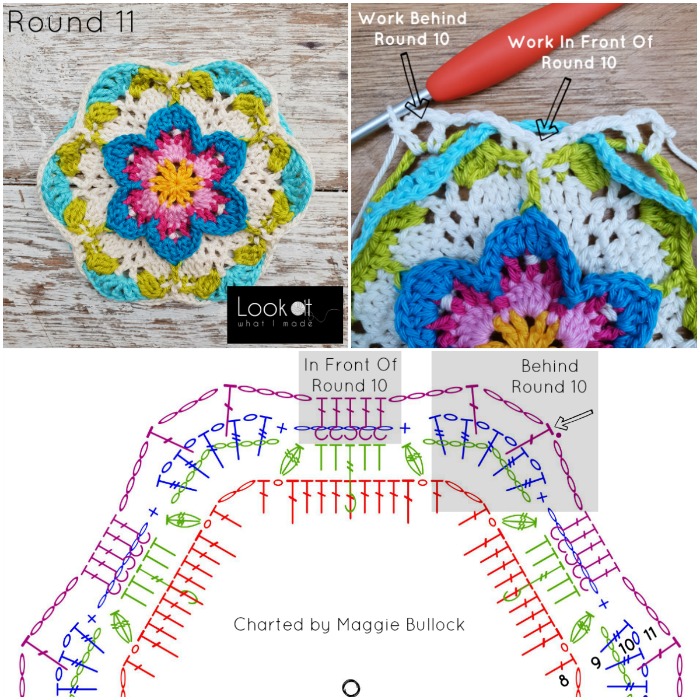
Round 11 {Yarn A}
This round will only be worked into the sts from Round 9. Pay special attention to when you should work in front of Round 10 and when you should work behind it (see photos below)!
Working behind the Scallop from Round 10, join your yarn by making a standing dc in any ch-10 corner sp from Round 9. (Ch 3, dc) in the same ch-10 sp. This is your first corner made.
*Ch 4. Working in front of Round 10, skip the next Tr Bobble from Round 9 and BPdc around the next 2 sts. FPdc around the next st, which should be the FPtr. BPdc around the next 2 sts. Ch 4. (Dc, ch 3, dc) into the next ch-10 corner sp from Round 9, working behind the Scallop from Round 10.*
Repeat from * to * 5 more times, omitting the last corner on the last repeat. Join to the first dc with a sl st. Fasten off and work away your ends.
Stitch Count Per Side: 2 dc, 1 FPdc, 4 BPdc, and 2 ch-4 sps, not including ch-3 corner sp
Round 12 {Yarn B}
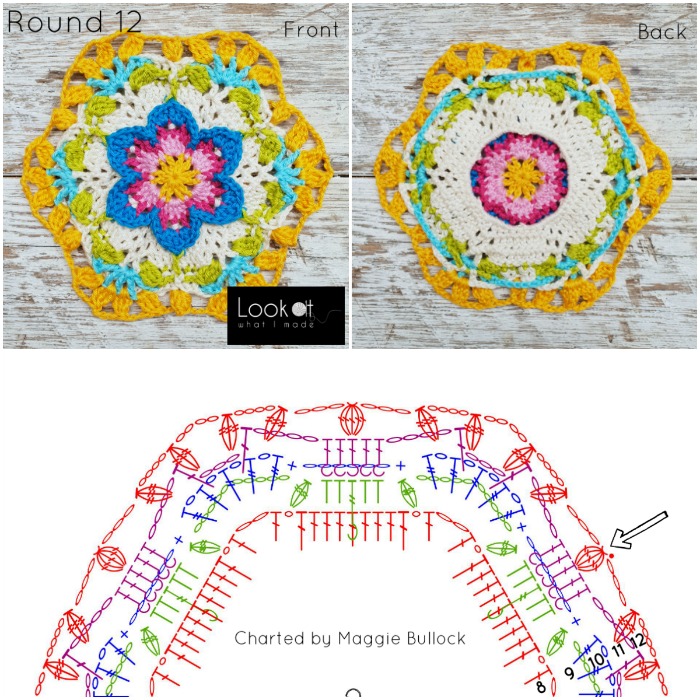
Join your yarn by making a standing Popcorn in any FPdc around.
*Ch 3 and skip the next 2 sts. Working in front of the ch-4 sp from the previous round, (Tr Bobble, ch 4) in the first ch-1 sp from Round 10 {Photo 1}. (Tr Bobble, ch 4) in the next two ch-1 sps from Round 10, enclosing the corner ch-3 sp from the previous round {Photos 2 – 4}. Working in front of the next ch-4 sp from the previous round, make a Tr Bobble in the last ch-1 sp from Round 10 {Photos 5 and 6}. Ch 3 and skip the next 2 sts. Make a Popcorn in the next st, which should be the FPdc.*
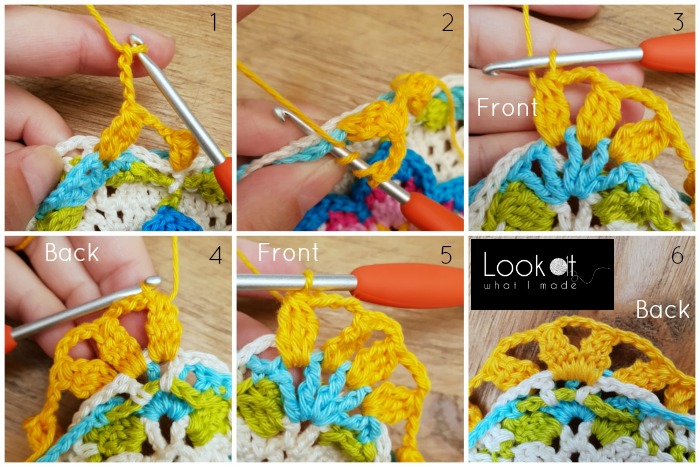
Repeat from * to * 5 more times, omitting the last Popcorn on the last repeat. Join to the first Popcorn with a sl st. Fasten off and work away your ends.
Stitch Count: 6 Popcorns, 24 Tr Bobbles, 12 ch-3 sps, and 18 ch-4 sp
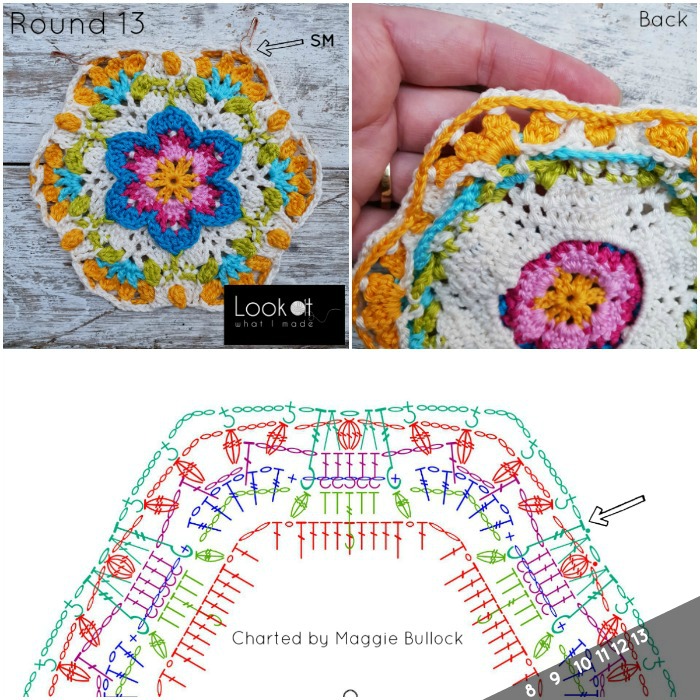
Round 13 {Yarn A}
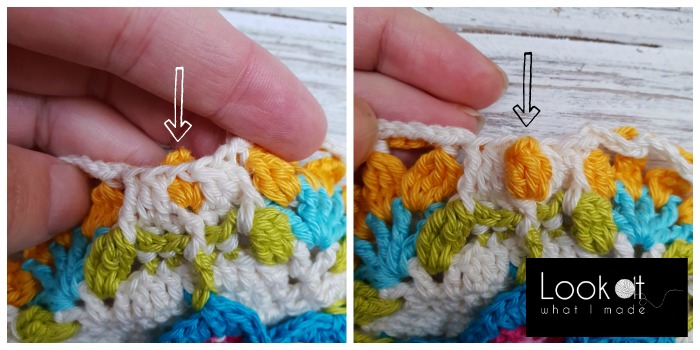
Join your yarn by making a standing FPtr around any Leaf from Round 9 directly before a Scallop from Round 10.
*Ch 1, make a FPsc around the first Petal from Round 12. [Ch 5, FPsc around the next Petal] 3 times, marking the central ch-5 sp with a SM. Ch 1, make a FPtr around the next Leaf from Round 9. Working in front of the ch-3 sp from Round 12, dc2tog over the next 2 sts from Round 11. Ch 1 and skip the Popcorn from Round 12. Working in front of the ch-3 sp from Round 12, dc2tog over the next 2 sts from Round 11. FPtr around the next Leaf from Round 9.*
Repeat from * to * 5 more times, omitting the last FPtr on the last repeat. Join to the first FPtr with a sl st. Fasten off and work away your ends.
Pop the Popcorns to the front of your work so that they poke through the ch-1 sps above them {photos below}.
Do not remove the stitch markers until you are instructed to do so in Round 17!
Stitch Count: 24 FPsc, 12 FPtr, 12 dc, 18 ch-1 sps, and 18 ch-5 sps
Round 14 {Yarn E} – Flower Round 1
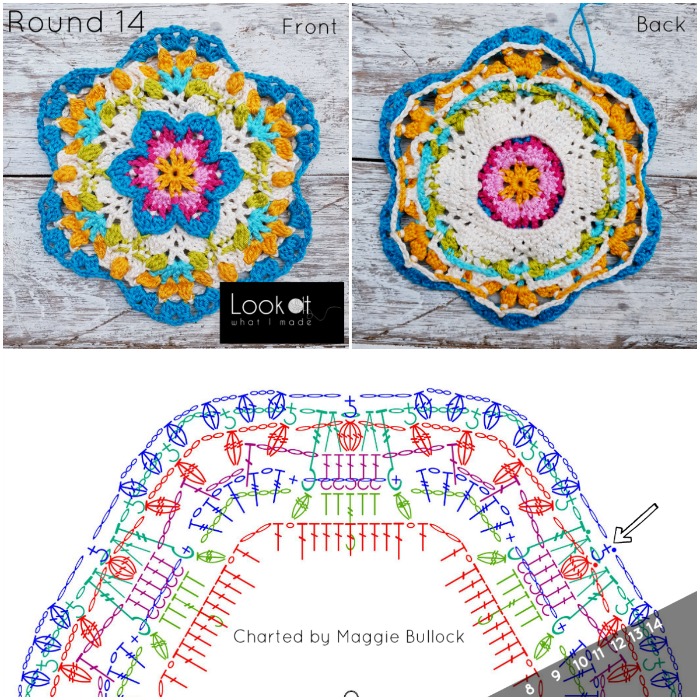
At the end of this round, the centre of your motif won’t lie flat. Don’t worry about it 😊
Join your yarn by making a FPsc around any Popcorn from Round 12, working in front of the ch-1 sp from Round 13.
*Ch 3. (3-dc Bobble, ch 3) twice in each of the next three ch-4 sps from Round 12, working in front of the ch-5 sps from Round 13. FPsc around the next Popcorn from Round 12, working in front of the ch-1 sp from Round 13.*
Repeat from * to * 5 more times, omitting the last FPsc on the last repeat. Join to the first FPsc with a sl st. Fasten off and work away your ends.
Stitch Count: 6 FPsc, 36 3-dc Bobbles and 42 ch-3 sps {6 3-dc Bobbles and 7 ch-3 sps per Flower}
Round 15 {Yarn G} – Flower Round 2
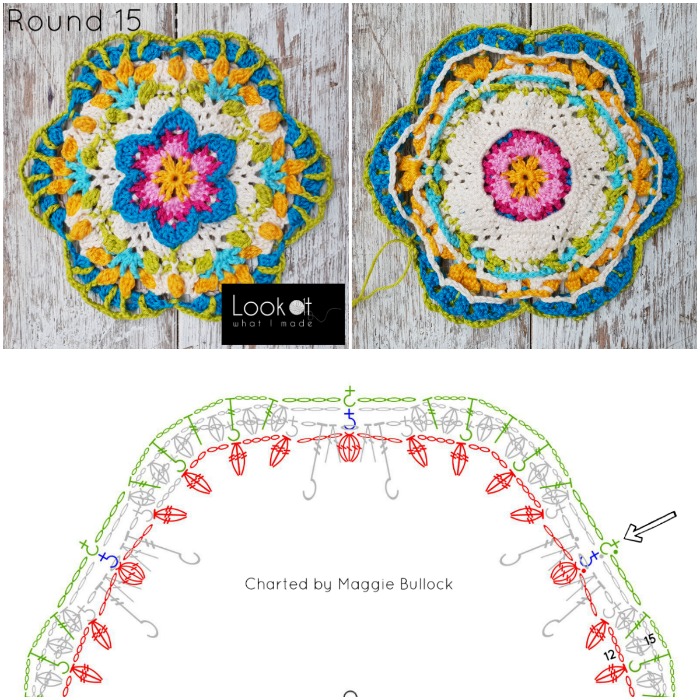
This round will need a bit of concentration!
Join your yarn by making a standing BPsc in any FPsc around.
*Ch 4. Tr in the ch-4 sp from Round 12, working between the two Bobbles from Round 14 and in front of the ch-3 sp from Round 14 and the ch-5 sp from Round 13. You might need to squish your Bobbles apart a little bit.
(Ch 4, FPtr around the next Petal from Round 12. Ch 4, tr in the next ch-4 sp from Round 12, working between the two Bobbles from Round 14 and in front of the ch-3 sp from Round 14 and the ch-5 sp from Round 13) twice. Ch 4 and make a BPsc in the next FPsc from Round 14.*
Repeat from * to * 5 more times, omitting the last BPsc on the last repeat. Join to the first BPsc with a sl st. Fasten off and work away your ends.
Stitch Count: 6 BPsc, 18 tr, 12 FPtr, and 36 ch-4 sps, not including sl sts
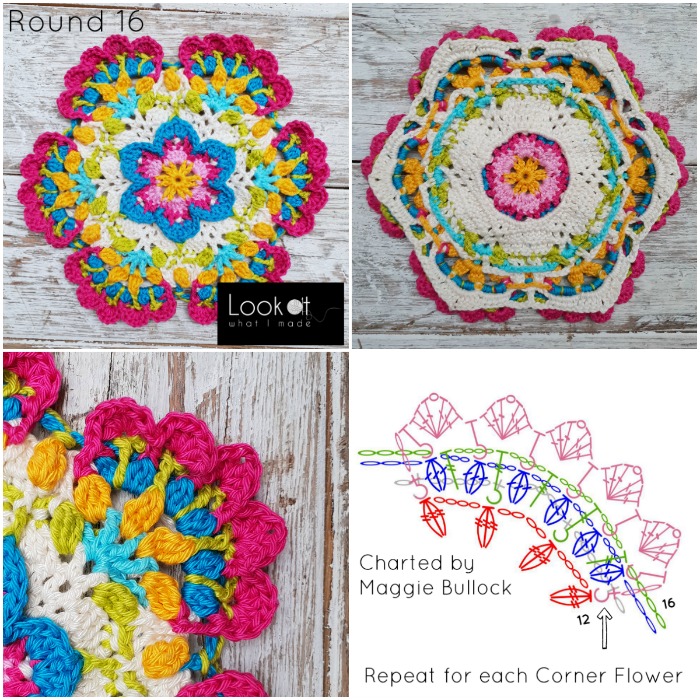
Round 16 {Yarn D} – Flower Round 3
You will need to repeat these instructions for each Flower around. When working around the Petals from Round 12, make your FP sts below the FP sts from Round 13 so that they are hidden.
Join your yarn by making a standing FPsc around the first ‘Petal’ of any Flower from Round 12.
*Ch 2. (FPhdc around the next Bobble from Round 14, working in front of the ch-4 sp from Round 15. [3dc, ch 1, 3 dc] in the next st of Round 15) 5 times. FPhdc around the last Bobble from Round 14, working in front of the ch-4 sp from Round 15. Ch 2 and make a FPsc around the last Petal from Round 12. Fasten off and work away your ends (see TIP below).
Stitch Count: 2 FPsc, 6 FPhdc, 5 Petals (each containing 6 dc and 1 ch-1 sp) and 2 ch-2 sps
Your first flower is now complete. You will need to repeat this 5 more times until each flower is complete.
You will ‘catch’ the Petals from Round 16 in Rounds 19 and 20 (Part 3).
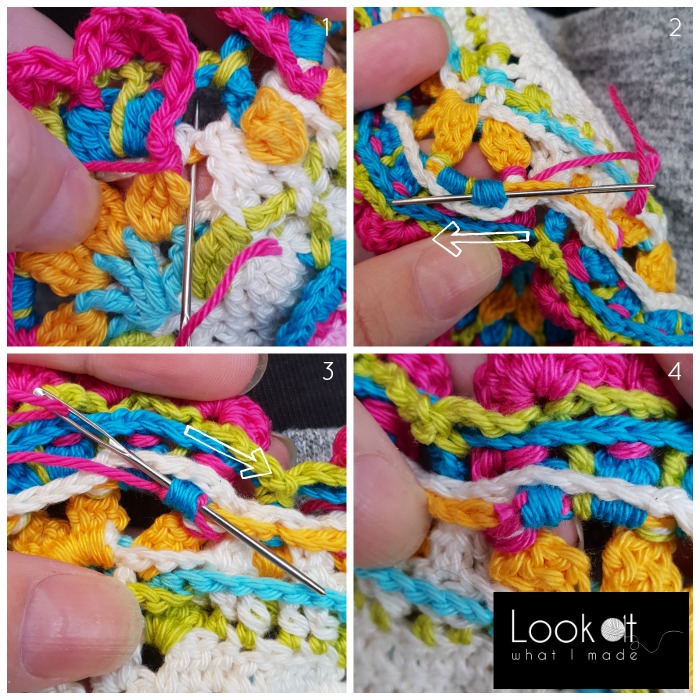
TIP to Work Away Ends: Thread your yarn needle. Insert it from front to back between the Tr Bobble from Round 12 and the FPtr from Round 13 {Photo 1}. Turn your work around and work the end away into the bottom of the closest 3-dc Bobble from Round 14 {Photos 2 – 4}. Cut your yarn.
There you go. I’ve eaten so much cake while I was editing this post! I think I deserve a nap :) See you on Thursday for Part 3.
Back to Information Post *** Continue to Part 3

This blog post contains affiliate links. I only link to products I personally use or would use. All opinions are my own.


Irene Munden says
Fantastic – with the modified Ubuntu border will be perfect for a cushion – or two to go with the Ubuntu blanket.
Niamh says
Thank you for part 2 of Mary’s Memory. It’s lovely! I’m eagerly awaiting part 3. Being left-handed, I greatly appreciate the charts given along with the photo tutorials, as this helps me to be sure of the correct stitch placement. I’ve signed up for your newsletters, and am looking forward to receiving them. It’s nice to have something pleasant to look forward to amidst all the political furor on this side of the pond.
Deniz says
Happy B’day Dedri.
It’s an awesome pattern, thank you very much.
I finished firt 2 parts and I’m looking forward the Part III.
love from Austria
Jana says
Happy Birthday Dedri!!!!! My daughter loved her Charlottes blanket (I think she was just being nice) even though it was a bit cattywampous around the edges…I finished it at her house a year ago by doing a very simple border after attaching them all. I used the yarn you used and it was rather flimsy but made a really heavy blanket.
Anyway, Happy 38 BD!!!
Dedri Uys says
Hi Jana. I’m glad she liked it :) I am curious why it turned out flimsy. Were you able to match gauge? Jenny’s blanket is quite sturdy x
TOSHIA McMILLION says
Thank you for the pattern.