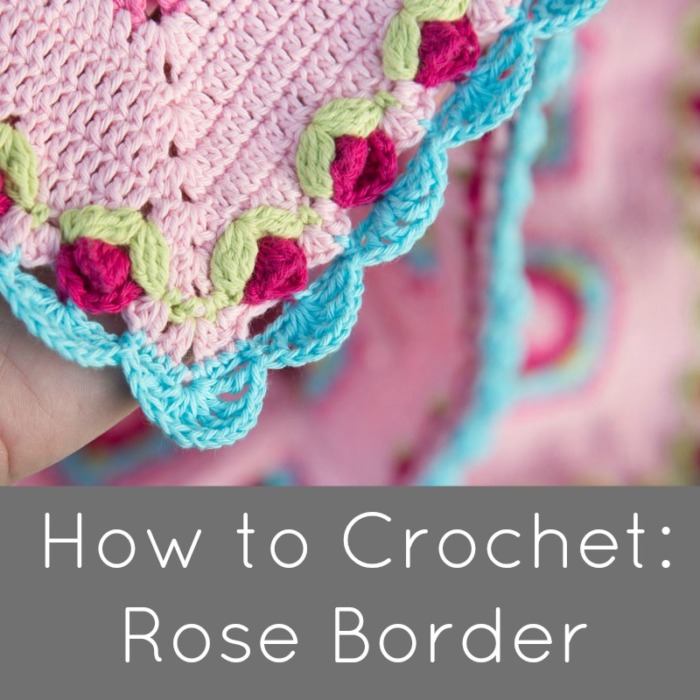
Today I am going to show you how to create this gorgeous crochet Rose Border (as seen in my free Lydia Blanket pattern). As most of you know, the roses were my favourite part of Sophie’s Universe and I plan on using them in all sorts of projects over the next year, starting with this dainty Rose Border.
Once you know how to make the Rose Border, you can add it to blankets, squares, lovies, dishcloths…anything with 4 sides, really! It is much simpler than it looks and I hope you enjoy making it (a lot)!
Materials
Use whichever hook/yarn you used to create the project you plan to add this border to. The last round curls over a bit, so I suggest going up a hook size when making the very last round.
Abbreviations
US Terminology Used (US/UK Comparisons HERE)
- BPsc – Back post single crochet
- FPsc – Front post single crochet
- Ch – Chain
- Dc – Double crochet
- Dc2tog – Double crochet 2 together
- Sc – Single crochet
- St/st’s – Stitch/stitches
- () – Repeat instructions between parentheses the amount of times specified
- * – Repeat instructions between asterisks the amount of times specified
Special Stitches
- Rose – see Round 5.
- 7-tr Scallop – Tr in the indicated stitch/space. (Ch 1, tr) 6 more times into the same stitch/space so that you end up with 7 tr’s and 6 ch-1 spaces.
- 5-tr Scallop – Tr in the indicated stitch/space. (Ch 1, tr) 4 more times into the same stitch/space so that you end up with 5 tr’s and 4 ch-1 spaces.
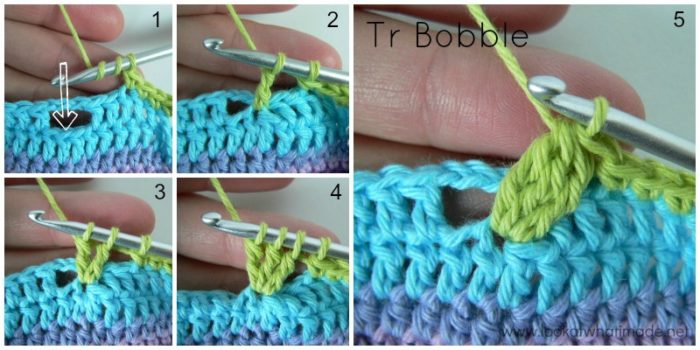
- Tr Bobble – Yarn over twice {Photo 1} and insert your hook into the indicated stitch. Yarn over and pull up a loop. (Yarn over and pull through 2 loops) twice – 2 loops on your hook {Photo 2}. Yarn over twice and insert your hook into the same stitch. Yarn over and pull up a loop – 5 loops on your hook. (Yarn over and pull through 2 loops) twice – 3 loops on your hook {Photo 3}. Yarn over twice and insert your hook into the same stitch. Yarn over and pull up a loop – 6 loops on your hook. (Yarn over and pull through 2 loops) twice – 4 loops on your hook {Photo 4}. Yarn over and pull through all 4 loops {Photo 5}.
Special Instructions
When a Round Starts With a Dc:
- If you are using the same colour, ch 3 to form your first dc. When you get to the end of the round, join to the top of this ch-3.
- If you are using a different colour, join your yarn by making a standing double crochet in the indicted st/space.
When a Round Starts With a Sc:
- If you are using the same colour, (ch 1, sc) in the indicated stitch/space to make your first sc. When you get to the end of the round, join to the top of the sc (not the ch).
- If you are using a different colour, join your yarn by making a standing single crochet in the indicated stitch/space.
How to Crochet a Rose Border
© Dedri Uys 2015. All Rights Reserved.
I am using my Lydia Blanket to demonstrate the border on. You can find the free Lydia Blanket pattern HERE.
You will need a multiple of 8 + 6 stitches (not including corner space/stitch) to start this border. If you do not have multiples of 8 + 6 stitches, you will need to add rounds to your project until you do have a multiple of 8 + 6 stitches per side.
Update: I have included stitch counts (in the form of multiples) for the first 2 rounds. This is to help you check that have the right number of stitches before you start Round 3.
Round 1
*(2 dc, ch 2, 2 dc) in any ch-2 corner space – see Special Instructions. This is your corner made. Dc in each stitch across. Don’t accidentally skip the first (hidden) stitch.* Repeat from * to * 3 more times. Join to the first dc with a sl st. If you are going to change colours, fasten off. If you are going to use the same colour, sl st in the next st and in the ch-2 corner space.
Stitch Count Per Side: Multiples of 8 + 2 (not including ch-2 corner space)
Round 2
*(2 dc, ch 2, 2 dc) in the ch-2 corner space. This is your corner made. Skip the first (hidden) stitch. Dc in each of the remaining stitches across.* Repeat from * to * 3 more times. Join to the first dc with a sl st. If you are going to change colours, fasten off. If you are going to use the same colour, sl st in the next st and in the ch-2 corner space.
Stitch Count Per Side: Multiples of 8 + 5 (not including ch-2 corner space)
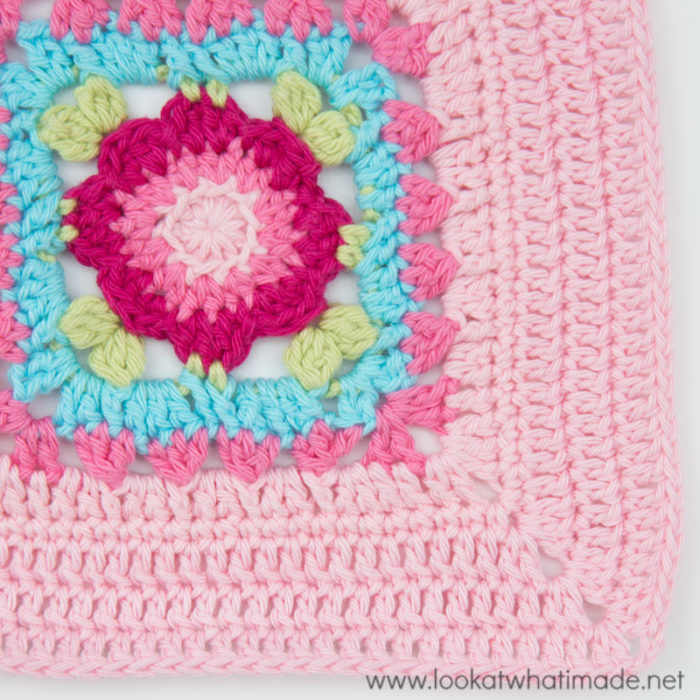
Dc Base Round (to get to multiples of 8+6 stitches) and the first 2 rounds of the border.
Round 3
*(2 dc, ch 2, 2 dc) in the ch-2 corner space. This is your corner made. Dc in the first (hidden) stitch. (Ch 3 and skip the next 3 st’s. Dc in the next 5 st’s) until there are 4 st’s left. Ch 3 and skip the next 3 st’s. Dc in the last st.* Repeat from * to * 3 more times. Join to the first dc with a sl st. Fasten off and work away your yarn ends.
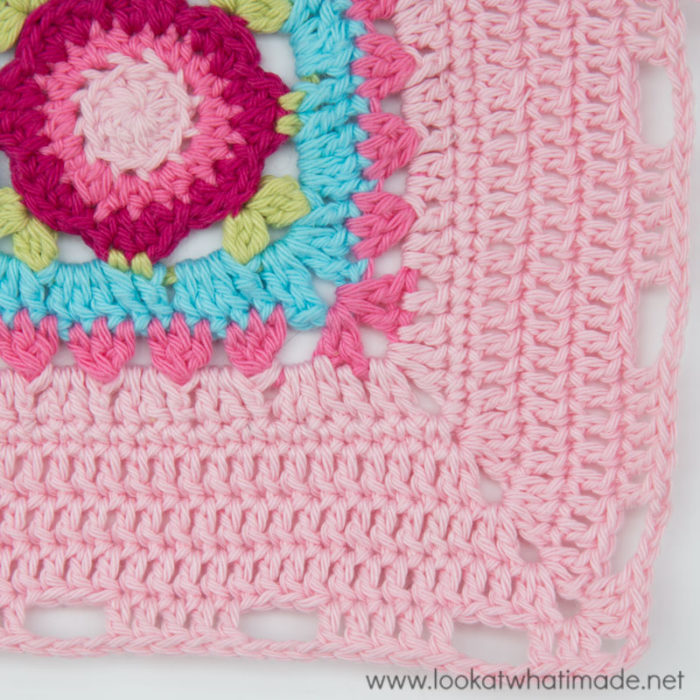
Round 4 – Leaves
Please see Note below before making this round.
*(Sc, ch 2, sc) in the ch-2 corner space. This is your corner made. Sc in the first (hidden) stitch. (Skip the next 2 dc’s. Working in front of the ch-3 space from Round 3, make a Tr Bobble in the central skipped st from Round 2. Ch 5 and make a Tr Bobble in the same stitch. Skip the next 2 dc’ of Round 3 and sc in the next dc) until you get to the next ch-2 space. The last sc should fall in the last dc before the corner space.* Repeat from * to * 3 more times. Join to the first sc with a sl st. Fasten off and work away your yarn ends.
Note
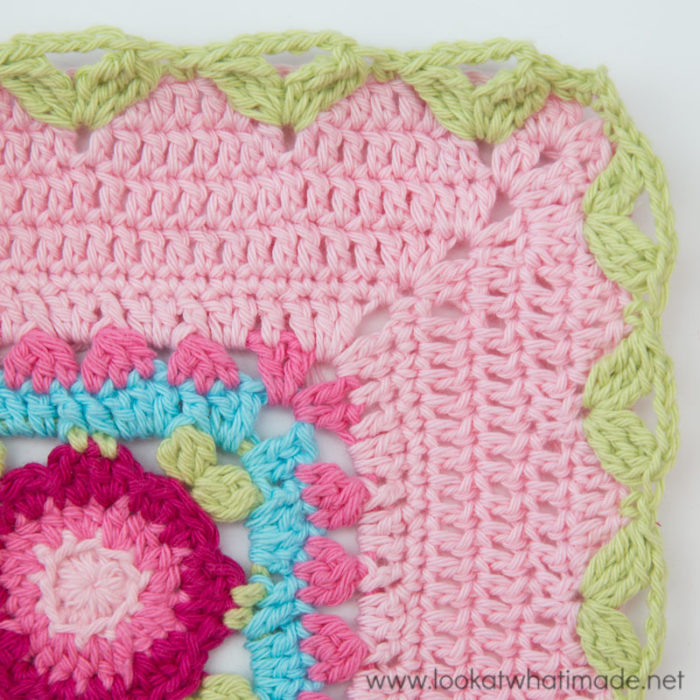
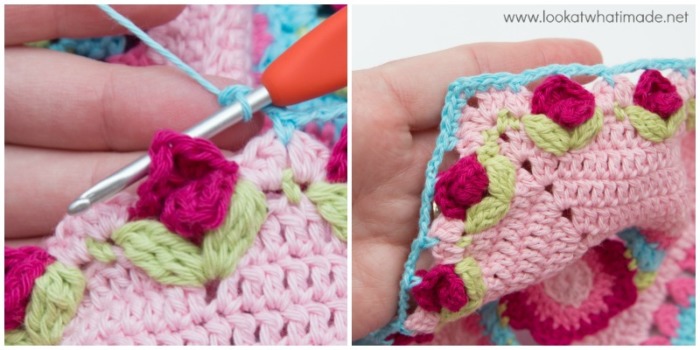
In the photo below, you will notice that the leaves along the top have ‘gaps’ at the base where they meet, whereas the ones along the side don’t. Why? The ones along the top were made between the second and third dc of the 5 skipped dc’s. The ones along the side were made into the central of the skipped dc’s (as written). If you like the ‘gaps’, and the fact that they look like little stems, you are welcome to make your leaves like this instead.
Round 5 – Roses
Before we get started with this Round I am going to show you how to make the roses when the pattern calls for them.
Rose
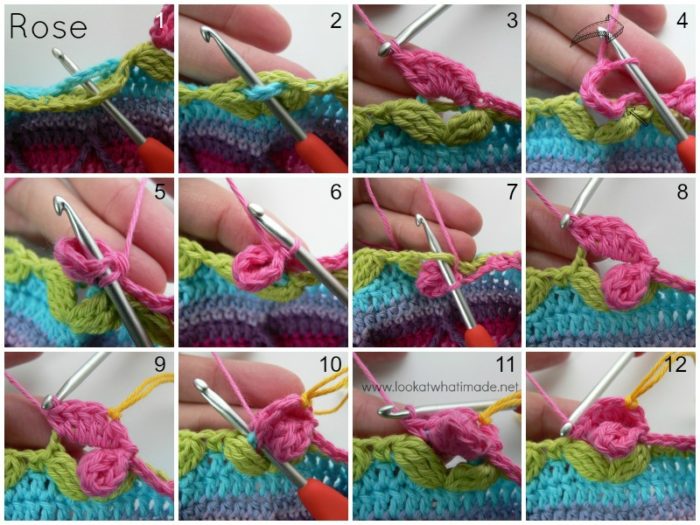
Pull the ch-3 space from Round 3 through the ch-5 space from Round 4 {Photos 1 and 2}. Working only into the ch-3 space, make (2 sc’s, 3 hdc’s, 3 dc’s) – Photo 3. Bring the last stitch around the back of your work {Photo 4} and join to the first sc with a sl st, forming a ring {Photos 5 and 6}. Let’s call this a modified popcorn.
(Sc, hdc, 3 dc, hdc) into the ch-5 space from Round 4, which should be behind the modified popcorn {Photos 7 and 8}. Mark the first of the 3 dc’s with a piece of scrap yarn if you are going to have trouble identifying it later on {Photo 9}. To finish the rose, make a sc into the ch-3 space from Round 3, again making sure to work in front of the ch-5 space {Photos 10 – 12}.
Join your yarn by making a standing single crochet in the first ch-3/ch-5 space of any side (see Rose above). This is the first sc of the rose. Complete the rose as instructed above.
*(Ch 4 and make a rose into the next ch-3/ch-5 space) until you have worked into each ch-3/ch-5 space. Ch 6. Skip the next 3 st’s {which will be the last leaf and the last 2 sc’s} the ch-2 corner space, and the first 3 st’s of the next side {which will be the 2 sc’s and the first leaf}. Make a rose into the first ch-3/ch-5 space of the next side.*
Repeat from * to * 3 more times, omitting the last rose on the last repeat. Join to the ch-3 space that contains the first rose with a sl st. Fasten off and work away your yarn ends.
Flip the ch-6 spaces in the corners to the back of your work!
Round 6 – Scallops
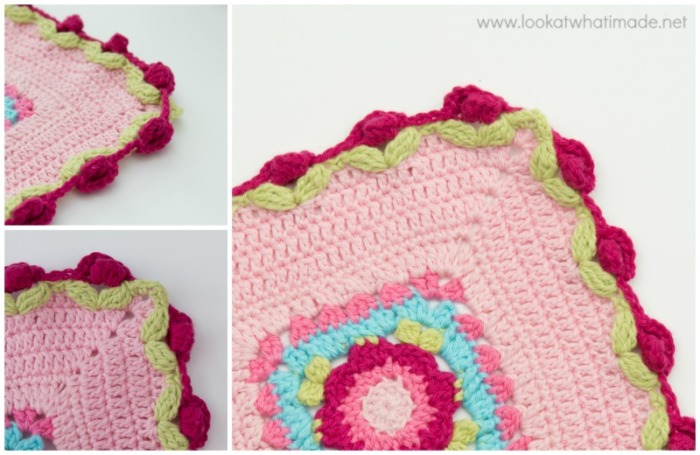
When making the scallops, you can work in front of the ch spaces from Round 5, or over them. It is up to you. I will say that your roses will be slightly neater if you work in front of the ch spaces from Round 5.
*(2 dc, ch 2, 2 dc) in the ch-2 corner space. This is your corner made. Skip the first (hidden) stitch. (Dc, hdc, sc) in the next stitch. Ch 4. Skip the next rose and both its leaves. (Working in front of the ch space from Round 5, {sc, hdc, dc} in the next sc of Round 4. {Dc, hdc, sc} between the same sc and the next Tr Bobble leaf, again working in front of the ch space from Round 5. This is one scallop made. Ch 4. Skip the next rose and both its leaves) until you have 2 st’s left. (Sc, hdc, dc) in the next sc of Round 4. Skip the last stitch of Round 4.*
Repeat from * to * 3 more times. Join to the top of the first dc with a sl st. Fasten off and work away your yarn ends.
Flick all the ch-4’s to the back of your work so that they do not lie in front of your roses.
Round 7 – Connecting the Roses and the Scallops
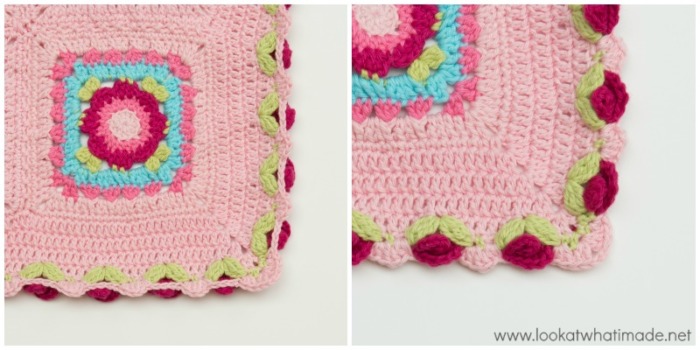
In this round, you will be working into the tops of the roses from Round 5 and between the central 2 dc’s of each scallop. It will be helpful if you familiarise yourself with the “anatomy” of the roses first. Have a look at one of the roses. The “top” of the rose is formed by the (sc, hdc, 3 x dc, hdc) made into the ch-5 space from Round 4. When making your BPsc’s, you will make them into the first of the 3 dc’s.
Make sure that your ch-4 spaces from Round 6 are behind your roses! You will be super annoyed if they aren’t.
If you have trouble identifying the stitches when you make the front post stitches, have a look at this tutorial to remind yourself which loops (and posts) belong to which stitch. And take it slow.
*(Sc, ch 2, sc) in the ch-2 corner space. This is your first corner made. Sc in the first 3 dc’s. Ch 3. Make a BPsc around the post of the first dc of the 3 dc’s at the top of the Rose from Round 5. (Ch 3. Sc between the 2 dc’s at the center of the next scallop from Round 6. Ch 3. Make a BPsc around the post of the first dc of the 3 dc’s at the top of the Rose from Round 5) until you have worked into each Rose. Ch 3. Skip the next sc and the next hdc. Sc in the last 3 dc’s. *
Repeat from * to * 3 more times. Join to the top of the first sc with a sl st. If you are going to change colours, fasten off. If you are going to use the same colour, sl st in the next ch-2 corner space.
Round 8 – Lacy Scallops
This round has a tendency to curl over. I don’t mind it, but if you want a nice flat last round, I suggest going up a hook size before you start.
The first tr of this round is made by chaining 4.
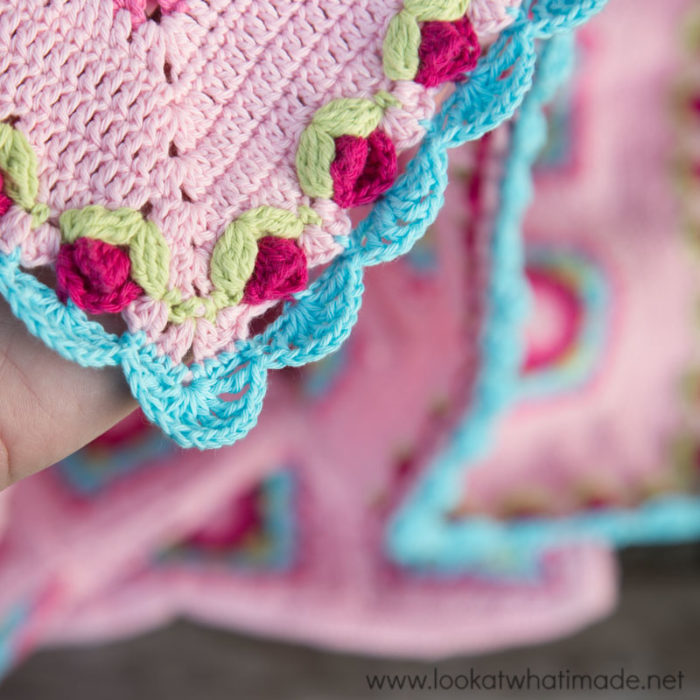
*Make a 7-tr Scallop in any ch-2 corner space. Skip the first 3 sc’s. (Make a FPsc around the next sc. Make a 5-tr Scallop in the next sc, which should be above the Rose) until you have worked into every Rose. Make a FPsc around the next sc. Skip the last 3 sc’s.*
Repeat from * to * 3 more times. Join to the first tr (top of ch-4) with a sl st. Fasten off and work away your yarn ends.
Doesn’t that just make you happy?
I would like to thank my wonderful testers: Claire Martin, Beth Spaulding, Phyllis Haygood, Rosanne Van de Peppel, and Maggie Bullock!

This blog post contains affiliate links. I only link to products I personally use or would use. All opinions are my own.


Rachel Wingrove says
Try putting a french knot into the middle of the rose ….
Jenny Lowman says
Interesting suggestion!
GwenDaleAnn Rose Ragland says
I’m not usually in love with anything but I have to tell you that I love your mind, you create beautiful art and share it with people and that’s lovely. Thank you
Dedri Uys says
Thank you so much.
I pour my heart and soul into my creations, and I am so pleased that you like them.
Dedri
Linda Horton says
I made the sweet afghan with the rose border this past summer and entered it in the local fair. I won first place and Best of Show. My first great granddaughter was blessed with the afghan and I was so happy.
Vicki says
Just made this using Stylecraft Special DK…Love it!
Caitie says
Absolutely gorgeous! Such a lovely design and a very helpful and detailed tutorial. Thank you so much for sharing.
Dedri Uys says
Thank you :)
Helena Visser says
Jou werk is soooooo pragtig!! Net ‘n boeremeisie kan so slim wees soos jy. Dankie vir al die inspirasie.
Heleen says
Baie baie dankie dat jy so vinnig teruggekom het na my ek is nou met voor laaste rondte besig en het aangeneem jy los dit net so.Die fotos van elke stap het verskriklik baie gehelp om die randjie baas te raak.My kleindogter is baie in haar skik met haar rosies dit is voorwaar pragtig.
heleen says
help asb met rondte 7 -8. die 4 kettings wat jy agter werk moet laat le gaan dit net so bly want sien nerens in rondte 8 waar ek dit gaan gebruik nie n omgekeerde tutoral van foto 8ste rondte is sal ek daar kon kyk.
Dedri Uys says
Hi Heleen. Dit bly los agter jou werk. As dit jou pla kan jy dit met ‘n stekie vang. Ek hou nie daarvan om oor dit te werk nie, want dan steek die donker pienk uit aan die voorkant, maar jy is welkom om dit te doen as die kettings jou pla.
Cay says
Help! I’m struggling with my row math. My Lydia blanket is 6 by 6 squares so I have added a base round to get to 158 stitches on each side. Row 1 of the Rose Border adds 4 stitches on each side (162), Row 2 adds 4 more (166)- I can’t make row 3 come out. Any suggestions?
By the way- I joined squares FOR THE FIRST TIME! Your instructions were fantastic and I am so encouraged. Thank you
Dedri Uys says
Hi Cay :) Just double check the instructions for Row 2. You should be skipping the first (hidden) stitch, which means you only add 3 st’s per side, not 4. You should have an uneven number of stitches per side with multiples of 8 + 5. If you have already made Round 2 and don’t want to frog, you can fudge it by skipping the first (hidden) stitch on the next Round.
I hope that helps.
ps. I am so excited for you about the joining. I remember when I joined my first blanket and I had to call my granny lots so she could remind me what to do.
Leigh says
I love roses (who doesn’t?) and this border is truly lovely. It’s just the finishing touch for an afghan I’m planning to crochet (the flowers are done, just need the rest of it!).
Dedri Uys says
Thank you, Leigh :)
gillian elliott says
Thank you. Ive used rhe border to finish of a blanket with white and blue roses. It looks lovely x
Linda says
Wauw!! Any chance for a danish translation? :-)
This border will definately be the border for my Sophie, when I get so far – I’m at extension-blocks, so I’m getting there ;-)
Dedri Uys says
Hi Linda. I haven’t asked my Danish translator yet. But I will do so!
Lena de Beer Trichardt says
Hi Dedre, ek kry nie die patroon se print knoppie dat dit week nie, is daar dalk n rede voor? Groete uit SA. Baie dankie vir nog n mooi patroon, hierdie ouma Groot is seker nou gehoek op hekel.
Dedri Uys says
Hi Lena.
As daar te veel mense is wat gelyk die knoppie probeer gebruik kalf die hele besigheid. Dis ‘n goeie idee om later weer te probeer as dit gebeur. Laat my weet as dit nog steeds nie werk nie.
one small frog says
You, my Dear, are the Cat’s Whiskers, the Bee’s Knees!! How lovely you Lydia blanket is, and the Rose border is exquisite! Thank you so much for sharing your beautiful patterns. XOXO
Rachel says
I love these too. thanks for introducing them to me. I used them to make a detail row on a bag for my daughter in law for Christmas. She adored them.
Dedri Uys says
I’m glad to hear that :)
Cindy B says
This is so lovely. I am trying to keep everything in one place so I can find it again. Is this in Ravelry? Thank you so much for sharing. It is truly beautiful. Can’t wait to see the new pattern.
Jenny says
Hi Cindy. The pattern is only available here on the blog at present :)
Renee Molony says
Thank you, Dedri. This is so beautiful!
Katie says
Lovely! Thank you so much for sharing this beautiful design with your readers!
I am working on this project for my daughter’s birthday. Did you ever say how you joined the squares?
Jenny says
Yes, Katie, Dedri gives a link to how to join the squares in the ‘Joining the Squares’ part of the pattern :)