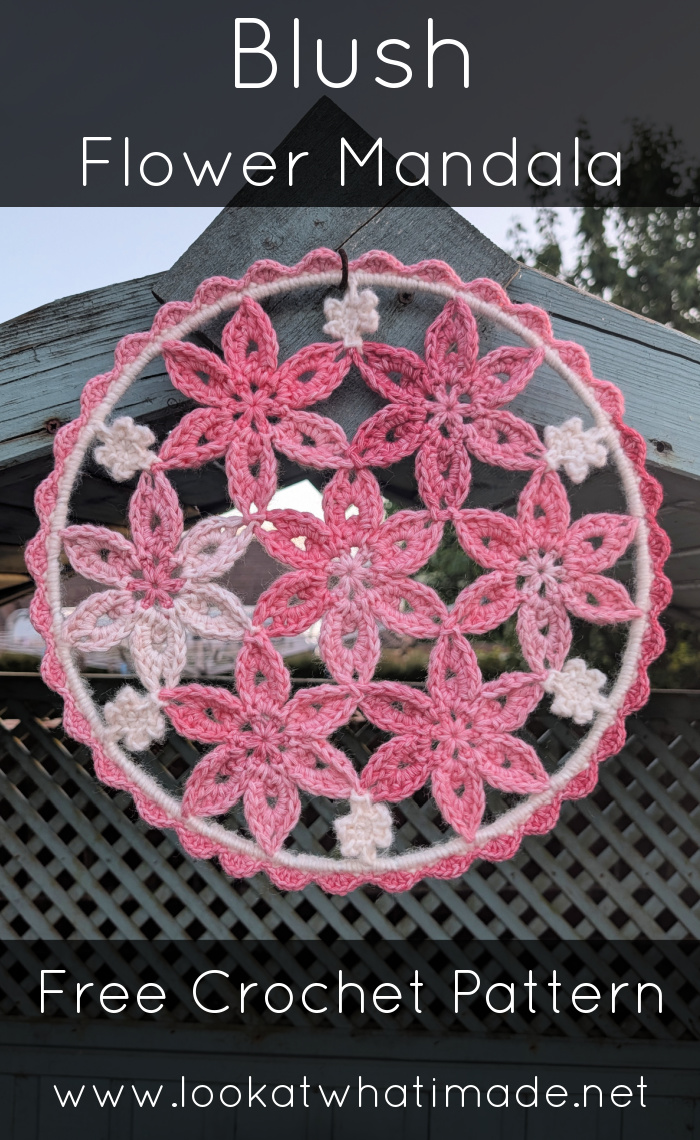
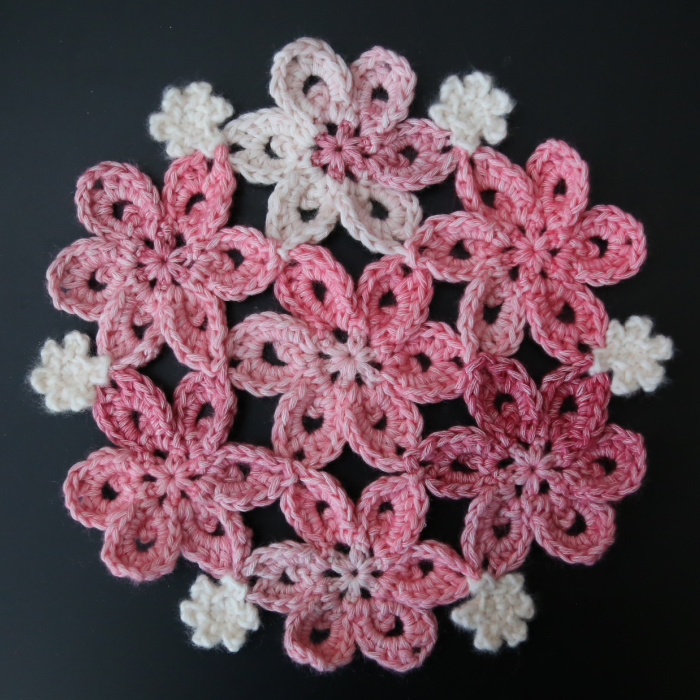
Last week I shared the pattern for the Blush Crochet Flower. This week I am showing you how to turn those flowers into a floral mandala, perfect for displaying on a wall or in a window.
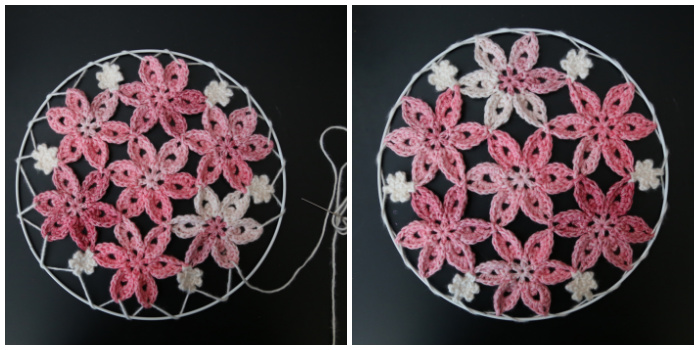
I initially made the mandala by simply sewing it to a hoop and calling it a day. This simple version hung on my wall for weeks while I worked on the baby blanket version. On Monday, I decided to gift my mandala to a brand-new baby girl arriving in the world today, so I added a border to make it feel a little more special.
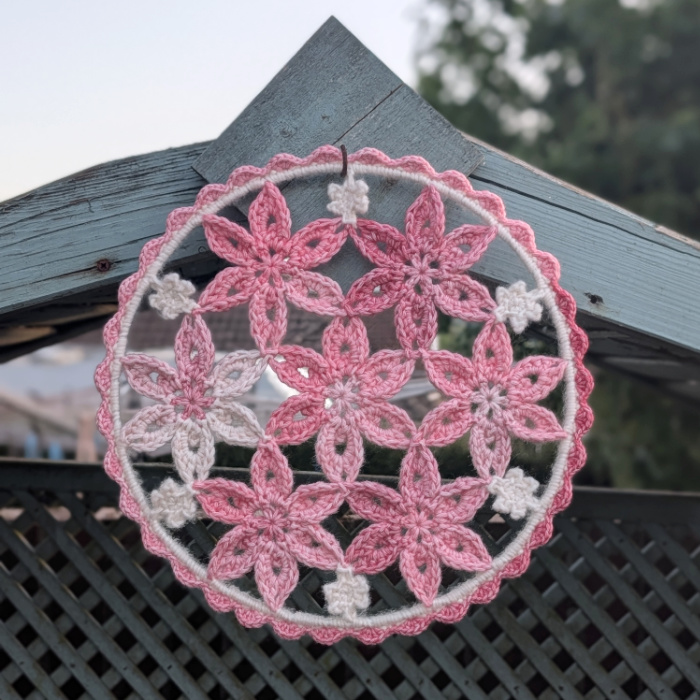
I absolutely love how this colourway of Scheepjes Stonewashed Flow XL dances with the pattern. I was super curious to see how it would look in one of the other colourways, so I started another version in Hushness (14), using Stonewashed XL Yellow Jasper (849) for the Tiny Flowers.
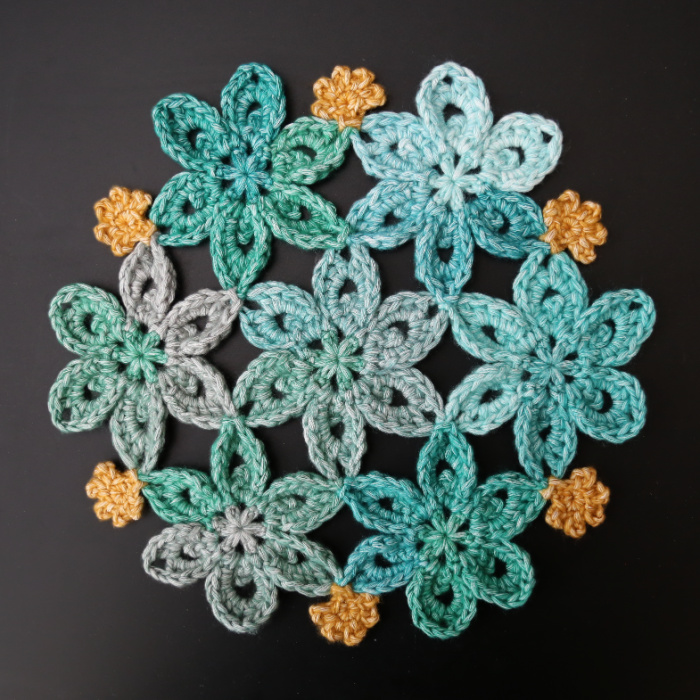
The result completely surprised me. Where the blush version feels soft and blossom-like, the Hushness version has a much moodier feel to it – like stormy skies, sea glass, wildflowers, and rain-washed leaves all tangled together. It completely changed the personality of the pattern, and I find myself coming back to look at it over and over again.
This colourway feels like a perfect representation of the weather we’ve had here in Exeter over the last two weeks: clear blue skies one minute, stormy and sombre the next, grey and drizzly shortly after that.
Blush Flower Mandala Pattern
© Dedri Uys 2026. Charts by Masako Kawahara. All Rights Reserved.
Resources
- Ravelry: Add this Pattern to Your Ravelry Queue
- Hashtag: #BlushFlowerMandala
If you prefer to use an ad-free PDF of this pattern, you can buy one HERE from Ravelry. Alternatively, you can use the Print-friendly button at the bottom of this post to print or save this post to PDF.
Information
Materials
You can use any hook/yarn combination you like.
I am using:
- Yarn A: Scheepjes Stonewashed Flow XL in the colourway Serenique (12) x 1 ball
- Yarn B: Scheepjes Stonewashed XL in the colourway Moon Stone (841)
- 8g for the Tiny Flowers
- 10g for the Optional Border/Edging
- 6mm Clover Amour crochet hook
- 30cm/12” hoop (roughly 2.5cm/1” bigger than finished mandala)
Optional Border/Edging:
- 4mm Clover Amour crochet hook (used only for Edging Round 2)
With this combination, each Flower weighs 6.8g and measures 10.5cm from Petal tip to Petal tip through the centre (unblocked).
Abbreviations
US Terminology
- Ch – Chain
- Dc – Double crochet
- Hdc – Half-double crochet
- Rep – Repeat
- Sc – Single crochet
- Sl st – Slip stitch
- Sp/sps – Space/spaces
- St/sts – Stitch/stitches
- [] – Stitches to be worked into the same st/sp
- () – Repeat instructions between parentheses the number of times specified
- * – Repeat instructions between asterisks the number of times specified
Chart Legend
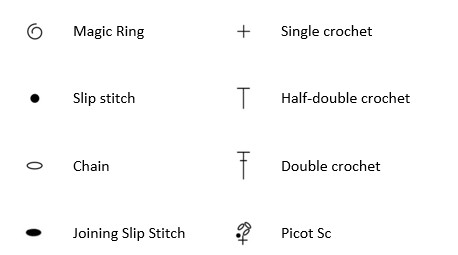
Special Stitches
Picot Sc
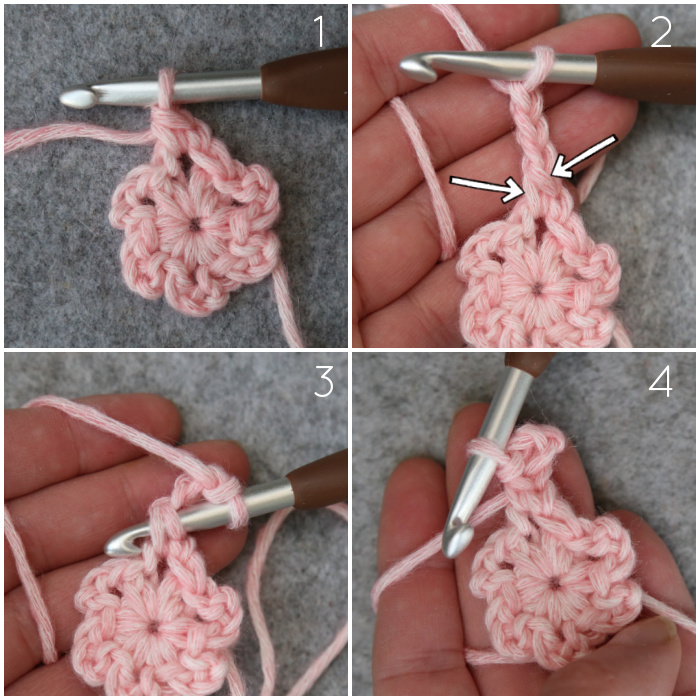
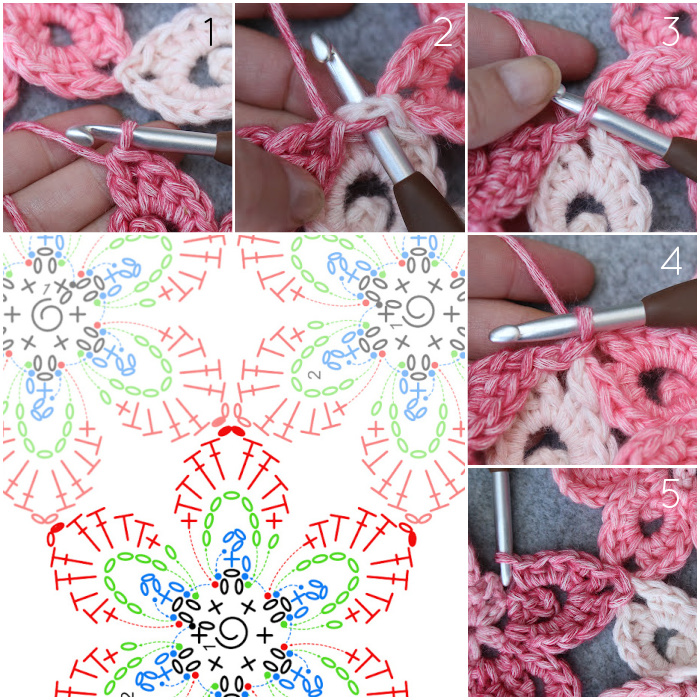
Make a sc {Photo 1}. Ch 3 {Photo 2}. Insert your hook from top to bottom into the FLO of the sc and the left ‘leg’ (right, if you are left-handed) of the sc {Indicated with arrows in Photo 2 and illustrated in Photo 3}. Make a sl st to complete your Picot sc {Photo 4}.
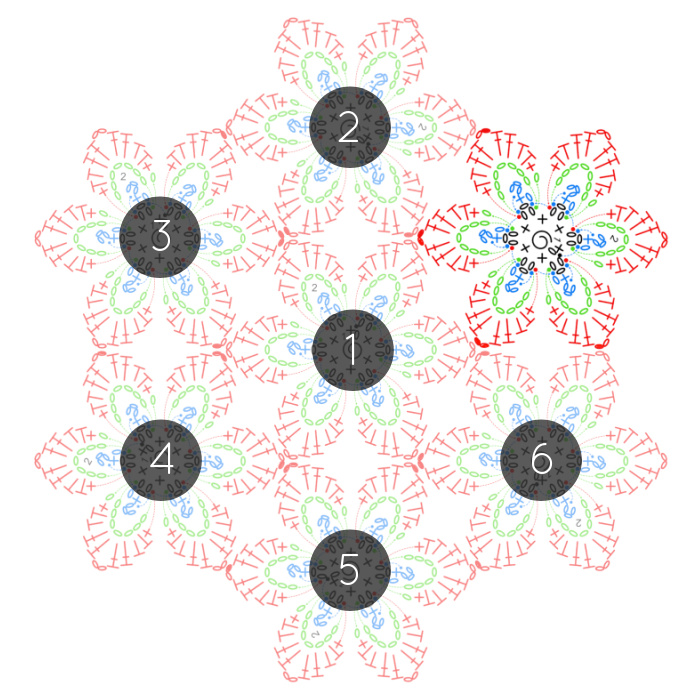
Making the Mandala
For this mandala, you will make 7 Blush Flowers, using a join-as-you-go (JAYGO) method.
First Flower (Stand-alone Flower)
Below are the written-only instructions for making the First Flower. If you need a little bit more help, you can find a step-by-step photo and video tutorial HERE.
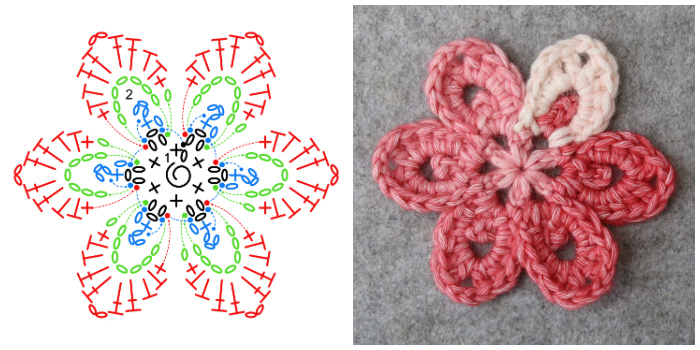
Round 1
With Yarn A and working into a magic ring: Ch 1 (doesn’t count as a st, here and throughout), (sc, ch 3) 6 times. Join to the first sc with a sl st.
Stitch Count: 6 sc and 6 ch-3 sps
Round 2
In this round, you will make 6 Petals. Each Petal will be made individually in 3 steps.
*Step 1: Sl st in the next ch-3 sp. Ch 1, make a Picot sc, sl st in the same ch-3 sp.
Step 2: Ch 7 and turn. Sl st in the same ch-3 sp, placing sl st to the left of the Picot (right, if you are left-handed). Ch 1 and turn.
Step 3: [Sc, 2 hdc, 2 dc, ch 2, 2 dc, 2 hdc, sc] in the ch-7 sp. Sl st in the same ch-3 sp to finish the Petal.*
Rep from * to * 5 more times so that you end up with 6 Petals, one in each ch-3 sp. Fasten off and work away your ends.
Stitch Count per Step 3 Petal: 2 sc, 4 hdc, 4 dc, and 1 ch-2 sp.
Working Away the Final Yarn End Neatly
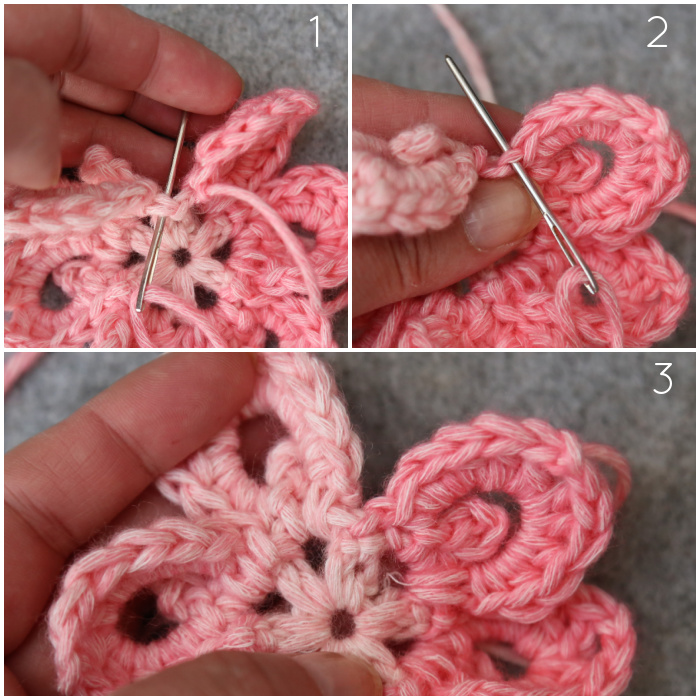
Thread a needle with your final yarn end. Insert it from front to back into the first sl st of the round {Photo 1}. Then insert it from top to bottom into the last sl st of the round {Photo 2}. Pull your yarn tight {Photo 3} and work the end away to the back of the last Petal.
Joining as You Go (JAYGO)
You will be joining the remaining flowers to the First Flower and to each other as you go (JAYGO). This will be done by swapping one or both of the ch sts at the tip of a Petal for a joining sl st, depending on whether or not the Petal you are attaching to has already been attached to another Petal.
PLEASE NOTE: To make things easier, the work you are joining to should be farthest away from you.
JAYGO Method 1: Joining a Petal to a Petal That Doesn’t Contain a Joining Sl St Yet
Alter Step 3 of Round 2 as follows:
[Sc, 2 hdc, 2 dc] in the ch-7 sp {Photo 1}. Insert your hook from front to back into the ch-2 sp of the Petal you will be joining this Petal to {Photo 2} and make a sl st {Photo 3}. This is a joining sl st, here and throughout, and it will replace one of the corner chains. Ch 1 {Photo 4}, [2 dc, 2 hdc, sc] in the same ch-7 sp. Sl st in the same ch-3 sp from Round 1 to finish the Petal {Photo 5}.
JAYGO Method 2: Joining a Petal to a Petal That Already Contains a Joining Sl St
Alter Step 3 of Round 2 as follows:
Step 3: [Sc, 2 hdc, 2 dc] in the ch-7 sp {Photo 1}. Insert your hook from front to back into the ch-2 sp of the Petal you will be joining this Petal to {Photo 2} and make a sl st to create your first joining sl st {Photo 3}. Insert your hook from front to back into the ch-2 sp of the next Petal you will be joining to, which will already be attached the first Petal you joined to, make another joining sl st {Photo 4}. [2 dc, 2 hdc, sc] in the same ch-7 sp {Photo 5}. Sl st in the same ch-3 sp from Round 1 to finish the Petal.
Remaining Flowers
Now that we have covered HOW to join the motifs, I’ll walk you through Flowers 2 – 7.
Flower 2
For this Flower, we will use JAYGO Method 1 on the last two Petals.
Round 1
As Round 1 of First Flower.
Round 2
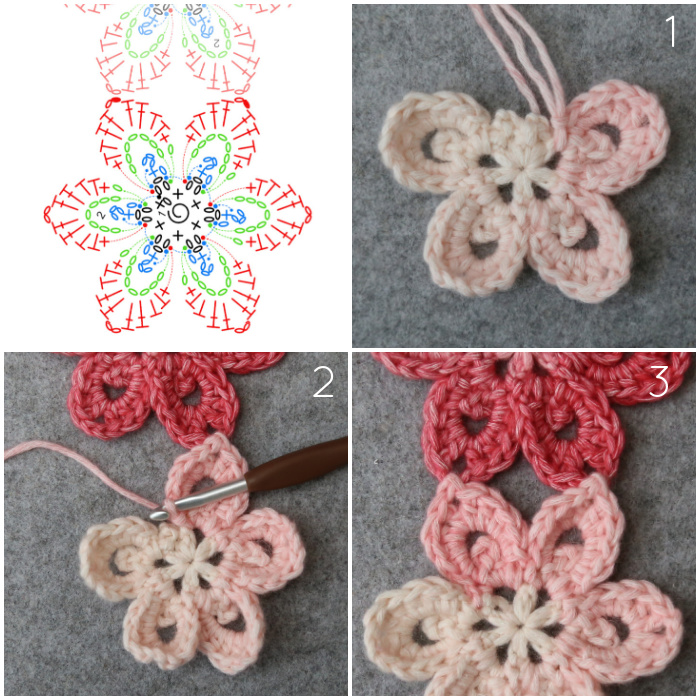
Make the first four Petals as Steps 1 – 3 in Round 2 of the First Flower {Photo 1}.
On the last two Petals, change Step 3 to JAYGO Method 1 and join to any two consecutive Petals of the First Flower {Photos 2 and 3}. Fasten off and work away your ends.
Flower 3
For this Flower, we will use JAYGO Methods 1 and 2 on the last three Petals.
Round 1
As Round 1 of First Flower.
Round 2
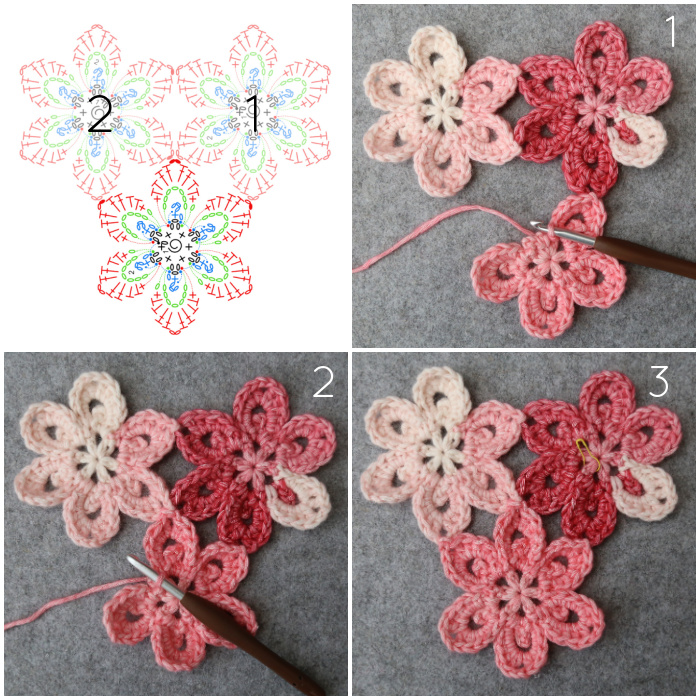
Make the first three Petals as Steps 1 – 3 in Round 2 of the First Flower.
On the fourth Petal, change Step 3 to JAYGO Method 1 and join to the unworked Petal of the First Flower to the right of your previous join (left, if you are left-handed) – Photo 1.
On the fifth Petal, change to Step 3 of JAYGO Method 2 and join to the petals from the previous two flowers that already contain a joining sl st {Photo 2}.
On the last Petal, change to Step 3 of JAYGO Method 1 and join to the next available petal {Photo 3}. Fasten off and work away your ends.
Flowers 4 – 6
As Flower 3 – Please see diagram at end of Flower 7.
Flower 7
For this Flower, we will use JAYGO Methods 1 and 2, joining this last Flower to the second, first, and sixth flowers to complete the ‘circle’.
Round 1
As Round 1 of First Flower.
Round 2
Make the first two Petals as Steps 1 – 3 in Round 2 of the First Flower.
On the third Petal, change Step 3 to JAYGO Method 1 and join to the unworked Petal of the Second Flower to the right of your previous join (left, if you are left-handed).
On the fourth and fifth Petals, change to Step 3 of JAYGO Method 2 and join to the petals from the previous flowers that already contain a joining sl st.
On the last Petal, change to Step 3 of JAYGO Method 1 and join to the next available Petal. Fasten off and work away your ends.
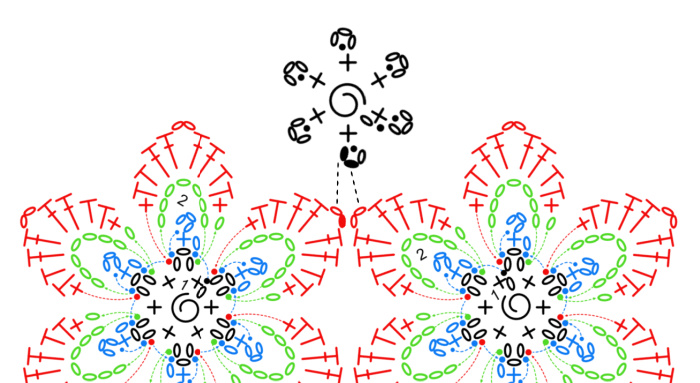
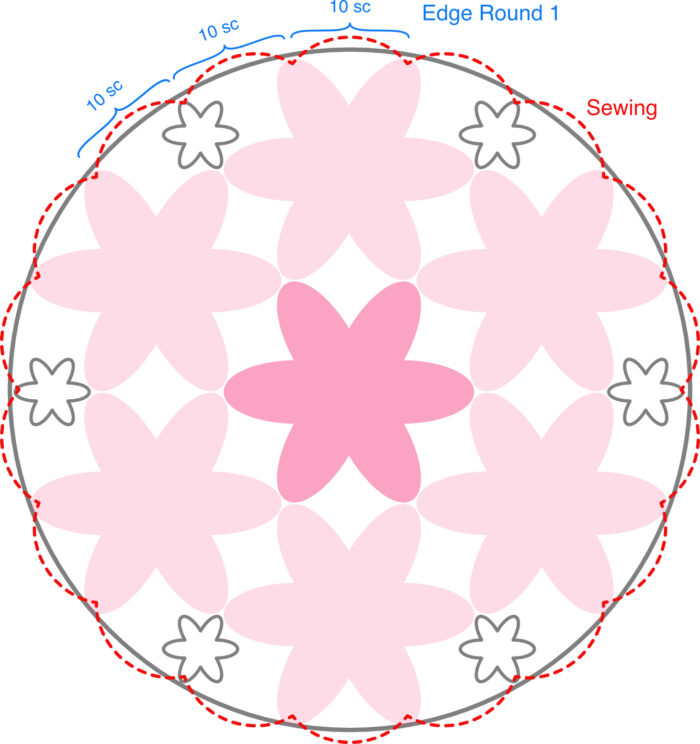
Adding Tiny Flowers
Once you have joined all 7 Blush Flowers, you will need to make 6 Tiny Flowers, joining each of them as per the photo below.
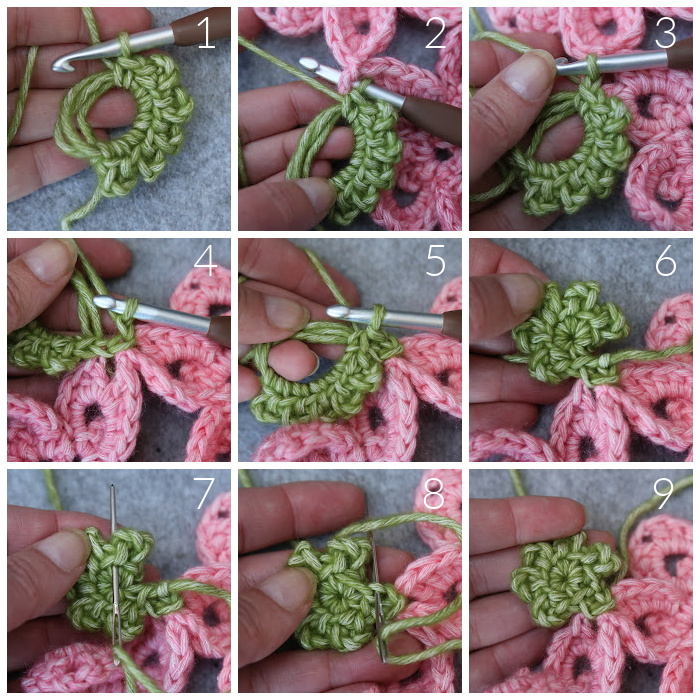
Tiny Flowers
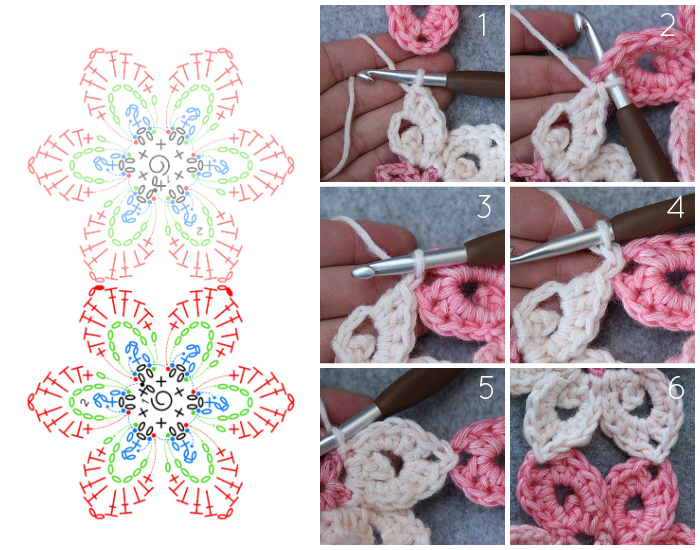
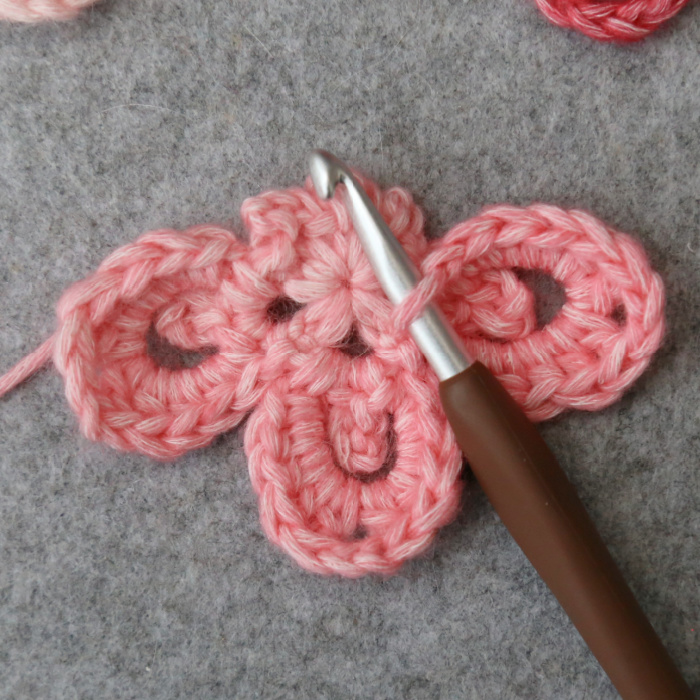
With Yarn B and working into a magic ring, ch 1 (doesn’t count as a st), make 5 Picot sc. Make one last sc {Photo 1}.
Insert your hook from front to back into the ch-2 sp of the Petal you will be joining the Tiny Flower to {Photo 2} and make a sl st to create your first joining sl st {Photo 3}. Insert your hook from front to back into the ch-2 sp of the next Petal you will be joining to and make another joining sl st. Ch 1 {Photo 4}.
Insert your hook from top to bottom into the FLO of the sc and the left ‘leg’ (right, if you are left-handed) of the sc, and make a sl st to complete your last Picot sc {Photo 5}.
Cut your yarn, leaving a 10cm/4” end {Photo 6}. Thread a needle with your final yarn end. Insert it from front to back into the second sc {Photo 7}. Then insert it from top to bottom into the last sl st of the round {Photo 8}. Pull your yarn tight {Photo 9} and work away the end.
Repeat this until you have attached 6 Tiny Flowers to your mandala.

Attaching the Mandala to a Hoop
When you have made all six Tiny Flowers, you are ready to sew your mandala to a hoop. My mandala was 27.5cm in diameter and I used a 30cm hoop.
Sew the mandala to your hoop using Yarn B and a whip stitch. Before finishing off with a knot, pull on the yarn you used to sew the mandala to the hoop until it is as tight as you can get it.
I quite like this minimalist finish, but if you prefer something a little bit more polished, you can add the Optional Edging below.
Optional Edging
Edging Round 1
You will have 18 spaces around, either between two petals, or between a Petal and a Tiny Flower. We will be making 10 sc in each of these ‘spaces’.
Join Yarn B by making a standing sc after any Petal around, working OVER the hoop and the yarn used to sew the mandala to the hoop, here and throughout. Make 9 more sc in the same sp. (Make 10 sc in the next space) 17 times. Join to the first sc with a sl st. Fasten off and work away your ends.
Stitch Count: 180 sc
Edging Round 2
With the 4mm hook (because it is just easier), join Yarn A by making a sl st in the first sc of the previous round. Skip the next st, make 5 hdc in the next st, skip the next st. (Sl st in the next 2 sts, skip the next st, make 5 hdc in the next st, skip the next st) 35 times. Sl st in the last st. Fasten off and work away your ends.
Stitch Count: 36 5-hdc Shells


I hope you have had fun making this mandala. If you share photos, I’d love it if you could use #blushflowermandala so that I can see them.

This blog post contains affiliate links. I only link to products I personally use or would use. All opinions are my own.
Pin This Pattern for Later