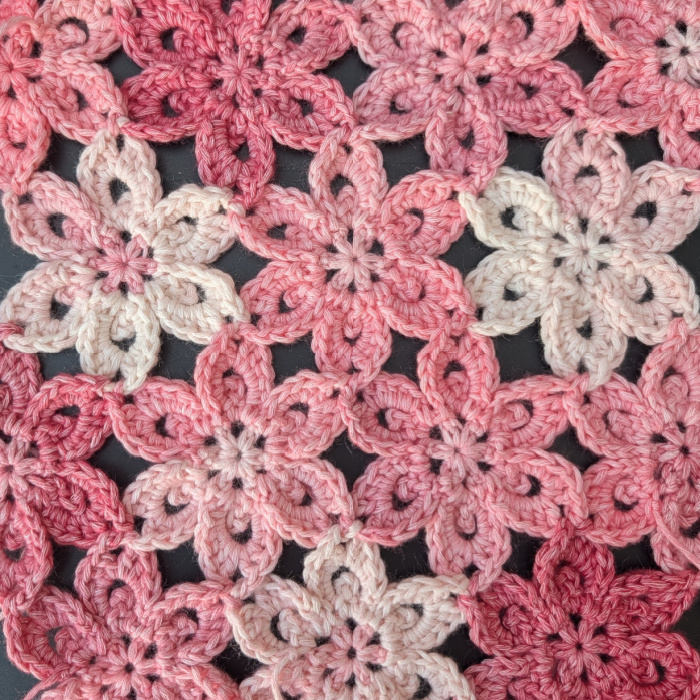
Still playing with colour-change yarns, I have designed this easy Blush Crochet Flower Motif to complement yarns with a medium-length colour-change. It consists of only two rounds, although the second round includes short back-and-forth rows to create each Petal.
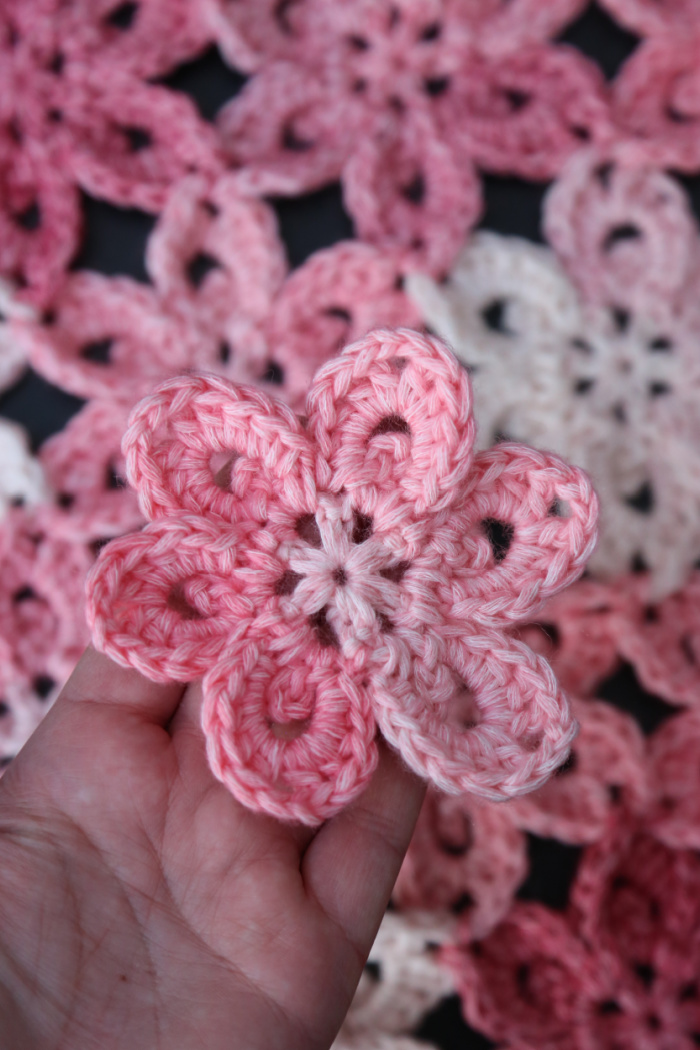
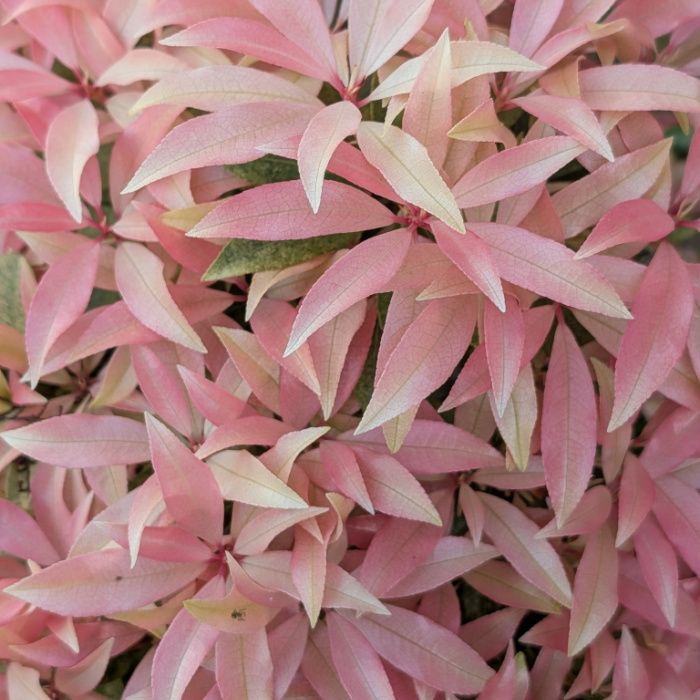
This specific yarn and colourway combination – Scheepjes Flow XL in Serenique – reminds me of apple blossoms, cherry blossoms, and Japanese Andromeda (Pieris japonica), all of which I pass on my way to work.
Here is a picture of my neighbour’s Japonica. Isn’t it spectacular? And see what I mean about the colours?
This crochet flower motif works beautifully as a stand-alone flower, which is the pattern I will be sharing below. It also lends itself wonderfully to a join-as-you-go (JAYGO) motif, allowing you to join multiple flowers together to create garments, mandalas, blankets, table runners – anything you fancy, really.
Here you can see an example of the motif used to make a simple mandala.
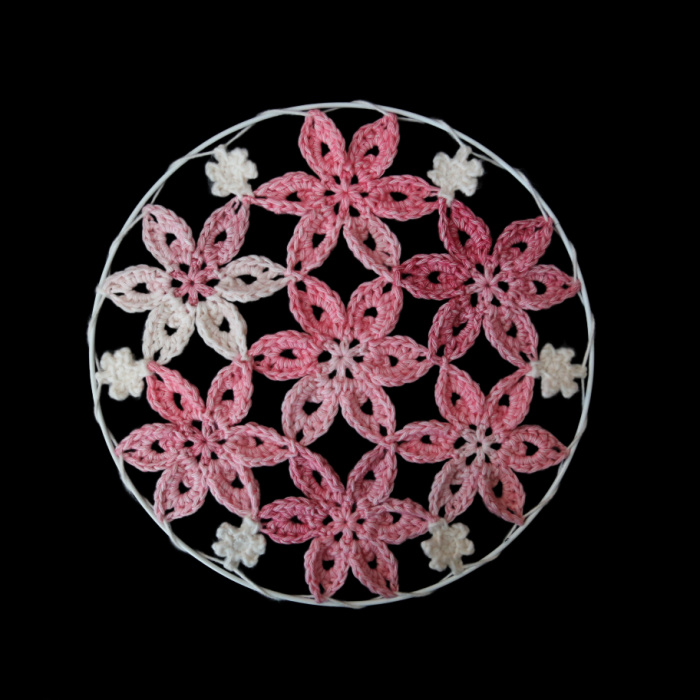
This requires the motifs to be joined as you make them. If you are already comfortable with join-as-you-go crochet, you will likely be able to adapt this motif to your preferred method. If not, don’t worry. I will explain exactly how I joined them when I share the mandala pattern next week.
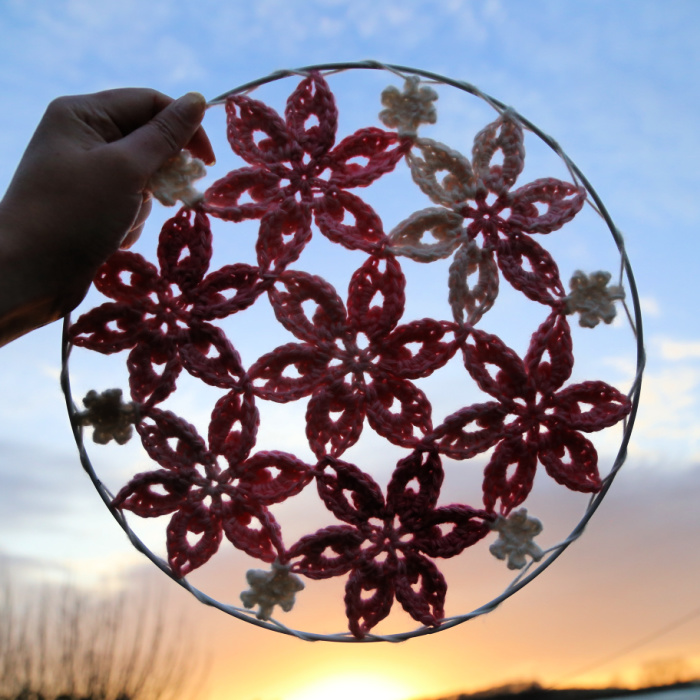
Ah… I couldn’t resist sharing a photo of it against a Devon sunset…
After I share the mandala pattern, I will also share a small, decorative baby blanket using these motifs, complete with edge pieces and a border. I will point out that there is a lot of ‘negative space’ in the blanket (also known as holes), so it may not be everyone’s cup of tea. It does look awfully pretty, though, doesn’t it?
Blush Crochet Flower Motif Pattern
Dedri Uys 2026. Charts by Masako Kawahara. All Rights Reserved.
Index
- Information
- Written-only Instructions
- Photo Tutorial Instructions
- Working Away the Final Yarn End Neatly
- Chart
- Video Tutorial
Information
Materials
You can use any hook/yarn combination you like.
I am using:
- Scheepjes Stonewashed Flow XL in the colourway Serenique (12)
- 6mm Clover Amour crochet hook
With this combination, each Flower weighs 6.8g and measures 10.5cm from Petal tip to Petal tip through the centre (unblocked).
Abbreviations
US Terminology
- Ch – Chain
- Dc – Double crochet
- Hdc – Half-double crochet
- Rep – Repeat
- Sc – Single crochet
- Sl st – Slip stitch
- Sp/sps – Space/spaces
- St/sts – Stitch/stitches
- [] – Stitches to be worked into the same st/sp
- () – Repeat instructions between parentheses the number of times specified
- * – Repeat instructions between asterisks the number of times specified
Chart Legend
Special Stitches
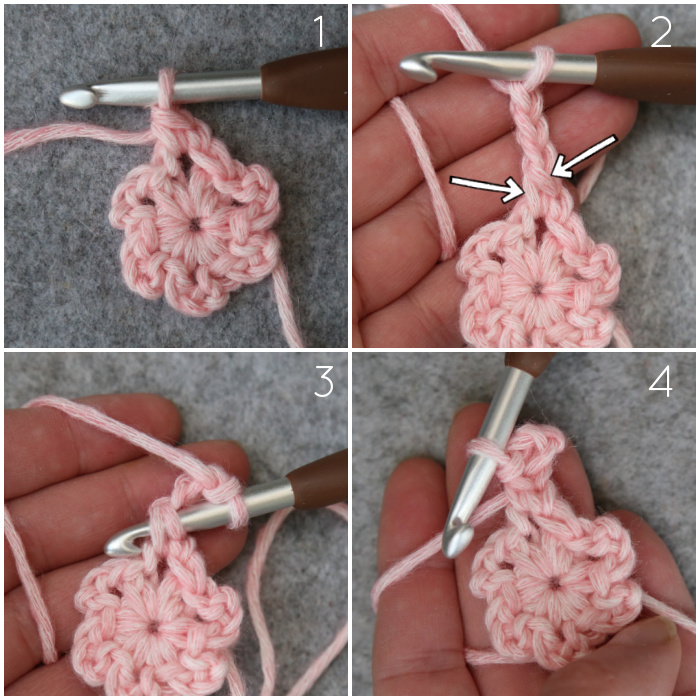
Picot Sc
Make a sc {Photo 1}. Ch 3 {Photo 2}. Insert your hook from top to bottom into the FLO of the sc and the left ‘leg’ (right, if you are left-handed) of the sc {Indicated with arrows in Photo 2 and illustrated in Photo 3}. Make a sl st to complete your Picot sc {Photo 4}.
Written-only Instructions
Round 1
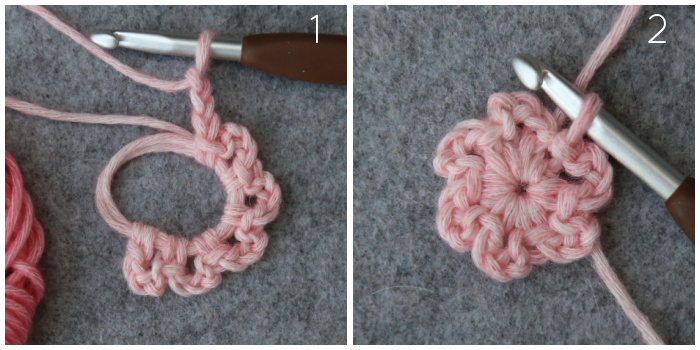
Into a magic ring: Ch 1 (doesn’t count as a st, here and throughout), (sc, ch 3) 6 times. Join to the first sc with a sl st.
Stitch Count: 6 sc and 6 ch-3 sps
Round 2
In this round, you will make 6 Petals. Each Petal will be made individually in 3 steps.
*Step 1: Sl st in the next ch-3 sp. Ch 1, make a Picot sc, sl st in the same ch-3 sp.
Step 2: Ch 7 and turn. Sl st in the same ch-3 sp, placing sl st to the left of the Picot (right, if you are left-handed). Ch 1 and turn.
Step 3: [Sc, 2 hdc, 2 dc, ch 2, 2 dc, 2 hdc, sc] in the ch-7 sp. Sl st in the same ch-3 sp to finish the Petal.*
Rep from * to * 5 more times so that you end up with 6 Petals, one in each ch-3 sp. Fasten off and work away your ends.
Stitch Count per Step 3 Petal: 2 sc, 4 hdc, 4 dc, and 1 ch-2 sp.
Photo Tutorial Instructions
Round 1
Into a magic ring: Ch 1 (doesn’t count as a st, here and throughout), (sc, ch 3) 6 times {Photo 1}. Join to the first sc with a sl st {Photo 2}.
Stitch Count: 6 sc and 6 ch-3 sps
Round 2
In this round, you will make 6 Petals. Each Petal will be made individually in 3 steps.
*Step 1: Sl st in the next ch-3 sp. Ch 1, make a Picot sc {Photo 1}, sl st in the same ch-3 sp {Photo 2}.
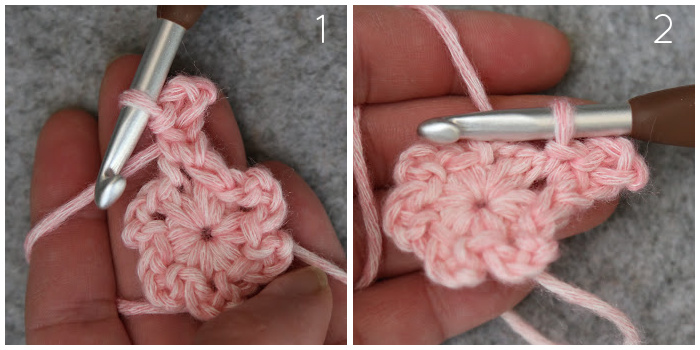
Step 2: Ch 7 {Photo 3} and turn {Photo 4}. Sl st in the same ch-3 sp, placing the sl st to the left of the Picot (right, if you are left-handed) – Indicated with an arrow in Photo 4 and illustrated in Photo 5. Ch 1 {Photo 6} and turn.

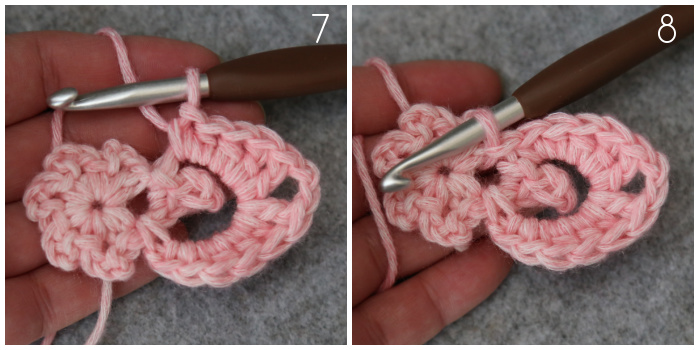
Step 3: [Sc, 2 hdc, 2 dc, ch 2, 2 dc, 2 hdc, sc] in the ch-7 sp {Photo 7}. Sl st in the same ch-3 sp to finish the Petal {Photo 8}.*
Rep from * to * 5 more times so that you end up with 6 Petals, one in each ch-3 sp.
Stitch Count per Step 3 Petal: 2 sc, 4 hdc, 4 dc, and 1 ch-2 sp.
Fasten off and work away your ends.
Working Away the Final Yarn End Neatly
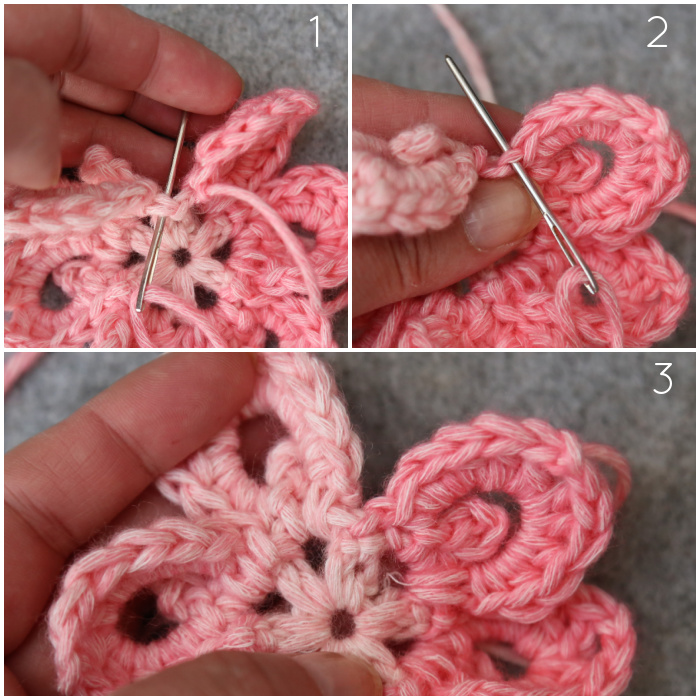
Thread a needle with your final yarn end. Insert it from front to back into the first sl st of the round {Photo 1}. Then insert it from top to bottom into the last sl st of the round {Photo 2}. Pull your yarn tight {Photo 3} and work the end away to the back of the last Petal.
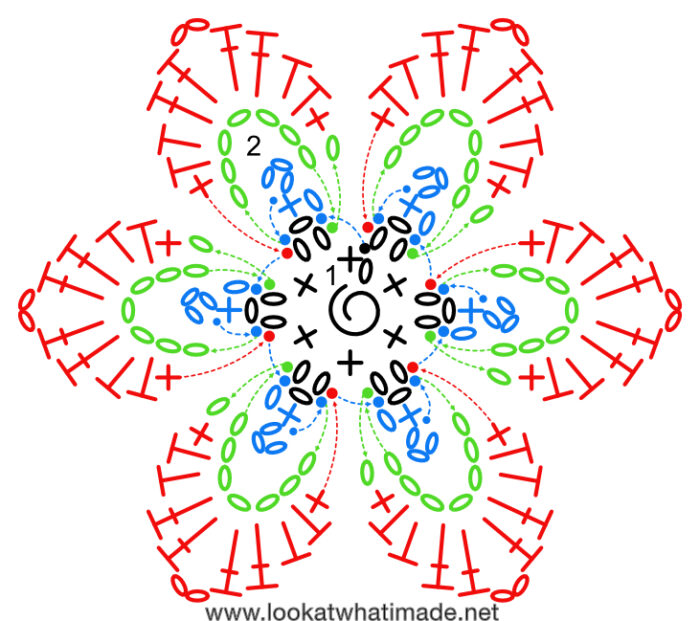
Chart
Video Tutorial
I would love to see what you make using this motif, so if you share online, please use the hashtags #blushcrochetflower or #lookatwhatimadedotnet so that I can see your beautiful creations.

This blog post contains affiliate links. I only link to products I personally use or would use. All opinions are my own.


Abbie Reed says
I love this! I think I may make a sweater or cardigan out of this!
Jenny Lowman says
Ooh! Send us pictures on the Facebook Group if you do :)