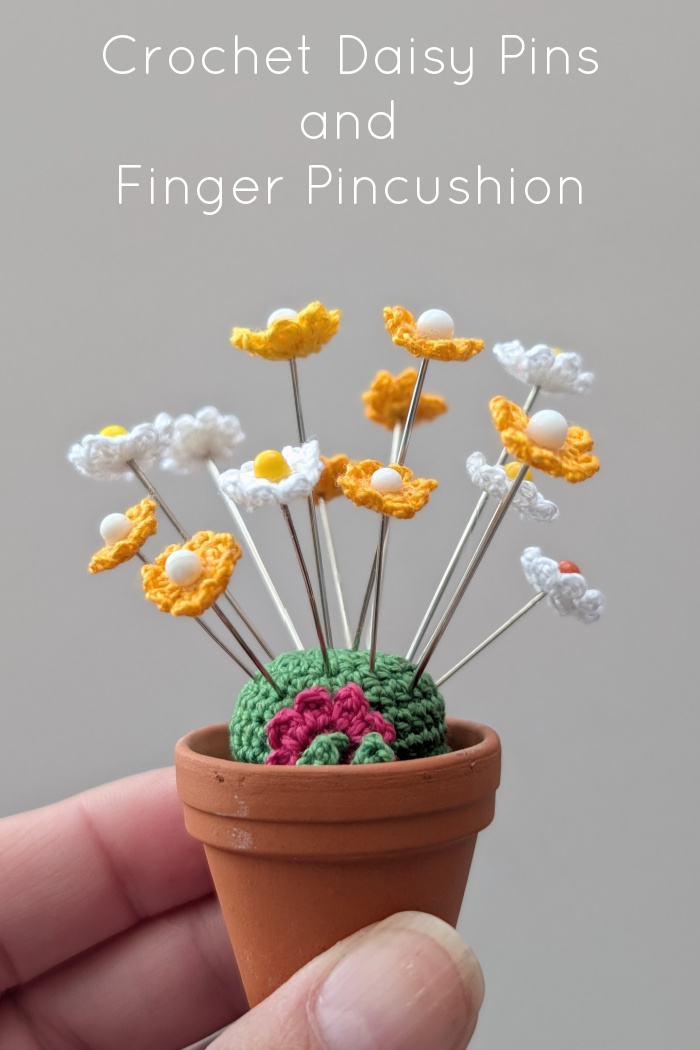
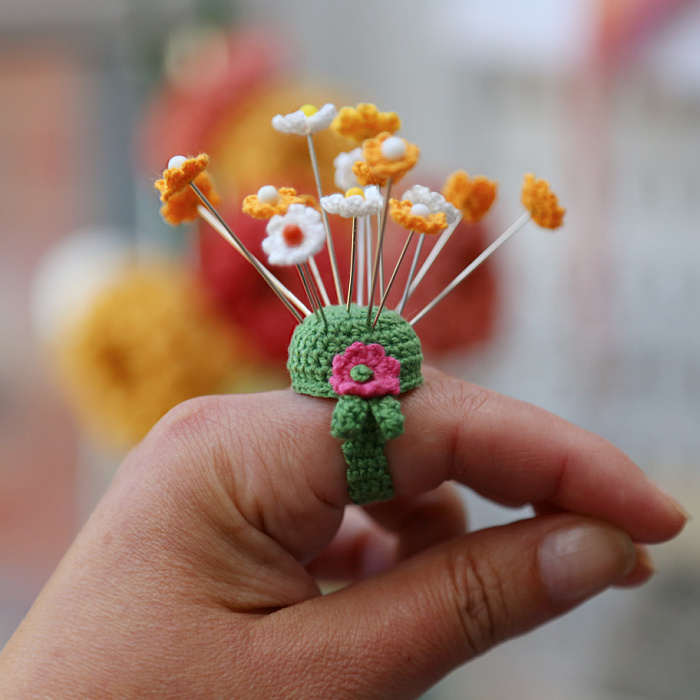
Hello, and thank you so much for all my birthday wishes yesterday! To celebrate, I am sharing the pattern for my crochet Daisy pins and ‘Finger Bling’ pincushion.
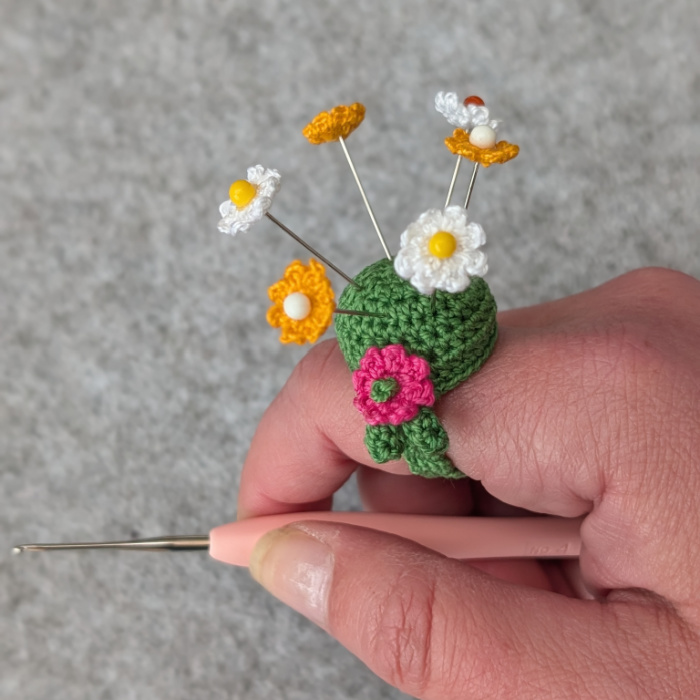
I am obsessed with flowers and micro crochet at the moment, and those two obsessions led to the idea of adorning my blocking pins with tiny flowers. Once I’d done that, it seemed only right to make them a practical little ‘home’ in the form of a Finger Bling Pincushion (Thank you to Rita Knight for the name!).
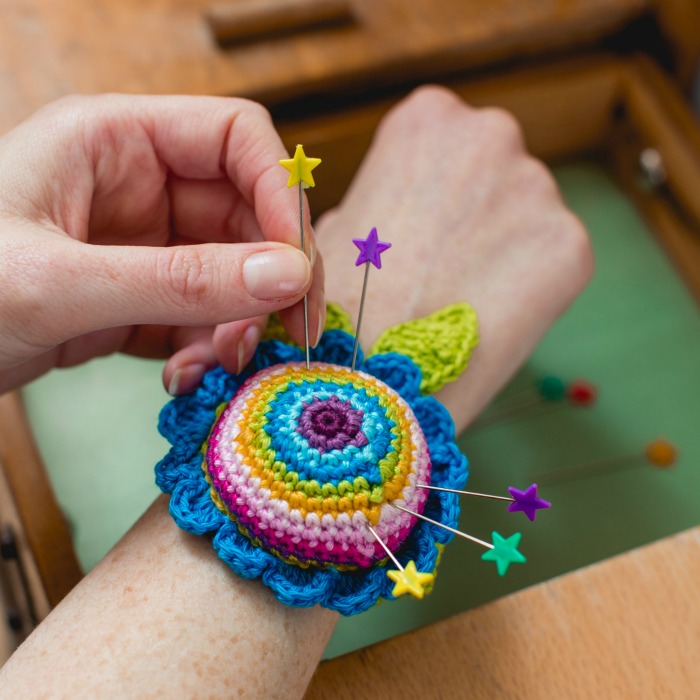
Years ago, I made a Sophie Pincushion that could either attach to scissors or strap around your wrist. I absolutely love it and still use it, but it turns out I’m far too lazy to strap it on and load it with pins before blocking. These days, it lives attached to my scissors more as a pretty companion than a working pincushion (especially in case Buddy gets hold of it and accidentally swallows a pin).
I do love the idea of having pins close at hand so I don’t end up popping them in my mouth for ‘safekeeping’ while I work. I know! My mum always told me never to do that — although I’ve definitely seen her do it herself, haha. It’s a bad and dangerous habit. Don’t do it!
Anyway, I loved the idea of having a tiny bouquet of daisy pins ready whenever I decide to block something, so I designed this little Finger Bling Pincushion for them. When I’m blocking, it makes it easy to grab pins from it (and pop them back again afterwards). And when not in use, the whole thing lives in a teeny terracotta pot on my desk.
Crochet Daisy Pins and Finger Pincushion
This is a whimsical, playful pattern, and I so hope you enjoy it.
Crochet Daisy Pins and ‘Finger Bling’ Pincushion Pattern
© Dedri Uys 2026. All Rights Reserved.
Charts by Masako Kawahara and tested by Niamh Holcroft.
Resources
- Ravelry: Add this Pattern to Your Ravelry Queue
- Hashtag: #FingerBlingPincushion
If you prefer to use an ad-free US Terminology PDF of this pattern, you can buy one HERE from Ravelry. Alternatively, you can use the Print-friendly button at the bottom of this post to print or save this post to PDF.
Translations
- Japanese Translation by Masako Kawahara (also available as a Paid PDF in my Ravelry store at the link above)
Information
Abbreviations
US Terminology
- Ch – Chain
- Hdc – Half-double crochet
- Sc – Single crochet
- Sl st – Slip stitch
- SM – Stitch Marker
- St/sts – Stitch/stitches
- () – Repeat instructions between parentheses the number of times specified
- * – Repeat instructions between asterisks the number of times specified
- {} – Photo references and stitch counts are supplied in Curly Brackets
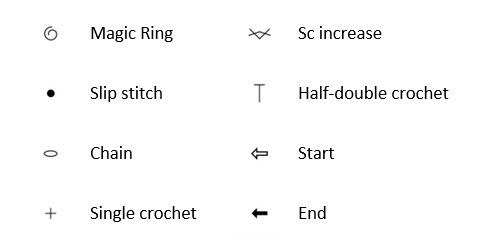
Chart Legend
Materials
- 1mm crochet hook (I used a 1.25mm Clover Amour hook because I crochet tight)
- Scheepjes Maxi Sugar Rush (100% cotton; 25g/140m)
- Forest Green (412) for the Ring
- Garden Rose (251) for the Flower on the Ring
- Snow White (106) and Yellow Gold (208) for the Daisies
- 48mm stainless steel sewing pins (I bought mine HERE from Amazon)
- Hi-Tack all purpose glue (dries clear) (I bought mine HERE from Amazon)
Size
- Daisies – 1.4cm in diameter
- Pincushion – 2.2cm in diameter with adjustable strap length
Notes
For the photos in this pattern, I am using a 4mm hook and Yarnsmiths Cotton Aran to make it easier for you to see the stitches. My lens is not good enough to take step-by-step photos of this project made in its proper (tiny) size.
Flower Pins
Making the Daisies
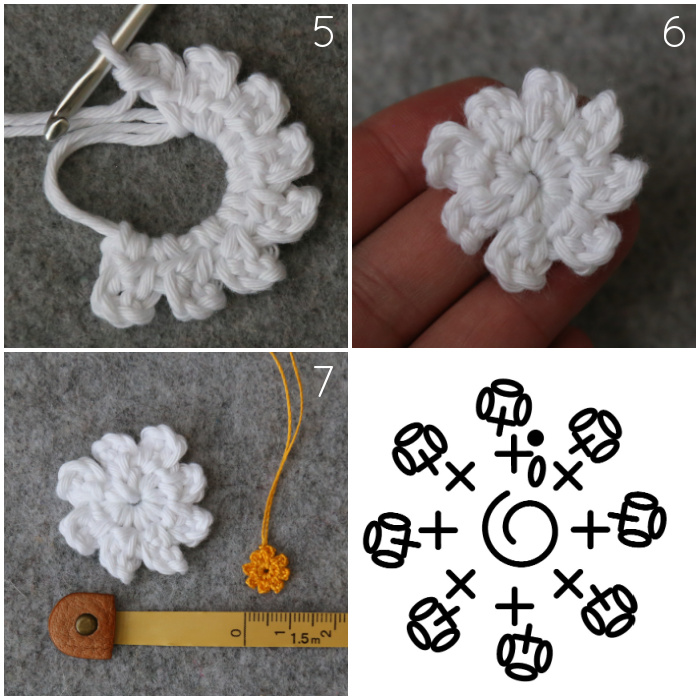
Working into a magic ring, ch 1 (doesn’t count as a st). *Make a sc {Photo 1}. Ch 3 {Photo 2}. Insert your hook from top to bottom into the FLO of the sc and the left ‘leg’ of the sc (right, if you are left-handed) – Indicated with arrows in Photo 2 and illustrated in Photo 3. Make a sc to complete your Petal {Photo 4}.*
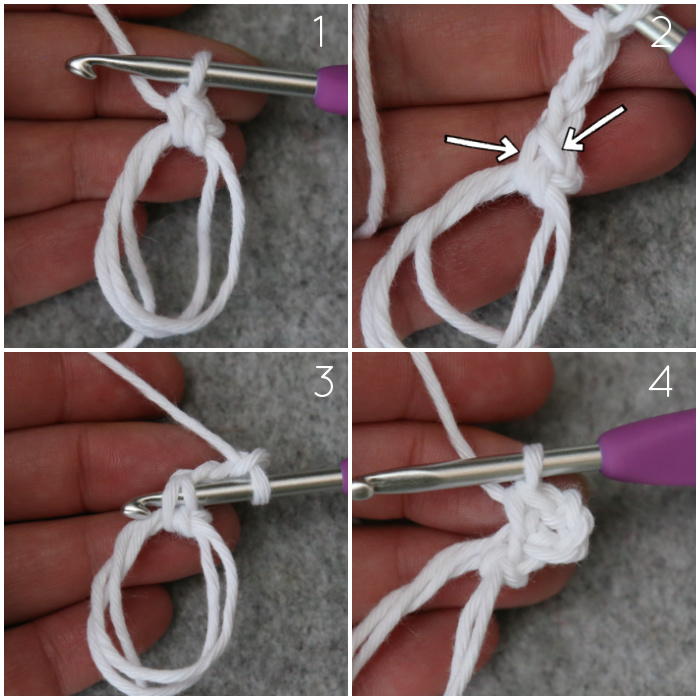
Repeat from * to * 7 more times so that you end up with 8 ‘Petals’ {Photo 5}. Join to the first sc with a sl st. Fasten off, close the magic ring, and work away your ends thoroughly {Photos 6 and 7}.
Attaching the Daisies to your Pins
Once you have made your Daisy, stick a pin through the middle of it, right down the eye of the magic ring. Move the Daisy close to the head of the pin {Photo 1}. Dab a bit of glue in the centre of the Daisy {Photo 2} and then scootch the Daisy all the way up until it touches the head of the pin {Photo 3}. You can scrape excess glue off with the corner of a piece of paper.
Stick the pin in something and leave it to dry fully. If you are using the glue I recommended, it will dry clear, so it is ok if you are a bit messy with this process {Photo 4}.

‘Finger Bling’ Pincushion
Dome Base
Worked in a spiral.
Round 1: Working into a magic ring, ch 1 (doesn’t count as a st throughout), make 6 sc. {6 sc}
Round 2: Make 2 sc in each of the 6 sts. {12 sc}
Round 3: (Make 2 sc in the next st, sc in the next st) 6 times. {18 sc}
Round 4: (Make 2 sc in the next st, sc in the next 2 sts) 6 times. {24 sc}
Round 5: (Make 2 sc in the next st, sc in the next 3 sts) 6 times. Sl st in the next st and fasten off. {30 sc, not including sl st}
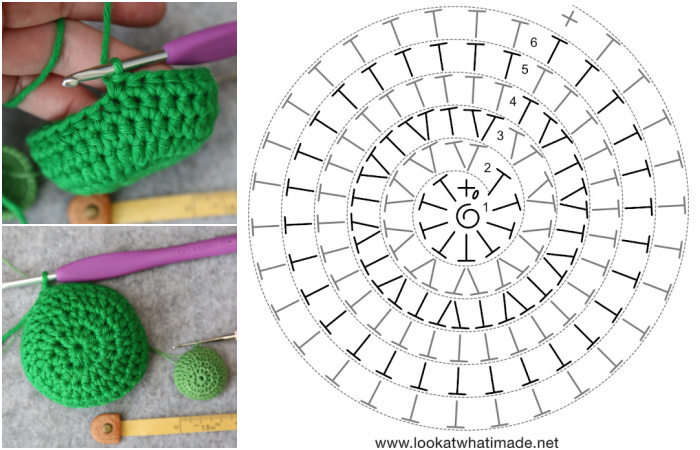
Dome Top
Worked in a spiral.
Round 1: Working into a magic ring, ch 1, make 1 sc, make 9 hdc. {1 sc and 9 hdc}
Round 2: Make 2 hdc in each of the 10 sts. {20 hdc}
Round 3: (Make 2 hdc in the next st, hdc in the next st) 10 times. {30 hdc}
Round 4: Hdc in each st around. {30 hdc}
Round 5: As Round 4.
Round 6: Hdc in the first 29 sts, sc in the last st. {1 sc and 29 hdc}
Attaching the Dome Base and Dome Top to Each Other
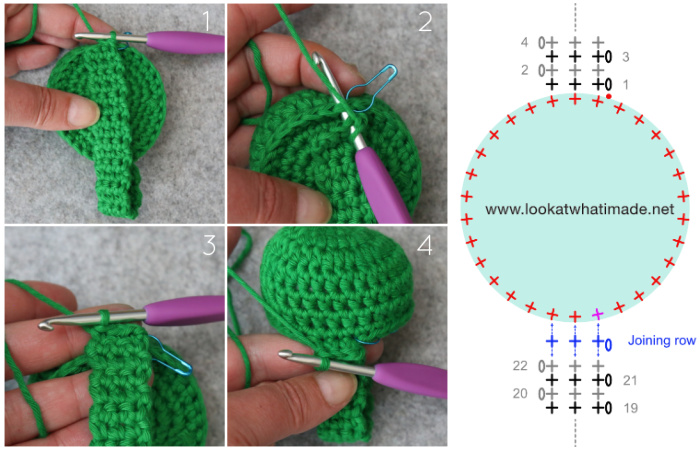
Place the Base behind the Top, with the wrong sides facing each other, and aligning the stitches on both pieces. Working through both layers {Photo 1}, sc in the next 30 sts, marking the first and 18th sts with a SM and stuffing as you go {Photos 2 and 3}. Sl st in the next st, which should contain the first SM {Photo 4}. Do not fasten off.
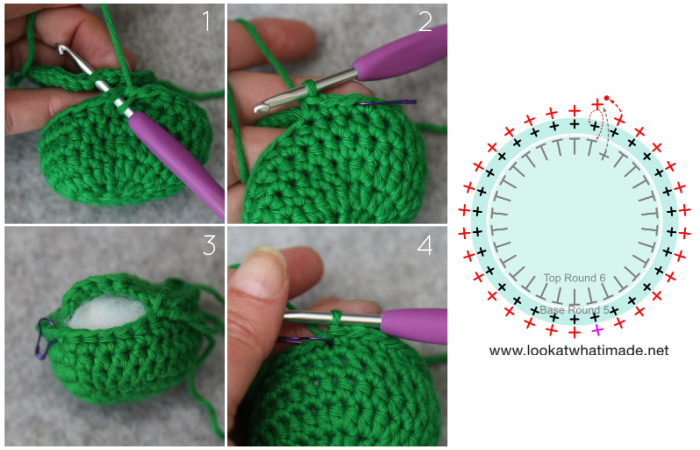
Making the Strap
Worked back and forth in rows.
Row 1: Ch 1, sc in the same st as the SM, sc in the next 2 sts. TURN. Remove the SM. {3 sc}
Row 2: Ch 1, sc in each of the 3 sts, TURN. {3 sc}
Rows 3 – 22 (See Note Below): As Row 2.
Note
Measure the strap by placing the ‘ring’ on your finger. You may need to do a couple of rows more or less to get it to the right size.
Make sure that you end on an even-numbered row. You will know that you have ended on an even-numbered row if the Top of the Dome is pointing towards you when you have turned at the end of the last row.
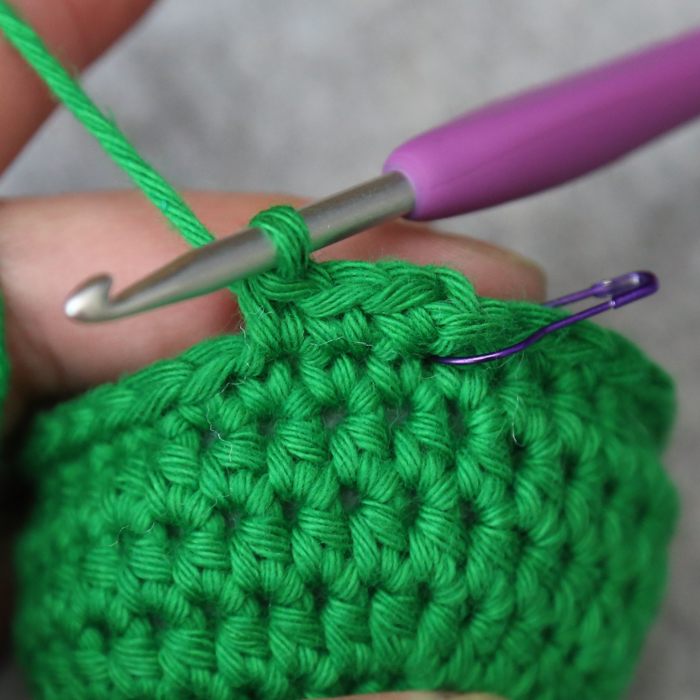
Once your strap is as long as you want it to be, you will attach it to the other side of the Dome. Flatten the strap and line it up with the other side of the Dome so that the first stitch on the right-hand side of the strap (left, if you are left-handed) lines up with the 18th (marked) st (Photo 1).
Joining Row: Ch 1, sc in the first st of the strap and the marked 18th st of the joining round {Photo 2}. Working through both layers, sc in the next 2 sts {Photos 3 and 4}, TURN. {3 sc}
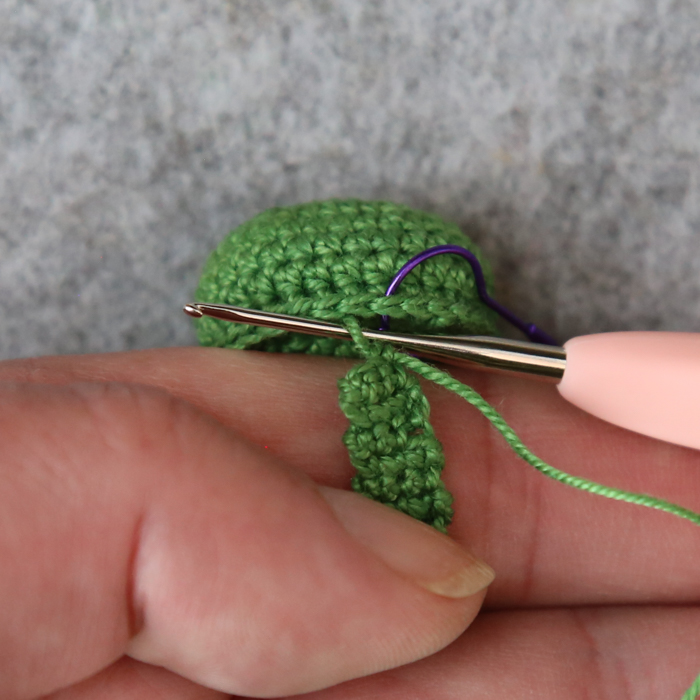
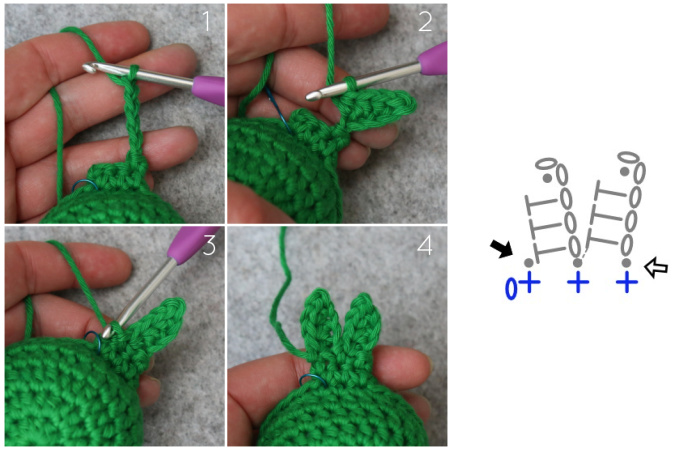
Leaf Row: Sl st in the first sc. (Ch 5 {Photo 1}, sl st in the second ch from the hook, hdc in the next 3 ch {Photo 2}, sl st in the next sc {Photo 3}) twice {Photo 4}. Fasten off, leaving a 10cm/4” yarn end. {2 Leaves, each containing 3 hdc}
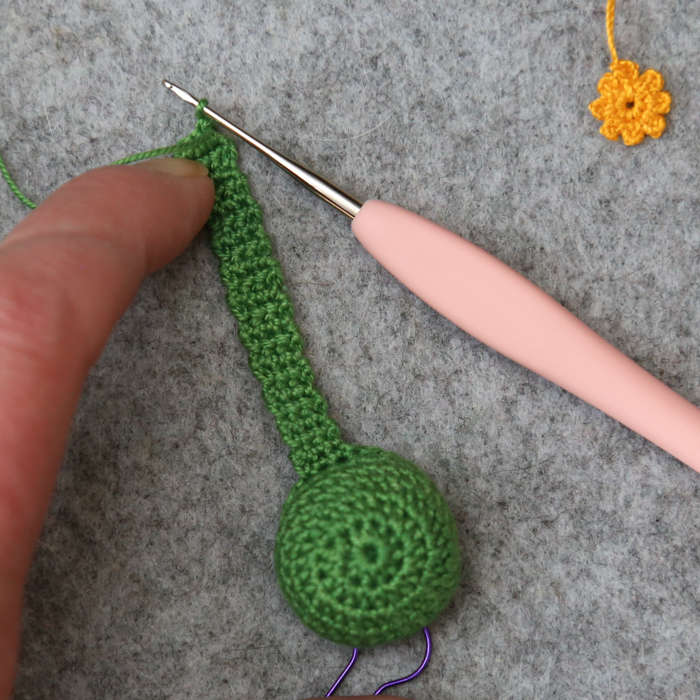
Flower
Create a Flower using the same pattern you used for the pins.
Attaching the Flower to the Pincushion
Option 1: Using the 10cm/4” yarn end, sew the Flower to the Dome right above the leaves, working through the back of the flower so the stitches aren’t visible.
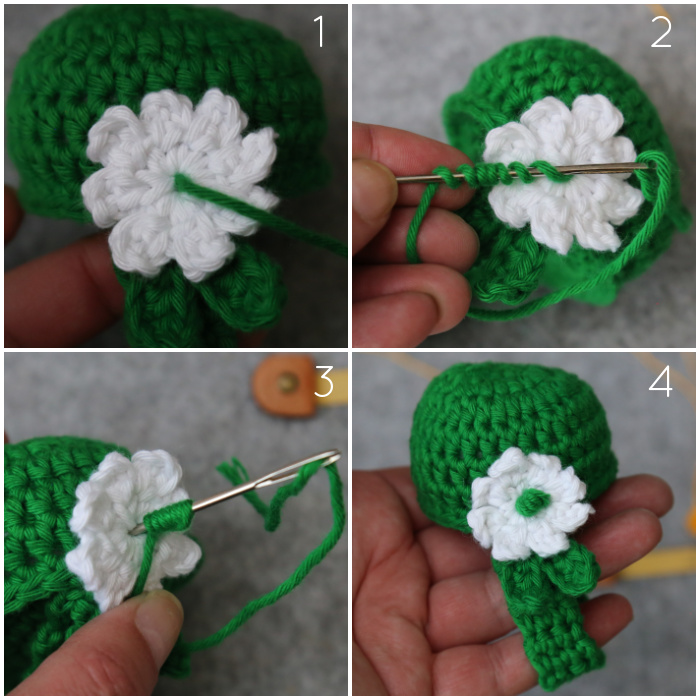
Option 2: If you are feeling adventurous, you can attach it by making a French Knot through the centre of the Flower (as I did). To do that, insert your needle from back to front into the Flower and pull your yarn through {Photo 1}. With your non-dominant hand, pinch the yarn about 5cm/2” away from where it exits the Flower to create some tension. With your dominant hand, place the needle parallel to the taut yarn (and close to the Flower) and then wrap the yarn around the needle 7 times {Photo 2}. Insert the needle back down the hole, catching a strand of yarn from the Flower in the process {Photo 3}. Keeping tension on your thread, pull the needle all the way through to create a knot on the front of your work, then work your ends away thoroughly {Photo 4}. Once you’ve done that, use a bit of glue to secure the flower to the pincushion.
And voila! Loads of cute little pins and an OTT ‘Finger Bling’ pincushion!
I would love to see what you make using this pattern, so if you share online, please use the hashtags #FingerBlingPincushion or #lookatwhatimadedotnet so that I can see your beautiful creations.

This blog post contains affiliate links. I only link to products I personally use or would use. All opinions are my own.


Valerie says
I love your patterns, am just making a daisy. Will gift the pincushion to a friend with 2 daughters, Poppy and Daisy. Thank you for the inspiration x
Jenny Lowman says
We are so happy you are enjoying the patterns! :)
Christine Donaldson says
Beautiful. Thank you ❤️