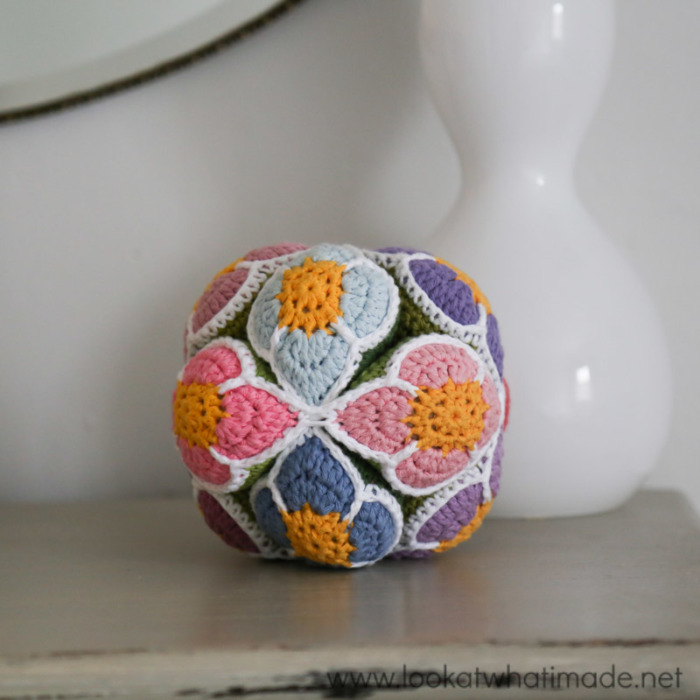
This crochet flower ball is based on the traditional Amish puzzle ball and as such comes apart into three segments that have to be assembled to form the ball. I wrote this pattern in 2011, but as it was one of my first patterns, it was sorely in need of a bit of tlc, so I have re-done it with clear photos and some better yarn.

I remain obsessed with puzzle balls and their possibilities. If you have not seen my Amamani (Amigurumi Amish Puzzle Animals) yet, you can find them HERE. The animals also come apart into segments so that little hands can have fun building AND playing.
Materials

I have used Drops Paris Cotton and a 4 mm crochet hook (US G/6 UK 8) for my Crochet Flower Ball, but you can use any yarn and hook you fancy.
I do suggest NOT using a yarn that has a lot of stretch, as you will want to stuff the wedges quite tightly without them stretching too much.
You will need:
- 4 mm Clover Amour Crochet Hook
(US 6/G UK 8)
- Double knit yarn in green for the wedges – about 15 m/16 yards per wedge (there are 12 wedges)
- Double knit yarn in any colours you choose for the flowers – less than 2 m/2.2 yards for the center and about 7 m/7.5 yards for the petals per flower (there are 12 flowers)
- Double knit yarn in a contrasting colour for attaching the flowers to the wedges – about 35 m/38 yards
- A yarn needle for working away your yarn ends
- About twice as much stuffing as you think you will need
Abbreviations
US Terminology used. {US/UK Comparison Chart HERE}
| Ch | Chain |
| Dc | Double crochet (Flower Pattern) |
| Dc inc | Double crochet increase (Flower Pattern) |
| Fpdc | Front post double crochet |
| Hdc | Half double crochet (Flower Pattern) |
| Hdc inc | Half double crochet increase (Flower Pattern) |
| Sl st | Slip stitch |
| Sc | Single crochet |
| St/sts | Stitch/stitches |
| * | Repeat all instructions between asterisks the amount of times specified. |
Additional Notes
The initial ch st’s in each round are NOT counted as stitches.
Translations
- Czech Translation by Inka Lakatošová
- Dutch Translation by Elke Wellens from HetHaakBeest
- Japanese Translation by Masako Kawahara from Crochet Hmmm
Crochet Flower Ball Pattern
© Dedri Uys 2011. All Rights Reserved. Please see my Terms of Use.
Updated November 2013
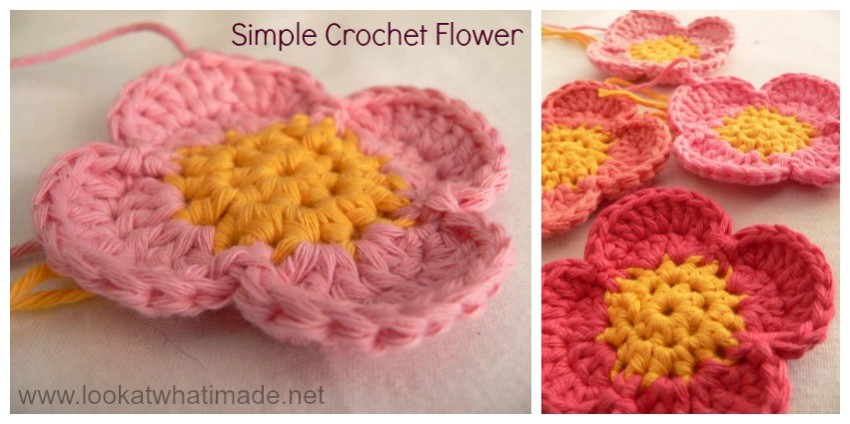
Flowers
{Make 12}
Make 12 flowers following this Simple Crochet Flower pattern. When you fasten off each flower, don’t work away your yarn ends. You can if you really really want to, but the ends will be hidden inside the wedges when you assemble them, so don’t bother.
Wedges
{Make 12}
- Ch 2. Make 4 sc in the second ch from the hook. Ch 1 and turn. {4}
- Sc inc in each of the 4 sts. Ch 1 and turn. {8}
- *Sc inc in the next st, sc in the next stitch* x 4. Ch 1 and turn. {12}
- *Sc inc in the next st, sc in the next 2 sts* x 4. Ch 1 and turn. {16}
- *Sc inc in the next st, sc in the next 3 sts* x 4. Ch 1 and turn. {20}
- *Sc inc in the next st, sc in the next 4 sts* x 4. Ch 1 and turn. {24}
- *Sc inc in the next st, sc in the next 5 sts* x 4. Ch 1 and turn. {28}
- *Sc inc in the next st, sc in the next 6 sts* x 4. Ch 1 and turn. {32}
- *Sc inc in the next st, sc in the next 7 sts* x 4. Ch 1 and turn. {36}
- *Sc inc in the next st, sc in the next 8 sts* x 4. Ch 1. {40}
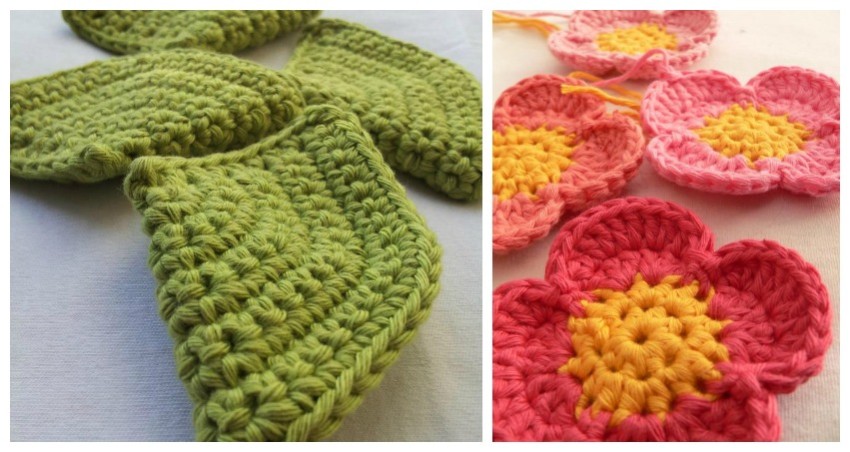
Fold the resulting half-circle (for lack of a better description) in half, with the side farthest away from the hook to the back. Place the initial tail of yarn INSIDE the folded wedge (not dangling out like in the photos below), to save yourself some working-away later on.
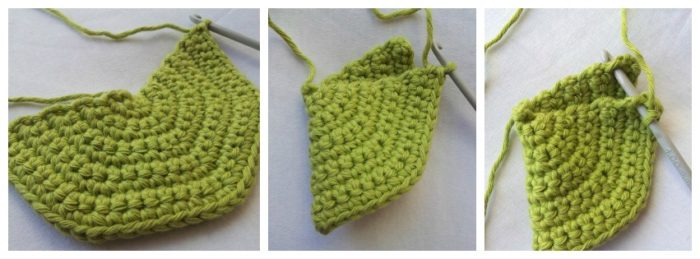
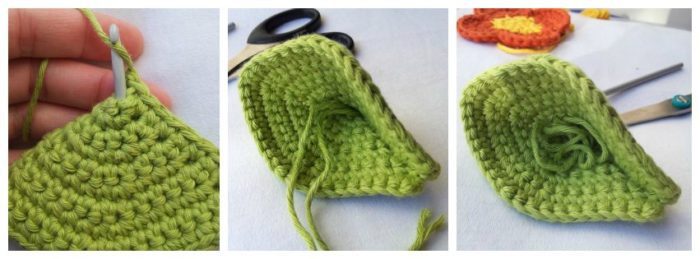
Insert your hook into the first row down the side of the wedge (through both layers) and make a sc. Make 8 more sc along this edge, working through both layers of each row. Ch 1 and fasten off. I have done it in yellow so that you can see it better, but you will obviously be doing it in the same colour as the wedge.
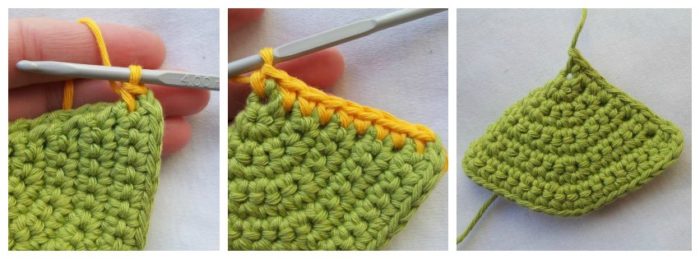
To get rid of that final yarn end, poke your crochet hook into the pointy end of the wedge from the inside of the wedge to the outside. Yarn over with the final end and pull it into the wedge. Use both yarn ends as part of the stuffing for your wedges later on.
Attaching the Flowers to the Wedges
Remember to place the yarn ends INSIDE the wedges as you crochet them shut.
You are going to be attaching the flowers to the wedges in strips of 4, which you will then join together to form your segments (or rings). If you are confused at this point, don’t worry. As you work, all will become apparent. If you are REALLY confused, scroll down and have a look at all the photos before you continue.
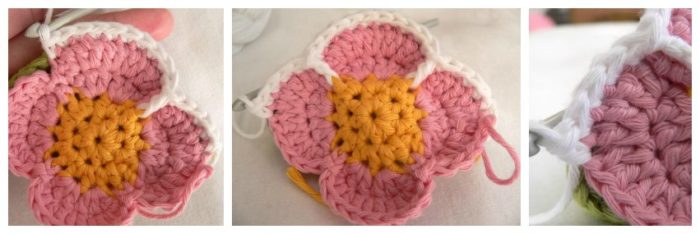
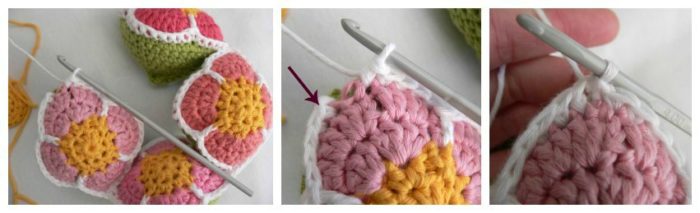
Take one of your flowers and place it over the opening of one of the wedges, making sure that the sc seam of the wedge is to your right (left if you are left-handed). You want the right side of the flower to be facing out and it should sit over the wedge like a lid.
Take the yarn you are going to use to attach the flowers to the wedges and make a slip knot. With this slipknot already on your hook, insert your hook into the st after the sl st join of the flower AND into the first st of the last round of the wedge. Make a sc through both layers.
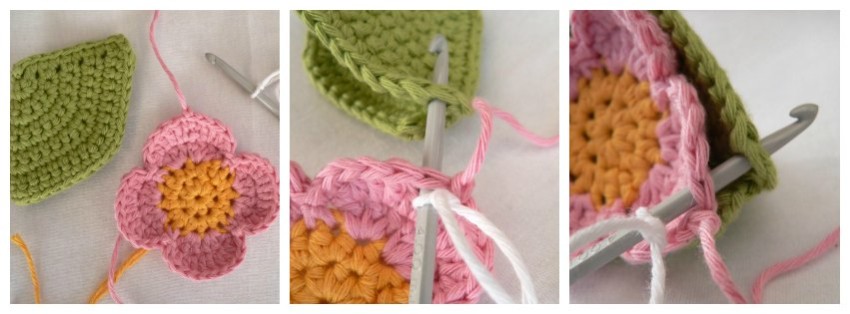
Make 4 more sc, working into each st of the flower AND the wedge. This will bring you to the 2 sl sts. Fpdc around the vertical post of the st 3 rounds below. In this case, it will be the yellow vertical post below the join of the petals.
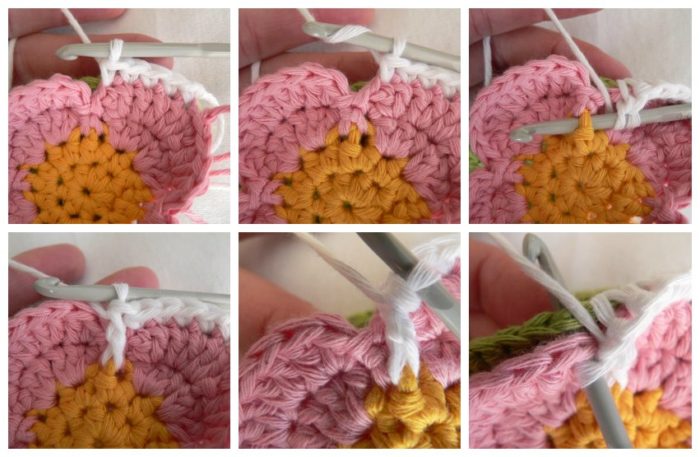
Skip the 2 sl sts between petals and make 10 sc, working into the stitches of the next petal AND the next 10 sts of the wedge (through both layers). Fpdc around the vertical post as before and skip the 2 sl sts. Make 5 sc, working through the first 5 sts of the next petal AND the next 5 sts of the wedge. At this point ,you have attached half the flower to half the wedge.
Now you will attach the next flower in the same way.
*Starting in the st after the sl st on the next flower AND the first st of the next wedge, make a sc as before. Make 4 more sc through both layers. Fpdc around the yellow stitch below the join of the petals and skip the 2 sl sts at the join. Make 10 sc through the stitches of the next petal AND the next 10 sts of the wedge. Fpdc around the post of the st 3 rounds down (as before) and skip the 2 sl sts at the join of the petals. Make 5 sc, working through the first 5 sts of the next petal AND the next 5 sts of the wedge.* 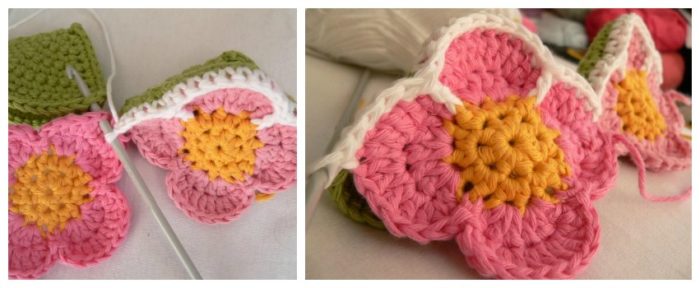
Attach the next 2 flowers and wedges in the same way, repeating the instructions between asterisks (*) above. You should end up with a strip of 4 flowers and wedges, each attached to the next on one side only.
You will now “close” the wedges, so continuing around the fourth wedge, repeat the instructions between asterisks above.
Remember to stuff your wedge thoroughly before closing it completely. If you use too little stuffing, your ball will be lifeless and slightly blah. If you use too much stuffing, you are going to struggle VERY much to assemble your ball. I over-stuffed this one a tiny bit, so I can’t see any of us taking it apart and building it very much. But the resulting ball is surprisingly heavy and the boys love it!
At the bottom of this pattern, you can find out about using stuffing bombs to prevent stuffing from poking out through the stitches.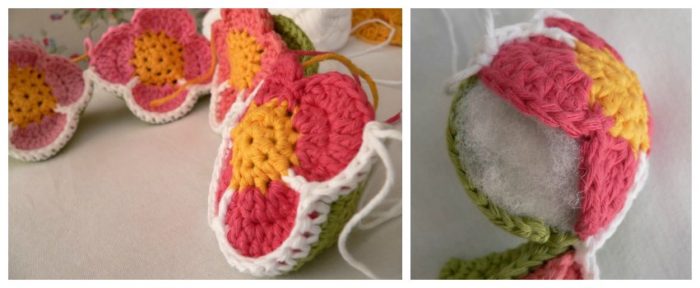
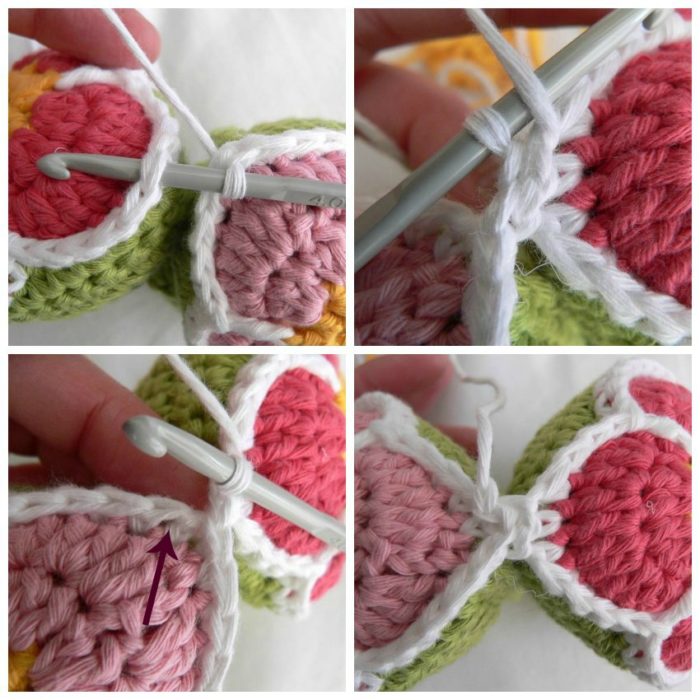
When you have finished working the stitch pattern between asterisks, you should have worked into each stitch of the last flower AND each stitch of the wedge, bringing you to the junction between flowers. Sl st into the first st of the flower (which already contains a sc) and then sl st into the first st of the next flower (which also already contains a sc) – indicated with arrows in the photo below. Keep your tension very tight when you are making these sl sts. You don’t want a gaping hole between flowers.
Now repeat the instructions between asterisks above for each remaining flower, starting in the next available stitch of the flower AND remembering to work through both layers. Remember to stuff as you go. Remember to sl st into the stitches on either side of the junction (as above) between flowers.

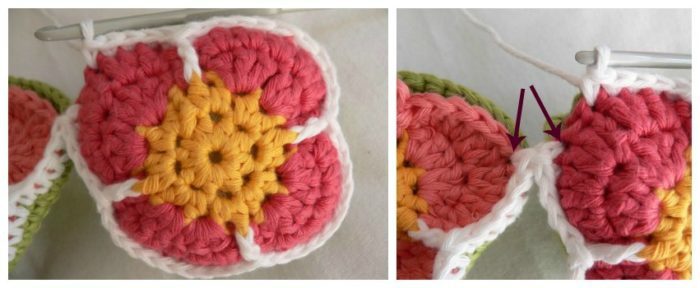
When you have closed all four wedges, sl st in the first st of the first flower (indicated with an arrow below).
Bend the wedges into a ring so that you can attach the first and last flowers to each other. The first and last wedges should be touching each other. You will be joining the first and last flower to each other by making 2 sl sts into the middle of the third petal of the last flower (indicated with arrows in the photo below).

To do this, insert your hook into the 6th st of the third petal of the last flower and make a sl st (photo top left below). Now insert your hook into the 5th st of the last petal and make a sl st (photo top right below). Anchor the join by making a sl st into the next st of the FIRST flower (bottom two photos below). Fasten off and work away your ends.
Congratulations! You have just completed one segment (or ring).
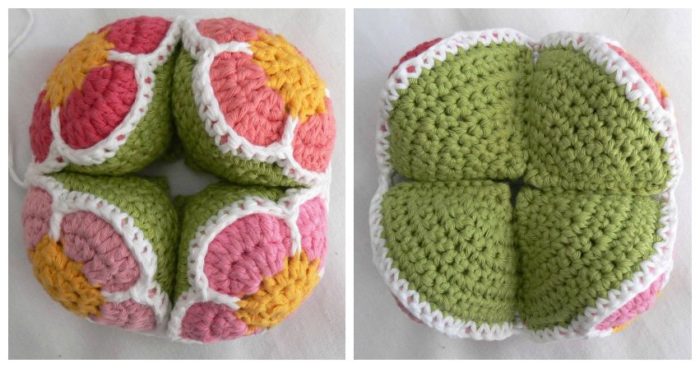
Now finish the other two segments in the same way, and build your ball.
You can find a hint for building the ball in my original Crochet Amish Puzzle Ball Pattern. Just remember that this ball takes a lot more elbow grease to assemble. Don’t be afraid to pull and stretch and squeeze to get the segments over each other. And once you are done building, it’s not just magically going to look perfect. You will need to poke and prod the wedges a little bit to make the ball nice and neat.


Stuffing Bombs
If you are worried about the stuffing poking out through the dc stitches, I’ve got a little hint for you.
Remember how granny used to tie moth-balls in pantyhose and hang them in the cupboard? Well, these stuffing bombs remind me of those mothballs.
Once you’ve stuffed your first flower as much as you think you will want (stuffing pressed down and slightly bulging out), remove the stuffing and weigh it. Then weigh out 11 more equal clumps of stuffing (7 g of manky old pillow stuffing in my case).
Cut the legs of a pair of pantyhose into segments (about 10 cm or 4″ each). Knot the resulting tubes on one end, moving the knot as close to the end as you can. Stretch the “tube” and place your stuffing inside. Knot the other side to close the little stuffing bomb and cut off any excess pantyhose. Now pop one of the stuffing bombs back into the wedge (more like squeeze it in) and continue closing it.

I hope you enjoy making (and playing with) your Crochet Flower Puzzle Ball. If you have any questions, please don’t hesitate to contact me so that I can help you.

This blog post contains affiliate links. I only link to products I personally use or would use. All opinions are my own.


Crystal says
Hi! Does it matter which direction the wedges are flipped and stuffed? I’m comparing the photos to my work and I’ve sewn the flower to the wedge with the seam hiding inside each wedge… I hope that makes sense. Thanks for your help!
Dedri Uys says
Hi Crystal. It doesn’t matter. I like them with the seam outside because they slot together better if they have a bit of an edge (at least on one side). If they are spiral or turned inside out, they are very rounded. It works either way. It really just is a personal preference.
Jennifer Kelso says
Lovely pattern! Just what I was looking for to make for my mother-in-law with Alzheimers. She has a few of the fidget blankets but I thought this would be interesting for her too. Thank you!!
Dedri Uys says
What a great idea :)
pattye gallegos says
Just wanted to let you know that I love all your patterns I have made the Sophie’s universe and a lot more there all wonderful. I wanted to ask if it’s OK to translate the Amish flower Ball pattern to Spanish to give to a friend of mine. It’s for her personal use. Please let me know as of now I have not done it for her. Thank you for your wonderful patterns.
Dedri Uys says
Hi Pattye. Sure you can. Thank you for asking ;)
Susan V says
I love your flower toy. It has been a long long time since I had little ones at home. Can you advise what age child would be able to play with this toy. The child I am thinking of will be 8 months soon. Thank you
Dedri Uys says
Hi Susan. I really don’t think age matters with this one. My (then) 5-year old couldn’t take it apart and put it together again, but he had a whale of a time throwing it everywhere and cuddling it in bed.
Lucia Seedall says
Hi. Just wanted to pop in and say thank you for the super easy to follow patterns. I learned 3 new “things”, firstly read the actual pattern first (made 12 wedges using the continuous round method and wondered all the while, how I was going to join a 30 st wedge to a 40 st flower). Starting a magic ring with hdc is way easier when you get to round 2, and doesn’t make much difference in size. Beginning to join 2 pieces together, use a slip stitch…brilliant.
I also made a couple of the smaller ” flat ” puzzles, I added a unicorn head and tail to one and a giraffe to the other. I must admit I prefer the size of the flower ball, will have to figure out how to make a 40 st lid. Thanks again
Warm regards Lucia
Dedri Uys says
Hi Lucia. I am so pleased that you managed to take so much away from that pattern. Don’t you just love how we can always figure out new things in this craft? Have you shared any of your photos? I’d love to see.
Dedri
zeenath says
am i the only one who cannot put the ball together? :(
Jenny says
What are you struggling with in particular, Zeenath? We haven’t had anyone voice their struggles as yet :(
Jenny
Sandi says
Zeenath, you are not alone. I’d never seen or heard of an Amish puzzle ball before so this wasn’t intuitive for me either. There is a short video just over halfway down this page that explains how it is supposed to go together: https://www.allaboutami.com/puzzleball/
Carol says
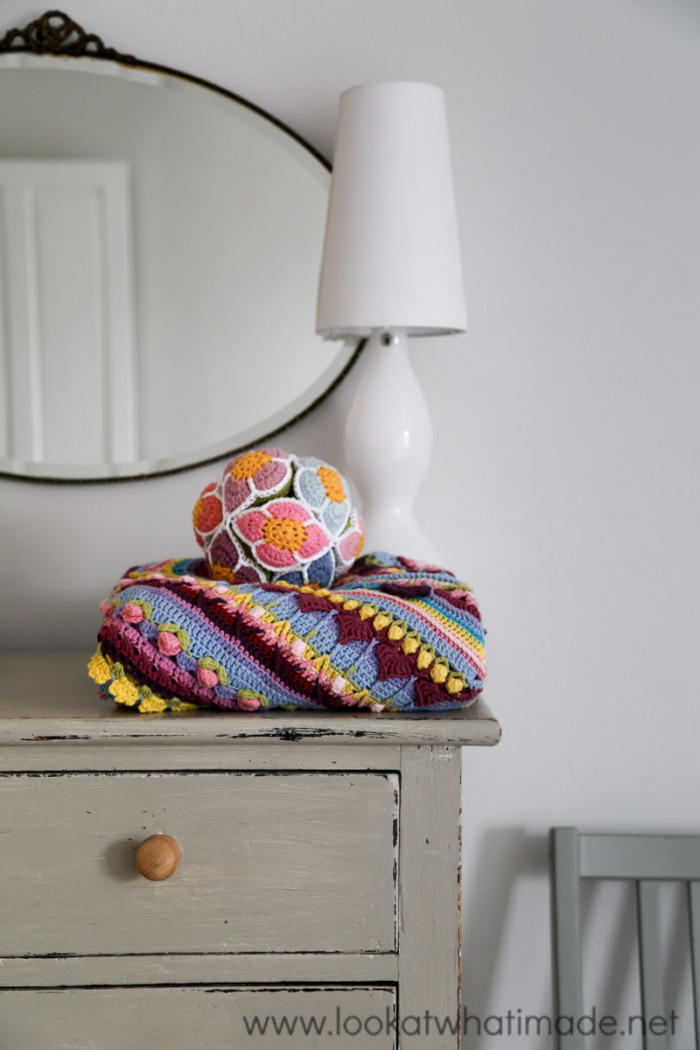
I hope I’m not being incredibly dense, but do you have a pattern for the beautiful blanket on which your wonderful flower puzzle rests in the last photo (with the lamp and mirror)?
Jenny says
Hello Carol.
The beautiful blanket you are referring to is the Medium Sophie’s Universe in Scheepjes Soft Fun yarn HERE
We look forward to seeing your finished blanket ;)
Jenny
Beaska says
Dziękuję za wzór https://kreatywnanuda.blogspot.com/2017/08/pika-takane.html
Beaska says
Thank you for the pattern.
https://www.instagram.com/p/BYGW80ZF1dv/?taken-by=beaska67
Anna S says
Dear Dedri, thank you for the pattern, and especially for its convenient PDF version and a clever way to do the stuffing :)
Love,
Anna
Dedri Uys says
Hi Anna. You are welcome :)
bodynsoil says
I’m glad I stumbled upon this one as I love it more than the original for my baby grand-daughter.