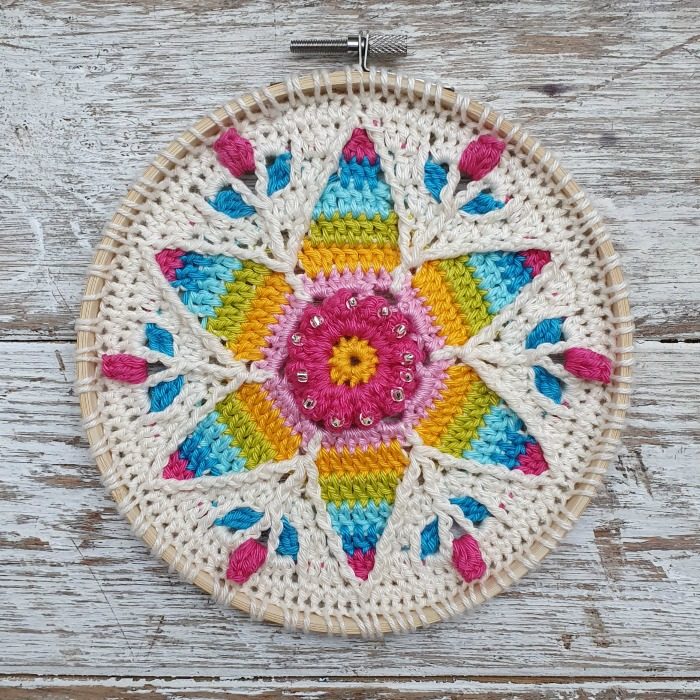
This crochet mandala is called Fancy Nancy and it celebrates the colour and joy my friend Nancy (@avocadofairy) brings to the lives of everyone around her. It is a reminder of the fact that life is full of serendipitous encounters, wonderful people, precious moments of grace, and rainbows!
“There are people whom one loves immediately and forever. Even to know they are alive in the world with one is quite enough.”
Nancy Spain
When Nancy and I ‘met’ on Instagram two years ago, bonding through a love of crochet and mutual friends, we realised that our paths had already crossed in 2005 (when I was still a baby radiographer and newly arrived in the country).
I think she will be pleased that I have decided to dedicate this pattern to each and every one of my colleagues who are working tirelessly and selflessly to ensure that our national health service continues to operate. I also dedicate this pattern to the umbrella of essential workers – especially Jackie and Rhianna at our local Sainsbury’s, who have become a weekly joy-injection for me.
If you haven’t gotten around to hanging a rainbow in your window yet, this would be the perfect substitute :)
The pattern uses very little yarn per colour (except for the main colour, which uses about 12g). It is, therefore, perfect for using up small scraps of colourful yarn or Catona Cutie Pies (if you have any).
Fancy Nancy Mandala Pattern
© Dedri Uys 2020. All Rights Reserved. Tested by @lynnettelau and @annamoore3 on Instagram.
Resources
- Hashtag: If you share photos, please use #fancynancymandala so that we can find your projects and have a gleeful look.
- You can buy Scheepjes Catona from the following retailers:
- Black Sheep Wools (International)
- Deramores (International)
- Caro’s Atelier (Netherlands)
- Knotty House (Canada)
- More Retailers
If you prefer a formatted ad-free version of this pattern (both written-only AND Photo Tutorial), you can buy it HERE in my Ravelry Store.
Translations
- Japanese Translation by Masako Kawahara *NEW*
Difficulty
Intermediate.
Materials
- 3.25mm hook**
- Main Colour:
- Scheepjes Catona, 100 % Cotton, 50g/125m/137yds
- Yarn A – 130 Cream
- Scheepjes Catona, 100 % Cotton, 50g/125m/137yds
- Contrasting Colours:
- Scheepjes Catona, 100 % Cotton, 10g/25m/27yds
- Yarn B – 208 Yellow
- Yarn C – 222 Medium Pink
- Yarn D – 114 Dark Pink
- Yarn E – 146 Turquoise
- Yarn F – 397 Light Blue
- Yarn G – 245 Green
- Scheepjes Catona, 100 % Cotton, 10g/25m/27yds
- 12 x Size 6 beads in any colour of your choosing
- Optional: Embroidery hoop measuring 1cm/0.4” larger than your completed (blocked) mandala
**I am a very tight crocheter. If you find it hard to match gauge (or you know that you have a loose tension), you might want to go down a hook size or two.
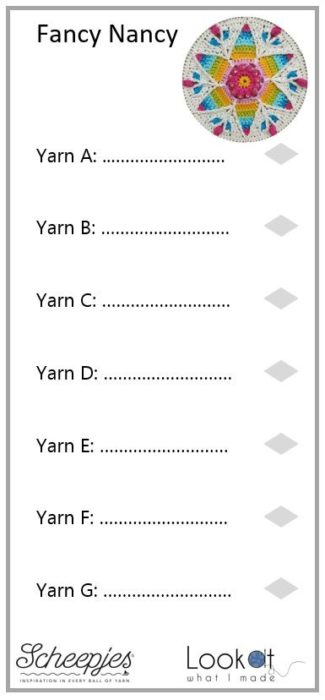
If you are using different colours, you can use this little bookmark to help you keep track of your colours. Printing this template out on A5 will provide a handy reference as you work through the pattern.
Gauge
At the end of Round 4, your flower should measure 5cm/2”.
Size
15cm/6”
Abbreviations
US Terminology
- Ch – Chain
- Dc – Double crochet
- Hdc – Half-double crochet
- Rep – Repeat
- RS – Right side
- Sc – Single crochet
- Sl st – Slip stitch
- Sp/sps – Space/spaces
- St/sts – Stitch/stitches
- Tr – Treble crochet
- WS – Wrong side
Punctuation
- *An asterisk indicates pattern repeats. You will need to repeat all the instructions between asterisks the number of times specified. This is a hard-core repeat and will consist of multiple instructions.
- Parentheses () indicate repeats. You will need to repeat the instructions between parentheses the number of times specified. This is a lower level repeat.
- Square Brackets [] are used to indicate a group of stitches to be worked in the same stitch/space.
Special Stitches
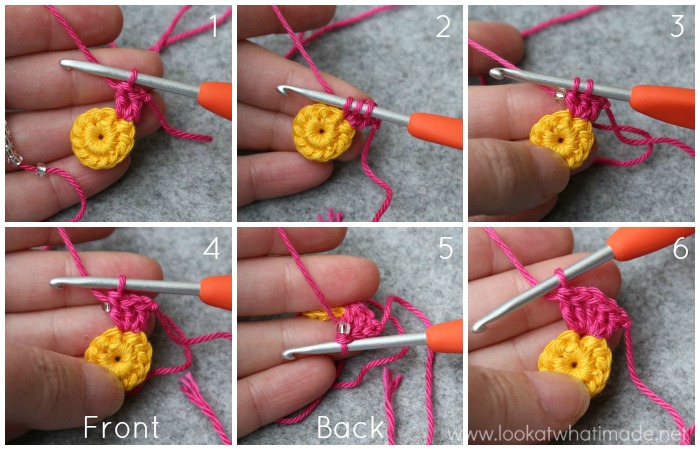
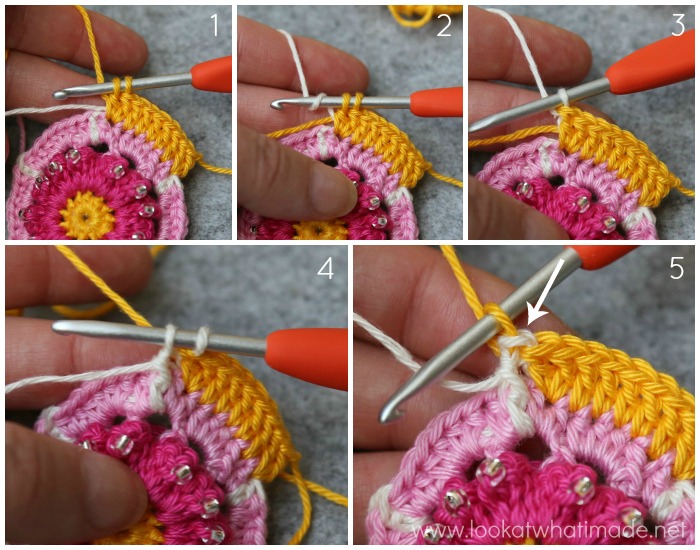
- Beaded Shell (BDC) – Make 2 dc in the indicated st/sp {Photo 1}. Yarn over, insert your hook into the same st/sp, yarn over and pull up a loop {Photo 2}. Yarn over and pull through 2 loops. Move one bead so that it abuts your hook {Photo 3}. Yarn over and pull through both remaining loops, enclosing the bead in the st {Photos 4 and 5}. Make 2 more dc in the same st/sp.
- Dc2tog – Yarn over, insert your hook into the indicated st and pull up a loop. Yarn over and pull through 2 loops. Yarn over, insert your hook into the next st and pull up a loop. Yarn over and pull through 2 loops. Yarn over and pull through all 3 loops on your hook.
- Dc3tog – Yarn over, insert your hook into the indicated st and pull up a loop. Yarn over and pull through 2 loops. (Yarn over, insert your hook into the next st and pull up a loop. Yarn over and pull through 2 loops) twice. Yarn over and pull through all 4 loops on your hook.
- FP (Front Post) – Identify the post of the stitch you want to work around. Insert your hook from the front to the back and then from the back to the front around the post of the stitch so that the post lies on top of your hook. Complete your stitch as normal.
- Shell – Make 5 dc in the indicated st/sp.
- Standing stitches – Standing stitches are the same as regular stitches, except that they are made ‘in air’, without being attached to a previous stitch. Start with a slip knot already on your hook and complete the stitch as normal. As an example, you can see a tutorial for a standing single crochet HERE.
- 3-tr Bobble – Yarn over twice and insert your hook into the indicated st/sp. Yarn over and pull up a loop. (Yarn over and pull through 2 loops) twice. *Yarn over twice and insert your hook into the same st/sp. Yarn over and pull up a loop. (Yarn over and pull through 2 loops) twice.* Rep from * to * once more. Yarn over and pull through all 4 loops.
Notes
Changing Colours
Change colour on the last yarn-over of the last st before the colour change. To do that, drop the yarn you are working with when you have two loops left on your hook {Photo 1}. Pick up the yarn you want to change to {Photo 2}. Yarn over and pull through both loops on your hook {Photo 3}. This ensures that the top of the next st will be the same colour as the post of that st {Photos 4 and 5}. If you need any help with Stitch Anatomy, have a quick look at THIS PART of the Ubuntu CAL 2018 Information.
Carrying Yarn
You should always work OVER the ‘carried’ yarn (the colour you are not using for that portion of the round). The only exceptions are:
- When otherwise instructed (like in Round 8)
- When making front post stitches
- When only making ONE stitch in a specific colour
Invisible Join
Once you have made all the required sts for the Round, cut your yarn, leaving a 10cm/4″ end. Pull this end all the way through the top of the last st made. Pick up your yarn needle and thread it with the end. Insert your needle under both loops of the second st of the round, working OVER the first st {Indicated with an arrow in Photo 1 and illustrated in Photo 2}. Pull the yarn tight, but not too tight{Photo 3}.
Insert your needle into the top of the last of the round {Indicated with an arrow in Photo 3 and illustrated in Photos 4 (Front) and 5 (Back)}. You want to insert it straight down into the eye formed by the loops. Make sure that you insert your needle through the third loop behind the st as well. Pull your yarn through. This will form a “false” st on top of the first st. Make sure that you don’t pull it too tight. You want this “false” st to be more or less the same size as your other sts {Photo 7}.
To secure this st, insert your needle from top to bottom into the third loop behind the st and pull the yarn through again {Photo 6}. Now work away your yarn ends.
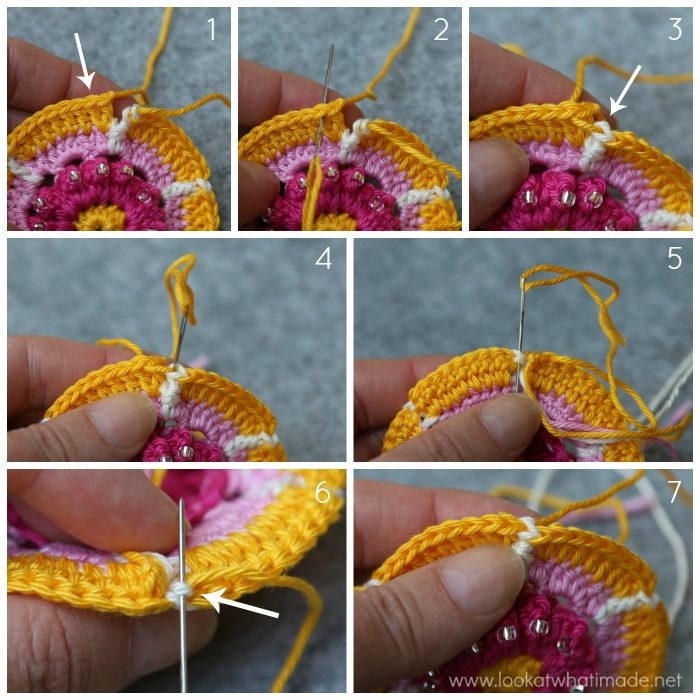
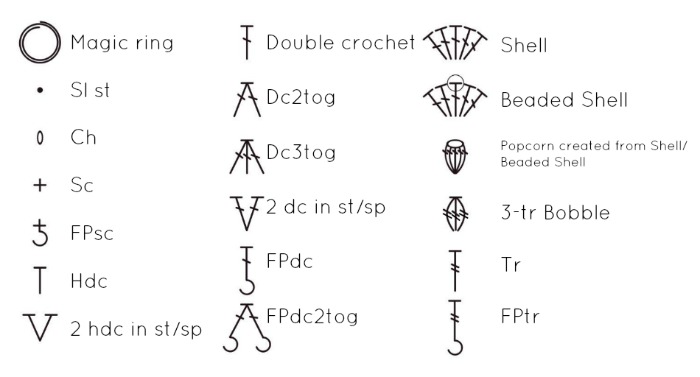
Chart Legend
Instructions
With Yarn B, make a magic ring. Alternatively, ch4 and join to the first ch with a sl st to form a ring.
Round 1 {Yarn B}
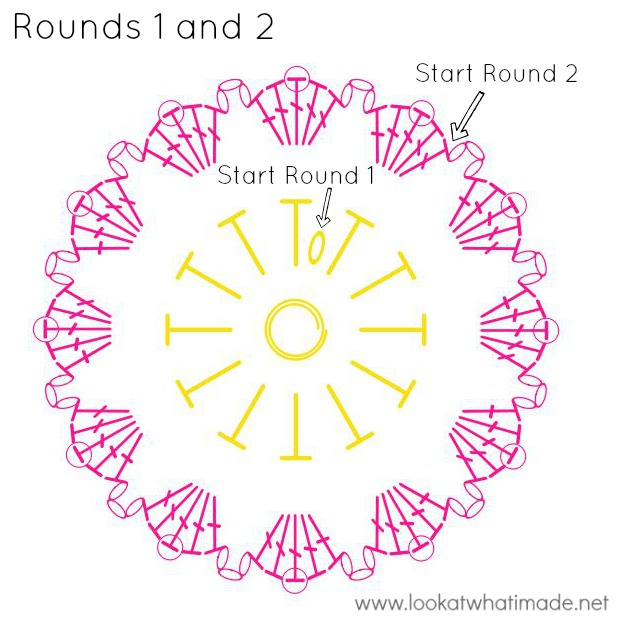
Into the ring, ch 1 (doesn’t count as a st throughout), make 12 hdc. Cut Yarn B and join OVER the first hdc with an invisible join (see Notes above). TURN. {12 hdc}
Round 2 {Yarn D}
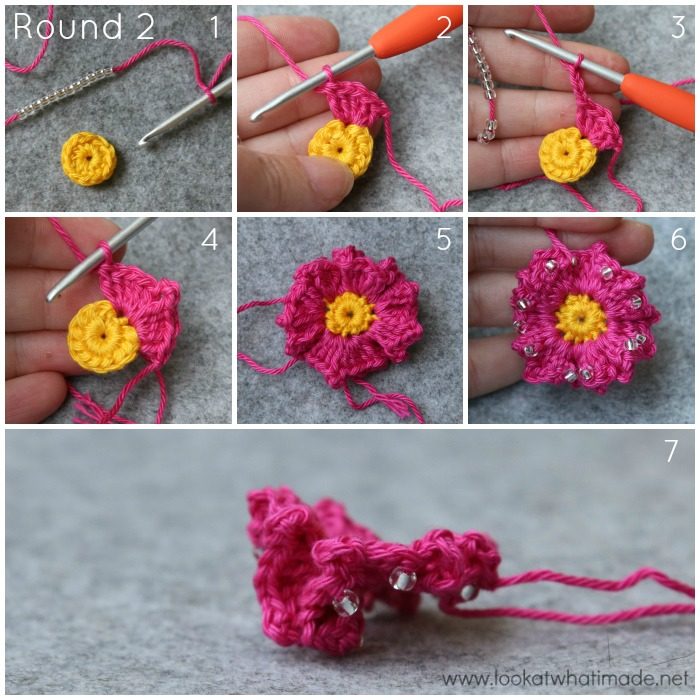
With WS facing, 12 beads loaded onto Yarn D, and a sl knot already on your hook, make a standing Beaded Shell in any st around {Photos 1 and 2}.
(Ch 3, make a Beaded Shell in the next st {Photos 3 and 4}) 11 times. Ch 3. Cut Yarn D and join OVER the first dc with an invisible join {Photo 5}. TURN {Photo 6}. {12 Shells and 12 ch-3 sps}
Note: When making the Shells, they will hide the next st to be worked into. Make very sure that you don’t accidentally skip any sts and check that you have 12 Shells and 12 ch-3 sps before you go on to the next round. This round will look all kinds of wrong {Photo 7}. Don’t worry about it :)
Round 3 {Yarn C}
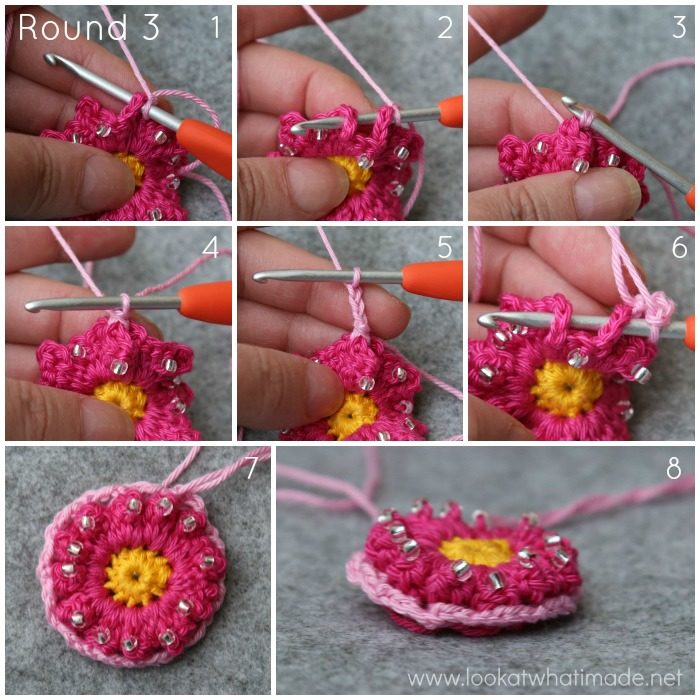
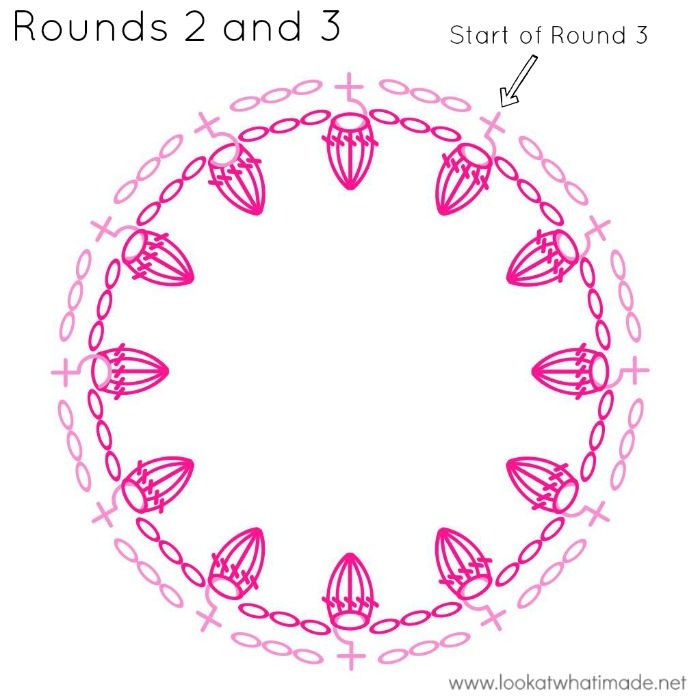
To make a FPsc around a Shell to turn it into a Popcorn, insert your hook from front to back into the ch sp before the Shell {Photo 1}. Then insert it from back to front into the ch sp after the Shell {Photo 2}. Complete your sc as normal, making sure to pull on your yarn so that the Popcorn is nice and neat {Photos 3 and 4}.
With RS Facing, join Yarn C by making a standing FPsc around any Shell {Photos 1 – 4}.
Ch 3 {Photo 5}. (FPsc around the next Shell, ch 3) 11 times. Join to the first sc with a sl st. {12 FPsc and 12 ch-3 sps}
Your centre will be raised (and will remain so). That is perfectly ok {Photos 7 and 8}.
Round 4 {Yarn C and Yarn A}
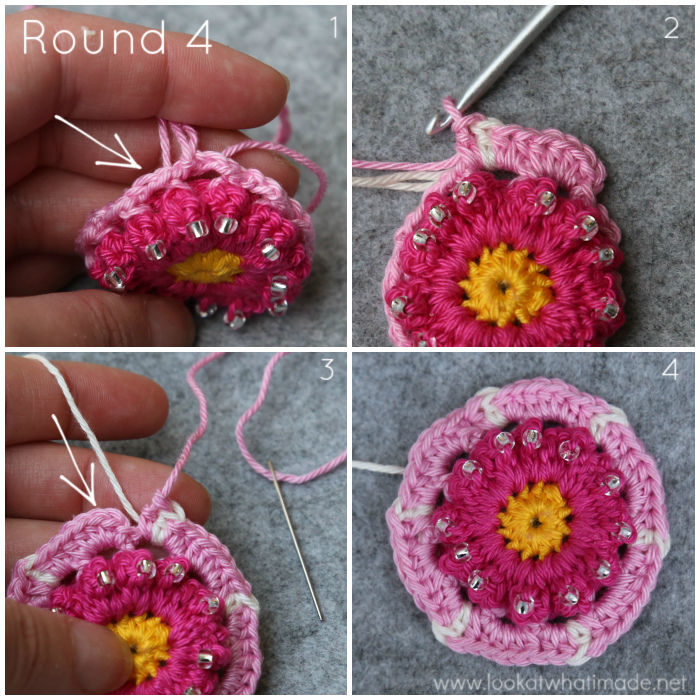
Sl st into the next ch-3 sp {Indicated with an arrow in Photo 1}. Ch 1 (doesn’t count as a st), make 4 hdc in the same ch-3 sp.
*[2 hdc, change to Yarn A, dc, change to Yarn C, hdc] in the next ch-3 sp {Photo 2}. Make 4 hdc in the next ch-3 sp.*
Rep from * to * 4 more times. [2 hdc, change to Yarn A, dc, change to Yarn C, hdc] in the last ch-3 sp. Cut Yarn C and join OVER the first hdc with an invisible join, making sure that Yarn A is BEHIND your work – see Photos 4 and 5 of Round 5. {42 hdc and 6 dc}

Round 5 {Yarn B and Yarn A}
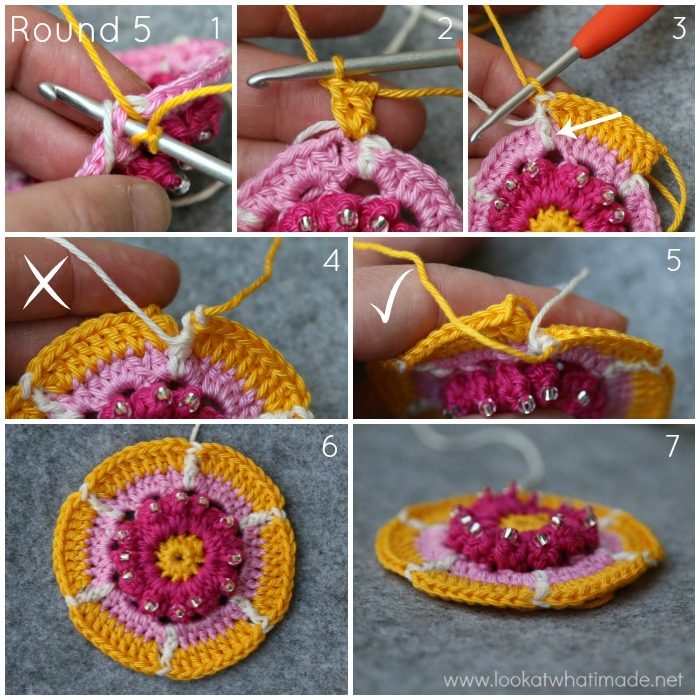
Please Note (here and throughout): You will always start your two-colour rounds as close as possible to end of the previous round. When making your first (standing) st, remember to work OVER Yarn A so that it doesn’t form a loop behind your work {Photo 1}.
Hint: From this point on, I will tell you which stitch to start each round in. If you find this confusing, it might help to mark that stitch with a stitch marker before starting the repeats. Also, the charts are your friend!
With a Yarn B sl knot on your hook, start in the first Yarn C hdc after the last Yarn A dc with a standing st:
*Make 2 dc in the next st {Photo 2}, dc in the next 5 sts, make 2 dc in the next st. Change to Yarn A and make a FPdc around the next Yarn A dc {Photo 3}. Change to Yarn B.*
Rep from * to * 5 more times. Cut Yarn B and join OVER the first dc with an invisible join, again (and throughout) making sure that your Yarn A end is BEHIND your work {Photos 4 and 5}. {54 dc and 6 FPdc}

Round 6 {Yarn G and Yarn A}
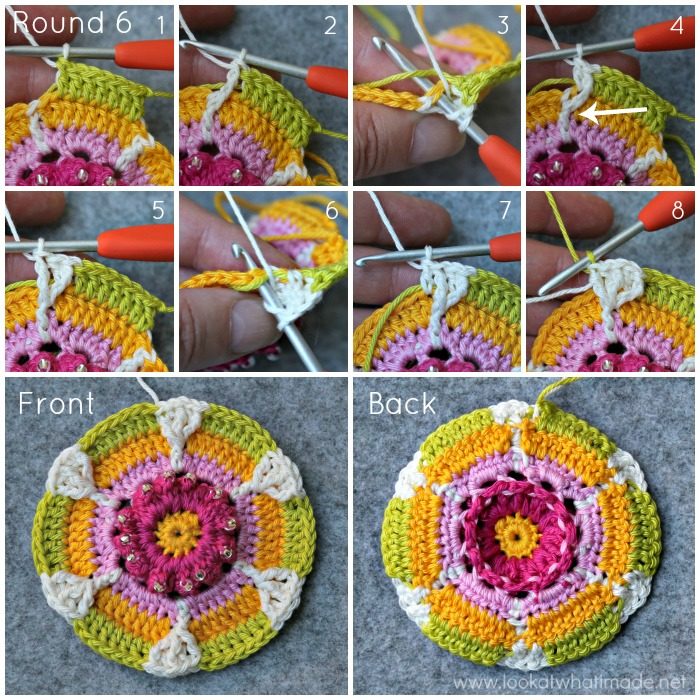
With a Yarn G sl knot on your hook, start in the second Yarn B dc after the last Yarn A FPdc with a standing st:
*Dc in the next 7 sts {Photo 1}. Change to Yarn A, skip the next st, FPtr around the next FPdc {Photo 2}. Working behind the FPtr just made, dc in the skipped dc {Photos 3 and 4}. FPtr around the same FPdc {Indicated with an arrow in Photo 4 and illustrated in Photo 5}, dc in the next Yarn B dc {Photos 6 and 7}. Working in front of the dc just made, FPtr around the FPdc that already contains two FPtr {Photo 8}. Change to Yarn G.*
Rep from * to * 5 more times. Cut Yarn G and join OVER the first dc with an invisible join. {54 dc and 18 FPtr}

Round 7 {Yarn F and Yarn A}
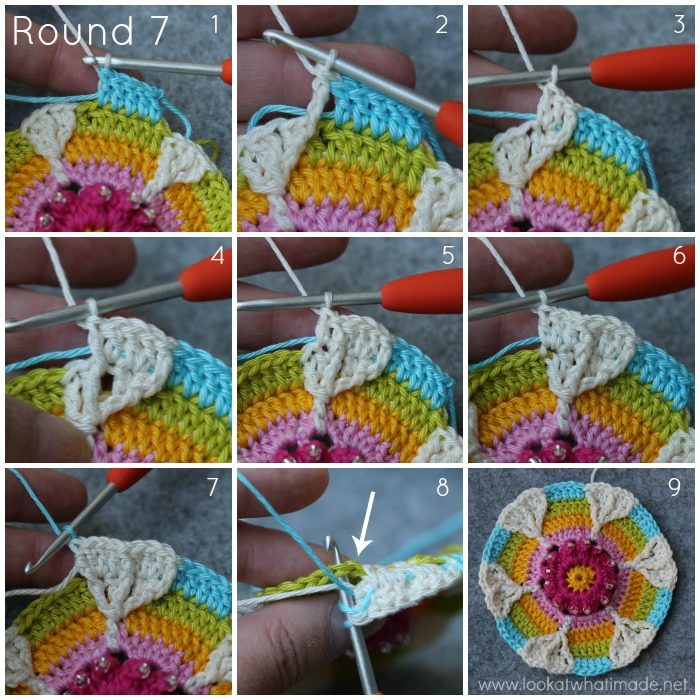
With a Yarn F sl knot on your hook, start in the second Yarn G dc after the last Yarn A FPtr with a standing st:
*Dc in the next 5 sts {Photo 1}. Change to Yarn A, skip the next Yarn G st, FPtr around the next FPtr {Photo 2}. Make 2dc in the next dc {Photo 3}. [Dc, FPdc] in the next FPtr {Photo 4}, dc in the next st {Photo 5}. [2dc, FPtr] in the next FPtr {Photos 6 and 7}. Change to Yarn F, skip the next Yarn G st {Photo 8}.*
Rep from * to * 5 more times. Cut Yarn F and join OVER the first dc with an invisible join. {66 dc, 6 FPdc, 12 FPtr}

Round 8 {Yarn E and Yarn A}
When you make the Bobbles in this round, pay special attention to the placement of each.
With a Yarn E sl knot on your hook, start in the second Yarn F dc after the last Yarn A FPtr with a standing st:
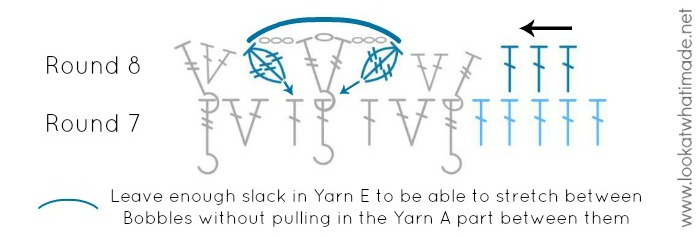
*Dc in the next 3 sts {Photo 1}. Change to Yarn A, skip next Yarn F st, FPtr around the next FPtr. Make 2 dc in the next dc {Photo 2}. Change to Yarn E and skip the next 2 sts. Working in front of the Yarn A end, not over it, make a 3-tr Bobble in the next FPdc {Photos 3 and 4}. Change to Yarn A, ch 3, [FPtr, ch 1, FPtr] around the same FPdc, ch 3. Change to Yarn E, leaving enough slack in Yarn E to be able to stretch between Bobbles without pulling in the Yarn A part between them {Photo 5}.
Working in front of the Yarn A end, not over it, make a 3-tr Bobble in the next st {Photo 6}. Change to Yarn A, skip the next 2 sts, [2dc, FPtr] in the next FPtr {Photo 7}. Change to Yarn E, skip the next Yarn F st.*
Rep from * to * 5 more times. Cut Yarn E and join OVER the first dc with an invisible join. {42 dc, 12 3-tr Bobbles, 24 FPtr, 6 ch-1 sps, and 12 ch-3 sps}
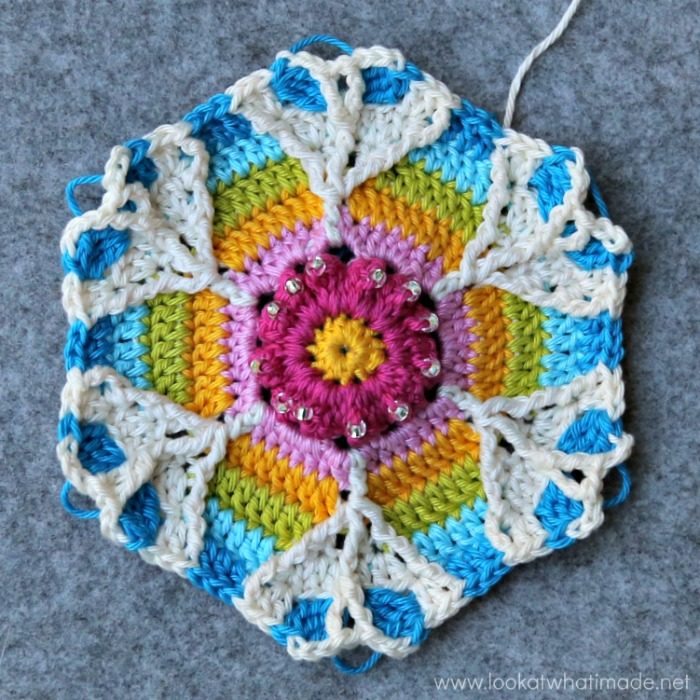
Photos 7 and 8 show the Yarn E ‘loop’ from the back (both relaxed and stretched).
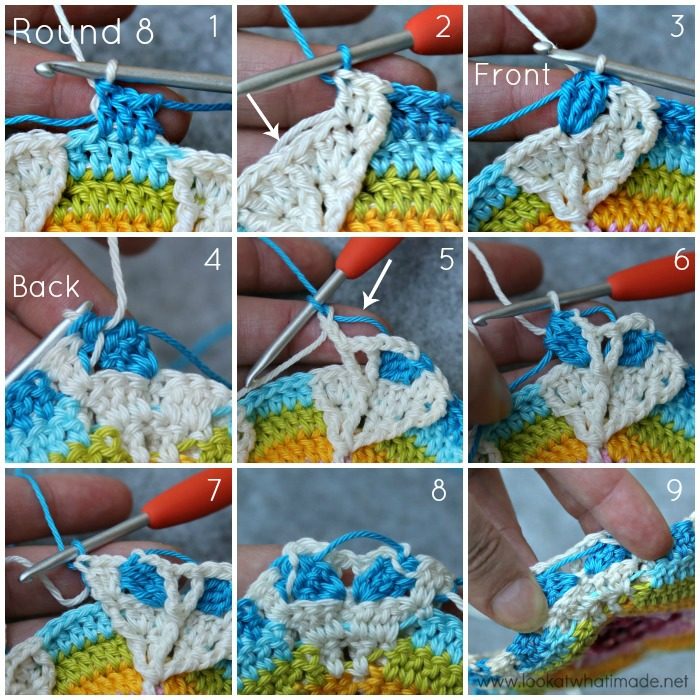
In the photo below, I have pulled the loops out, so they look more exaggerated. See Photo 9 above for a more accurate representation.
Round 9 {Yarn D and Yarn A}
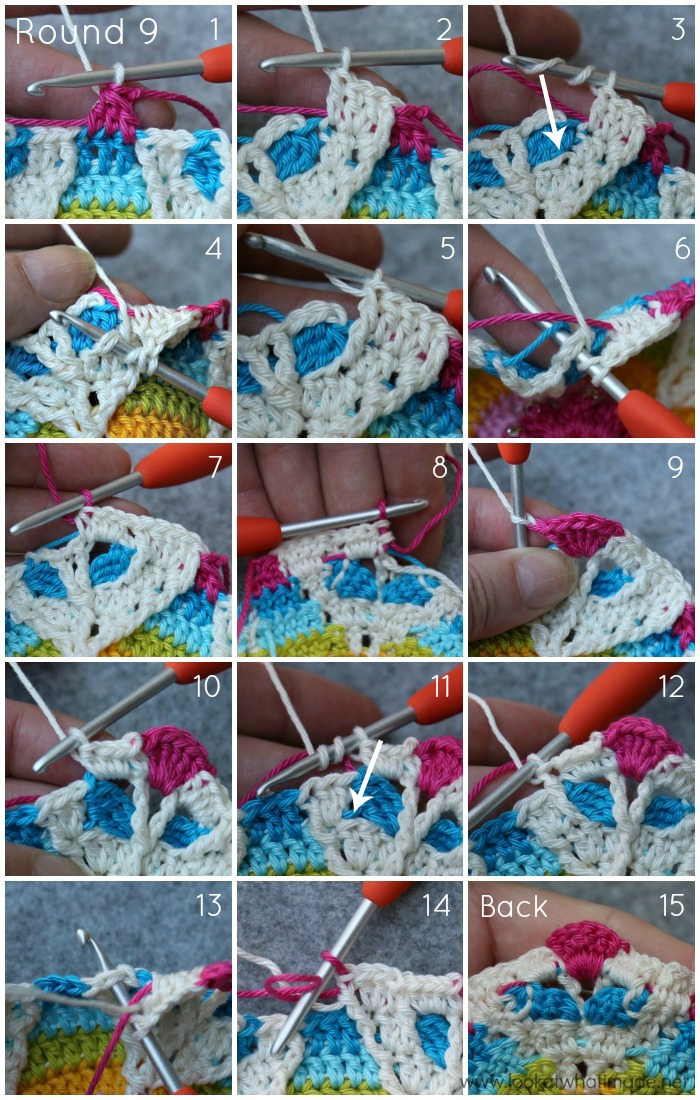
With Yarn D sl knot on your hook, start in the first Yarn E dc after the last Yarn A FPtr with a standing st:
*Dc3tog {Photo 1}. Change to Yarn A, FPtr around the next FPtr, make 2 dc in the next dc, dc in the next dc {Photo 2}. Working in front of the sts from the previous round, make a tr in the next skipped dc from Round 7 {Indicated with an arrow in Photo 3 and illustrated in Photos 4 and 5}.
Working OVER the trailing Yarn E end behind your work:
Make 3 hdc in the next ch-3 sp, hdc in the next FPtr {Photos 6 – 8, with Photo 8 showing the work from the back}. Change to Yarn D, ch 1, make a Shell in the next ch-1 sp, ch 1 {Photo 9}. Change to Yarn A, hdc in the next FPtr, make 3 hdc in the next ch-3 sp {Photo 10}. The trailing Yarn E end should now be hidden beneath the stitches just made {Photo 15}.
Working in front of the sts from the previous round, make a tr in the second skipped dc from Round 7 {Indicated with an arrow in Photo 11 and illustrated in Photo 12}. Skip the next dc from Round 8 {Photo 13} and make a dc in the next dc, [2dc, FPtr] in the next FPtr. Change to Yarn D {Photo 14}.*
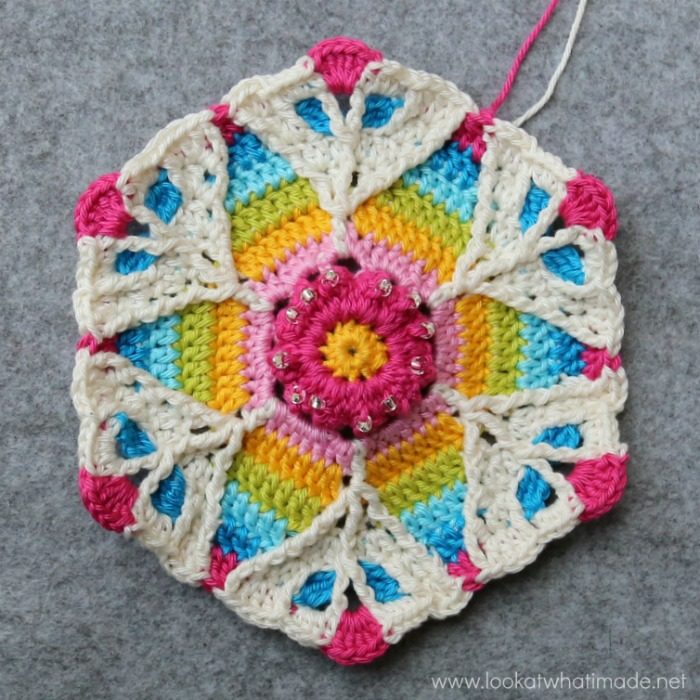
Rep from * to * 5 more times. Cut Yarn D and join OVER the first dc3tog with an invisible join.
{48 hdc, 72 dc, 12 tr, 12 FPtr, and 24 ch-1 sps}

Round 10 {Yarn A}
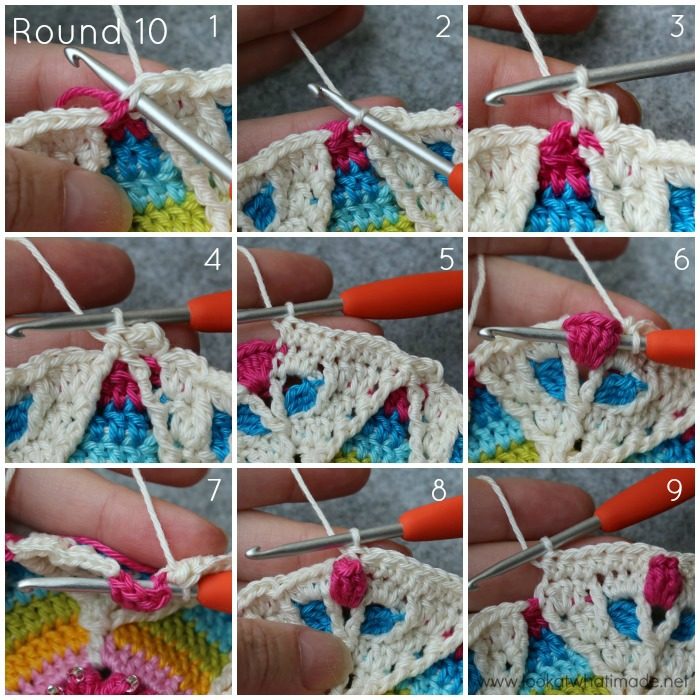
Insert your hook into the last FPtr made {Photo 1} and pull Yarn A through to the front of your work {Photo 2}. Ch 1 (doesn’t count as a st).
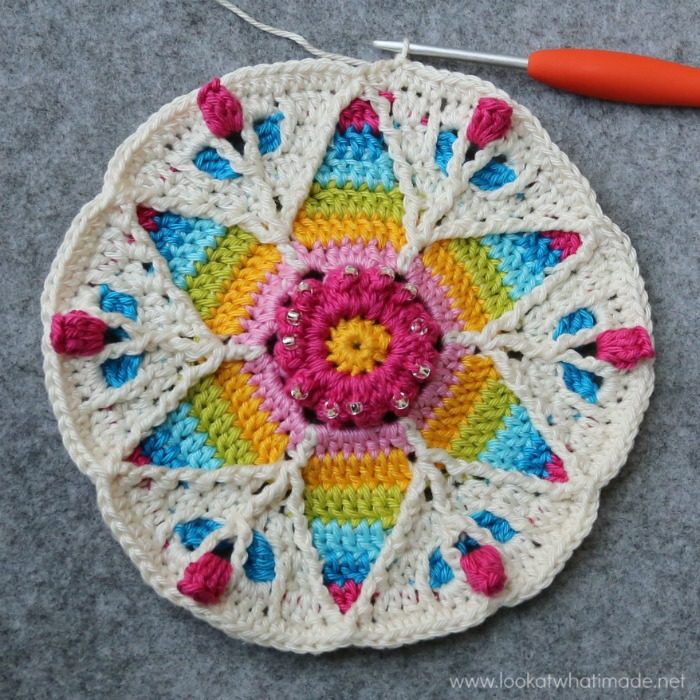
*Make 2 hdc in the FPtr {Photo 3}. FPdc2tog, working around the same FPtr and the next FPtr, skipping the Yarn D dc3tog between them {Photo 4}. Make 2 hdc in the next st, hdc in the next 7 sts {Photo 5}. FPsc around the next Shell {Photos 6 – 8} and skip the next (hidden) st. Hdc in the next 7 sts {Photo 9}.*
Rep from * to * 5 more times.
- If you finish on this round, join OVER the first hdc with an invisible join and work away your ends.
- If you would like to add one more round to make your mandala slightly bigger, join to the first hdc with a sl st and continue with the Optional Round 11 below.
{6 FPsc, 108 hdc, and 6 FPdc}

Optional Round 11 {Yarn A}
Ch 2 (counts as hdc). Hdc in the next 12 sts. The last hdc should fall in the FPsc from the previous round, here and at the end of each repeat. (2hdc in the next st, hdc in the next 19 sts) 5 times. 2 hdc in the next st, hdc in the last 6 sts. Join OVER the beg ch-2 with an invisible join and work away your ends. {126 hdc}

Attaching Your Crochet Mandala to a Hoop
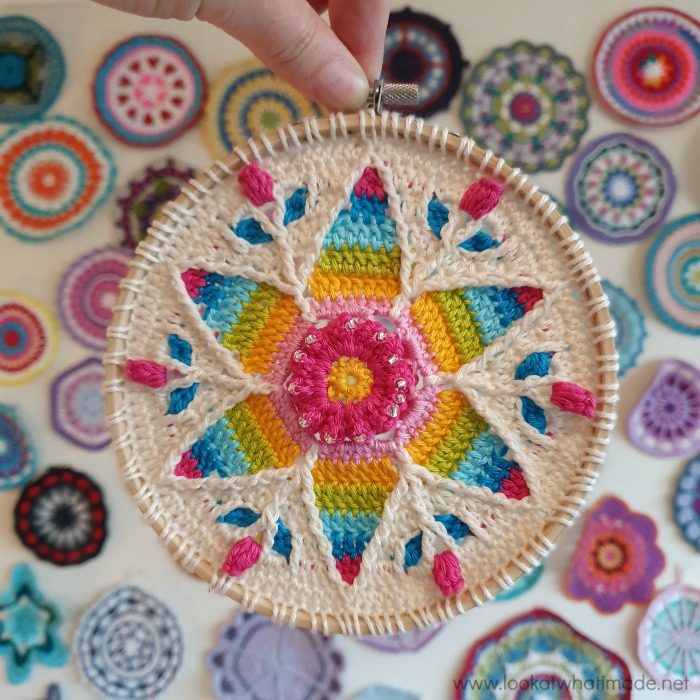
Once you have completed your mandala, it is a good idea to block it, even if you are not going to attach it to a hoop. Once it is blocked, measure the mandala to figure out how large your hoop needs to be. I usually use a hoop that is 1cm/0.4″ bigger than the mandala. For this specific mandala, I used a 16cm hoop (measured from outside to outside) and it fit my 15cm mandala perfectly.
Using 4 short lengths of yarn, tie the mandala to the hoop to secure it. Using a 4m length of yarn and overhand stitches, sew the mandala to the hoop, making sure to tighten the stitches every now and then. When you are done, work away the ends into the last round of the mandala.
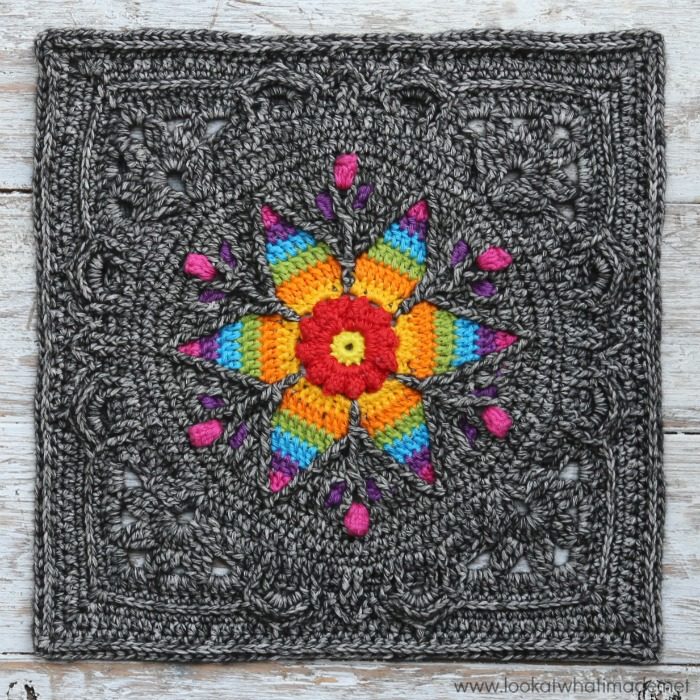
I will (surprise, surprise) be squaring this mandala up with a modified version of Sophie’s Garden very soon, so keep your eyes peeled for that.
I hijacked Jenny’s Fancy Nancy to check that the instructions for the squaring up will work. In this photo, it looks like the details have gotten lost, which is a pity, because in real life they POP! Now to frog those corners back and mount this Midnight Fancy Nancy in her own little hoop :)
Jenny used the Rainbow Colourway of the Hygge CAL 2017 by Kirsten Ballering to make her Fancy Nancy.
I hope you have enjoyed making this mandala, and that doing so has brought a smile to your socially-isolated face!

This blog post contains affiliate links. I only link to products I personally use or would use. All opinions are my own.


melanie yarborough says
Thank you so much for the beautiful pattern and making it easy to understand
Jenny Lowman says
What colours did you choose, Melanie? I have played with Fancy Nancy square recently and made a lovely lap blanket using the small Ubuntu blanket kit :)
Rosie Bunn says
This looks amazing and just incredible in the middle of Sophie! Ive longed to do something Sophie linked before a big Sophie and I think this is the one – thank you so much.
Thank you
Rosie
Rosie Bunn says
*apologies Jenny – meant looks great in Fancy Nancy and think it will look incredible in the middle of Sophie!
Can’t wait for the rainbow insert in Sophie!
Rosie
Mandy says
This is beautiful ❤️ I can’t wait to make it.
Thank you soooo much for making a pdf printable version, it’s so difficult for me to keep looking at the screen to follow patterns.
This will make a wonderful present for mum.
Bless you
Jenny says
Enjoy, Mandy! Don’t forget to share pics on the blog Facebook page with us.
BW
Jenny and Dedri :)
Shereen Ayoub says
I just finish it and I love it very much
Thanks a lot ❤️❤️❤️❤️❤️
Dedri Uys says
You are most welcome :)
Isabel says
Almost finished and had to tell you how much I’ve enjoyed making the Fancy Nancy! Thank you for the photos and graphics, made it very easy to follow! Now i have to find the hoop to mount and decorate. Thanks again!
Isabel from Spain.
Dedri Uys says
Hi Isabel.
I am so glad you enjoyed this pattern. I hope you find a hoop soon x
Eulalia Isabel says
hOLA dEDRI
hERMOSO EL MANDAL, QUE COLORES MARAVILLOSOS.
ME ENCANTA.
SALUDOS
Dedri Uys says
Thank you :)
Margalit Abas-Gian says
Thank you Dedri, it’s very cute and beautiful! mine came out lovely
Dedri Uys says
Oh yay!!
Sabine Lehnert says
Thank you very much for the lovely pattern
Jennie Gaskin says
Hmmm, just the right size for a potholder!
Kathleen Fuller says
I love this! I can’t wait to make it. I enjoy crocheting with beads so I’m glad you added them into such a beautiful pattern. Thank you!
Nanci St John says
This is beautiful! My name is Nanci and my family call me Fancy Nanci sometimes! I also love the books by the same name.
Julie says
Oh my goodness, this is beautiful. I have an urge to put all my crochet projects on hold and give this a try. It looks quite advanced for me but I see lots of pictures in your tutorial so maybe I will be ok! Thank you.
Dedri Uys says
Hi Julie,
One stitch at a time and you will be absolutely fine! And I am always here to help should you get stuck :)
Dedri
Wendy de Vries says
This pattern is absolutely gorgeous and i love the way you wrote the pattern, with the pictures and the symbols to make it all clear. I used a lot of time on the 11 rows, but sooo satisfied by the result!! I might try make it into a dreamcatcher/wallhanging with more rows from another pattern where i dont like the middle section, cos this one is so very good! thank you for lots of crochet fun. I am also making the ubuntu btw, and have sophies garden as a wallhanger the round middle section that is, and i also used it squared as middle of a blanket, which i extended with some rows of the LIT squared. Could well be possible i want to make the summer in swanage as well….but my house is already full of mandalas, blankets and wallhangings….thanks for all the inspiration!
Dedri Uys says
Hi Wendy.
The pattern IS complex, but not difficult. I’m so pleased to hear that you have made some of my other patterns. Gift, when your house gets too full. And then make some more things :) x
Maria says
I love the square! Would it be possible to share how you did it? Thanks for the great pattern. Love your mandalas.
Dedri Uys says
I will do in a future post :)
Madeline Bresler says
This may be my favorite project you’ve shared, and I’ve loved them all! (And I LOVe the way it looks in the center of a Sophie’s!)
Dedri Uys says
Thank you Madeline :)