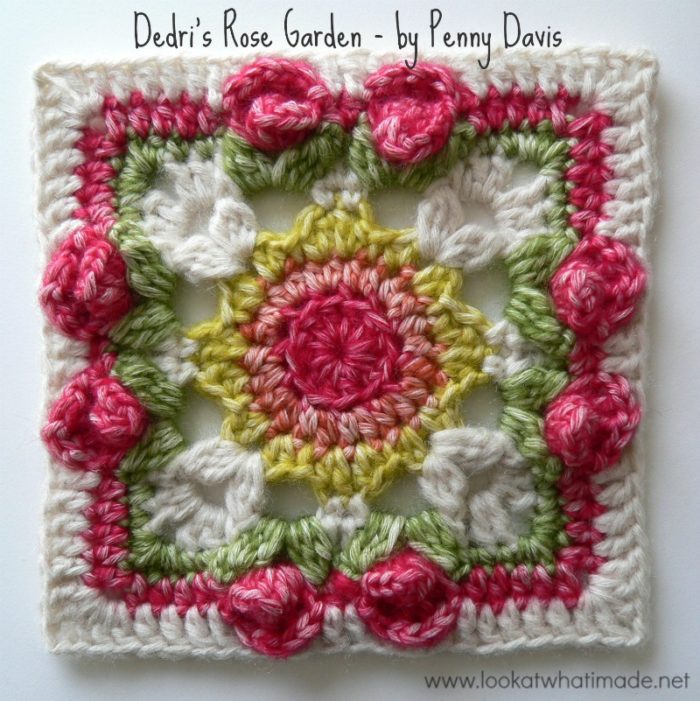
Due to popular demand, I bring you Penny Davis’ crochet square, which she has decided to call Dedri’s Rose Garden. I am a little bit shy about having this square named after me (on a blog that already screams “Look At Me!”), but it is Penny’s design, so she got to choose the name.
This square is a modification of the Lydia square, which was offered as an option for “growing” Sophie’s Universe into a rectangle. Penny has used the Roses from Part 7 of Sophie’s Universe to liven the square up a bit.
I am honoured and proud to present Penny’s square to you. Thank you, Penny!
This is my first time working with the “skinny” Stonewashed. I still prefer the Stonewashed XL, because I am just a bigger-is-better kinda gal, but I love the density with which the regular Stonewashed works up, and the colours…well…you know I love those!
Dedri’s Rose Garden Square
©Penny Davis and Dedri Uys 2015. All Rights Reserved. Please see Terms of Use.
- Add This Pattern to your Ravelry Queue
- Use the Print Friendly button at the bottom of this post if you would like to print/save this tutorial.
Translations
- Dutch Translation by Dianne Baan
- French Translation by Sandra Larvin
Size
11 cm (Just over 4”)
Please Note: If you use Cotton 8 to make this square, it will come out smaller (10 cm/4”).
Materials
- 3.25 mm Crochet Hook (US D/3 UK 10) – I use Clover Amour Hooks
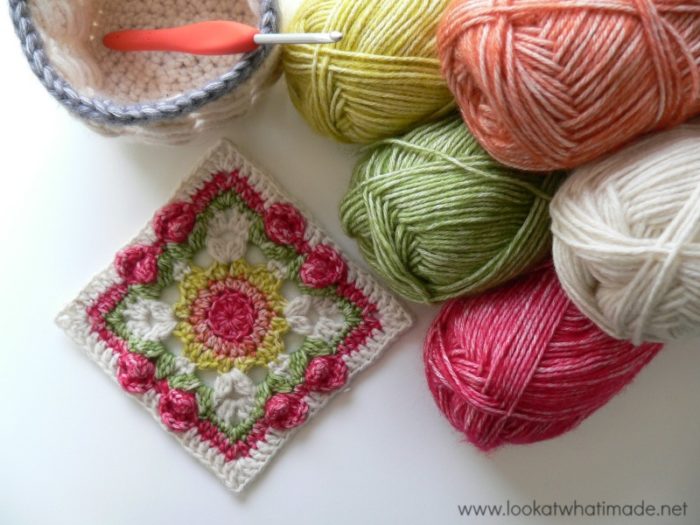
- Scheepjeswol Stonewashed (4 Ply /#2) – about 50 meters per square. I used Red Jasper, Coral, Lemon Quartz, Moonstone, and Canada Jade.
- Yarn needle
I just love my Tiny Cable Stitch Basket, which has been made using Stonewashed XL.
Abbreviations
- BLO – Back loop only
- Ch – Chain
- Dc – Double crochet
- Fpdc – Front post double crochet
- Hdc – Half-double crochet
- Sc – Single crochet
- Sl st – Slip stitch
- St/st’s – Stitch/stitches
- * – Repeat instructions between asterisks the amount of times specified. This is a hardcore repeat and will consist of multiple instructions.
- () – Repeat instructions between parentheses the amount of times specified. This is a lower level repeat.
Special Stitches
- Cluster : Dc3tog – see this tutorial.
- Bobble Stitch: Yarn over and insert your hook into the indicated stitch. Yarn over and pull up a loop. Yarn over and pull through 2 loops – 2 loops on your hook. Yarn over and insert your hook into the same stitch. Yarn over and pull up a loop – 4 loops on your hook. Yarn over and pull through 2 loops – 3 loops on your hook. Yarn over and insert your hook into the same stitch. Yarn over and pull up a loop – 5 loops on your hook. Yarn over and pull through 2 loops – 4 loops on your hook. Yarn over and pull through all 4 loops. See this tutorial.
Special Stitch Combinations
Leaves
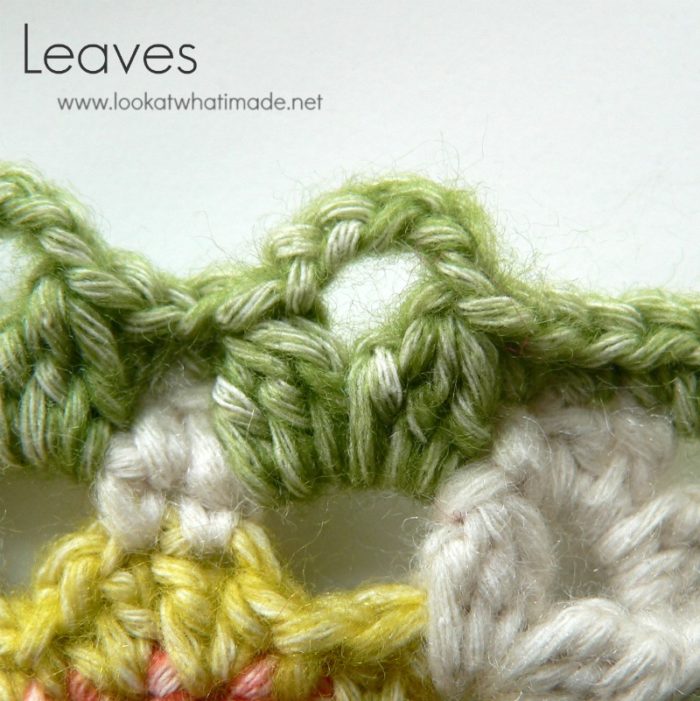
Working in front of the ch-3 space from Round 5, make a Bobble in the ch-3 space from Round 4. Ch 5 and make a Bobble in the same ch-3 space.
Roses
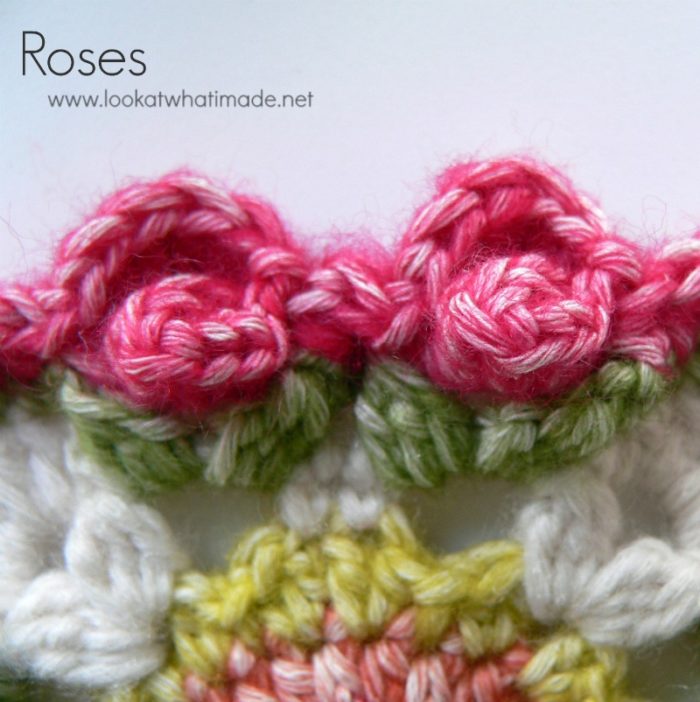
Pull the ch-3 space from Round 5 through the ch-5 space from Round 6. Working only into the ch-3 space, make (2 sc’s, 3 hdc’s, 3 dc’s). This will be a tight squeeze! Bring the last stitch around the back of your work and join to the first sc with a sl st, forming a ring. Let’s call this a modified popcorn.
(Sc, hdc, 3 dc, hdc) into the ch-5 space from Round 6, which should be behind the modified popcorn. To finish the rose, make a sc into the ch-3 space from Round 5, again making sure to work in front of the ch-5 space. This will be a bit tricky.
There is a step-by-step photo tutorial for the roses at the start of Round 59 in Part 7 of Sophie’s Universe.
Instructions
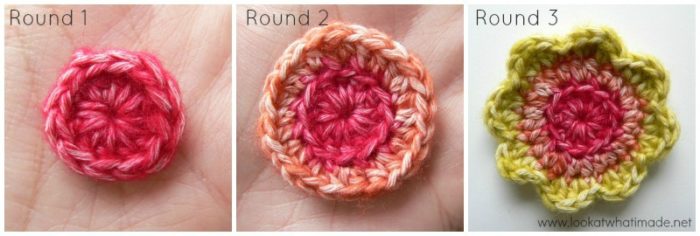
Round 1
This round is just a standard double crochet circle.
Into a magic ring: ch 3 (this counts as your first dc). Make 11 dc’s into the ring. Join to the top of the beginning ch-3 with a sl st. If you are going to change colours for the next round, consider using the invisible join instead.
If you are not familiar with working into a magic ring, this video tutorial by Tamara from Moogly is very good. Please remember, when working into a magic ring you HAVE to work away your initial tail very well. If you just cut it, your whole project might unravel!
Stitch count: 12 dc’s
Round 2
Join your new colour by making a standing half-double crochet in the blo of any stitch around. Make another hdc in the blo of the same stitch. Make 2 hdc’s in the blo of each of the remaining 11 st’s.
Stitch count: 24 hdc’s
Round 3
- If you are using the same colour, (hdc, dc) in the stitch after the sl st join. (Dc, hdc) in the next stitch.
- If you are using a new colour, join your yarn by making a sl st into the same st as the sl st join (Photo 1). (Hdc, dc) in the next stitch. (Dc, hdc) in the next stitch.
*Slip stitch in the next stitch. (Hdc, dc) in the next stitch. (Dc, hdc) in the next stitch.* Repeat from * to * 6 more times. Join by making a sl st in the same stitch as the initial sl st.
Fasten off and work away your tails of yarn.
Stitch count: 40 st’s – including sl st’s {16 dc’s, 16 hdc’s, and 8 sl st’s – not including the initial sl st to join}
Round 4
Join your yarn by making a standing single crochet in the second dc of any petal.
*Ch 3. (Bobble Stitch, ch 4, Bobble Stitch) between the 2 dc’s of the next petal. This is your corner made. Ch 3. Sc in both dc’s of the next petal.*
Repeat from * to * 3 more times, omitting the last sc on the last repeat. Join to the top of the first sc with a sl st.
Fasten off. Leave your tails until you have made the next round as it will be easier to work them away then.
Stitch counts:
- Total: 16 st’s, 8 ch-3 spaces and 4 ch-4 corner spaces {8 Bobble Stitches and 8 sc’s}
- Per Side: 4 st’s and 2 ch-3 spaces {2 Bobble Stitches and 2 sc’s}
Round 5
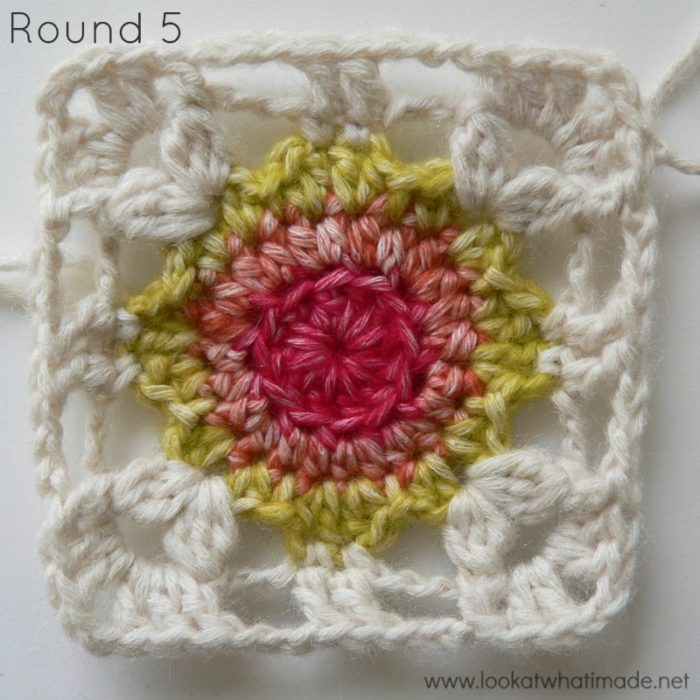
Dedri’s Edit: I suggest making a ch-4 instead of a ch-3 (where indicated), otherwise you will find the roses a bit tricky to make.
Join your new yarn by making a standing double crochet in any ch-4 corner space. (Dc, ch 2, 2 dc) in the same ch-4 corner space. This is your corner made.
*Make a fpdc around the next Bobble Stitch. Ch 3 and skip the next ch-3 space. Dc in the next 2 sc’s. Ch 3 and skip the next ch-3 space. Make a fpdc around the next Bobble Stitch. (2 dc, ch 2, 2 dc) in the next ch-4 space.*
Repeat from * to * 3 more times, omitting the last corner on the last repeat. Join to the top of the beginning ch-3 (or the standing double crochet) with a sl st.
Stitch counts:
- Total: 24 dc’s, 8 fpdc’s, 8 ch-3 spaces, and 4 ch-2 corner spaces
- Per Side: 6 dc’s, 2 fpdc’s, and 2 ch-3 spaces
Round 6
See Leaves under Special Stitch Combinations above.
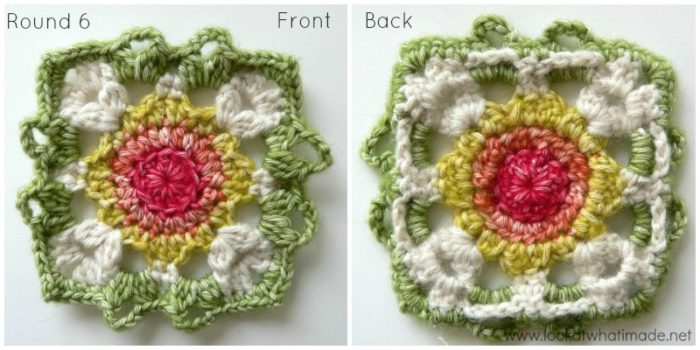
Join your new yarn by making a standing single crochet in any ch-2 corner space. (Sc, ch 2, 2 sc) in the same ch-2 corner space. This is your corner made.
*Sc in the next 3 st’s. Make Leaves. Sc in the next 2 st’s. Make Leaves. Sc in the last 3 st’s. (2 sc, ch 2, 2 sc) in the next ch-2 space.*
Repeat from * to * 3 times, omitting the last corner on the last repeat. Join to the top of the standing sc with a sl st.
Stitch counts:
- Total: 48 sc’s, 8 Leaves – each containing 2 Bobbles and a ch-5 space, and 4 ch-2 corner spaces
- Per Side: 12 sc’s and 2 Leaves – each containing 2 Bobbles and a ch-5 space
If you take a look at the photo below, you will see that the ch-3 spaces are behind your work. This is extremely important, otherwise you won’t be able to make your roses in the next round!
Round 7
- See Roses under Special Stitch Combinations above.
- Do not hdc in the top of the leaves from the previous round. In other words, skip ALL the Bobble “Leaves”.
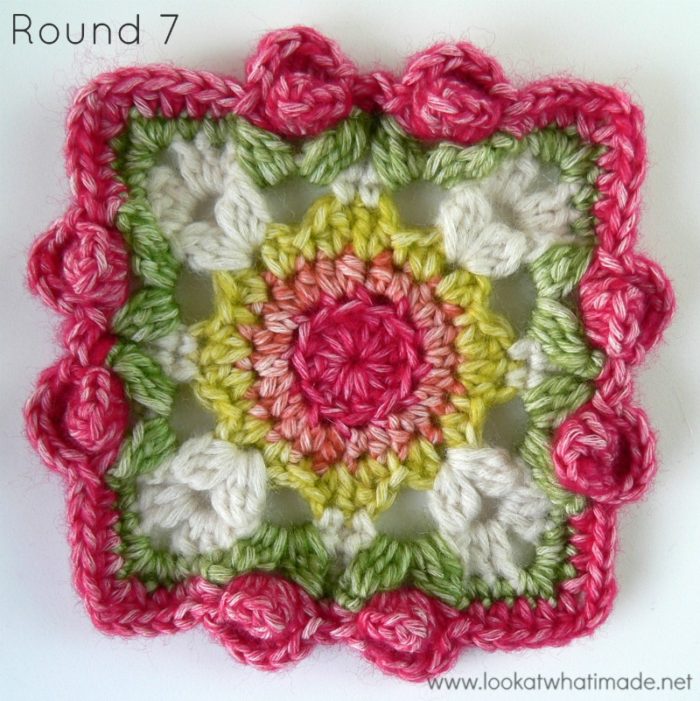
Join your yarn by making a standing half double crochet in any ch-2 corner space. (ch 2, hdc) in the same ch-2 corner space. This is your corner made.
*Skip the first (hidden) st. Hdc in the next 4 sc’s. Make a rose in the next ch-3/ch-5 space. Hdc in the next 2 sc’s. Make a rose in the next ch-3/ch-5 space. Skip the first sc after the last leaf, which will be hidden anyway, and hdc in the last 4 sc’s. (Hdc, ch 2, hdc) in the next ch-2 space.*
Repeat from * to * 3 more times, omitting the corner on the last repeat.
Stitch counts:
- Total: 48 hdc’s, 8 Roses, and 4 ch-2 corner spaces
- Per Side: 12 hdc’s and 2 Roses
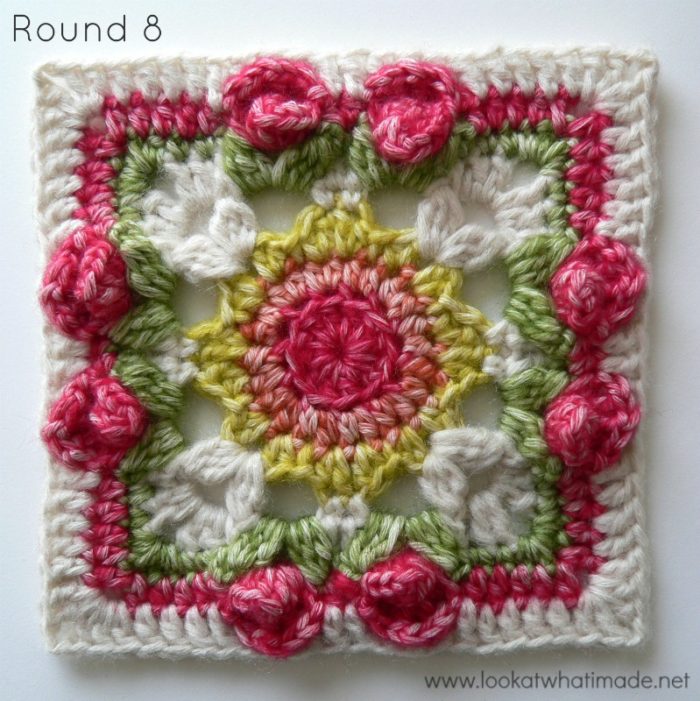
Round 8
Dedri’s Note: When working into the back of the Roses, I suggest working around the back posts.
Join your yarn by making a standing double crochet in ch-2 any corner space. (Dc, ch2, 2 dc) in the same ch-2 space. This is your first corner made.
*Taking care not to skip the first hidden stitch, dc in next 5 st’s. Working into the back of the Rose, hdc in the first hdc, sc in the centre dc, hdc in the last hdc. Dc in next 2 hdc’s. Working into the back of the second Rose, hdc in the first hdc, sc in the centre dc, hdc in the last hdc. Dc in last 5 hdc’s. (2 dc, 2 ch, 2 dc) in next ch-2 space.*
Repeat from * to * 3 more times, omitting the corner on the last repeat. Fasten off and work away your tails of yarn. Block your square so that your edges are nice and neat.
If you are going to use foam squares to block on, consider buying these Interlocking Foam Exercise Mats. They are similar to these Knitter’s Pride Lace Blocking Mats, but cheaper. You will also need some of these Clover Fork Blocking Pins (although regular old sewing pins work just as well).
Stitch counts:
- Total: 88 st’s and 4 ch-2 corner spaces {64 dc’s, 16 hdc’s, and 8 sc’s}
- Per Side: 22 st’s {16 dc’s, 4 hdc’s, and 2 sc’s}

This blog post contains affiliate links. I only link to products I personally use or would use. All opinions are my own.



Linda says
Hello. So pleased to have come across your page via crochet surfing. I love the colours you have used on your Rose garden square. It’s hard to get the yarn you mention in Australia and postage is expensive on overseas orders. Is their an alternative you can suggest. scheepjes yarn is very popular at the moment. Thank you for sharing your patterns. I wish I had, had the internet when I was teaching myself to crochet in the mid-sixties. I’ll be 72 next week and I love crocheting Many thanks Linda
Jenny says
Hello Linda.
Scheepjes stone washed yarn is a double knit yarn, and any double knit can be used as a replacement.
BW. Jenny :)
marcella says
Oh Dedri this is a beautiful square your instructions are so well detailed thank you for this pattern but especially for giving it to us free
Dedri Uys says
You are very welcome x
mando says
PERFECT!!!THANKS A LOT!!!
Stephanie says
Thank you. This whole experience has been wonderful. I know have a family heirloom to pass down. I love it. Stephanie 2018 Australia
Dedri Uys says
I’m so pleased to hear that :)
Jean says
This is my favorite square. I am making some for a throw. Please don’t take the tutorial away!
Jean
Dedri Uys says
Hi Jean :) I have no intention of removing the tutorial, so you don’t have to worry :) I’m pleased you like it, as I’m sure Penny will be too.
Jasmine Maddix says
Thank you for your beautiful pattern. It has bought me joy, and I feel so proud of my achievement. I am now addicted to Sophie’s afghans.!!! My cousin wants one so I shall attempt one for her birthday. Once again a heartfelt thank you. I would like to send a photo but I don’t know how to I’ll keep trying.
Jenny says
Hi Jasmine!
Best to send us pictures via the Lookatwhatimade Facebook page. Lovely to hear of another Sophie addict! :)
Jenny
Rosa Pestana says
Hi. Love this work. I want to do the extra squares, with Dedri’s rose garden, but I am not sure if I should use the stonewashed XL as for the whole work, or if the 4 ply as it is in the directions on lookatwhatimade ?
Please do let me know as I can’t wait to continue this amazing project.
Thank you !!!!
Dedri Uys says
Hi Rosa. If you have made your Sophie with XL, you will need to use XL for the Rose Garden squares as well. Yardages will differ and I cannot give you exact amounts, but I can try and guess it if you want me to. I am fairly accurate at guessing, but I would need to know how much yarn you ended up using for your final Sophie in order to do the maths magic.