There are many ways to crochet in the round. Each one has its own merits and everyone has their favourite. They are not all interchangeable, but once you understand the ‘anatomy’ behind them, it will be easier for you to decide if you can swap them in specific patterns and how this will affect your work.
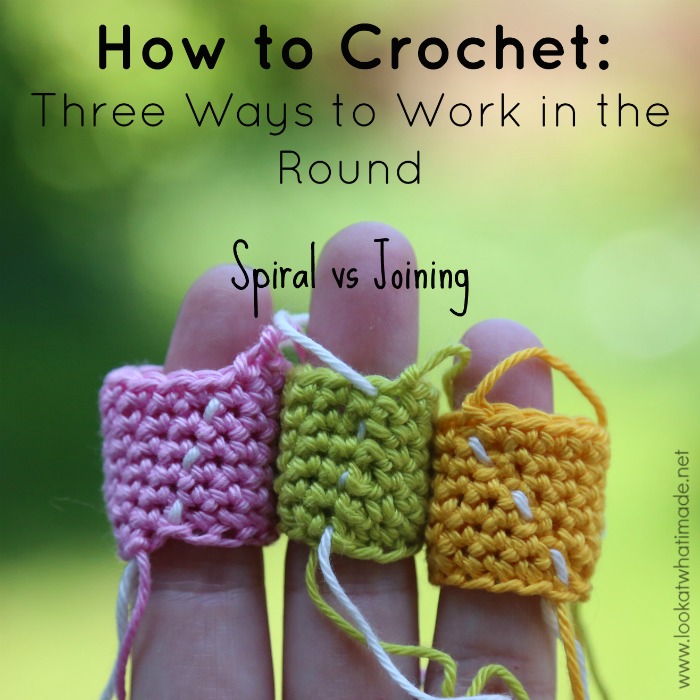
In this post, we will look at:
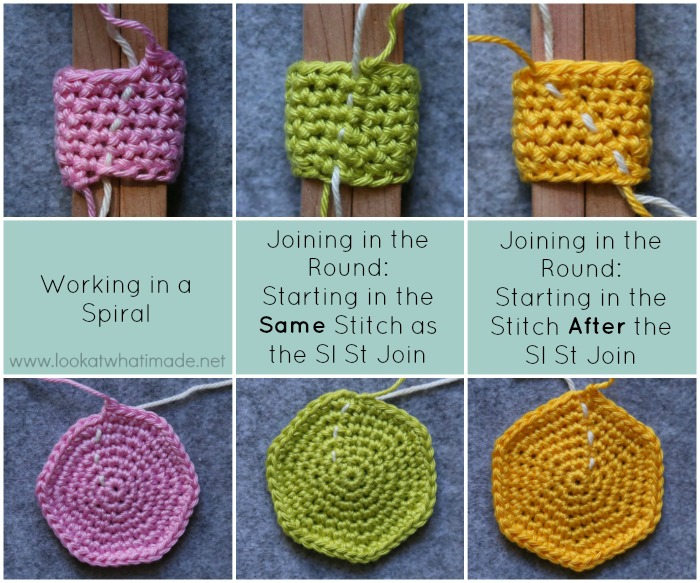
- Working in a spiral
- Joining in the round: Starting in the same stitch as the sl st join (traditional method)
- Joining in the round: Starting in the stitch after the sl st join (how my Granny taught me)
This photo tutorial will show you how to accomplish each of the three methods listed above. I also hope to shed some light on the differences between the methods. Lastly, I will touch on Interchanging Methods and what would happen if you use one method where another one is required by a pattern.
All three of these methods are worked with the right side always facing you (so no turning at the end of each round).
Note: If you are required to (or choose to) turn at the end of each round, Futuregirl’s seamless single crochet tutorial is an excellent photo-laden tutorial.
How to Crochet in the Round
A Guide to Working in a Spiral and Joining in the Round
First published 16 June 2013. Updated 8 May 2020.
Notes
- If you do not want to read the whole article, you can skip to the relevant section by clicking on the bullet points below under Index.
- I use US terminology throughout. You can find a US/UK Conversion Chart HERE.
- I have used Running Stitch Markers (RSM) to make it easier to see the seams. I am a massive advocate for them to keep track of the start of each round. A RSM is a piece of scrap yarn that you flick backwards/forwards over your work before making the first stitch of each round. They form a running stitch up your work, making it easy to spot if you have made a mistake in a round. If the line is smooth, you’re good. If the line has a jog in it, you’ve either skipped a stitch or made one too many. When you have finished your piece, you can just pull the scrap yarn out.
- If you struggle with identifying your stitches and which loops belong to which post, you might find it useful to look at this Stitch Anatomy Tutorial.
- For this tutorial, I have started with a 15-ch foundation chain, illustrating the steps by making a small tube in single crochet. Feel free to grab some yarn and follow along with me for a practical lesson.
Index
- Working in a Spiral
- Joining in the Round: Starting in the Same Stitch as the Sl St Join
- Joining in the Round: Starting in the Stitch After the Sl St Join – this is by far my favourite method when not working in a spiral. It yields a very neat seam.
1. Working in a Spiral
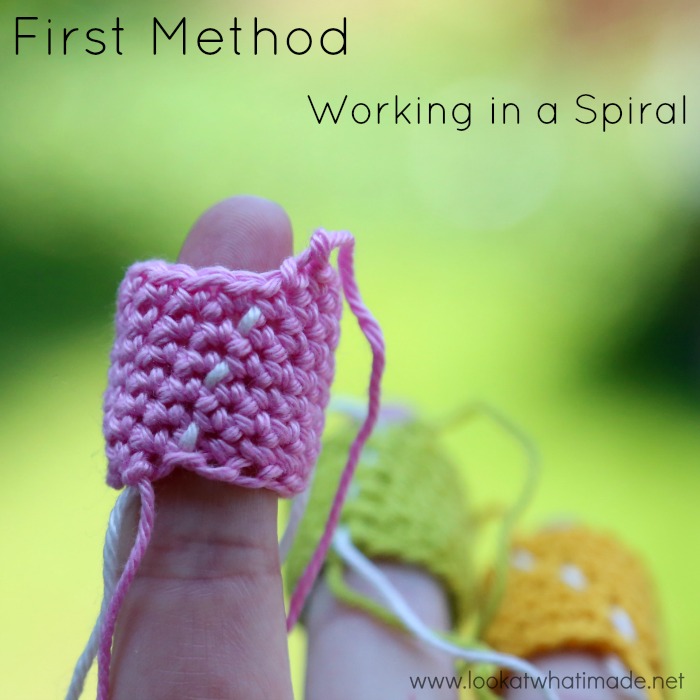
This method applies to absolutely anything that needs to be worked in a spiral, regardless of whether it is flat or three-dimensional. What that means is that you won’t join the beginning and end of each round with a slip stitch or an invisible join. Instead, you will continue around, making the first st of each round in the first st of the previous round.
Recommendations
I strongly recommend using a RSM when you work in a spiral as you won’t have any other prompts/cues to remind you where the end of the round should fall. If you are just making a tube, this doesn’t really matter. If you are making something shaped, like a head or a body for Amigurumi, this can be detrimental!
An example of a pattern written for crocheting in a spiral would be:
Ch 15. Don’t turn and don’t join. Just continue around, working the first st of the next round in the first st of this round.
Round 1: Sc in the next 15 sts. {15 sc}
Round 2: Sc in the next 15 sts. {15 sc}
Method
After you have worked your foundation chain {Photo 1}, insert your hook into the first ch (the one farthest away from your hook – indicated by an arrow in Photo 1 and illustrated in Photo 2) and make a sc {Photo 3}.

If you are working in a spiral and you want to use a piece of yarn as a RSM, you can only start doing it from the end of the first round as there is nothing to hold the yarn in place at the end of the foundation chain. Continue to work each st of Round 1 as required by the pattern. Your last st of Round 1 should fall in the last st of the foundation chain {Photo 4}.
Before starting the next round, lay a piece of scrap yarn over your work {Photo 5}. Now crochet the next round, starting in the next available stitch, which will be the first st of Round 1 {Indicated with an arrow in Photo 4}. The last stitch of the round should fall in the st to the right of the scrap yarn (left, if you are left-handed) – see Photo 6.

Continue working your rounds, making the first st of every round in the first st of the previous round and flicking your stitch marker back and forth before the first st of each round {Photos 7 and 9}. If you ARE using a Running Stitch Marker, it will serve as a visual cue that you are still on the right track. The last st of each round should fall in the st to the right of the RSM (left, if you are left-handed) – see Photo 8.

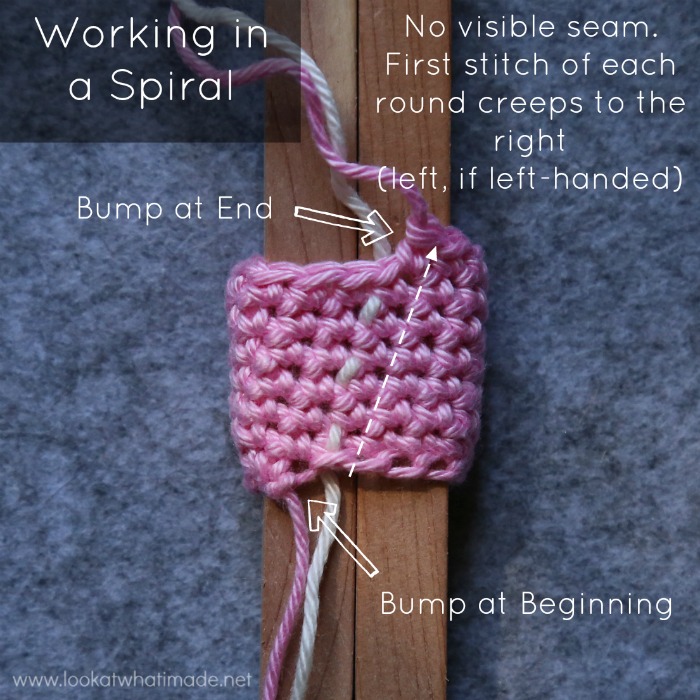
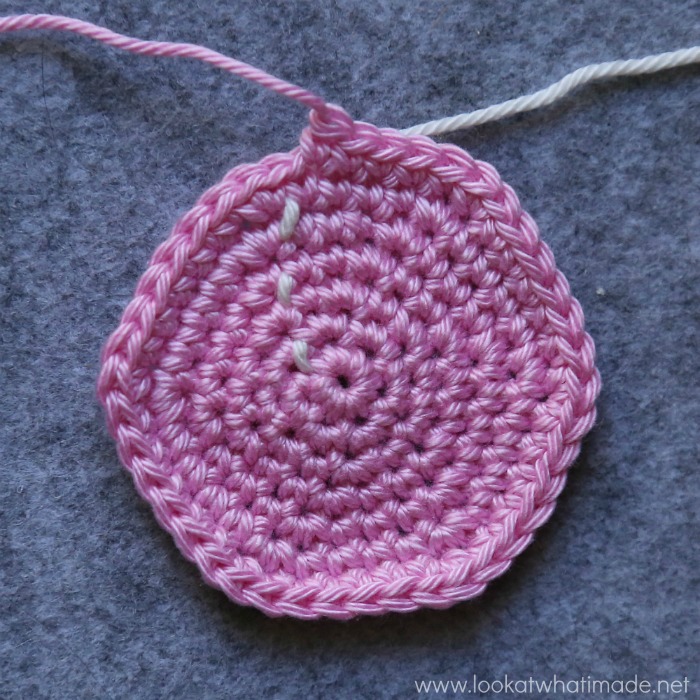
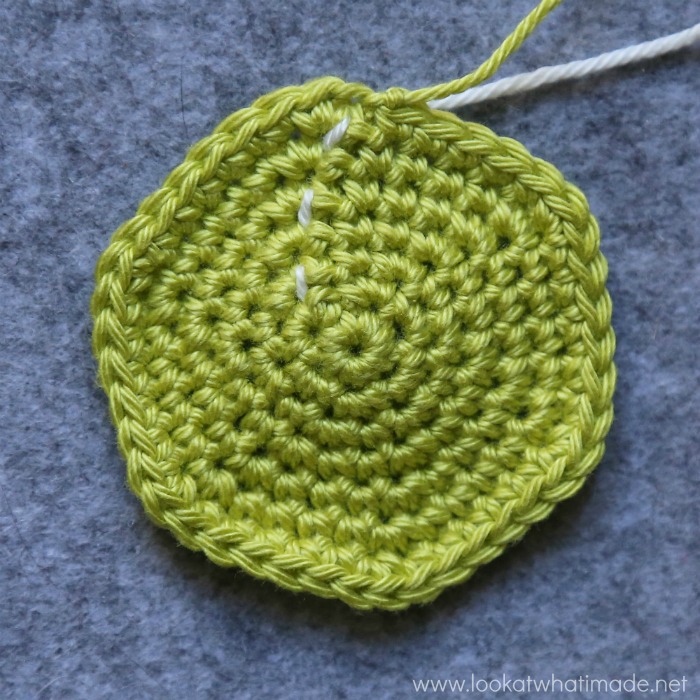
When you work in a spiral you will not have a seam at all. The Running Stitch Marker below shows you where each round started. You can see that it creeps to the right as your crochet item progresses (left, if you are left-handed). If there is a jog in this line, it is an indication that something has gone awry.
Note
You can apply this method to hdc, dc, and tr stitches. The only difference with using taller stitches in a spiral is that you may want to ‘step’ the first few stitches of the first round. For instance, when starting a dc spiral, I will often replace the first two dc with a sc and a hdc so that the change from the end of Round 1 to the start of Round 2 isn’t as abrupt.
Pros
Working in a spiral is ridiculously easy. No joining and no fussing. As long as you keep an eye on where your rounds need to start and finish, you will be fine!
Cons
The down-side to working in a spiral is that you have a bump at the beginning and the end of your work. This does not make a difference when the piece is sewn onto another piece.
Remedy
I usually just take a yarn needle and thread the initial yarn end through both remaining loops of the last chain stitch. This flattens the bump almost as if you had made a sl st.
To get rid of the bump at the end of your work, most patterns will inform you to sl st in the next st and then fasten off, making the bump less noticeable.
2. Joining in the Round: Starting in the Same Stitch as the Sl St Join
For the most part, this method is completely interchangeable with working in a spiral as the first st of each round creeps to the right in both of these methods. So, if you have a pattern that calls for joining in the round, you can just as easily ignore the sl st join at the end of each round and the ch-1 at the beginning of each round and just continue working in a spiral.
This method applies to absolutely anything that requires you to join in the round, starting each round in the same stitch as the sl st join.
An example of a pattern written for crocheting in the round in this way would be:
Ch 15. Join to the first ch with a sl st to form a ring.
Round 1: Ch 1. Sc in the same st as the sl st join. Sc in each of the next 14 sts. Join to the first sc with a sl st. {15 sc}
Round 2: Ch 1. Sc in the same st as the sl st join. Sc in each of the next 14 sts. Join to the first sc with a sl st. {15 sc}
Method
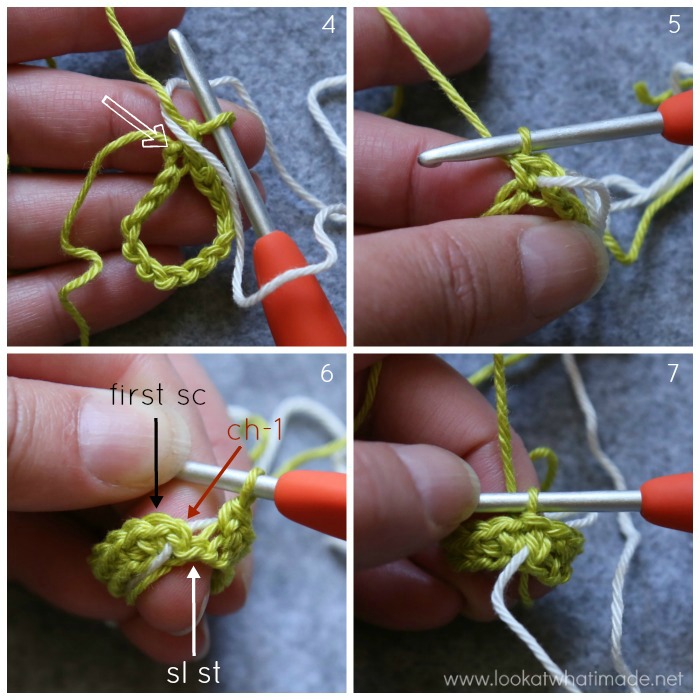
After you have worked your foundation chain {Photo 1}, insert your hook into the first ch (the one farthest away from your hook – indicated by an arrow in Photo 1 and illustrated in Photo 2) and make a sl st {Photo 3}.

Ch 1 to begin the next round. Each round will start with a ch-1 to get you up to the height you need (if you are using hdc or dc, please see the Note below). This chain stitch does not count as a stitch if you are using sc.
If you are going to use a RSM, lay it over your work after making the ch-1 but before making the first stitch of the round {Photo 4}. Now make the first sc in the same st as the sl st join {Indicated with an arrow in Photo 4 and Illustrated in Photo 5}. Continue working the rest of your stitches. When you get to end of the round, you should have what looks like one stitch left. This is not a stitch, but rather the back-end of the slip stitch join. Skip this stitch AND the initial ch-1 and join to the first st (sc) with a sl st {Photo 7}.
Photo 6 shows the sl st, ch-1, and first sc indicated with arrows.
Continue working each subsequent round in the same way, making your first st in the same st as the sl st join and skipping the sl st join and the initial ch-1 when joining at the end of the round.
Remember to flick your Running Stitch Marker backwards and forwards after each initial ch-1, taking care to note that the RSM will hide the stitch you need to work into. Pull it to the side so that you can see your stitches properly.
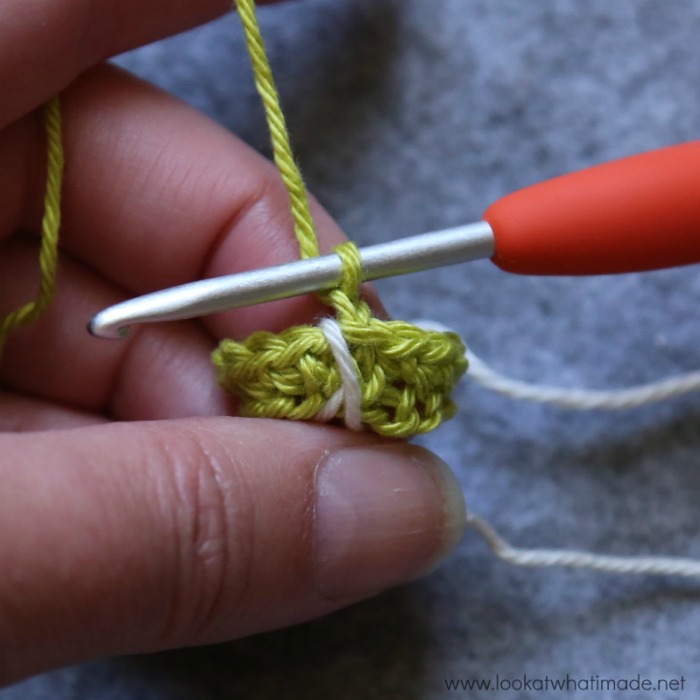
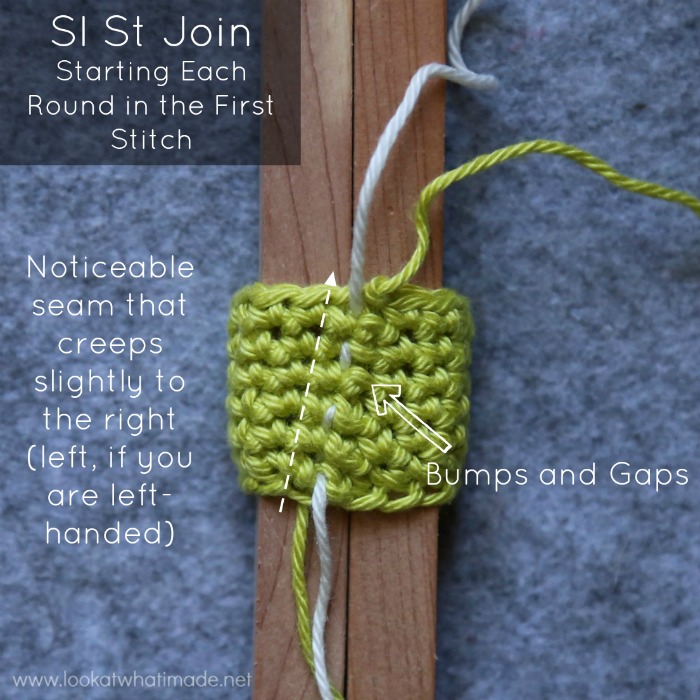
When you join in the round like this, you will get quite a visible seam that will creep slightly to the right as your item progresses. Because you are skipping the join and the initial ch-1, your seam will be gappy, with visible bumps created by the skipped sl sts.
Note
If you are using hdc or dc, you will have to consult the relevant pattern. Sometimes the starting chain doesn’t count as a st, in which case you will ignore it when joining the round. If it DOES count as a st, you will join to it when you get to the end of the round, treating it as a hdc or dc – as indicated in the relevant pattern.
My personal preference is to make my starting chain one ch shorter than it would usually be and have it not count as a stitch. For example, if I am making a dc rug, I would start with a ch-2 (usually ch-3 for dc height) and then make my first st in the same st as the ch-2. When I get to the end of the round, I would skip the sl st and the ch-2, and join to the first dc with a sl st.
Pros
Joining in the round like this makes it easy to keep track of your stitch counts. At the end of each round, you should have a st left before the st marker (this will be the joining sl st). If you don’t have a st left, or you have 2 sts left, it immediately flags up the fact that you have made an error, either in this round or in the previous one.
The start and end of the work will also be neater than when working in a spiral.
Cons
The seam is clearly visible and can be an eyesore, especially if you change colours at the end of each round.
Remedy
If you are only making a tube or something where the placement of your increases is not particularly important, you can consider using futuregirl’s method for seamless single crochet. This method involves turning the work at the end of every round though, so is only suitable for things where the placement of the increases is not important! You cannot turn your work on things like a shaped Amigurumi head unless the pattern specifically calls for the work to be turned.
If you are changing colours at the end of each round, you might want to use an Invisible Join instead of a Sl st Join. I LOVE the Invisible Join and use it wherever possible.
3. Joining in the Round: Starting in the Stitch After the Sl St Join
This is the method my granny taught me and I prefer it for various reasons. It is NOT interchangeable with the other two methods AT ALL, unless you are only working a tube or a flat circle where the placement of the increases doesn’t matter.
I use this method for my Amamani (Amigurumi Amish Puzzle Animals), specifically the rhinosaur, the elephant, the dinosaur, the horse and the giraffe.
Update 2020: For the Amamani book, I rewrote the patterns for all but the Rhinosaur and the Horse to use a spiral join instead.
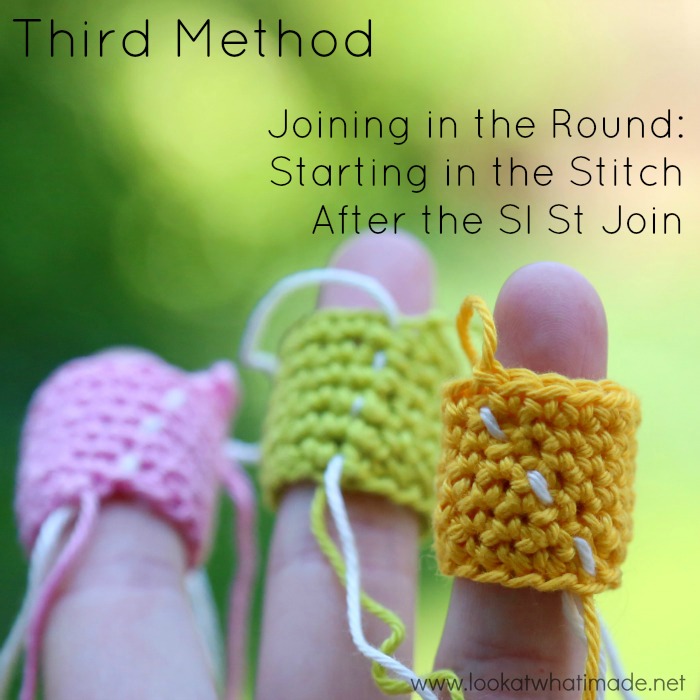 This method applies to patterns where the designer specifically expresses that the first stitch should not be worked in the same st as the sl st join. You won’t find many of those!
An example of a pattern written for this method would be:
Please note: for the purposes of this pattern, do not make your first st in the same st as the sl st join. This will mean that your last st will fall in the back end of the sl st join, which is quite tight.
Ch 15. Join to the first ch with a sl st to form a ring.
Round 1: Ch 1. Sc in the next 15 sts. Join to the first sc with a sl st. Remember that you should not make your first st in the same st as the sl st join and that your last st will fall in the back end of the sl st join. {15 sc}
Round 2: Ch 1. Sc in the next 15 sts. Join to the first sc with a sl st. {15 sc}
Method
After you have worked your foundation chain {Photo 1}, insert your hook into the first ch (the one farthest away from your hook – indicated by an arrow in Photo 1 and illustrated in Photo 2) and make a sl st {Photo 3}.

Ch 1 to begin the next round. Each round will start with a ch-1 to get you up to the height you need (if you are using hdc or dc, please see the Note below). This chain stitch does not count as a stitch if you are using sc.
If you are going to use a Running Stitch Marker, lay it over your work after making the ch-1 but before making the first stitch of the round {Photo 5}. Now make the first sc in the st AFTER the sl st join, so the first open st {Indicated with an arrow in Photo 4 and Illustrated in Photo 6}. Continue working the rest of your stitches. The last st of the round should be quite tight to get into as it is the back end of the sl st join.
Photo 7 shows the last st that you will need to work into (white arrow) as well as the initial ch-1 (red arrow) and the first sc (black arrow).
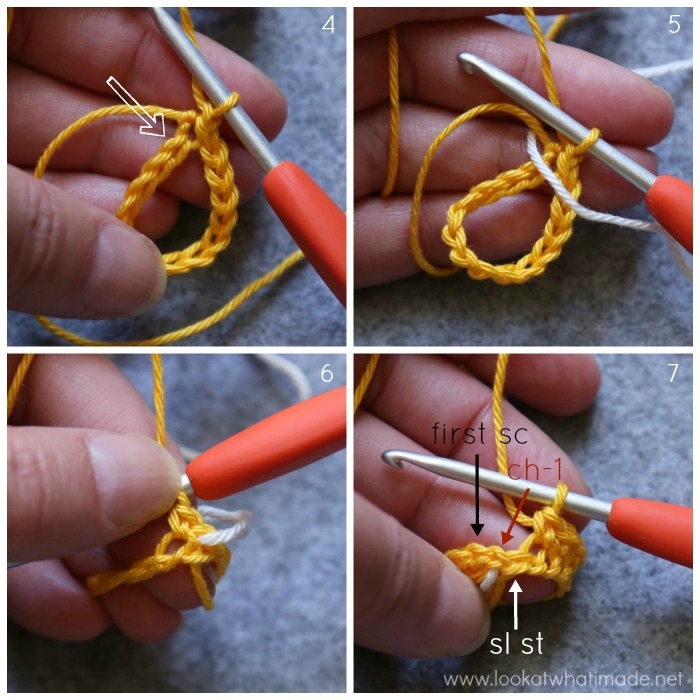
Photo 8 shows the last st of the round made into the back end of the sl st join. This will bring you to the initial ch-1 of the round, which will fall directly over the running stitch marker {Photo 8}. Skip this initial ch-1 and join to the first st (sc) with a sl st {Indicated with a black arrow in Photo 8 and Illustrated in Photo 9}.
If you are using a Running Stitch Marker, remember to flick it backwards and forwards at the beginning of each round {Photo 10}.

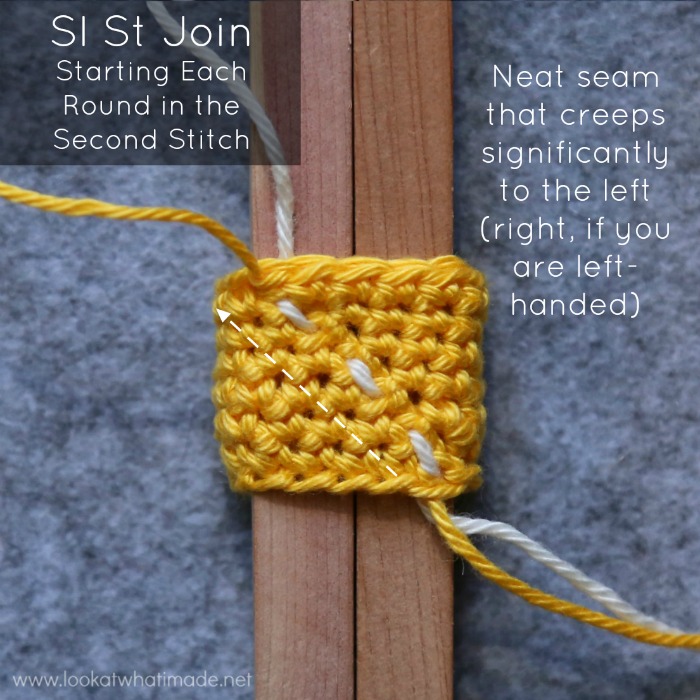
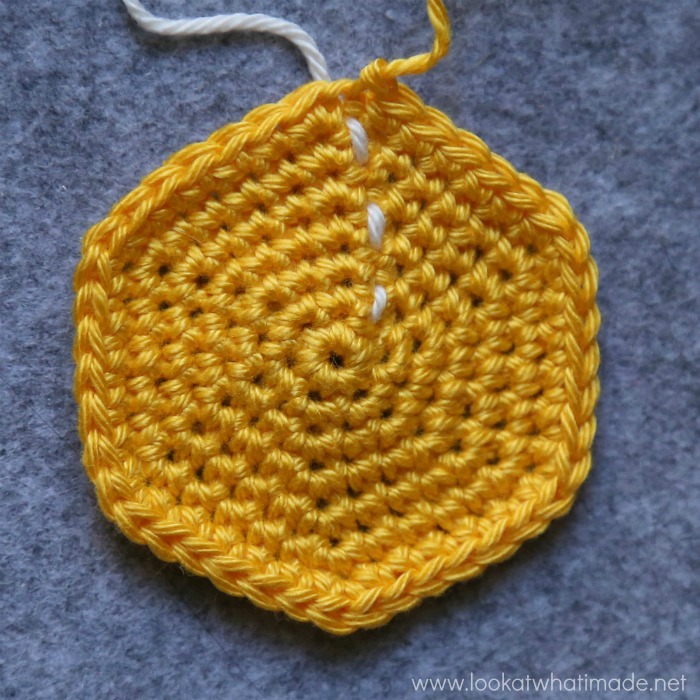
When you join in the round like this, you will end up with a seam that creeps significantly to the LEFT (right, if left-handed).
BUT
The resulting seam will be a lot neater than if you had started in the same st as the sl st join.
Note
If you are using hdc or dc, you will have to consult the relevant pattern. Sometimes the starting chain doesn’t count as a st, in which case you will ignore it when joining the round. If it DOES count as a st, you will join to it when you get to the end of the round, treating it as a hdc or dc – as indicated in the relevant pattern.
My personal preference is to make my starting chain one ch shorter than it would usually be and have it not count as a stitch. For example, if I am making a dc rug, I would start with a ch-2 (usually ch-3 for dc height) and then make my first st in the same st after the ch-2. When I get to the end of the round, I would skip the ch-2, and join to the first dc with a sl st.
Pros
Joining in the round like this is NEAT! The resulting seam is visible but smooth and not ugly.
The tightness of the last st you work into (the back end of the sl st join) acts as an extra prompt that you have indeed worked all your stitches correctly.
If the last stitch I work into is not tight, it prompts me to check all the stitches in my round. It can be indicative of a mistake in the current round or the previous one.
Cons
This method is not interchangeable with the other two methods (unless you are purely working a tube or a flat circle). Because the first stitch of every round creeps to the left in this method and to the right in the others, it will cause massive problems if you are working a shaped object like an Amigurumi head.
If a pattern is written to be worked in a spiral or calls for the first stitch to be made in the same stitch as the sl st join, using this method instead will place the increases in a completely different spot. This won’t be so noticeable on the first round, but the more rounds you have, the more your increases will be offset from where they should be.
It can get ugly very fast!
Remedy
None, unfortunately. Use this method only if a pattern calls for it specifically! Or be prepared to do a lot of maths to re-write the pattern.
Interchanging Methods
As I have already mentioned, the Spiral Technique and the First Technique for joining in the round (making your first st in the same st as the sl st join) are completely interchangeable as the first st of each round for both of these creeps steadily to the right at more or less same angle.
If you want a completely straight seam, futuregirl’s seamless single crochet tutorial offers you the best choice, but you will have to turn at the end of each round. This means that you cannot interchange this method with any of the three I mentioned UNLESS you are only working a tube (like an octopus tentacle) or a flat circle (like a coaster or a Round Rag Rug) where the position of the increases doesn’t matter as much.
My favourite by far is the Second Method for joining in the round where you make your first st in the st after the sl st join. But this method, like future girl’s method, is not interchangeable with any of the other methods if there is any shaping involved. Like I have already said, the seam for this method creeps significantly to the left. So if you used this method where any of the other methods were called for, you’ll end up with a very lopsided item. You can, however, use it in patterns where there are no increases or the placement of the increases doesn’t matter as much.
Phew! What a mouth full.
I hope you have found this tutorial helpful and would love to hear from you if you have (or even if you haven’t). Do you have a different approach to joining in the round? Or maybe you have a hint that makes working in the round easier.

This blog post contains affiliate links. I only link to products I personally use or would use. All opinions are my own.


Ana Carolina says
Dear Dedri, you can’t imagine how this tutorial was helpful to me! I was very confused and my rows was endind with more stitches than it had to, I didn’t know in wich stitch should I made the Sl St and now it’s so clear!! Thank you very much!! <3
Brilliant tutorial, excellent explanations and photos! I think I'm nor afraid of joining rounds anymore.
Dedri Uys says
Hi Ana.
I am so pleased to hear that. This is one of the things I always found tricky, so I wanted to look into it and make it clear to myself and to others.
Julie Hart says
Dear Dedri, Your tutorials for working in-the-round have taught me so much! Now however I have so many ideas floating around I can not see the solution to my problem and hope you can help! I am working on a poncho where the pattern calls for turning each round but the joining slip stitch seam is very evident traveling up the back so I changed it to working in a spiral. This stopped the necessity of turning each round and ss to join. However, I completed my first poncho and notice the front and back line where I increase, (dc-ch1-dc into the previous rows ch1 space) curves a bit and does not fall straight. I did not know about the traveling stitch marker so cannot check my if my stitch count is off. Should I resign myself to the obvious joining seam by following the pattern specifically as written or continue with the spiral or another neat joining method but using a traveling stitch marker to ensure my stitch count doesn’t get off balanced causing a wonky line down the front and back of the poncho?
Isabel Austin says
Hi Dedri. I am self-taught and have read and watched a lot, created (and undone) a ton of stuff. In trying to now explain to friends who want to learn, this is by FAR the best and most-well-written explanation. Thank you so much to you and others like you who share your amazing knowledge and uplift us all x Izzy
Dedri Uys says
Thank you, Isabel. I try my best to write clear tutorials, but there is always room for improvement, so if you have suggestions, please let me know x
Elena says
Hi Debri!
This is a great explanation! I am a beginner so really struggle when there is no explanation on how to join. I actually found this article because I was confused about a flat circle pattern. Can you do the same thing for flat circle? I think in my crochet book the author uses spiral method, but she doesn’t even mention that there are different methods. Also, I wonder if it’s better to use spiral method for single crochet, and joining with slip stitch for double etc.? Can you explain what method is best and in what stitch to join for flat circles in different kind of stitches?
Dedri Uys says
Elena, hi. You can use the same method for flat circles. Spiral works really well for single crochet, because the ‘jump’ isn’t so big when you start the second round in the first stitch of the first round. BUT you can also use it for higher stitches. To do that for dc, for example, change the first stitch of the first round to a sc. Change the second stitch of the first round to a hdc. Then continue as normal. This gives you a little slope at the start of the round so that the ‘jump’ isn’t too big. Once you have those first 2 rounds made, you won’t need to adjust again. You can just keep going in a spiral.
Eileen says
Thank you so much for posting this excellent tutorial!! I think this is going to take a lot of practice for me to get the joining-in-the-round-with-slip-stitch methods – I keep winding up with more and more stitches LOLOL!! Thanks for all the photos too – it’s going to help a lot for me remember the ‘anatomy’ of that joining/sl st/ch st/first st section. Thanks again!
Dedri Uys says
You are welcome. I used to end up with more and more stitches as well, which is why I started paying very close attention to what my stitches actually looked like :)
Geri ellen says
Hi. What do you mean by fling the stitch marker back and forth?
Dedri Uys says
If you place a piece of scrap yarn over your work before making the first stitch, it will get ‘trapped’ by the stitch. In the next round you will take one of the ends of the piece of yarn and lay it over your work again, so that it gets trapped again by the next stitch. In the next round, you will place it over your work again…in this way you are creating a running stitch with it that will lead up your work and mark the first stitch of each round. The scrap yarn can be pulled out when you are done. You can see what it will look like if you have a look at the photo tutorials.
Maggie Lewin says
Dedri again you are a life saver! I have been trying to make socks and was inadvertently using your method 3! Now I compare I can see it meant method 1. I have tried to fudge it with little joy. Your photos have made it so clear. Thanks a billion
Dedri Uys says
I’m so glad you found this post helpful, Maggie. I used to get so confused about joining methods. It helps when you know the anatomy of your stitches. Have you had a look at the Elusive Hidden Stitch post?
Ricki Lieberman says
this just blows my mine! It was so good but confusing for a beginner crocheted. I am working on coffee cozes. She said to chain 33 and connect with a ss st. And continue going around in the spiral method. I don’t like the bump at the beginning and at the end. It’s hard to keep the first row from twisting a being grossy different. It’s like the first row is not even what do you reccomended. I liked when you said to use one method with the ch 1 at the beginning, but not for every row. Is that possible? Help? I am on Pinterest but I will check here for an answer. Will it be in my e mail or on your site.
Dedri Uys says
Hi Ricki,
It is possible. Instead of working in a spiral, just join to the first stitch with a sl st. Then ch 1 and make your first stitch of the round in the same stitch as you made the slip stitch into. When you have made all your stitches of the round, join to the first stitch (not the chain) with a sl st. You never work into the chain. If you get confused, take a stitch marker or a piece of scrap yarn and mark the first stitch of the round so that you know which stitch to join into.
Once you have joined with a slip stitch, ch 1 and make the first stitch of the next round in the same stitch you just made the sl st into. When you have made all the stitches of the round, join to the first stitch (not the chain 1) with a sl st. You repeat this for every round.
I hope that helps.
Ricki Lieberman says
Hi thank you for such a great answer I just need clarification on one thing… First round you ss,ch1, sc in the ch1 stitch. Do you do this for every round or if you use a stitch marker do you just keep going around and start in the 1st st each round as the pattern calls for? I am making coffee coozies for everyone at Dialysis. After my husband died after 40 years of marriage, we were both needlepointers. I couldn’t do it anymore. I developed a bad blood infection and I was in the hospital for 5 months. I lost the ability to walk and I lost the use of my kidneys. I have been on Dialysis for 1 year. I taught myself to crochet. I LOVE iT! But I am still very new at this. Thanks for all your help! I will look everyday for your answer. I will be following Look What I Made! Ricki Lieberman
Jen says
Wow thank you so much for this. Best explanation ever!
Charlene Boardman says
Thank you so very much for a simple explanation. I’m sharing this on my blog as I think it is invaluable!
Dedri Uys says
Thank you, Charlene :)
Nina says
Such a headache-saving blog post!! xx
Michelle says
Incredibly helpful, thank you. I don’t know anyone IRL who crochets so am learning all of this stuff online, I’ve got the basics down but sometimes there are things like this that I didn’t even know needed learning!
Dana @ Whisks & Words says
I stumbled on your blog this morning while looking for help on crocheting in the round. I wrestled with a cuff for 2.5 hours last night before giving up, and your blog post today helped clarify things for me, and I’m happy to say that, using your method, I just completed the cuff, at last! So thank you for this great tutorial – I’ll return to it again and again!
Dedri Uys says
Dana, thank you very much for your comment. It has brightened my evening up tremendously!
Renee says
Great information!!! Thanks for posting this!!
Regina says
Using the 2nd method (starting in the same st as the sl st join) do you count the slip stitch as a stitch in the round? The pattern I’m working calls for 18 sts to complete each rnd. Is the sl st one of those 18?
Thanks!
Dedri Uys says
Hi Regina. It depends on what the designer has stipulated. If nothing has been said about the sl st’s, this is the general rule:
If a round has 18 st’s, that will be 18 st’s NOT COUNTING the sl st (as the sl st in just a join). It is true that by joining to one st with a sl st and then not counting the sl st it sounds like you are losing a st, but because you then make your first stitch in the same st that you joined to, you still have 18 st’s. When you get to the end of the round using this method, you will skip the back end of the sl st join (because it is NOT a stitch) AND the initial ch st (because that too doesn’t count as a stitch).
I get a little confused myself sometimes with which stitch is which. Using a running stitch marker really helps as it forms a little horizontal bar over the stitch marker, making it easy to identify and skip.
I hope that has answered your question as I wasn’t exactly sure if you meant “should I work into it” or “is it one of the 18” (so 17 + sl st – which it isn’t).
Please let me know if my answer doesn’t make sense and I will drop you an email.
Dedri
I hope
Sylvia says
Hi Dedri, thanks so much for this post! I was getting so confused and frustrated during my last project that in between crocheting, I was researching which “how to crochet” book to buy just to get this info that you shared here! Thank you!
Dedri Uys says
I am so pleased that you found it useful!
Ashley says
I can’t remember the source but a tip I found said when (joining in the round-starting in the stitch after the sl st join) you make your slip stitch then pull the yarn so that your sl st just almost disappears and continue on as normal. It doesn’t completely get rid of the seam leaning but it does improve it
Dedri Uys says
Thank you, Ashley. In this case that would be a bad thing, as you need to work into the back end of the sl st if you start in the stitch after the join, because the sl st then counts as a stitch. If you pull it tightly, you won’t be able to get into it.
If you intend to work in a spiral from that point on, however, this is an excellent idea!
Lissa Brooks says
This post has been very helpful for me. I always end up with extra stitches at the ends of rounds because a lot of patterns don’t specify which method to use and the instructions aren’t clear where the first stitch of the round should be. I end up counting stitches every round just to make sure they match the number I should have.
Dedri Uys says
Lissa, I am so pleased that you have found this tutorial helpful.
If you are making something like a beanie, it doesn’t matter in which stitch you start, as long as you keep count and don’t work into the first (containing the ch st’s) AND last (back end of sl st join) st’s. Does that make sense?
For something like amigurumi that has shaping, it DOES matter and if the pattern doesn’t specify which stitch to start in, feel free to contact the designer and just double-check with them. I am sure they won’t mind as they would much rather you get it right than end up with a wonky toy.
Have a great day!
Dedri
Brigitte says
Thanks for the great explanation! I was wondering how you would work a spiral around a foundation chain so you can end up with a tetrahedron shaped triangle?
Dedri Uys says
What a question! I would say that you’d need to increase on one side of the foundation chain by 2 in every round and decrease on the other side by an equal amount. But it would be much MUCH easier to crochet a triangle (the size you want for your base) and then crochet around all 3 sides, decreasing on each of the 3 corners in each round. I wouldn’t work around the foundation chain for a tetrahedron. Give me a couple of days and I’ll see what I can come up with x
DeeAnn says
Me, too!. Thank you so much!
Patty says
This is the first explanation I’ve found that clearly demonstrates the differences between the joining methods. Thank you so very much.
Dedri Uys says
Thank you, Patty.