Welcome to Part 5 of Charlotte’s Universe. Did you enjoy making the Forget-Me-Nots last week? I loved seeing them pop up in all the different colours.
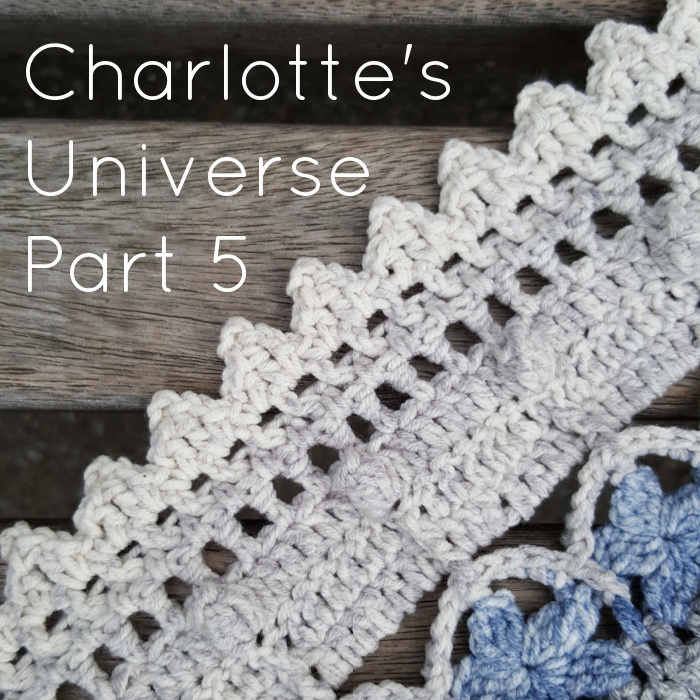
This week, we are painting a whimsical story. We start off by making little arches to frame the flowers. Then we plant some tulips, followed by a white picket fence beyond which the ocean lies choppy and stormy. This is our imaginary garden by the seaside. In the photo above, the little triangles are light grey. They didn’t sing ‘Seaside’ to me, so I changed the little choppy waves to blue.
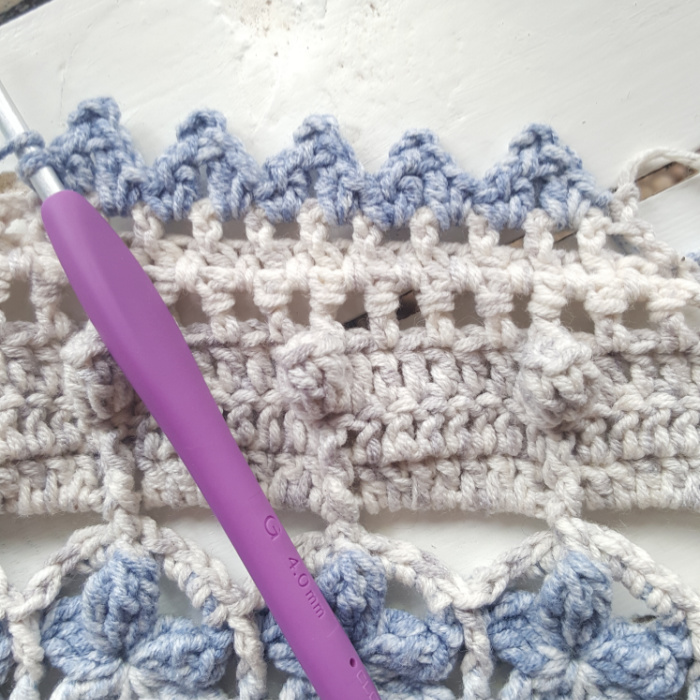
It is only fitting, then, that I took the majority of this week’s photos at Whipsiderry beach last Monday. I have to say that it was my least organised photo session ever. Every time I put my whiteboard down to take some photos, one or all of the following would happen:
- A Gust of Wind – There goes board and crochet work
- A Gust of Wind With Sand – OUCHY ouch ouch, also work and board covered in sand
- Digging Puppy – Sand everywhere
- Wet Puppy – Wet AND sand everywhere
- Sneaky Puppies – there goes work and board in different directions!!!
Add to that every possible season known to man in quick succession, and I pretty much gave up trying to take photos. But what a lovely day!!! So as you make your little waves, pretend that you are sitting on your favourite beach, and view them as a little reward for finishing one side.
Charlotte’s Universe Part 5: Triangles Part 1
Resources
- You can find links to the right and left-handed video tutorials (US) for Part 5 HERE on It’s All in a Nutshell.
- Add this pattern to your Ravelry Queue.
Translations
- Dutch Information and Links by Dianne Baan
- German Translation – by Sabi Bulla and Silke Schippa-Witte
- Hebrew Translation by Michal Ben-Hur, Iris Fait, Tami Sultan Nudelman, Tali Shchori, and Sarit Grinberg
- Japanese Information and Links by Masako Kawahara
- Swedish Translation by Åza Karlsson and Ulrika Larsson
Abbreviations and Special Stitches
Please see Special Stitches and Techniques (worth bookmarking or saving as a PDF as we go forward – Take a look at THIS TUTORIAL if you don’t know how to use the print-friendly button).
Charts
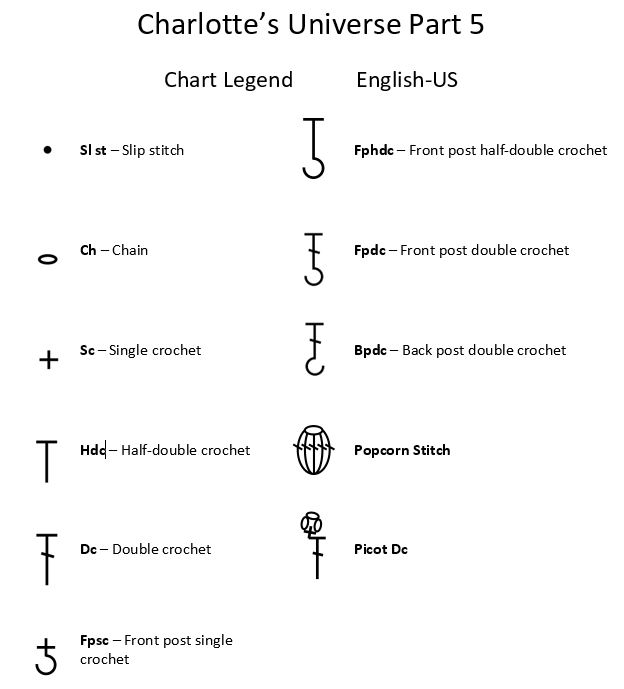
Credit: Masako Kawahara from Crochet_Hmmm
Please follow the charts in a counter-clockwise direction, regardless of whether you are right or left-handed.
Colours Per Row
Vintage and Sunshine
Follow the colour reference next to each round title {for example, Round 1 (Colour A)}.
- Vintage Charlotte
- Sunshine Charlotte
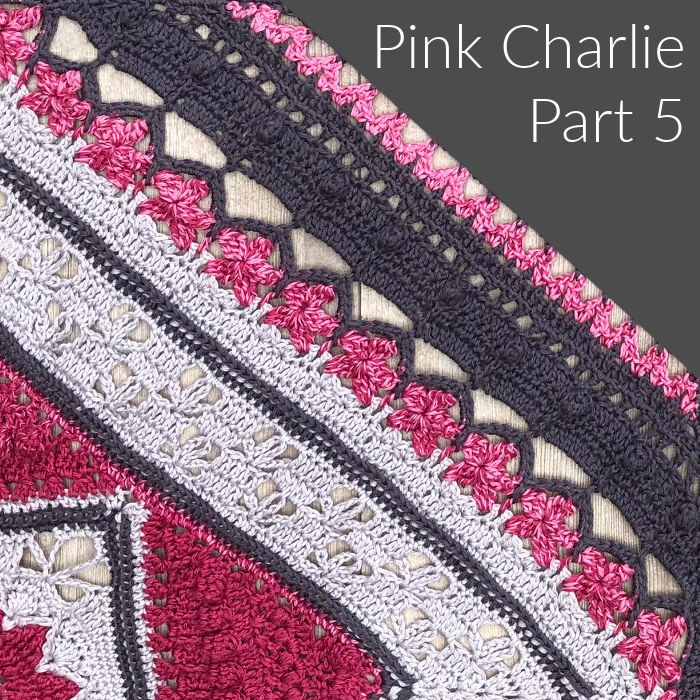
Pink Charlie
- Rows 43 – 50 – C
- Row 51 – A
Bonus Colourways
- Sunflower Charlotte – Michael Wassenaar (Chunky Monkey)
- Space for Grace – Sabi Bulla (Skies Light)
- Latte With Love – Jenny Lowman (Scheepjes Softfun)
Esther Dijkstra will be sharing her Scheepjes Stonewashed Colours Per Round HERE.
Important Note
The photos, charts, and videos are your friends. If you are in any doubt as to the placement of a stitch or a skipped stitch, take a moment and consult them. Remember that the ch-3 that starts most rounds counts as a dc. Have fun!!
Instructions
© Dedri Uys and Scheepjes 2021. All Rights Reserved.
In this part, we will start making corner triangles again. This will rotate the central square by 90 degrees. We will complete the triangles in Part 6. At the end of this part, you will have an octagon(ish) shape.
Row 43 (Colour A) – Arches
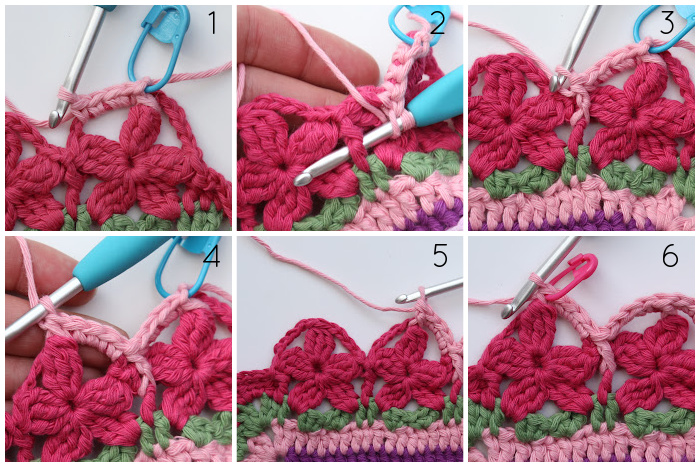
With RS facing, join your yarn by making a FPsc around the second (marked) 3-tr Bobble of any side. Mark this FPsc with a SM to help you identify it in the next row. (Make 4 sc in the next ch-5 sp {Photo 1}. FPdc around the next dc from Round 41, two rounds down {Photos 2 and 3}. Make 4 sc in the next ch-4 sp. FPhdc around the next central 3-tr Bobble {Photo 4}) 10 times. There should now be one flower left {Photo 5}. Make 4 sc in the next ch-5 sp. FPdc around the next dc from Round 41. Make 4 sc in the next ch-4 sp. FPsc around the last central 3-tr Bobble {Photo 6}. Mark this FPsc with a SM to help you identify it in Row 45. TURN.
Stitch Count: 111 sts {88 sc, 2 FPsc, 10 FPhdc and 11 FPdc}

Row 44 (Colour A) – Chains
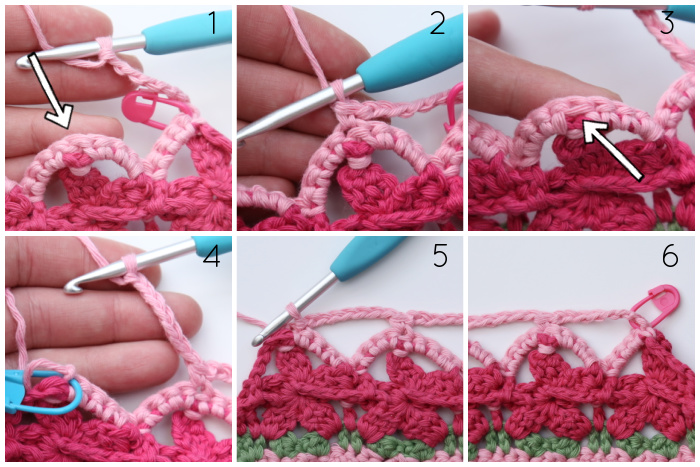
With WS facing, (Ch 7, sc in the next FPhdc) 10 times. You will recognize the FPhdc by the loop at the back {Photos 1 – 3}. Ch 7 and sl st into the next (marked) FPsc {Photos 4 and 5}. Remove the SM. TURN.
Photos 5 and 6 show the beginning and the end of Row 44 before turning.
Stitch Count: 10 sc and 11 ch-7 sps (not including last sl st)

Row 45 (Colour A)
The 7 dc made into the ch-7 sps won’t take up all the space. Either make sure that you space them evenly when making them, or move them along with your fingers once done. Tedious, I know, but necessary.
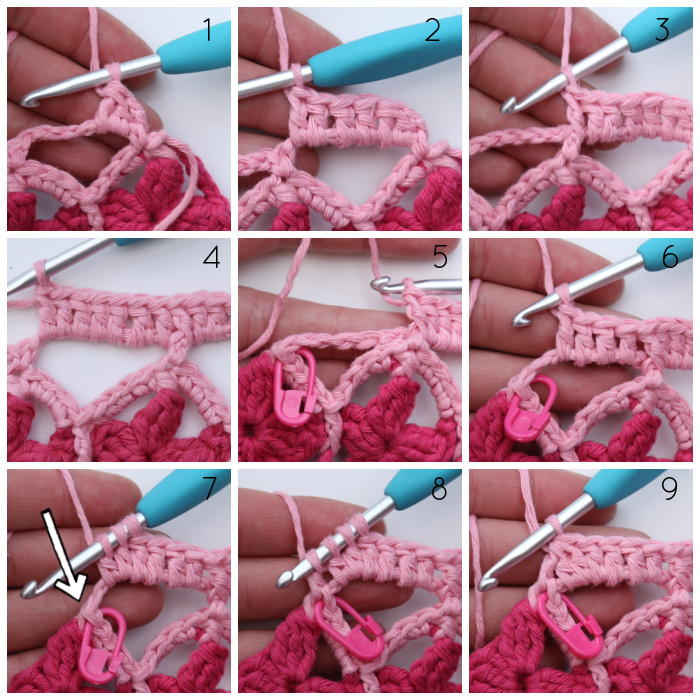
With RS facing, ch 2, dc2tog in the next ch-7 sp. This counts as your first 3-dc Cluster {Photo 1}. Make 4 dc in the same ch-7 sp {Photo 2}. (FPdc around the next sc {Photo 3}, make 7 dc in the next ch-7 sp {Photo 4}) 9 times. FPdc around the next sc {Photo 5}. Make 4 dc in the last ch-7 sp {Photo 6}. Make a 3-dc Cluster, placing 2 of the ‘legs’ in the last ch-7 sp, and the last ‘leg’ in the (marked) FPsc from Row 43 {Photos 7 – 9}. Remove the SM. TURN.
Stitch Count: 83 sts {2 Clusters, 71 dc, and 10 FPdc}

Row 46 (Colour A)
When you make the BPdc in this row, remember that you will skip the top of the stitch when you work around the post.
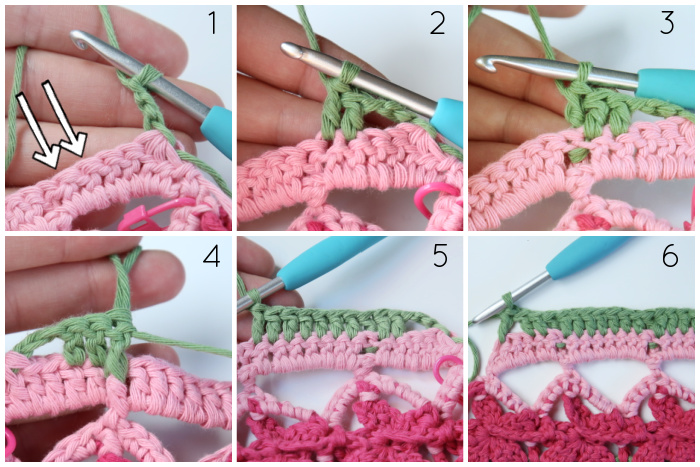
With WS facing, ch 3. Skip the next 2 sts. Dc in the next 2 sts {Indicated with arrows in Photo 1 and illustrated in Photo 2}. (BPdc around the next st, which will be the FPdc from the previous row {Photos 3 and 4 illustrates what this should look like from the WS and the RS of your work}. Dc in the next 7 sts {Photo 5}) 9 times. BPdc around the next st. Dc in the next 2 sts. Skip the next 2 sts and make a dc in the Cluster {Photo 6}. TURN.
Stitch Count: 79 sts {69 dc and 10 BPdc}

Row 47 (Colour A)
With RS facing, ch 3. Skip the next 2 sts. (Make a Popcorn in the next st, which should be the BPdc from the previous row. Dc in the next 7 sts {Photo 1}) 9 times. Make a Popcorn in the next st. Skip the next 2 sts and make a dc in the top of the beg ch-3 {Photo 2}. TURN.
Stitch Count: 75 sts {10 Popcorns and 65 dc}
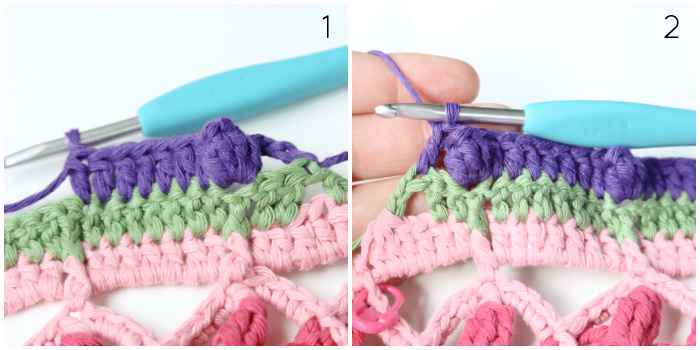

Row 48 (Colour A)
You will be making BPdc sts around the Popcorns. To do that, insert your hook from back to front and then from front to back around the Popcorn and complete a dc as normal {Photos 2 and 3}.
With WS facing, ch 3. Skip the next 2 sts, which will be the Popcorn and the next dc. *(Dc in the next st, ch 1 and skip the next st) 3 times {Photo 1}. BPdc around the next Popcorn, ch 1 and skip the next st.*
Repeat from * to * 7 more times. (Dc in the next st, ch 1 and skip the next st) twice. Dc in the next st. Skip the next 2 sts and make a dc in the top of the beg ch-3 {Photo 4}. TURN.
Stitch Count: 29 dc, 8 BPdc, and 34 ch-1 sps
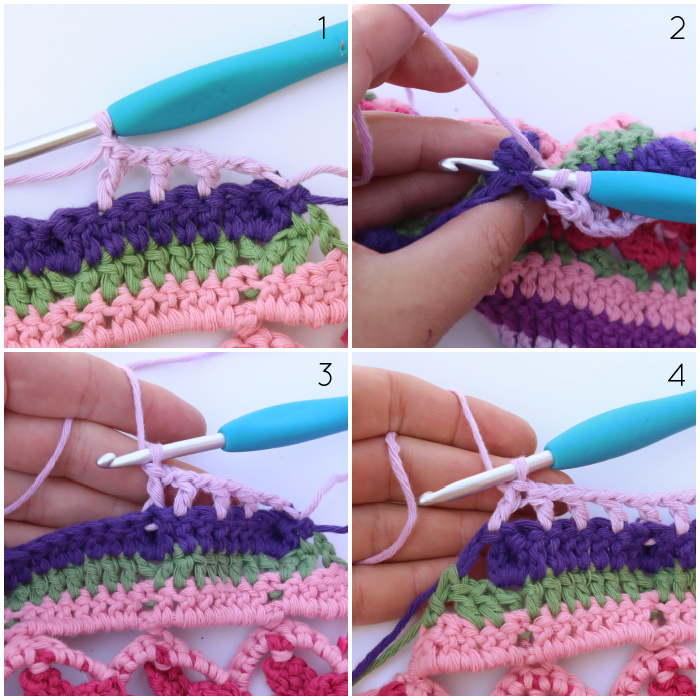

Row 49 (Colour A)
With RS facing, ch 3. Skip the next st and the first ch-1 sp. (BPdc around the next st, hdc in the next ch-1 sp) 32 times. BPdc around the next st. Skip the last ch-1 sp and the next st. Dc in the top of the beg ch-3. TURN.
Stitch Count: 67 st {33 BPdc, 2 dc, and 32 hdc}
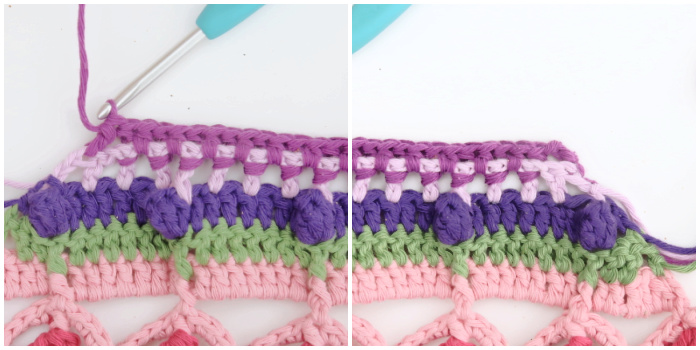

Row 50 (Colour A)
With WS facing, ch 3. Skip the next 2 sts, which will be the BPdc and the hdc. (BPdc around the next BPdc, ch 1 and skip the next hdc) 30 times. BPdc around the next BPdc. Skip the next 2 sts and dc in the top of the beg ch-3. Fasten off and TURN.
Stitch Count: 31 BPdc, 2 dc, and 30 ch-1 sps
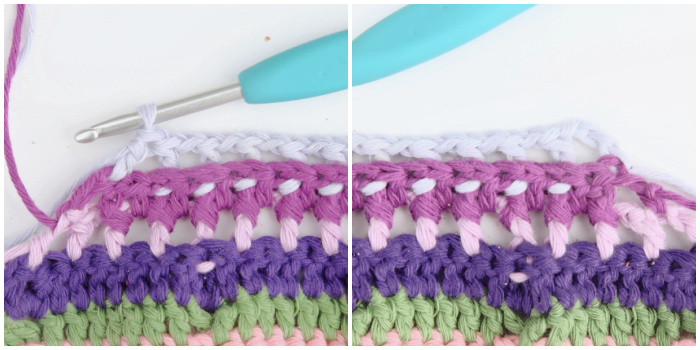

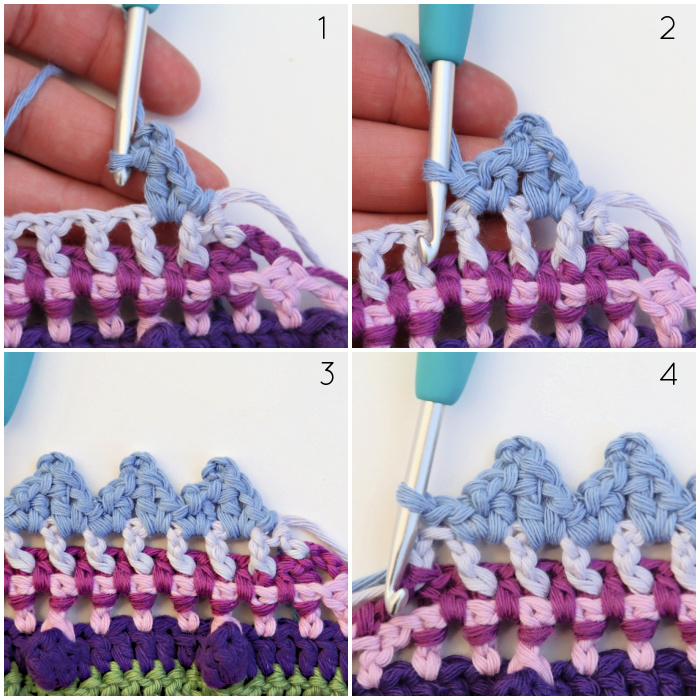
Row 51 (Colour B) – Triangles
In this row, you will be making little Triangles.
With RS facing, join your yarn by making a sl st in the first dc. Skip the next st. ([Sc, ch 1, Picot Dc] in the next ch-1 sp {Photo 1}. [Dc, ch 1, sc] in the next ch-1 sp {Photo 2}) 15 times. Skip the next dc and make a sl st in the top of the beg ch-3 {Photo 4}. Fasten off and TURN.
Stitch Count: 15 Triangles {each consisting of 2 sc, 1 dc, 1 Picot Dc, and 2 ch-1 sps}

When you get to the end of Row 51, you will have completed the first part of one triangle. You will need to repeat Rows 43 to 51 for each side of the Part-4 square so that you end up with an octagon(ish) shape.
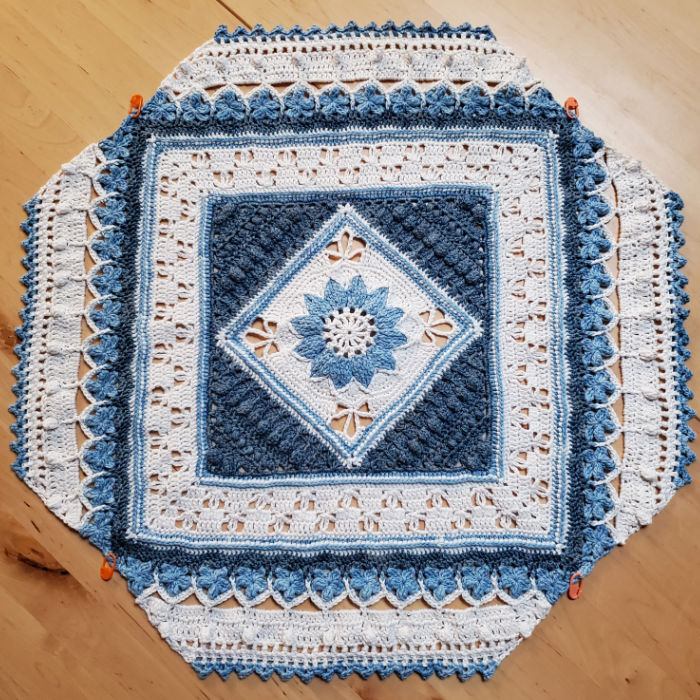
Photo Credit: Sabi Bulla – Space for Grace Colourway – Scheepjes Skies Light
There you go. How was that? After the flowers from last week, I am sure this week was a breeze. Although… I often find that the simple rounds cause the most confusion!
Please remember to share your photos and stories with us. Brownie Points if you manage to work some scenery in there!

This blog post contains affiliate links. I only link to products I personally use or would use. All opinions are my own.


Marie Hellier says
Hi, just wondering where the second DC is in row 49? I can only see one.
Jenny Lowman says
Hi! The first chain three counts as one dc :)
Trilby says
I love this and I’m having fun creating it but would really like a complete printed copy, even if it costs. Can you please direct me to one?
Jenny Lowman says
We don’t have a complete printable version of the pattern I am afraid. You may be able to create one using the Print Friendly pdf option at the bottom of each part, after Dedri’s signature.
Sherry says
In part 5, row 43, how does the sc stitches equal to 88, no matter how I count it’s 96 plus 2 fpsc is 98, please help.
Jenny Lowman says
Hi Sherry.
You should have 22 sides of arches above the 12 flowers to make your 4sc in to, which adds up to 88sc.
Kathy says
The above picture with pink mauve white and blue colour what colour way is she using
Jenny Lowman says
Those were just random yarns chosen for the photos. It wasn’t a set colour way :)
Jennifer says
When is part 6 coming out? I’m itchin to stitch.
Jenny Lowman says
Each part comes out on Sundays at approximately 10am UK time.
Kelly says
Hi . Thanks for this beautiful pattern . Do we have to wait for each part every week?. Just finished part 5
Jenny Lowman says
Hi Kelly. Yes, this is a Crochet A Long, so parts are published each week. We hope you are enjoying this!
Mart-Mari says
Hi Dedri
I am loving Charlotttes Universe. Thank you for all the work you did in designing it!!Any chance in designing crochet tops in the future?
Jenny Lowman says
Never say never! Dedri is always full of surprises!