Welcome to Part 4 of Charlotte’s Universe. Up until this point, the pattern has been familiar and/or known to some of you as the Large Charlotte Square I designed back in 2016. From Part 4, however, we are entering uncharted territory.
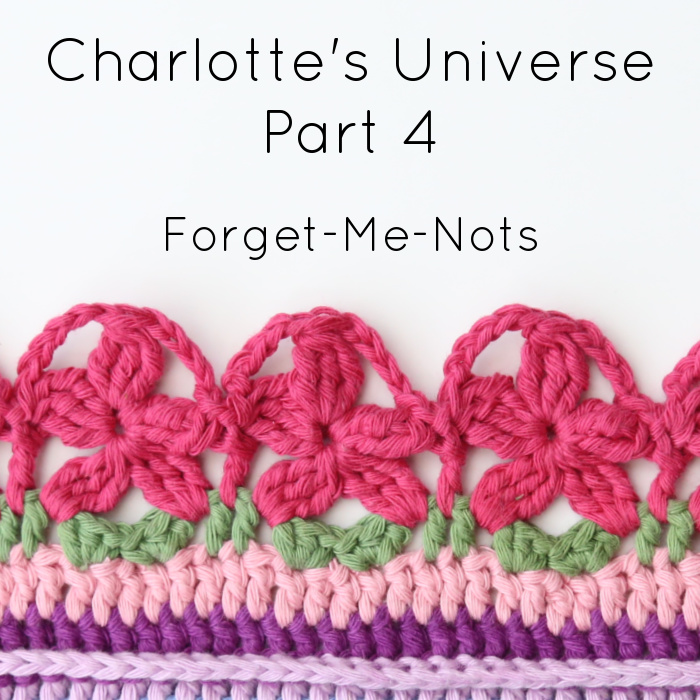
This week we will be making pretty little flowers. I think they look like Forget-Me-Nots, so that is what I’ve called them 🙂
The flower rounds are wordy, but once you get into the swing of making the flowers, you’ll be whizzing along. Next week, we’ll frame these little beauties and create what I affectionately call the Flower Arches. This is by far my favourite part of the pattern. It took days and days of figuring out and frogging… and just like with the Sophie Roses, I was quite giddy when I finally got them to work.
For the Part 4 Photo Tutorial, I will be using Softfun Aquarel and Cahlista. I had initially wanted to use this yarn for all the photos, but, gorgeous as it is, it is hard to see stitch definition with Aquarel. All those beautiful speckles and the subtle changes in colour!
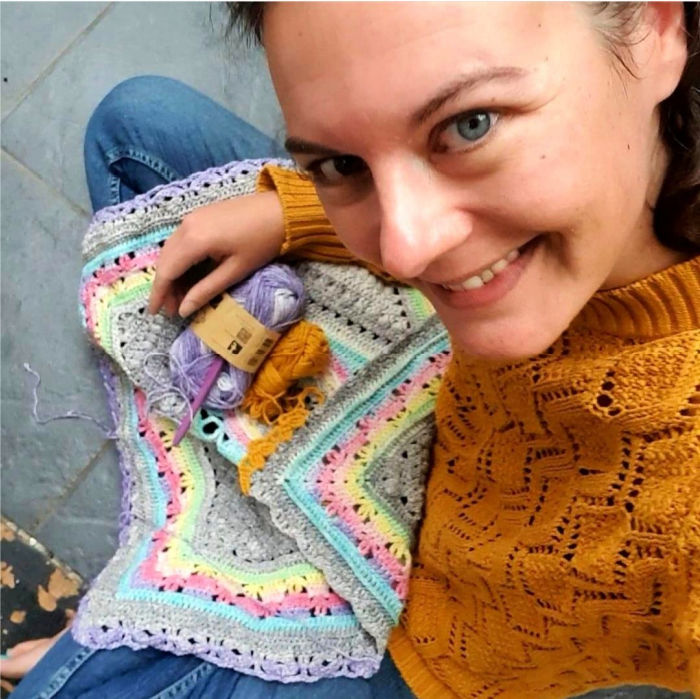
So, for the tricky rounds, I’ve used Cahlista, which has awesome stitch definition. I’m very tempted to explore using different yarns each week so that you can see how they work up.
Housekeeping: I have noticed that some people get confused when I use different yarns/colours to those specified in the pattern (or when Esther uses different yarn/colours in the videos). In a finished blanket, it is not necessary for you to see every single stitch with crystal clarity. When I am taking photos to demonstrate stitch placement, it’s a completely different matter. I need the photos to be as clear and unambiguous as possible, so I will often use different yarns and/or contrasting colours so that you can clearly see which stitch goes where and how different rounds interact with each other (especially important if you want to change colours randomly and you’re not sure how the rounds will play together in different colours).
When you are making your blanket, please follow the Colours Per Round for your chosen colourway. If you need help with this, or you need a more wordy explanation, please leave a comment here or in the Facebook Group.
Righto. On your marks… Get set… GO!
Charlotte’s Universe Part 4: Forget-Me-Nots
Resources
- You can find links to the right and left-handed video tutorials (US) for Part 4 HERE on It’s All in a Nutshell.
- Add this pattern to your Ravelry Queue.
Translations
- Dutch Information and Links by Dianne Baan
- German Translation – by Sabi Bulla and Silke Schippa-Witte
- Hebrew Translation by Michal Ben-Hur, Iris Fait, Tami Sultan Nudelman, Tali Shchori, and Sarit Grinberg
- Japanese Information and Links by Masako Kawahara
- Swedish Translation by Åza Karlsson and Ulrika Larsson
Abbreviations and Special Stitches
Please see Special Stitches and Techniques (worth bookmarking or saving as a PDF as we go forward – Take a look at THIS TUTORIAL if you don’t know how to use the print-friendly button).
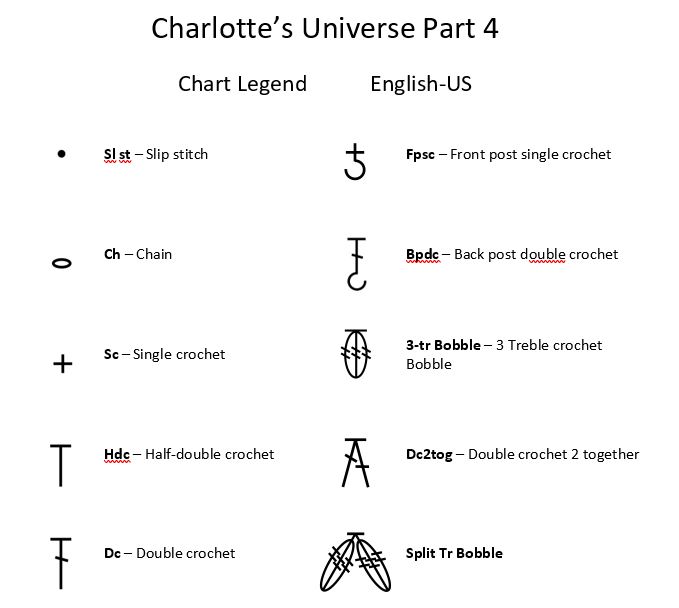
Charts
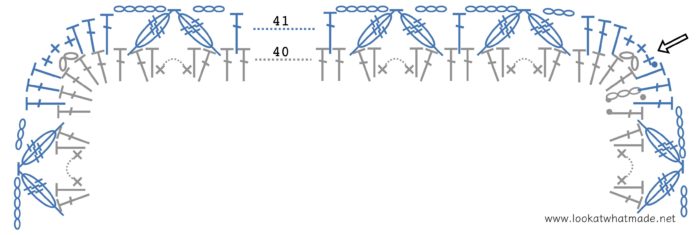
Credit: Masako Kawahara from Crochet_Hmmm
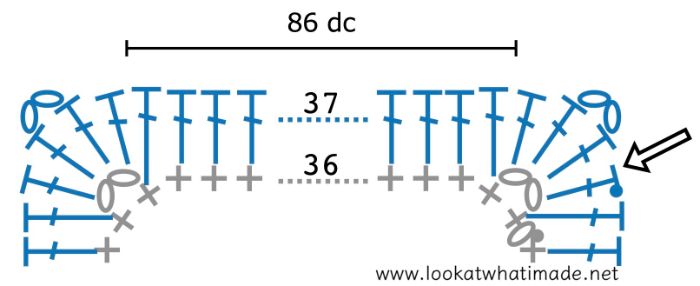
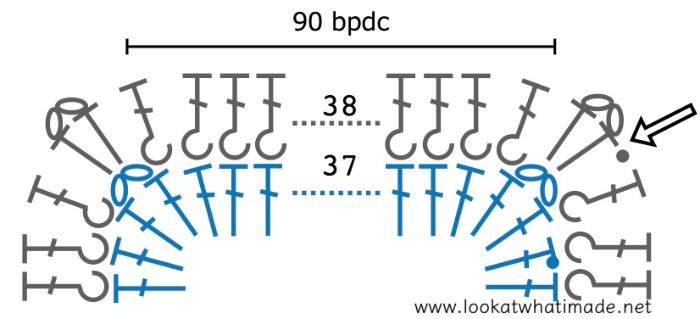
Please follow the charts in a counter-clockwise direction, regardless of whether you are right or left-handed.
Colours Per Round
Vintage and Sunshine
Follow the colour reference next to each round title {for example, Round 1 (Colour A)}.
- Vintage
- Sunshine
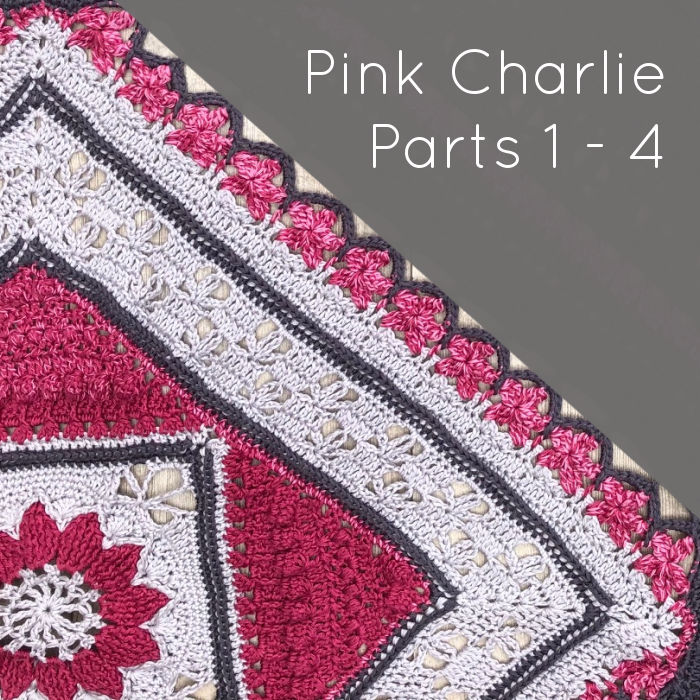
Pink Charlie
- Round 37 – C
- Round 38 – B
- Round 39 – B
- Round 40 – B
- Round 41 – A
- Round 42 – A
Bonus Colourways
- Sunflower Charlotte – Michael Wassenaar (Chunky Monkey)
- Space for Grace – Sabi Bulla (Skies Light)
- Latte With Love – Jenny Lowman (Scheepjes Softfun)
Esther Dijkstra will be sharing her Scheepjes Stonewashed Colours Per Round HERE.
Instructions
© Dedri Uys and Scheepjes 2021. All Rights Reserved.
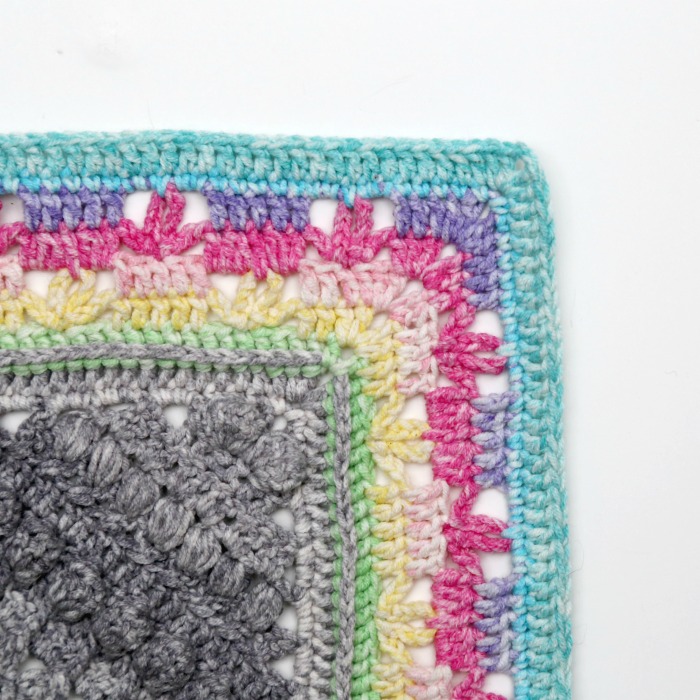
Round 37 (Colour B)
Join your yarn by making a standing dc in any ch-2 corner sp. (Dc, ch 2, 2 dc) in the same sp. This is your first corner made.
*Dc in each of the 86 sts across. (2 dc, ch 2, 2 dc) in the next ch-2 corner sp.* Repeat from * to * 3 more times, omitting the last corner on the last repeat. Join to the first dc with a sl st. Fasten off and work away your ends.
Stitch Count Per Side: 90 dc – not including ch-2 corner sps
Round 38 (Colour A)
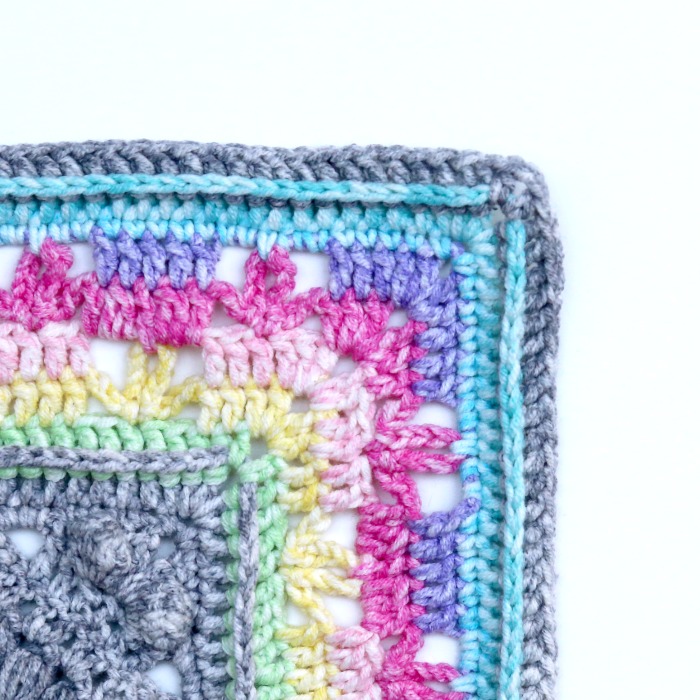
Join your yarn by making a standing hdc in any ch-2 corner sp. (Ch 2, hdc) in the same sp. This is your first corner made.
*BPdc in each of the 90 sts across. (Hdc, ch 2, hdc) in the next ch-2 corner sp.* Repeat from * to * 3 more times, omitting the last corner on the last repeat. Join to the first hdc with a sl st. Fasten off and work away your ends.
Stitch Count Per Side: 90 BPdc and 2 hdc – not including ch-2 corner sps
Round 39 (Colour C)
Join your yarn by making a standing dc in any ch-2 corner sp. (Dc, ch 2, 2 dc) in the same sp. This is your first corner made.
*Dc in each of the 92 sts across. Don’t accidentally skip that first (hidden) st, which will be tricky to get into. (2 dc, ch 2, 2 dc) in the next ch-2 corner sp.* Repeat from * to * 3 more times, omitting the last corner on the last repeat. Join to the first dc with a sl st.
Stitch Count Per Side: 96 dc per side – not including ch-2 corner sps
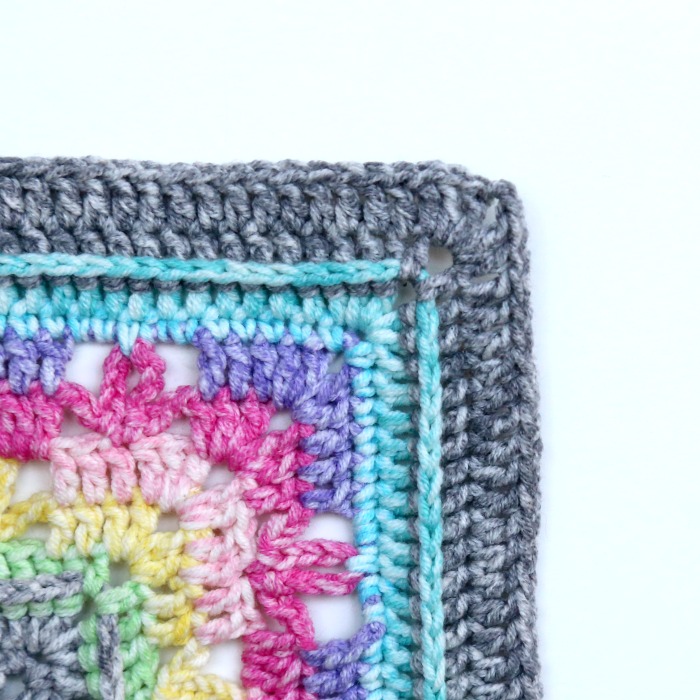
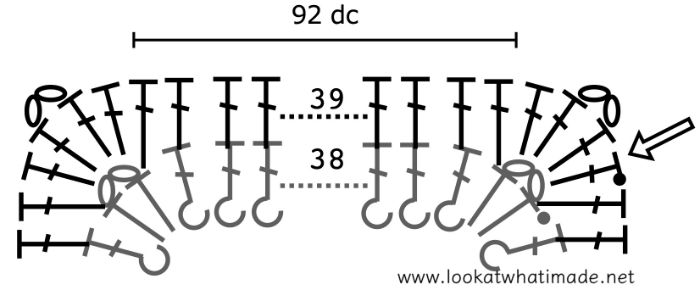
Round 40 (Colour C)
You will need to concentrate in this round. It is not a hard round, but you do need to focus when doing each repeat. And count at the end!
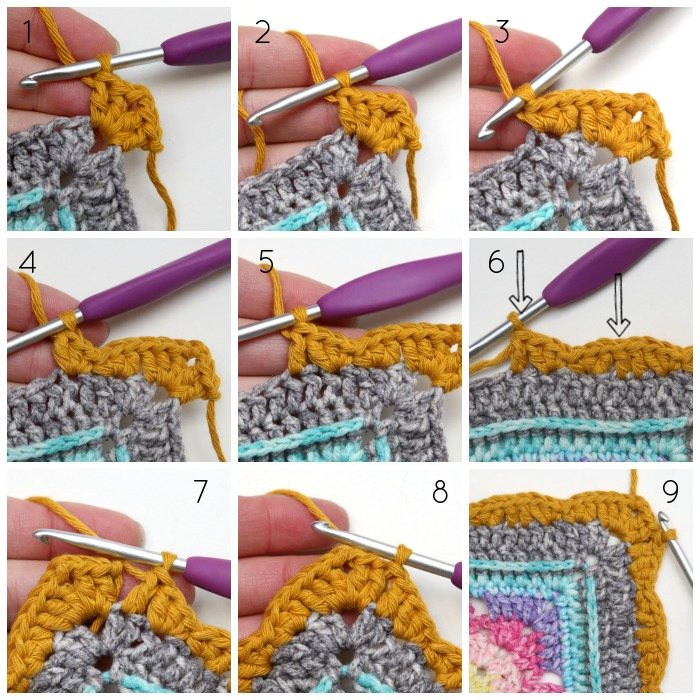
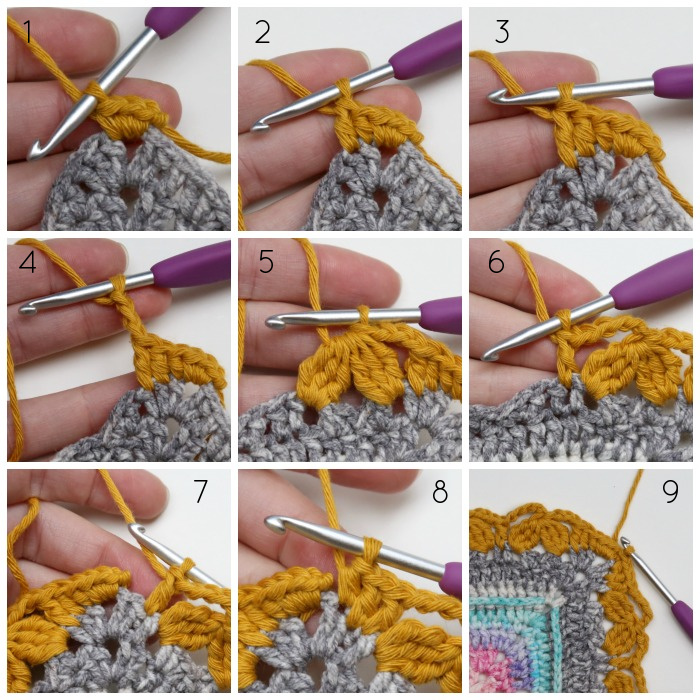
Sl st into the next dc and into the ch-2 corner sp. (Ch 3, dc, ch 2, 2 dc) in the same ch-2 corner sp. This is your first corner made {Photo 1}.
*Dc in the first (hidden) st {Photo 2}. Skip the next st. [Dc, hdc, sc] in the next st {Photo 3}. Skip the next 2 sts. [Sc, hdc, dc] in the next st {Photo 4}. Skip the next st. Dc in the next st {Photo 5}. This is your first repeat made. Notice that the repeat starts and ends with a dc and falls over 8 sts {Arrows in Photo 6}.
(Dc in the next st and skip the next st. [Dc, hdc, sc] in the next st. Skip the next 2 sts. [Sc, hdc, dc] in the next st. Skip the next st and dc in the next st) 11 times. This will give you 12 repeats in total. The last dc should fall in the last st before the ch-2 corner sp. (2 dc, ch 2, 2 dc) in the next ch-2 corner sp.*
Repeat from * to * 3 more times, omitting the last corner on the last repeat {Photo 7}. Join to the top of the beg ch-3 with a sl st {Photo 8}. Fasten off and work away your ends.
Stitch Count Per Side: 100 sts {52 dc, 24 hdc, and 24 sc – not including ch-2 corner sps}

Round 41 (Colour B) – Flowers
This round will feel all kinds of wrong when you are making it. In fact, every time I make it, I have a mini ‘WHAT???’ moment. Just trust the pattern.
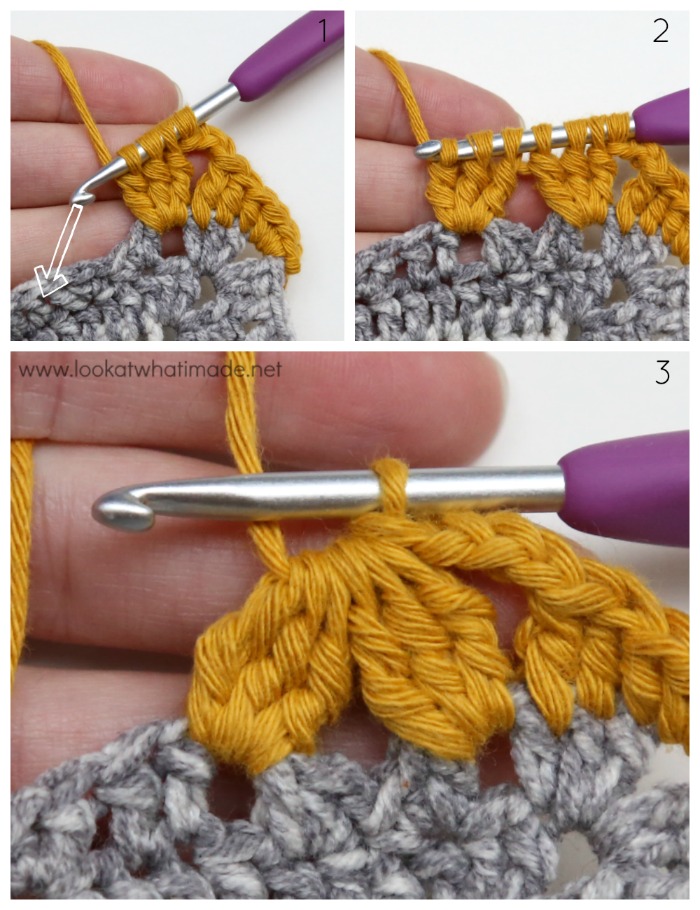
Making a Split 3-tr Bobble
Make a Partial 3-tr Bobble between the next dc and the first dc of the next [dc, hdc, sc] group {Photo 1}. Make another Partial 3-tr Bobble between the last dc of the next [sc, hdc, dc] group and the next dc {Photo 2}. Yarn over and pull through all 7 loops on your hook {Photo 3}.
In this round, you will be using stitch markers. Keep them in your work, because you will need them when you make Round 67 (purely as a reference).
Join your yarn by making a standing sc in any ch-2 corner sp. Make 2 more sc in the same sp {Photo 1}. This is your corner made. Mark the central sc with a SM.
*Hdc in the first (hidden) st, dc in the next st {Photos 2 and 3}. Dc between the same dc and the next dc. To do this, insert your hook between the posts of the stitches, not only into the top 2 loops.
(Ch 3 {Photo 4}. Make a Split 3-tr Bobble {Photo 5}. Ch 5. Make a dc between the next 2 dc {Photo 6}) 12 times.
There should now be 2 dc left unworked. Dc in the next st, which will be slightly hidden by the last dc you made {Photo 7}. Hdc in the next st {Photo 8}. Make 3 sc in the ch-2 corner sp. Mark the central sc with a SM.*
Repeat from * to * 3 more times, omitting the last 3 sc on the last repeat. Join to the first sc with a sl st {Photo 9}. Fasten off and work away your ends.
Stitch Count Per Side: 12 Split 3-tr Bobbles, 12 ch-3 sps, 12 ch-5 sps, 15 dc, 2 hdc, and 2 sc per side – not including central corner sc
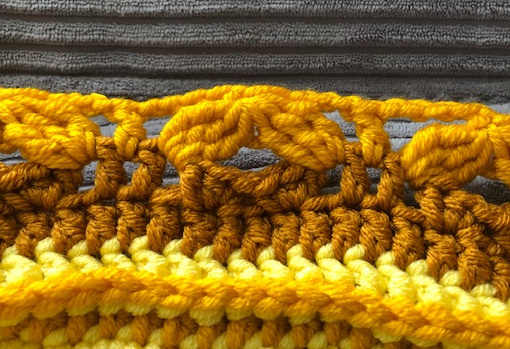
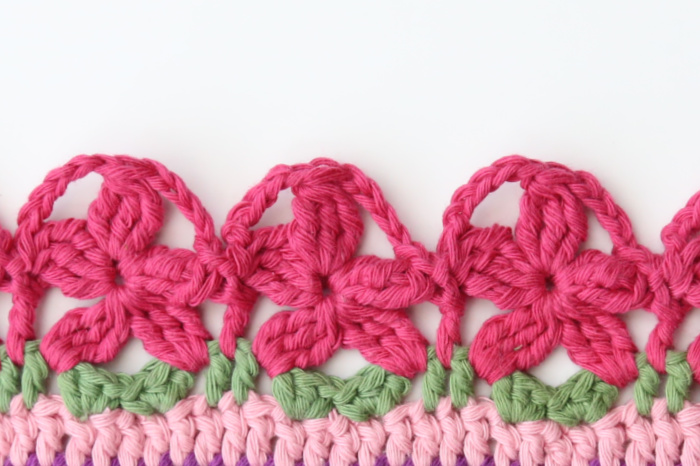
Here is a nice little close-up of what each repeat should look like:
Sunflower Charlotte – Michael Wassenaar
Round 42 (Colour B) – Flowers
Note 1: In this round, you will be working into the first chain after each Split 3-tr Bobble. This chain will make a little loop on top of the Split 3-tr Bobble.
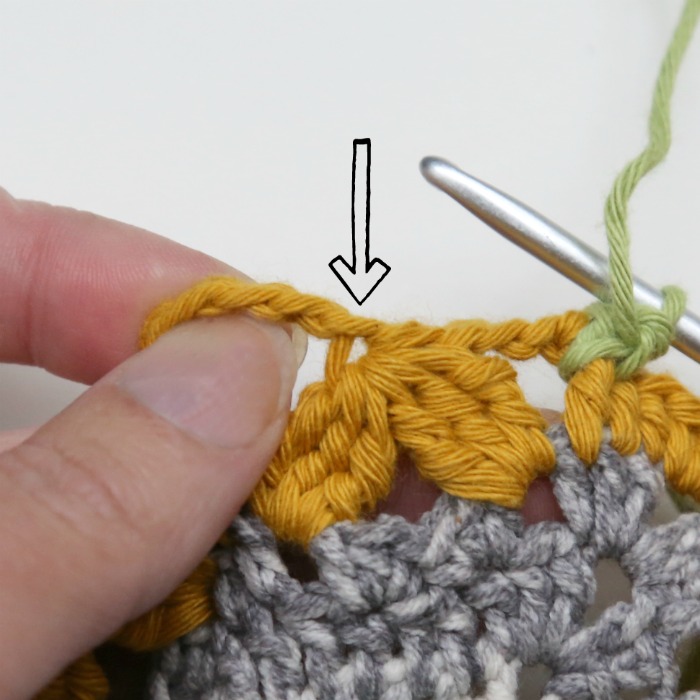
Note 2: When making the second and third 3-tr Bobble of each flower, you will be instructed to work in front of the next ch-5 sp. To do so, insert your hook from front to back into the indicated st and then from back to front below the next ch-5 sp so that the ch-5 lies behind your hook. When you have completed the relevant stitches, you should be able to see the ch-5 sp behind your work.

Note 3: Please mark the second 3-tr Bobble of each side with a SM. You will find this Bobble at the top of the first Flower.
Instructions
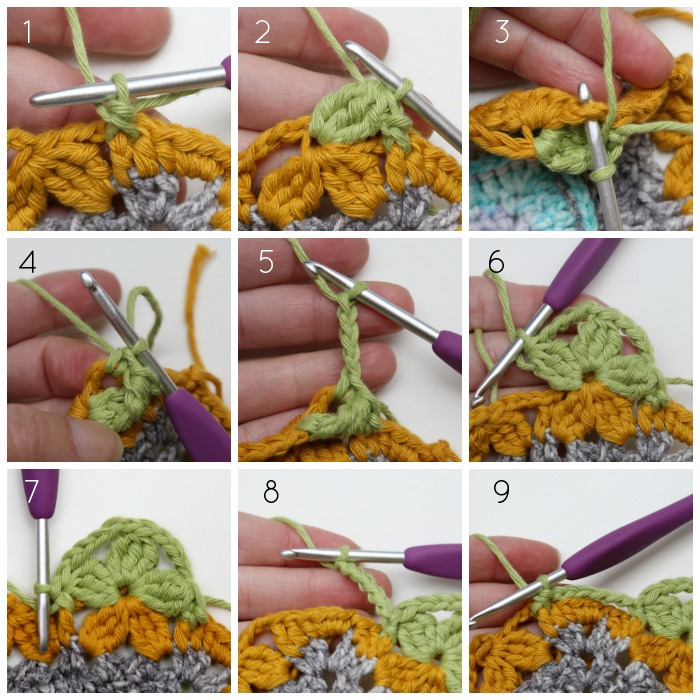
Join your yarn by making a standing FPsc around the second dc of any side. If you have trouble identifying this stitch, it is the last dc before the first ch-3 sp {Photo 1}.
*(Make a 3-tr Bobble in the first ch after the next Split 3-tr Bobble {Photo 2}. Sc into the ch-3 sp behind this 3-tr Bobble {Photos 3 and 4}. Working in front of the ch-5 sp from the previous round: [Ch 4, 3-tr Bobble, ch 5, 3-tr Bobble] into the same ch {Photos 5 and 6}. FPsc around the next dc {Photo 7}) 12 times. Ch 6 and skip the next 7 sts. FPsc around the next st, which should be the second dc of the next side {Photos 8 and 9}.*
Repeat from * to * 3 more times, omitting the last FPsc on the last repeat. Join to the first FPsc with a sl st. Fasten off and work away your ends.
Stitch Count Per Side: 36 3-tr Bobbles, 12 ch-4 sps, 12 ch-5 sps, 13 FPsc, and 12 sc – not including ch-6 corner sp

Just look at those beauties! Aren’t they awfully pretty???
I can’t wait to frame them in their little arches next week. See you then!!

This blog post contains affiliate links. I only link to products I personally use or would use. All opinions are my own.


Olivia says
Hi! I am stuck on round 40. I’ve done a row and now had to unravel and retry three times. I was wondering if you had any tips? I haven’t had any trouble up until now.
Dedri Uys says
Hi Olivia, which part of Round 40 are you having trouble with? Have you had a look at the videos Esther Dijkstra did? They are really great.
Sherry says
In round 42, I am assuming there are 3 sc in each corn, because it doesn’t say. Unless I just missed something. The picture looks like 6 chain, but the pattern says there are 12 sc. Help!
Jenny Lowman says
Hi!
There are 12 sc in each side, not including the chain 6 corner stitches. There are no sc stitches in the corners for round 42, just 6 chain stitches :)
“Stitch Count Per Side: 36 3-tr Bobbles, 12 ch-4 sps, 12 ch-5 sps, 13 FPsc, and 12 sc – not including ch-6 corner”
DoingMyBest says
On Round 41, which is the “central” stitch: the first, second, or third?
Thank you for another beautiful pattern! I appreciate all of the time you take to explain things so thoroughly and to include such detailed, helpful pictures. I needed a beautiful project to distract me, and I was so excited to discover that you had “grown” the Charlotte square! I’ve used the Charlotte square for several projects now because it is just so lovely; I’m glad to be able to try something new with it now. Thank you!!
Jenny Lowman says
The central stitch of a group of three stitches is the second stitch. This is the case here as well.
Helen Darling says
Thank you Dedri for this amazing pattern. I am only just working on Round 42 making the flowers. I really appreciate having the Charts as I find these easier to understand sometimes than the instructions. Each crocheter to their own preferred method. Thank you for all three – words, photos and charts and of course, access to videos. Thankfully I have not had to refer to them yet, given the quality and clarity of the other three. Cheers
Jenny Lowman says
So happy to hear you are enjoying the CAL and the lovely charts created by Masako. They really are beautiful in their own right!
Adrienne says
When I started crocheting I started with the Ubuntu and I must admit even though Ester was a life saver on YouTube, I found the photos extremely helpful. I don’t need them so much anymore but for a beginner or not a confident crocheter, it is so helpful. Thank you Dedri for letting gorgeous pattern, I love it x
Jenny Lowman says
Thank you for your positive comments, Adrienne. We find most people are accepting of Dedri’s wonderful pattern writing, and those who aren’t then have the easy option to edit their own PDF prior to saving it or printing it out.
Virginia Hardy says
Why in the world don’t you have just the instructions? So much paper when printing all those pictures. We don’t need all those pictures of every stitch. Think on this. Thanks. Virginia
Jenny Lowman says
Hello Virginia. We hope you are enjoying creating your Charlotte.
Dedri’s patterns are created for all skill levels. They are made in a way to assist less experienced crocheters with stitch placements etc. where they might struggle a bit, as well as for more experienced crocheters.
Many people save patterns electronically on their devices and computers and follow them without printing off at all, thus avoiding the use of paper and ink entirely. This is a popular choice for many, but not for all.
So, if this doesn’t suit, at the bottom of every pattern and blog post Dedri provides a create PDF button. This allows people to create printable PDF files that they can edit to remove everything that they don’t wish to print out, including photos and wordy bits. This option allows people to save on the amount of paper and printer ink used, and is usually sufficient for everyone to create/save whatever style of pattern they wish.
Perhaps you can think on this, also.
TJ says
I love all the photos that Dedri creates with her instructions. I am a beginner and it helps me so much making sure I’m in the right spot and that everything looks the way it does.
Jenny Lowman says
Thank you TJ. We are glad that you enjoy Dedri’s photo tutorials :)
SaraAnn says
You don’t have to print the pictures. Copy and paste whatever you would like to print and place it into a word processing document (such as Google docs or MS Word). Then YOU are in control of what you print. It’s up to you, not the designer.
Jenny Lowman says
Making a PDF as possible in the print friendly option of each post also allows you to do this kind of editing :)