Welcome to Part 13 of Charlotte’s Universe. In this, the penultimate part, we will be planting large flowers in each corner to square the blanket up once more. I hope you will enjoy this slight change in technique/shaping.
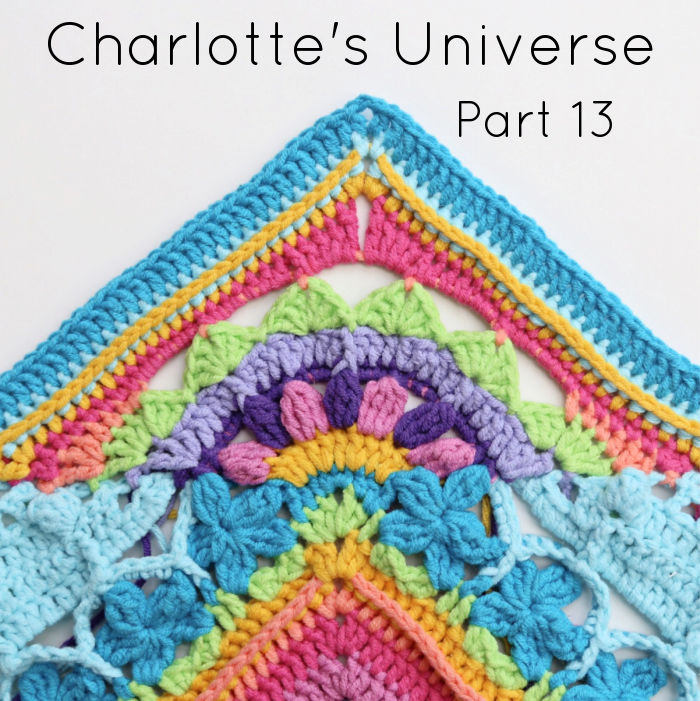
I am dedicating this part to my lovely neighbour and friend Lilian, who taught me SO much about plants, compassion, and grace in the four short months I was privileged to know her. I feel so blessed to have memories of her springing up all over my garden (and now in this blanket, as I thought of her with every stitch I made for the photo tutorial below).
Charlotte’s Universe Part 13: Corner Flowers
Resources
- You can find links to the right and left-handed video tutorials (US) for Part 13 HERE on It’s All in a Nutshell.
- Add this pattern to your Ravelry Queue.
Translations
- Dutch Information and Links by Dianne Baan
- German Translation – by Sabi Bulla and Silke Schippa-Witte
- Hebrew Translation by Michal Ben-Hur, Iris Fait, Tami Sultan Nudelman, Tali Shchori, and Sarit Grinberg
- Japanese Information and Links by Masako Kawahara
- Swedish Translation by Åza Karlsson and Ulrika Larsson
Abbreviations and Special Stitches
Please see Special Stitches and Techniques (worth bookmarking or saving as a PDF as we go forward – Take a look at THIS TUTORIAL if you don’t know how to use the print-friendly button).
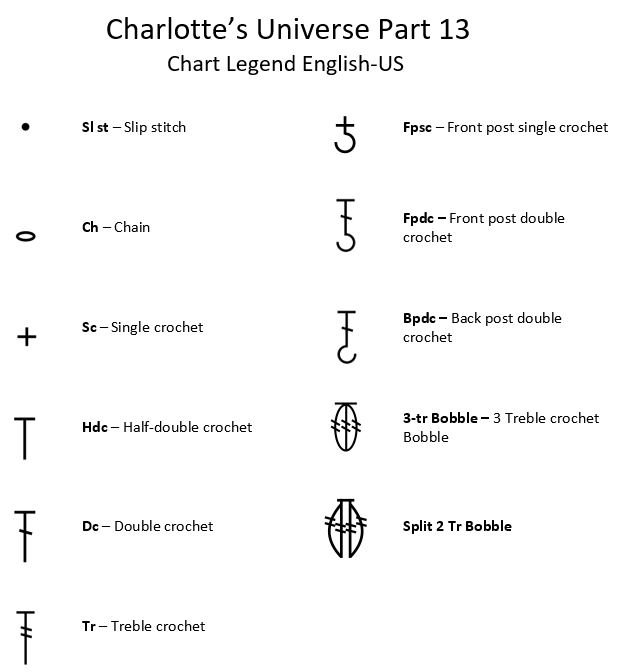
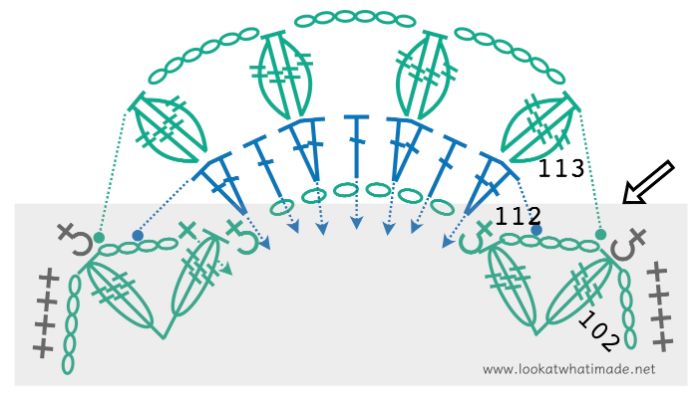
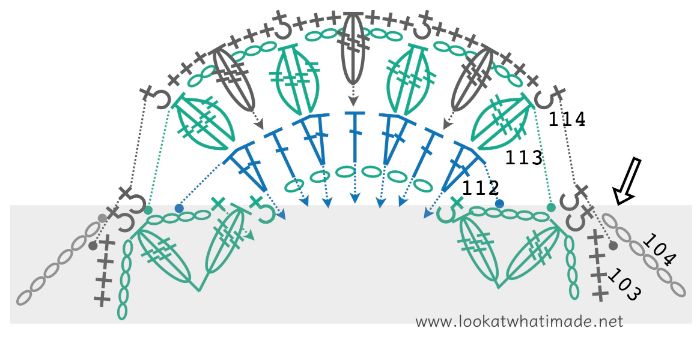
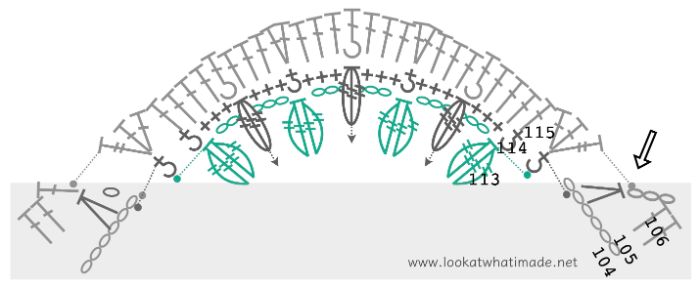
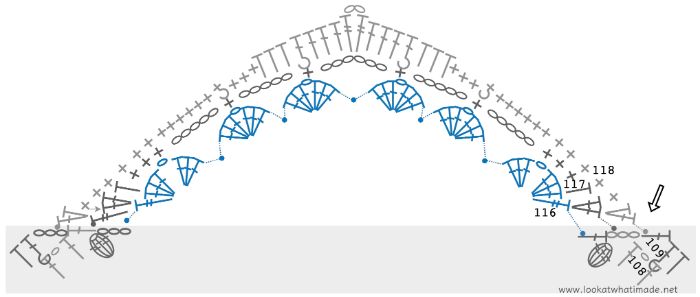
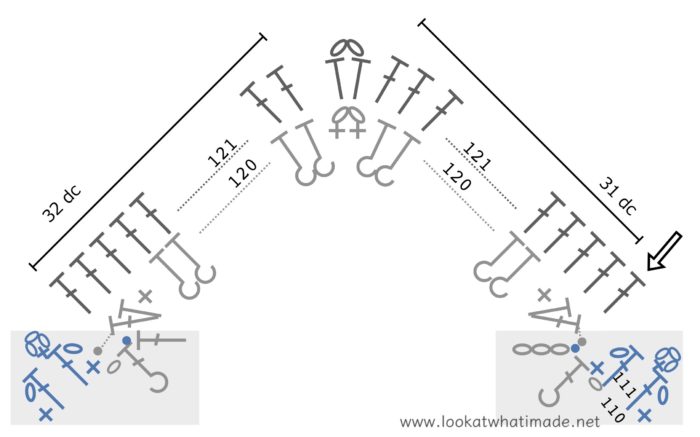
Charts
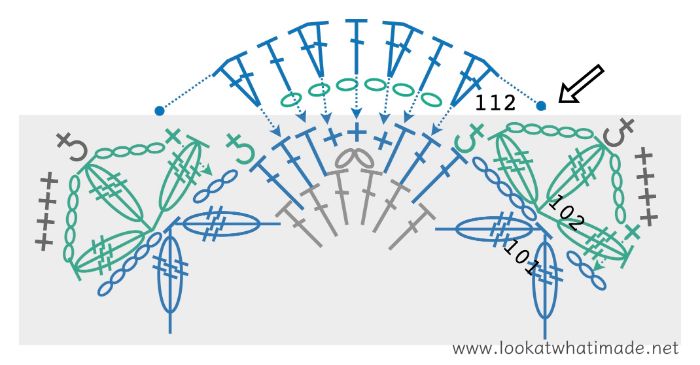
Credit: Masako Kawahara from Crochet_Hmmm
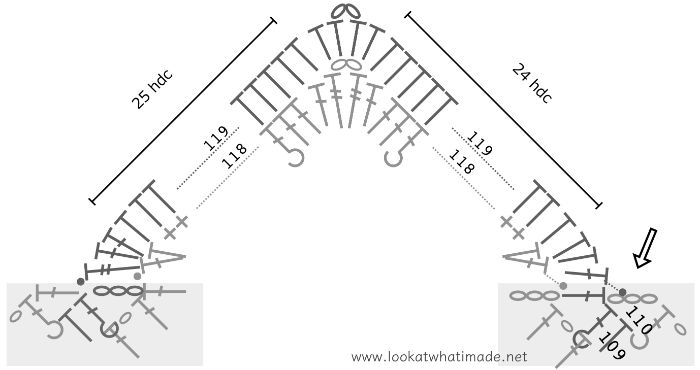
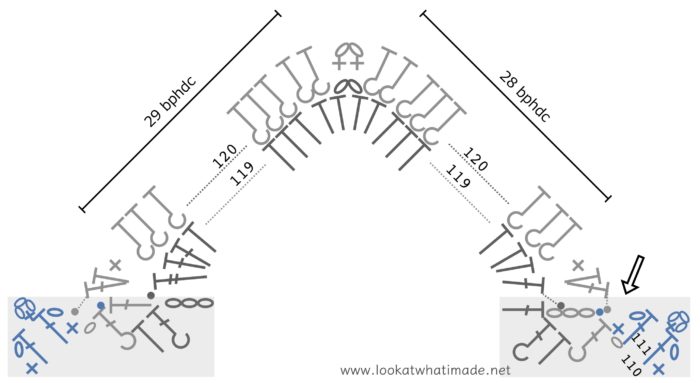
Please follow the charts in a counter-clockwise direction, regardless of whether you are right or left-handed.
Colours Per Row
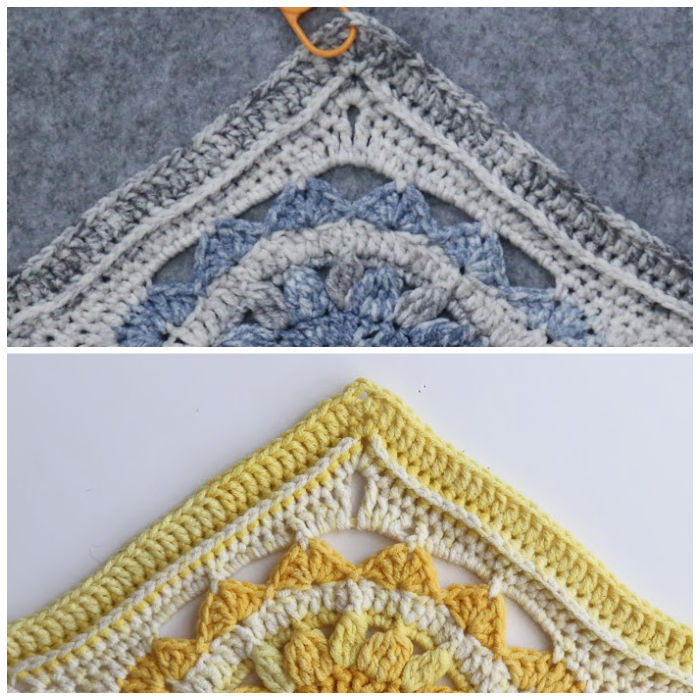
Vintage and Sunshine
Follow the colour reference next to each row title {for example, Row 1 (Colour A)}.
Pink Charlie
- Row 112 – A
- Row 113 – A
- Row 114 – C
- Row 115 – B
- Row 116 – A
- Row 117 – B
- Row 118 – B
- Row 119 – B
- Row 120 – C
- Row 121 – C
Bonus Colourways
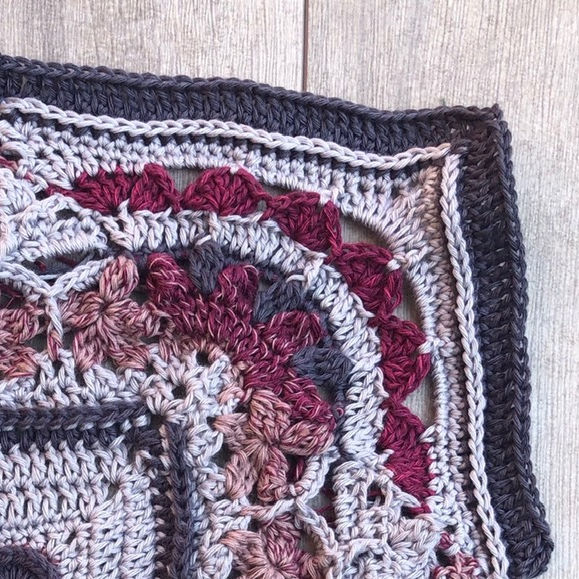
- Sunflower Charlotte – Michael Wassenaar (Chunky Monkey)
- Space for Grace – Sabi Bulla (Skies Light)
- Latte With Love – Jenny Lowman (Scheepjes Softfun)
Esther Dijkstra will be sharing her Scheepjes Stonewashed Colours Per Round HERE.
Instructions
© Dedri Uys and Scheepjes 2021. All Rights Reserved.
In this part, you will be filling in the corners. You can either complete the corners one by one, or you can repeat each row for each corner. I suggest completing one entire corner first (to get the hang of it), and then deciding how you want to proceed with the other three. You will be working into the spaces marked with stitch markers in Rows 102 – 110.
After Esther created the videos for this part, we found out something new about each other’s crochet styles (quite a unicorn after working together for 6 years now!!). Esther doesn’t start with a slip knot on her hook when starting with a slip stitch. I ALWAYS start with a slip knot on my hook.
It had never even occurred to me to question whether people did or didn’t. I just assumed you always did! And we all know what assume does…
Both these methods are correct and perfectly fine. For this part, though, you may find that it will be easier to keep your first stitch in place if you DO start with a slip knot already on your hook.
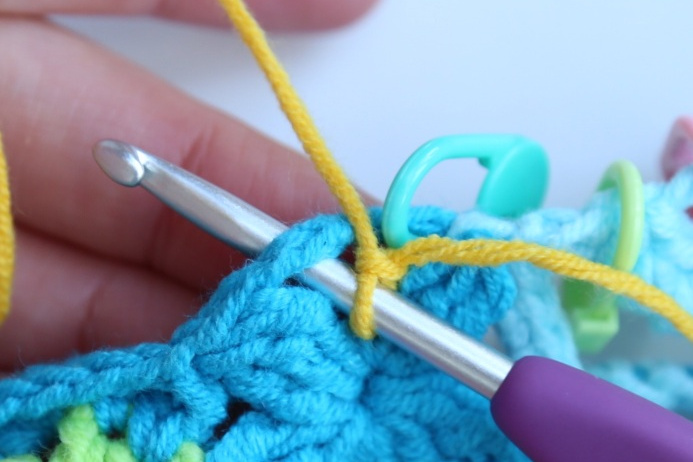
Similarly, when fastening off, some people just pull their yarn through the top of the last st and some make an extra chain to secure the work (which I do). In this part, and for the same reason, you may find it easier to chain once after you have joined with a sl st, pulling the chain tight so that it forms a little knot (see Photo 6 at the end of Row 112).
Row 112 (Colour B)
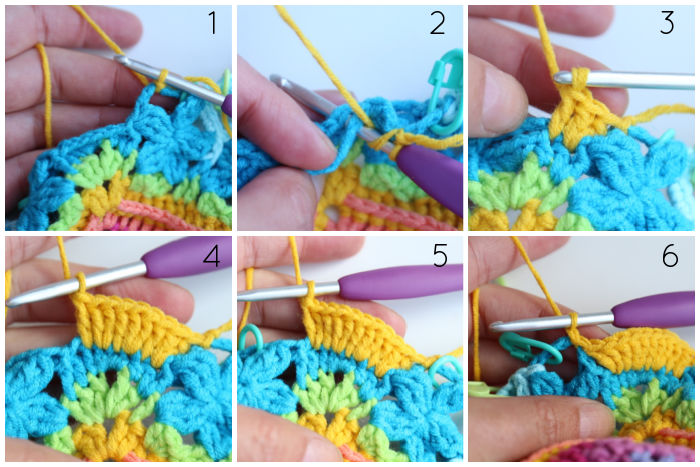
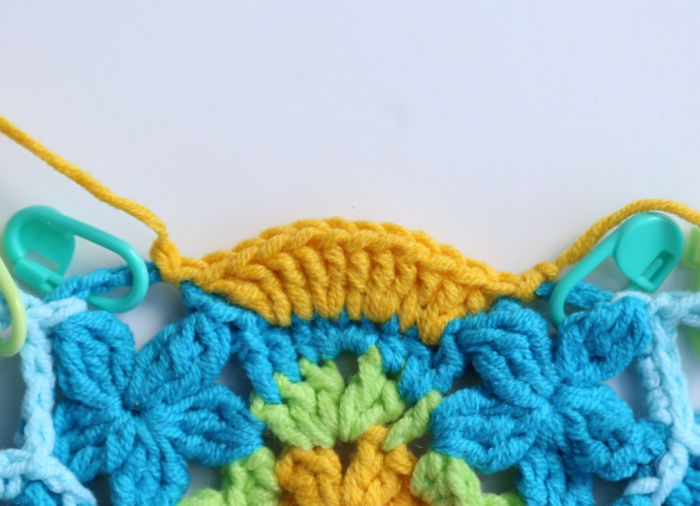
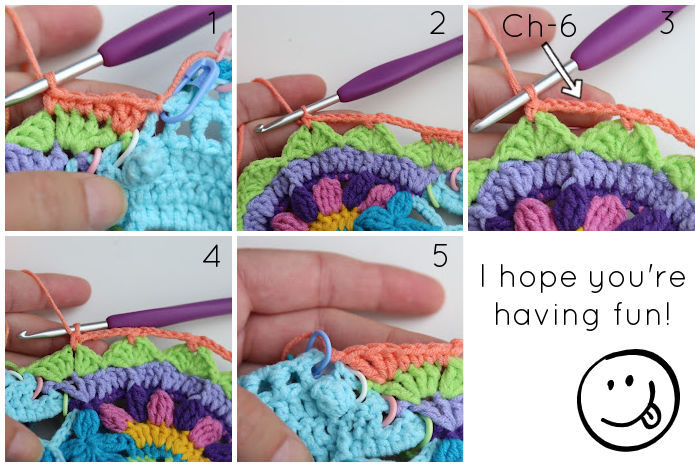
With RS facing, join your yarn by making a sl st in the last ch-5 sp of Round 102 on any side (marked with SM 1) – Photo 1. Working into the 7 corner sts from Round 101 and OVER the ch-6 from Round 102, (make 2 dc in the next st, dc in the next st) three times {Photos 2 – 4}. Make 2 dc in the last st {Photo 5}. Sl st in the first ch-4 sp of Round 102 on the other side (marked with SM 1) – Photo 6.
Fasten off, remove SM 1, and work away your ends.
Stitch Count: 11 dc
Row 113 (Colour B)
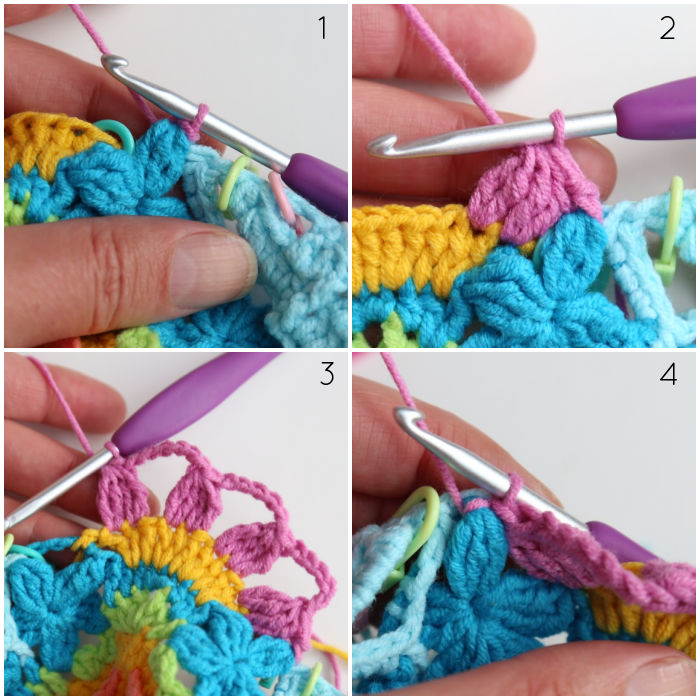
Making a Split 2-tr Bobble
Make a Partial 2-tr Bobble in the indicated st/sp {Photo 1}. Make a Partial 2-tr Bobble in the next st/sp {Photo 2}. Yarn over and pull through all 5 loops on your hook {Photo 3}.

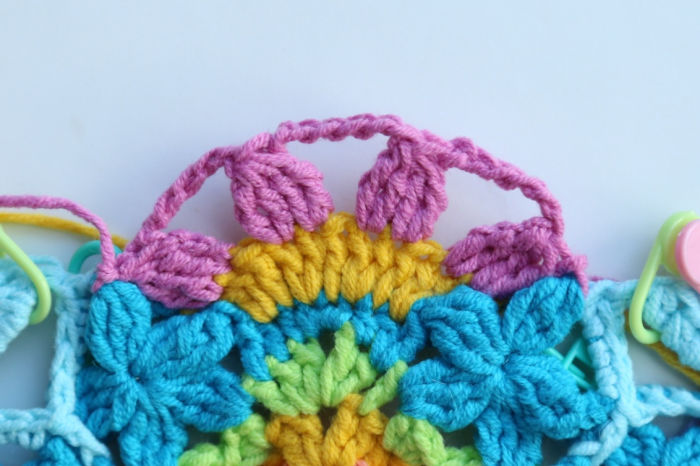
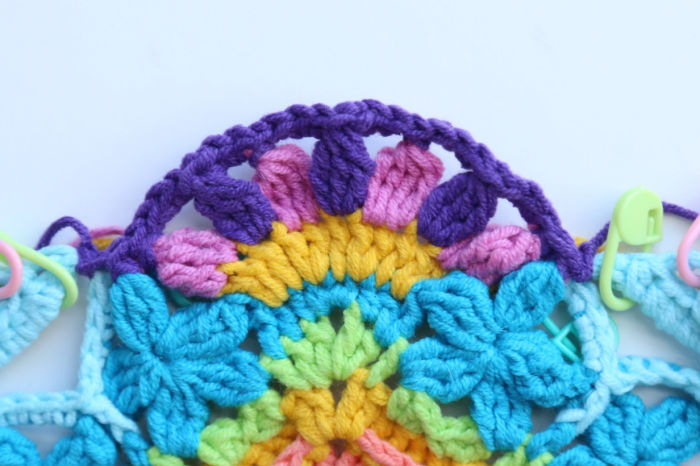
With RS facing, join your yarn by making a sl st around the second-to-last 3-tr Bobble of Round 102 {Photo 1}. Make a Split 2-tr Bobble over the first 2 sts of Row 112 {Photo 2}. (Ch 6, skip the next st, make a Split 2-tr Bobble over the next 2 sts) 3 times {Photo 3}. Sl st around the second 3-tr Bobble of Round 102 on the other side {Photo 4}.
Fasten off and work away your ends.
Stitch Count: 4 Split 2-tr Bobbles and 3 ch-6 sps
Row 114 (Colour C)
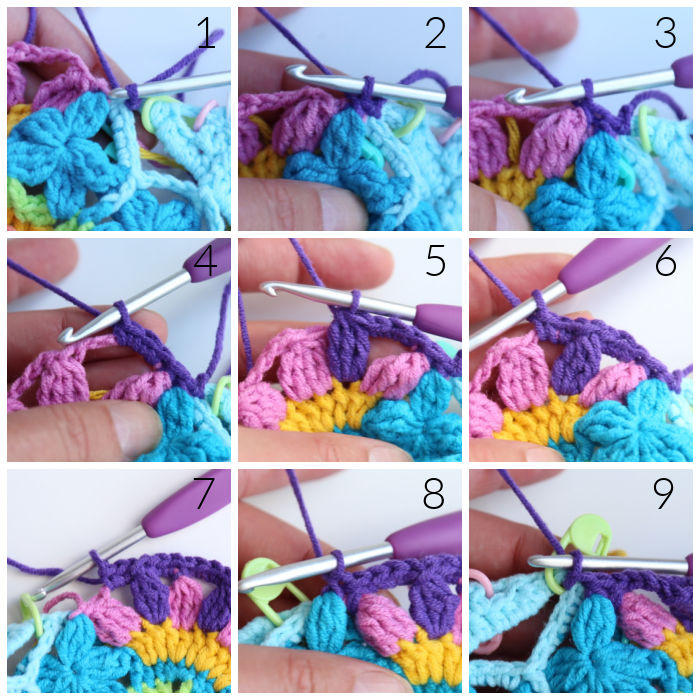
With RS facing, join your yarn by making a sl st between Rows 103 and 104 (marked with SM 2) – Photo 1. FPsc around the next 3-tr Bobble from Round 102, which already contains a sl st and a FPsc {Photo 2}.
*FPsc around the next Split 2-tr Bobble from Row 113 {Photo 3}. Make 3 sc in the next ch-6 sp {Photo 4}. Make a 3-tr Bobble into the next (skipped) st from Row 112, working IN FRONT OF the ch-6 sp {Photo 5}. Make 3 sc in the same ch-6 sp {Photo 6}.*
Repeat from * to * 2 more times {Photo 7}. Make a FPsc around the last Split 2-tr Bobble from Row 113. FPsc around the second 3-tr Bobble from Round 102, which already contains a sl st and a FPsc {Photo 8}. Sl st between Rows 103 and 104 (marked with SM 2) – Photo 9.
Fasten off, remove SM 2, and work away your ends.
Stitch Count: 27 sts {18 sc, 6 FPsc, and 3 3-tr Bobbles}
Row 115 (Colour A)
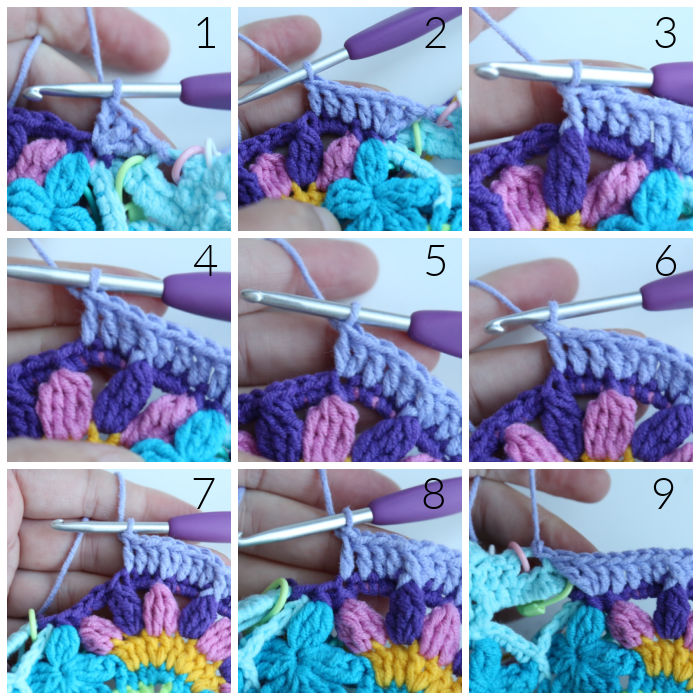
With RS facing, join your yarn by making a sl st in the side of Row 106 (marked with SM 3). (Tr, 2 dc) in the first st of Row 114 (don’t accidentally skip the first FPsc) – Photo 1. Dc in the next 4 sts {Photo 2}.
(FPdc around the next 3-tr Bobble {Photo 3}. Dc in the next 3 sts, the first of which will be hidden {Photo 4}. Make 2 dc in the next FPsc {Photo 5}, dc in the next 3 sts {Photo 6}) twice {Photo 7}.
FPdc around the last 3-tr Bobble. Dc in the next 4 sts, the first of which will be hidden {Photo 8}. (2 dc, tr) in the last st of Row 114. Sl st in the side of Row 106 (marked with SM 3) – Photo 9.
Fasten off, remove SM 3, and work away your ends.
Stitch Count: 33 sts {28 dc, 3 FPdc, and 2 tr}
Row 116 (Colour B)
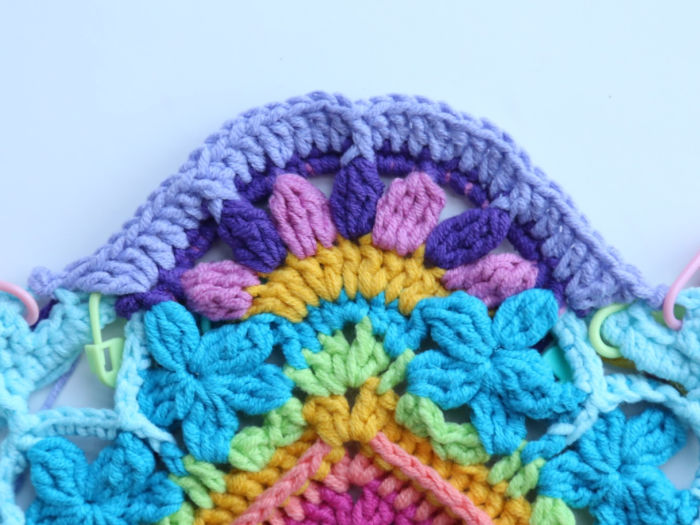
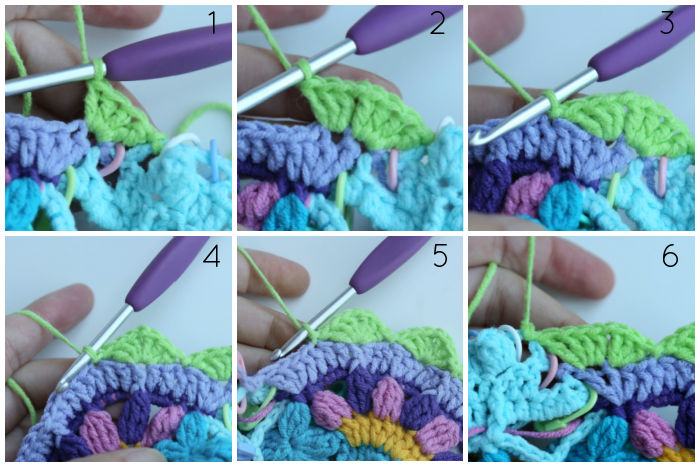
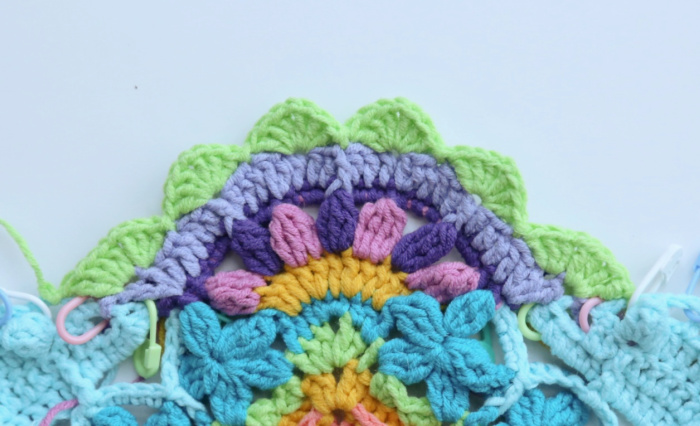
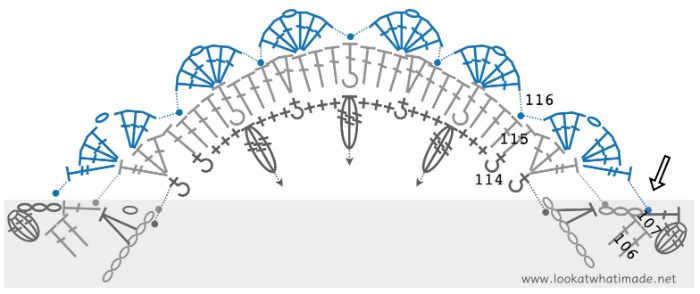
With RS facing, join your yarn by making a sl st in the side of Row 107 (marked with SM 4). (Tr, 3 dc) in the first st of Row 115 {Photo 1}. Ch 1, make 3 dc in the next st {Photo 2}. Skip the next 2 sts, sl st in the next st {Photo 3}. (Skip the next 2 sts, [3 dc, ch 1, 3 dc] in the next st. Skip the next 2 sts, sl st in the next st {Photo 4}) 4 times {Photo 5}. Skip the next 2 sts, make 3 dc in the next st, ch 1. (3 dc, tr) in the last st of Row 115. Sl st in the side of Row 107 (marked with SM 4) – Photo 6.
Fasten off, remove SM 4, and work away your ends.
Stitch Count: 36 dc, 2 tr, and 6 ch-1 sps
Note
The start and end of Rows 117 – 120 are asymmetric. The second side will have one more stitch than the first side. This will increase the neatness of the corners.
Row 117 (Colour A)
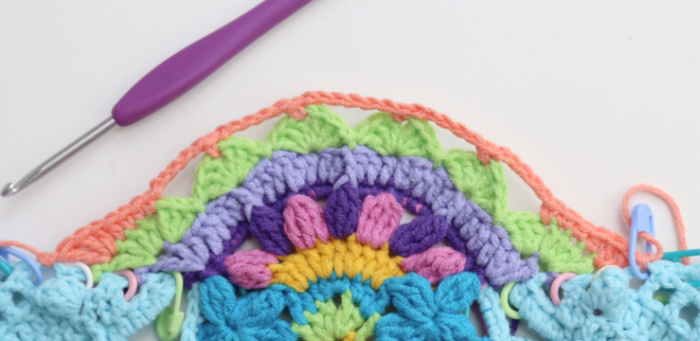
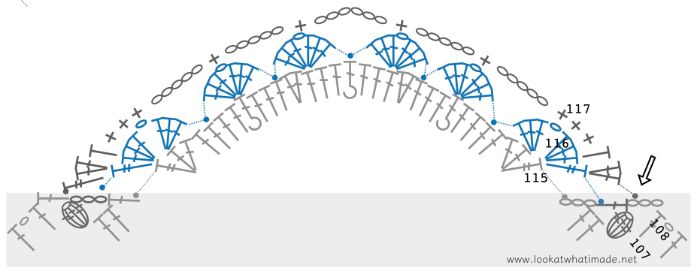
With RS facing, join your yarn by making a sl st in the side of Row 108 (marked with SM 5). Make 2 dc in the first st of Row 116. Hdc in the next st, sc in the next 2 sts. Sc in the next ch-1 sp {Photo 1}. (Ch 5, sc in the next ch-1 sp) twice {Photo 2}. Ch 6, sc in the next ch-1 sp {Photo 3}.
(Ch 5, sc in the next ch-1 sp) twice{Photo 4}. Sc in the next 2 sts, hdc in the next st. [2 dc, tr] in the last st of Row 116. Sl st in the side of Row 108 (marked with SM 5) – Photo 5.
Fasten off, remove SM 5, and work away your ends.
Stitch Count: 10 sc, 2 hdc, 4 dc, 1 tr, 4 ch-5 sps, and 1 ch-6 sp
Row 118 (Colour A)
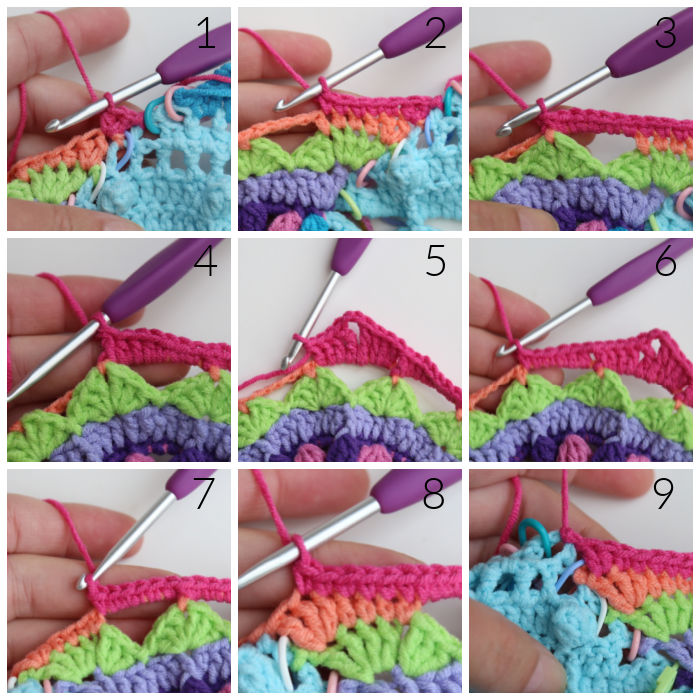
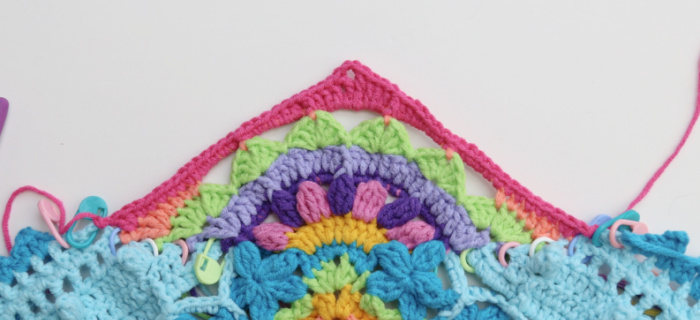
With RS facing, join your yarn by making a sl st in the side of Row 109 (marked with SM 6). (Dc, hdc) in the first st of Row 117 {Photo 1}. Sc in the next 5 sts {Photo 2}. Make 6 sc in the next ch-5 sp, FPsc around the next sc {Photo 3}. (3 sc, 3 hdc) in the next ch-5 sp, FPdc around the next sc {Photo 4}. (3 dc, tr, ch 2, tr, 3 dc) in the next ch-6 sp {Photo 5}.
FPdc around the next sc, (3 hdc, 3 sc) in the next ch-5 sp {Photo 6}. FPsc around the next sc, make 6 sc in the next ch-5 sp {Photo 7}. Sc in the next 6 sts {Photo 8}. (Hdc, dc) in the last st of Row 117. Sl st in the side of Row 109 (marked with SM 6) – Photo 9.
Fasten off, remove SM 6, and work away your ends.
Stitch Count: 51 sts {29 sc, 2 FPsc, 8 hdc, 8 dc, 2 FPdc, and 2 tr} – not including ch-2 corner sp
Row 119 (Colour A)
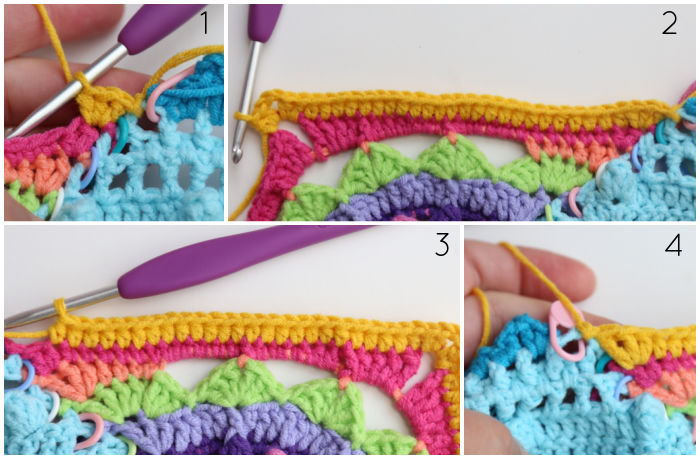
With RS facing, join your yarn by making a sl st in the side of Row 110 (marked with SM 7). (Dc, 2 hdc) in the first st of Row 118 {Photo 1}. Hdc in the next 24 sts. (2 hdc, ch 2, 2 hdc) in the ch-2 corner sp {Photo 2}.
Hdc in the next 25 sts {Photo 3}. (2 dc, tr) in the last st of Row 118. Sl st in the side of Row 110 (marked with SM 7) – Photo 4.
Fasten off, remove SM 7, and work away your ends.
Stitch Count: 59 sts {55 hdc and 3 dc, and 1 tr} – not including ch-2 corner sp
Row 120 (Colour C)
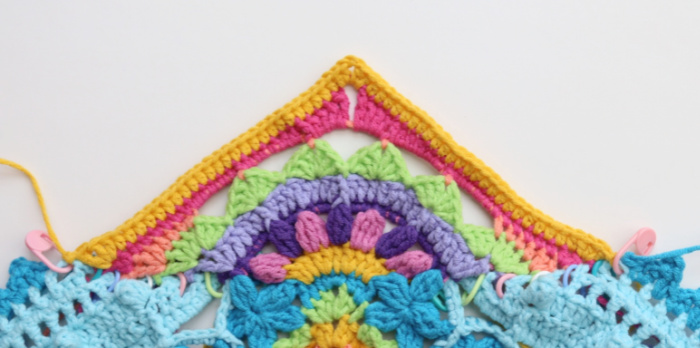
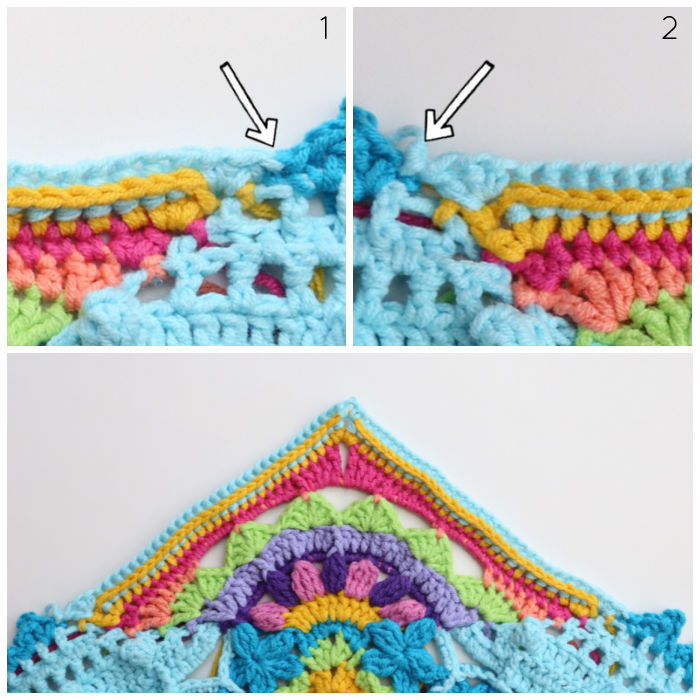
With RS facing, join your yarn by making a sl st in the sl st of Row 111 (the Triangle row) – Arrow in Photo 1. It may be a bit tricky to get into that sl st. (Dc, hdc, sc) in the first st of Row 119. BPhdc in the next 28 sts. (Sc, ch 2, sc) in the ch-2 corner sp. BPhdc in the next 29 sts. (Sc, hdc, dc) in the last st of Row 119. Sl st in the first st of Row 111 {Arrow in Photo 2}.
Fasten off and work away your ends.
Stitch Count: 65 sts {4 sc, 2 hdc, 57 BPhdc and 2 dc} – not including ch-2 corner sp
Row 121 (Colour C)
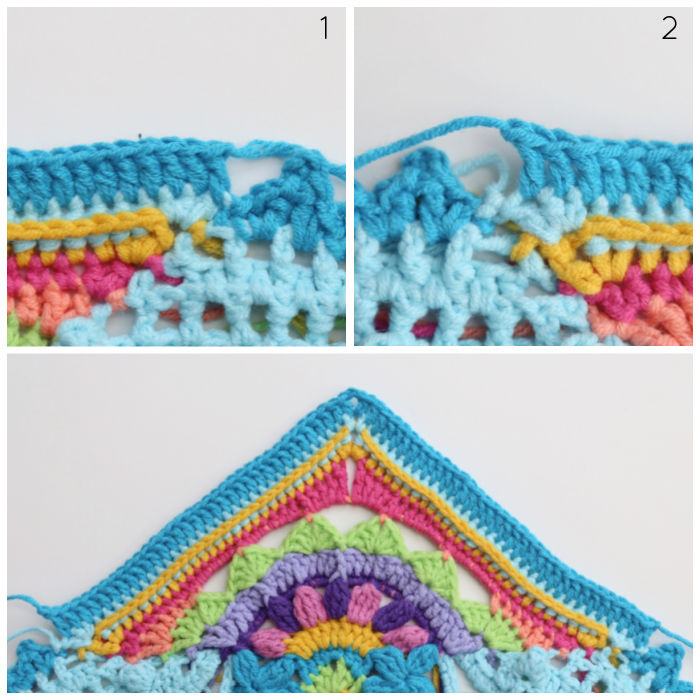
With RS facing, join your yarn by making a standing dc in the first st of Row 120 {Photo 1}. Dc in each of the rem 31 sts. (Hdc, ch 2, hdc) in the ch-2 corner sp. Skip the first (hidden) st. Dc in each of the rem 32 sts. Fasten off and work away your ends {Photo 2}.
Stitch Count: 66 sts {2 hdc and 64 dc} – not including ch-2 corner sp
Things will look a bit odd at the moment. Don’t worry about it.
When you have created all four corners, and you have worked away all your ends, you are ready to continue adding the border.
I will see you next week for the last part of this journey x

This blog post contains affiliate links. I only link to products I personally use or would use. All opinions are my own.


Tamara says
In the video tutorial for round 120 section 13 it is demonstrated to place the first stitch in the single crochet of the triangle, not the slip stitch of the triangle. I have already completed two corners that way. Which way is correct? The written pattern says to place it in the slip stitch.
Jenny Lowman says
I would always follow the written pattern for the correct recipe :)
Debra Emig says
I just glanced through your recent instructions and I think they are wonderful! I crochet. My mother taught me when I was young. I learned many different stitches by watching her. I could say I’m intermediate or above as far as knowing all the basics and I am able to mix them up quite well. I also do my own style of freeform.
When I learned so much from my mom but i never learned to read instructions at that time. I’ve taught myself since then to read basic pattern instructions but most times I cannot put them together very well! Ha! I think I could learn from your instructions! They are so very learn able to me. Pictures in color!! Plus the symbols. I have learned some of those. My mother could crochet anything!! From doilies, pineapples, afghans, and even beautiful Victorian dolls(completely all crocheted). And she could read any instructions! I’d like to really try to crochet your project. I’d like to know how I can obtain your instructions from the very beginning. Is it possible?
Thank you so much.
Debbie
Dedri Uys says
Hi Debra,
Thank you for sharing a bit about your mother. It is wonderful when we can carry the people we love with us through creating. You can find links to all the parts of Charlotte HERE in the information post. Enjoy!!
Ina says
Absolutely stunning work!!
Dedri Uys says
Thank you Ina :)
Virpi says
Very interesting to learn about your crochet styles. Somehow I am little uneasy about knots in both my knitting and crochet, so usually I try to avoid any knots
Good to read that you always start witha slip knot. I was worried thar my slip knots would end up too loose and to avoid that, I have recently started making the loop of the slip knot with yarn tail, so when I am working away my tails, I can pull the slip knot tighter, if I want to. This seems to help with my uneasy feeling about knots
Dedri Uys says
Hi Virpi,
The knots don’t replace a thorough working away of ends. I def still work my ends away very well. Instead, they are just an extra layer of security :)
Carol Young says
Is there any way to see the whole of Charlotte’s Universe made up and the entire pattern? I’ve just now discovered this and it’s part 13! It’s beautiful!!!
Thanks. Carol.
Dedri Uys says
Hi Carol,
You can see photos of the completed Charlotte in the information post HERE. You will also find the links to each part there. I hope you have fun with it :)