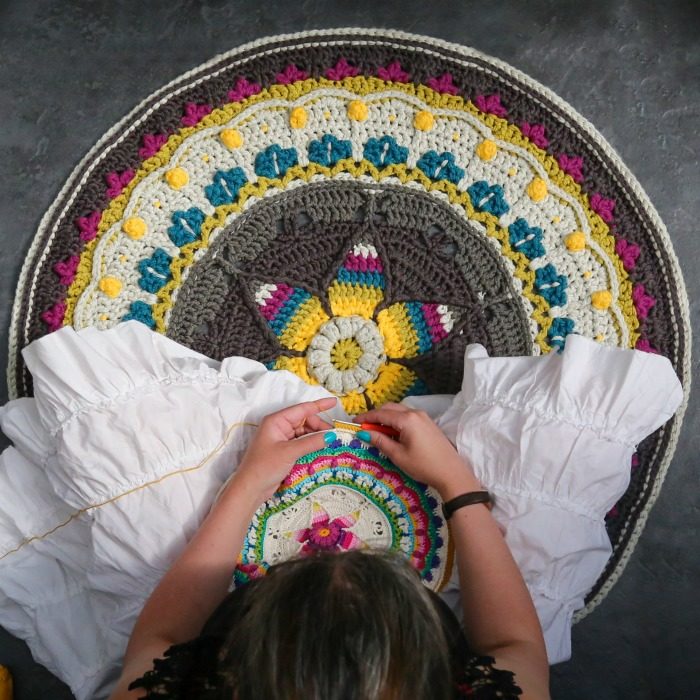
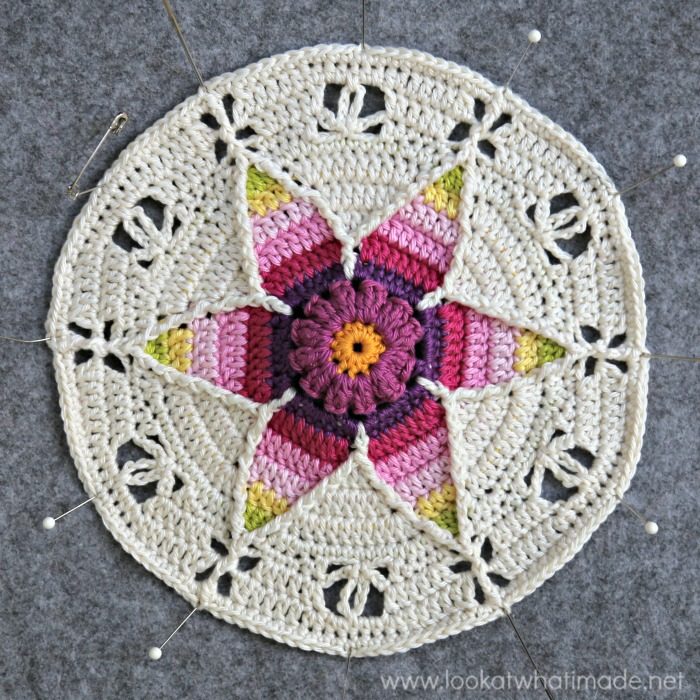
This pattern celebrates my love of two things: cosy crochet rugs and the glorious colours of Cornwall. When I first started playing around with this design, my Fancy Nancy Mandala was still fresh in my mind, so I planted a less-fancy version of it in the middle of the rug.
It is of hearing the waves breaking, one, two, one, two . . . It is of lying and hearing this splash and seeing this light, and feeling, it is almost impossible that I should be here; of feeling the purest ecstasy I can conceive.
Virginia Woolf (Cornwall)
Although this design is for a large rug, using two strands of yarn held together, there is nothing preventing you from making this in a thinner yarn to create a gorgeous mandala. It would look fantastic mounted in a hoop!
Want to see more of our Camping in Cornwall journey?
This rug has a bit of a history. I’m not going to repeat it all here, but you are welcome to read about it in the posts below :)
- Camping in Cornwall Rug Yarn (loads of inspirational photos)
- Camping in Cornwall Rug WIP
- Camping in Cornwall Rug Reveal
Camping in Cornwall Rug Pattern
© Dedri Uys and Scheepjes 2020. All Rights Reserved.
Information
Resources
- Hashtag: If you share photos, please use #campingincornwallrug so that we can find your projects and have a gleeful look.
- You can buy Scheepjes Our Tribe from the following retailers:
- Black Sheep Wools (International)
- Wool Warehouse (International)
- Deramores (International)
- Caro’s Atelier (Netherlands)
- Knotty House (Canada)
- More Retailers
- Add This Pattern to Your Ravelry Queue
Photo Tutorials
Due to the length of this tutorial, I have broken it up into two parts. You can find Part 2 HERE:
If you prefer a formatted ad-free US PDF version of this pattern (Written-only and Photo Tutorial), you can buy it HERE in my Ravelry Store.
Difficulty
Intermediate.
Materials
- 9mm hook*
- Scheepjes Chunky Monkey (100% acrylic), 100g/116m/127yds – 2 strands held together
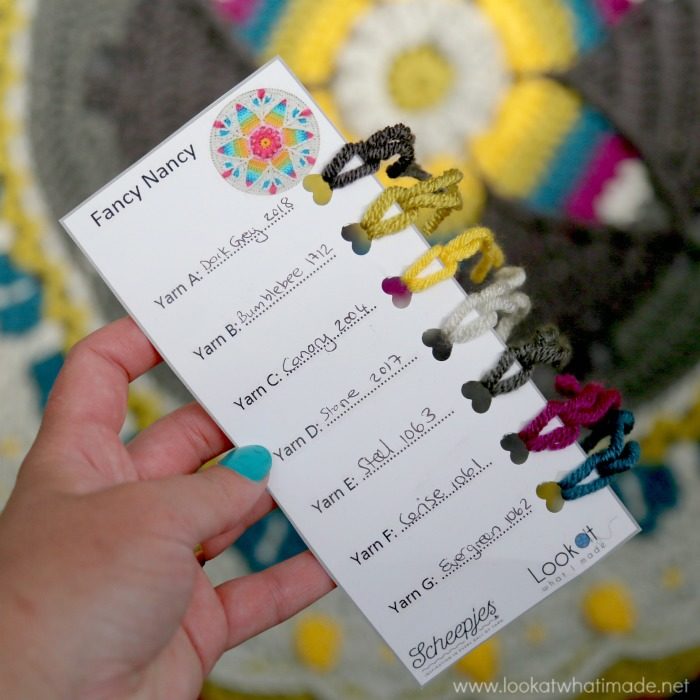
- Yarn A– 2018 Dark Grey {Dark Grey} – 4 balls
- Yarn B – 1712 Bumblebee {Green} – 2 balls
- Yarn C – 2004 Canary {Yellow} – 1 ball
- Yarn D– 2017 Stone {Ecru} – 5 balls
- Yarn E– 1063 Steel {Medium Grey} – 2 balls**
- Yarn F– 1061 Cerise {Purple} – 1 ball
- Yarn G– 1062 Evergreen {Teal} – 1 ball
*I am a very tight crocheter. If you find it hard to match gauge (or you know that you have a loose tension), you might want to go down a hook size or two. If you decide to use two strands of the specified yarn, you can’t go down to less than an 8mm hook as you will keep losing one of the strands.
**Yarn E is only used for three rounds (to create a gentle fade). If you prefer a single-colour background for the central mandala, you can substitute Yarn E with Yarn A, in which case you will need one extra ball of Yarn A.
For this photo tutorial, I am using Catona 10g balls in random colours and a 3mm hook.
Gauge
At the end of Round 4, your flower should measure 15cm/6”.
Size
- Unblocked: 92cm/36”
- Blocked: 95cm/37.5”
Abbreviations
US Terminology
- BLO – Back loop only
- Ch – Chain
- Dc – Double crochet
- Hdc – Half-double crochet
- Rep – Repeat
- Sc – Single crochet
- Sl st – Slip stitch
- Sp/sps – Space/spaces
- St/sts – Stitch/stitches
- Tr – Treble crochet
Punctuation
- *An asterisk indicates pattern repeats. You will need to repeat all the instructions between asterisks the number of times specified. This is a hard-core repeat and will consist of multiple instructions.
- Parentheses () indicate repeats. You will need to repeat the instructions between parentheses the number of times specified. This is a lower level repeat.
- Square Brackets [] are used to indicate a group of stitches to be worked in the same stitch/space.
Special Stitches
- BP (Back Post) – Identify the post of the stitch you want to work around. Insert your hook from the back to the front and then from the front to the back around the post of the stitch so that the post lies behind your hook. Complete your stitch as normal.
- Dc2tog – Yarn over, insert your hook into the indicated st and pull up a loop. Yarn over and pull through 2 loops. Yarn over, insert your hook into the next st and pull up a loop. Yarn over and pull through 2 loops. Yarn over and pull through all 3 loops on your hook.
- Dc3tog – Yarn over, insert your hook into the indicated st and pull up a loop. Yarn over and pull through 2 loops. (Yarn over, insert your hook into the next st and pull up a loop. Yarn over and pull through 2 loops) twice. Yarn over and pull through all 4 loops on your hook.
- Dc Bobble – Yarn over and insert your hook into the indicated st/sp. Yarn over and pull up a loop. Yarn over and pull through 2 loops. Yarn over and insert your hook into the same st/sp. Yarn over and pull up a loop. Yarn over and pull through 2 loops. Yarn over and pull through all 3 loops on your hook.
- FP (Front Post) – Identify the post of the stitch you want to work around. Insert your hook from the front to the back and then from the back to the front around the post of the stitch so that the post lies on top of your hook. Complete your stitch as normal.
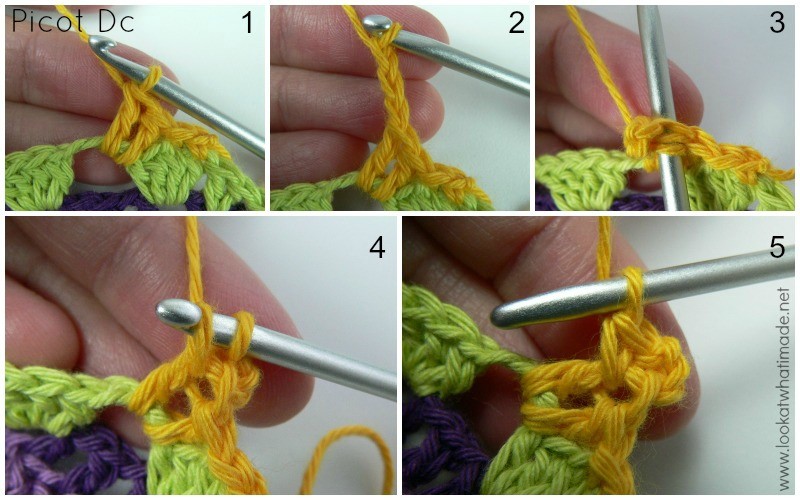
- Picot Dc – Make a dc {Photo 1}. Ch 3 {Photo 2}. Complete the Picot by making a sc in the top of the dc just made. To do this, insert your hook into both loops of the dc from the side and complete a sc {Photos 3-5}.
- Popcorn* – Make 4 dc in the indicated st/sp. Pull up a loop and remove your hook. Insert your hook into the first dc of the 4-dc group. Grab the last stitch with your hook and pull it through the first stitch.
- Shell* – Make 4 dc in the indicated st/sp.
- Standing Stitches – Standing stitches are the same as regular stitches, except that they are made ‘in air’, without being attached to a previous stitch. Start with a slip knot already on your hook and complete the stitch as normal. As an example, you can see a tutorial for a standing single crochet HERE.
*If you decide to make this pattern in a thinner yarn, you will find that the 4-dc Popcorns and Shells don’t POP enough. To remedy this, please use 5 dc instead.
Notes
General
There is some lace detail in Rounds 10 – 13. I have provided instructions for making that part solid, should you choose to do so. You can find those instructions at the end of this post.
Working With 2 Strands of Yarn
When you make this rug, you will be working with two strands of yarn held together. I suggest using two separate balls wherever possible. Some of the colours only require one ball of yarn, though, and in those instances, I suggest that you use the inside and outside ends held together. Chunky Monkey balls have a tendency to fall apart as soon as you start working with them, so you might want to roll the yarn into a double-stranded ball before you start.
Changing Colours
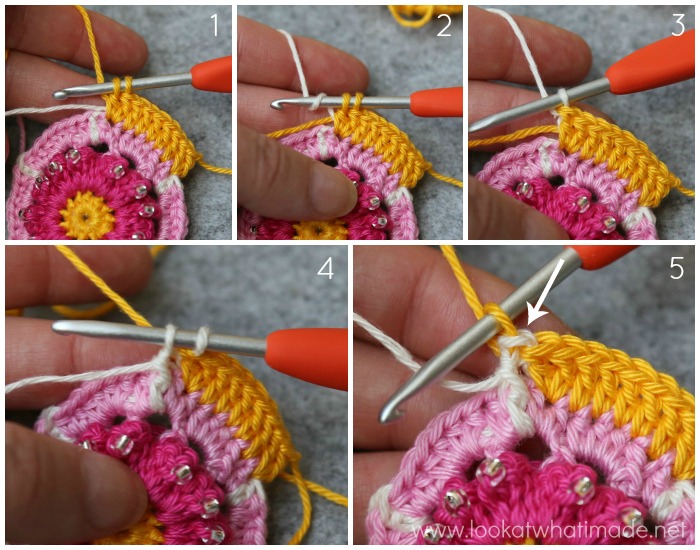
Change colour on the last yarn-over of the last st before the colour change. To do that, drop the yarn you are working with when you have two loops left on your hook {Photo 1}. Pick up the yarn you want to change to {Photo 2}. Yarn over and pull through both loops on your hook {Photo 3}. This ensures that the top of the next st will be the same colour as the post of that st {Photos 4 and 5}. If you need any help with Stitch Anatomy, have a quick look at THIS PART of the Ubuntu CAL 2018 Information.
Carrying Yarn
You should always work OVER the ‘carried’ yarn (the colour you are not using for that portion of the round). The only exceptions are:
- When otherwise instructed
- When making front post stitches
- When only making ONE stitch in a specific colour
Invisible Join
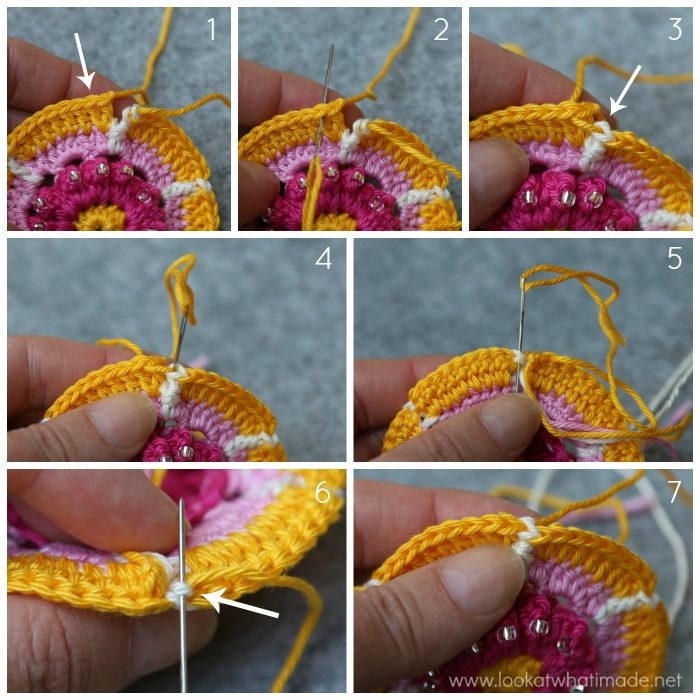
Once you have made all the required sts for the Round, cut your yarn, leaving a 10cm/4″ end. Pull this end all the way through the top of the last st made. Pick up your yarn needle and thread it with the end. Insert your needle under both loops of the second st of the round, working OVER the first st {Indicated with an arrow in Photo 1 and illustrated in Photo 2}. Pull the yarn tight, but not too tight{Photo 3}.
Insert your needle into the top of the last of the round {Indicated with an arrow in Photo 3 and illustrated in Photos 4 (Front) and 5 (Back)}. You want to insert it straight down into the eye formed by the loops. Make sure that you insert your needle through the third loop behind the st as well. Pull your yarn through. This will form a “false” st on top of the first st. Make sure that you don’t pull it too tight. You want this “false” st to be more or less the same size as your other sts {Photo 7}.
To secure this st, insert your needle from top to bottom into the third loop behind the st and pull the yarn through again {Photo 6}. Now work away your yarn ends.
Keeping Track of Colours
If you would like a simple way to keep track of which colour is which as you work, feel free to use the bookmark supplied in the Fancy Nancy pattern. The two patterns are sisters, after all :)
Instructions
With Yarn B, make a magic ring. Alternatively, ch4 and join to the first ch with a sl st to form a ring.
Round 1 {Yarn B}
Into the ring, ch 1 (doesn’t count as a st throughout), make 12 hdc. Cut Yarn B and join OVER the first hdc with an invisible join (see Notes above). {12 hdc}
Round 2 {Yarn D}
With a Yarn D sl knot on your hook, make a standing Shell in any st around. (Ch 3, make a Shell in the next st) 11 times. Ch 3. Cut Yarn D and join OVER the first dc with an invisible join. {12 Shells and 12 ch-3 sps}
Note: When making the Shells, they will hide the next st to be worked into. Make very sure that you don’t accidentally skip any sts and check that you have 12 Shells and 12 ch-3 sps before you go on to the next round. This round will look all kinds of wrong. Don’t worry about it :)
Round 3 {Yarn C}
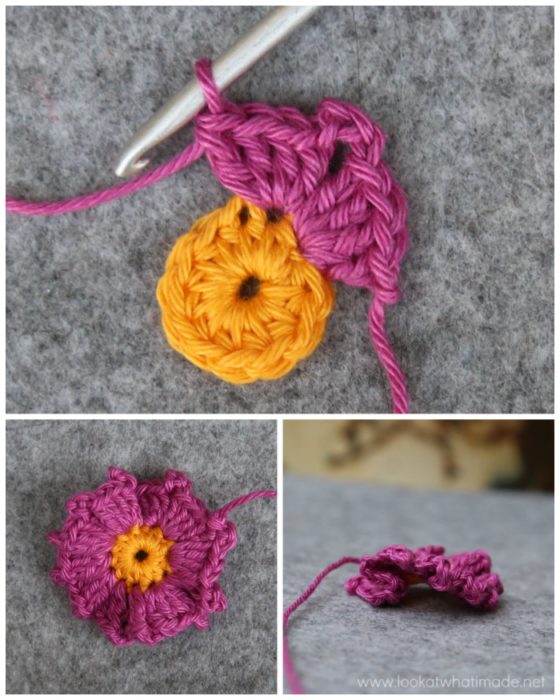
To make a FPsc around a Shell to turn it into a Popcorn, insert your hook from front to back into the ch sp before the Shell. Then insert it from back to front into the ch sp after the Shell {Photo 1}. Complete your sc as normal, making sure to pull on your yarn so that the Popcorn is nice and neat.
Join Yarn C by making a standing FPsc around any Shell. Ch 3. (FPsc around the next Shell, ch 3) 11 times. Join to the first sc with a sl st {Photo 2}. {12 FPsc and 12 ch-3 sps}
Your centre will be raised (and will remain so). That is perfectly ok.
Round 4 {Yarn C and Yarn A}
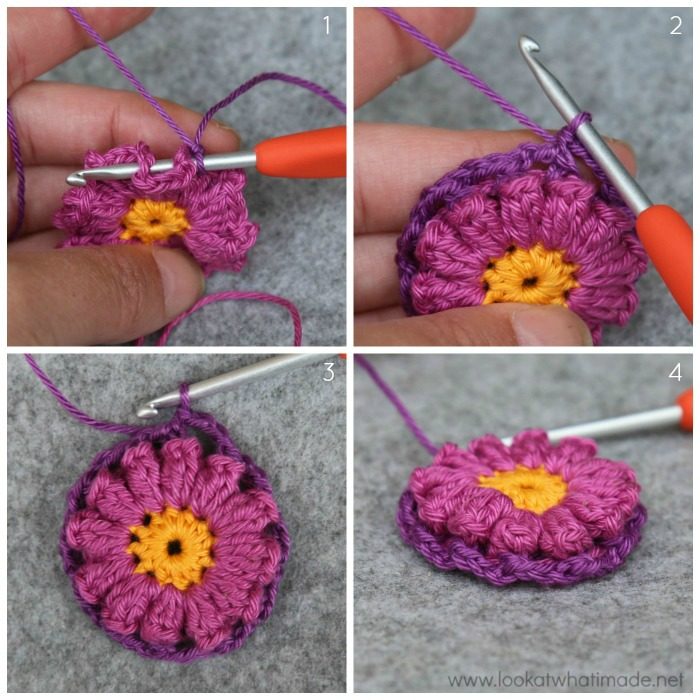
Sl st into the next ch-3 sp. Ch 1, make 4 hdc in the same ch-3 sp.
*[2 hdc, change to Yarn A, dc, change to Yarn C, hdc] in the next ch-3 sp. Make 4 hdc in the next ch-3 sp.*
Rep from * to * 4 more times. [2 hdc, change to Yarn A, dc, change to Yarn C, hdc] in the last ch-3 sp. Cut Yarn C and join OVER the first hdc with an invisible join, making sure that Yarn A is BEHIND your work. {42 hdc and 6 dc}
Round 5 {Yarn B and Yarn A}
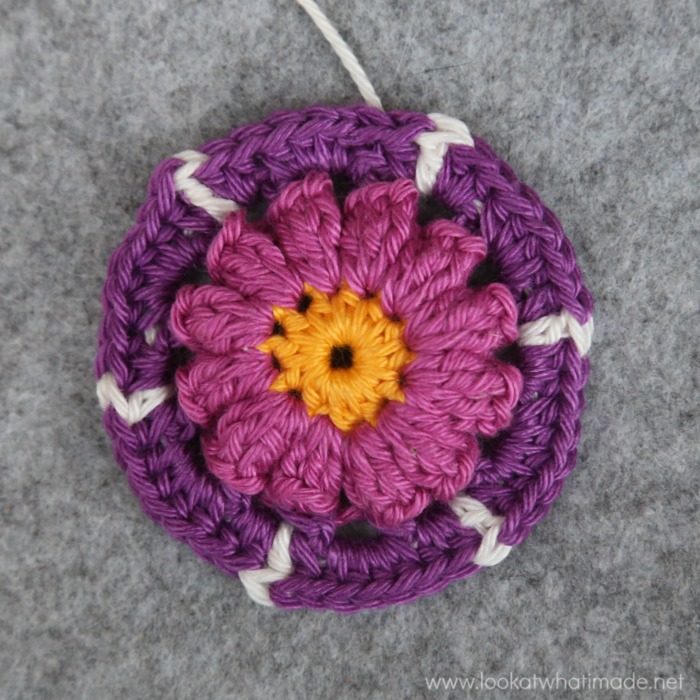
Please Note (here and throughout): You will always start your two-colour rounds as close as possible to end of the previous round. When making your first (standing) st, remember to work OVER Yarn A so that it doesn’t form a loop behind your work {Photo 1}.
Hint: From this point on, I will tell you which stitch to start each round in. If you find this confusing, it might help to mark that stitch with a stitch marker before starting the repeats.
With a Yarn B sl knot on your hook, start in the first Yarn C hdc after the last Yarn A dc with a standing st:
*Make 2 dc in the next st, dc in the next 5 sts, make 2 dc in the next st. Change to Yarn A and make a FPdc around the next Yarn A dc. Change to Yarn B {Photo 2}.*
Rep from * to * 5 more times. Cut Yarn B and join OVER the first dc with an invisible join, again (and throughout) making sure that your Yarn A end is BEHIND your work. {54 dc and 6 FPdc}
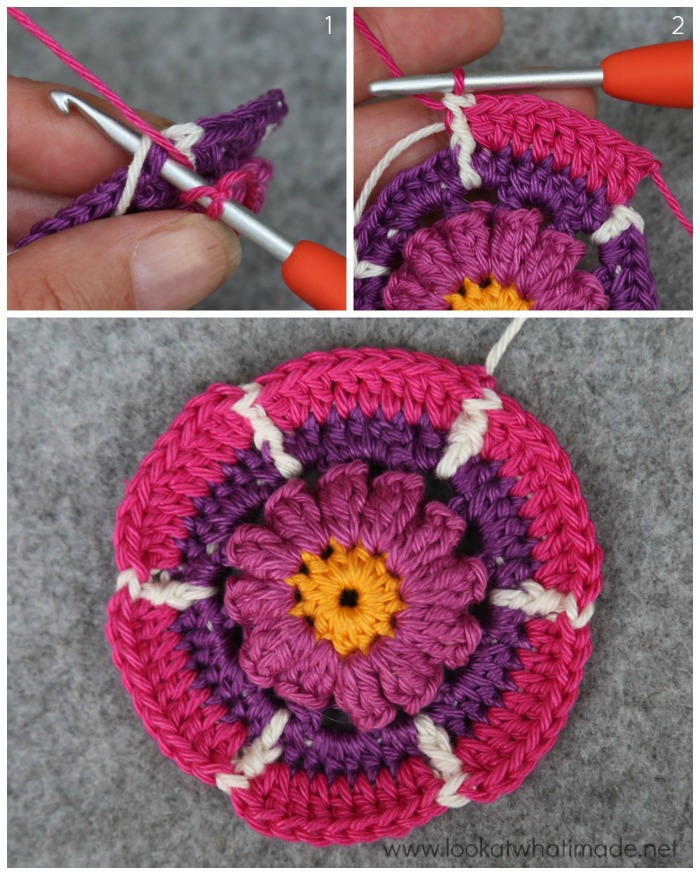
Round 6 {Yarn G and Yarn A}
With a Yarn G sl knot on your hook, start in the second Yarn B dc after the last Yarn A FPdc with a standing st:
*Dc in the next 7 sts. Change to Yarn A, skip the next st, FPtr around the next FPdc. Working behind the FPtr just made, dc in the skipped dc. Dc in the same FPdc, dc in the next Yarn B dc. Working in front of the dc just made, FPtr around the FPdc that already contains a FPtr. Change to Yarn G.*
Rep from * to * 5 more times. Cut Yarn G and join OVER the first dc with an invisible join. {60 dc and 12 FPtr}
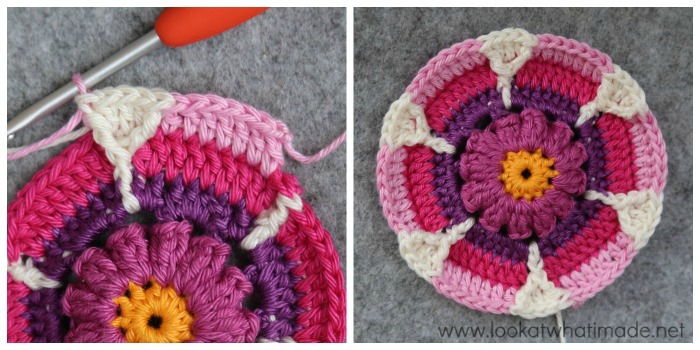
Round 7 {Yarn F and Yarn A}
With a Yarn F sl knot on your hook, start in the second Yarn G dc after the last Yarn A FPtr with a standing st:
*Dc in the next 5 sts. Change to Yarn A, skip the next Yarn G st, [FPtr, 2dc] in the next FPtr. Dc in the next 3 sts. [2dc, FPtr] in the next FPtr. Change to Yarn F, skip the next Yarn G st.*
Rep from * to * 5 more times. Cut Yarn F and join OVER the first dc with an invisible join. {72 dc and 12 FPtr}
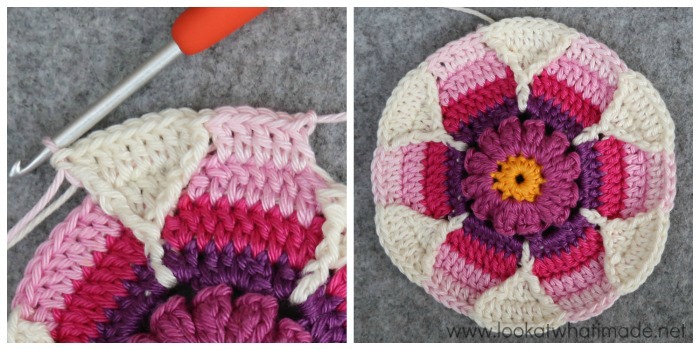
Round 8 {Yarn D and Yarn A}
With a Yarn D sl knot on your hook, start in the second Yarn F dc after the last Yarn A FPtr with a standing st:
*Dc in the next 3 sts. Change to Yarn A, skip next Yarn F st, FPtr around the next FPtr. Make 2 dc in the next dc. Dc in the next 6 sts. [3dc, FPtr] in the next FPtr. Change to Yarn D, skip the next Yarn F st.*
Rep from * to * 5 more times. Cut Yarn D and join OVER the first dc with an invisible join. {84 dc and 12 FPtr}
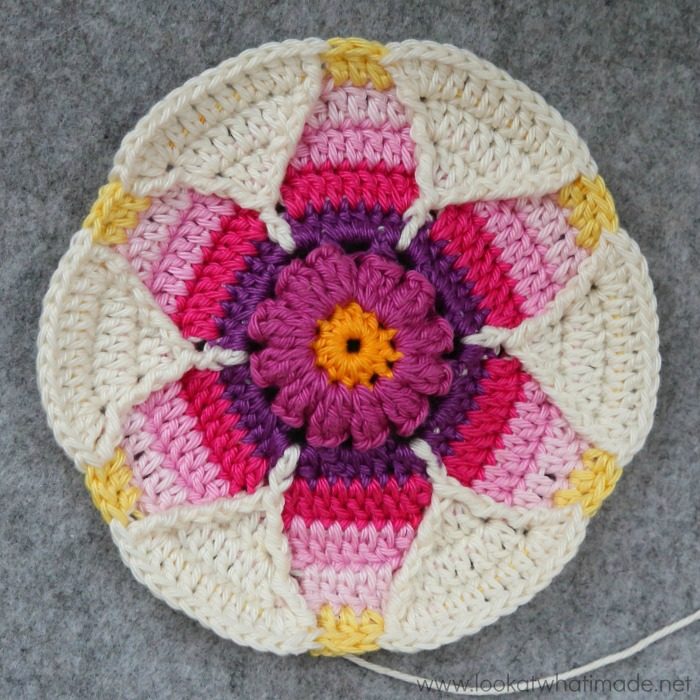
Round 9 {Yarn E and Yarn A}
With Yarn E sl knot on your hook, start in the first Yarn D dc after the last Yarn A FPtr with a standing st:
*Dc3tog. Change to Yarn A, FPtr around the next FPtr, (make 2 hdc in the next dc) twice. Sc in the next 8 sts. Make 2 hdc in the next dc. [2hdc, FPtr] in the next FPtr. Change to Yarn E {Photo 14}.*
Rep from * to * 5 more times. Cut Yarn E and join OVER the first dc3tog with an invisible join.
{48 sc, 48 hdc, 6 dc, and 12 FPtr}
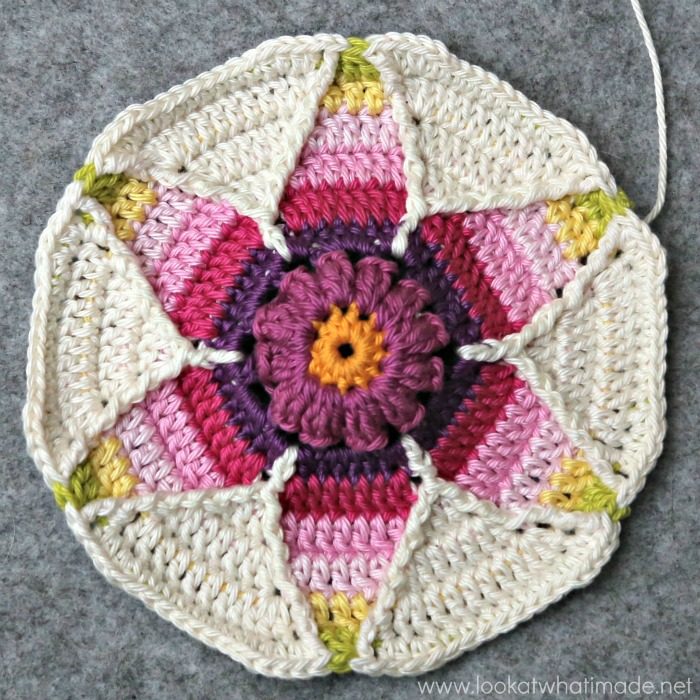
Round 10 {Yarn A}
Insert your hook into the last FPtr made {Photo 1} and pull Yarn A through to the front of your work. Ch 1 {Photo 2}.
*FPdc2tog, working around the FPtr and the next FPtr, skipping the Yarn E dc3tog between them {Photo 3}. Ch 2, skip the next st and sc in the next 3 sts. Hdc in the next st, dc in the next st. Ch 3, skip the next 2 sts and sl st in the next st. Ch 8 and sl st in the same st to form a loop. Ch 3 and skip the next 2 sts. Dc in the next st, hdc in the next st. Sc in the next 3 sts. Ch 2.*
Rep from * to * 5 more times. Join OVER the first FPdc with an invisible join and work away your ends.
{36 sc, 12 hdc, 12 dc, 6 FPdc 12 ch-2 sps, 12 ch-3 sps, and 6 ch-8 loops}
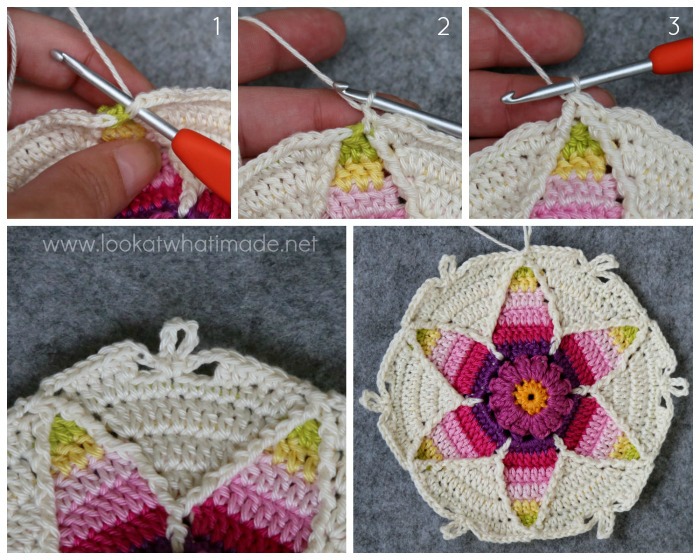
Round 11 {Yarn E}
With a Yarn E sl knot on your hook, start in any FPdc with a standing st:
*FPsc around the FPdc. Ch 2, skip the next ch-2 sp and the next sc. Make 2 dc in the next st. Dc in the next 2 sts. Make 2 dc in the next st, which should be the dc before the ch-3 sp. Ch 5. Skip the (Ch-3, ch-8, ch-3) spaces and make 2 dc in the next dc. Dc in the next 2 sts. Make 2 dc in the next st. There should now be one sc left before the next ch-2 sp. Ch 2, skip the next sc and the next ch-2 sp.*
Rep from * to * 5 more times. Join to the first FPsc with a sl st.
{6 FPsc, 72 dc, 12 ch-2 sps, and 6 ch-5 sps}
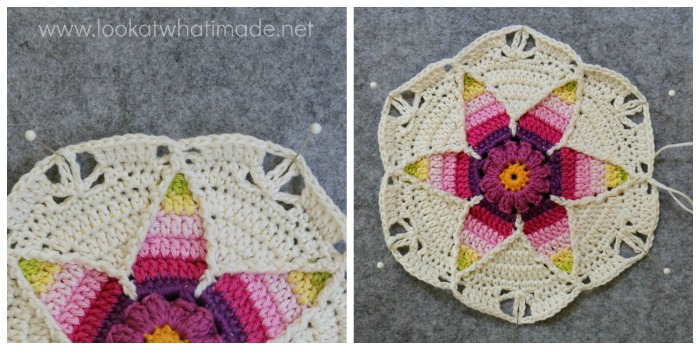
Round 12 {Yarn E}
Ch 1.
*FPdc around the FPsc. Ch 2. Make a dc2tog, making the first ‘leg’ in the ch-2 sp and the second ‘leg’ in the first dc after the ch-2 sp {Photo 1}. Dc in the next 4 sts. Make 2 hdc in the next st {Photo 2}. Make 2 hdc in the next ch-5 sp. Catch the ch-8 loop by making a hdc through the ch-8 loop from Round 10 AND the ch-5 sp. Make 2 hdc in the same ch-5 sp {Photo 3}.
Make 2 hdc in the next st. Dc in the next 4 sts. Dc2tog, making the first ‘leg’ in the next st and the second ‘leg’ in the next ch-2 sp {Photo 4}. Ch 2.*
Rep from * to * 5 more times. Join to the first FPdc with a sl st.
{60 dc, 54 hdc, 6 FPdc, and 12 ch-2 sps}
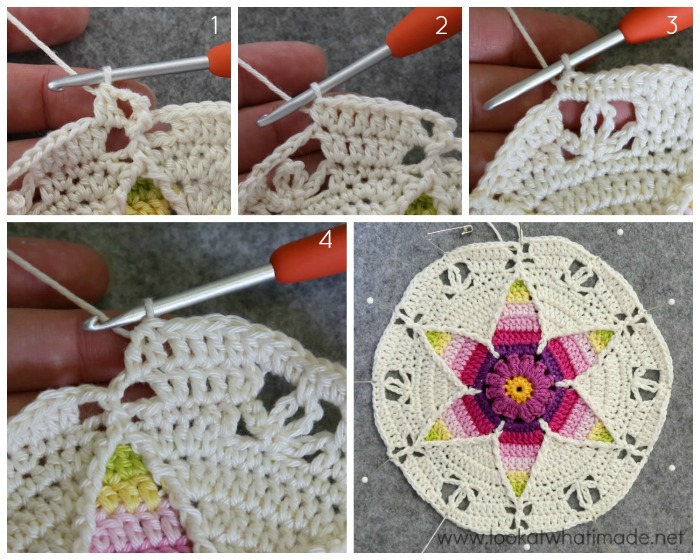
Round 13 {Yarn E}
Ch 1.
*FPhdc around the FPdc. Make 2 sc in the ch-2 sp. Sc in the next 19 sts. Make 2 sc in the next ch-2 sp.*
Rep from * to * 5 more times.
Join OVER the first FPhdc with an invisible join and work away your ends.
{138 sc and 6 FPhdc}
Round 14 {Yarn D}
I find it easiest to do this round in batches of 24 BPhdc, starting in a FPhdc and ending each 24-st repeat in the st before the next FPhdc. It helps with the counting 😊 Don’t worry if your rug curls up at this point.
With Yarn D sl knot on your hook, start in any FPhdc with a standing st:
BPhdc in each st around. Join OVER the first BPhdc with an invisible join and work away your ends.
{144 BPhdc}
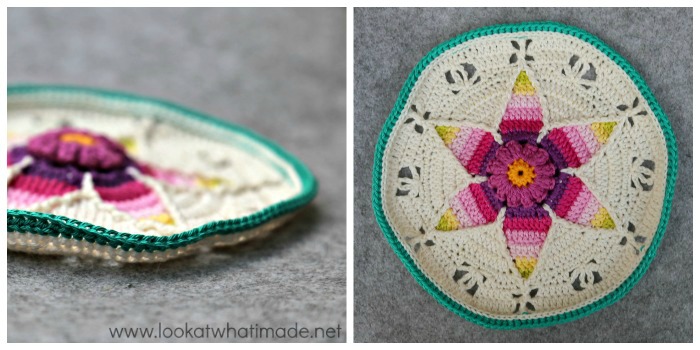
Please Note: If you are making this pattern with cotton yarn and you find that Round 14 makes your mandala curl up a lot (see photo above left), I suggest that you redo Round 14 with a slightly bigger hook and then continue using that hook for the rest of the pattern. A little bit of curling is fine, though 😊
Replacing Rounds 10 – 13 With a Solid Background
If you are not a fan of the lace detail in Rounds 10 – 12, you can replace Rounds 10 – 13 with the following solid rounds:
Round 10 {Yarn A}
Insert your hook into the last FPtr made and pull Yarn A through to the front of your work. Ch 1.
*FPdc2tog, working around the FPtr and the next FPtr, skipping the Yarn E dc3tog between them. Sc in the next 4 sts. Hdc in the next st, dc in the next 7 sts. Hdc in the next st. Sc in the next 4 sts.* Rep from * to * 5 more times. Join OVER the first FPdc with an invisible join and work away your ends.
{48 sc, 12 hdc, 42 dc, and 6 FPdc}
Round 11 {Yarn E}
With a Yarn E sl knot on your hook, start in any FPdc with a standing st:
*FPsc around the FPdc. Make 2 dc in the next st. Dc in the next 4 sts. Make 2 dc in the next st. Dc in the next 5 sts. Make 2 dc in the next st. Dc in the next 4 sts. Make 2 dc in the next st.* Rep from * to * 5 more times. Join to the first FPsc with a sl st.
{6 FPsc and 126 dc}
Round 12 {Yarn E}
Ch 1.
*FPdc around the FPsc. Dc in the next 7 sts. Make 2 hdc in the next st. Hdc in the next 5 sts. Make 2 hdc in the next st. Dc in the next 7 sts.* Rep from * to * 5 more times. Join to the first FPdc with a sl st.
{60 dc, 54 hdc, 6 FPdc, and 12 ch-2 sps}
Round 13 {Yarn E}
Ch 1.
*FPhdc around the FPdc. Sc in the next 23 sts.* Rep from * to * 5 more times. Join OVER the first FPhdc with an invisible join and work away your ends.
{138 sc and 6 FPhdc}

This blog post contains affiliate links. I only link to products I personally use or would use. All opinions are my own.


Laura SF says
Dedri, Thank you for this pattern! I loved making this rug. It is my first crocheted medallion rug. I fell in love with yours and had to make it for my master bathroom. I switched out the colors a bit so it would coordinate with our colors. Then I needed it to be 44 inches in diameter, so I repeated from the rick rack looking row out. Not sure if I can add a picture here or not, but I will try.
Nope. No way to add the pic. Sorry.
Jenny says
Hi Laura.
Do share a pic with us on the blog page on Facebook! We’d love to see your rug :)
BW Jenny and Dedri
Nancy Whitmire says
Hi I’m new to your blog and I fell in love with this rug. I can’t wait to make this. The colors are just exquisite. I just hope mine comes out as beautiful as yours did. Thank you for sharing and taking the time to go into great lengths to show all of us how this rug is made. When I get done with mine I will post a photo. Thank you
Dedri Uys says
Hi Nancy,
I would love to see yours when it is done. I am so glad that you like it x
Linda Robertson says
Your instructions look very detailed and easy to follow. However I am a beginner as I don’t know how to crochet. Would you have instructions such as these for a beginner blanket? I would love to learn to crochet
Dedri Uys says
Hi Linda.
If you are an adventurous beginner, you can try making the first Part of Sophie’s Universe. It has step by step videos to help you through each round. Esther, who created the videos, also has an extensive list of beginner-friendly tutorials, which you can find HERE.
Eulalia Isabel says
Hermoso, me encanta
saludos
Soffity says
This is beautiful Dedri. I’m wondering if it slips on the floor? I’m keen to make it but need to know if you have to put some sort of anti slip device under it. I have all wooden floors so have to be careful.
Dedri Uys says
Hi Soffity
We have carpeted floors, so I never add anti-slip. If you are at all concerned, though, you can find some hints on making rugs non-slip HERE.
RoyG says
Love that White overlay technique to reveal flower underneath. Thinking of White Flower and overlay as blue water. Um now how to do Lotus Leaves..
Dedri Uys says
Hello there stranger! I hope you are much better than when we spoke last. I’m glad you like the flower and shall look forward to seeing your Lotus Leaves :)
D