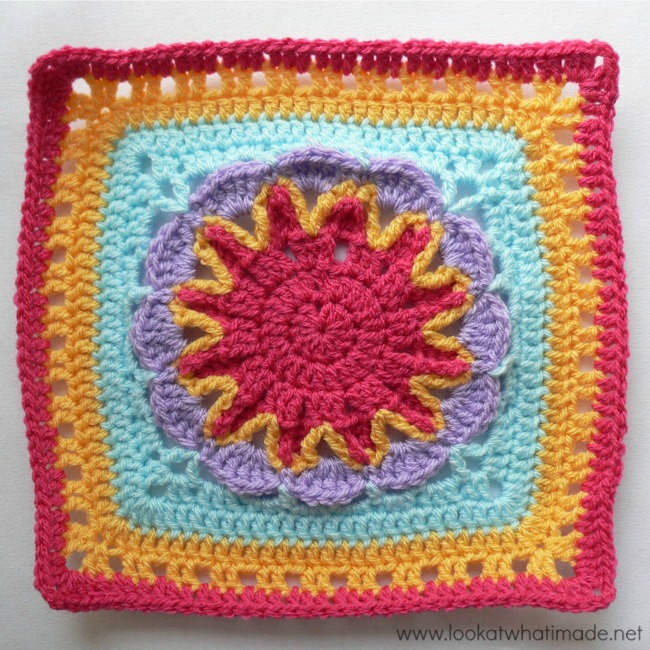
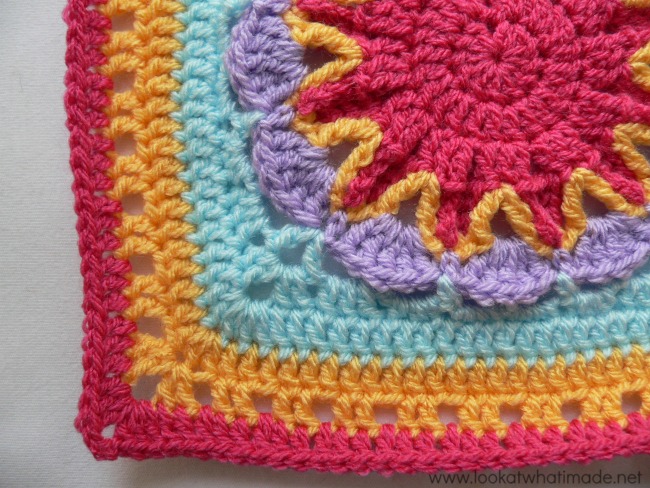
It’s Week 3 of the Official CCC Social Group CAL (crochet-along) and this week’s block is the Starburst Flower Square by Donna Mason-Svara (aka SmoothFox) from Smooth Fox Crochet and Knit. Donna has an amazing array of patterns and I urge you to go and have a look if you aren’t familiar with her patterns yet. You are sure to find something to distract you!
For those of you who aren’t familiar with the CAL, please see THIS INFORMATION POST.
The Starburst Flower Square is classed as intermediate and this is pretty much spot on. It is not a hard square by any stretch of the imagination, but there are quite a few places where you might find yourself scratching your head.
As requested by Kimberly Slifer, and with kind permission from the designer, Donna Mason-Svara, I have done a bit of a photo walk-through for Rounds 3-6. Hopefully this will help those of you who do not yet consider yourselves intermediate crocheters.
Starburst Flower Square
Pattern
- You can find the pattern here on Ravelry
Suggested Materials
- 5 mm Clover Amour Crochet Hook (US H/8 UK 6)
- Worsted weight yarn
Size
Using the hook and yarn specified, your square should be a nice even 12″ when you are done. Using a 4 mm crochet hook (US G/6 UK 8) and double knit yarn, as I have done, your finished square will be about 8″ big.
My Yarn and Colour Choices
I am using Stylecraft Special DK.
- Pomegranate (Rounds 1 – 3, 11, and Optional Round 12)
- Saffron (Rounds 4, 9 and 10)
- Wisteria (Round 5)
- Sherbet (Rounds 6-8)
Starburst Flower Square: The Tricky Bits
You will probably notice that the yarn I used for the photo tut is NOT Stylecraft. It is Drops Paris Cotton and it just photographs better.
Abbreviations
US terminology used (US/UK Comparison Chart)
| Ch | Chain |
| Dc | Double crochet |
| Dc inc | Double crochet increase |
| Sc | Single crochet |
| Sl st | Slip stitch |
| St/St’s | Stitch/Stitches |
| Tr | Treble crochet |
| * | Repeat all instructions between asterisks the amount of times specified. |
Round 2
At the end of Round 2 the instructions tell you to slip st to the beginning dc. The initial ch-3 of the round counts as a dc, so this means that you should sl st to the top of the beginning ch-3, NOT the first actual dc, otherwise you will only have 23 st’s to work with in the next round.
Round 3
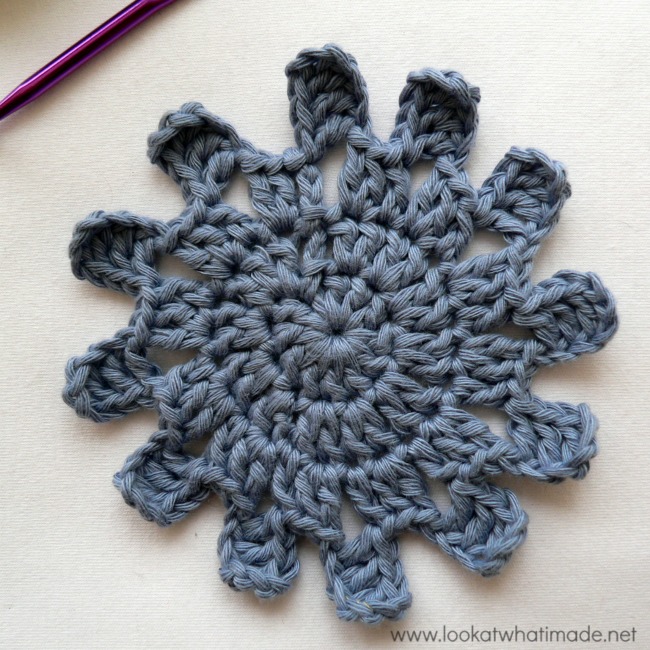
For Round 3 you will need to know how to make a 4 dc point, which is explained below.
Round 3 starts: “Ch 3, 2 dc in the next st”. So ch 3 and make 2 dc’s in the next stitch like the lady says.
Now you are going to make the first 4 dc point. To do that, ch 6 (Photo 1). Dc in the fourth chain from the hook (indicated with an arrow in Photo 2 and illustrated in Photo 3). Dc in the remaining 2 ch st’s (indicated with arrows in Photo 3 and illustrated in Photo 4). This drifting-in-air bit is your 4 dc point.
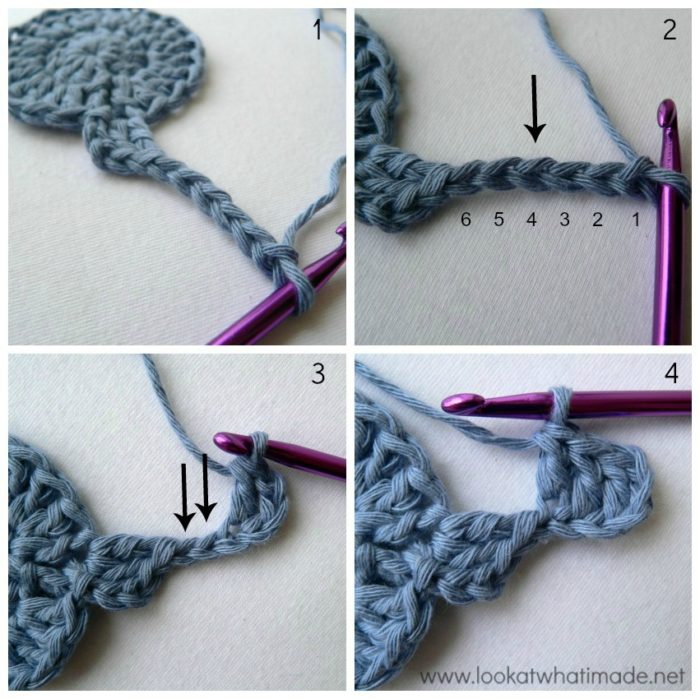
*Dc in the next st (Photo 5), make 2 dc’s in the next st (Photo 6), and make a 4 dc point as instructed above (Photo 7).* Repeat these instructions until you have 12 4-dc points, each separated by 3 dc’s (Photo 8). Join to the top of the beg ch-3 with a sl st and bind off (Photo 9). I like to ch-1 before I bind off. By pulling this chain stitch tight, I am creating a little knot that will help my slip knot stay where it should. It is not visible once you work the next round over it.
Voila. Round 3 Completed!
Round 4
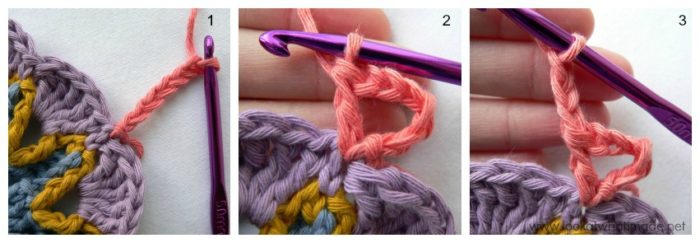
If you take a good look at Round 3, you will notice that there are 12 4-dc points, each separated by 3 double crochet stitches. In Round 4 you will be working into the second chain stitch at the end of each 4 dc point and the second of the three dc’s between points (so the middle chain stitch and the middle dc). Don’t worry if that doesn’t make sense, it soon will.
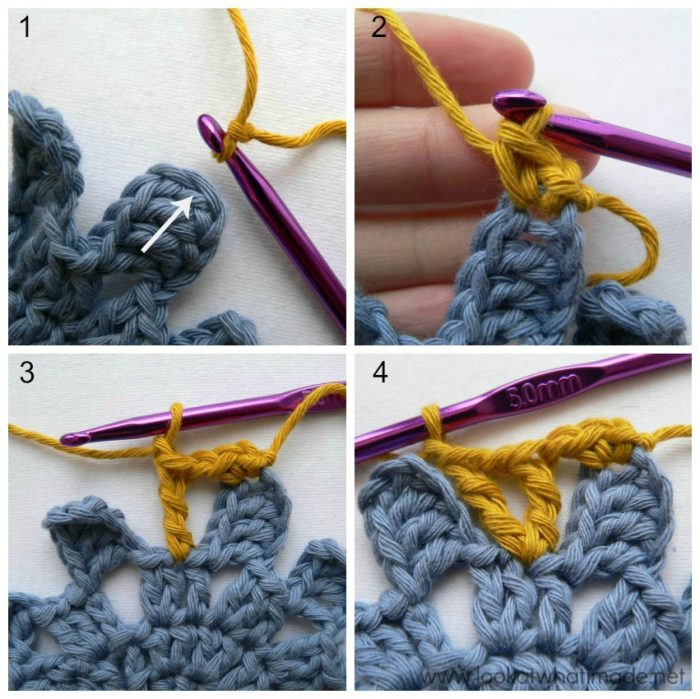
Round 4 starts with a sl st in the second chain of any point around (so the middle chain stitch) – see Photo 1. I like to start with a slip knot already on my hook. Ch 1 and make a sc in the same stitch (Photo 2). Ch 1 again.
I have followed these instructions for this tutorial, but you can also join your yarn by just making a single crochet into that central chain and skipping the (sl st, ch-1.)
Into the second of the three dc’s between points: tr, ch 1 (Photo 3), tr, ch 1 (Photo 4).
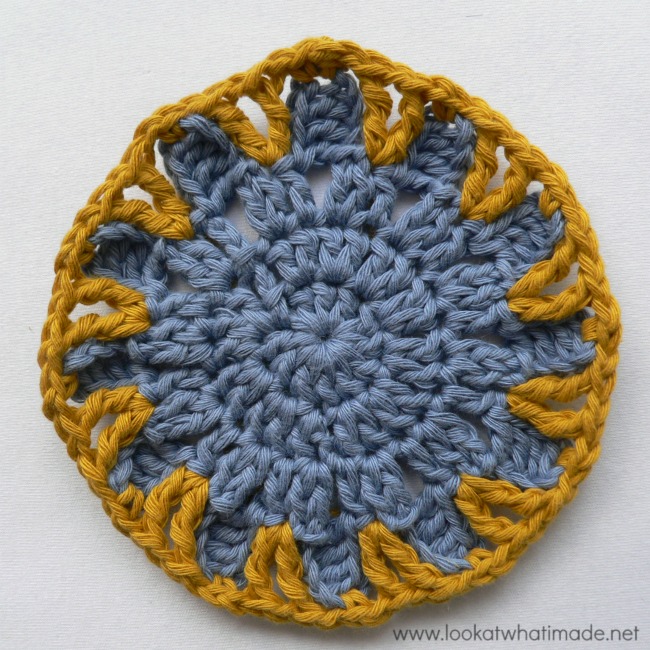
*Into the second chain of the next point (Photo 5): sc, ch-1. Into the second of the three dc’s between points: tr, ch-1, tr, ch-1.* Repeat around until you get back to the beginning. Join to the first sc with a sl st (NOT the ch st).

This is what your work should look like at the end of Round 4.
Round 5
In round 5 you will be working into the single crochets on top of the 4-dc points and the ch-1 spaces between the 2 tr’s of the previous round.
So join your yarn by working a sl st followed by a ch-1 into any sc of Round 4 (indicated with an arrow in Photo 1 and illustrated in Photo 2). Sc in the same stitch.
Into the ch-1 space between the 2 treble crochet stitches: 5 x tr (indicated with an arrow in Photo 3 and illustrated in Photo 4).
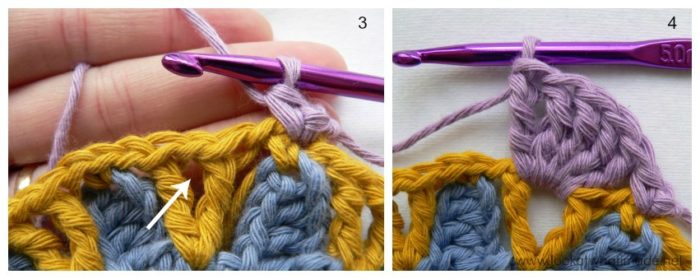
*Sc in the next sc, 5 x tr in the next ch-1 space between tr’s*. Repeat around until you have made 12 scallops (Photo 6). Join to the first sc with a sl st.
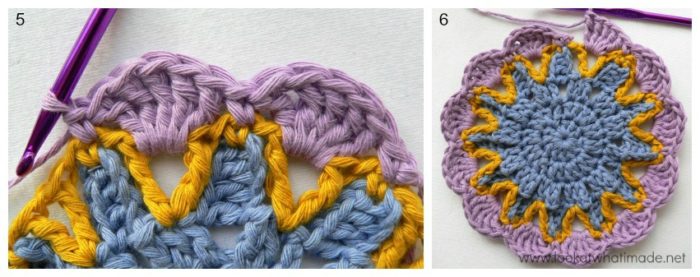
Another pretty flower! Only one more “thinking” round to go and then you can kick back.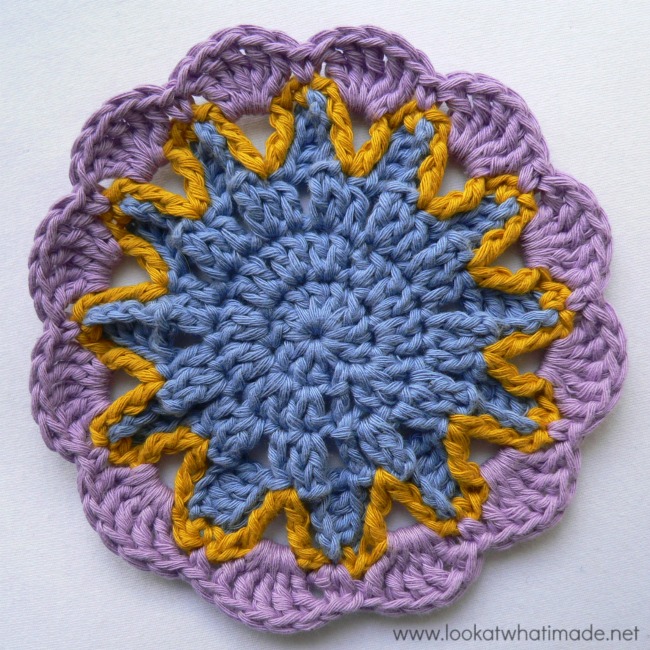
Round 6
The single crochets in this round will be worked into a hidden horizontal ridge BEHIND the back loop of the central treble crochet of each scallop and I am going to help you find that hidden ridge/loop.
Join your yarn by making a sl st in any sc from Round 5. Ch 6 (Photo 1) and dc in the same st (Photo 2). This forms your first corner. Ch 3 (Photo 3) and brace yourself for a treasure hunt.
When you are looking at your work you can only see the front loop and the back loop. Photo 4 shows the front of the stitches. If you twist your work slightly towards you, you will see a horizontal ridge behind the back loop (indicated with an arrow in Photo 5). This is the ridge/loop you need to make your next stitch (and each subsequent sc) into.
So once you have found the horizontal ridge of the central tr (the third of the 5 tr’s forming the scallop), make a sc into it (Photos 6 and 7).
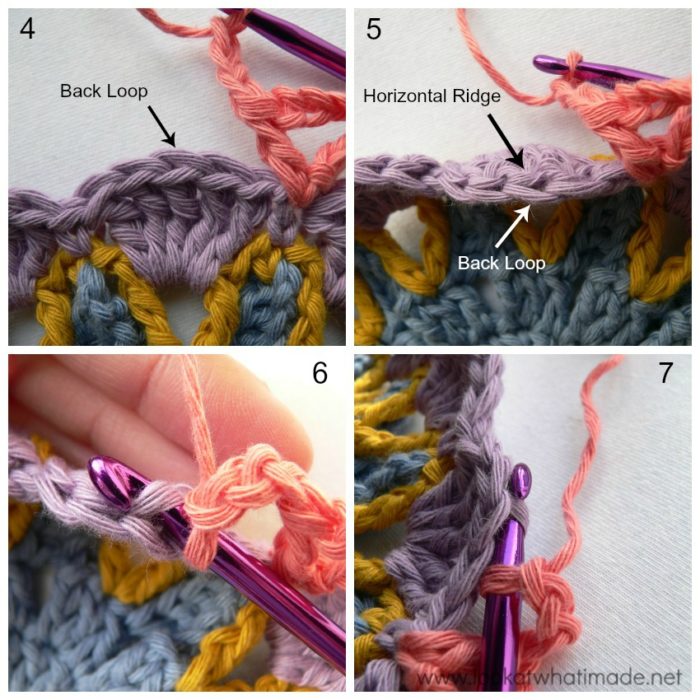
Photo 8 shows the completed sc worked into the horizontal ridge behind the back loop of the central tr.
Ch 3 and hdc into the next sc (Photo 9). Ch 3, sc in the horizontal ridge behind the central tr, ch 3, hdc in the next sc, ch 3, sc in the horizontal ridge behind the central tr, ch 3. This is your first side completed (Photo 10).
For each of the next 3 sides: (Dc, ch 3, dc) in the next sc (Photo 11). This is your corner. *ch 3, sc in horizontal ridge behind central tr, ch 3, hdc in the next sc* x 2. Ch 3, sc in the horizontal ridge behind the central tr, ch 3.
When you get back to the beginning, join to the beg ch-3 with a sl st.
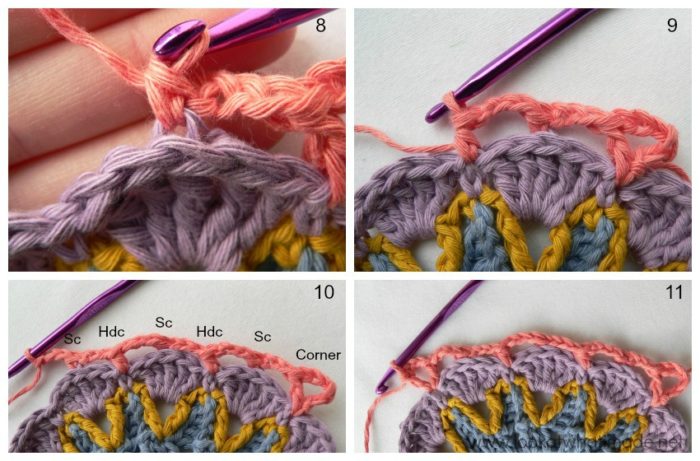 This is what you should end up with at the end of Round 6.
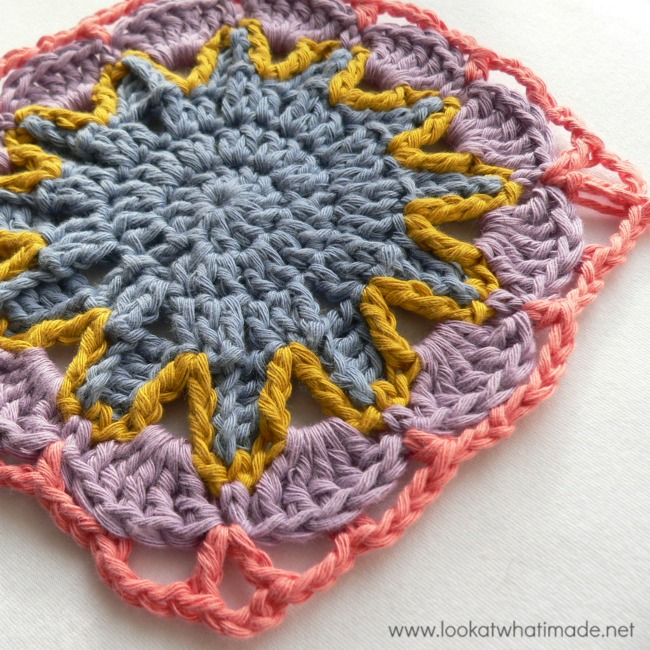
And that is all I have to say about it :) From this point on the square is straightforward and easy. So grab a cuppa, go sit down in your favourite spot, and let the magic happen.
If you have any problems with your stitch counts, check out this tutorial about corners and the elusive “hidden” stitch to make sure that you are not skipping the first stitch right after making a corner.
I hope you have found this walk-through helpful. If you have any questions, or something isn’t clear enough, please feel free to ask! Also, if you spot an error, please let me know so that I can correct it.
Remember to subscribe to my Weekly Newsletter if you would like to be kept in the loop. You can also like my Facebook page or follow me on Bloglovin, Google+, Pinterest, Twitter, or Instagram.
Happy Hooking!





mandy says
I so should have looked at your explanation, my round 4 is quite different and I have a slightly bobbly paisley thing happening. It actually worked out nicely because I made the same mistake all the way around LOL.
Julia says
Hi Dedri,
On the print friendly button here I keep getting a creamy chicken lasagne. Is it me or is the link incorrect?
Many thanks
Julia
Dedri Uys says
Hi Julia. There is no link. Printfriendly is an independent website that allows you to grab the information from the website you are currently visiting. If you are getting creamy lasagne, I have now idea what is happening as I don’t even have a recipe for creamy lasagne on my website. Maybe just give it another go in a little while? Sometimes an out-of-date browser (like running an older version of Internet Explorer) messes with how my website communicates with you.
I hope that helps,
Dedri
Julia says
Hi Dedri,
That’s clever stuff! I tried it before in a new tab and several times over an hour and kept getting the same thing. Tried it just now and it worked perfectly. Very strange but glad it worked.
Thanks for the brilliant clear tutorials and wonderful patterns :-)
Julia
Karen says
Thank you so much for your tutorials, Dedri, you explain them so well. Really helps a novice like myself.
Regards
Karen
Dedri Uys says
Just a pleasure, Karen. I get a huge kick out of knowing that someone is finding them useful. These designers are amazing and I love doing these tutorials.
Mary says
Well, now I am sitting here with a cup of Boston tea, cat on my lap in the garden room looking at my completed block 4 -YES!! moving along. Wow, round 6 without picture 10 would have been a rough one. Again, your help is wonderful. Thanks so much.
Cindy says
Round 1-4 done…! Thanks for explaining it with pictures!!
Dedri Uys says
Excellent, Cindy x
manya says
Please sign me up for your newsletter. I hope that will have the next block.
manya says
your blocks are beautiful and I’d like to join to know when you’re having another block on this site. But I’m not on Facebook and don’t want to be. So what do I do – how often should I check back here? Or is there another solution????
Dedri Uys says
Manya, I will be sharing the blocks every Sunday evening (Monday at the very latest if everything goes pear-shaped). So you can just follow along on here :)
Dedri Uys says
There will be a new block each week, so if you check in once a week you will be grand :)
Joanne Morrow says
Dedri, thanks so much for the great tutorial. I followed your rows 3 – 7. It was so helpful to see the stitches and your explanations were so helpful! Thank you!!
Dedri Uys says
Thank you, Joanne :)
Rhondda Mol says
Excellent explanation :) and I love the colours you used in your square!! It looks fabulous Dedri :)
Mindi says
Thank you, Dedri. I was confused in Round 6, but it was quite logical once I saw your photo.
Dedri Uys says
Just a pleasure, Mindi. I am glad you found it useful :)
Kim says
Dedri, you are the best!!! Your block is beautiful and I just love the colors :)
Dedri Uys says
Thank you, Kim. I’m starting to regret going to rainbow-route. Picking colours every week is hard!