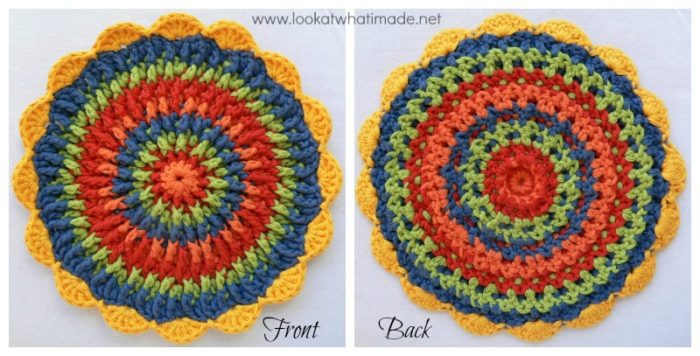
This Frenzied Crochet Potholder could also be used as a trivet. The use of front post stitches yields a lovely, dense fabric that has got tons of texture. I just love playing with front post stitches, but I know that they can be daunting to some people. With this step-by-step tutorial, however, I am hoping that even a moderate beginner will be able to tackle (and master) them with ease.
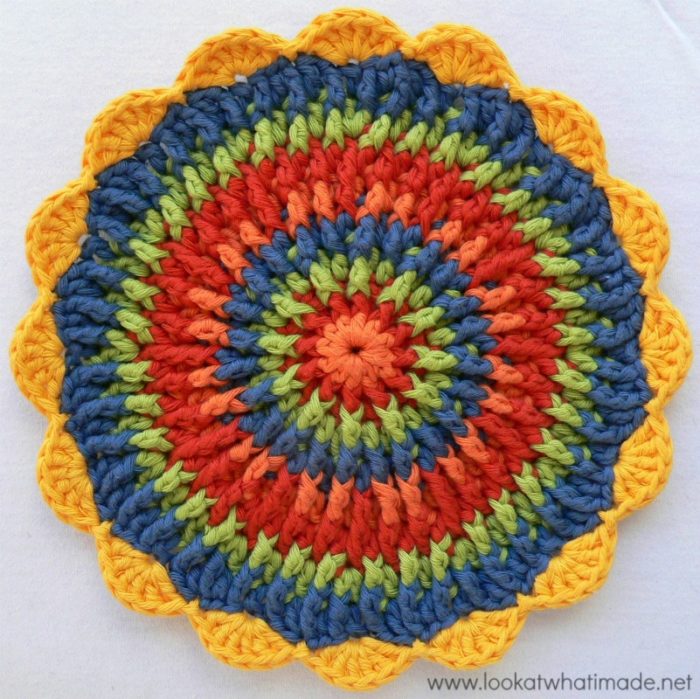
Like most of my patterns, this potholder has dreams of one day becoming something bigger than just a potholder. So if you are lucky, you might see it morph into something else in the not-too-distant future.
Update: You can now find the ‘grown-up’ version of this pattern HERE as the King Protea Mandala.
Front Post Frenzy Potholder Photo Tutorial
©Dedri Uys 2014. All Rights Reserved.
Resources
- Add the pattern to your Ravelry Queue
- I am very excited to tell you that this pattern is now also available as a Podcast by Underground Crafter.
- If you would like to print this pattern, use the PrintFriendly button below the post.
Difficulty
Intermediate
Gauge
Using worsted weight yarn and dc stitches:
8 rows and 20 st’s per 4” (10 cm) square.
Size
7.5” (19 cm) in diameter.
Materials
- 4 mm crochet hook (US G/6 UK 8)
- Worsted weight yarn or double knit yarn (light worsted weight) – approx. 65 m/ 71 yards
- Yarn Needle
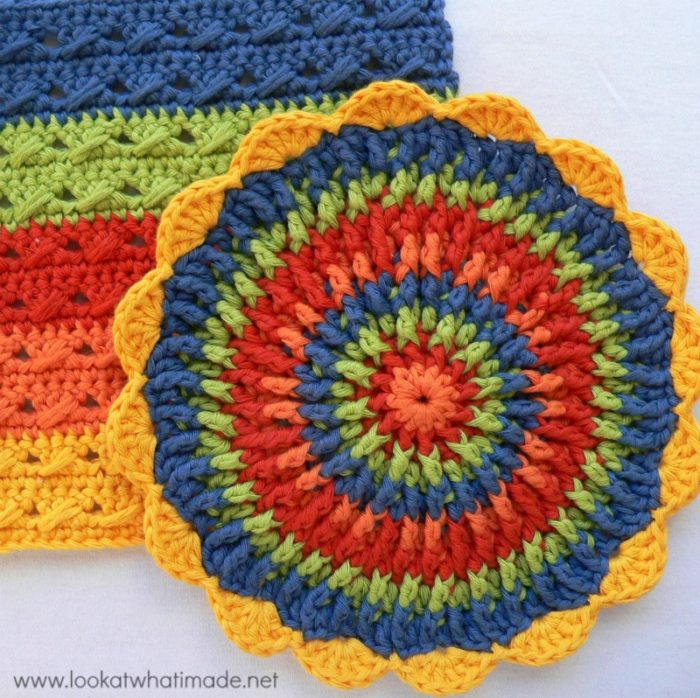
I used DROPS Paris Cotton in the same 5 shades that I used for Sophie’s Mandala (Small) and my Cable Stitch Dishcloth (pictured above).
Abbreviations
US Terminology used (US/UK comparison chart here)
- Dc – Double crochet
- Fpdc – Front post double crochet
- Fpdtr – Front post double treble
- Fptr – Front post treble crochet
- Sl st – Slip stitch
- St/s – Stitch/stitches
- * – Repeat instructions between asterisks the amount of times specified. This is a hardcore repeat and will consist of multiple instructions.
- () – Repeat instructions between parentheses the amount of times specified. This is a lower level repeat.
Notes
- The initial ch st’s in each round are counted as a stitch.
- In this pattern, most of the increases will be made by working into the top of a specific stitch (in other words, through both loops as you normally would) AND around the posts of that same stitch (where indicated).
- If you want to bookmark a short tutorial for the front post increases used below, see this post, which covers the first 3 rounds found below.
Instructions
Round 1
This round is just a standard double crochet circle.
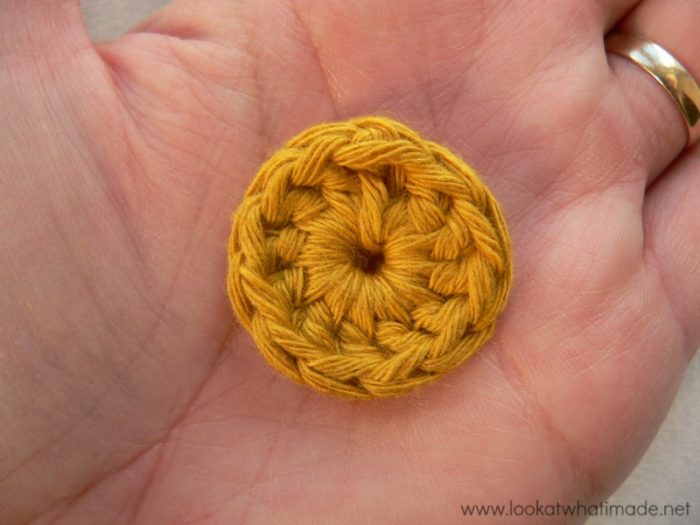
Into a magic ring: ch 3 (this counts as your first dc). Make 11 dc’s into the ring. Join to the top of the beginning ch-3 with a sl st.
If you are not familiar with working into a magic ring, this video tutorial by Tamara from Moogly is very good. Please remember, when working into a magic ring you HAVE to work away your initial tail very well. If you just cut it, your whole project might unravel!
Stitch count: 12 dc’s
Round 2
- If you are using the same colour, ch 3 (this counts as your first dc) and make a fpdc around the beginning ch-3 of the previous round.
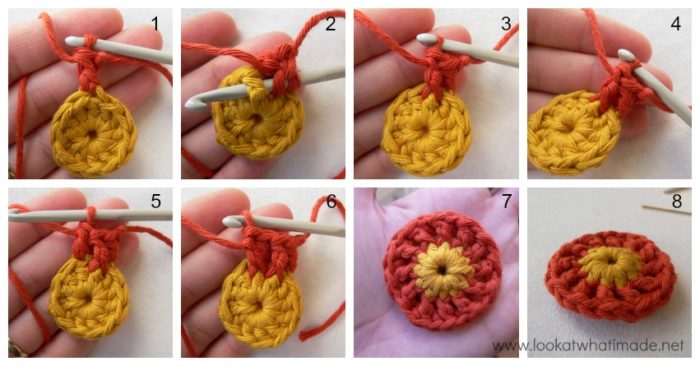
- If you are using a new colour, join your yarn by making a standing double crochet in the same st as the sl st join (Photo 1) and then make a fpdc around the beginning ch-3 of the previous round(Photos 2 – 4) .
(Dc in the blo of the next dc (Photo 5), make a fpdc around the post of the same stitch – see Photo 6) in every stitch around. Join to the top of the beginning ch-3 (or the standing double crochet) with a sl st. Photos 7 and 8 show you what your circle should look like at the end of this round.
Notice that the regular dc’s between front post dc’s are slightly squished down.
Stitch count: 24 st’s {12 dc’s and 12 fpdc’s}
Round 3
- If you are using the same colour, ch 3 (this counts as your first dc).
- If you are using a new colour, join your yarn by making a standing double crochet in the same st as the sl st join (Photo 1).
*Dc in the next st (which will be the fpdc from the previous round – see Photo 2) and make a fptr around the post of the same stitch (Photos 3 and 4). Dc in the next st.* Repeat from * to * 11 times (Photo 5). Omit the last dc on the last repeat. Join to the top of the beginning ch-3 (or the standing double crochet) with a sl st.
You will notice that the dc’s aren’t squished down. If anything, they are now “pulling” the fptr’s down to their heigh. This circle will be the same size as the standard dc circle.
Stitch count: 36 st’s {24 dc’s and 12 fptr’s}
Round 4
- If you are using the same colour, ch 3 (this counts as your first dc) and then make a fptr around the beginning ch-3 of the previous round (or the post of the standing double crochet).
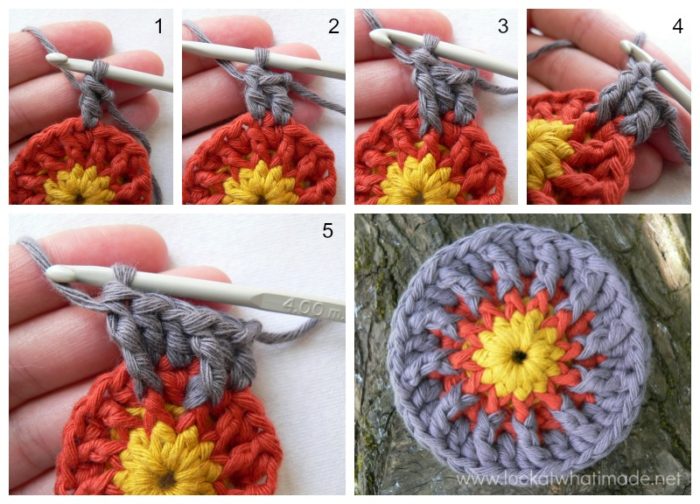
- If you are using a new colour, join your yarn by making a standing double crochet in the same st as the sl st join and then make a fptr around the beginning ch-3 of the previous round (or the post of the same standing double crochet) – indicated with an arrow in Photo 1 and illustrated in Photo 2.
Dc in the next dc (Photo 3), fptr around the post of the next fptr (Photo 4). *Dc in the next dc, fptr around the post of the same stitch, dc in the next dc, fptr around the post of the next fptr.* Repeat from * to * 10 times. Join to the top of the beginning ch-3 (or the standing double crochet) with a sl st.
Stitch count: 48 st’s {24 dc’s and 24 fptr’s}
Round 5
- If you are using the same colour, ch 3 (this counts as your first dc).
- If you are using a new colour, join your yarn by making a standing double crochet in the same st as the sl st join (Photo 1).
*Dc in the next st (which will be the fptr from the previous round – see Photo 2) and make a fptr around the post of the same stitch (indicated with an arrow in Photo 2 and illustrated in Photo 3). Dc in the next dc (Photo 4), fptr around the post of the next fptr (indicated with an arrow in Photo 4 and illustrated in Photo 5), dc in the next dc.* Repeat from * to * 11 times. Omit the last dc on the last repeat. Join to the top of the beginning ch-3 (or the standing double crochet) with a sl st.
Count your stitches at the end of this round! You are going to be mightily annoyed if you realize later that you’ve goofed up (like I did).
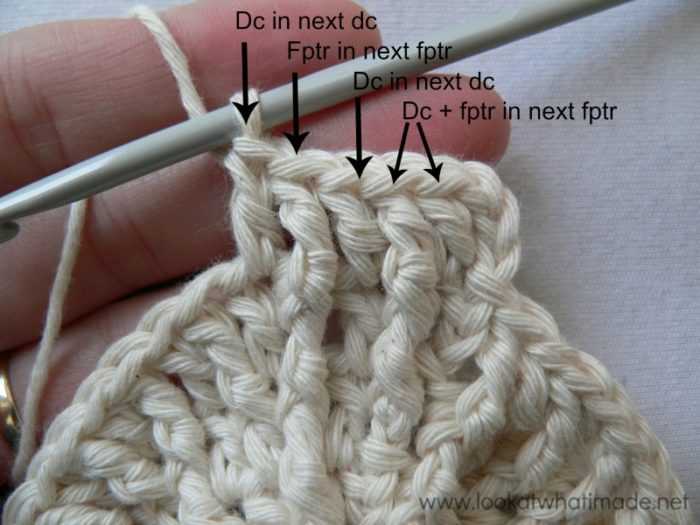
If you are having trouble with Round 5, look at the extra hints below the following photo.
Stitch count: 60 st’s {36 dc’s and 24 fptr’s}
Having Trouble with Round 5?
Here is another photo of the first repeat.
If you have trouble distinguishing between the normal stitches and the front post stitches, have a look at the bottom of each stitch. If the bottom of the stitch is flat, it’s a normal stitch. If the bottom of the stitch looks like a gnarly tree root, knotted around the stitch from the previous round, it’s a front post stitch.
Have a look at the last round of stitches. Can you tell which ones are normal and which ones are front post stitches?
Round 6
In this round, you will be working into the stitches of Round 4 only where indicated. The rest of the stitches are all made into Round 5.
- If you are using the same colour, ch 3 (this counts as your first dc) and then make a fpdtr around the post of the dc in Round 4 directly below the stitch you just worked into.
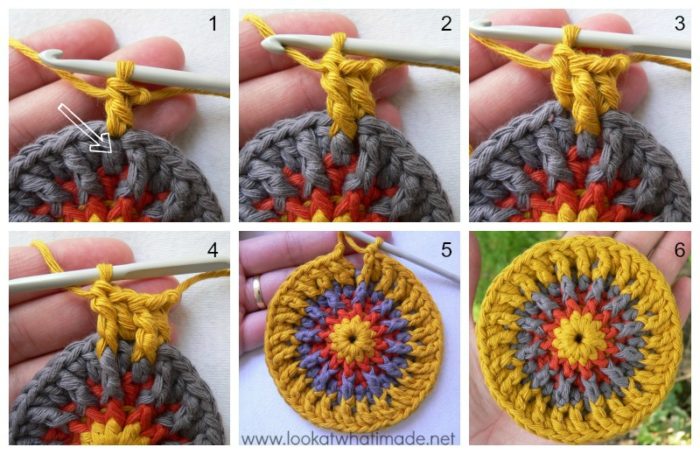
- If you are using a new colour, join your yarn by making a standing double crochet in the same st as the sl st join (Photo 1) and then make a fpdtr around the post of the dc in Round 4 directly below the stitch you just worked into (indicated with an arrow in Photo 1 and illustrated in Photos 2 and 3).
(Dc in the next dc, fptr around the post of the next fptr) twice- see Photos 4 – 7. *Dc in the next dc, fpdtr around the post of the dc in Round 4 directly below the stitch you just worked into. (Dc in the next dc, fptr around the post of the next fptr) twice.* Repeat from * to * 10 times. Join to the top of the beginning ch-3 (or the standing double crochet) with a sl st.
Stitch count: 72 st’s {36 dc’s, 24 fptr’s, and 12 fpdtr’s}
Round 7
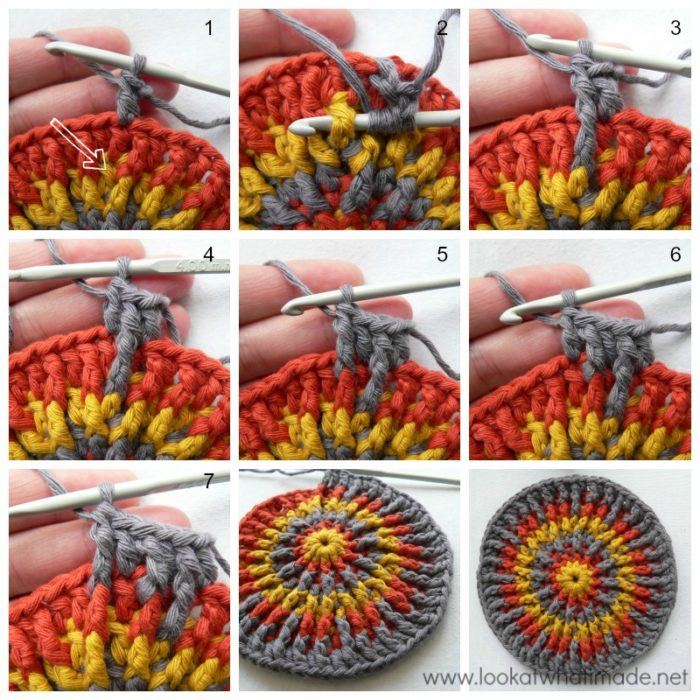
- If you are using the same colour, sl st into the next st (which will be the fpdtr). ch 3 (this counts as your first dc) and then make another dc in the same stitch.
- If you are using a new colour, join your yarn by making a standing double crochet in the stitch after the sl st join (which will be the fpdtr). Then make another dc in the same stitch (Photo 1).
*(Fptr around the post of the next dc – see Photo 2, dc in the next fptr) twice. Fptr around the post of the next dc (Photo 3). Make 2 dc’s in the next fpdtr.* Repeat from * to * 11 times. Omit the last 2 dc’s on the last repeat. Join to the top of the beginning ch-3 (or the standing double crochet) with a sl st.
Stitch count: 84 st’s {48 dc’s and 36 fptr’s}
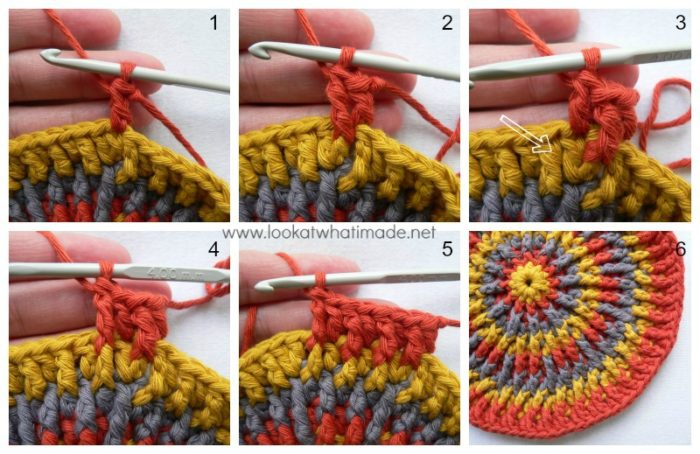
Round 8
- If you are using the same colour, ch 3 (this counts as your first dc) and then make a fptr around the beginning ch-3 of the previous round (or the post of the standing double crochet).
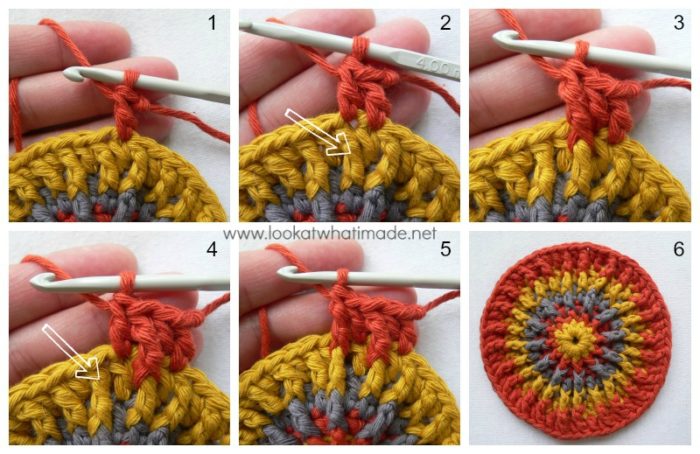
- If you are using a new colour, join your yarn by making a standing double crochet in the same st as the sl st join and then make a fptr around the beginning ch-3 of the previous round (or the post of the same standing double crochet) – see Photos 1 and 2.
(Dc in the next dc, fptr around the post of the next fptr) three times (Photos 3 – 5). *Dc in the next dc and make a fptr around the post of the same st. (Dc in the next dc, fptr around the post of the next fptr) three times.* Repeat from * to * 10 times. Join to the top of the beginning ch-3 (or the standing double crochet) with a sl st.
Stitch count: 96 st’s {48 dc’s and 48 fptr’s}
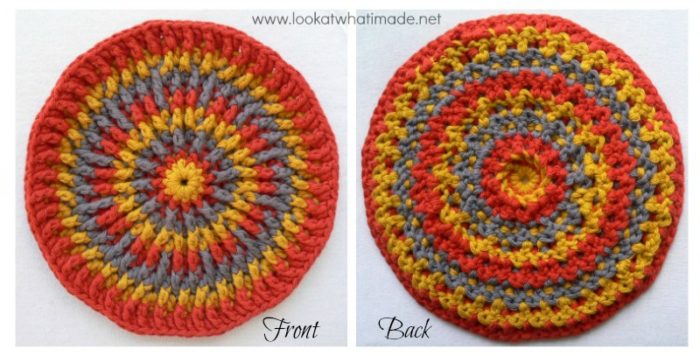
You now have a perfectly functionable potholder which is almost as pretty from the back as it is from the front!
But we are not done yet. You can now add a scalloped edge to make it look like a frenzied flower :)
Round 9 (Optional)
In this round you will be making decorative scallops.
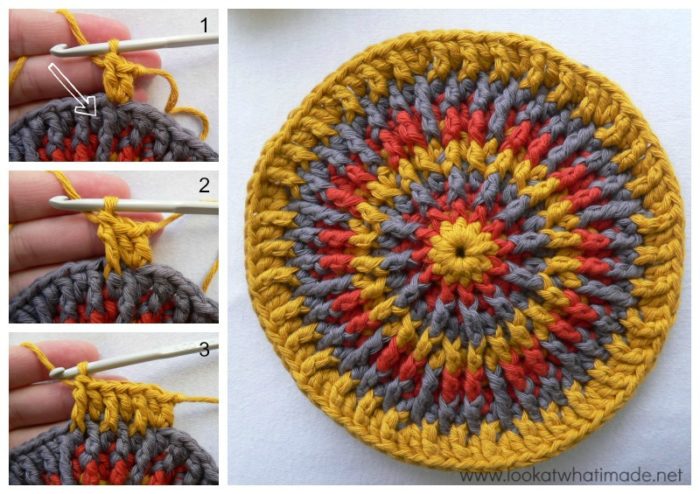
Join your yarn by making a sl st in any st around.
(Skip the next 2 st’s and make 6 dc’s in the next st. Skip the next 2 st’s and sl st in the next st) around. The last sl st should fall in the same st as the first sl st. Bind off and work away your tails of yarn.
Stitch count: 96 dc’s {16 6-dc scallops} – sl st’s are not included in the st count.
Thank you to Laurel Brown Spurlin, Claire Martin, Sara Steinberg Kersey, Beth Spaulding, Carolyn Robinson King, Rosanne Van de Peppel, and my mom (Minette Strydom) for testing the pattern for me!
Related Patterns

This blog post contains affiliate links. I only link to products I personally use or would use. All opinions are my own.


Arlene says
I am not a new crocheter but i have torn out second row numerous times. I keep ending up with 22 st instead of 24. Have no idea what i”m doing wrong. Im thing of using an H hook for first row then maybe i can see stitches better. Any help would be greatly appreciated.
Jenny Lowman says
Keep trying, Arlene!
Unfortunately we can’t offer help as such, apart from count every stitch of each round before continuing to the next. Maybe using stitch markers in various stitches might help you keep track?
Arlene says
I just love your pattern, you make it so easy to follow and understand, thank you so much, I am looking foreword to doing another one!!!
Dedri Uys says
Thank you!
Coral says
Do you have a video for this pattern? I’m having a really had time with row 4.
Dedri Uys says
There is no video, I’m afraid. What are you finding hard? Maybe I can help.
Dedri
Marilyn says
Very Nice! I find Worsted Weight Cotton, not quick thick enough for a potholder, and 2 layers is too thick to handle nicely, particularly when trying to grab on to a dome shaped lid handle. I will definitely use this pattern, and just to day, your instructions and photos are excellent. Thanks so much for your time and effort to develop this pattern.
Dedri Uys says
Thank you :)
amanda says
How do I alternate the colours? Ie front post stitch blue and one regular stitch white.
Dedri Uys says
Change colours on the last yarn over before the colour change. For example, if you want to change colour after the front post stitch, complete the front post stitch until there are two loops on your hook. Yarn over with the new colour and pull through. Complete the next st until there are two loops on your hook, yarn over with the new colour and pull through. Here is a tutorial: https://www.youtube.com/watch?v=6979knxSLKM
cha says
I want to make it bigger. What should i do?
Dedri Uys says
Just keep increasing by 12 stitches in each round, placing the front post stitches in the way that looks most pleasing to you.
Cindy Postma says
I am on my 12th out of 14 hot pads for Christmas gifts. Thank you so much for this unique, attractive, fun pattern
farnaz says
Thank you for sharing your beautiful crochets
mama spins says
Thanks for sharing your crochet talent! Very detailed instructions and pics:) Will be pinning and trying this shortly! Thanks again:)
Ashlei says
Love this pattern! The instructions were very easy to follow & when I did get stuck the pictures were a huge help!
Jenny says
We are glad you are enjoying the CAL Ashlei :)
heidi says
Turned out great! The pics were very helpful!
Jenny says
Got to love all those front posts :)
marissa says
Eres una preciosa y muy talentosa … gracias por compartir estos formidables tutoriales.
Dedri Uys says
Thank you ;)
Jessica says
I just made this and you did a fantastic job writing it out. Thank you so much. I love it!
Dedri Uys says
Thank you, Jessica
Carmen says
Preciosos.
Carmen
Debra Webber says
This is so beautiful! Probably won’t get much crochet work done until winter but can’t wait to make it. Your instructions are wonderful! Thank you so much for sharing.
Dedri Uys says
Just a pleasure, Debra :)
Sharita says
I have already made it. Your instructions were perfect! THANK YOU!
Dedri Uys says
Great, Sharita
Mippy/Sabrina says
Oh! MY! laaaaand! I love your patterns, tutorials, etc. I think I’m going to try this one since your instructions are so clear and detailed; I might be able to do it! *jumps up & down in excitement* THANK YOU! :D
Dedri Uys says
Hehe, how did it turn out, Sabrina?
Alice Petty says
I cant get the row 5 right..I cant get 12 more dc worked in to it…I have redone it 5 or 6 times..Can you help please?
Thanks you..I love this pattern..
Alice Petty says
I have ripped out the 5th row 5 or 6 times..This is frustrating me lol…I cant figure out how to get 12 more dc in to the pattern…I know I am missing something really simple but I have done this row 2 or 3 different ways and somehow I am doing something wrong..Please help..thanks!!
Dedri Uys says
Alice, are you accidentally skipping a st on each repeat?
Kelly H. says
Just remember to work the pattern of stitches as you go around. Round 5 can be confusing, but the pattern of dc’s between fptr’s is 1-2-1-2-1-2-etc.
Marilyn says
My simple crochet projects are generally something I can casually work on in the evening watching TV.
Not this one! I had to pay attention to every stitch in the pattern. I could say I am a barely intermediate crocheter, and having made a few coasters and small mandalas these last few months, I decided to take on the front post potholder. Turned out beautifully. I had fun working with the 4 colour version, but unfortunately didn’t have a rich yellow for the scalloped edging. Looks just great without it.
Dedri, your designs are fabulous, and you tutorials are superb. I would never have attempted this without such a detailed and complete tutorial. So glad I found your site, and will be keeping watch for more creations. I will definitely make this potholder again, and after that I will attempt the wavy multicolour blanket and several other of your patterns.
Dedri Uys says
Hi Marilyn. Thank you for your lovely comment. I am so pleased that you found the tutorial easy to follow x
Julie says
Oh my, it’s just so pretty! On to my good old “to do list” it goes!
Dedri Uys says
Hehe…that ever-growing to-do list!