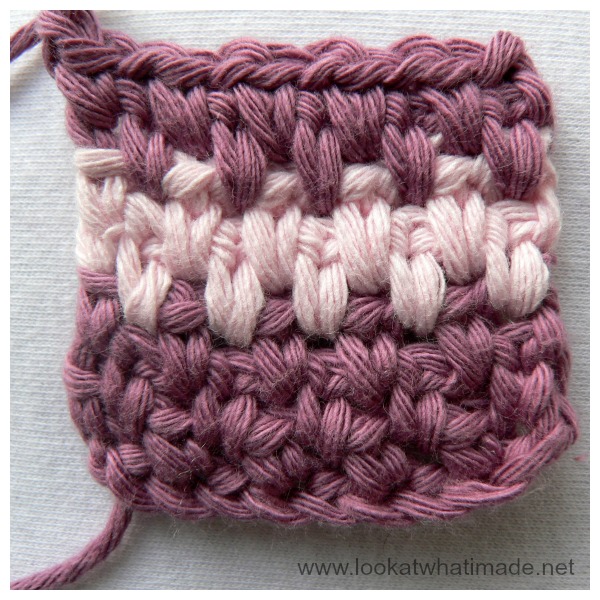
I know this stitch as the Linen Stitch, but have also seen it called the Moss Stitch (although the Moss stitch as I know it is slightly different). It is one of the simplest stitch patterns to master and yields a pretty, woven, dense fabric. The reason it is so simple is that you don’t even have to know how to work into the loops of the single crochet stitches, because you will be working into the ch-1 spaces between single crochet stitches instead.
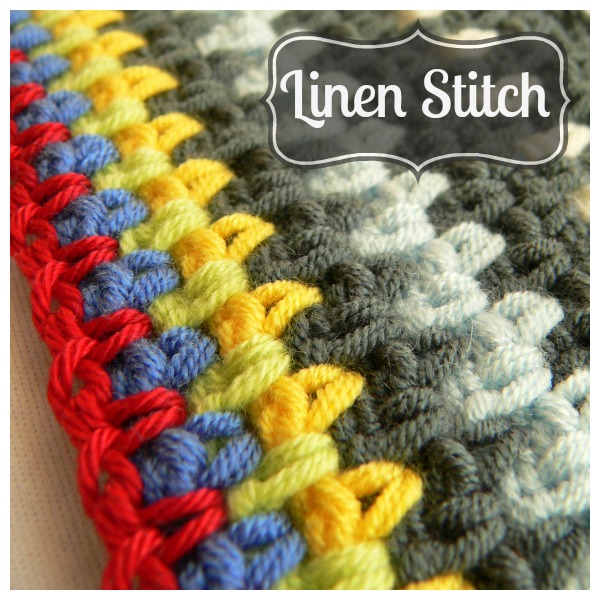
This stitch is excellent for working up a quick and easy chunky baby blanket and it is so much prettier than just regular old single crochet stitches.
You can use any yarn/hook combination your heart desires.
Using a single strand of light worsted weight (double knit) and a 1 cm crochet hook, for example, will yield a very “holey”, loose blanket (you can see this post about my Rainbow Blanket if you want to see what I’m talking about. The pictures are horrendous and the yarn is even worse as I could only afford the cheapest of yarns when I started out, but we still use the blanket often and love it a lot).
This tutorial includes:
- Linen Stitch Chart
- Linen Stitch Tutorial
- Changing Colours When Using The Linen Stitch
- Sample Pattern: Linen Stitch Lovie or Dishcloth
Linen Stitch
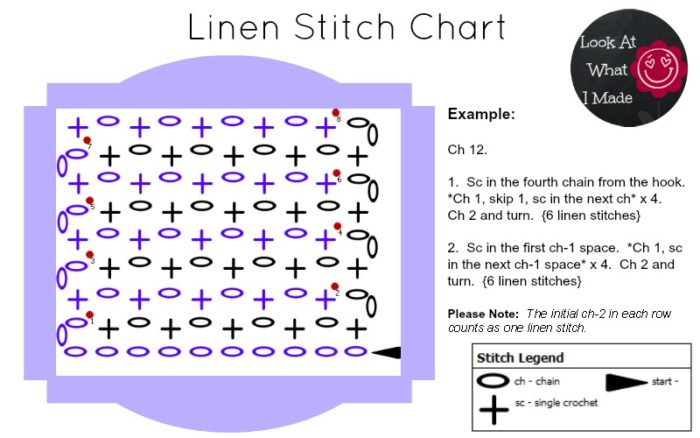
The linen stitch is basically a repetition of *ch,sc*, working into the ch-1 space formed by the ch-1’s in the previous row. You are effectively single crocheting BETWEEN single crochets, giving you a staggered woven look.
Stitches are worked into the ch-1 spaces, NOT the loops of the actual stitches.
One linen stitch = sc + ch into a ch-1 space. The initial Ch 2 at the beginning of each row counts as a ch-1 space (so one linen stitch).
How to Make The Linen Stitch
Linen Stitch Tutorial
Abbreviations
US Crochet Terminology (Find a US/UK conversion chart HERE).
| Ch | Chain |
| Sc | Single crochet |
| St/st’s | Stitch/stitches |
| * | Repeat all instructions between asterisks the amount of times specified. |
Instructions
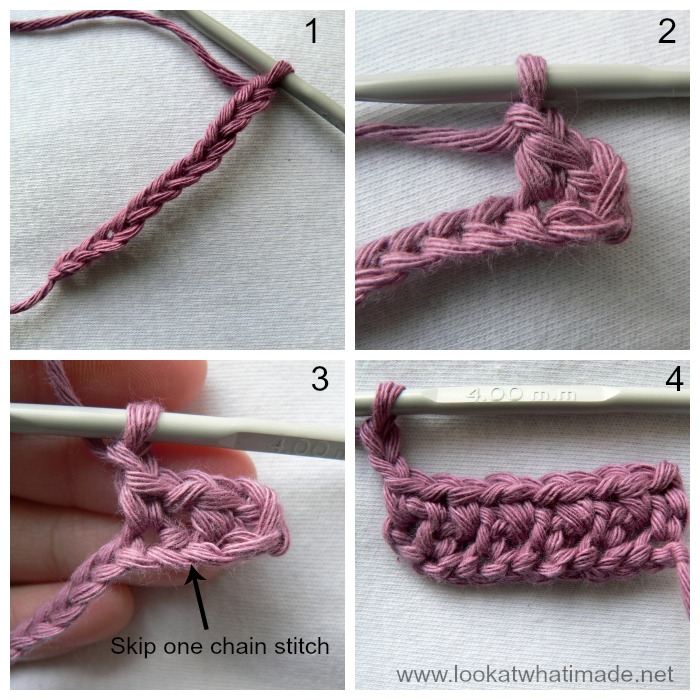
Start with an even number of chains. In this case I have used 12 ch st’s (Photo 1).
Row 1
Sc in the fourth chain from the hook (Photo 2). *Ch 1, skip the next ch and sc in the next ch (Photo 3)*. Repeat the instructions between asterisks until you get to the end of your chain. Ch 2 (Photo 4) and turn. You will have half as many linen stitches (so *ch, sc* clusters) as the number of foundation chain stitches. Remember that the ch-2 turn counts as one linen stitch.
Subsequent Rows
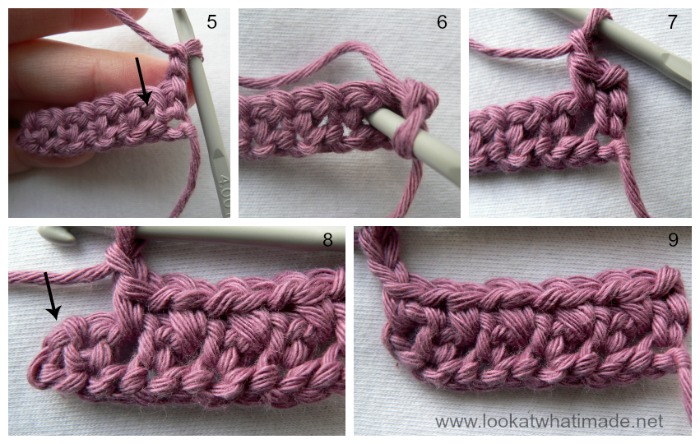
Sc in the first ch-1 space. To do this, insert your hook under the ch st between the first 2 sc’s (indicated with an arrow in Photo 5 and illustrated in Photo 6), and make a sc (Photo 7). *Ch, sc in the next ch-1 space*. Repeat instructions between asterisks until you get to the end. Remember that the turning ch-2 (indicated with an arrow in Photo 8) counts as a stitch and should be worked int0. Ch 2 (Photo 9) and turn.
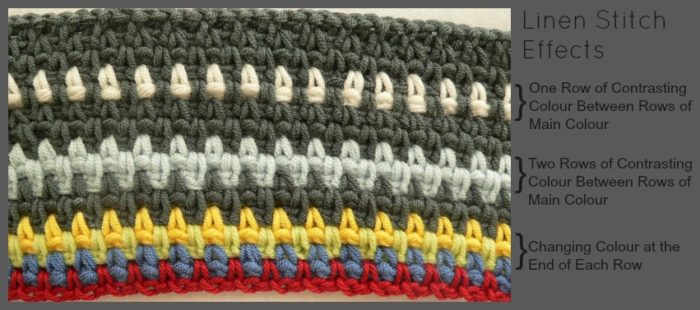
Changing Colours and Working Over Your Yarn Ends
If and when you decide to change colours, it is a good idea to work over your yarn ends as you add each new colour. That way you won’t have a million tails of yarn to work away at the end.
You will need to change colours on the last yarn-over of the last sc of the row BEFORE the colour change. With normal single crochet, you only need to worry about working over your tails of yarn in the first row. With the linen stitch, you need to work over your tails of yarn in the next TWO rows. That will make a bit more sense in a minute.
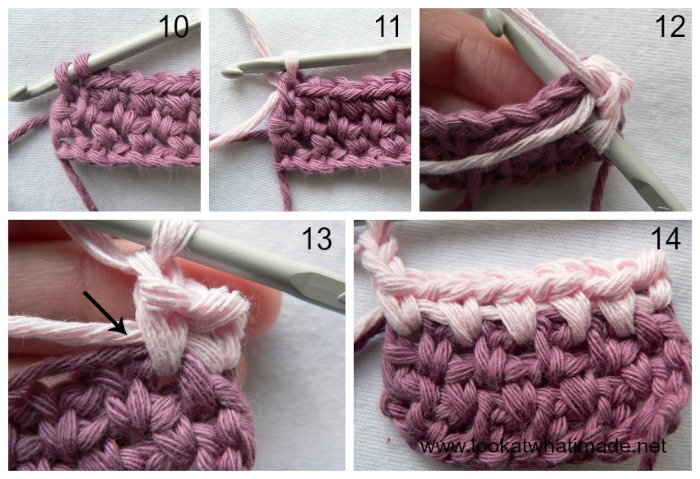
So to change colour on the last yarn over of the row before the colour change, insert your hook into the ch-2 space at the beginning of the previous row. Yarn over and pull up a loop (Photo 10). Yarn over with your new colour and pull through both loops on your hook (Photo 11). Ch 2 and turn.
Hold your tails of yarn in front of the stitches of the last row. Insert your hook into the first ch-1 space, working OVER the tails of yarn (Photo 12). Make your first sc. This will trap the yarn under the sc (indicated with an arrow in Photo 13).
Continue making a linen stitch in each ch-1 space as instructed above. When you get to the end of the row, ch 2 and turn. Photo 14 illustrates the first row worked OVER the tails of yarn. You will notice that the tails of yarn are still quite visible.
To ensure that these tails of yarn won’t be visible on your final piece, we will need to work over them again. More specifically, you will need to trap them under the sc’s of the next row.
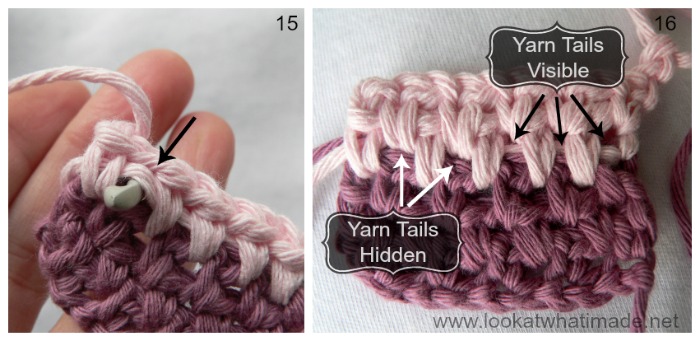
So insert your hook into the first ch-1 space, making sure that you insert your hook UNDER the tails of yarn running through the ch-1 space, and make a sc. Photo 15 shows the hook inserted UNDER the tails of yarn (this photo is taken from the back of the work).
Continue making a linen stitch in each ch-1 space, making sure that you insert your hook UNDER the tails of yarn every time.
Photo 16 illustrates the difference between inserting your hook under the tails of yarn (indicated with white arrows on Photo 16) and NOT inserting them under the tails of yarn (indicated with black arrows in Photo 16).
By altering how frequently you change your colours, you can get a variety of different looks.
Now that you know how to do the linen stitch, why not try this simple sample pattern below.
Sample Pattern: Crochet Linen Stitch Lovie (or Linen Stitch Dishcloth)
© Dedri Uys 2013. All Rights Reserved.
US Crochet Terminology Used
Abbreviations
| Ch | Chain |
| Sc | Single crochet |
| St/st’s | Stitch/stitches |
| * | Repeat all instructions between asterisks the amount of times specified. |
Materials
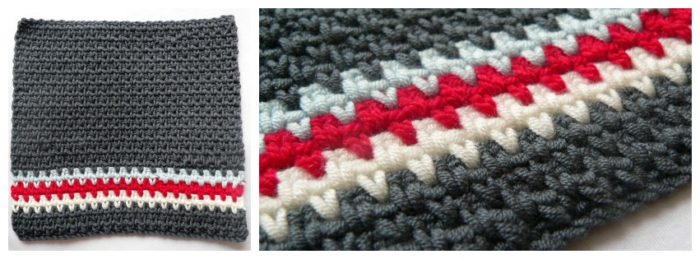
If you are going to make a dishcloth, I suggest using cotton yarn (I used mercerized cotton for my Linen Stitch Dishcloths). If you are going to make a Lovie, you can use whichever yarn type your heart desires, as long as it is nice and soft.
- Double knit yarn (light worsted weight/#3) in grey, red, cream and light blue. I am using Patons Smoothie in Slate, Cream, Red, and Pale Blue to create a Lovie.
- 5.5 mm (US I/9 UK 5) crochet hook (I love using Clover Amour hooks)
- Yarn needle
Instructions
With dark grey yarn and a 5.5 mm crochet hook:
1. Ch 42. Sc in the fourth chain from the hook. *Ch 1, skip the next ch, sc in the next ch* x 19. Ch 2 and turn. (21 linen stitches – remember that the initial ch-2 counts as one linen stitch).
2. Sc in the first ch-1 space. *Ch 1, sc in the next ch-1 space* x 19. Ch 2 and turn. (21 linen stitches)
3-4. Repeat row 2. Change to cream yarn at the end of Row 4 (see instructions above). (21 linen stitches)
5-6. Repeat row 2 in cream. Change to red yarn at the end of Row 6. (21 linen stitches)
7-8. Repeat row 2 in red. Change to light blue yarn at the end of Row 8. (21 linen stitches)
9-10. Repeat row 2 in light blue. Change to dark grey yarn at the end of Row 10. (21 linen stitches)
11-36. Repeat row 2 in dark grey. At the end of Row 36, ch 1 and bind off. Work away any remaining tails of yarn. (21 linen stitches)
♥
Related FREE Linen Stitch Patterns
I hope you have found this tutorial useful. If you have any questions, or suggestions on how I can improve this tutorial, please do not hesitate to contact me.
Remember to subscribe to my newsletter if you would like to be kept in the loop. You can also like my Facebook page or follow me on Bloglovin or Google+.
Happy Hooking!



Felicia Fitzgerald says
Thank you for this tutorial. It was easy to follow with the pictures and explanation on what is to be done.