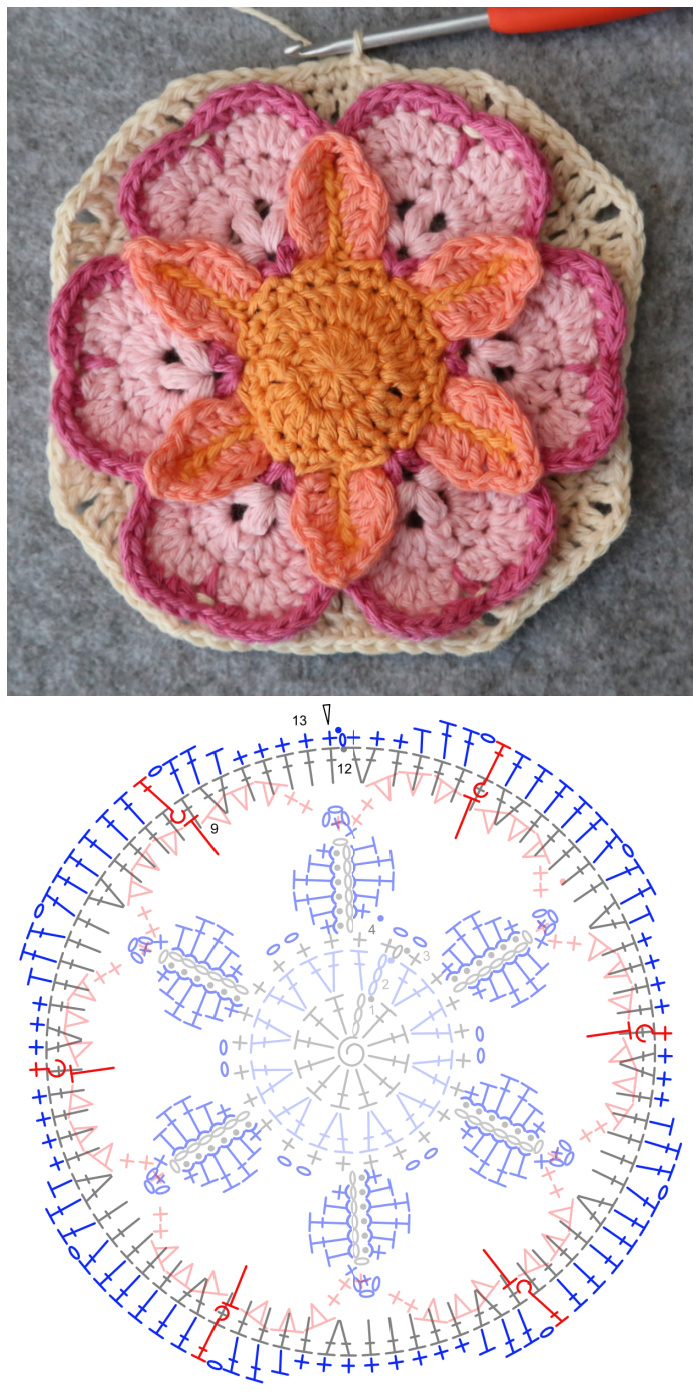
Welcome to Part 1 of Universe in Bloom. I hope you have a lot of fun making your gauge motifs last week. I know it has been tricky for some of you, but hopefully now that you have settled on your hook/yarn combination, things will go smoother. In this part, we will be making the central motif, 8 small Petals, and 4 Central Petals.
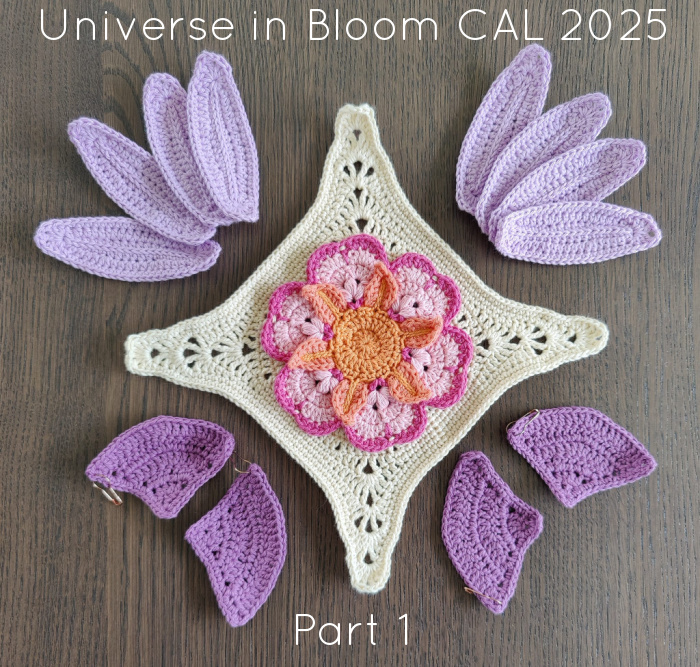
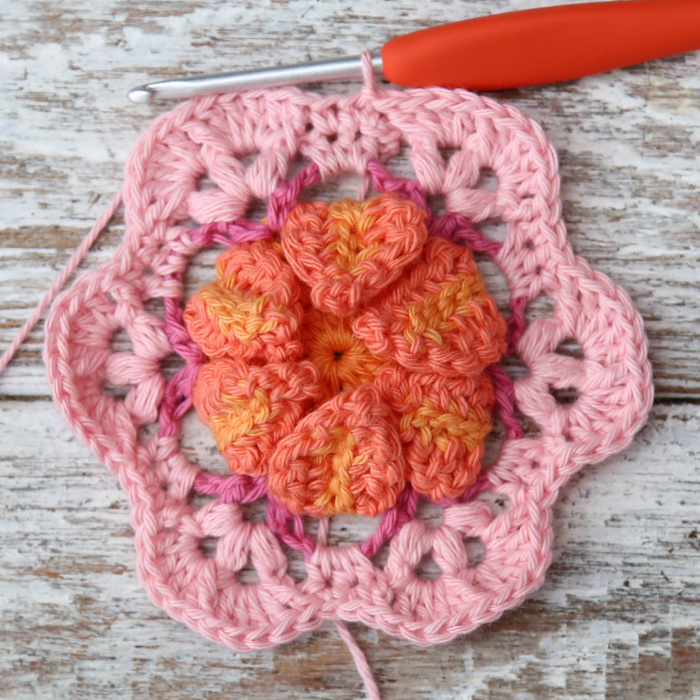
Photo Credit: Ruth Lambert
Resources
>>Universe in Bloom Information Post<<
- Universe in Bloom on Ravelry
- PDFs – these contain a condensed version of the pattern below, and can be found on the Scheepjes Website:
- English PDFs (US and UK Terms)
- Dutch PDF
Video Playlists
- English US Terminology
- Dutch
Abbreviations, Special Stitches, Chart Legend
The photo tutorial below uses US Terminology. Please see the Special Stitches and Techniques Post HERE for Photo Tutorials and Chart Legend.
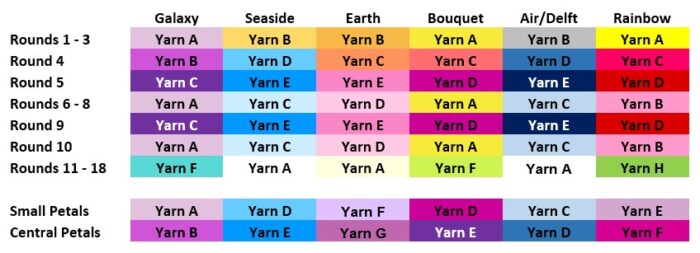
Colours Per Round
Instructions
Flower
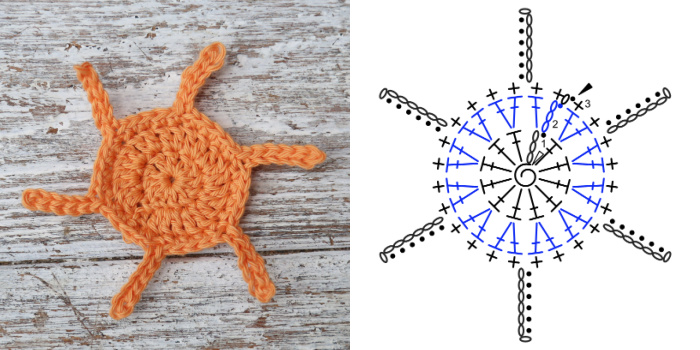
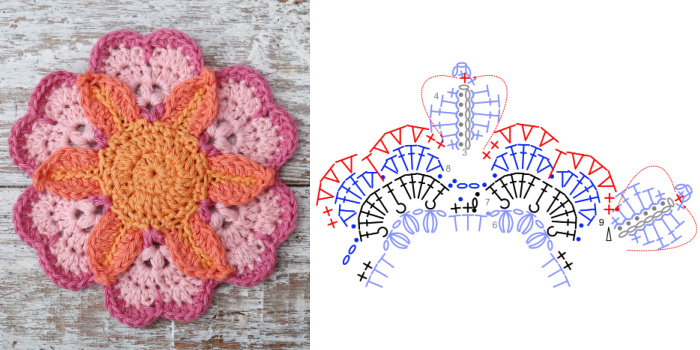
Round 1
Working into a Magic Ring: Ch 3 (counts as dc throughout) make 11 dc. Join to the top of the beg ch-3 with a sl st. Stitch Count: 12 dc
Round 2
Ch 3, dc in the same st as the sl st join, make 2 dc in each of the next 11 sts, the first of which may be tricky to get into. Join to the top of the beg ch-3 with a sl st.
Stitch Count: 24 dc
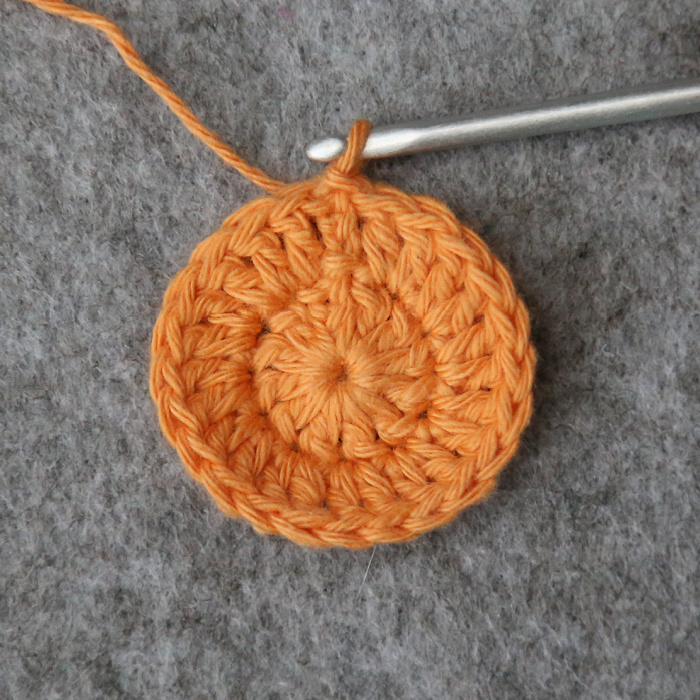
Round 3
In this round, try not to make your sl sts too tight, otherwise they will be hard to work into in the next round.
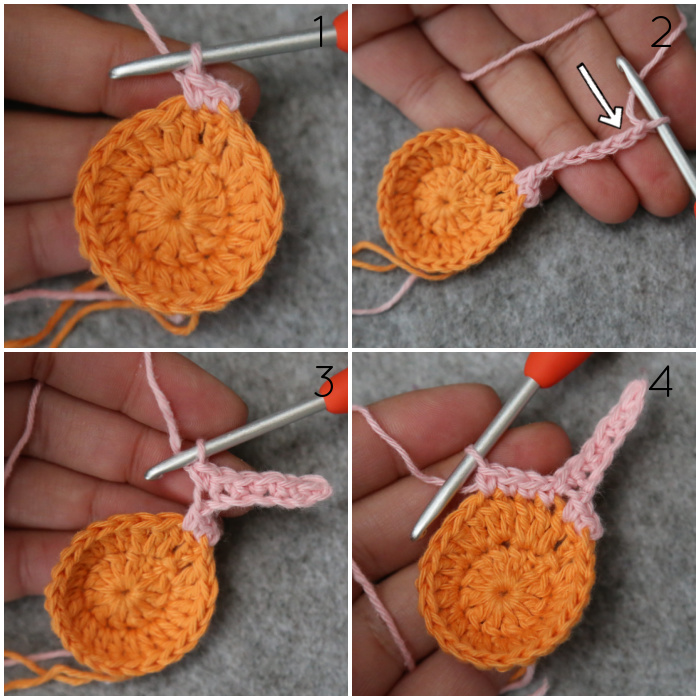
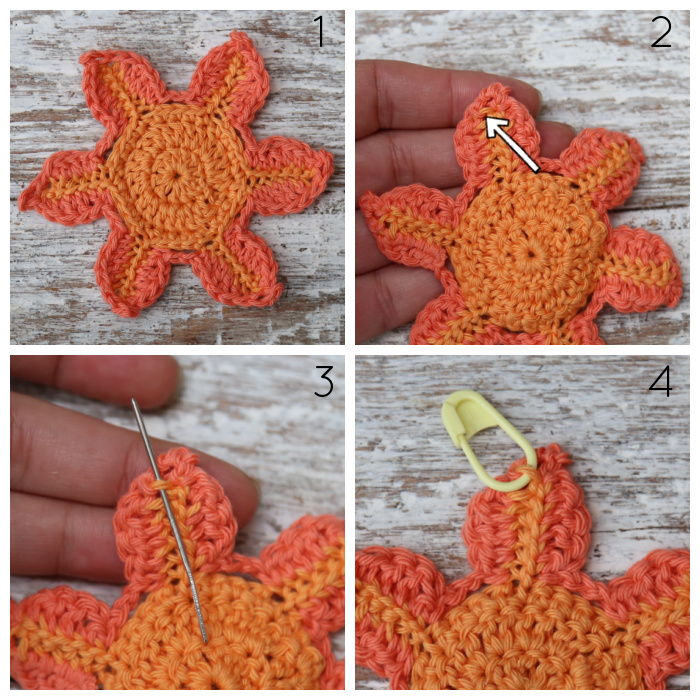
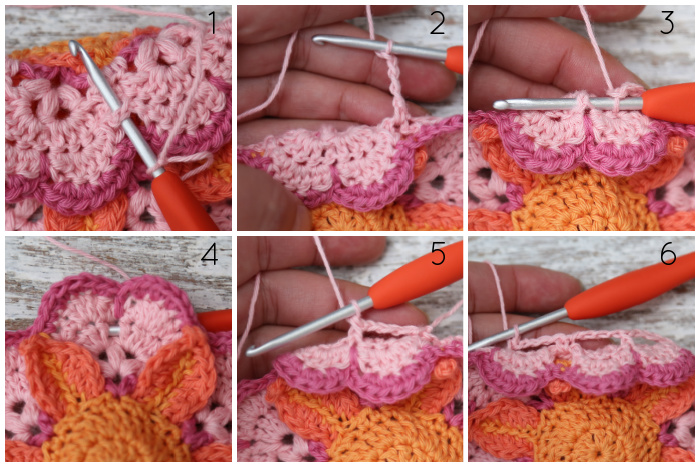
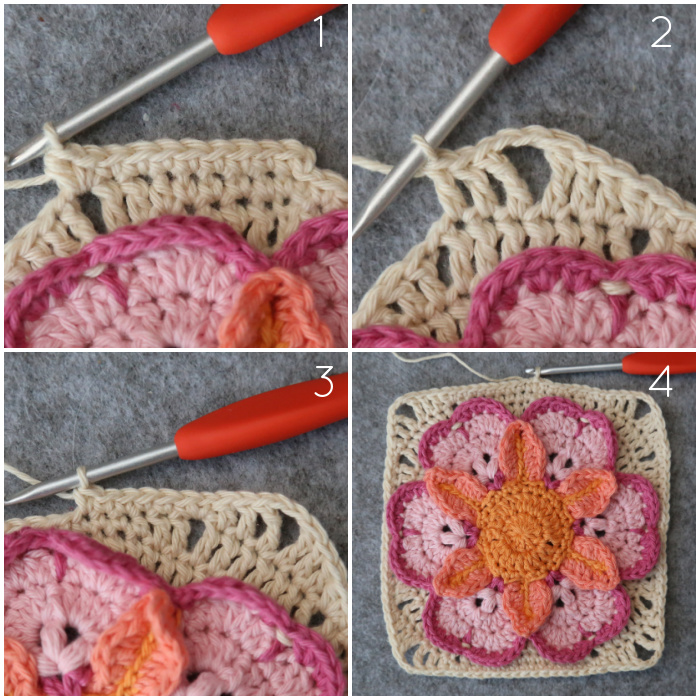
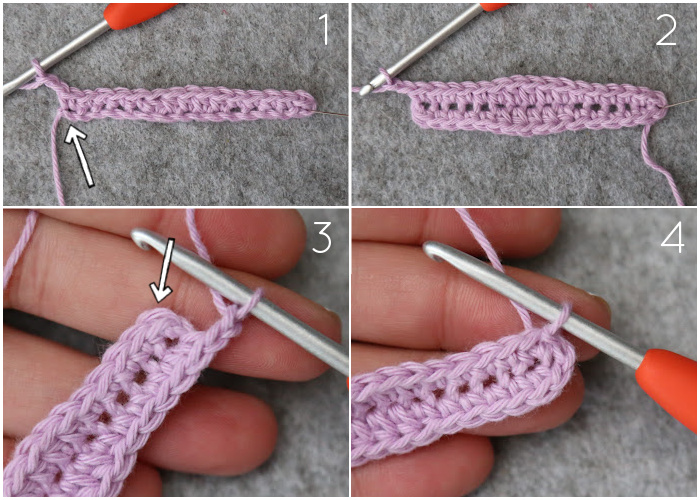
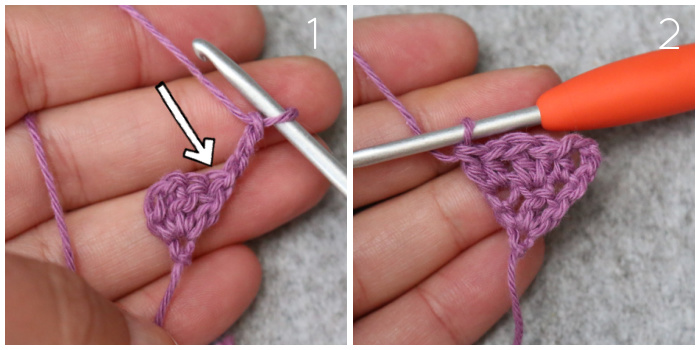
Ch 1 (doesn’t count as a st throughout), sc in the same st as the sl st join. Sc in the next st, which will be tricky to get into {Photo 1}.
*Ch 7 {Photo 2}, sl st in one loop only of the second ch from the hook, sl st in one loop only of the next 5 ch sts {Photo 3}. Sc in the next 4 sts {Photo 4}.*
Rep from * to * 5 more times, omitting the last 2 sc on the last repeat. Join to the first sc with a sl st. Fasten off and work away your ends.
Stitch Count: 24 sc and 6 Stems
Round 4
In this round, you will work into one loop only of the ch sts and sl sts from Round 3.
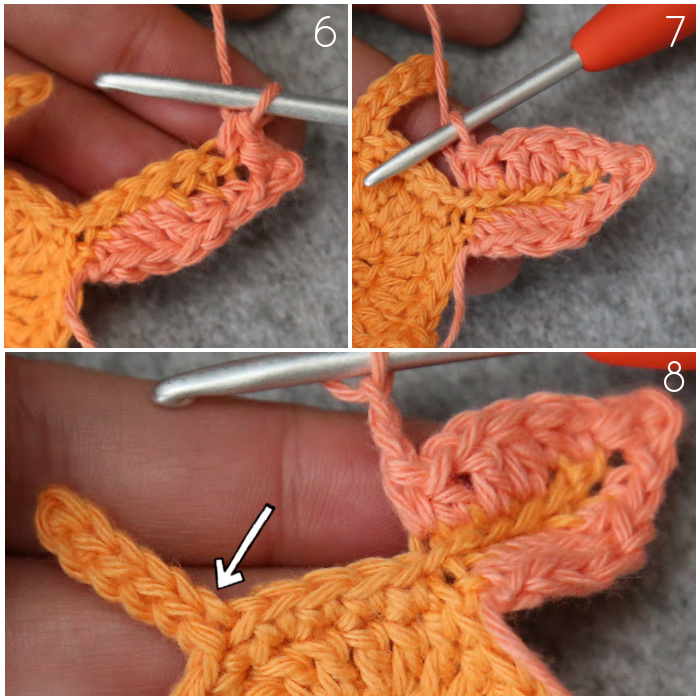
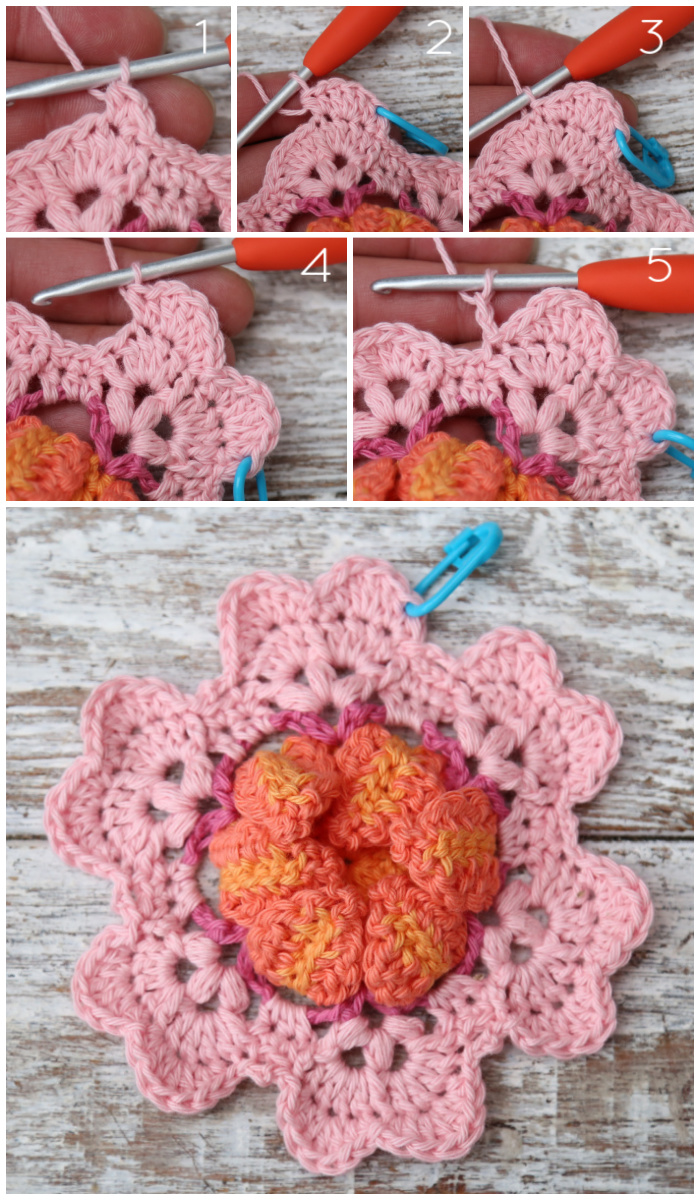
Starting with a standing st in the second ch of any Stem around: *Sc in the second ch of the Stem {Photos 1 and 2}, hdc in the next ch, dc in the next 2 ch, hdc in the next ch, sc in the last ch {Photo 3}. Ch 3, sc in the third ch from the hook to form a Picot {Photos 4 and 5}.
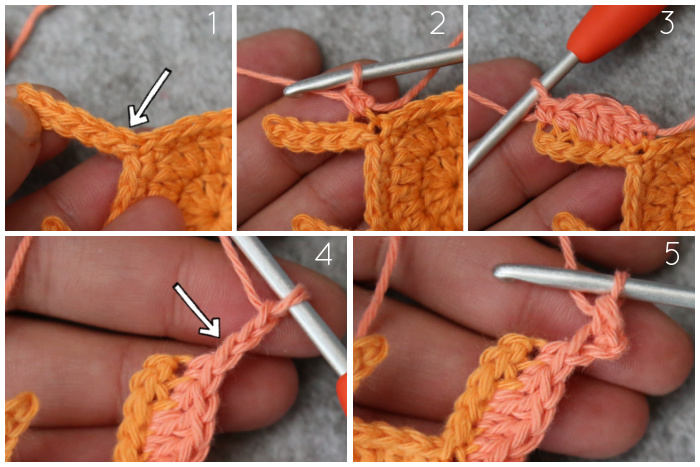
Sc in the next sl st {Photo 6}, hdc in the next sl st, dc in the next 2 sl sts, hdc in the next sl st, sc in the last sl st {Photo 7}. Ch 2, skip the next 4 sc and the first ch of the next ‘Stem’.*
Rep from * to * 5 more times. Join to the first sc with a sl st. Fasten off and work away your ends.
Stitch Count: 6 Small Petals and 6 ch-2 sps
Before you continue, turn your flower around so that the WS is facing you {Photo 2}. Mark the seventh ch from Round 3 of each ‘Stem’ with a SM {Indicated with an arrow in Photo 2, demonstrated with a needle in Photo 3, marked with a SM in Photo 4}.
You will find this ch top left on the stem (top right, if you are left-handed) and it will already contain a sc. Please keep these SM in place until Round 9.
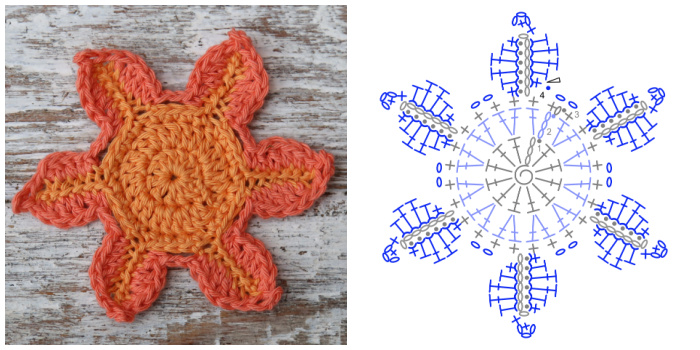
Round 5
With RS facing and starting with a standing st in any 4-sc group from Round 3:
*Working in front of the ch-2 sp from Round 4, [sc, ch 3, sc] in the third sc of the 4-sc group from Round 3. Ch 5 behind the next Petal.* Rep from * to * 5 more times. Join to the first sc with a sl st. Fasten off and work away your ends.
Stitch Count: 12 sc, 6 ch-3 sps, and 6 ch-5 sps
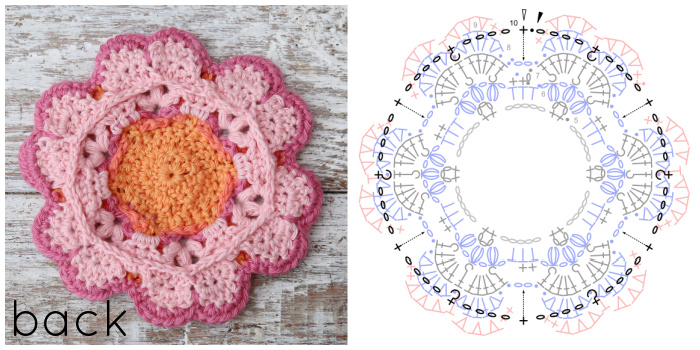
Round 6
In the next 3 rounds, you will work behind the Small Petals from Round 4.
Starting in any ch-5 sp behind a Petal with a standing st:
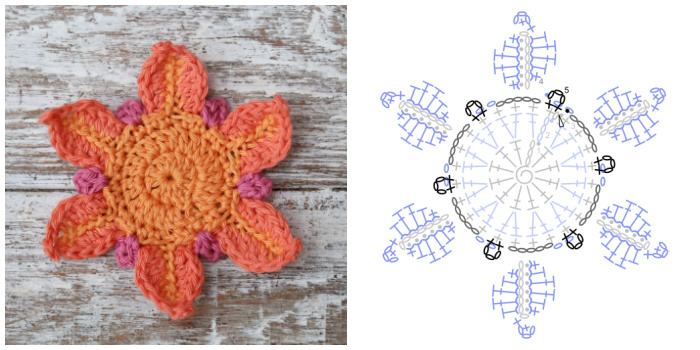
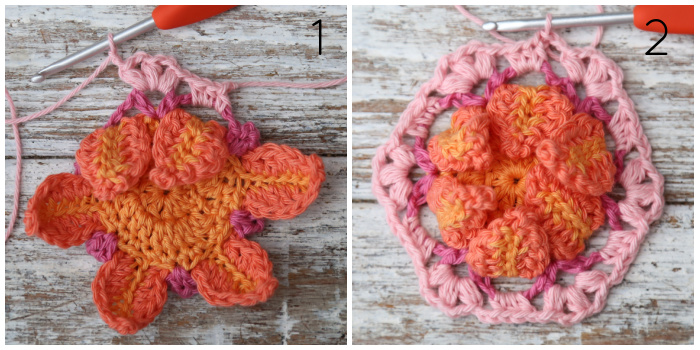
*Make 3 hdc in the next ch-5 sp, ch 1. Working into the next ch-3 sp: (Puff Stitch, ch 1) 3 times {Photo 1}.* Rep from * to * 5 more times. Join the the first hdc with a sl st {Photo 2}.
Stitch Count: 18 hdc, 18 Puff Stitches, 24 ch-1 sps
Round 7
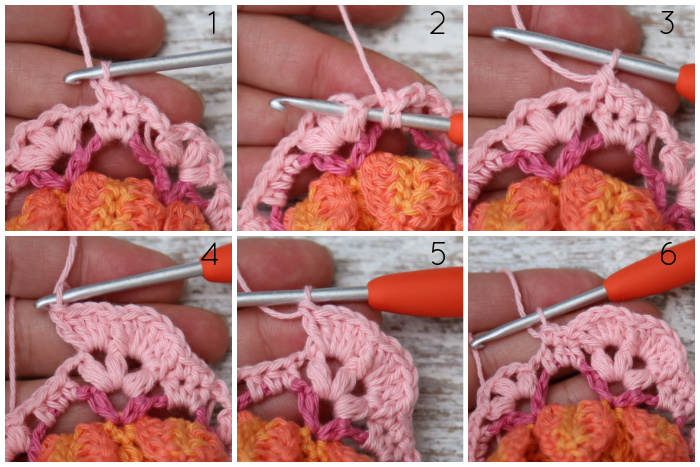
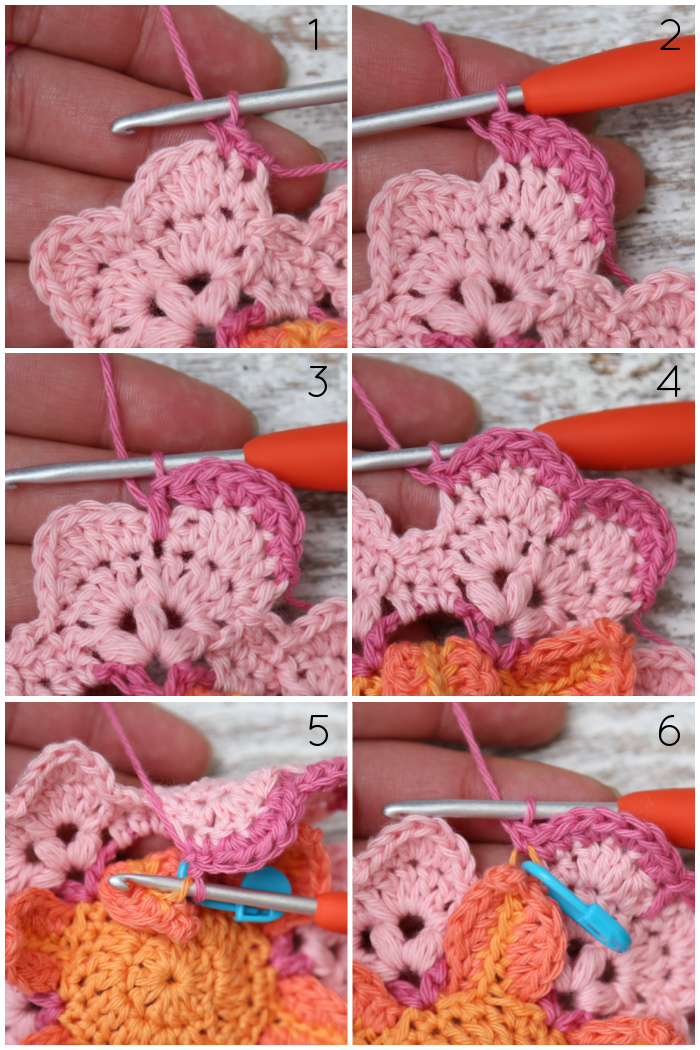
Sl st in the next hdc. Ch 1, sc in the same st, sc in the next st {Photo 1}.
*(FPdc around the next Puff Stitch {Photos 2 and 3}, make 4 dc in the next ch-1 sp) twice {Photo 4}. FPdc around the last Puff Stitch {Photo 5}. Skip the next hdc, which will be tricky to get into anyway, sc in the next 2 hdc {Photo 6}.*
Rep from * to * 5 more times, omitting the last 2 sc on the last repeat. Join to the first sc with a sl st.
Stitch Count: 12 sc, 48 dc, and 18 FPdc
Round 8
In this round, please mark the second hdc of the first repeat with a SM.
Sl st in the next sc.
*Sl st in the next FPdc and the next dc. Make 2 hdc in the second dc of the first 4-dc group {Photo 1}. Make 3 dc in the next dc, make 2 hdc in the last dc, sl st in the next FPdc {Photos 2 and 3}. Make 2 hdc in the next dc, make 3 dc in the next dc, make 2 hdc in the next dc {Photo 4}. Sl st in the next dc and the next FPdc {Photo 5}. Ch 2, skip the next 2 sc.*
Rep from * to * 5 more times. Join to the first FPdc of Round 7 with a sl st (it will already contain a sl st). Fasten off and work away your ends.
Stitch Count: 48 hdc , 36 dc, and 6 ch-2 sps
Round 9
Starting in the marked hdc with a standing st:
*Sc in the next 2 sts {Photo 1}, make 2 hdc in each of the next 3 sts {Photo 2}. Skip the next hdc, hdc in the next FPdc from Round 7, working over the sl st from Round 8 {Photo 3}. Skip the next 2 hdc, make 2 hdc in each of the next 3 sts, sc in the last 2 sts {Photo 4}.
Sc in the marked ch from Round 3, which you will find behind the next Petal {Photos 5 and 6}. This will secure the Petal and flatten it out. Remove the SM. Skip the next ch-2 sp and the first hdc of the next Heart-shaped Petal.*
Rep from * to * 5 more times. Join to the first sc with a sl st. Fasten off and work away your ends.
Stitch Count: 30 sc and 78 hdc
Round 10
In this round, you will be working into the ch-2 sps from Round 8, which you can find behind each Small Petal, and the central FPdc from Round 7 of each Heart-shaped Petal (the one above the Central Puff st from Round 6). Please ignore all other sts.
Join your yarn by making a standing sc in any ch-2 sp from Round 8 {Photo 1}.
(Ch 4 {Photo 2}, BPsc around the central FPdc from Round 7 of the next Heart-shaped Petal {Photos 3 – 5}, ch 4, sc in the next ch-2 sp from Round 8) 6 times, omitting the last sc on the last repeat. Join to the first sc with a sl st. Mark the first ch-4 sp of the round with a SM. Fasten off and work away your ends.
Stitch Count: 6 sc, 6 BPsc, and 12 ch-4 sps
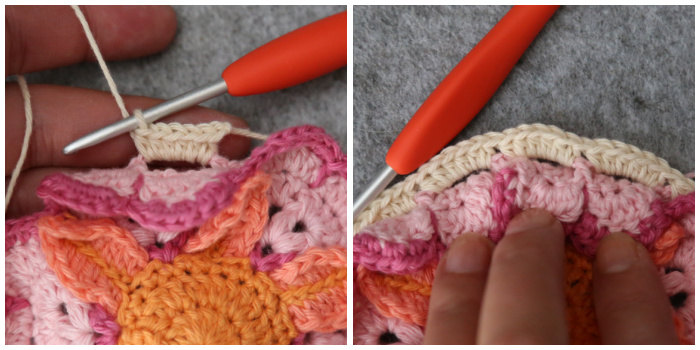
Background
Round 11
Join your yarn by making a standing hdc in the marked ch-4 sp from the previous round. Make 5 hdc in the same ch-4 sp. (Make 6 hdc in the next ch-4 sp) 11 times. Join to the first hdc with a sl st.
Stitch Count: 72 hdc
Round 12
Ch 3, dc in the next 4 sts, make 2 dc in the next st, which will be the last hdc of the 6-hdc group, here and throughout. (Dc in the next 5 sts, make 2 dc in the next st) 11 times. Join to the top of the beg ch-3 with a sl st.
Stitch Count: 84 dc
Round 13
In this round, we will ‘catch’ the Heart-shaped Petals to tack them down.
Ch 1, sc in the same st as the sl st join.
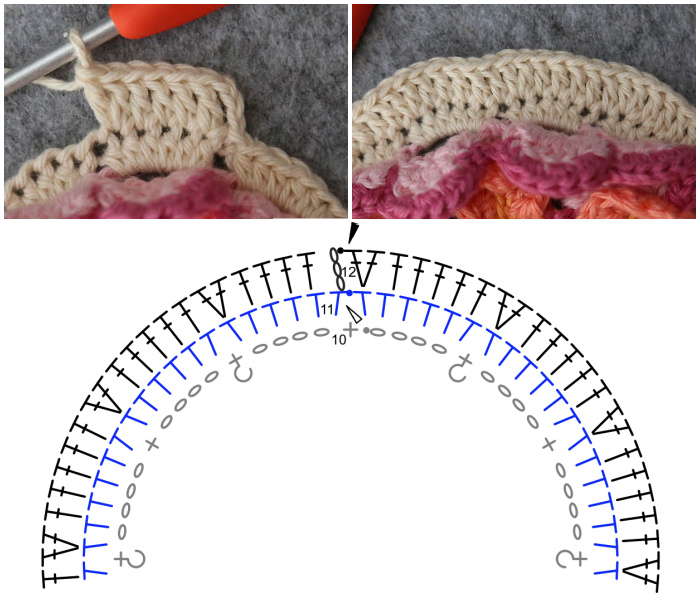
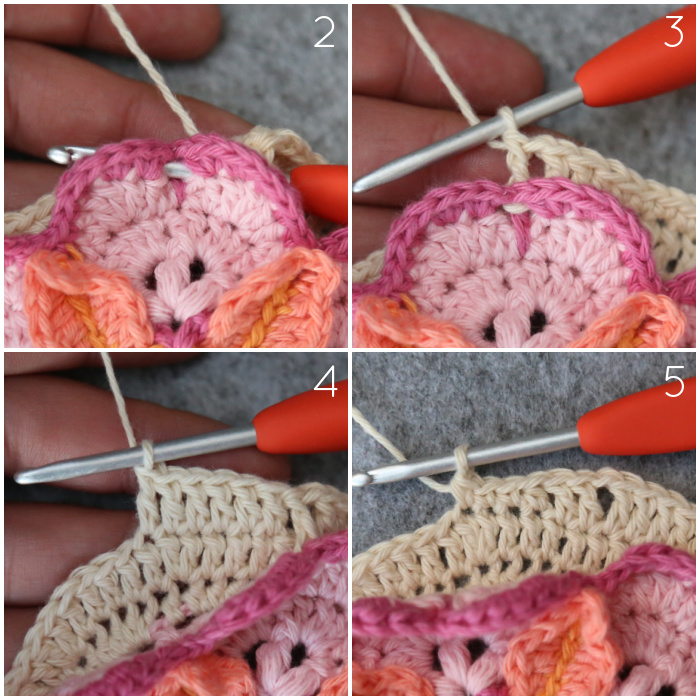
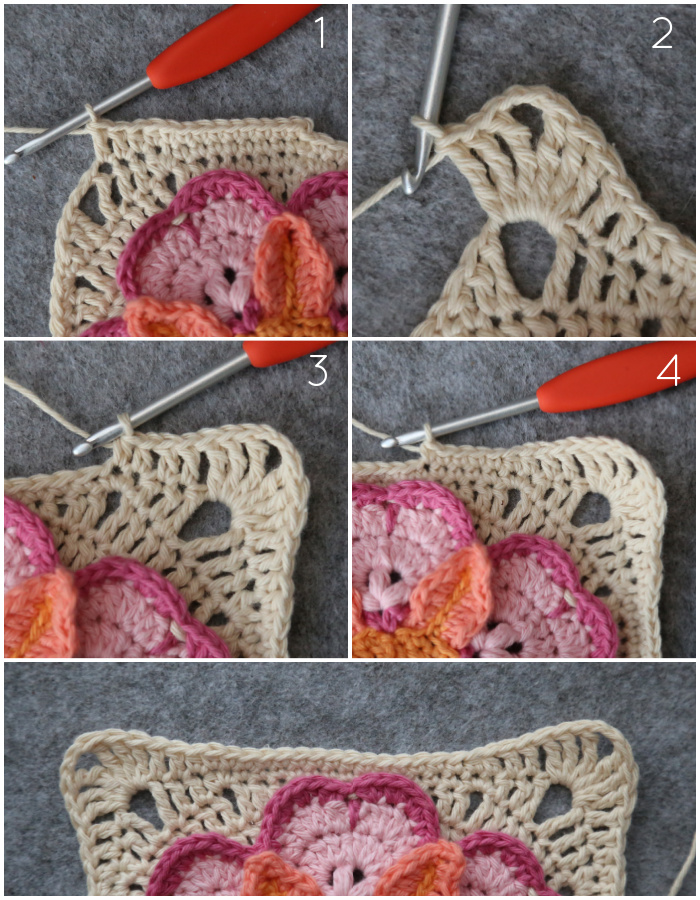
*Sc in the next 4 sts, hdc in the next st, which will be the first st of the dc increase from the previous round. Dc in the next 2 sts, ch 1 {Photo 1}.

BPdc around the hdc from Round 9 at the Centre of the Heart-shaped Motif {Photos 2 and 3}. Skip the next st of Round 12 and dc in the next 6 sts {Photo 4}.
Ch 1, dc in the next 2 sts, hdc in the next st, sc in the next 3 sts, the last of which will be the second dc of an increase from the previous round {Photo 5}.
BPsc around the hdc from Round 9 at the Centre of the Heart-shaped Motif.
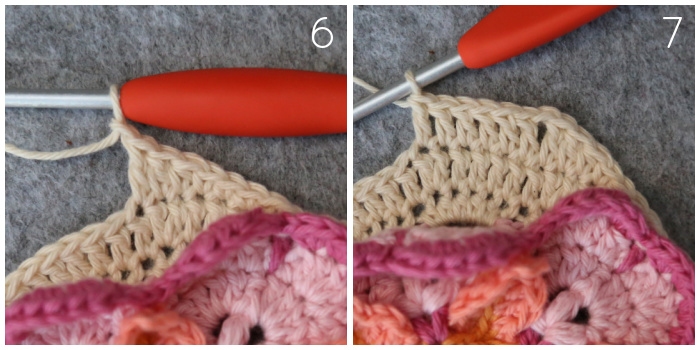
Skip the next st of Round 12 and sc in the next 4 sts. Hdc in the next st, which will be the first st of the dc increase from the previous round. Dc in the next 2 sts, ch 1 {Photo 6}. Dc in the next 6 sts, the last of which will be the second dc of an increase from the previous round {Photo 7}.
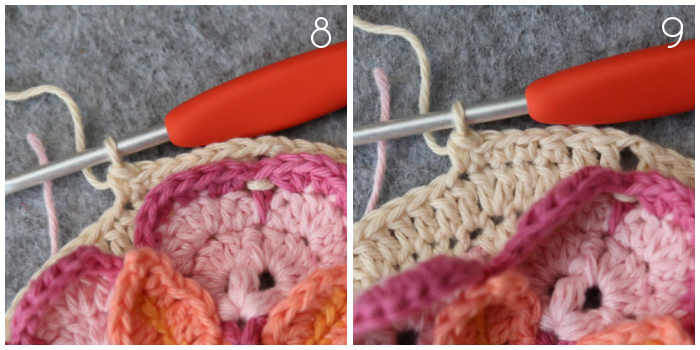
BPdc around the hdc from Round 9 at the Centre of the Heart-shaped Motif. Ch 1, skip the next st of Round 12, dc in the next 2 sts. Hdc in the next st, sc in the next 4 sts {Photos 8 and 9}.*
Rep from * to * once, omitting the last sc on the last repeat. Join to the first sc with a sl st.
Stitch Count: 30 sc, 2 BPsc, 8 hdc, 40 dc, 4 BPdc, and 8 ch-1 sps
Remember that the ch-1 starts of each round do not count as a st. You will therefore need to make the first st of each round in the same st as the sl st join.
Round 14
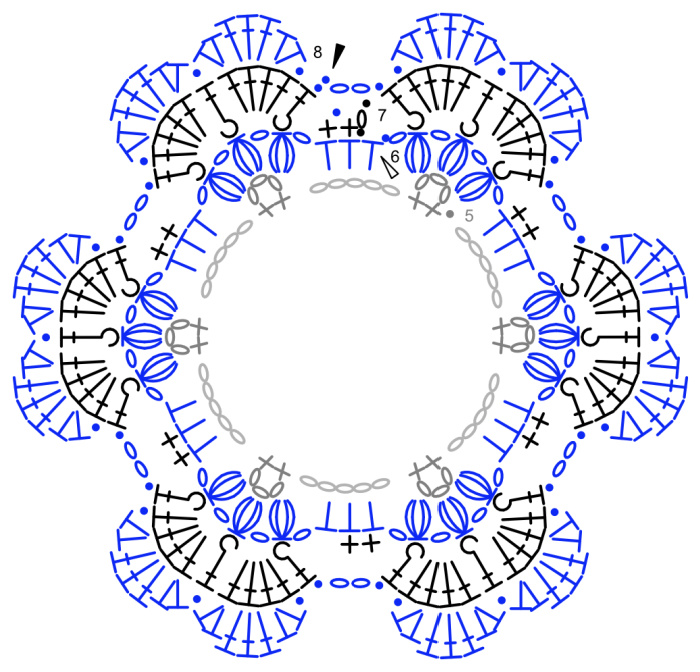
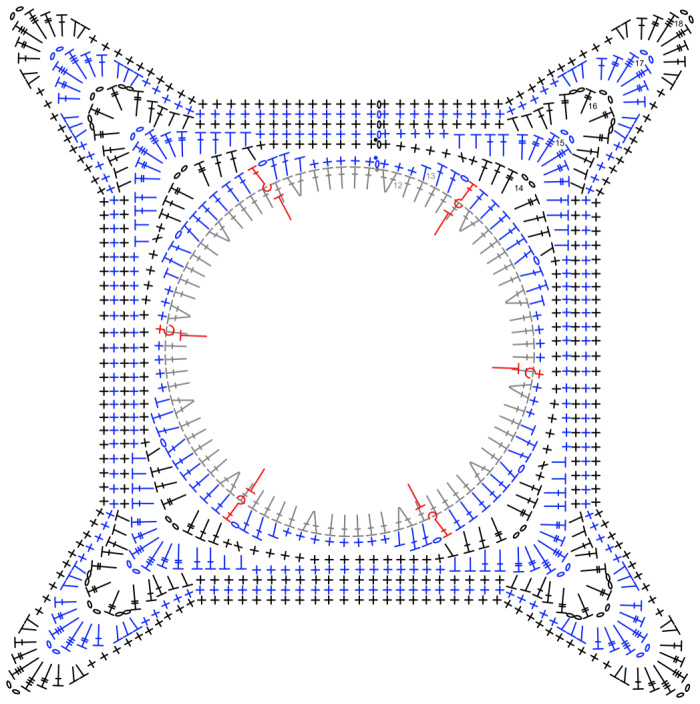
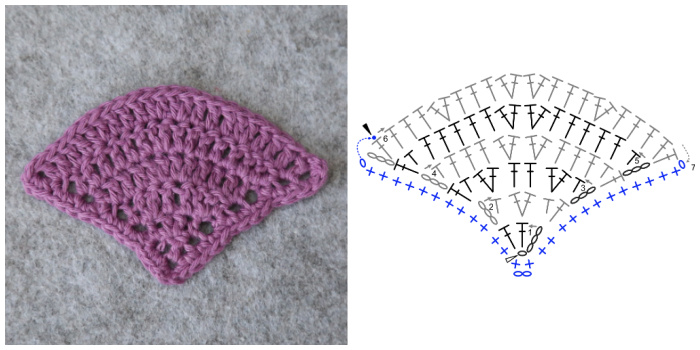
The chart for Rounds 14 – 18 is below Round 18.
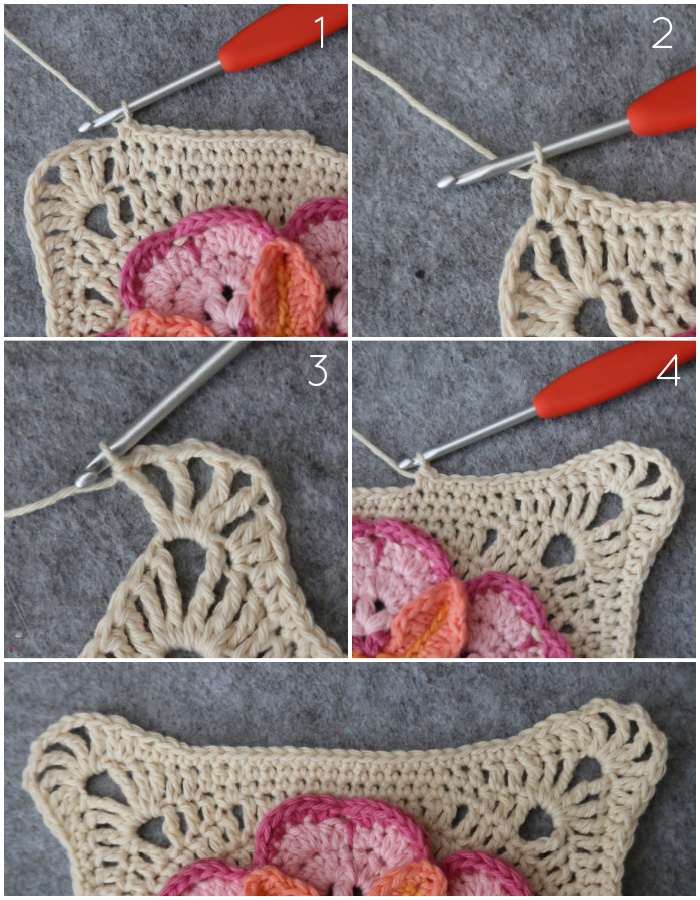
Ch 1. *Sc in the next 8 sts. [Sc, hdc] in the next ch-1 sp {Photo 1}. Skip the next st. Dc in the next 2 sts, tr in the next st. Ch 2, tr in the next st, dc in the next 2 sts {Photo 2}. Make 2 sc in the next ch-1 sp. Skip the next dc, sc in the next 5 sts {Photo 3}.*
Rep from * to * 3 more times. Join to the first sc with a sl st.
Stitch Count: 64 sc, 4 hdc, 16 dc, 8 tr, and 4 ch-2 sps
The ch-2 sps in this round will become your corners. From this point on, stitch counts will be provided per side.
Round 15
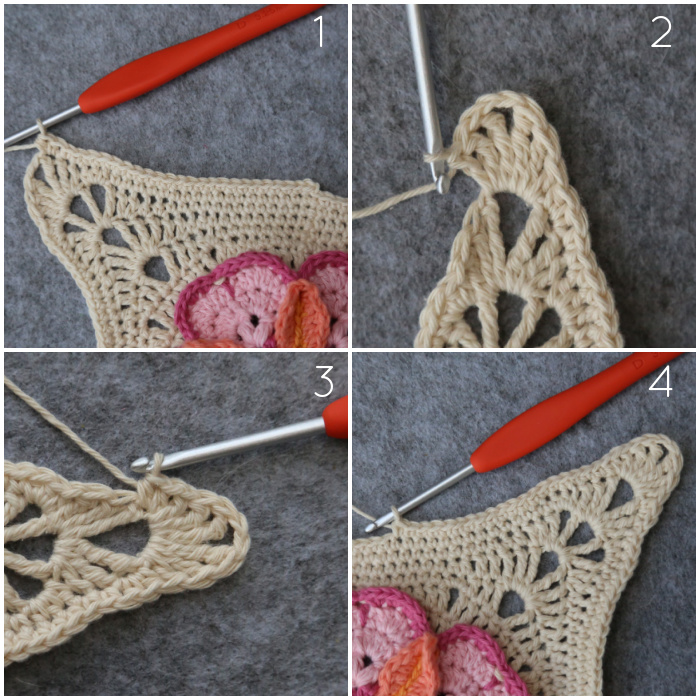
Ch 1. *Sc in the next 9 sts. Hdc in the next 2 sts, dc in the next 2 sts {Photo 1}. [2 tr, dtr, ch 2, dtr, 2 tr] in the next ch-2 sp {Photo 2}. Skip the first (hidden) st. Dc in the next 2 sts, hdc in the next 2 sts {Photo 3}, sc in the next 5 sts {Photo 4}.*
Rep from * to * 3 more times. Join to the first sc with a sl st.
Stitch Count per Side: 14 sc, 4 hdc, 4 dc, 4 tr, and 2 dtr, not including ch-2 corner sps.
Round 16
Ch 1. *Sc in the next 13 sts {Photo 1}. Hdc in the next 2 sts, make 2 dc in the next st {Photo 2}. (Tr, ch 2) 3 times into the next ch-2 sp. Tr in the same ch-2 sp {Photo 3}. Make 2 dc in the next st, hdc in the next 2 sts, sc in the next 9 sts {Photo 4}.*
Rep from * to * 3 more times. Join to the first sc with a sl st.
Stitch Count per Side: 22 sc, 4 hdc, 4 dc, 4 tr, and 2 ch-2 sps, not including central ch-2 corner sps.
Round 17
Ch 1. *Sc in the next 18 sts. Make 3 hdc in the next ch-2 sp {Photo 1}, [dc, tr, dtr, ch 2, dtr, tr, dc] in the next ch-2 sp {Photo 2}. Make 3 hdc in the next ch-2 sp {Photo 3}, sc in the next 14 sts {Photo 4}.*
Rep from * to * 3 more times. Join to the first sc with a sl st.
Stitch Count per Side: 32 sc, 6 hdc, 2 dc, 2 tr, and 2 dtr, not including ch-2 corner sps.
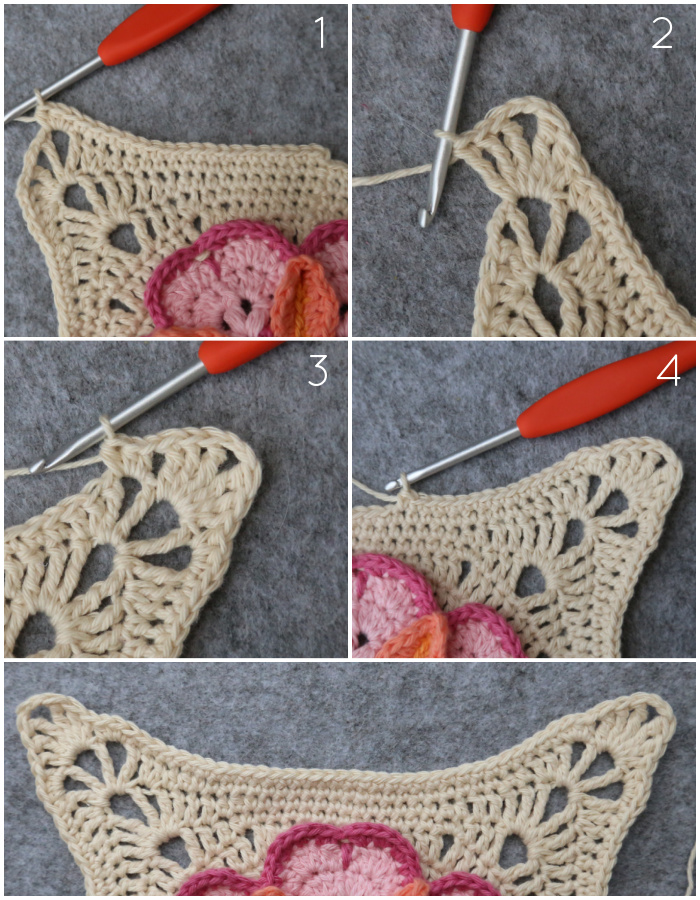
Round 18
Ch 1. *Sc in the next 23 sts. Make 2 hdc in the next st {Photo 1}, [dc, tr, dtr, ch 2, dtr, tr, dc] in the next ch-2 sp {Photo 2}. Make 2 hdc in the next st {Photo 3}, sc in the next 19 sts {Photo 4}.*
Rep from * to * 3 more times. Join to the first sc with a sl st. Fasten off and work away your ends.
Stitch Count per Side: 42 sc, 4 hdc, 2 dc, 2 tr, and 2 dtr, not including ch-2 corner sps.
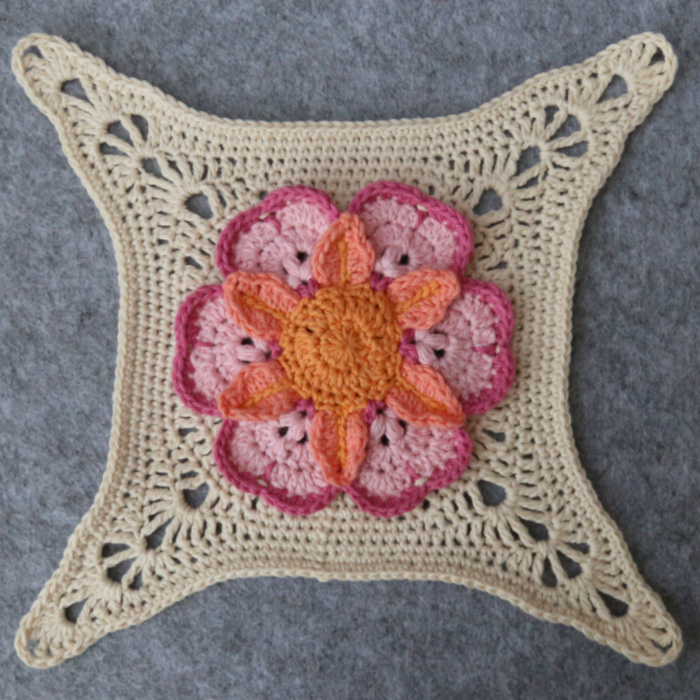
At the end of this part, your motif should measure/weigh roughly the following (unblocked):
- Cotton Create
- Weight: 22.5g – 25g
- Size: 18.5cm/7.3” along side and 26.5cm/10.4” along diagonal, measuring point to point
- Colour Crafter
- Weight: 26.5g – 29.5g
- Size: 23cm/9” along side and 33cm/13” along diagonal, measuring point to point
PLEASE NOTE: Yours may differ due to the hook/yarn combination determined by your gauge motif.
Small Petals
Make 8
Round 1
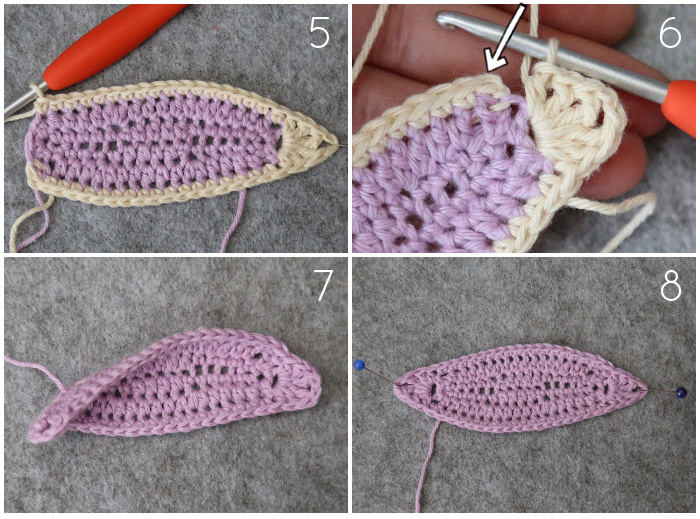
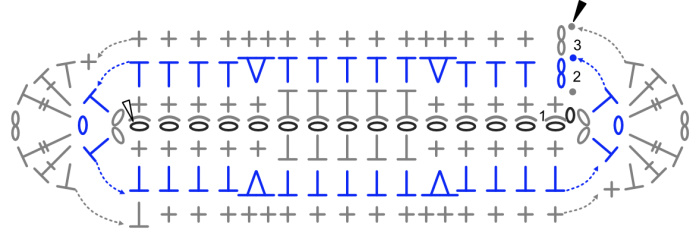
Starting with a 50cm/20” yarn end, ch 16. Working into one loop only, sc in the second ch from the hook and the next 4 sts. Hdc in the next 5 sts, sc in the next 5 sts. Ch 2 {Photo 1}.
Working into the rem two loops of each ch: sc in the first 5 sts, hdc in the next 5 sts, sc in the last 5 sts. Ch 2 {Photo 2}. Join to the first sc with a sl st {Photos 3 and 4}.
Stitch Count per Side: 10 sc and 5 hdc, not including ch-2 corner sps.
Round 2
Ch 2 (counts as hdc throughout). Hdc in the next 3 sts {Photo 1}, *make 2 hdc in the next st. Hdc in the next 5 sts, make 2 hdc in the next st {Photo 2}. Hdc in the next 4 sts {Photo 3}. [Hdc, ch 1, hdc] in the ch-2 corner sp {Photo 4}.*
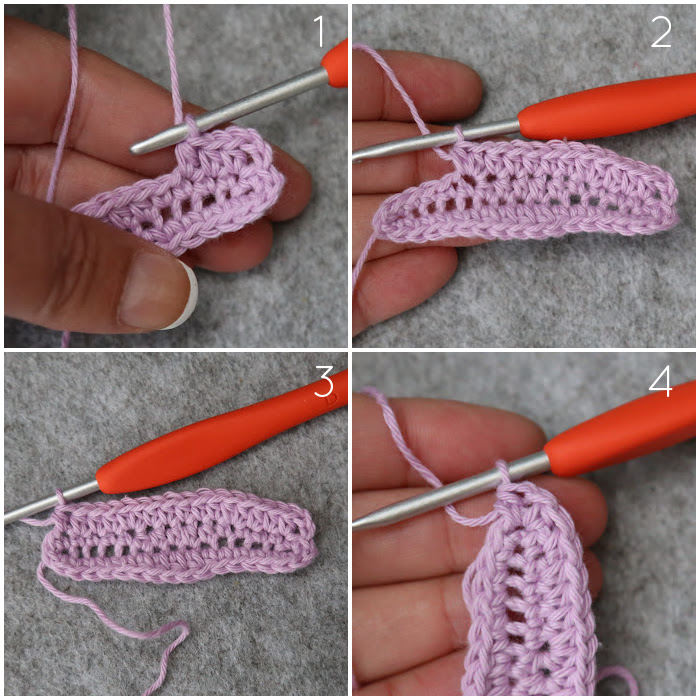
Hdc in the next 4 sts {Photo 5}. Rep from * to * once {Photo 6}. Join to the top of the beg ch-2 with a sl st {Photos 7 and 8}.
Stitch Count per Side: 17 hdc, not including ch-1 corner sps.
Round 3
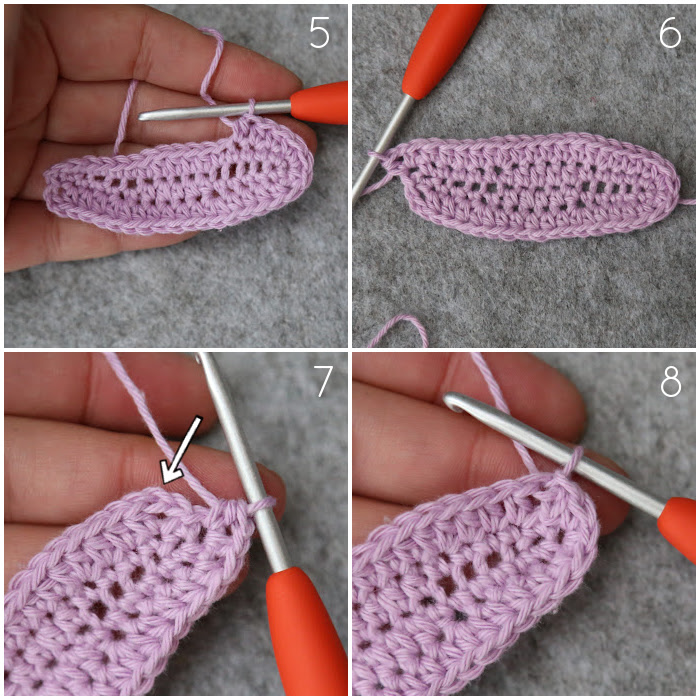
Ch 2 {Photo 1}, *sc in the next 17 sts {Photo 2}. [Hdc, dc, tr, ch 2, tr, dc, hdc] in the next ch-1 sp {Photo 3}.*
Skip the first st, which will be hidden anyway, and hdc in the next st {Photo 4}.
Rep from * to * once {Photos 5 and 6}. Join to the top of the beg ch-2 with a sl st. Fasten off, but don’t work away your initial end!
Your Petals may be a teeny bit curly, but they will flatten out neatly once we join them.
Stitch Count per Side: 17 sc, 3 hdc, 2 dc, and 2 tr, not including ch-2 corner sps.
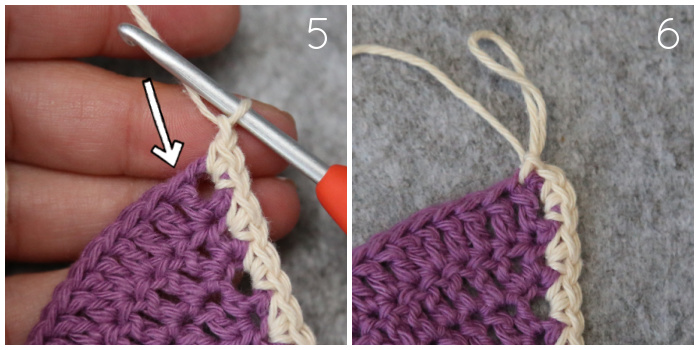
Round 4
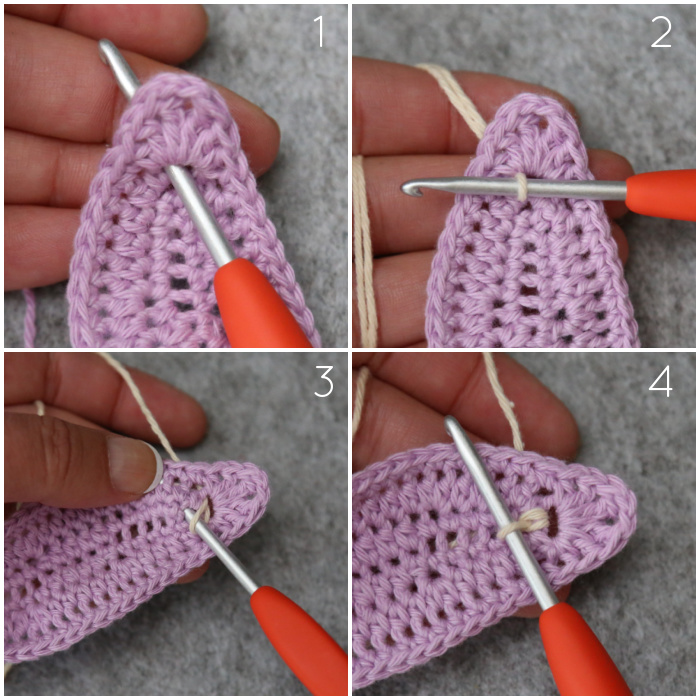
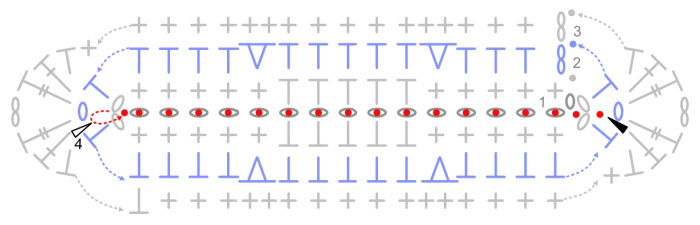
Starting at the pointy end next to the initial yarn end, insert your hook from front to back into the ch-1 sp of Round 2 {Photo 1}. Pull up a loop with the initial (long) yarn end {Photo 2}. Make a Surface Sl st in the ch-2 sp from Round 1, which will be tight to get into {Photos 3 and 4}. Make a Surface Sl st into each of the 15 ch sts down the centre of the Petal. Surface Sl st into the ch-2 sp from Round 1 and into the ch-1 sp from Round 2. Pull your yarn all the way through to the front of your work, then work away your ends.
Stitch Count: 18 Surface Sl sts

Central Petals
Make 4
Row 1
This Row will become the wrong side of your work for this piece.
Ch 4, make 2 dc in the 4th ch from the hook. TURN.
Stitch Count: 3 dc

Row 2
RS facing: ch 3, hdc in the same st. Make 2 dc in the next st, [hdc, dc] in the last st. TURN.
Stitch Count: 2 hdc and 4 dc
Row 3
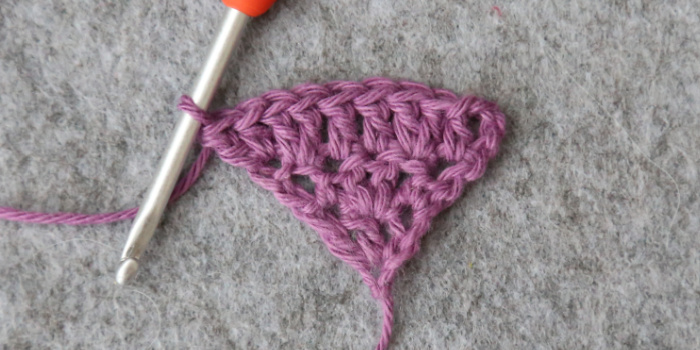
WS facing: ch 3, hdc in the same st. Make 2 dc in the next st, dc in the next 2 sts, make 2 dc in the next st, [hdc, dc] in the last st. TURN.
Stitch Count: 2 hdc and 8 dc
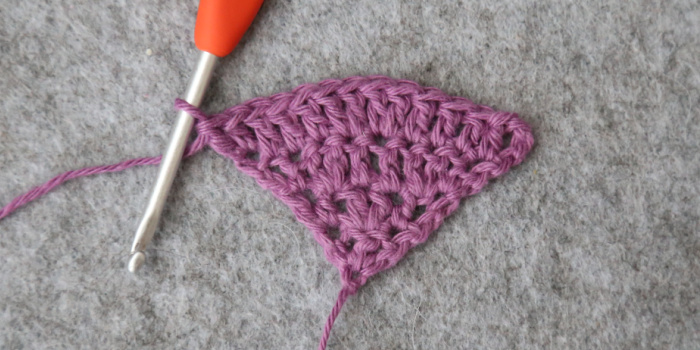
Row 4
RS facing: ch 3, hdc in the same st. Dc in the next 3 sts, (make 2 dc in the next st) twice, dc in the next 3 sts, [hdc, dc] in the last st. TURN.
Stitch Count: 2 hdc and 12 dc
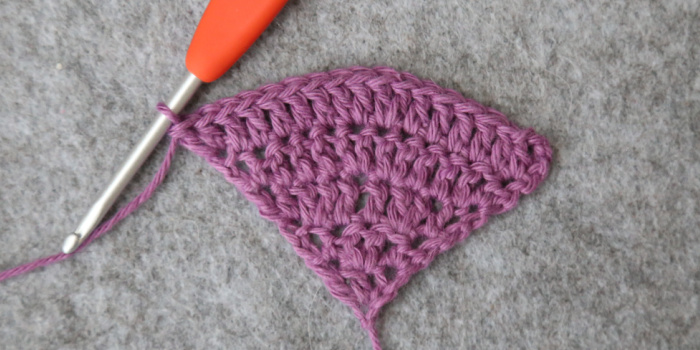
Row 5
WS facing: ch 3, hdc in the same st. Dc in the next 5 sts, (make 2 dc in the next st) twice, dc in the next 5 sts, [hdc, dc] in the last st. TURN.
Stitch Count: 2 hdc and 16 dc
Row 6
RS facing: ch 3, dc in the same st. (Dc in the next 3 sts, make 2 dc in the next st) twice. (Make 2 dc in the next st, dc in the next 3 sts) twice. Make 2 dc in the last st.
Stitch Count: 24 dc
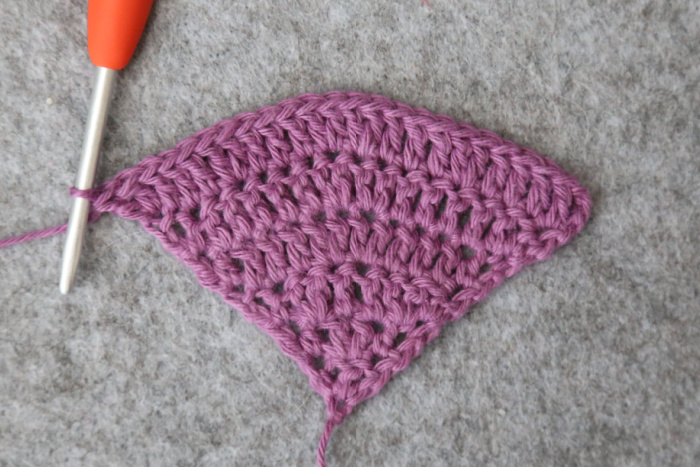
Row 7
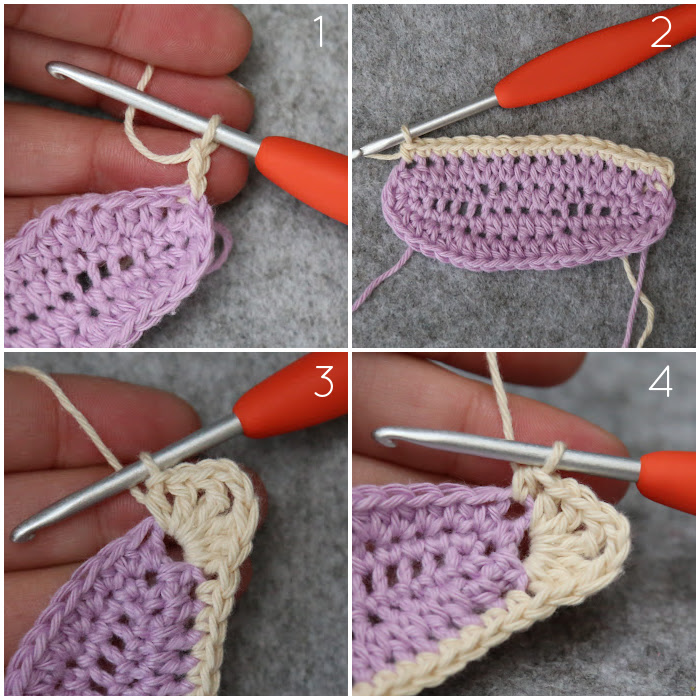
RS facing: ch 1 {Photo 1}. Working down the side of the Petal, make 2 sc in each of the 6 rows down the side, marking the first sc with a SM {Photo 2}.
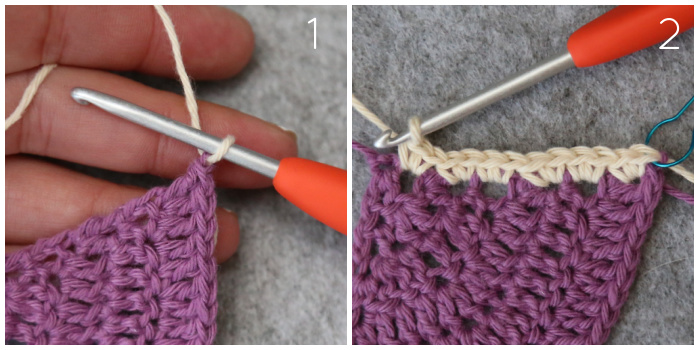
[Sc, ch 2, sc] in the beg ch {Photo 3}. Working up the other side of the Petal, make 2 sc in each of the 6 rows up the side {Photo 4}.
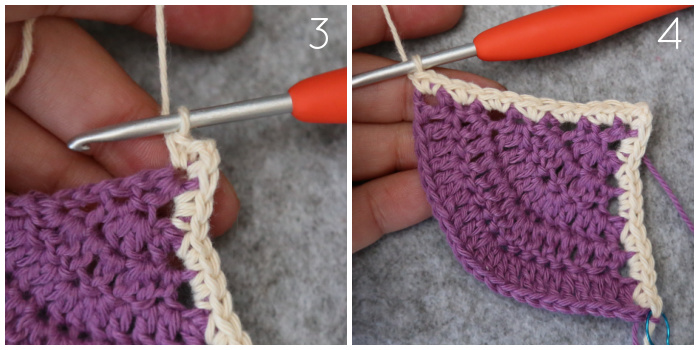
Ch 1, join to the first actual dc of Row 6 (not the top of the ch-3) with a sl st*. Fasten off and work away your ends.
* Don’t use an invisible join here. It won’t be as neat, and it will make it harder to identify this stitch later on.
Stitch Count: 26 sc and 1 ch-2 sp
And…. breathe! I hope those Small Petals and Central Petals will be a nice way to wind down from the complexity of the Heart Houses and the Central Motif. I can’t wait to see your pieces, and look forward to next week, when we make some LARGE Petals.

This blog post contains affiliate links. I only link to products I personally use or would use. All opinions are my own.


Sonia says
Are there any video tutorials ?
Thanks
Dedri Uys says
Hi Sonia, yes there are. You will find them under the Video links at the start of each part.
Mary Carol Durr says
This throw is going to be SO BEAUTIFUL!! I’m excited! I respect your design ability so much! Love from the US