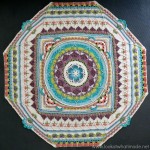
This week we will be making the short sides a bit more interesting by introducing a large central flower (and some zigzags).
I would like to say thank you to everyone who posted photos of their flower-giving last week. This week I would like you to share some photos of the men in your lives (this can be any man in your life, not just family) posing with Sophie. Dare them, bribe them, beg them…whatever it takes! From what I can tell most of your men-folk are good sports, so this should be fun :)
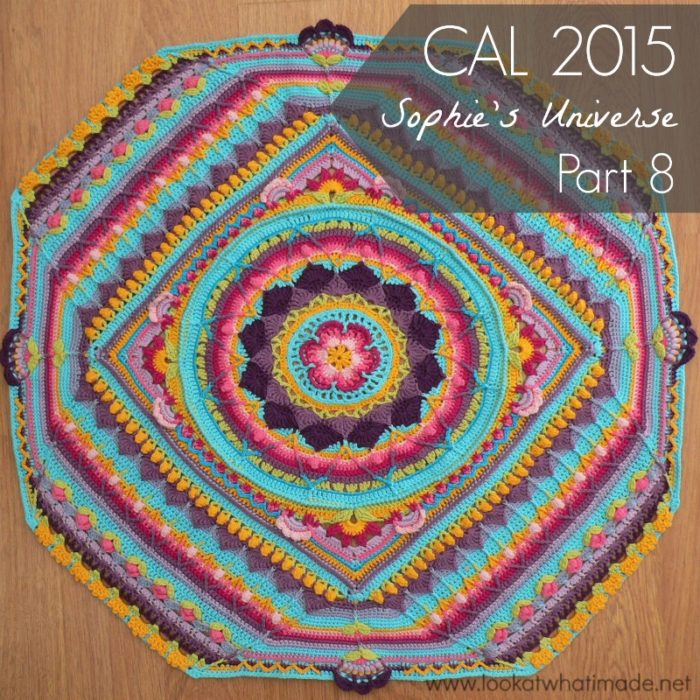
Sophie’s Universe Part 8
©Dedri Uys 2014. All Rights Reserved.
Resources
- Add this CAL to your Ravelry Queue
- Sophie’s Universe CAL 2015 Information
- Use the Print-friendly button at the bottom (right) of this post to print/save this tutorial. Don’t know how? Find out HERE.
- **Part 8 VIDEO TUTORIAL** by Esther Dijkstra from It’s All in a Nutshell
Translations
- Dutch Translation by Dianne Baan
- German Translation by Maja Heidingsfelder
- Spanish Translation by Lynda Hernandez
- French Translation by Sandra Larvin (with Video Tutorials by Géraldine Cymer)
- Danish Translation by Tina Poulsen
- Russian Translation (with Video) by Natalie V. Alimpieva
- Swedish CAL Information by Emma Vingqvist, Agnetha Magnusson, Åza Karlsson, and Ulrika Larsson
- Arabic Video Tutorial by Banan Felimban
Materials
See the Information Post.
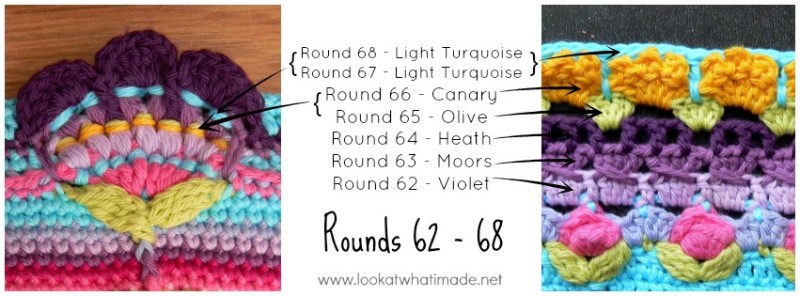
When deciding your colours for this part, you will need to consider the central flower on the short side. Rounds 62 – 64 will form the body of the flower. Rounds 65 and 66 will form the decorative detail around the bottom round of Puff Stitches. Rounds 67 and 68 will form the decorative detail around the top round of Puff Stitches.
Abbreviations
US Terminology Used (Basic US/UK comparison chart here)
- Bpsc – Back post single crochet
- Ch – Chain
- Dc – Double crochet
- Fpsc – Front post single crochet
- Fpdc – Front post double crochet
- Fpdtr – Front post double treble crochet
- Fptr – Front post treble crochet
- Hdc – Half-double crochet
- Sc – Single crochet
- Sl st – Slip stitch
- St/st’s – Stitch/stitches
- * – Repeat instructions between asterisks the number of times specified. This is a hardcore repeat and will consist of multiple instructions.
- () – Repeat instructions between parentheses the number of times specified. This is a lower level repeat.
Special Stitches
- Standing Stitches: Standing sc’s, hdc’s, and dc’s are stitches used to start the round without the need for the traditional beginning chain. Links to tutorials are supplied in each relevant round.
- Cable Stitch: Skip the next stitch. Dc in the next 3 st’s. Working over the 3 dc’s, yarn over and insert your hook into the skipped stitch. Pull up a loop to the height of the dc’s. This loop should encompass the 3 dc’s and should be visible on the front AND back of your work. (Yarn over and pull through 2 loops) twice, completing an extended (or long) dc. See this tutorial.
- Long Sc: To make the long sc, insert your hook into the indicated st/space and pull up a loop to the height of your work. Yarn over and pull through both loops on your hook.
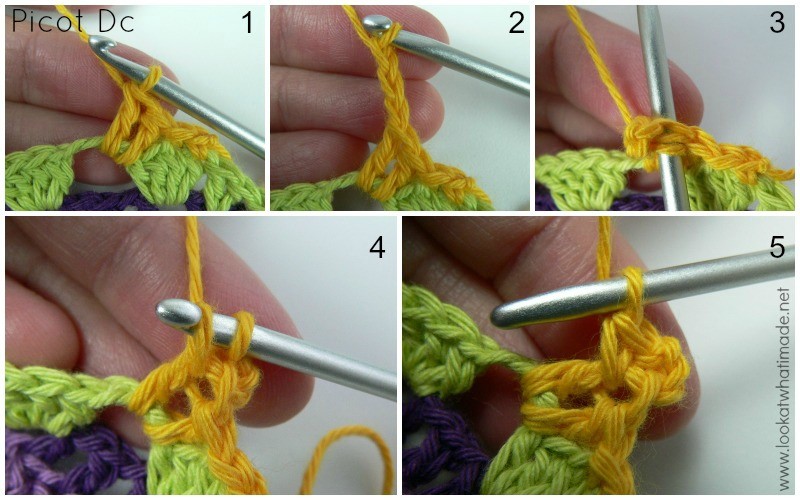
- Picot dc: Make a dc (Photo 1). Ch 3 (Photo 2). Complete the picot by making a sc in the top of the dc just made. To do this, insert your hook into both loops of the dc from the side and complete a sc (Photos 3-5).
- Puff Stitch: Yarn over and insert your hook into the specified stitch/space. Yarn over again and pull up a long loop. (Yarn over and insert your hook into the same stitch/space. Yarn over again and pull up a long loop) three more times (Photo 1). Yarn over and pull through all 9 loops on your hook (Photo 2). Ch 1 to close the Puff Stitch (Photo 3). Photo 4 shows 2 Puff Stitches made. See this tutorial if you need step-by-step help.

Instructions
Rounds 1 – 61
You can find the links for Rounds 1 – 61 HERE.
Remember to check the Helpful Tips before starting Part 8. You might find that you need to go up another hook size at this point. If you decide to do so, please remember that you will end up using more yarn.
Note About Counting
Remember that you will be counting from ch-1 corner space to ch-1 corner space. The only exceptions will be Rounds that do not have ch-1 corner spaces. If you are going to have trouble identifying the ch-1 spaces, please use stitch markers or scrap yarn to mark them.
Round 62 {First Row of Puff Stitches for Central Flower}
- If you are using the same colour, sl st into the next ch-1 space. (Ch 1, sc, ch 1, sc) in the same ch-1 space. This is your first corner made.
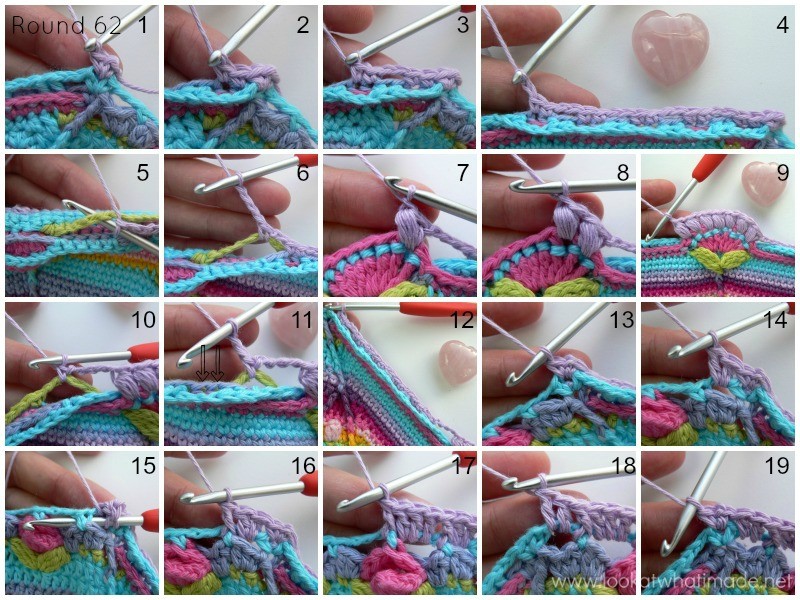
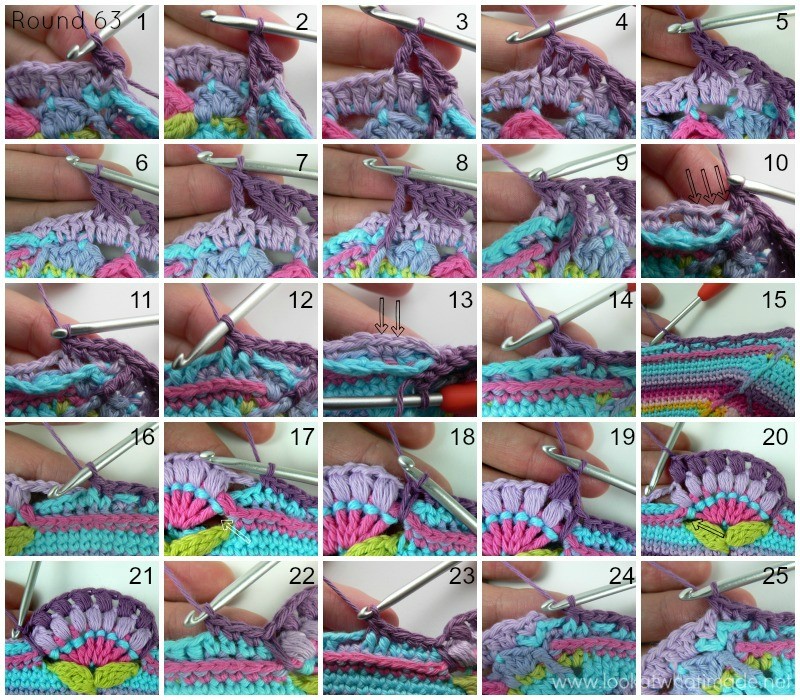
- If you are using a new colour, join your yarn by making a standing single crochet in the ch-1 space at the start of any short side. (Ch 1, sc) in the same ch-1 space. This is your first corner made (Photo 1).
*Short Side: Skip the first (hidden) stitch of Round 61. Working behind the stitches and spaces from Round 61, and taking care not to skip that first hidden stitch from Round 60: (make a sc in the next 2 skipped stitches from Round 60. Ch 2 and skip the next 2 st’s, which already contain fphdc’s from Round 61) 5 times (Photos 2 – 4). Sc into the next ch-6 space from Round 58 (Photo 5), which you will find behind your work. Ch 4 (Photo 6).
Make a Puff Stitch between the first and second tr’s of the “petal” from Round 59, remembering that the puff stitch is closed with a ch (Photo 7). (Make a Puff Stitch between the next 2 tr’s) 6 times (Photo 8). The last Puff Stitch should fall between the seventh and eighth tr’s of the 8-tr “petal” from Round 59 (Photo 9).
Ch 4. Sc into the next ch-6 space from Round 58, which you will find behind your work (Photo 10). Ch 2 (Photo 11). Working behind the stitches and spaces from Round 61: (sc in the next 2 skipped stitches from Round 60 – see arrows in Photo 11. Ch 2 and skip the next 2 st’s, which already contain fphdc’s from Round 61) 4 times. Sc in the last 2 skipped stitches from Round 60 (Photo 12). Skip the last st of Round 61.
Long Side: (Sc, ch 1, sc) in the next ch-1 space from Round 61 (Photo 13). Skip the first (hidden) stitch and make 2 dc’s in the first ch-2 space (Photo 14). Fpdc around the next sc (Photos 15 and 16). (Make 3 dc’s in the next ch-3 space, fpdc around the next sc) 14 times (Photo 17). Make 2 dc’s in the last ch-2 space and skip the last sc (Photo 18). (Sc, ch 1, sc) in the next ch-1 space (Photo 19).*
Repeat from * to * 3 more times, omitting the last (sc, ch 1, sc) corner on the last repeat. Join to the top of the first sc with a sl st.
Fasten off and work away your tails of yarn.
Stitch Counts:
- Total: 376 st’s, 40 ch-2 spaces, and 8 ch-4 spaces (including 8 ch-1 corner spaces) {104 sc’s, 184 dc’s, 60 fpdc’s, and 28 Puff Stitches}
- Per Short Side: 31 st’s, 10 ch-2 spaces, and 2 ch-4 spaces {24 sc’s and 7 Puff Stitches}
- Per Long Side: 63 st’s {2 sc’s, 46 dc’s, and 15 fpdc’s}
Round 63
In this round you will be making Cable Stitches. Please see Special Stitches above.
When working into the stitches of Round 62 on the short sides, make sure that you work behind the ch-2 spaces from Round 61.
Join your yarn by making a standing single crochet in the ch-1 space at the start of any LONG side. Sc in the same ch-1 space. This is your first 2-sc corner made (Photo 1).
*Long Side: Fpdtr around the fptr from Round 60 (Photo 2). Skip the first (hidden) sc and the next 2 dc’s. Dc in the next st, which will be the first fpdc from the previous round (Photo 3). (Make a Cable Stitch over the next 4 st’s) 14 times (Photos 4-6). Note that each Cable Stitch will fall between the posts of 2 fpdc’s from the previous round. Dc in the next st, which will be the first dc after the last fpdc (Photo 7). Fpdtr around the fptr from Round 60 and skip the last 2 st’s of the long side (Photo 8).
Short Side: Make 2 sc’s in the next ch-1 space (Photo 9). Making sure not to skip the first (hidden) stitch, sc in the next 3 st’s (indicated with arrows in Photo 10 and illustrated in Photo 11).
(Fpsc around the next 2 fphdc’s from Round 61 – see Photo 12. Sc into the next 2 st’s from Round 62, behind the next ch-2 space from Round 61 – indicated with arrows in Photo 13 and illustrated in Photo 14) 4 times (Photo 15). Fpsc around the next 2 fphdc’s from Round 61 (Photo 16) and sc in the next 3 st’s from Round 61 (Photo 17). There should now be 2 sc’s left unworked before the “flower”. Make a long sc into the space between the point of the leaf from Round 58 and the first tr of the “flower” from Round 59, encasing all the rounds (indicated with an arrow in Photo 17 and illustrated in Photo 18).
Make a Puff Stitch between the first and second Puff Stitches from Round 62 (Photo 19). (Make a Puff Stitch between the next 2 Puff Stitches) 5 times. The last Puff Stitch should fall between the sixth and seventh Puff Stitches from Round 62 (Photo 20).
Make a long sc into the space between the last tr of the “flower” from Round 59 and the tip of the next leaf from Round 58, encasing all the rounds (indicated with an arrow in Photo 20 and illustrated in Photo 21). Skip the next 2 st’s from Round 61, both of which will be hidden by the long sc, and sc in the next 3 st’s (Photo 22). If you have trouble determining the first stitch to work into, locate the first fphdc after the “flower” and count 3 stitches back from that.
(Fpsc around the next 2 fphdc’s from Round 61 – see Photo 23. Sc into the next 2 st’s from Round 62, behind the next ch-2 space from Round 61) 5 times. There should now be only one stitch left before the ch-1 corner space. Sc in this last stitch of the short side (Photos 24 and 25). Make 2 sc’s in the next ch-1 space.*
Repeat from * to * 3 more times, omitting the last 2 sc’s on the last repeat. Join to the top of the first sc with a sl st. Fasten off and work away your tails of yarn.
Stitch Counts:
- Total: 312 st’s {128 sc’s, 80 fpsc’s, 8 Long Sc’s, 8 dc’s, 8 fpdtr’s, 24 Puff Stitches, and 56 Cable Stitches}
- Per Short Side: 60 st’s {32 sc’s, 20 fpsc’s, 2 Long Sc’s, and 6 Puff Stitches}- this includes both sc’s of each 2-sc corner.
- Per Long Side: 18 st’s {2 dc’s, 2 fpdtr’s, and 14 Cable Stitches}
Round 64 {Petals of Central Flower}
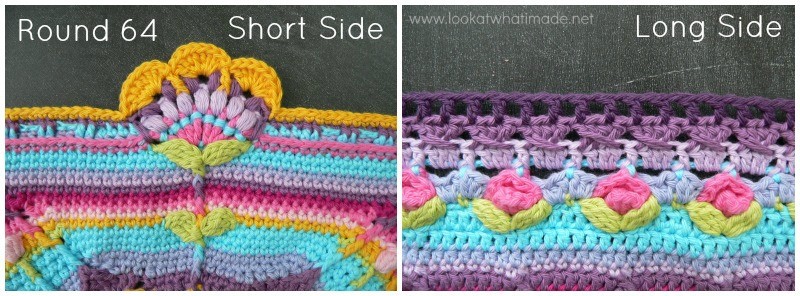
Please Note: In the photos I am using Canary to make it easier for you to see the stitches. I have actually done this round in Heath (see the Long Side photo below).
Hint: The dc’s on the long sides (apart from the first and last ones) should fall in the second and fourth st of each Cable Stitch from the previous round.
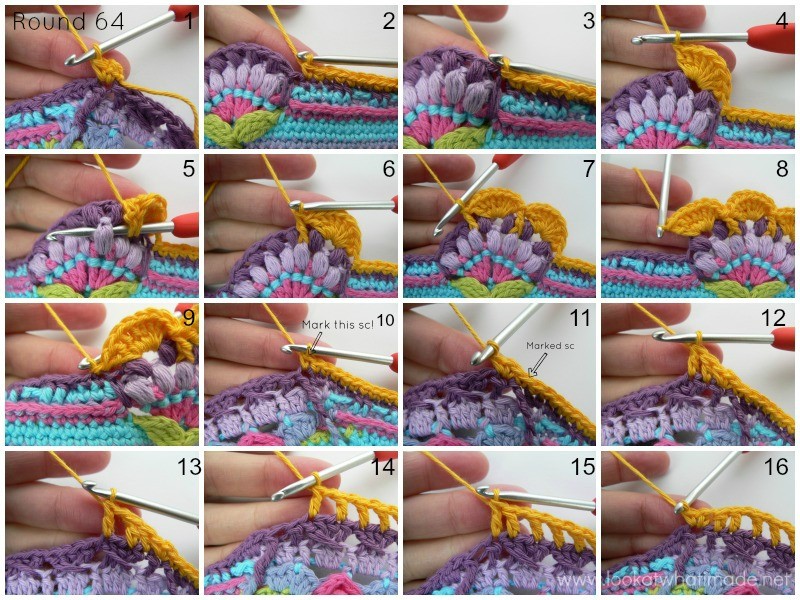
Join your yarn by making a standing single crochet in the fpdtr at the end of any long side. (Ch 1, sc) in the same stitch. This is your first corner made (Photo 1).
*Short Side: Sc in the next 26 st’s (Photo 2). Sl st in the next st, which should be the long sc (Photo 3).
(Make 8 dc’s between the next 2 Puff Stitches from Round 63 – see Photo 4. Make a fpdc around the Puff Stitch from Round 62 between the next 2 Puff Stitches from Round 63 – see Photos 5 and 6) twice (Photo 7).
Make 8 dc’s between the last 2 Puff Stitches (Photo 8). Skip the long sc and make a sl st in the next sc (Photo 9). Sc in the next 26 sc’s. The last sc should fall in the fpdtr. Mark this last sc so that you can find it easily in the next round (Photo 10).
Long Side: (Sc, ch 1, sc) in the next dc (Photo 11). Dc in the next 2 st’s (Photo 12). (Ch 1, skip the next st and dc in the next st) 27 times (Photos 13 and 14). Dc in the next st (Photo 15). (Sc, ch 1, sc) in the next st, which should be the fpdtr at the end of the long side (Photo 16).*
Repeat from * to * 3 more times, omitting the last (sc, ch 1, sc) corner on the last repeat. Join to the top of the first sc with a sl st.
Stitch Counts:
- Total: 456 st’s and 116 ch-1 spaces (including the 8 ch-1 corner spaces) {224 sc’s, 216 dc’s, 8 fpdc’s, and 8 sl st’s}
- Per Short Side: 82 st’s {54 sc’s, 24 dc’s (3 petals), 2 fpdc’s, and 2 sl st’s}
- Per Long Side: 32 st’s and 27 ch-1 spaces {2 sc’s, 30 dc’s}
Note About Short Sides and Long Sides
Take a moment to look at your work. You will notice that your short sides are now officially longer than your long sides. I have decided to keep calling the short sides (with the single central flower) “Short Sides”, and the long sides (with their busy gardens) “Long Sides”, because I think it will cause more confusion to swap the names at this point. If you ever get confused, just remember that the short sides are the ones with the single central flower.
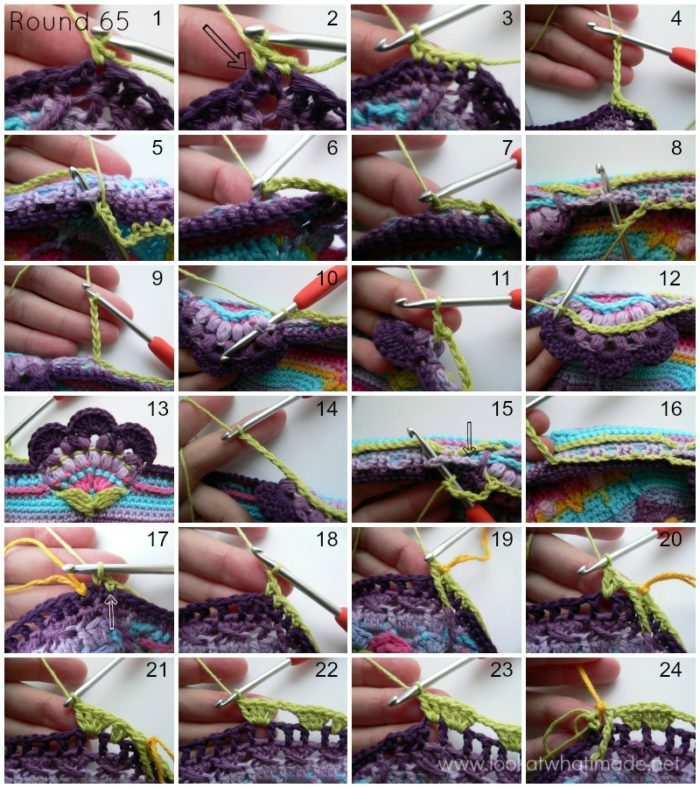
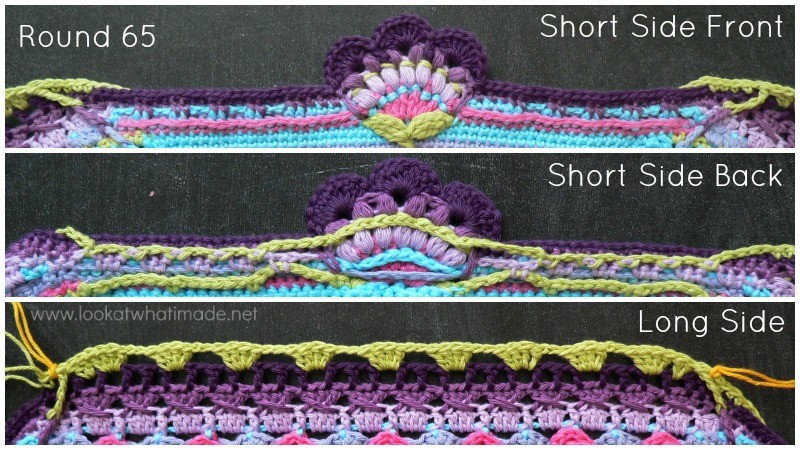
Round 65
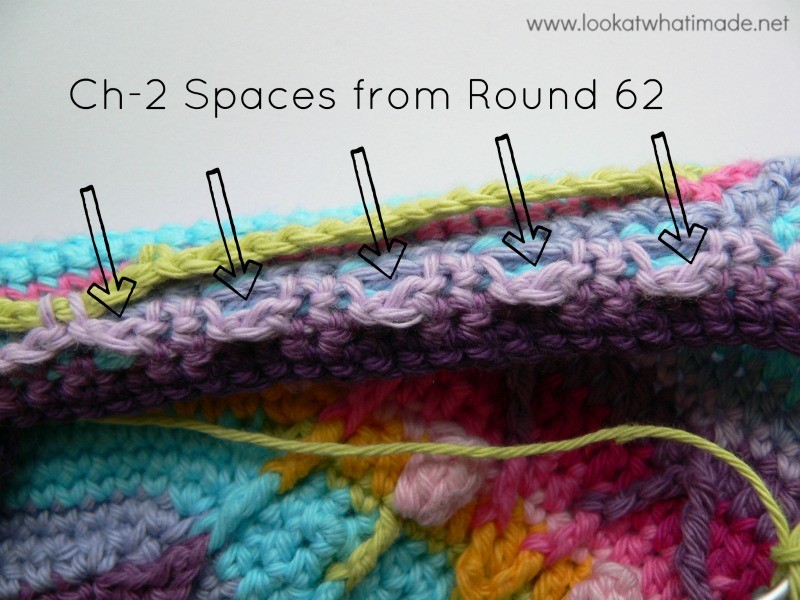
Before we get started with this round, take a moment to familiarise yourself with the ch-2 spaces you will need to work into when making the short sides. To find these ch-2 spaces, fold Sophie towards you so that you can see the back of your short side. There will be 5 ch-2 spaces and 1 ch-4 space between the first corner and the flower. There will be 1 ch-4 space, followed by 5 ch-2 spaces, between the flower and the next corner. You will be working into the 5 ch-2 spaces on each side of the flower. These ch-2 spaces will be the same colour as the first round of Puff Stitches.
Do not forget to make the ch-1 spaces at the start and end of each long side, which will count as your ch-1 corner spaces. Mark these ch-1 spaces if you are going to have trouble identifying them later, because you will be using them when you count your stitches.
- If you are using the same colour, (ch 1, sc) in the same st as the sl st join.
- If you are using a new colour, join your yarn by making a standing single crochet in the same st as the sl st join, which will be the first sc of the (sc, ch 1, sc) corner at the start of any short side (Photo 1).
*Short Side: Sc in the next ch-1 space (Photo 2). Skip the first (hidden) stitch (indicated with an arrow in Photo 2) and sc in the next 2 st’s (Photo 3). Ch 5 (Photo 4). Fold your work towards you so that you can see the back of your work. This will make it much easier to work into the ch-2 spaces and around the puff stitches. Sl st into the next ch-2 space from Round 62, which you will find behind your work (Photos 5 and 6).
(Ch 2 and sl st into the next ch-2 space from Round 62) 4 times (Photos 7 and 8). Ch 6 (Photo 9) and skip the next ch-4 space from Round 62. You will now work around the Puff Stitches from Round 62, taking care not to snag any other stitches in the process. (Bpsc, ch 1) around each of the first 6 Puff Stitches from Round 62 (Photos 10 and 11). Make a bpsc around the last Puff Stitch from Round 62 (Photos 12 and 13). Ch 6 (Photo 14). Skip the next ch-4 space from Round 62 and sl st into the next ch-2 space from Round 62 (Photo 15).
(Ch 2, sl st into the next ch-2 space) 4 times. Ch 5 (Photo 16). Sc in the marked stitch from Round 64, which should be the second sc before the ch-1 corner space (indicated with an arrow in Photo 17). If you didn’t mark this stitch in the previous round, locate the ch-1 space (marked in Photo 17 to make it clear) at the end of the short side and count back 2 stitches. Sc in the last st before the ch-1 space (Photo 17). Sc in the ch-1 space.
Long Side: Skip the first (hidden) stitch. Sc in the next st, which will be the first dc of the long side. Ch 1 (Photo 18) and make a fpdtr around the fpdtr from Round 63. This (sc, ch 1, fpdtr) is your corner (Photo 19). Skip the next dc. Make 2 dc’s in the next ch-1 space (Photo 20). Make 4 dc’s in the next ch-1 space (Photo 21).
(Ch 2 and skip the next 2 ch-1 spaces. Make 4 dc’s in the next ch-1 space – see Photo 22) 8 times. You should now have nine 4-dc groups, each separated by a ch-2 space. There should be 2 skipped ch-1 spaces between each 4-dc group.
Make 2 dc’s in the last ch-1 space (Photo 23). Make a fpdtr around the fpdtr from Round 63 and skip the next 2 dc’s of Round 64. Ch 1 and make a sc in the next st, which will be the first sc of the (sc, ch 1, sc) corner from the previous round. This (fpdtr, ch 1, sc) is your corner (Photo 24).*
Repeat from * to * 3 more times, omitting the last sc on the last repeat. Join to the first sc with a sl st. Fasten off and work away your tails of yarn.
Stitch Counts:
- Total: 268 st’s, 64 ch-2 spaces, 8 ch-5 spaces, 8 ch-6 spaces, and 32 ch-1 spaces, including the 8 ch-1 corner spaces {32 sc’s, 28 bpsc’s, 160 dc’s, 40 sl st’s and 8 fpdtr’s}
- Per Short Side: 25 st’s, 6 ch-1 spaces, 8 ch-2 spaces, 2 ch-5 spaces, and 2 ch-6 spaces {8 sc’s, 7 bpsc’s, and 10 sl st’s}
- Per Long Side: 42 st’s and 8 ch-2 spaces {40 dc’s and 2 fpdtr’s} – Remember that you are counting from the ch-1 space to the next ch-1 space.
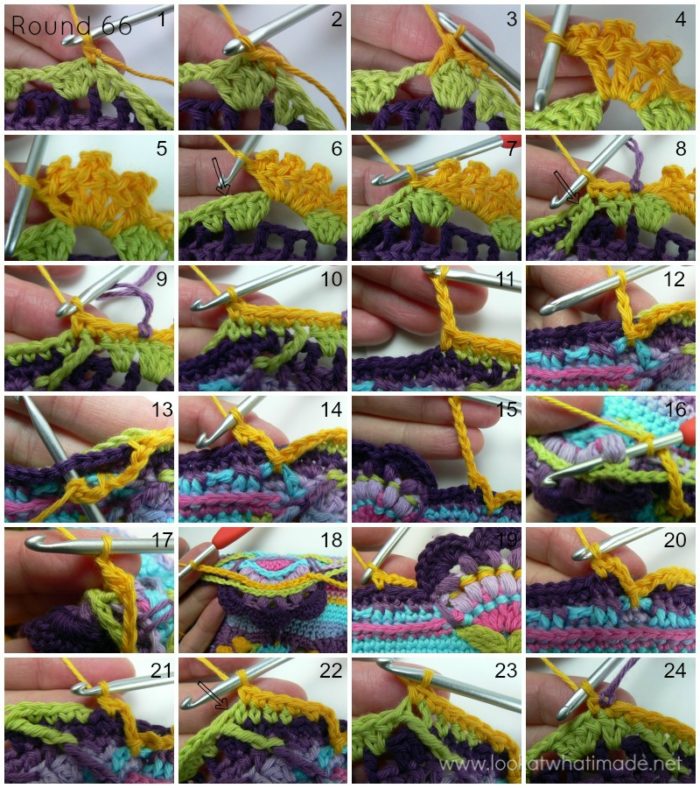
Round 66 {Ruffle Flowers}
In this round you will be making little zigzag “hills” using surface crochet, very much the same as you did in Round 33.
Join your new yarn by making a standing single crochet in the first dc of the first 4-dc group on any long side. Mark this stitch to help you count later on (Photo 1).
*Long side: Sl st in the next dc, which will be the second dc of the first 4-dc group (Photo 2). (Make a dc – Photo 3, make 3 Picot dc’s – Photo 4, make a dc – Photo 5) in each of the 8 ch-2 spaces across (see the photo of the long side below). Skip the next 3 dc’s and sl st in the last dc of the last 4-dc group (indicated with an arrow in Photo 6 and illustrated in Photo 7).
Short Side: Sc in the next 3 st’s, marking the first sc to help you count later on. The last sc should fall in the fpdtr at the end of the long side (Photo 8). Sc in the next ch-1 space (indicated with an arrow in Photo 8 and illustrated in Photo 9). Sc in the next 4 st’s (Photo 10). Sc in the first skipped stitch from Round 64 (Photo 11).
(Ch 3 and sl st into the next ch-2 space from Round 61. This ch-2 space will be in front of your work and between front post groups. Ch 3, skip the next 3 st’s from Round 64 and sc in the next st from Round 64 – see Photos 12 – 14) 5 times. The last sc should fall in the sc made into the last fpsc from Round 63 (before the flower).
Ch 6 (Photo 15). You will now work around the puff stitches from Round 62 that already contain the bpsc’s from Round 65, taking care not to snag any other stitches in the process. (Bpsc, ch 1) around each of the first 6 Puff Stitches from Round 62. Make a bpsc around the last Puff Stitch from Round 62. Ch 6 (Photo 16-18). Skip the first 3 sc’s of Round 64 after the flower. Sc in the next st from Round 64 (Photo 19).
(Ch 3 and sl st into the next ch-2 space from Round 61. Ch 3, skip the next 3 st’s from Round 64 and sc in the next st from Round 64- see Photo 20) 5 times (Photo 21). Skip the next st of Round 64 and sc in the next 4 st’s of Round 65 (Photo 22). Sc in the next ch-1 space (indicated with an arrow in Photo 22 and illustrated in Photo 23). Skip the fpdtr and sc in the next 3 dc’s. Mark the last stitch to help you count later on (Photo 24). *
Repeat from * to * 3 more times, omitting the last sc on the last repeat. Join to the top of the first sc with a sl st. Fasten off and work away your tails of yarn. Keep the stitch markers in place for the next round.
Stitch Counts:
- Total: 348 st’s, 24 ch-1 spaces, 80 ch-3 spaces, and 8 ch-6 spaces {112 sc’s, 64 dc’s, 96 Picot dc’s, 28 bpsc’s, and 48 sl st’s}
- Per Short Side: 45 st’s, 6 ch-1 spaces, 20 ch-3 spaces, 2 ch-6 spaces {28 sc’s, 7 bpsc’s, and 10 sl st’s } – counting from marked sc to marked sc
- Per Long Side: 8 petals and 2 sl st’s (or 16 dc’s, 24 Picot dc’s, and 2 sl st’s) – counting from slip stitch to slip stitch
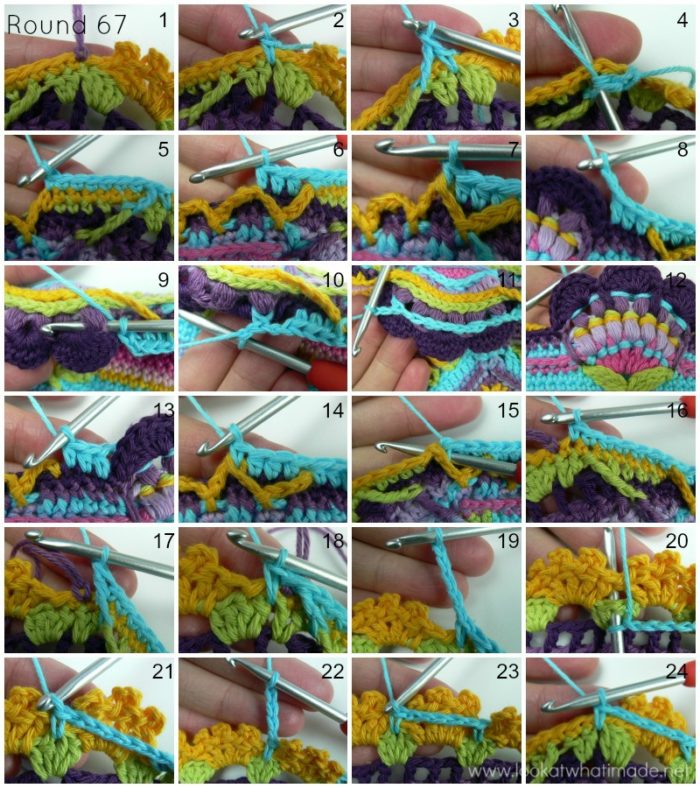
Round 67
Join your yarn by making a standing single crochet between the 4-dc group and the 2-dc group from Round 65 at the end of any long side, working OVER the (marked) sc from Round 66 (Photos 1 and 2).
*Short Side: Fptr in the fpdtr from Round 65 (Photo 3) and skip the next sc of Round 66, which will be the sc made into the second dc of the 2-dc group (Photo 4). Sc in the next 7 st’s. The last sc should fall in the last sc before the first ch-3 space (Photo 5).
(Hdc in the next 3 skipped st’s from Round 64 – see Photo 6. Make a bpsc around the next sc of Round 66, which will be at the top of the “zigzag hill” – see Photo 7) 5 times. Working in front of the ch-6 space from Round 66, hdc in the next 3 skipped st’s from Round 64. The last hdc should fall in the last sc before the flower.
Ch 2 (Photo 8). Being careful not to accidentally catch any of the other stitches, (bpsc, ch 1) around each of the first 5 Puff Stitches from Round 63 (Photos 9 and 10). Bpsc around the last Puff Stitch from Round 63. Ch 2 (Photo 11). Photo 12 shows what the bpsc’s should look like from the front.
Working in front of the ch-6 space from Round 66, hdc in the next 3 skipped sc’s from Round 64 (Photo 13). Skip the next sc from Round 66, which is at the top of the first “zigzag hill”. (Hdc in the next 3 skipped st’s from Round 64. Make a bpsc around the next sc of Round 66, which will be at the top of the “zigzag hill” – see Photo 14) 5 times, just like on the other side of the flower. Photo 15 shows the last bpsc being made. Sc in the next 7 st’s, taking care not to accidentally skip the first stitch after the last bpsc (Photo 16). Fptr around the fpdtr from Round 65 and skip the next (marked) sc (Photo 17).
Long Side: Make a sc between the 2-dc group and the 4-dc group from Round 65, working over the sl st from Round 66 (Photo 18). Ch 5 (Photo 19). Working over the stitches from Round 66: (sc between the second and third dc of the next 4-dc group from Round 65 – see Photos 20 and 21, and then ch 5 – see Photo 22) 7 times. Sc into the space between the next 4-dc group and the 2-dc group from Round 65, working OVER the (marked) sc from Round 66 (Photo 24).*
Repeat from * to * 3 more times, omitting the last sc on the last repeat. Join to the top of the first sc with a sl st.
It doesn’t matter if the ch-5 spaces are in front of the flowers or not. I actually find it easier to keep them in front of the flowers…at least for now.
Stitch Counts:
- Total: 308 st’s, 20 ch-1 spaces, 8 ch-2 spaces, and 32 ch-5 spaces {92 sc’s, 64 bpsc’s, 144 hdc’s, and 8 fptr’s}
- Per Short Side: 68 st’s, 5 ch-1 spaces, and 2 ch-2 spaces {14 sc’s, 16 bpsc’s, 36 hdc’s, and 2 fptr’s}
- Per Long Side: 9 sc’s and 8 ch-5 spaces
Round 68
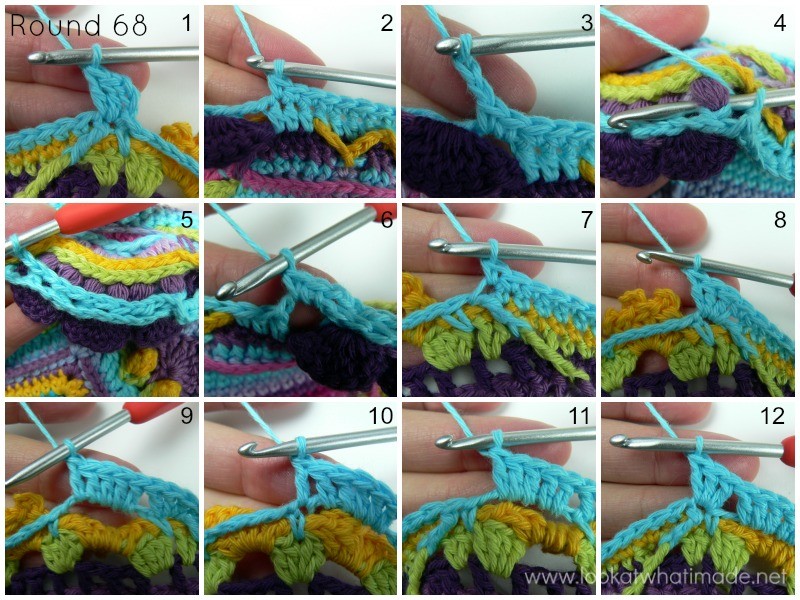
- If you are using the same colour, sl st into the next st, which will be the fptr from Round 67. Ch 3 (this counts as your first dc). Make 2 dc’s in the same stitch (Photo 1).
- If you are using a new colour, join your yarn by making a standing double crochet in the stitch after the sl st join (in other words, the fptr at the end of any long side). Make 2 dc’s in the same stitch.
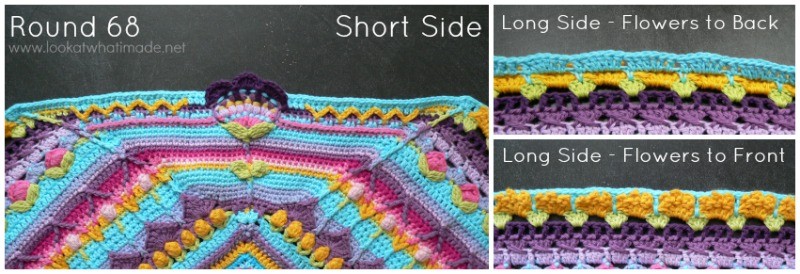
*Short Side: Sc in the next 30 st’s (Photo 2). Make 2 sc’s in the next ch-2 space. Ch 2 (Photo 3). Being careful not to accidentally catch any of the other stitches, (bpsc, ch 1) around each of the first 5 Puff Stitches from Round 63, which will already contain the bpsc’s from Round 67. Bpsc around the last Puff Stitch from Round 63. Ch 2 (Photos 4 and 5). Make 2 sc’s in the next ch-2 space (Photo 6). Skip the first (hidden) stitch, and sc in the next 30 st’s. The last sc will fall in the fptr from the previous round (Photo 7).
Long Side: Make 3 dc’s in the next stitch (Photo 8). (Make 5 dc’s in the next ch-5 space – see Photo 9, dc in the next sc – see Photo 10) 7 times. Make 5 dc’s in the last ch-5 space and skip the last sc (Photo 11). Make 3 dc’s in the next fptr (Photo 12).*
Repeat from * to * 3 more times, omitting the last 3 dc’s on the last repeat. Join to the top of the beginning ch-3 (or the standing double crochet) with a sl st.
If your “Ruffled Flowers” are still hiding behind your work at this point, flick them all to the front and marvel at your creative genius!
Stitch Counts:
- Total: 492 st’s and 20 ch-1 spaces {256 sc’s, 24 bpsc’s, and 212 dc’s}
- Per Short Side: 70 st’s and 5 ch-1 spaces {64 sc’s, 6 bpsc’s }
- Per Long Side: 53 dc’s
Note About Curling
At this point, your edges will curl over, just like at the end of Part 7. I am going to suggest blocking again. Annie’s has some good advice for Blocking Afghans and Other Large Pieces.
If you are going to use foam squares to block on, consider buying these Interlocking Foam Exercise Mats. They are similar to these Knitter’s Pride Lace Blocking Mats but cheaper. You will also need some of these Clover Fork Blocking Pins
.
Click on the images below if you would like to enlarge them.
This part of the pattern was tested by Kimberly Slifer, Claire Martin, Maja Heidingsfelder, Lynda Hernandez, Susan Wilkes-Baker, Venetia Smith and Dianne Baan.

This blog post contains affiliate links. I only link to products I personally use or would use. All opinions are my own.








Heather Abbott says
Thankyou for helping me download the pattern. cant wait to get going again. Thank you for such an inspirational blanket
Heather Abbott says
Dear Sophie,
I have been trying to download part 2 of your 2015 CAL because it is so beautiful. However all i get is a pattern for a itsy bitsy baby hat in grey and pink. How do i get the correct version, desperate to keep going.
keep up the beautiful creations.
Linda Penner says
The flower color and row chart at the top is very helpful! I just finished part 4 and I had to identify what each row would accomplish visually in order to figure out which colors I wanted to use since you have designed such a complex and intriguing pattern. I am in awe in how you do account for everything 2 and 3 rows back to get these beautiful flowers and landscape!
Jenny says
Dedri certainly is a talented designer :)
Katrina says
I just ran across this CAL while researching how to piece together the squares from the CAL I worked on LAST year!! Now that I see this project, I realize I HAVE to make it for my mom. I’m about to order the yarn pack from Deramores & hope I can catch up!! Thank you for doing this. It looks absolutely exquisite.
Jenny says
Hope you enjoy it as much as last year’s CAL :)
Lucile says
Many thanks Dedri, this is like a video game, can’t wait for the next levels! Just finished Part5 :) and can’t wait to be on part 8 looking at how things turn out in this last tutorial. Thanks for sharing your very good explanations!
Jenny says
We are delighted that you are enjoying your Sophie experience!
I am on part 5 with my green Sophie and in part 8 with my grey version. Such a joy to complete every week :)
Sharyn says
again, I am in awe of your talent. this is so gorgeous and keeps getting more so. I am loving it, every single stitch and surprise of beauty.
Carol D says
P.S. I had ordered the mats you recommended for blocking…only to discover I don’t have enough…I had to order more sets last night…
which is fine, because they will be useful for all future projects.
Thank you for that recommendation as well!
Carol D says
Just when I think Sophie can’t possibly get any prettier, you prove me WRONG!
Dedri, this is so stunningly beautiful!
I also had originally planned to stop long before now. Only because I wanted it to work in my afghan along with my smaller squares (made long ago and abandoned.) But each new Part is more beautiful than the one before and I can’t possibly quit!
With the Worsted Wt. yarn and hook I’m using, Sophie is getting almost large enough to cover the top of our Cal-King bed! So, now I have decided that if she does cover the top, so be it, and the smaller squares will be used for the ‘drop’ on the sides of the bed.
Now I plan to enlarge original small squares a little bit to incorporate some of the colors and designs from Sophie – that were not used originally…
Your design is just gorgeous. And I told my hubby the other night that you must be some mathematical genius to work this all out. Simply amazing! and that you are sharing this so generously with all of us in the ‘blogosphere’ is even MORE amazing.
I cannot thank you enough…so I shall, instead, pray for you and your family in Thanksgiving for your generosity.
Rhonda Coombes says
Thank you so much for sharing the beautiful pattern with all of us. I truly feel blessed to be apart of this amazing group. I am still working on last weeks rounds. Lots of frogging..LOL! Can’t wait to get to this weeks rounds. Gorgeous!
Dedri Uys says
Is there anything I can help you with to prevent the “lots of frogging”?
Heather knotek smith says
I’m still working along. I have two rounds from last week then I start this. It seems pretty complicated. Can’t wait! Hope I don’t get too far behind. :).
Dedri Uys says
It isn’t too complicated. More fiddly than anything.
Joke Dolsma says
Hi Dedri, what a creatieve person you are, you came up with an other amazingly beautiful and surprising new part this week. I love to work on this so much. Sophie helps me through very dark moments for me she is a livesafer and i am so glad that there will be 12 more weeks work on it that i can look forward to. Thank you so much!
Jeannie says
Thank you so much for this wonderful pattern! You have inspired me to try a pattern that I would never have thought I could accomplish. Can’t wait to start part 8.
Dedri Uys says
I am so pleased that you have taken up the challenge, Jeannie. One stitch at a time :)
Dolores says
I am lagging behind !!!!! I Have not been able to get to it all week so have 2 weeks to catch up on now
Liz says
Wow, wow, wow, can’t wait to start this. Looks stunning as usual. Thanks Dedri for all you hard work and for sharing this beautiful pattern. I am making two: one in Stonewashed XL and following your colour charts, the other is in Drops Big Merino in three shades of off white, pink and pistaschio. Absolutely delightful and a pleasure to crochet
Dedri Uys says
Thank you, Liz :) The off white, pink, and pistaschio sounds awesome!
Jude Parr says
Many thanks really looking forward to this part. Thanks for all your hard work.
Dedri Uys says
You are welcome :)
Erik says
Hey, what if we are the men in the family? Should we try to get a pic of the loving, patient, kind women in our lives with Sophie? :)
Dedri Uys says
Hi Erik. The women in our lives are going to get their turn. Postmen, pastors, local shopkeepers, basketball coaches, customers, clients, friends…I’m sure you can find a willing male soul :)
rachel says
YAY!!!Part 8!!! going to choose which color to do where….
Thank you all that have a part with providing us such a great ‘SOPHIE’!
Dedri Uys says
Thank you, Rachel
Leen says
Oh, this is my favourite part so far (and the roses in Part 7)! I have been refreshing the page all morning, I was so excited to see what was next. Thanks a million for doing this!
Dedri Uys says
You are most welcome, Leen ;)
Kate Boyle says
I have no man in my life, both my dad and grandfather are passed
Dedri Uys says
I am so sorry to hear that, Kate.
Minette says
Beautiful; such a unique concept. Mine is getting heavy. I love it.