Good Morning and Happy Easter!
Part 13 of the Sophie’s Universe CAL is fairly simple, and shouldn’t take too long to do. At the end of this part, you should once again have a square. Well, Sophie might not look exactly square straight off the hook, but once blocked you should have a neat square. You can find the details for blocking at the bottom of this post.
I have had a few more queries about yardage to date, and am in the process of setting up a table for you. Please be patient as I sort out the logistics of how to present this to you. This is not just a cut-and-paste job, I’m afraid.
This week I am going to ask for a repeat of a photo-task we have already done: Sophie in a Scenic Spot. Let your imagination soar! And please remember to share using #scenicsophie.
I hope you have a wonderful Easter weekend!
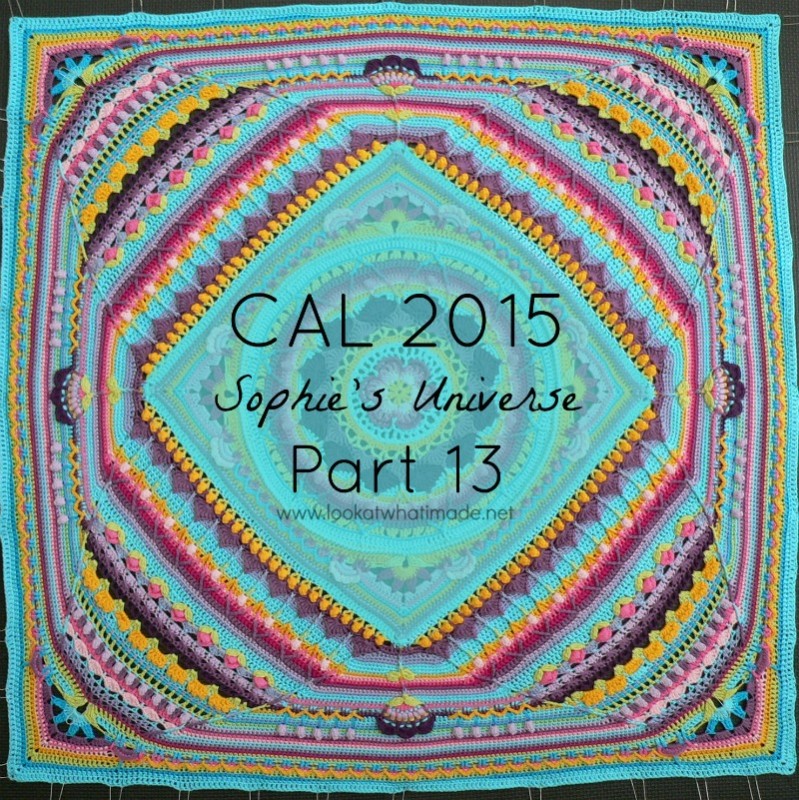
Sophie’s Universe Part 13
©Dedri Uys 2014. All Rights Reserved.
Resources
- Add this CAL to your Ravelry Queue
- Sophie’s Universe CAL 2015 Information
- Use the Print-friendly button at the bottom (right) of this post to print/save this tutorial. Don’t know how? Find out HERE.
- **Part 13 VIDEO TUTORIAL** by Esther Dijkstra from It’s All in a Nutshell.
Translations
- Dutch Translation by Dianne Baan
- German Translation by Maja Heidingsfelder
- Spanish Translation by Lynda Hernandez
- French Translation by Sandra Larvin (with Video Tutorials by Géraldine Cymer)
- Danish Translation by Tina Poulsen
- Russian Translation (with Video) by Natalie V. Alimpieva
- Swedish CAL Information by Emma Vingqvist, Agnetha Magnusson, Åza Karlsson, and Ulrika Larsson
Materials
See the Information Post.
*You can use whichever colour/colours you prefer for the Optional Flowers. I have decided to leave my Optional Flower until the blankets are done, mainly so that I can show you what they look like with/without the flowers. If you wait until later you will also have a better idea of which yarns you have lots left of (and which ones are close to running out).
I will remind you about the Optional Flowers again later when we add another bit of surface detail.
Abbreviations
US Terminology Used (Basic US/UK comparison chart here)
- Bpsc – Back post single crochet
- Bptr – Back post treble crochet
- Ch – Chain
- Dc – Double crochet
- Hdc – Half-double crochet
- Sc – Single crochet
- Sl st – Slip stitch
- St/st’s – Stitch/stitches
- * – Repeat instructions between asterisks the number of times specified. This is a hardcore repeat and will consist of multiple instructions.
- () – Repeat instructions between parentheses the number of times specified. This is a lower level repeat.
Special Stitches
- Standing Stitches: Standing sc’s, hdc’s, and dc’s are stitches used to start the round without the need for the traditional beginning chain. Links to tutorials are supplied in each relevant round.
Instructions
Rounds 1 – 88
You can find the links for Rounds 1 – 88 HERE.
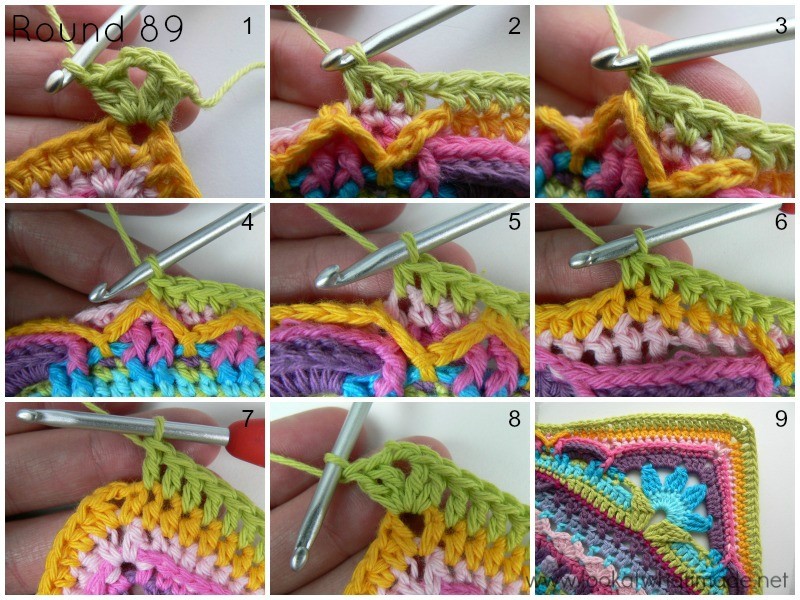
Round 89
- If you are using the same colour, sl st into the ch-2 space. Ch 3 (counts as your first dc). (Dc, ch 2, 2 dc) in the same ch-2 space.
- If you are using a new colour, join your yarn by making a standing double crochet in any ch-2 corner around. (Dc, ch 2, 2 dc) in the same corner space (Photo 1).
*Skip the first (hidden) stitch and dc in the next 15 st’s. Hdc in the next 5 st’s. The last hdc should fall in the last sc before the zigzag “hills”. (Hdc in the next 3 st’s from Round 87 – see Photo 2, make a bpsc around the next sc from Round 88, which will be at the top of the zigzag “hill” – see Photo 3) 28 times (Photo 4). Hdc in the next 3 st’s of Round 87 (Photo 5). Hdc in the next 5 st’s of Round 88, making very sure that you don’t accidentally skip the first st after the last ch-3 (Photo 6). Dc in the next 15 st’s (Photo 7). (2 dc, ch 2, 2 dc) in the next ch-2 corner space (Photo 8).*
Repeat from * to * 3 more times, omitting the last corner on the last repeat. Join to the top of the beginning ch-3 (or the standing double crochet) with a sl st.
Stitch Counts:
- Total: 636 st’s and 4 ch-2 corner spaces {112 bpsc’s, 388 hdc’s, and 136 dc’s}
- Per Side: 159 st’s {28 bpsc’s, 97 hdc’s, and 34 dc’s}
Round 90
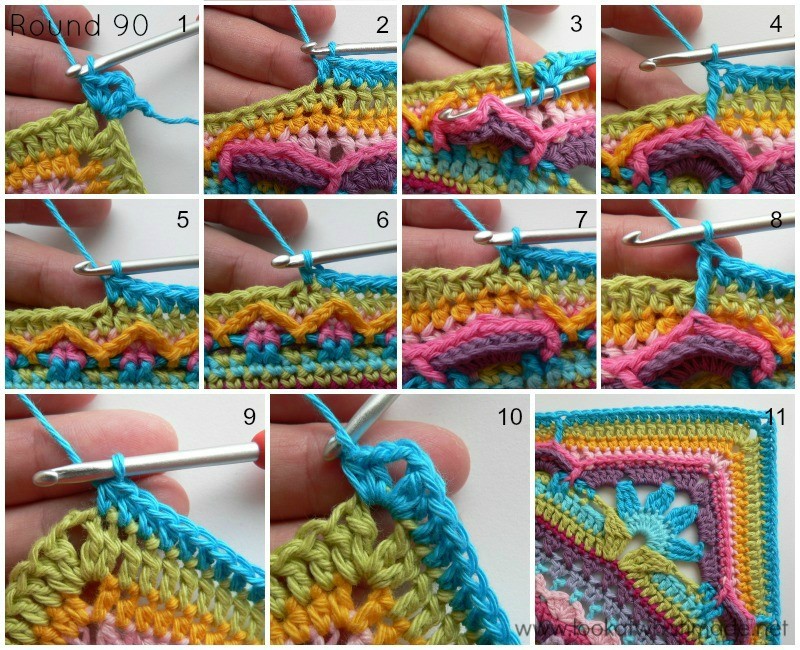
In this round, you will see that I have advised you to mark 2 stitches on each side. This is not necessary, it is just advisable if you still have trouble identifying your stitches. These marked stitches are purely “checkpoints”, as Esther likes to call it.
Join your yarn by making a standing half-double crochet in any ch-2 corner space around. (Hdc, ch 2, 2 hdc) in the same corner space (Photo 1).
*Skip the first dc (which will be hidden anyway) and hdc in the next 18 st’s. The last hdc should fall in the second hdc from the previous round (Photo 2). Bptr around the fourth bpsc of the “petal” formed by Rounds 85 and 86 (Photos 3 and 4). Skip the next st of Round 89 and hdc in the next 40 st’s (Photo 5). Mark the last hdc. Sc in the next 40 st’s (Photo 6). Mark the last sc. Hdc in the next 40 st’s. There should now be 2 hdc’s left before the dc’s from the previous round (Photo 7). Bptr around the fourth bpsc of the “petal” formed by Rounds 85 and 86 (Photo 8). Skip the next st of Round 89 and hdc in the next 18 st’s (Photo 9). (2 hdc, ch 2, 2 hdc) in the next ch-2 corner space (Photo 10).*
Repeat from * to * 3 more times, omitting the last corner on the last repeat. Join to the top of the first hdc with a sl st.
Stitch Counts:
- Total: 648 st’s and 4 ch-2 corner spaces {160 sc’s, 480 hdc’s, and 8 bptr’s}
- Per Side: 162 st’s {40 sc’s, 120 hdc’s, and 2 bptr’s}
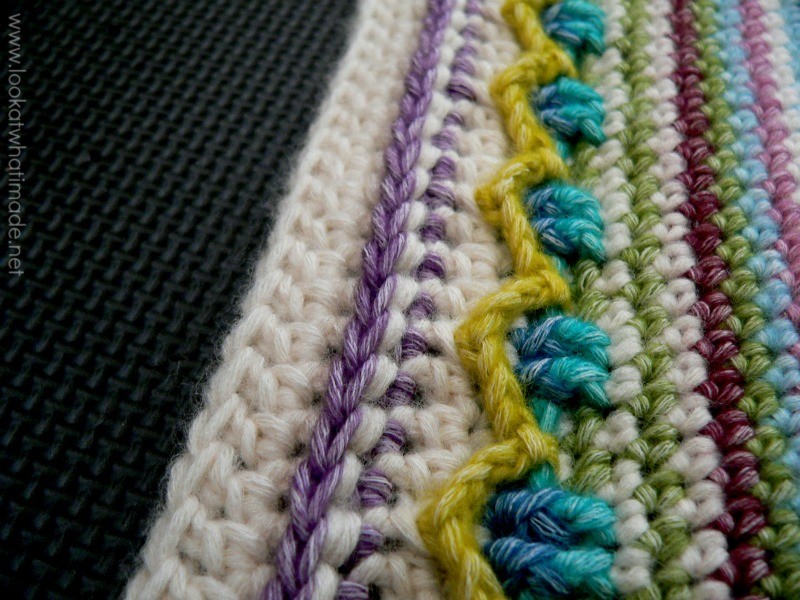
The photo below shows the marked stitches (if you choose to mark them).
Round 91 {Start of Butterfly Band}
I suggest that you use the same colour for Rounds 91 – 97 as the only detail in these rounds will be a bunch of butterflies, which may lose their definition if you use different colours for each round. You are, of course, welcome to do whatever your heart desires!
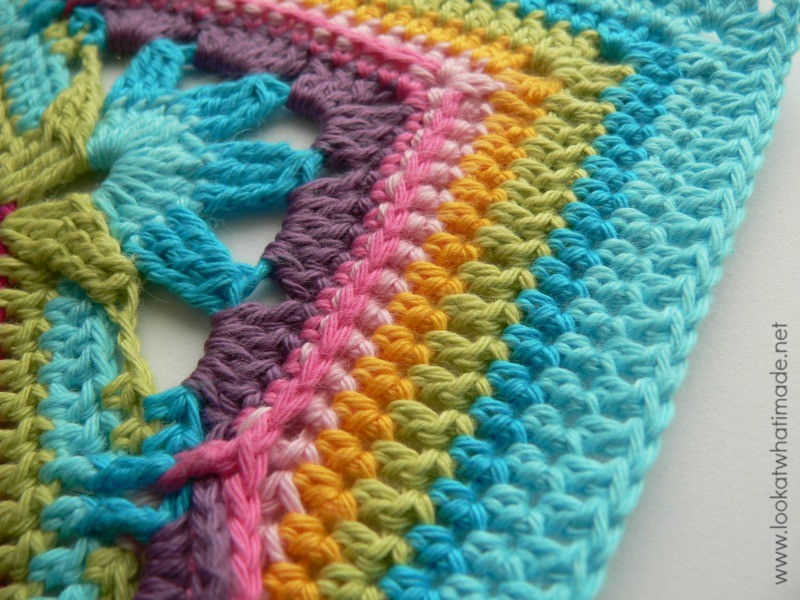
If you would like to add more definition to this band, feel free to work this round as back post stitches, instead of normal stitches. This really adds to the pattern, but I could honestly not face doing that many back post stitches, and I know many of you would have hated me if I had forced you to do them!
You can see what the back post stitches look like below. The astute among you will notice that my stitches are going the wrong way. This is not because I flipped the photo. I had a left-handed fairy who helped me with the Stonewashed XL version this week. This fairy is called Kay Crone, and I am so grateful to her for helping me. In my haste to get this posted I completely forgot to mention her. Naughty Dedri!
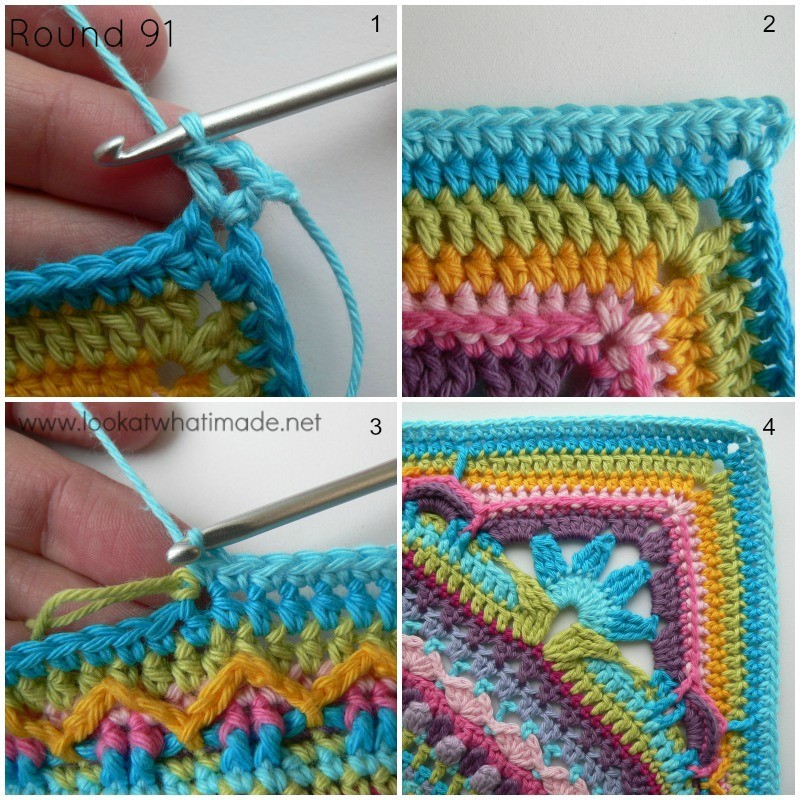
- If you are using the same colour, sl st into the next hdc and into the ch-2 space. Ch 4 (counts as hdc + ch 2). Hdc in the same ch-2 space.
- If you are using a new colour, join your yarn by making a standing half-double crochet in any ch-2 corner around. (Ch 2, hdc) in the same corner space (Photo 1).
*Hdc in the next 51 st’s, taking care not to skip the first (hidden) stitch (Photo 2). The 21st hdc should fall in the bptr from the previous round. Sc in the next 60 st’s. The tenth sc should fall in the last (marked) hdc from the previous round (Photo 3). The fiftieth sc should fall in the last (marked) sc from the previous round. Hdc in the next 51 st’s. (Hdc, ch 2, hdc) in the next ch-2 corner space.*
Repeat from * to * 3 more times, omitting the last corner on the last repeat. Join to the second ch of the beginning ch-4 (or the top of the standing hdc) with a sl st.
Stitch Counts:
- Total: 656 st’s and 4 ch-2 corner spaces {240 sc’s and 416 hdc’s}
- Per Side: 164 st’s {60 sc’s and 104 hdc’s}
Round 92
Snoozeville!
- If you are using the same colour, sl st into the next ch-2 space. (Ch 3, dc, ch 2, 2 dc) in the same ch-2 space.
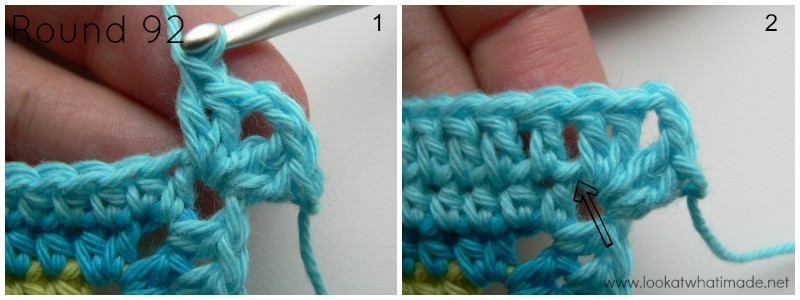
- If you are using a new colour, join your yarn by making a standing double crochet in any ch-2 corner around. (Dc, ch 2, 2 dc) in the same corner space (Photo 1).
*Skip the first stitch, which will be hidden anyway – see the arrow in Photo 2. Dc in each of the next 163 st’s across (Photo 2). (2 dc, ch 2, 2 dc) in the next ch-2 corner space.*
Repeat from * to * 3 more times, omitting the last corner on the last repeat. Join to the top of the beginning ch-3 (or the standing double crochet) with a sl st.
Stitch Counts:
- Total: 668 dc’s and 4 ch-2 corner spaces
- Per Side: 167 dc’s
Optional Flowers
Exactly as you made them at the end of Part 4.
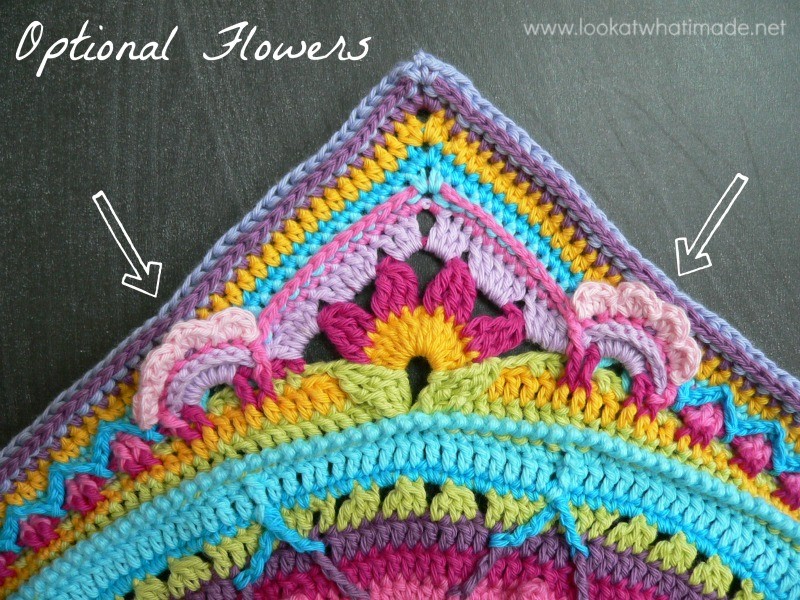
These flowers will be made into the bpsc’s of the 8-dc “petals” formed by Rounds 85 and 86. If you think this makes the corners look too busy, feel free to leave them out. You can make all the flowers in the same colour, or each one in a different colour. It is totally up to you.
And if you feel like making totally different flowers, that’s also fine!
Join your yarn to the first bpsc (Round 86) of any 8-dc “petal” from Round 85 with a sl st. (Make 4 hdc’s in the next st, sl st in the next st) 4 times. The last sl st should fall in the top of the fpdc after the petal. Bind off and work away your tails of yarn.
Repeat for each of the 8 “petals” from Rounds 85 and 86.
This part of the pattern was tested by Kimberly Slifer, Claire Martin, Maja Heidingsfelder, Lynda Hernandez, Susan Wilkes-Baker, Venetia Smith, and Dianne Baan.

This blog post contains affiliate links. I only link to products I personally use or would use. All opinions are my own.



Anna says
I just wanted to say, that I made the backpost stitches and I’m so proud that I made it without breaking my fingers, it looks so pretty. <3
Dedri Uys says
Hi Anna. I am so happy for you!!!
Joanna says
Dear Dedri
Thank You very much for Your lovely Sophie. Making it helped me surveive worse 2 weeks of my life. Im making Sophie for my 3.5yr old daughter.She is in intensive care unit, and just now we know she will stay with us… still dont know how long will going to stay in hospital, so i might start next blanket.
Xxx
Dedri Uys says
Joanna, your message… I think my heart just fell into my stomach. I am so grateful to hear that your daughter will be ok. Best of luck with her recovery. It must be so hard for you to watch her go through whatever she is going through. I pray the Lord bless her and keep her and make His face shine upon her.
Elie says
Question
On section 91.i know you gave us the option to work back post stitching. Is only on the 60 sc or does it include hdc also. Thanks
Dedri Uys says
If you do back post stitches, it will be in each stitch around, not just the sc’s.
Kim says
Never mind…my second side turned out to be 163…I’ll just skip one on the first side when I do the next round. So odd… BTW, this pattern is just gorgeous. I’m thinking of giving to a friend of mine to raffle off at his 4th of July party.
Dedri Uys says
Hi Kim, I’m guessing you saw the note. If you have any other questions, feel free to ask.
Dedri