Good Morning and Happy Easter!
Part 13 of the Sophie’s Universe CAL is fairly simple, and shouldn’t take too long to do. At the end of this part, you should once again have a square. Well, Sophie might not look exactly square straight off the hook, but once blocked you should have a neat square. You can find the details for blocking at the bottom of this post.
I have had a few more queries about yardage to date, and am in the process of setting up a table for you. Please be patient as I sort out the logistics of how to present this to you. This is not just a cut-and-paste job, I’m afraid.
This week I am going to ask for a repeat of a photo-task we have already done: Sophie in a Scenic Spot. Let your imagination soar! And please remember to share using #scenicsophie.
I hope you have a wonderful Easter weekend!
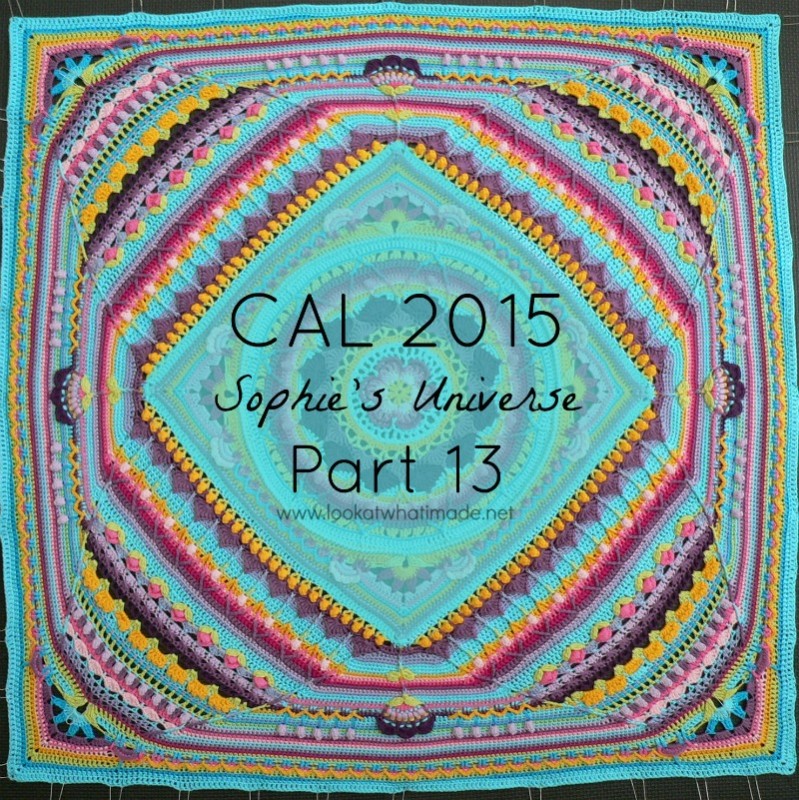
Sophie’s Universe Part 13
©Dedri Uys 2014. All Rights Reserved.
Resources
- Add this CAL to your Ravelry Queue
- Sophie’s Universe CAL 2015 Information
- Use the Print-friendly button at the bottom (right) of this post to print/save this tutorial. Don’t know how? Find out HERE.
- **Part 13 VIDEO TUTORIAL** by Esther Dijkstra from It’s All in a Nutshell.
Translations
- Dutch Translation by Dianne Baan
- German Translation by Maja Heidingsfelder
- Spanish Translation by Lynda Hernandez
- French Translation by Sandra Larvin (with Video Tutorials by Géraldine Cymer)
- Danish Translation by Tina Poulsen
- Russian Translation (with Video) by Natalie V. Alimpieva
- Swedish CAL Information by Emma Vingqvist, Agnetha Magnusson, Åza Karlsson, and Ulrika Larsson
Materials
See the Information Post.
*You can use whichever colour/colours you prefer for the Optional Flowers. I have decided to leave my Optional Flower until the blankets are done, mainly so that I can show you what they look like with/without the flowers. If you wait until later you will also have a better idea of which yarns you have lots left of (and which ones are close to running out).
I will remind you about the Optional Flowers again later when we add another bit of surface detail.
Abbreviations
US Terminology Used (Basic US/UK comparison chart here)
- Bpsc – Back post single crochet
- Bptr – Back post treble crochet
- Ch – Chain
- Dc – Double crochet
- Hdc – Half-double crochet
- Sc – Single crochet
- Sl st – Slip stitch
- St/st’s – Stitch/stitches
- * – Repeat instructions between asterisks the number of times specified. This is a hardcore repeat and will consist of multiple instructions.
- () – Repeat instructions between parentheses the number of times specified. This is a lower level repeat.
Special Stitches
- Standing Stitches: Standing sc’s, hdc’s, and dc’s are stitches used to start the round without the need for the traditional beginning chain. Links to tutorials are supplied in each relevant round.
Instructions
Rounds 1 – 88
You can find the links for Rounds 1 – 88 HERE.
Round 89
- If you are using the same colour, sl st into the ch-2 space. Ch 3 (counts as your first dc). (Dc, ch 2, 2 dc) in the same ch-2 space.
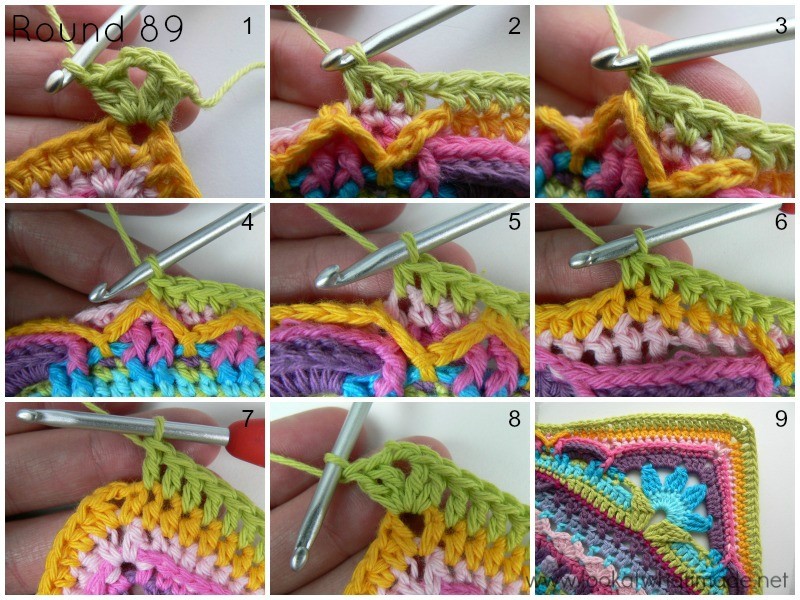
- If you are using a new colour, join your yarn by making a standing double crochet in any ch-2 corner around. (Dc, ch 2, 2 dc) in the same corner space (Photo 1).
*Skip the first (hidden) stitch and dc in the next 15 st’s. Hdc in the next 5 st’s. The last hdc should fall in the last sc before the zigzag “hills”. (Hdc in the next 3 st’s from Round 87 – see Photo 2, make a bpsc around the next sc from Round 88, which will be at the top of the zigzag “hill” – see Photo 3) 28 times (Photo 4). Hdc in the next 3 st’s of Round 87 (Photo 5). Hdc in the next 5 st’s of Round 88, making very sure that you don’t accidentally skip the first st after the last ch-3 (Photo 6). Dc in the next 15 st’s (Photo 7). (2 dc, ch 2, 2 dc) in the next ch-2 corner space (Photo 8).*
Repeat from * to * 3 more times, omitting the last corner on the last repeat. Join to the top of the beginning ch-3 (or the standing double crochet) with a sl st.
Stitch Counts:
- Total: 636 st’s and 4 ch-2 corner spaces {112 bpsc’s, 388 hdc’s, and 136 dc’s}
- Per Side: 159 st’s {28 bpsc’s, 97 hdc’s, and 34 dc’s}
Round 90
In this round, you will see that I have advised you to mark 2 stitches on each side. This is not necessary, it is just advisable if you still have trouble identifying your stitches. These marked stitches are purely “checkpoints”, as Esther likes to call it.
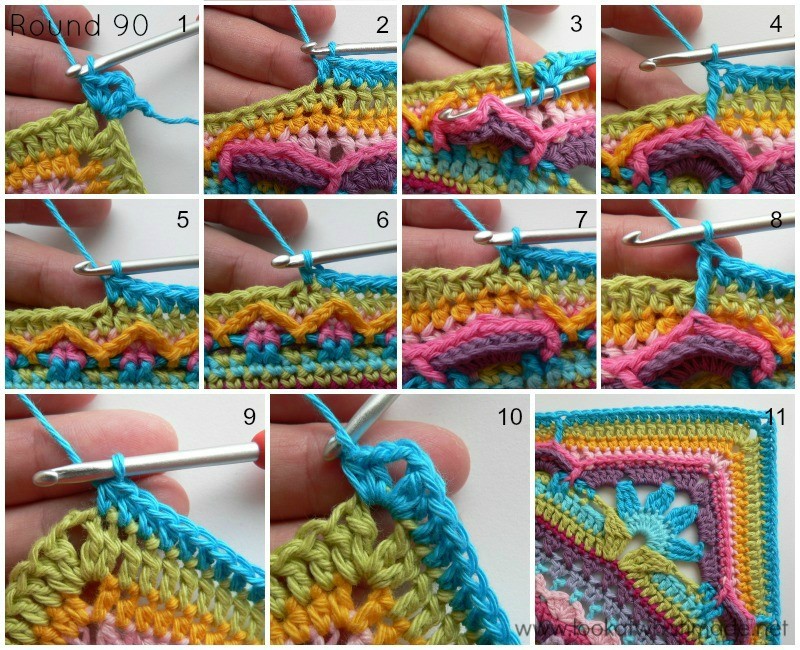
Join your yarn by making a standing half-double crochet in any ch-2 corner space around. (Hdc, ch 2, 2 hdc) in the same corner space (Photo 1).
*Skip the first dc (which will be hidden anyway) and hdc in the next 18 st’s. The last hdc should fall in the second hdc from the previous round (Photo 2). Bptr around the fourth bpsc of the “petal” formed by Rounds 85 and 86 (Photos 3 and 4). Skip the next st of Round 89 and hdc in the next 40 st’s (Photo 5). Mark the last hdc. Sc in the next 40 st’s (Photo 6). Mark the last sc. Hdc in the next 40 st’s. There should now be 2 hdc’s left before the dc’s from the previous round (Photo 7). Bptr around the fourth bpsc of the “petal” formed by Rounds 85 and 86 (Photo 8). Skip the next st of Round 89 and hdc in the next 18 st’s (Photo 9). (2 hdc, ch 2, 2 hdc) in the next ch-2 corner space (Photo 10).*
Repeat from * to * 3 more times, omitting the last corner on the last repeat. Join to the top of the first hdc with a sl st.
Stitch Counts:
- Total: 648 st’s and 4 ch-2 corner spaces {160 sc’s, 480 hdc’s, and 8 bptr’s}
- Per Side: 162 st’s {40 sc’s, 120 hdc’s, and 2 bptr’s}
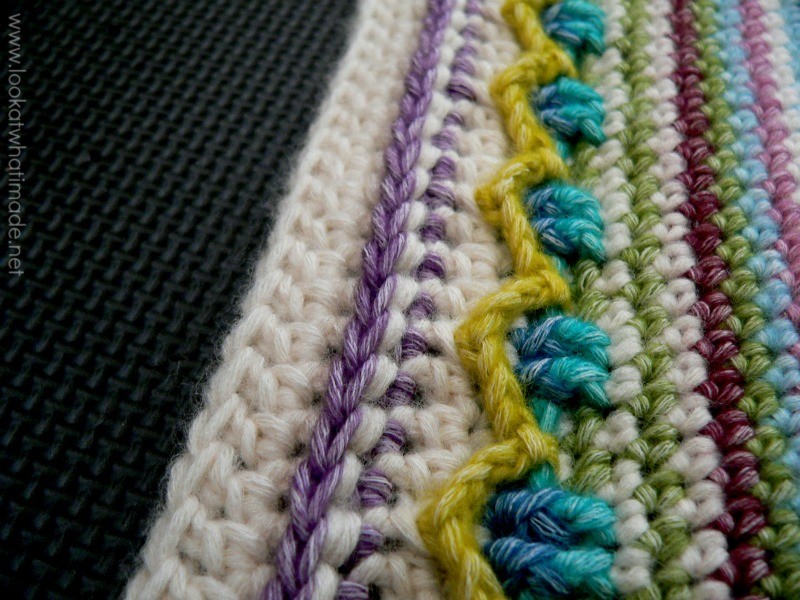
The photo below shows the marked stitches (if you choose to mark them).
Round 91 {Start of Butterfly Band}
I suggest that you use the same colour for Rounds 91 – 97 as the only detail in these rounds will be a bunch of butterflies, which may lose their definition if you use different colours for each round. You are, of course, welcome to do whatever your heart desires!
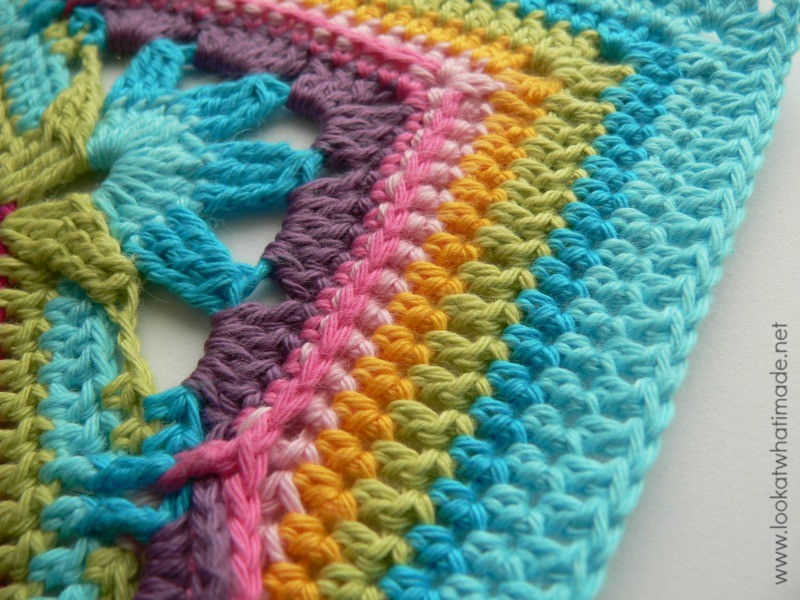
If you would like to add more definition to this band, feel free to work this round as back post stitches, instead of normal stitches. This really adds to the pattern, but I could honestly not face doing that many back post stitches, and I know many of you would have hated me if I had forced you to do them!
You can see what the back post stitches look like below. The astute among you will notice that my stitches are going the wrong way. This is not because I flipped the photo. I had a left-handed fairy who helped me with the Stonewashed XL version this week. This fairy is called Kay Crone, and I am so grateful to her for helping me. In my haste to get this posted I completely forgot to mention her. Naughty Dedri!
- If you are using the same colour, sl st into the next hdc and into the ch-2 space. Ch 4 (counts as hdc + ch 2). Hdc in the same ch-2 space.
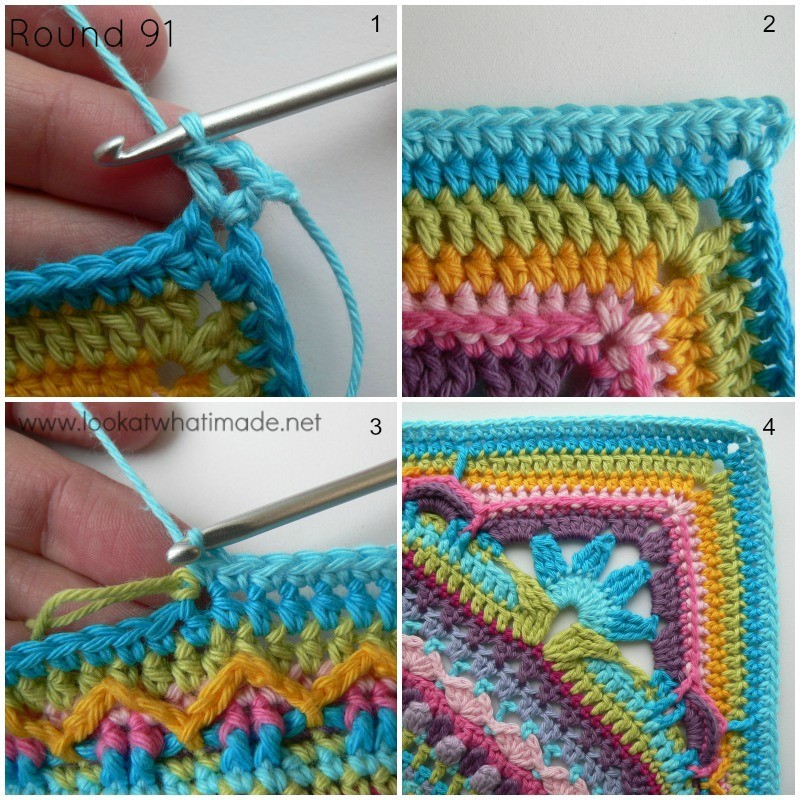
- If you are using a new colour, join your yarn by making a standing half-double crochet in any ch-2 corner around. (Ch 2, hdc) in the same corner space (Photo 1).
*Hdc in the next 51 st’s, taking care not to skip the first (hidden) stitch (Photo 2). The 21st hdc should fall in the bptr from the previous round. Sc in the next 60 st’s. The tenth sc should fall in the last (marked) hdc from the previous round (Photo 3). The fiftieth sc should fall in the last (marked) sc from the previous round. Hdc in the next 51 st’s. (Hdc, ch 2, hdc) in the next ch-2 corner space.*
Repeat from * to * 3 more times, omitting the last corner on the last repeat. Join to the second ch of the beginning ch-4 (or the top of the standing hdc) with a sl st.
Stitch Counts:
- Total: 656 st’s and 4 ch-2 corner spaces {240 sc’s and 416 hdc’s}
- Per Side: 164 st’s {60 sc’s and 104 hdc’s}
Round 92
Snoozeville!
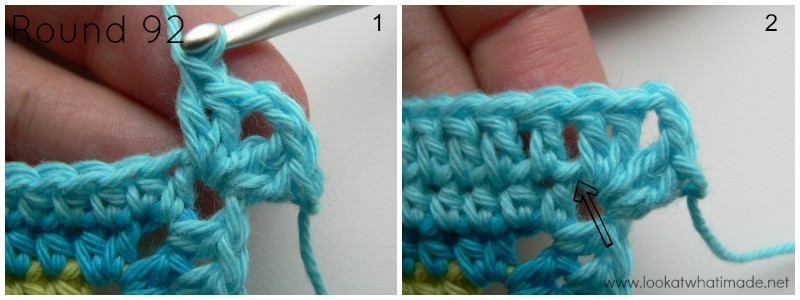
- If you are using the same colour, sl st into the next ch-2 space. (Ch 3, dc, ch 2, 2 dc) in the same ch-2 space.
- If you are using a new colour, join your yarn by making a standing double crochet in any ch-2 corner around. (Dc, ch 2, 2 dc) in the same corner space (Photo 1).
*Skip the first stitch, which will be hidden anyway – see the arrow in Photo 2. Dc in each of the next 163 st’s across (Photo 2). (2 dc, ch 2, 2 dc) in the next ch-2 corner space.*
Repeat from * to * 3 more times, omitting the last corner on the last repeat. Join to the top of the beginning ch-3 (or the standing double crochet) with a sl st.
Stitch Counts:
- Total: 668 dc’s and 4 ch-2 corner spaces
- Per Side: 167 dc’s
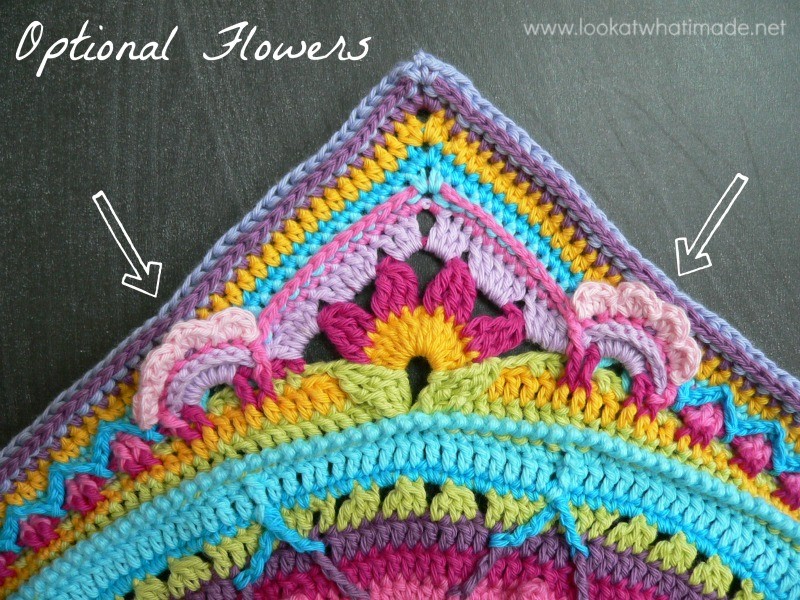
Optional Flowers
Exactly as you made them at the end of Part 4.
These flowers will be made into the bpsc’s of the 8-dc “petals” formed by Rounds 85 and 86. If you think this makes the corners look too busy, feel free to leave them out. You can make all the flowers in the same colour, or each one in a different colour. It is totally up to you.
And if you feel like making totally different flowers, that’s also fine!
Join your yarn to the first bpsc (Round 86) of any 8-dc “petal” from Round 85 with a sl st. (Make 4 hdc’s in the next st, sl st in the next st) 4 times. The last sl st should fall in the top of the fpdc after the petal. Bind off and work away your tails of yarn.
Repeat for each of the 8 “petals” from Rounds 85 and 86.
This part of the pattern was tested by Kimberly Slifer, Claire Martin, Maja Heidingsfelder, Lynda Hernandez, Susan Wilkes-Baker, Venetia Smith, and Dianne Baan.

This blog post contains affiliate links. I only link to products I personally use or would use. All opinions are my own.



Kim says
I hope you still see this even though your CAL is long over. In row 91 you say there are 164 total stitches each side…then in row 92 you say to double crochet in 163 stitches across. Do I skip a single crochet or half double to make it only 163 stitches? (or am I counting wrong because when I recount I still get 164). Ugh…I want it to be right when I get to the rest of it.
Tina says
Dear Dedri
I am a little behind with Sophie, I love the pattern and do want to finish the pattern.
I am trying to print the instructions, but when I press the print friendly button the pictures all disappear / become blank.
Is it because I have left it too late?
With the summer and visitors I just haven’t had much Sophie time…
Kind regards…Tina
Jenny says
Hi Tina. Try clearing your cache from your browser and cookies and try again. The Print friendly button works for me perfectly and the patterns will not be discontinued and will always be available here :)
Kat Ennis says
Hi,
Thank you so much for sharing your beautiful pattern, I’m planning to turn my finished Sophie into a wall hanging. Just a quick question about sound 91 – to start it says hdc into 51sts and that the last hdc st should be in round 90’s bptr. I make it 21 hdc’s to the bptr, have I made a major mistake?
If you could help I’d appreciate it :-)
Regards,
Kat
Kat Ennis says
Just realised my mistake…..duh! Tired eyes + pattern instructions don’t mix so I think I’d better put Sophie down for her own safety!
xxx
Donna Nix says
I’ve caught up! But I want to thank you again for sharing such a gorgeous pattern with us!
Donna
Dedri Uys says
You are so welcome, Donna.
Becki says
I was sitting here waiting for tomorrow’s post while my sweet Sophie is stretched out on the guest bedroom floor being blocked, when I suddenly realized…I’m oppsessed with this CAL. Now I’m wondering what I’ll do when this all ends in May? Do you have any plans for another CAL in the future?
Dedri Uys says
Becki, I don’t have any plans for now. I think I will need a break after Sophie finishes.
Ellen Fayard says
Just wanted you to know I was on a crazy hunt today for The Secret Garden coloring book. I t is sold out everywhere..even Amazon. Managed to find some at Barnes and Noble book store. They are for my girls….30 &26!!!They absolutely love them.
Jenny says
I have a couple of colouring books that I am holding off starting until I finish my Sophies :)
Emmarenthia says
Thanks for a beautiful pattern and the hard work to provide us with the photos that I am sure are consuming your life at the moment.
Because we are not paying for the privilege, how about all of us paying it forward with something like slippers for some of our senior citizens or hats for those undergoing chemo. I am sure we can make a difference in a small or maybe a big way.
Dankie uit Kaapstad Emma
Dedri Uys says
What a great idea, Emma!
Miriam Varona says
Sophies es realmente hermoso !!!!Cuando estará la parte 13 en castellano ???? Gracias …
Dedri Uys says
Miriam, Part 13 has been posted.
Ann says
Hi Dedri! I really, really love your Sophie patterns. So beautiful. I wanted to ask if you would consider diagrams along with your (incredibly comprehensive, I know) patterns. I’ve been confused a few times, and I’d definitely find diagrams useful. I recently made Nicky Epsteins’s Medallion Medley shawl, and I found it extremely helpful that she provides both written instructions and diagrams. Would you consider doing diagrams along with the rest of your instructions? I know you put a great deal of work into this as it is, though – and I quite understand if you don’t have the time!
Jenny says
Ann, do you not find the photographs helpful?
When you say diagrams, do you mean charts? Dedri has her hands more than full with the tutorials as she does them at the moment, so there will not be any further expansion on the patterns as they stand for the foreseeable future.
I hope you can manage to cope with her fabulous tutorials as they are :)
Ann says
Hi Jenny – Yes, of course I do find the photos helpful. And I appreciate that a great deal of work goes into this. I do mean charts. I find them extremely useful, and they can often clarify something that written instructions, and even photos, sometimes don’t. They can give an overall pictorial view that even photos can’t. (I’m not alone in this view – members of my crochet group have said the same.) But I quite understand that time might prohibit including them. I wonder if you’d perhaps consider them for possible future inclusion? Thank you for these gorgeous designs.
Milla says
I also do find the charts more usefull than written instrucions so I understand Anns grave for charts.
So perhaps, for the next CAL there could be charts too? Appreciate the work Dedris doing, love Sophie and I don’t want to sound ungrateful.
Have a nice weekend!
Dedri Uys says
Ann, I appreciate that many people prefer charts and I did consider doing charts for Sophie. I found it immensely tricky in some rounds and virtually impossible in others (due to all the surface work). I even approached a well-know “charter” and he confirmed that it would by no means be a straightforward endeavour. So until I can afford to pay someone to chart this pattern in the way that I would like it charted, I will not be publishing charts. Most of the chart will have to be broken up into 2-round sections, otherwise the stitches will fall over each other and obscure the stitches of the previous rounds.
I am sorry if this is an inconvenience, but Sophie is my baby and if I am going to have her charted, I want to have it done properly or not at all.
Ann says
I do realise that charting this would be difficult, and I do appreciate that there are some things that are more easily explained by words and photos. There are also some things that are more clearly explained by charts, of course. I understand that you want it done properly, though. And I see no reason why you should pay for someone to do charts for this beautiful pattern which you so kindly offer free. If I were an expert I’d do it for you for nothing – but unfortunately I’m not. Thank you so much for the lovely designs.
Bobbi says
I absolutely love doing the Sophies. When I do a row I can’t wait till I get to the next one. Everyone that sees it is just amaze at the different stitches that is in it and they say it is so pretty. Thank you for sharing such amazing and fun patterns. Never can wait till I get the next chapter (that is what I call each CAL part).
anita says
Stunning i cant read a pattern made mine from your pics and you tube thank y so much
Anita
Jenny says
I learnt from Dedri’s photo tutorials too! Won’t be long before you feel confident to try other patterns :)
anita says
Stunning i cant read a patern made mine from your pics and you tube thank y so much
Anita
Kathy Fowler says
Thanks so much again for such a beautiful design. Just wanted to check to see if I’m doing something wrong
In row 90 it says *Skip the first hdc (which will be hidden anyway) and hdc in the next 18 st’s
But row 89 starts with dc not hdc
Should it say *skip the first dc ?
Thanks again
Kathy
Suzanne says
Just love my Sophie, and have had it on show this weekend at an Easter festival, where there were lots of girls doing craft, so the word has spread here in Wagga Wagga Australia. Most say they couldn’t do it, but I am loving it and can’t wait for the next week, bring on the butterflies, waiting.
Sue
Jenny says
We would love to see photos of your Sophie at the Easter Show, Suzanne :)
Helena says
I agree with Nina, seriously – you are just going to let us hang out there for a week with the comment …a bunch of butterflies! That is so unfair:-)! Not even a tiny little pic of what that is going to look like?
Dedri Uys says
Not even a glimmer of a pic!
anna says
lol
Nina says
On a different note: “…as the only detail in these rounds will be a bunch of butterflies”
Seriously?? You’re just gonna drop that sentence, ever so casually, and then leave us hanging for a whole week?? You’re mean!! :-p :-)
Dedri Uys says
It’s a mystery CAL :) If I show you a pic, you’ll know what next week’s looks like, spoiling all the fun. Luckily there are only 7 weeks of torture left! Muhahahaha!
Nina says
Since the Softfun-thumbnail is not clickable, here’s the link to the larger picture :-)
https://lookatwhatimade.net/wp-content/uploads/2015/04/Sophies-Universe-Part-13-Softfun-Lookatwhatimade.jpg
Dedri Uys says
Hopefully it is fixed now, Nina. If something like that happens, I always appreciate people highlighting it to me so that I can fix it as speedily as possible.
Thank you,
Dedri
Erik says
There are several weeks like that :(
pien says
Hello.i think it is difficult to choise what color row 91-96 must bed.van you give a exampel hoe it looks like with the butterflyes?
Jeanette Smith says
Row 91: The best way to work a complete round of bp stitches is to turn the work back to front and work fp stitches in the opposite direction. It looks just as good and is much less frustrating to do! Jeanette x
Andrea Corbo says
Como todos tus trabajos hermosisimos!!! la capacidad de combinar colores, puntos, diseños.
Para mi un aprendizaje de ver arte, perfección y una delicadeza incomparable.
Aún no he intentado hacer ninguno de tus diseños, me animare en algun momento jajaja.
Un beso grande y gracias por ser tan generosa y mostrar tus diseños.
Jenny says
¡Hola!
Debes probar algunos de los diseños pronto. Son creados para que incluso un principiante a tener un ir a ganchillo con. Estamos seguros que usted disfrutará los vez darle una oportunidad.