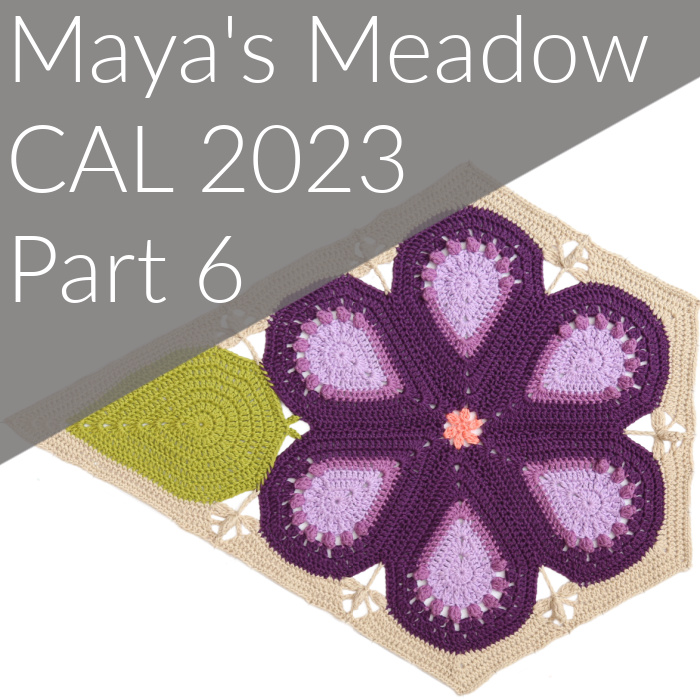
Welcome to Part 6 of the Maya’s Meadow CAL. In this part, we will turn our one-leaf motifs into weird hexagon-ish shapes. I hope you enjoy the little dragonflies that will emerge between Petals as you work :)
Resources
- Introduction Post
- Abbreviations and Special Stitches
- I’ve done a video tutorial for Parts 6 and 7*. You can find that HERE:
*Parts 6 and 7 are the same, except that Part 6 has one leaf and Part 7 has two. You will notice that each round below is split into 5 segments/elements. In Part 6 you will repeat one of them four times while only using the other elements once. In Part 7, you will do each element once and then repeat the whole sequence once. I have, therefore, demonstrated Part 7 in the video tutorials so that I can show you how to work around the second leaf, telling you in the description which parts to follow for Part 6, which has only one leaf.
Translations
Part 6: Large Hexagon With One Leaf
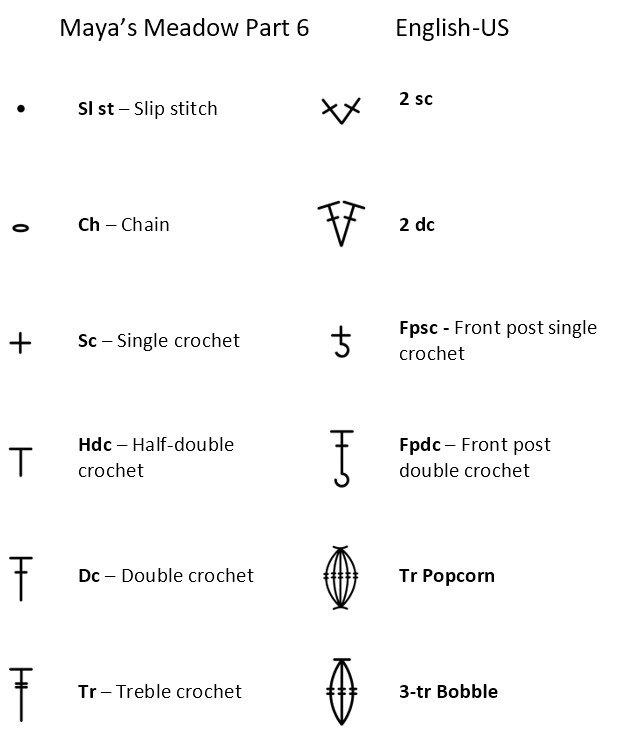
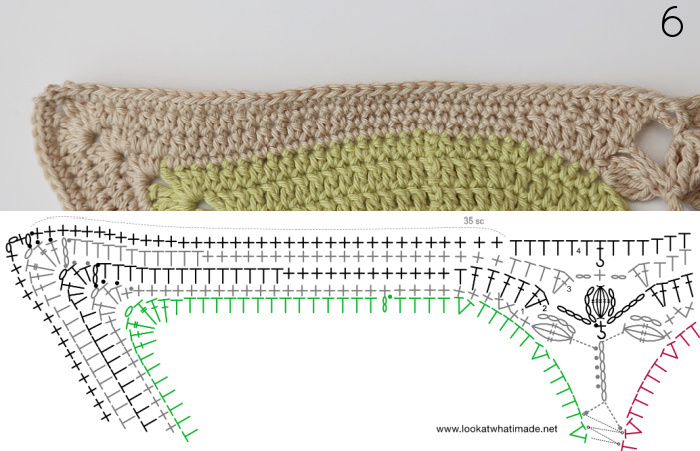
Chart and Abbreviations
Charts by Masako Kawahara from Crochet_hmmm
Instructions
These 4 rounds are made with Colour P. You will need to repeat the instructions below for each of the six Hexagons that contain one Leaf.
Before we start Round 1, I will tell you how to make ‘a Stem’. Whenever the instructions below tell you to ‘Make a Stem’, this is how you will do it.
How to Make a Stem
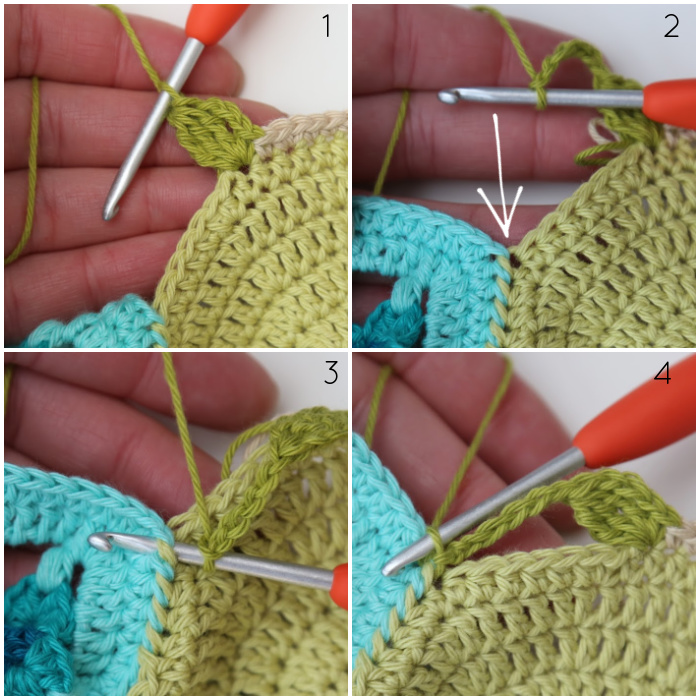
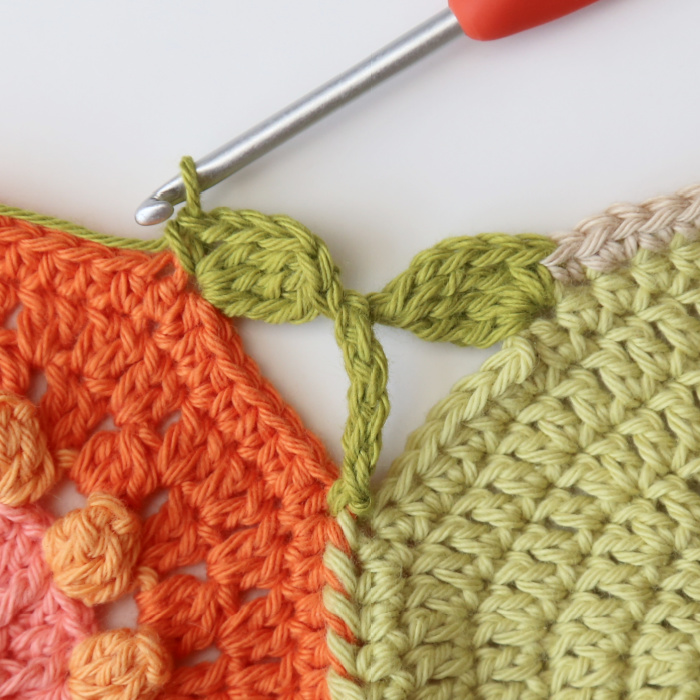
Sc in the next st. Ch 3, make a 3-tr Bobble in the same st {Photo 1}. Ch 6. Skip the next 7 sts and insert your hook through the next st of both motifs, which will contain a join {Photos 2 and 3}. Make a sl st {Photo 4}.
Turn your work from left to right towards you (right to left, if you are left-handed) so that the back of the chain is facing you (and the working yarn is in front of your hook).
You will notice that the ‘back bumps’ of the ch form a dotted line. When working into the ch, you will insert your hook under two loops (so under the back bump). The last back bump will look slightly different as it hugs all the loops from the 3-tr Bobble.
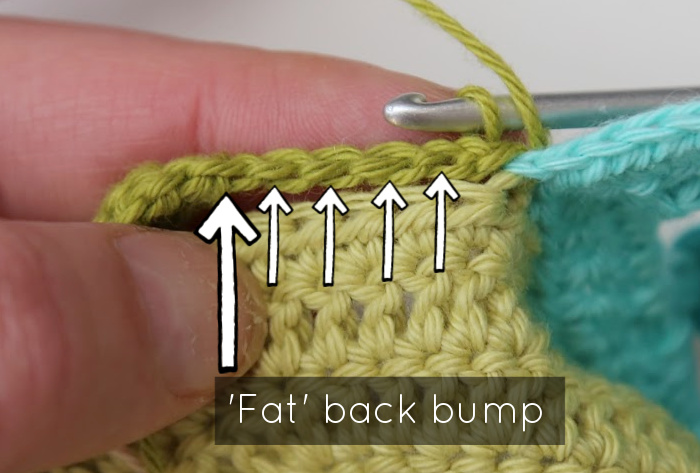
Skip the first ch, which will be hidden by your working yarn. Working through 2 loops of each ch, sl st in the next 5 ch sts. If you can’t identify the first (skipped) ch, just count 5 back from the last ‘fat’ back bump.

Now you will need to turn your work again so that the RS is facing you again. How you turn your work in this step will impact how neat your next 3-tr Bobble is, so listen closely. Turn your work from right to left towards you (left to right, if you are left-handed), so that the working yarn is behind your hook. Try it both ways to see the difference.
Skip the next 7 unworked sts of the next motif. Make a 3-tr Bobble in the next st. Ch 4, sc in the same st.
The second leaf will flip forward a bit. Don’t worry about this. It will fix itself in the next round.
Round 1
Working into the Leaf: Starting in the ch-1 corner of the leaf with a standing st, [sc, hdc, dc, ch 1, dc, hdc, sc]. Sc in the next 27 sts, the first one of which will be hidden. Make 2 sc in the next st, sc in the next st {Photo 1}. Make a Stem {Photo 2}. {32 sc, 2 hdc, 2 dc, 1 Stem, and 1 ch-1 sp}
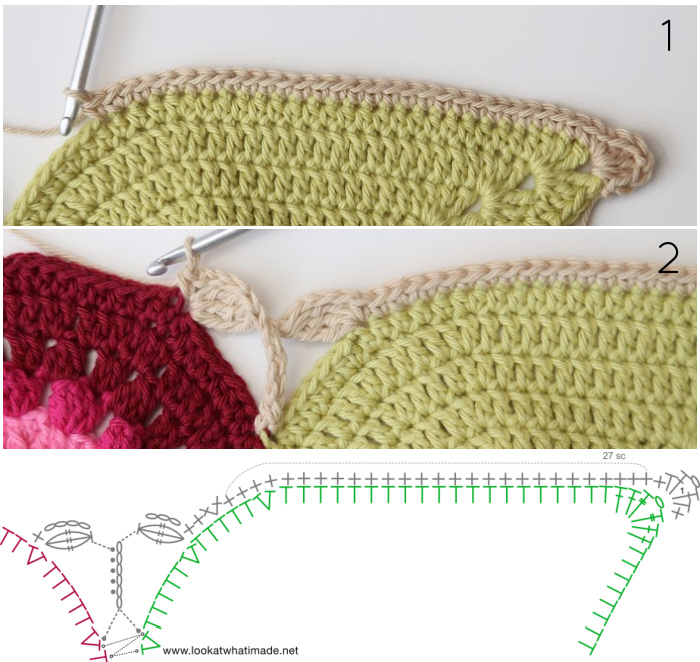
Working into the first Petal: Sc in the next st, make 2 sc in the next st. Sc in the next 14 sts. Make 2 sc in the next st, sc in the next st. Make a Stem. {20 sc and 1 Stem}
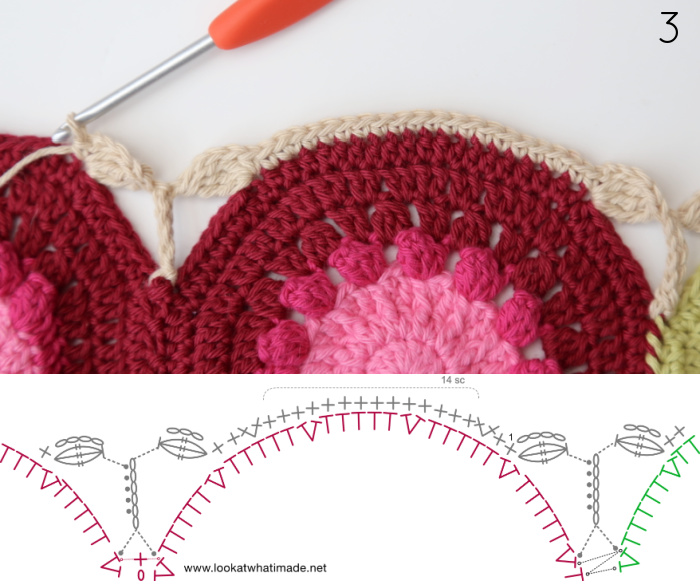
Working into Petals 2 – 5: *Sc in the next st, make 2 sc in the next st. Sc in the next 10 sts. The last sc should fall in the first st of an increase. Hdc in the next 2 sts, dc in the next st. [2 dc, ch 1, 2 dc] in the next st. Dc in the next st, hdc in the next 2 sts. Sc in the next 10 sts. Make 2 sc in the next st, sc in the next st. Make a Stem.* Rep from * to * 3 more times. {Per Repeat: 26 sc, 4 hdc, 6 dc, 1 Stem, and 1 ch-1 sp}
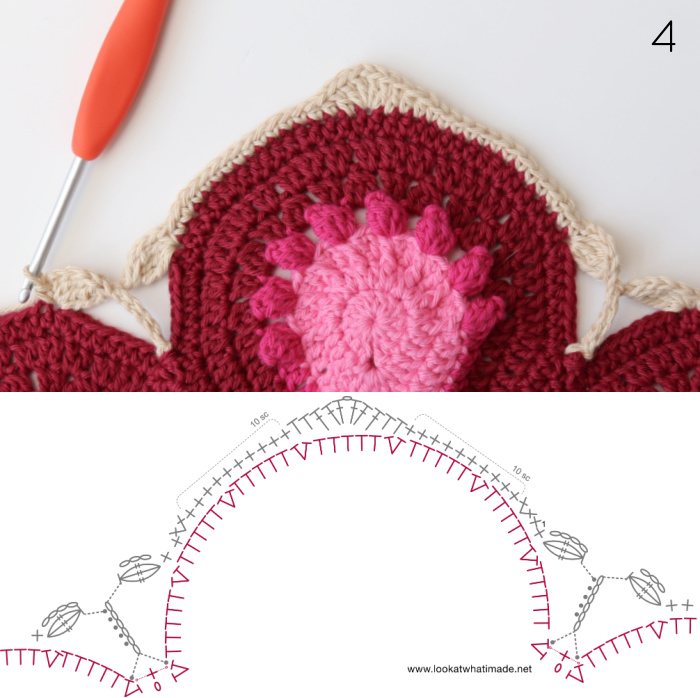
Working into the sixth Petal: Sc in the next st, make 2 sc in the next st. Sc in the next 14 sts. Make 2 sc in the next st, sc in the next st. Make a Stem. {20 sc and 1 Stem}
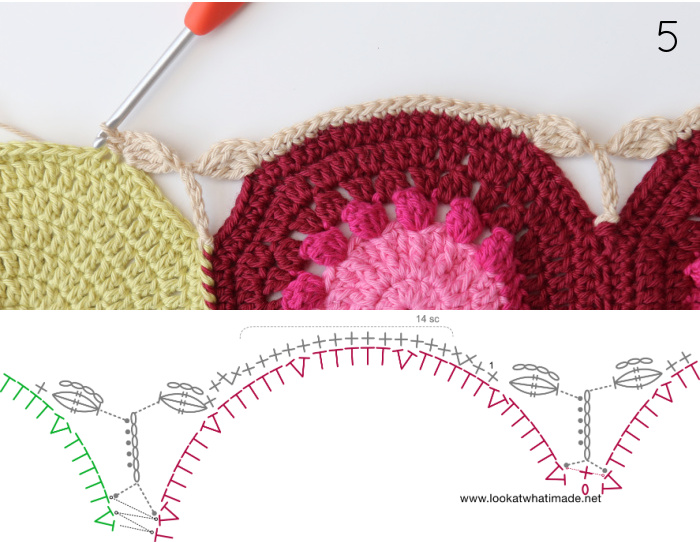
Working into the Leaf: Sc in the next st, make 2 sc in the next st. Sc in the next 26 sts, the second of which will fall in the first st of an increase. Join to the first sc with a sl st. {29 sc}
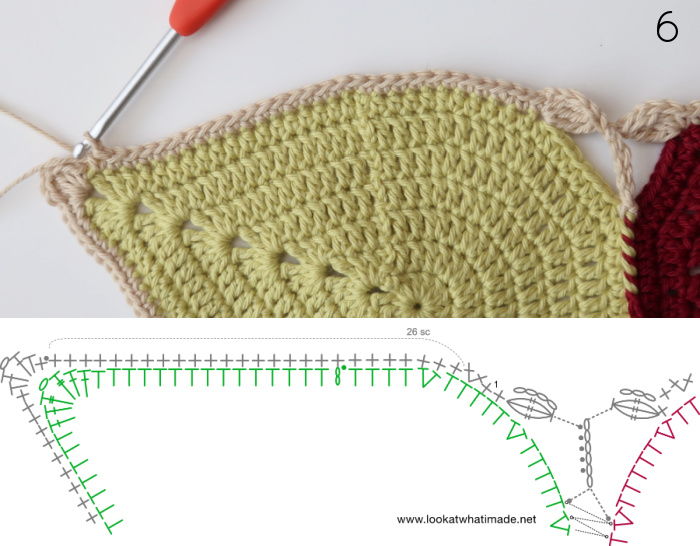
Before we start the next round, I will tell you how to make ‘a Flower’. Whenever the instructions below tell you to ‘Make a Flower’, this is how you will do it.
How to Make a Flower
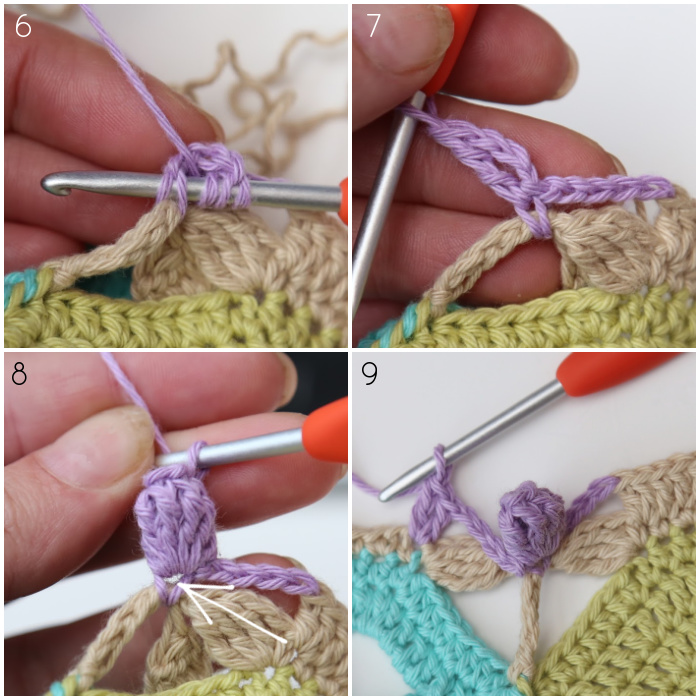
Ch 5 {Photo 1}, make a FPsc around the Stem, just below the leaves. Ch 3 {Photos 2 and 3}.
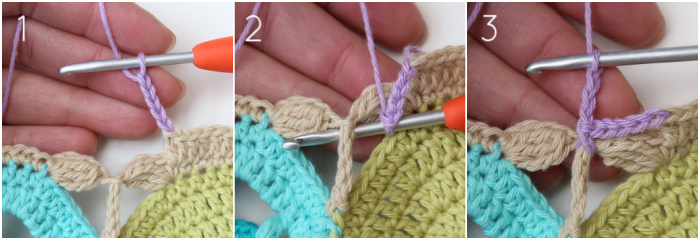
Before you continue, take a look at your FPsc. You will notice that the post of the st forms a V at the front and the back. When instructed to work ‘into the side of the FPsc’, you will insert your hook between the ‘legs’ of the V at the front and the back {see Arrows}.
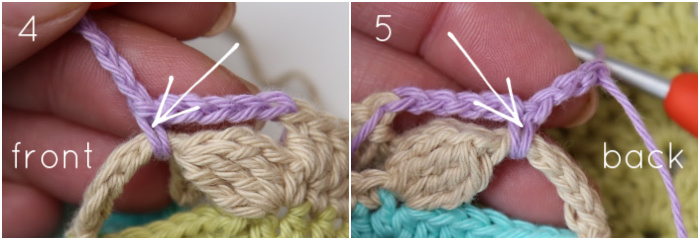
Working into the side of the FPsc, make a Tr Popcorn {Photos 6 – 8}. Ch 4, sl st in the side of the FPsc. Make sure that the ch-4 is behind your Popcorn, not strangling it. Ch 4.
Round 2
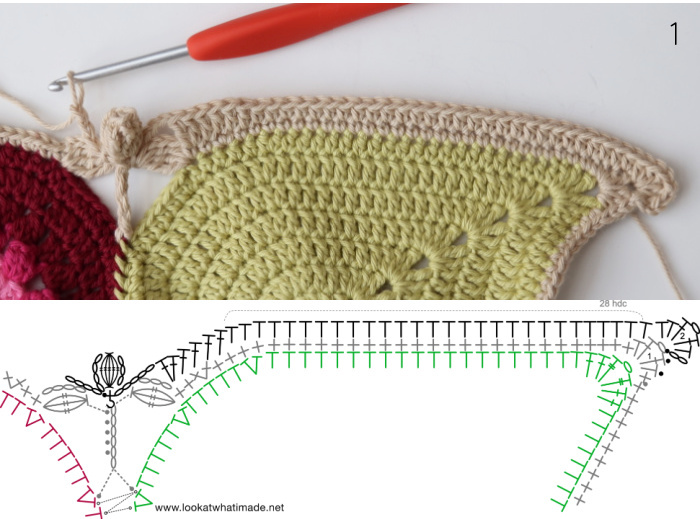
Working into the Leaf: Sl st in the next 2 sts and into the ch-1 corner sp. Ch 2 (counts as hdc). [Hdc, dc, ch 1, dc, 2 hdc] in ch-1 corner sp. Skip the first (hidden) st. Hdc in the next 28 st, dc in the next 4 sts. Make 2 dc in the next st, which should be the sc at the base of the leaf. Make a Flower. {32 hdc, 8 dc, 1 Flower, and 1 ch-1 sp}
Working into the first Petal: Skip the sc at the base of the second leaf {indicated with an arrow in Photo 2}. Make 2 dc in the next st. Dc in the next 4 sts, hdc in the next 11 sts, dc in the next 4 sts. Make 2 dc in the next st, which should be the sc at the base of the leaf. Make a Flower. {11 hdc, 12 dc, and 1 Flower}
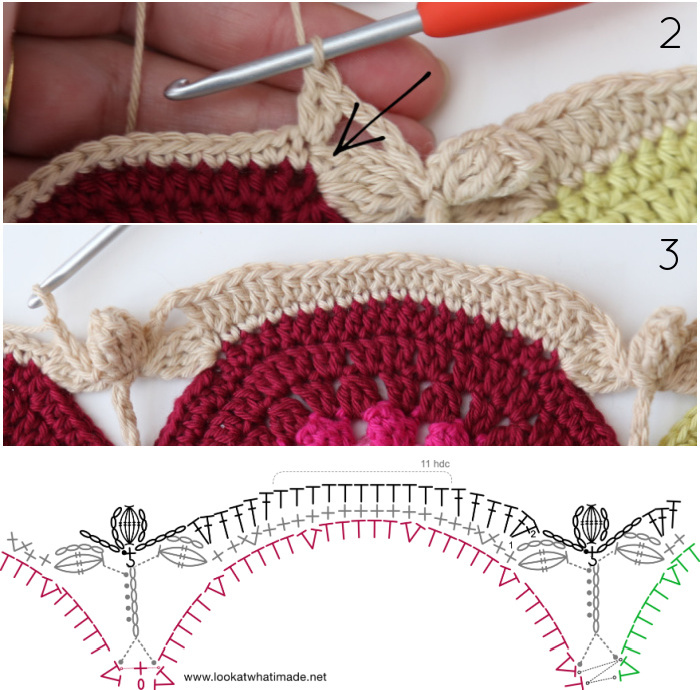
Working into Petals 2 – 5: *Skip the sc at the base of the second leaf. Make 2 dc in the next st. Dc in the next 4 sts, hdc in the next 13 sts. [2 hdc, ch 1, 2 hdc] in the ch-1 corner sp. Skip the first (hidden) st. Hdc in the next 13 sts, dc in the next 4 sts. Make 2 dc in the next st, which should be the sc at the base of the leaf. Make a Flower.* Rep from * to * 3 more times. {Per Repeat: 30 hdc, 12 dc, 1 Flower, and 1 ch-1 sp}
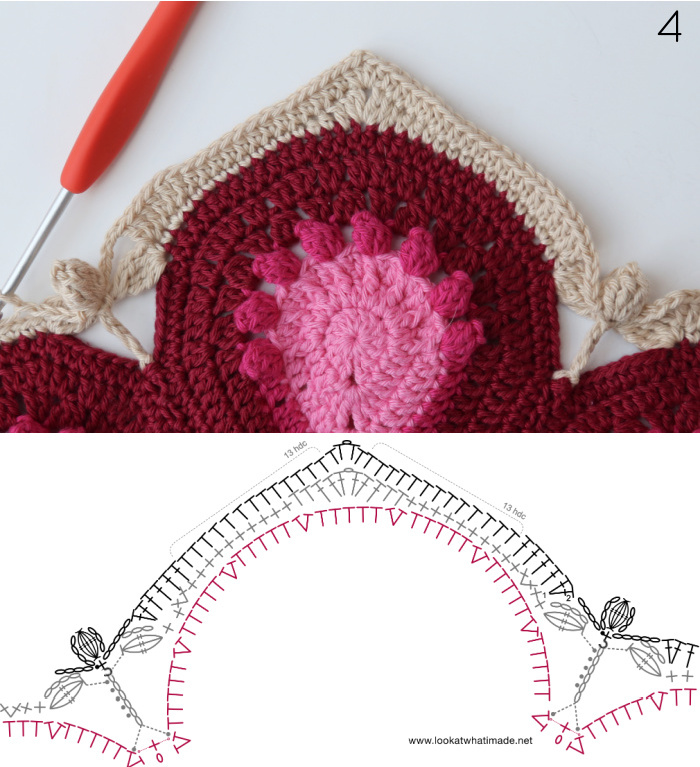
Working into the sixth Petal: Skip the sc at the base of the second leaf. Make 2 dc in the next st. Dc in the next 4 sts, hdc in the next 11 sts, dc in the next 4 sts. Make 2 dc in the next st, which should be the sc at the base of the leaf. Make a Flower. {11 hdc, 12 dc, and 1 Flower}
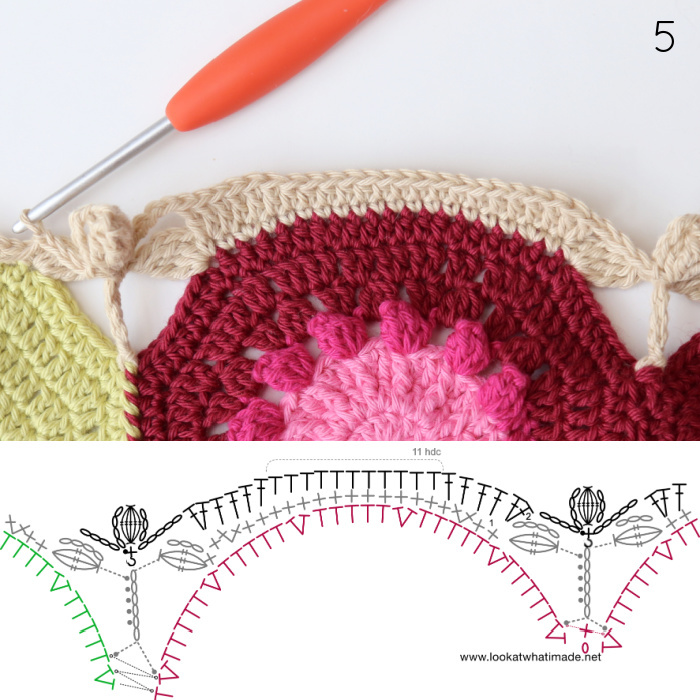
Working into the Leaf: Skip the sc at the base of the second leaf. Make 2 dc in the next st. Dc in the next 4 sts, hdc in the next st, sc in the next 12 sts, hdc in the next 14 sts. Join to the top of the beg ch-2 with a sl st. {15 hdc, 12 sc, and 6 dc}
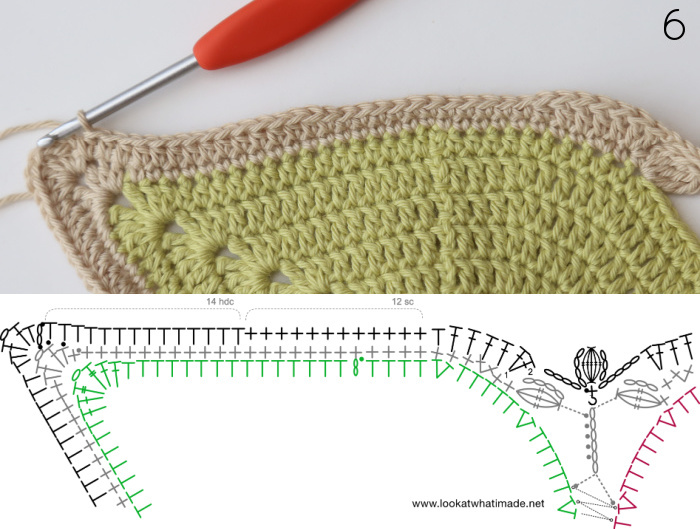
Round 3
Sl st in the next 2 sts and in the ch-1 sp. Ch 3 (counts as first dc). [dc, tr, ch 1, tr, 2 dc] in the ch-1 corner sp. {4 dc, 2 tr, and 1 ch-1 sp}
Working into the Leaf: Skip the first (hidden) st. Hdc in the next 35 sts, make 2 dc in the next st. Ch 2. Sc into the Popcorn, inserting your hook from front to back into the first tr of the 5 tr-group {indicated with an arrow in Photo 1 and illustrated in Photo 2} and from back to front between the last tr and the ch-4 that ends the Popcorn {Photos 3 and 4}.
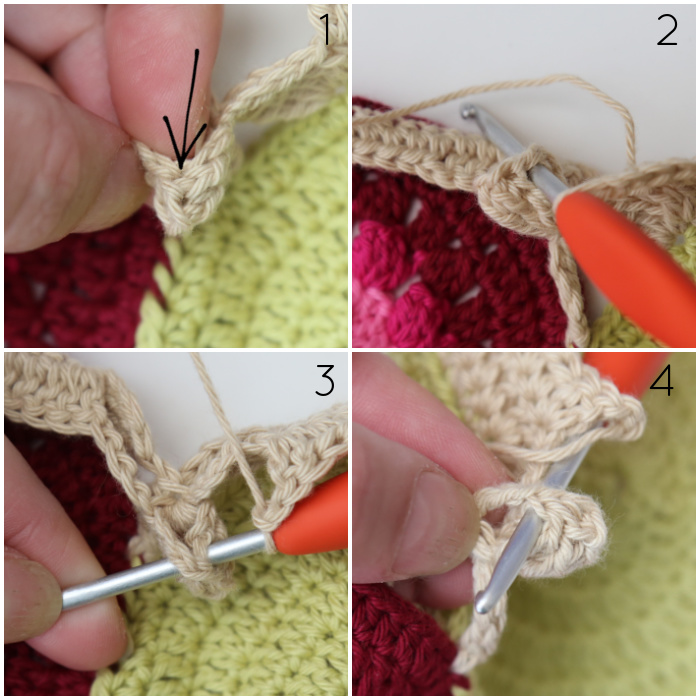
This will hide the ch-4. You will work into each Popcorn in this way. Ch 2. {1 sc, 35 hdc, 2 dc, and 2 ch-2 sps}
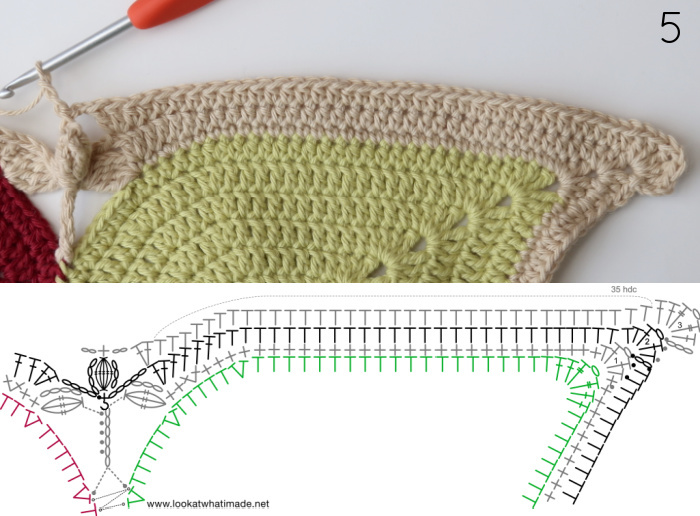
Working into the first Petal: Skip the next ch-4 sp. Make 2 dc in the next st, hdc in the next 21 sts, make 2 dc in the next st. Ch 2, sc into the Popcorn, ch 2. {1 sc, 21 hdc, 4 dc, and 2 ch-2 sps}
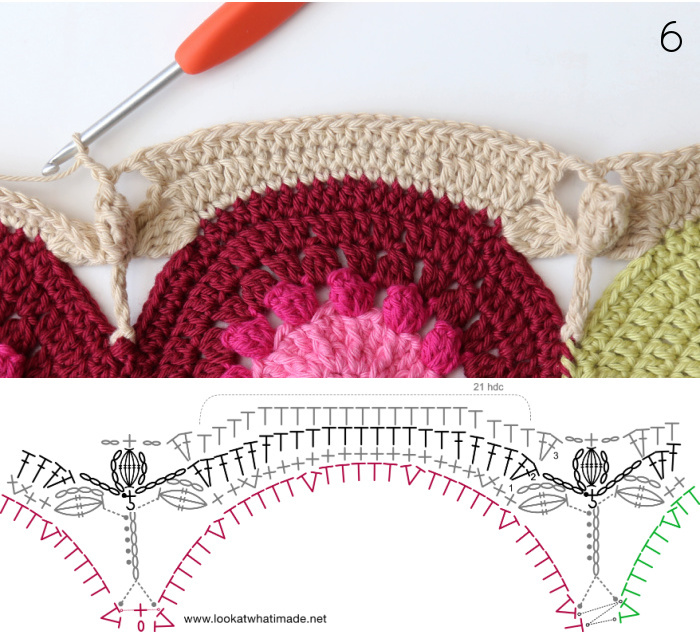
Working into Petals 2 – 5: *Skip the next ch-4 sp. Make 2 dc in the next st. Hdc in the next 20 sts. [Hdc, ch 1, hdc] in the ch-1 corner sp. Skip the first (hidden) st. Hdc in the next 19 st. Make 2 dc in the next st. Ch 2, sc into the Popcorn, ch 2.* Rep from * to * 3 more times. {Per Repeat: 1 sc, 41 hdc, 4 dc, 1 ch-1 sp and 2 ch-2 sps}
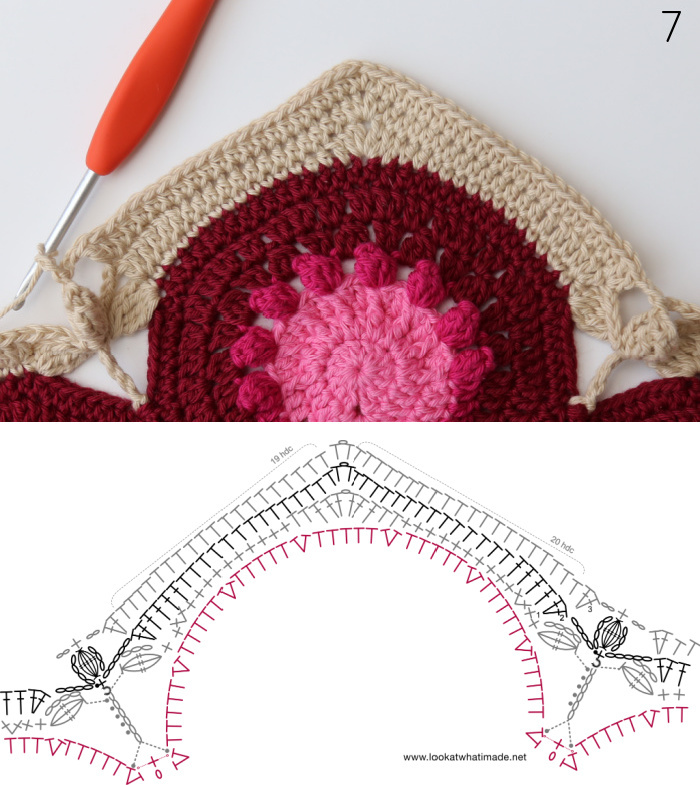
Working into the sixth Petal: Skip the next ch-4 sp. Make 2 dc in the next st, hdc in the next 21 sts, make 2 dc in the next st. Ch 2, sc into the Popcorn, ch 2. {1 sc, 21 hdc, 4 dc, and 2 ch-2 sps}
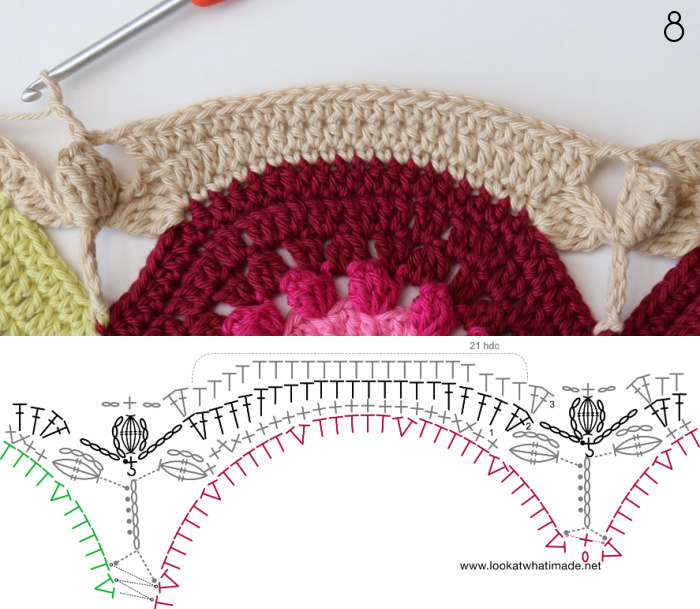
Working into the Leaf: Skip the next ch-4 sp. Make 2 dc in the next st, hdc in the next 3 sts, sc in the next 21 sts, hdc in the last 11 sts. Join to the top of the beg ch-3 with a sl st. {21 sc, 14 hdc, and 2 dc}
Round 4
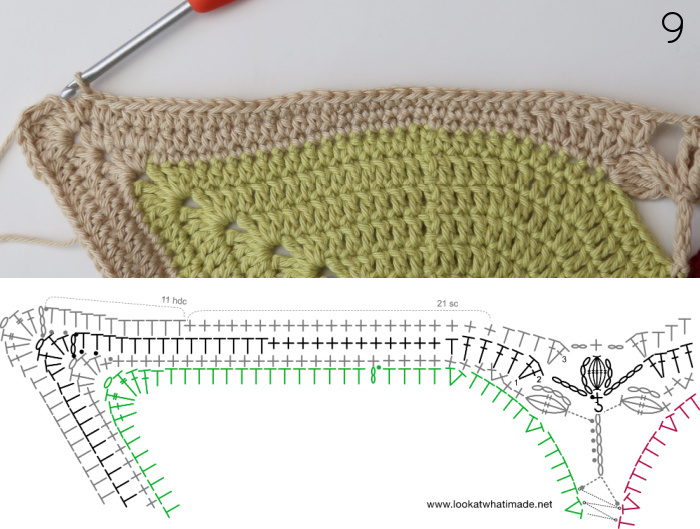
Sl st in the next 2 sts and in the ch-1 corner sp. Ch 1 (doesn’t count as a st). [sc, ch 2, sc] in the ch-1 corner sp. {2 sc and 1 ch-2 sp}
Working into the Leaf: Sc in the next 35 sts, the first of which will be hidden. Hdc in the next 5 sts. Hdc in the next ch-2 sp, FPdc around the next sc, hdc in the next ch-2 sp. {35 sc, 7 hdc, and 1 FPdc}
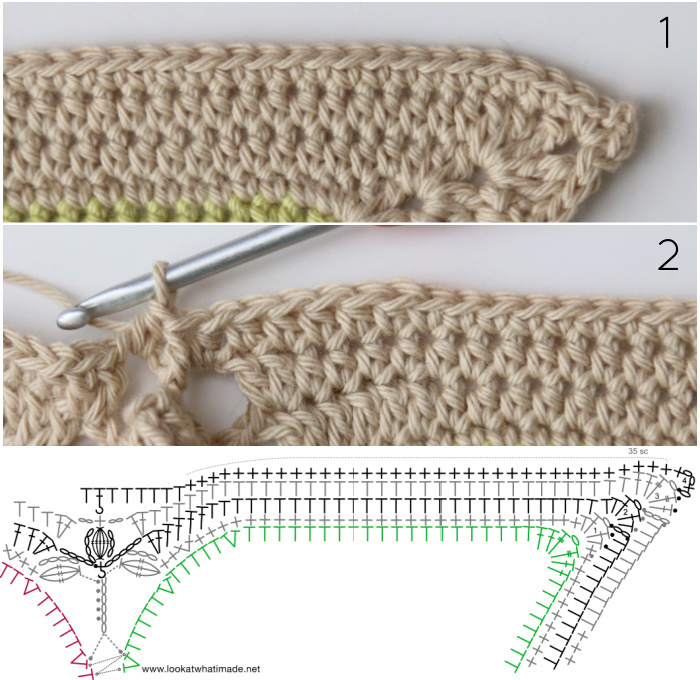
Working into the first Petal: Hdc in the next 5 sts, sc in the next 15 sts, hdc in the next 5 sts. Hdc in the next ch-2 sp, FPdc around the next sc, hdc in the next ch-2 sp. {15 sc, 12 hdc, and 1 FPdc}
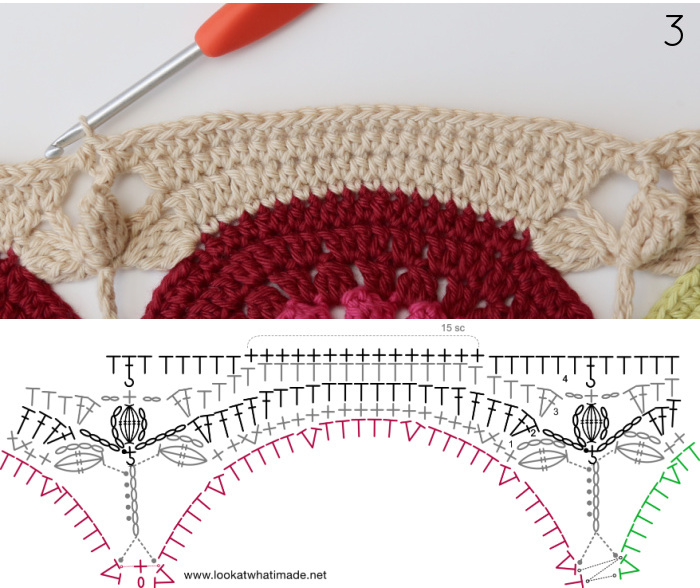
Working into Petals 2 – 5: *Hdc in the next 5 sts, sc in the next 18 sts. [Sc, ch 2, sc] in the ch-1 corner sp. Sc in the next 17 sts, the first of which will be hidden and tricky to get into. Hdc in the next 5 sts. Hdc in the next ch-2 sp, FPdc around the next sc, hdc in the next ch-2 sp.* Rep from * to * 3 more times. {Per Repeat: 37 sc, 12 hdc, 1 FPdc, and 1 ch-2 sp}
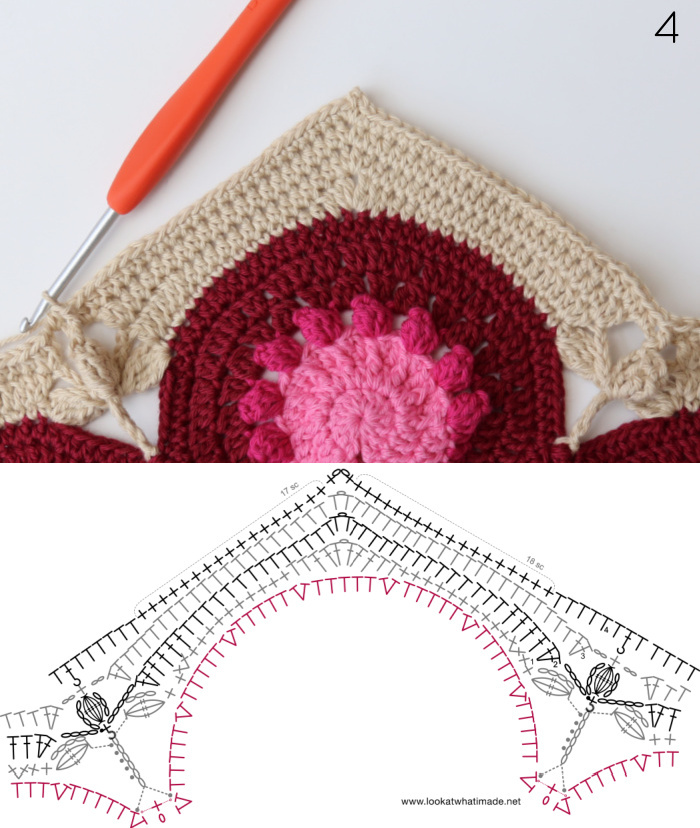
Working into the sixth Petal: Hdc in the next 5 sts, sc in the next 15 sts, hdc in the next 5 sts. Hdc in the next ch-2 sp, FPdc around the next sc, hdc in the next ch-2 sp. {15 sc, 12 hdc, and 1 FPdc}
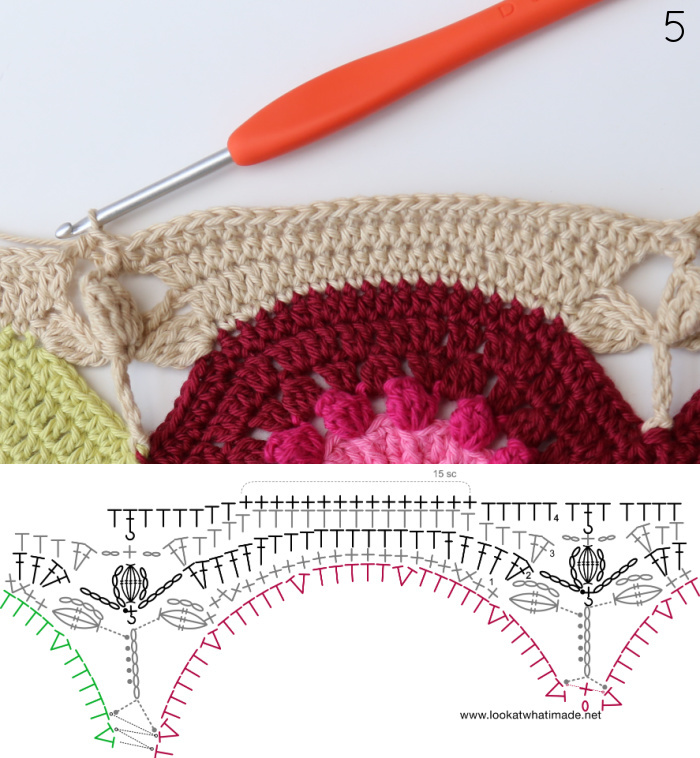
Working into the Leaf: Hdc in the next 5 sts. Sc in the next 35 sts. Join to the first sc with a sl st. Fasten off and work away your ends. {35 sc and 5 hdc}
Well done! You’ve just finished your first Weird Hexy! Only 5 more to go!
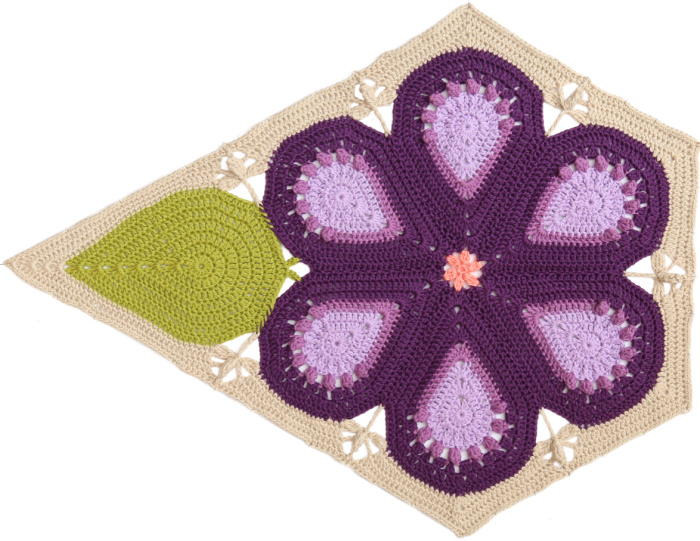
In Part 7 HERE, I will show you how to turn the two-leaf Flowers into Diamonds.

This blog post contains affiliate links. I only link to products I personally use or would use. All opinions are my own.


Jolande says
Download PDF doesn’t work
Jenny Lowman says
Hi Jolande. If you mean the print friendly tan at the bottom of the pattern signature, it is working for us this morning. Have you managed to get it to work for other parts?
J :)