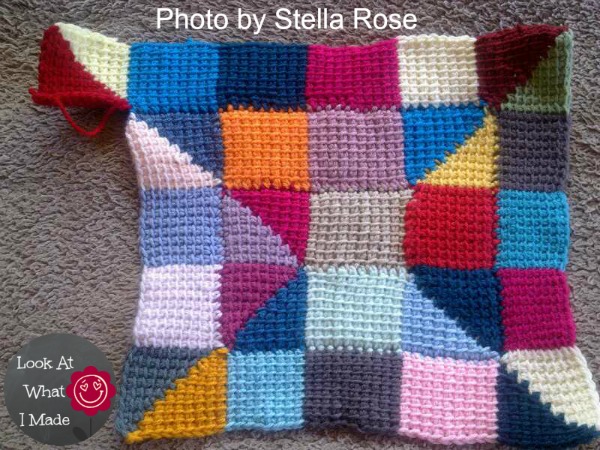
I remain enamoured with Frankie Brown’s Ten Stitch Knit Blanket and have now converted it into a Tunisian Crochet Pattern (with Frankie’s kind permission). This blanket is worked in a 10-stitch spiral around an initial 10 stitch x 10 row square, and is suitable for Adanced Beginners.
I have changed colours for each section to make it easy for you to distinguish between the different sections, but you can always use one colour for your whole blanket. Slow colour change yarn works really well!
Because Tunisian Crochet yields a more dense “fabric”, this blanket does not drape as well as the knit/crochet version, but by altering your hook size you can easily remedy this.
This pattern is FREE, but if you would like to show your appreciation for Frankie and her designs, you are more than welcome to make a donation to the Children’s Liver Disease Foundation through Frankie’s Just Giving Page.
What is a Ten Stitch Blanket?
The Ten Stitch Blanket is worked in a spiral (or “rounds of rows”) around a central square of 10 stitches by 10 rows. The beauty of the project is that the short rows (10 stitches per row, less on the corner rows) propel you forward like you wouldn’t believe and it is the perfect pattern for using up any and every scrap of yarn in your house. When you decide that your Tunisian Crochet Ten Stitch Blanket is large enough, simply stop at the end of one of a Middle Sections and work a slip stitch row as indicated at the end of the pattern.
The photos below were taken by one of my testers, Terry Spears, who is left-handed and had no problems following the pattern (even though it is written for right-handers). I really have tried to make it as simple as possible.
But I Don’t Know How To Do Tunisian Crochet
And I don’t have a tunisian crochet hook either…
You don’t need a tunisian crochet hook for this! Because there are so few stitches in each row, a regular old crochet hook will do (and might even be easier to wield). You don’t really need to know how to do tunisian crochet either. Each step is explained thoroughly with loads and loads of photos to help you on your merry way.
The Perfect Stash-buster
This blanket is the ideal stash-buster. I have used a different colour for each section to better illustrate how they are worked. You are more than welcome to follow this trend. Quite a few of my testers did! It yields a lovely checker-boardy pattern.
But there is another (easier) way to use scrap-yarn for your blanket. Why not start with a ball of scrap yarn and then just add the new scrap yarn in when the old yarn runs out? This way you will have less tails to work in and you can use absolutely every last scrap of scrap yarn. Just as an aside, there is NO SUCH THING as stash-busting. Any knitter/crocheter will know that scrap yarn has a way of multiplying. Some of us even buy more yarn when our scrap yarn runs out in the middle of a project, leaving us with MORE scrap yarn, not less.
The last alternative is to make your blanket in a single colour. For this I suggest colour change yarn, preferably a yarn with fewer, longer colour changes. Think ombre!
Ideas
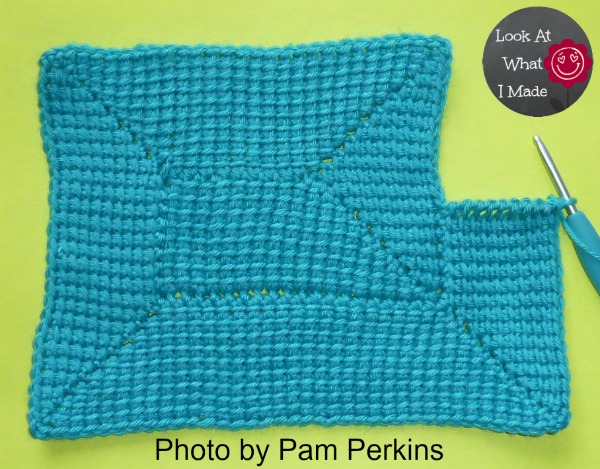
Although this is a blanket pattern, you can use it to make cushion covers, table runners, baby blankets, placemats and even rugs. The basic pattern stays the same, you just work less “rounds of rows”. One of my testers’ daughter, Chloe, made her Tunisian Crochet Ten Stitch into this lovely little pillow. Chloe is only 9! Well done, Chloe, and thank you for sharing your awesome pillow with us!

Altering the pattern
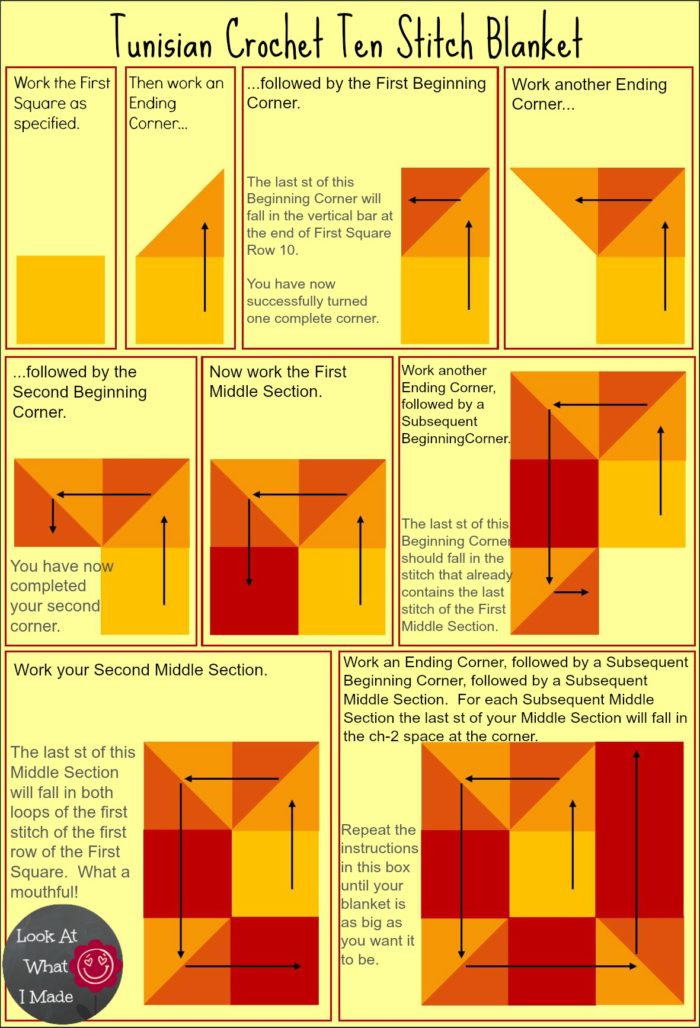
If you would prefer a more rectangular blanket, start with a Beginning Square that is 60 – 100 rows long (obviously it won’t be a square anymore if it has 60 – 100 rows). Then, following the Diagram below and the pattern itself, work the rest of your blanket, altering the amount of rows in each Middle Section accordingly. Your Ending Corners and Beginning Corners will remain unchanged. The resulting blanket will be longer than it is wide. Exactly by how much will depend on the amount of “rounds of rows” you make. The bigger your blanket is, the smaller the difference will become. I strongly advise making a little sampler first so that you get a feel for the blanket. Once you know what goes where, go ahead and alter it in any way you like.
Tunisian Crochet Ten Stitch Blanket Pattern
© Dedri Uys 2013. All Rights Reserved. Please see my Terms of Use.
Index
- Resources
- Abbreviations
- Materials
- Colour Changes and Yarn Ends
- A Word About Tunisian Crochet
- Diagram
- Instructions
- Ending the Blanket
- Single Crochet Edging
- Testers
Resources
- Add This Pattern to Your Ravelry Queue
- If you would like to print/save this pattern, please use the Print-Friendly button at the bottom of this post
- **Video Tutorial** by Esther Dijkstra from It’s All in a Nutshell
- Also available: FREE Crochet Ten Stitch Blanket Pattern (Regular Crochet Pattern)
Abbreviations
- Ch – Chain stitch
- Ch-2 Space – This is the corner stitch (the pointy end of each corner), formed by starting the Beginning Corner with a ch-2.
- Sc – Single crochet (for the edging round only)
- Sl st – Slip stitch
- { } – Stitch counts are supplied in parentheses
- * – Repeat all instructions between asterisks the amount of times specified
Materials
- Double knit yarn (light worsted weight – #3) in any colours you fancy
- 5 mm crochet hook ( US 8/H, UK 6)
OR
- Worsted weight yarn (#4) in any colours you fancy
- 6 mm hook ( US 10/J, UK 4)
Colour Changes and Yarn Ends
When changing colours, do so on the last yarn-over of the last stitch of the row before you wish to change colours. Unfortunately there is no “easy” way to get rid of all the yarn ends. You can’t crochet over them, because they are to the back of your work and you are working through the vertical bars, which are on the front of your work. You’re going to have to weave them in, I’m afraid.
A Word About Tunisian Crochet
If you are well-versed in Tunisian crochet, just skip this little blurb.
In normal crochet (for lack of a better word) you work each stitch on its own and each row goes only in one direction (usually from right to left if you are right-handed).
In Tunisian crochet you work each row forwards (by picking up stitches in each stitch of the previous row and keeping them on your hook) AND backwards (by working the stitches off your hook again). Each row consists of a forward pass and a reverse pass and will typically be written like this:
- Forward pass: Skipping the very first vertical bar, insert your hook into the next vertical bar and pull up a loop. Insert it into the next vertical bar and pull up a loop. Keep pulling up loops until you have worked into all the vertical bars (including the very last one).
- Reverse pass: Ch 1 (In some patterns this might be written as: Yarn over and pull through one loop only). *Yarn over and pull through 2 loops* until you have only one loop remaining on your hook.
For the first square I will keep to this format so that you can get the hang of it. For the subsequent sections (Ending Corner, Beginning Corner and Middle Section) the reverse pass will be indicated in bold.
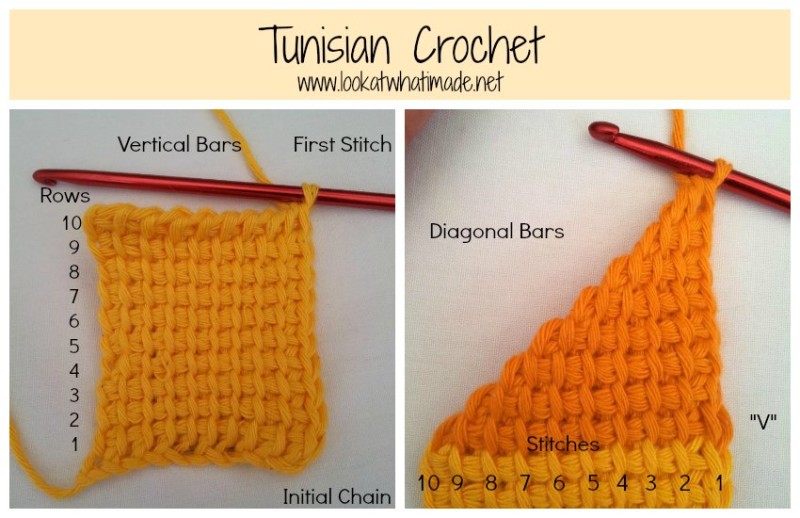
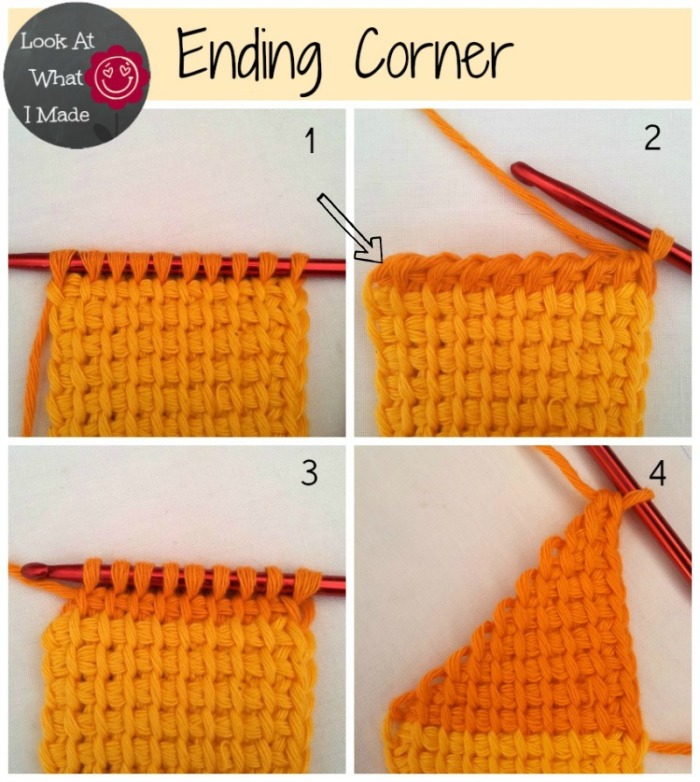
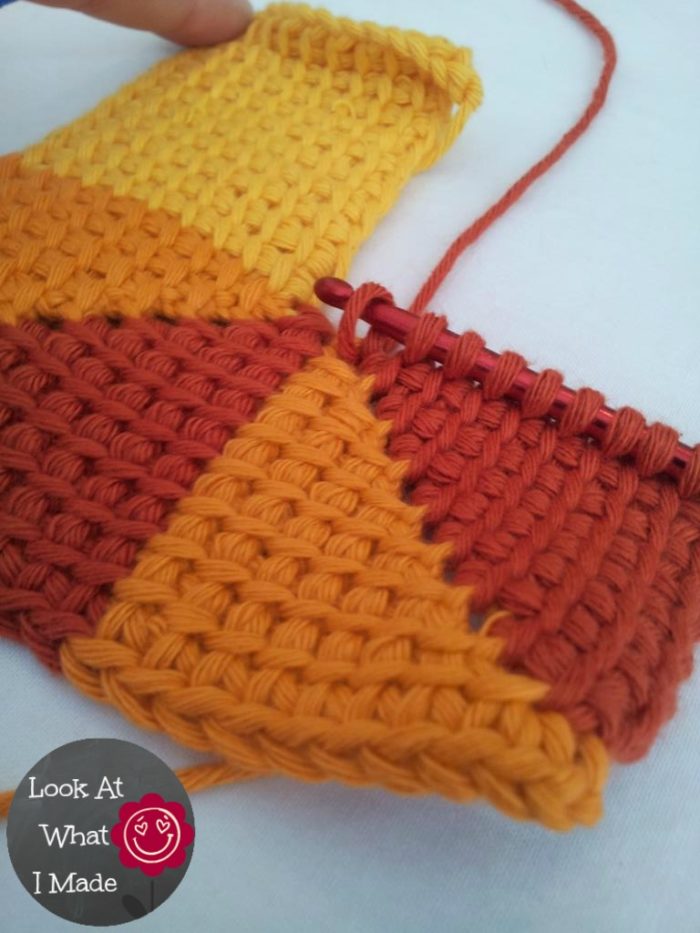
To create the decreases in the Ending Corner and Beginning Corner of this pattern, you will skip the initial Ch-1 of the reverse pass. This will create what I will refer to as a diagonal bar (see photo below). Only work into these diagonal bars when the pattern calls for it.
When working the Middle Sections of this pattern you will also skip the initial Ch-1 of the reverse pass.
Hint: Keep you tension loose! It’s a lot more pleasurable when you aren’t having to wrestle with each stitch. And as an added bonus your work will curl a lot less if you keep your tension nice and relaxed.
Diagram
Please follow this diagram when deciding which section to work next. Do NOT just follow the Instructions (below). They only tell you HOW to make each section when the diagram calls for it.
Instructions
Please remember to follow the diagram (above) when making your Tunisian Crochet Ten Stitch Blanket. The instructions below will only tell you HOW to make each section, not WHEN to make them.
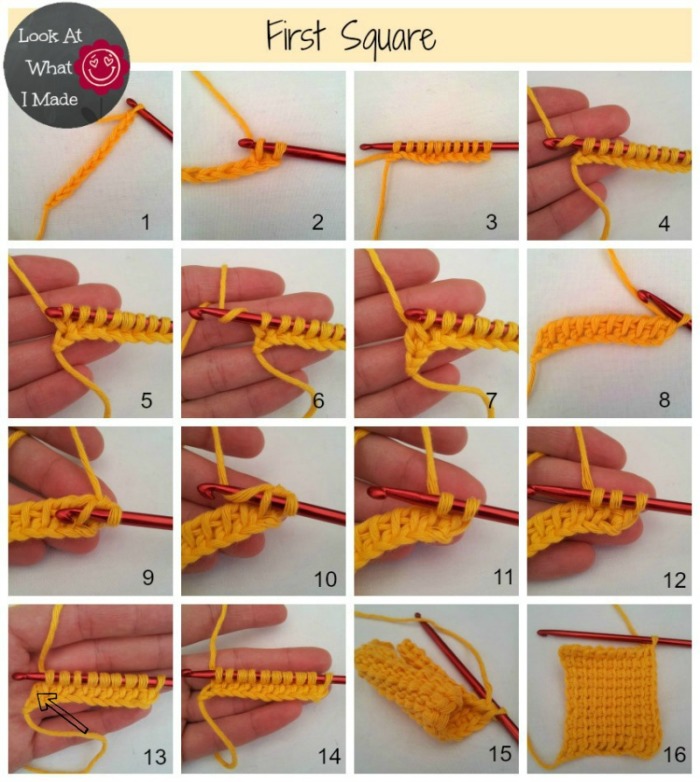
First Square
Ch 10. This foundation chain does not count as a row (Photo 1).
Row 1
Forward pass: Pull up a loop in the second chain from the hook (Photo 2) and each subsequent chain stitch (Photo 3). You should end up with 10 loops on your hook.
Reverse pass: Ch 1 (so yarn over and pull through one loop – see Photos 4 and 5). *Yarn over (Photo 6)and pull through 2 loops (Photo 7)* 9 times (Photo 8). {10}
Rows 2 – 10
Forward pass: Skipping the very first vertical bar, pull up a loop in each of the 9 vertical bars across. To do this, insert your hook into the next vertical bar, yarn over and pull up a loop (Photos 9-12). Repeat this for each vertical bar. Don’t forget to pull up a loop in the last vertical bar (indicated with an arrow in Photo 13). You should have 10 loops on your hook (Photo 14).
Reverse pass: Ch 1. *Yarn over and pull through 2 loops* 9 times. {10}
Your First Square will curl quite a bit (Photo 15). Don’t worry about it! Photo 16 shows the First Square Completed.
Ending Corner
Please Note: The diagonal loops formed by the decreases have not been included in the stitch counts in parentheses.
- Pull up a loop in each of the 9 vertical bars. You should now have 10 loops on your hook (Photo 1). *Yarn over and pull through 2 loops* 9 times. By skipping the first chain stitch, you are decreasing by one stitch (Photo 2). {9}
- Pull up a loop in each of the 8 vertical bars. Notice the diagonal bar formed by decreasing in the previous row (indicated with an arrow in Photo 2)? Don’t work into it. Just work into the 8 vertical bars. You should now have 9 loops on your hook (Photo 3). *Yarn over and pull through 2 loops* 8 times. {8}
- Pull up a loop in each of the 7 vertical bars (8 loops on your hook). *Yarn over and pull through 2 loops* 7 times. {7}
- Pull up a loop in each of the 6 vertical bars (7 loops on your hook). *Yarn over and pull through 2 loops* 6 times. {6}
- Pull up a loop in each of the 5 vertical bars (6 loops on your hook). *Yarn over and pull through 2 loops* 5 times. {5}
- Pull up a loop in each of the 4 vertical bars (5 loops on your hook). *Yarn over and pull through 2 loops* 4 times. {4}
- Pull up a loop in each of the 3 vertical bars (4 loops on your hook). *Yarn over and pull through 2 loops* 3 times. {3}
- Pull up a loop in each of the 2 vertical bars (3 loops on your hook). *Yarn over and pull through 2 loops* twice. {2}
- Insert your hook into the vertical bar and pull up a loop. Yarn over and pull through both loops on your hook (Photo 4). {1}
First Beginning Corner
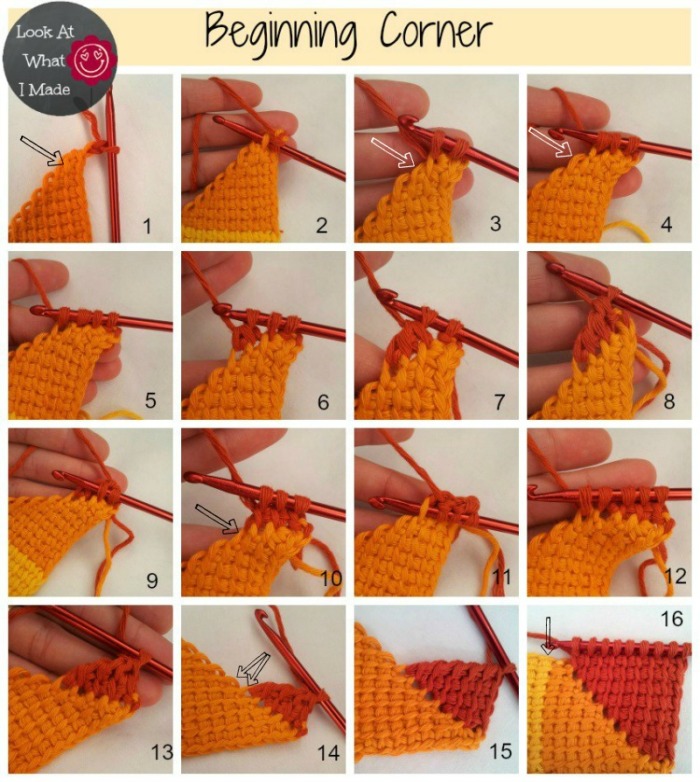
In this section you will be working into the diagonal bars formed by the decreases in the Ending Corner section (see the arrow in Photo 2 above).
- Ch 2 (Photo 1). Insert your hook into the only vertical bar (Photo 2) of Row 8 of the Ending Corner (indicated with an arrow in Photo 1) and pull up a loop. This vertical bar will already contain a stitch from Row 9 of the Ending Corner. Insert your hook into the diagonal bar at the end of Ending Corner Row 8 (indicated with an arrow in Photo 3) and pull up a loop. Insert your hook into the diagonal bar at the end of Ending Corner Row 7 (indicated with an arrow in Photo 4) and pull up a loop . You should now have 4 loops on your hook (Photo 5). *Yarn over and pull through 2 loops* 3 times (Photos 6 – 8). At this point it will become easier to continue working the Beginning Corner if you turn your work 90 degrees. {3}
- Pull up a loop in each of the 2 vertical bars (Photos 9 and 10). Pull up a loop in the diagonal stitches at the ends of Ending Corner Rows 7 (Photo 11) and 6 (Photo 12). The diagonal bar at the end of Ending Corner Row 7 will already contain a stitch from the previous row and is indicated with an arrow in Photo 10. You should now have 5 loops on your hook. *Yarn over and pull through 2 loops* 4 times (Photo 13). {4}
- Pull up a loop in each of the 3 vertical bars. Pull up a loop in the diagonal stitches at the ends of Ending Corner Rows 6 (already contains a stitch) and 5. Both of these stitches are indicated with arrows in Photo 14. You should now have 6 loops on your hook. *Yarn over and pull through 2 loops* 5 times. {5}
- Pull up a loop in each of the 4 vertical bars. Pull up a loop in the diagonal stitches at the ends of Ending Corner Rows 5 (already contains a stitch) and 4 (7 loops on your hook). *Yarn over and pull through 2 loops* 6 times (Photo 15). {6}
- Pull up a loop in each of the 5 vertical bars. Pull up a loop in the diagonal stitches at the ends of Ending Corner Rows 4 (already contains a stitch) and 3 (8 loops on your hook). *Yarn over and pull through 2 loops* 7 times. {7}
- Pull up a loop in each of the 6 vertical bars. Pull up a loop in the diagonal stitches at the ends of Ending Corner Rows 3 (already contains a stitch) and 2 (9 loops on your hook). *Yarn over and pull through 2 loops* 8 times. {8}
- Pull up a loop in each of the 7 vertical bars. Pull up a loop in the diagonal stitches at the ends of Ending Corner Rows 2 (already contains a stitch) and 1 (10 loops on your hook). *Yarn over and pull through 2 loops* 9 times. {9}
- Pull up a loop in each of the 8 vertical bars. Pull up a loop in the diagonal stitch at the end of Ending Corner Row 1 (already contains a stitch). Pull up a loop in the last vertical bar of Row 10 of the First Square (indicated with an arrow on Photo 16). You should now have 11 loops on your hook. *Yarn over and pull through 2 loops* 10 times. {10}
Second Beginning Corner
Work as the First Beginning Corner up to and including Row 7.
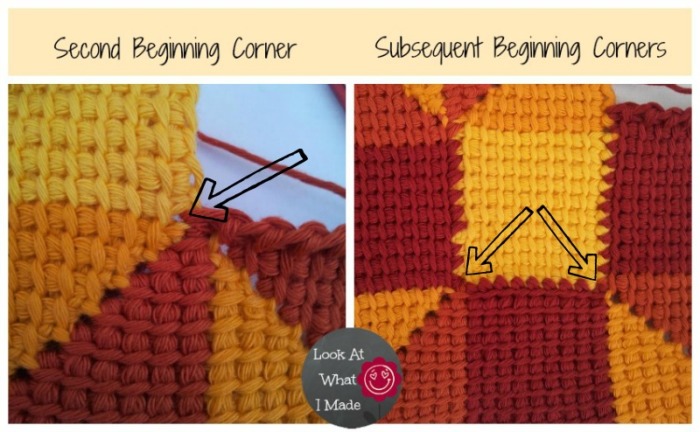
- Pull up a loop in each of the 8 vertical bars. Pull up a loop in the diagonal stitch at the end of Ending Corner Row 1 (already contains a stitch). Inserting your hook from front to back, pull up a loop in the last vertical bar of Row 10. This stitch will already contain the last stitch of the First Beginning Corner. You should now have 11 loops on your hook. *Yarn over and pull through 2 loops* 10 times. See the photo labelled Second Beginning Corner below. {10}
Subsequent Beginning Corners
Work as the First Beginning Corner up to and including Row 7.
- Pull up a loop in each of the 8 vertical bars. Pull up a loop in the diagonal stitch at the end of Ending Corner Row 1 (already contains a stitch). Pull up a loop in the stitch that contains the last stitch of the last row of the Middle Section. You should now have 11 loops on your hook. See the photo below – note the 2 stitches in the same stitch, indicated with arrows. *Yarn over and pull through 2 loops* 10 times. {10}
First Middle Section
At this point you should have your First Square, followed by an Ending Corner and a Beginning Corner, followed by ANOTHER Ending Corner and Beginning Corner! Your blanket should look like this:
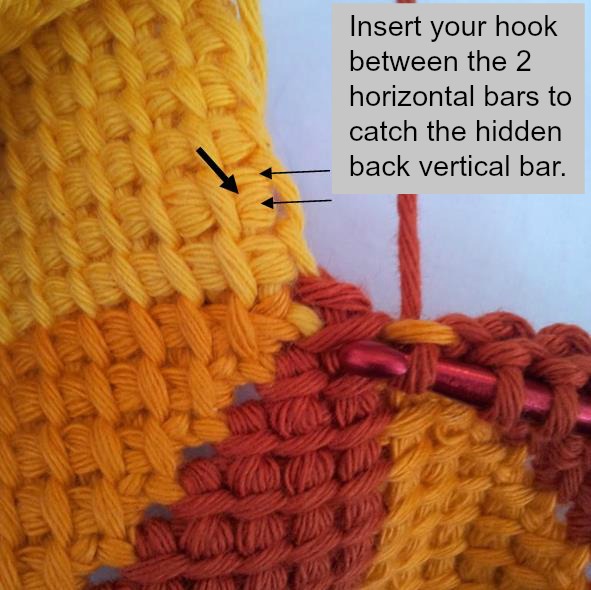
You will be joining this First Middle Section to the side of the First Square. At the end of each row, you will need to draw up a loop in the last stitch of the relevant First Square Row.
To do this you will need to insert your hook from front to back between the 2 horizontal bars (see photo below) of the last stitch of the First Square so that it catches the hidden back vertical loop. Don’t try to look for it, it is very well hidden! Just poke your hook in there and pull up a loop. Inserting your hook in this way will ensure that you do not have unsightly holes running along this seam.
If you find it too tricky to catch that hidden back vertical bar, you can always just insert your hook into the last vertical bar of each First Square Row and pull up a loop. Just bear in mind that this will cause holes along this seam.
Rows 1 – 9
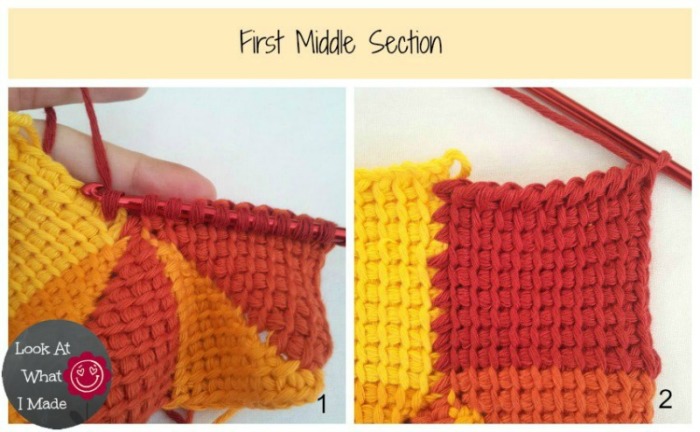
Draw up a loop in each of the 9 vertical bars of the last row of the Beginning Corner. Draw up a loop between the 2 horizontal bars of the next row of the First Square (Photo 1). You should now have 11 loops on your hook. *Yarn over and pull through 2 loops* 10 times. {10}
Photo 2 below illustrates the Completed First Middle Section.
Second Middle Section
Rows 1 – 8
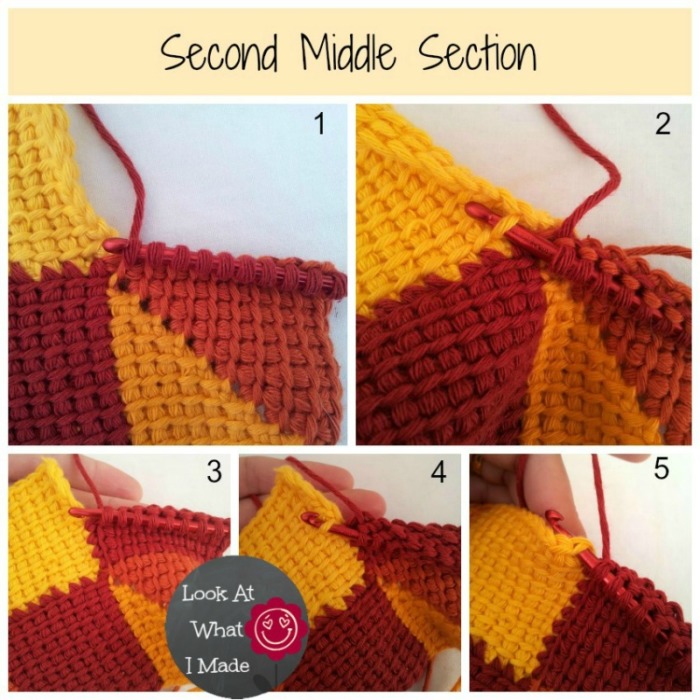
Draw up a loop in each of the 9 vertical bars (Photo 1). Draw up a loop in the next vertical bar of the first row of the First Square (Photo 2). You should now have 11 loops on your hook. *Yarn over and pull through 2 loops* 10 times. {10}
Row 9
Draw up a loop in each of the 9 vertical bars. Draw up a loop through both loops of the first stitch of the first row of the First Square (Photo 5). You should now have 11 loops on your hook. *Yarn over and pull through 2 loops* 10 times. {10}
Subsequent Middle Sections
All Rows Except the Last Row
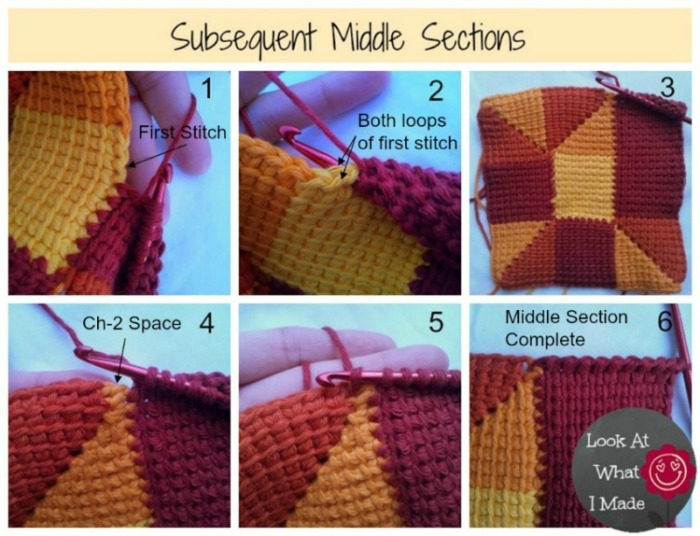
Draw up a loop in each of the 9 vertical bars. Draw up a loop through both loops of the first stitch of the next row of the blanket (Photos 1 and 2). You should now have 11 loops on your hook. *Yarn over and pull through 2 loops* 10 times. {10}
Repeat this until you have worked into all the rows along the relevant side of the blanket. You will know you have worked into all the rows when you get to the ch-2 space in the corner, formed by making the 2 ch st’s at the beginning of each Beginning Corner (Photo 4). You will join the last row of the Middle Section to this ch-2 space.
Last Row
Draw up a loop in each of the 9 vertical bars. Draw up a loop in the ch-2 space in the corner of the blanket (Photo 5). You should now have 11 loops on your hook. *Yarn over and pull through 2 loops* 10 times (Photo 6). {10}
Ending the Blanket
When your blanket is as big (or as small) as you want it to be, STOP. Well, not immediately. If you stop in the middle of a Middle Section, or at the end of an Ending or Beginning Corner, it will look too funny. So once you’ve decided that enough is enough, crochet your way to the second last row of the Middle Section.
For the binding-off row, sl st into each vertical bar across. To do this, insert your hook into the first vertical bar, yarn over and pull through the vertical bar AND the loop on your hook. Do this for each stitch across. When you get to the end, make a sl st into the ch-2 space and bind off.
You can find an excellent video tutorial by HERE. It is by Kim Guzman. She’s a bit of a Tunisian Crochet Guru.
The video also shows you the following bind-off methods:
- The Modified Simple Stitch Bind Off
- Knit Stitch Bind Off
- Single Crochet Bind Off
If you feel like it, you can always work a single round of single crochet all the way around the blanket.
Single Crochet Edging
With a slip knot already on your hook, sc in any of the ch-2 spaces at the corners of the blanket. *Work a sc through both loops of each stitch across. (Sc, ch 1, sc) in the ch-2 space at the corner. Turn your blanket 90 degrees.* Repeat from * to * for each of the 4 sides. When you get back to the first corner, so the ch-2 space that you started in, (sc, ch 1) in the ch-2 space. Sl st to the first stitch of the round and bind off. Work away your tails.
Thank You To My Lovely Testers
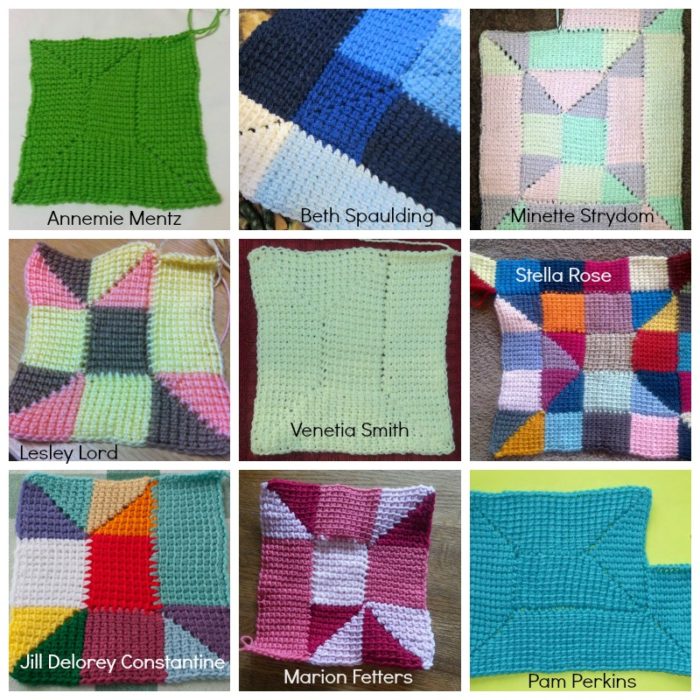
Terry Spears ♥ Jill Delorey Constantine ♥ Corky Arkovich ♥ Lesley Lord ♥ Venetia Smith ♥ Beth Spaulding ♥ Marion Fetters ♥ Pam Perkins ♥ Adele Van Der Merwe ♥ Annemie Mentz ♥ Minette Strydom (my mom) ♥ Stella Rose (my aunt)
Remember to subscribe to my newsletter if you would like to be kept in the loop. You can also like my Facebook page or follow me on Bloglovin or Google+. If you have any questions, please do not hesitate to contact me.




M-R says
Erhmmm .. I’d like to print it out, all this; but I can’t find that ‘print-friendly’ button you mention.
Is it just me being a cretin ?
Probably. :(
Dedri Uys says
Hi :) Right next to my signature it says Print/PDF. You can click on either of those to print or create a PDF :)
Carol Craven says
I am left handed and do not understand how to do it left. What am i doing wrong.
Jenny Lowman says
Carol, if you have a search for Tunisian 10 stitch left handed on YouTube, there are some good videos to help. Knitter Knotter has one that is ideal :)
Marjory says
Many,many years ago I made an afghan using the afghan stitch. It was a picture of a flower cart filled with flowers. I don”t remember where I found the pattern and have never found another one. I look forward to trying your pattern to use up my overflow of left-over yarn. Thank you.
Carriebeth says
Thanks for the pattern. While I have been crocheting for 30+ years I have yet to tackle Tunisian on a large project. This should be a perfect start. I was recently gift a huge amount of yarn from several sources and amounts it a lot of variegated, so I just gathered it all up and we will see where it takes us. My favorite kind of project.
Kamikaze Kumquat says
Just to let y’all know, I am working on this pattern using the Tunisian Net Stitch and that with a little finagling it is possible to crochet over your tails when you change colors to lessen the amount of sewing you have to do later. When you push the hook through front to back to pull a loop, if you alternate between going over and under the tails between stitches, when you pull the yarn through it will anchor them quite well. I wish I could video or draw it, but I’m not good at either. But, with a net stitch, it’s possible to anchor your stitches as you work. Hope this helps someone!
Sharon Kirkpatrick says
Love the look of this pattern! I’m ready to order yarn; in the materials section, there is reference to using one color, but I don’t see anything regarding the total amount of yarn is required. I found some veriegated yarn that I really like, but don’t know how much to purchase. Thanks!
Dedri Uys says
Hi Sharon. It is a scrap blanket, so yardage would depend very much on the size of your hook, the thickness of your yarn, and how big you want your final blanket to be. If you have a look at the ravelry projects for this pattern, it will give you a good idea of what and how much other people used. My favourite one so far used a 6.5mm hook and 11 skeins of Scheepjes Wanderlust. Dedri
Kris says
what hook set are you using? i love how the head of the hook you are using is sharper or more pointed. all that i have found so far are very blunt and rounded tips.
Dedri Uys says
Hi Kris. It is a cheap tunisian set. I can’t even remember where I bought it as it was so long ago! I think it was on ebay.
Larry says
If I can get my stiff fingers around this pattern , it looks like a challenge for me(80), but one I can master!
Dedri Uys says
Let me know how you go!
Hannah says
My 10 X 10 square is not square! It’s taller than it is wide. Where am I going wrong? It’s old t-shirt yarn with a big 10mm hook.
Thanks
Dedri Uys says
Hi Hannah. Have you got a photo so that I can better assist you?
cath dahl says
Your photos and instructions are great! Thank you very much
Janice says
I really need to do this, its a lovely effect and something I have never tried before.
DEBBIE MARTIN says
Thank you, thank you!!! I’ve just started Entrelac last week and am addicted to Tunisian! Can’t wait for your vid!
Dedri Uys says
Hi Debbie :)
I am very excited about Esther’s video too!
Brenda says
I have just learnt to do this on a cruise we just did around Australia.
The lady that showed use .her husband makes them.
Sizes 4.5.6.7.8.9.10..
I am after size 4.if any one knows were I can get one please.
Andreyah says
I usually have no problem with patterns and yours is no doubt very well written… I cannot for the life of me get the second beginning square at all. I have frogged it about 9 times. I wish there was a video. I couldn’t figure it out from the pictures either =[ Lovely pattern nonetheless. Thank you for translating it to crochet.
Dedri Uys says
Hi Andreyah
I am sorry that you are finding this pattern so hard. If you email me a photo of where you are up to and explain exactly what about the beginning square is bugging you I can better help you figure it out. You can find a contact form at the top of my website.
Dedri
Sue says
I agree. I’ve been crocheting for over 50 years and cannot for the life of me figure out this pattern. I was so enthused but can’t get even the beginning corner right. I have pulled it out five times now.
Dedri Uys says
Hi Sue. Have a look at the Tunisian Log Cabin pattern by Knitter Knotter here. Her construction doesn’t use corners, so you might find her blanket easier to follow. Have fun!
Chris says
Hi Dedri
Is there a video tutorial for your Tunisian Crochet Ten Stitch Blanket? I’m sure that I have seen one, but now that I am ready to start a blanket I cannot seem to find the link.
Many thanks
Chris
Dedri Uys says
Hi Chris. There isn’t one, I’m afraid. The photo tutorial is very comprehensive, so maybe have another look at that and please ask if you get stuck.
Irene Slough says
Does anyone know what is the difference between the Tunisia stitch and the afghan stitch?
Irene
Dedri Uys says
Irene, as far as I know they are one and the same thing.
annalina says
very clever!1
Rhondda Mol says
Hi Dedri! Thank you for linking up at Link & Share Wednesday :) I am hoping to try this one myself in the very near future :) I signed up for a class to learn Tunisian and once it is done I am all over this!
Thank you again :) Rhondda
PS Finished my lovey test and will send you the results hopefully tomorrow :) and I LOVE it!!
Dedri Uys says
I forgot to put a link on my site, sorry Rhondda :( Next time x
Carrie says
I love this pattern! I am new to Tunisian crochet and wondered if you have a recommended tutorial on how to use the Tunisian crochet hook (I’m new to you blog so please excuse me if I missed any post where you explained how to). Thanks so much!
Carrie
Dedri Uys says
Hi Carrie,
I don’t have a tutorial, but Kim Guzman is a tunisian crochet expert and she has some very clear You Tube tutorials.
Have you had a look at the tunisian ten stitch pattern? There is a quick how-to at the beginning of the pattern. The instructions for the First Square (in the pattern) also include some step-by-step photos.
I hope this helps
Dedri