I love Love LOVE making mandalas. They are just so calming and mindful. Having said that, I love squaring them up even more. It is my fervent hope that we will eventually have a collective library of ‘squaring up’ patterns that can be applied to mandalas of any size. So, today, I am going to tell you how to Square a Mandala with a final-round stitch count of 160 stitches, using a modified version of Sophie’s Garden.
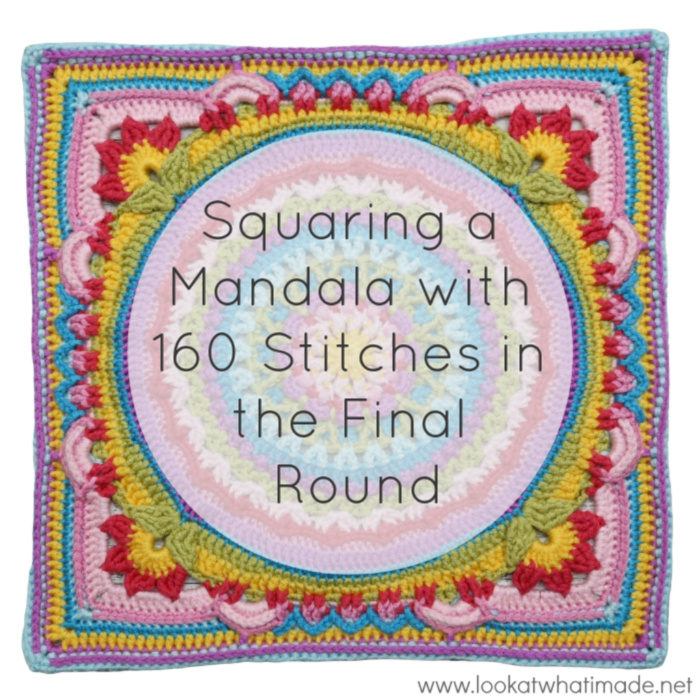
Yes, dearies, Sophie again! Still!! Always!!!
Ever since I designed the first four parts of Sophie’s Universe (which make up the initial Sophie’s Garden square), I have wanted to adapt the instructions for different sizes. It has taken many MANY hours of brain-pain maths, but I’ve finally written out the instructions for using Part 4 to square mandalas with 80, 112, 128, 144, and 160 stitches in the final round. While I have all these sizes tested, I will continue to work on the maths for multiples of 16 stitches above the ones listed (except for 240 stitches, which is the original Part 4).
As I have already mentioned, this post will contain the instructions for squaring a mandala with a final-round stitch count of 160 stitches. This is a written-only post, but if you have any trouble with parts of a round, feel free to see the Video Tutorial of Part 4 HERE and the Photo Tutorial HERE. Please keep in mind that the sides for this smaller version will have less repeats than the original version, and some tiny modifications.
To illustrate the squaring up instructions, I used my friend Rhondda Mol’s Kinship Mandala, turning it into a Kinship Square. You can find all the details for the square HERE.
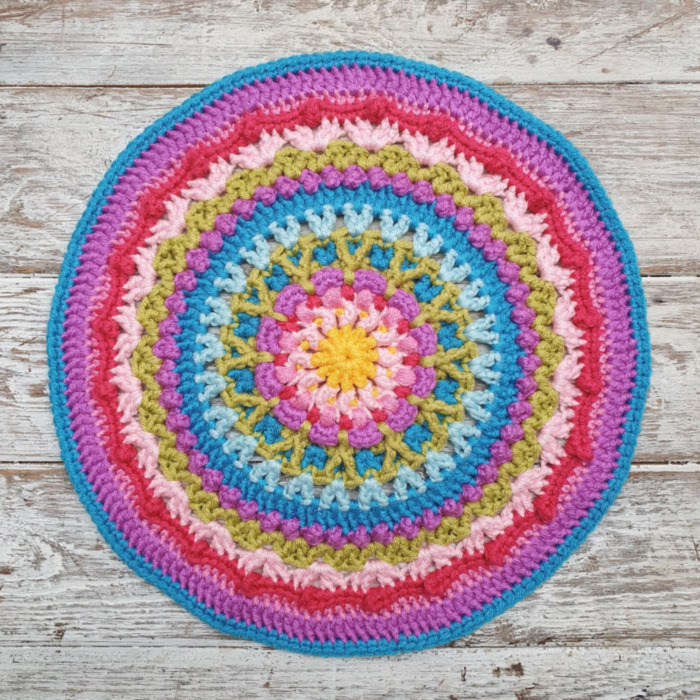
How to Square a Mandala with 160 Stitches
Identifying Where to Start
Some mandalas have a very clear symmetrical pattern, which means that you will need to think about your corner placement carefully. You will need to look at your mandala to decide where you want your corners to fall. The (3tr, ch 2, 3tr) that will form the centre of each corner will fall over two stitches, so you will have to divide your mandala into symmetrical quarters and then identify the two stitches that will give you the most symmetric look if used for the corners.
Mark the 2 sts that each of your corners will fall over with Stitch Markers (SM2 and SM3). Count 9 sts back from the first marked st of each corner and mark that st (SM1).
SM 1 is where you will start. When you make the first corner, your 3-tr groups should fall in marked sts 2 and 3. Look at your work to see if this corner looks symmetrical. If it doesn’t, adjust your starting position and try again!
Information
Abbreviations
- BP – Back post – see Special Stitches
- Ch – Chain
- Dc – Double crochet
- FP – Front post – see Special Stitches
- Hdc – Half-double crochet
- Sc – Single crochet
- Sl st – Slip stitch
- SM – Stitch marker
- Sp/sps – Space/spaces
- St/sts – Stitch/stitches
- Tr – Treble crochet
Punctuation
* An asterisk indicates pattern repeats. You will need to repeat all the instructions between asterisks the number of times specified. This is a hard-core repeat and will consist of multiple instructions.
Parentheses () indicate repeats. You will need to repeat the instructions between parentheses the number of times specified. This is a lower level repeat. Parentheses are also used to indicate a group of stitches to be worked into the same st/sp.
Special Stitches
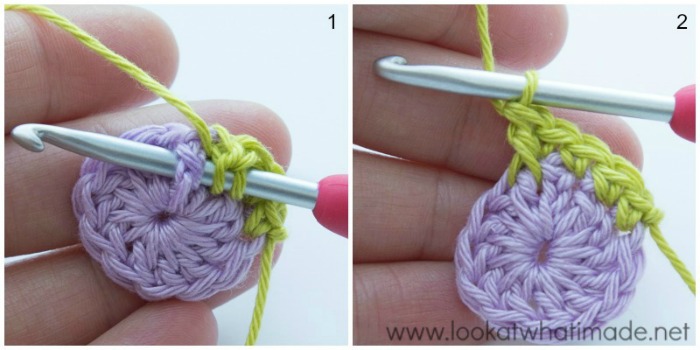
Front Post Stitches
Identify the post of the st you want to work around. Insert your hook from the front to the back and then from the back to the front around the post of the st so that the post lies on top of your hook {Photo 1}. Complete your st as normal {Photo 2}.
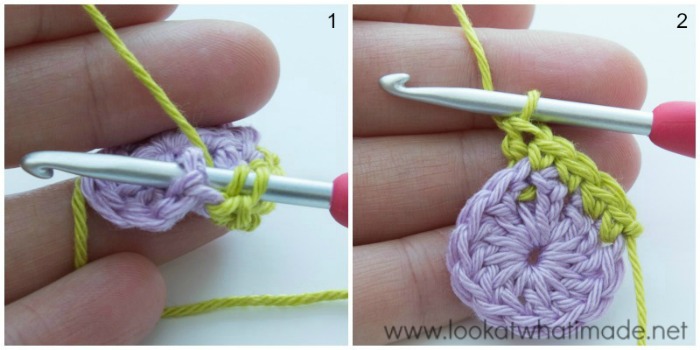
Back Post Stitches
Identify the post of the st you want to work around. Insert your hook from the back to the front and then from the front to the back around the post of the st so that the post lies behind your hook {Photo 1}. Complete your st as normal {Photo 2}. You might find it easier to twist your work forward so that you can see what you are doing.
Standing Stitches
Standing stitches are used to start the round when using a new colour. They are exactly the same as regular stitches, except that they are made ‘in air’, without being attached to a previous stitch. I suggest always starting with a slip knot already on your hook.
I will walk you through making a standing single crochet. That way you will get an idea of how they work. Once you understand the principle, you can create standing stitches of any height.
Standing Single Crochet
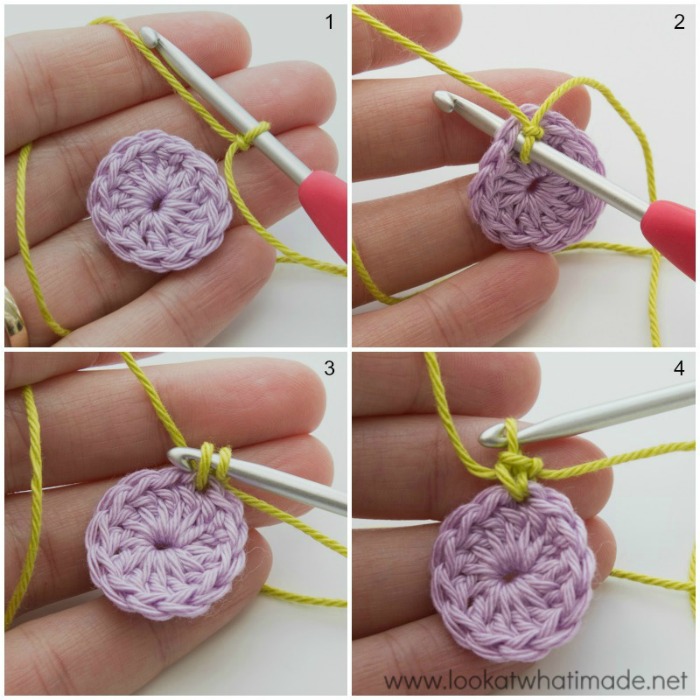
With a sl knot already on your hook {Photo 1}, insert your hook into the indicated stitch {Photo 2}. Yarn over and pull up a loop {Photo 3}. Yarn over and pull through both loops {Photo 4}.
Tr Cluster
This stitch is also known as a tr3tog (treble crochet 3 together).
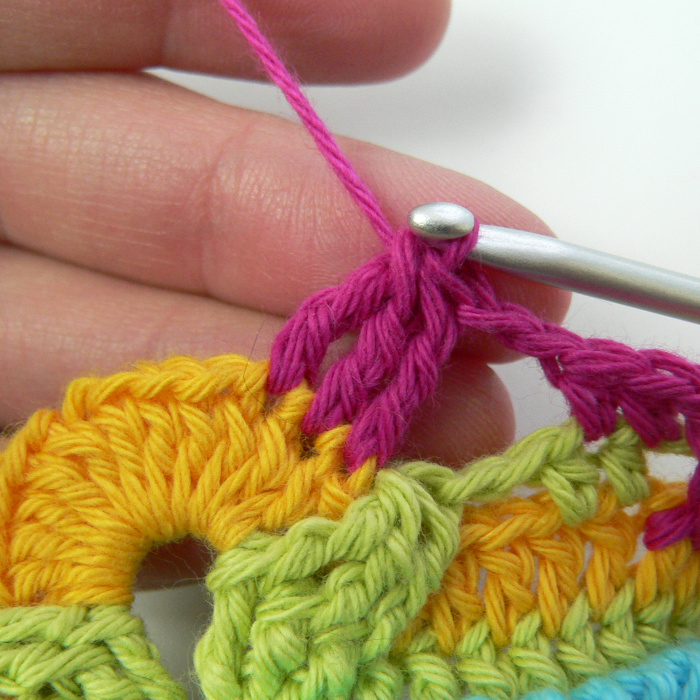
Yarn over twice and insert your hook into the next st. Yarn over and draw up a loop {4 loops on hook}. (Yarn over and pull through 2 loops) twice {2 loops on hook}.
Yarn over twice and insert your hook into the next st. Yarn over and draw up a loop {5 loops on hook}. (Yarn over and pull through 2 loops) twice {3 loops on hook}.
Yarn over twice and insert your hook into the next st. Yarn over and draw up a loop {6 loops on hook}. (Yarn over and pull through 2 loops) twice {4 loops on hook}. Yarn over and pull through all 4 loops on your hook.
Instructions
Round 1 – Round 26 of Sophie’s Universe {Start of Corner Leaves}
Join your yarn by making a Standing dc in the first (marked) st. Mark this dc with a SM. Dc in the next 8 sts. Make 3 tr in the next (marked) st, ch 2, make 3 tr in the next (marked) st. This is your first corner made. Dc in the next 9 sts. Sc in the next 20 sts.
*Dc in the next 9 sts. Mark the first dc (of each side) with a SM. Make 3 tr in the next (marked) st, ch 2, make 3 tr in the next (marked) st. Dc in the next 9 sts. Sc in the next 20 sts.*
Repeat from * to * 2 more times. Join to the top of the standing dc with a sl st.
- If you are going to use a different colour for the next round, fasten off and work away ends.
- If you are going to use the same colour for the next round, ch 3. This replaces the first (standing) dc in the next round.
Stitch Count Per Side: 20 sc, 18dc and6tr – not including ch-2 corner sps
Round 2 – Round 27 of Sophie’s Universe
Join your yarn by making a Standing dc in the marked dc before any corner. Mark this dc with a SM. Dc in the next 8 sts. The last dc should fall in the last dc before the 3 tr sts that form the corner. Skip the 3 tr before the ch-2 corner sp. Into the ch-2 corner sp: (Make 6 dc. Ch 3 and sl st into the third ch from the hook to form a Picot. Make 6 dc). Skip the 3 tr after the ch-2 corner sp, the first of which will be hidden. Dc in the next 12 sts. Hdc in the next 3 sts. Sc in the next 8 sts. Hdc in the next 3 sts. Dc in the next 3 sts.
*Dc in the next 9 sts. Mark the first of these 9 dc (of each side) with a SM. The last dc should fall in the last dc before the 3 tr sts that form the corner. Skip the 3 tr before the ch-2 corner sp. Into the ch-2 corner sp: (Make 6 dc. Ch 3 and sl st into the third ch from the hook to form a Picot. Make 6 dc). Skip the 3 tr after the ch-2 corner sp, the first of which will be hidden. Dc in the next 12 sts. Hdc in the next 3 sts. Sc in the next 8 sts. Hdc in the next 3 sts. Dc in the next 3 sts.*
Repeat from * to * 2 more times. Join to the top of the standing dc with a sl st.
- If you are going to use a different colour for the next round, fasten off and work away ends.
- If you are going to use the same colour for the next round, ch 2. This replaces the first (standing) hdc in the next round.
Stitch Count Per Side: 36 dc, 6 hdc, and 8 sc, not including corner ch-3 Picot
Round 3 – Round 28 of Sophie’s Universe {Corner Leaves}
Do not forget the ch-2 spaces that are in bold and underlined below. I keep forgetting them!
Join your yarn by making a standing hdc in the marked dc of any side. Remove the SM and place it in the next dc of Round 2. Do not remove this SM until you have worked into it in Round 4. Ch 2, skip the next 2 sts, hdc in the next 2 sts. There should now be 4 dc left before the tr sts from Round 1. Ch 2. Make a Tr Cluster by working around the front posts of the 3 tr sts in Round 1. Ch 4. Sc in the Picot. Ch 4. Make a Tr Cluster, working around the front posts of the next 3 tr sts in Round 1. Ch 2. Skip the first 4 dc after the tr sts. (Hdc in the next 2 sts, ch 2, skip the next 2 sts) twice. (Sc in the next 2 sts, ch 2, skip the next 2 sts) four times. Hdc in the next st. The next st should contain a SM.
*Hdc in the marked dc. Remove the SM and place it in the next dc of Round 2. Do not remove this SM until you have worked into it in Round 4. Ch 2, skip the next 2 sts, hdc in the next 2 sts. There should now be 4 dc left before the tr sts from Round 1. Ch 2. Make a Tr Cluster by working around the front posts of the 3 tr sts in Round 1. Ch 4. Sc in the Picot. Ch 4. Make a Tr Cluster, working around the front posts of the next 3 tr sts in Round 1. Ch 2. Skip the first 4 dc after the tr sts. (Hdc in the next 2 sts, ch 2, skip the next 2 sts) twice. (Sc in the next 2 sts, ch 2, skip the next 2 sts) four times. Hdc in the next st. The next st should contain a SM.*
Repeat from * to * 2 more times. Join to the top of the standing hdc with a sl st.
- If you are going to use a different colour for the next round, fasten off and work away ends.
- If you are going to use the same colour for the next round, ch 1 and continue Round 4 as written.
Stitch Count Per Side: 8 sc, 8 hdc, 2 Tr Clusters, 9 ch-2 sps, and 2 ch-4 sps, not including corner sc
Once you have completed the round, push the (ch-4, sc, ch-4) bits in each corner to the back of your work, never to be seen or used again!
Round 4 – Round 29 of Sophie’s Universe
Except for 16 stitches, you will be working only into the sts of Round 2 in this round. When working into the sts from Round 2 below the ch-2 sps, work in front of the ch-2 sps, not over them!
Locate the marked dc from Round 2 at the start of any corner and start in that stitch as follows:
*FPtr in the marked dc from Round 2. FPtr in the next dc from Round 2. Hdc in the next 2 hdc from Round 3.
You will now be working into the half-circle formed by the (6 dc, Picot, 6 dc) corner from Round 2, and in front of the ch-4 sps from Round 3. You will have to push the Leaves out of the way to find the first and last sts of the half-circle.
Ch 2 and make a Tr Cluster in the first 3 dc of the half-circle. (Ch 4 and make a Tr Cluster in the next 3 dc of the half-circle) 3 times. Ch 2 and hdc in the next 2 hdc from Round 3.
FPtr in the 2 sts from Round 2 directly below the next ch-2 sp. Ch 2 and skip the next 2 hdc.
(FPdc in the 2 sts from Round 2 directly below the next ch-2 sp. Ch 2 and skip the next 2 sts of Round 3) 5 times.*
Repeat from * to * 3 more times. Join to the top of the FPtr with a sl st.
Fasten off and work away ends, even if you are going to use the same colour for the next round.
Stitch Count Per Side: 4 hdc, 4 FPtr, 4 Tr Clusters, 10 FPdc , 8 ch-2 sps, and 2 ch-4 sps (not including corner ch-4 sp)
Round 5 – Round 30 of Sophie’s Universe
Join your yarn by making a standing dc in the central ch-4 sp of any corner around. (2 dc, ch 2, 3 dc) in the same ch-4 sp. This is your first corner made.
*Make 5 dcs in the next ch-4 sp. Make 5 dc in the next ch-2 sp. Skip the next 2 hdc and sl st in the next FPtr. Make 8 dc in the next ch-2 sp. Skip the next FPdc and sl st into the next FPdc. Now you will be working into the sts and ch-2 sps of Round 3, which you will find behind the sts of Round 4.
(Sc in the next 2 sc of Round 3. Make 2 sc in the next ch-2 sp of Round 3) three times. Sc in the next 2 sts of Round 3.
Working into Round 4 again: sl st in the next FPdc. Skip the next FPdc and make 8 dc in the next ch-2 sp. Skip the next 2 FPtr and sl st in the next hdc. Skip the next hdc and make 5 dc in the next ch-2 sp. Make 5 dc in the next ch-4 sp. (3 dc, ch 2, 3 dc) in the central ch-4 corner sp.*
Repeat from * to * 3 more times, omitting the last corner on the last repeat. Join to the top of the standing dc with a sl st.
Fasten off and work away ends, even if you are going to use the same colour for the next round.
Stitch Count Per Side: 14 sc and 42 dc – not including ch-2 corner sp
Round 6 – Round 31 of Sophie’s Universe
This round is very involved! Just take one stitch at a time and celebrate when you’re done!
Start with a standing sc in any ch-2 corner sp. (Ch 2, sc) in the same ch-2 sp. This is your first corner made.
*Sc in the next 12 dc. Skip the next dc and make a FPdc around the first FPtr of Round 4. Make a BPsc in each of the 8 dc of the half-circle from Round 5.
Skip the next FPdc from Round 4 and FPdc around the next FPdc from Round 4, which will be the FPdc that contains the sl st from Round 5. Dc in the next 2 sc of Round 5, behind the next ch-2 space of Round 4. FPdc around the next 2 FPdc of Round 4 and skip the next 2 sts of Round 5, which will be the 2 sc made into the ch-2 sp of Round 3 directly behind the front post sts.
Hdc in the next 2 sts of Round 5. FPhdc around the next 2 FPdc of Round 4 and skip the next 2 sc of Round 5.
Hdc in the next 2 sts of Round 5. FPdc around the next 2 FPdc of Round 4 and skip the next 2 sts of Round 5. Dc in the next 2 sts of Round 5.
FPdc around the next FPdc from Round 4. BPsc in each of the 8 dc of the half-circle from Round 5. Skip the next FPtr from Round 4 and FPdc around the next FPtr. Skip the next dc from Round 5 and sc in the next 12 dc. (Sc, ch 2, sc) in the ch-2 corner sp.*
Repeat from * to * 3 more times, omitting the last corner on the last repeat. Join to the first sc with a sl st.
- If you are going to use a different colour for the next round, fasten off and work away ends.
- If you are going to use the same colour for the next round, sl st into the next ch-2 sp and ch 1 (doesn’t count as a st).
Stitch Counts Per Side: 26 sc, 16 BPsc, 4 hdc, 2 FPhdc, 8 FPdc, and 4 dc – not including ch-2 corner sp
Round 7 – Round 32 of Sophie’s Universe
Starting in any ch-2 corner sp:
*(Sc, ch 2, sc) in the ch-2 corner sp. BPsc in the next 12 sts. BPhdc in the next st. Make 3 tr in the first ch-2 sp from Round 3, behind the Petal. Make 3 tr in the next ch-2 sp from Round 3. Skip the 8 BPsc of the Petal, and the next FPdc. Sc in the next 14 sts. The last sc should fall in the stitch before the FPdc from Round 6.
(Make 3 tr in the next ch-2 sp from Round 3) twice – as before. Skip the 8 BPsc of the Petal, and the next FPdc of Round 6. BPhdc in the next st. BPsc in the next 12 sts.*
Repeat from * to * 3 more times. Join to the first sc with a sl st.
- If you are going to use a different colour for the next round, fasten off and work away ends.
- If you are going to use the same colour for the next round, sl st into the next ch-2 sp and ch 1 (doesn’t count as a st).
Stitch Counts Per Side: 16 sc, 24 BPsc, 2 BPhdc, and 12 tr – not including ch-2 corner sp
Round 8 – Round 33 of Sophie’s Universe {ZigZag Hills}
In this round, you will be making little ZigZag Hills using surface crochet.
Starting in any ch-2 corner sp:
*(Sc, ch 2, sc) in the ch-2 corner sp. Sc in the next 20 sts. The last sc will fall in the last tr worked into the ch-2 sps behind the Petal. If it doesn’t, check that you haven’t accidentally skipped the first (hidden) st after the corner.
(Ch 3 and sl st into the next ch-2 sp from Round 4. This ch-2 space will be in front of your work and between front post groups. Ch 3, skip the next 3 st’s from Round 7 and sc in the next st from Round 7) four times. The last sc should fall in the second tr worked into the ch-2 spaces behind the Petal. Sc in the next 18 sts.*
Repeat from * to * 3 more times. Join to the first sc with a sl st.
- If you are going to use a different colour for the next round, fasten off and work away ends.
- If you are going to use the same colour for the next round, sl st into the next ch-2 sp and ch 1 (doesn’t count as a st).
Stitch Count Per Side: 44 sc and 3 ZigZag Hills – not including ch-2 corner sp
Round 9 – Round 34 of Sophie’s Universe
Starting in any ch-2 corner sp:
*(2 hdc, ch 2, 2 hdc) in the ch-2 corner sp. Skip the first (hidden) st and hdc in the next 20 sts. (Hdc in the next 3 sts from Round 7, make a BPsc around the next sc from Round 8, which will be at the top of the ZigZag Hill) 3 times. Hdc in the next 3 sts of Round 7. Hdc in the next 20 sts of Round 8, making sure not to accidentally skip the first st after the last ch-3.*
Repeat from * to * 3 more times. Join to the first hdc with a sl st.
- If you are going to use a different colour for the next round, fasten off and work away ends.
- If you are going to use the same colour for the next round, sl st into the next st and into the next ch-2 sp. Ch 1 (doesn’t count as a st).
Stitch Count Per Side: 56 hdc and 3 BPsc – not including ch-2 corner sp
Round 10 – Round 35 of Sophie’s Universe
Starting in any ch-2 corner sp:
*(2 hdc, ch 2, 2 hdc) in the ch-2 corner sp. Skip the first hdc, which will be hidden anyway, and hdc in the next 18 sts. BPdc around the fourth BPsc of the Petal formed by Rounds 5 and 6. Skip the next st of Round 9 and hdc in the next 20 sts. BPdc around the fourth BPsc of the Petal formed by Rounds 5 and 6. Skip the next st of Round 9 and hdc in the next 18 sts.*
Repeat from * to * 3 more times. Join to the first hdc with a sl st.
- If you are going to use a different colour for the next round, fasten off and work away ends.
- If you are going to use the same colour for the next round, sl st into the next st and into the next ch-2 sp. Ch 1 (doesn’t count as a st).
Stitch Count Per Side: 60 hdc and 2 BPdc – not including ch-2 corner sp
Round 11 – Round 36 of Sophie’s Universe
Starting in any ch-2 corner sp:
*(Sc, ch 2, sc) in the next ch-2 corner sp. BPhdc in each of the 62 sts across.*
Repeat from * to * 3 more times. Join to the first sc with a sl st.
Fasten off and work away ends.
Stitch Count Per Side: 2 sc and 62 BPhdc – not including ch-2 corner sp
Optional Flowers
These Flowers are completely optional. If you think they make the corners look too busy, feel free to leave them out – I have! You can make all the Flowers in the same colour, or each one in a different colour. It is totally up to you.
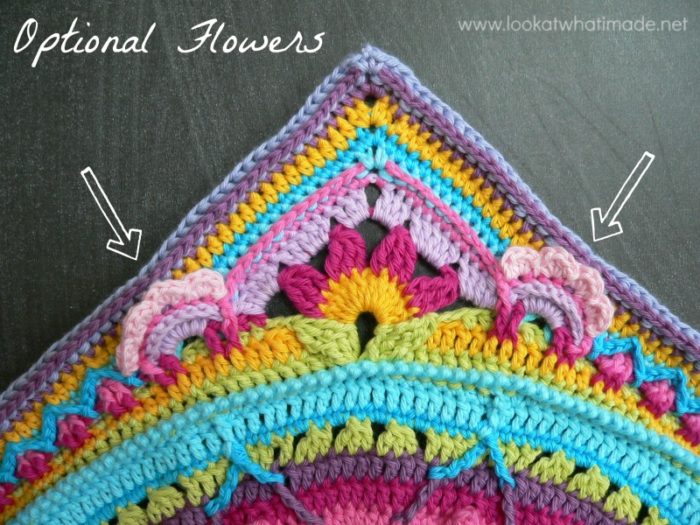
Join your yarn to the first BPsc {Round 6} of any 8-dc Petal from Round 5 with a sl st. (Make 4 hdc in the next st, sl st in the next st) 4 times. The last sl st should fall in the top of the FPdc after the Petal. Fasten off and work away your yarn ends.
Repeat for each of the Petals from Rounds 5 and 6.
And there you have it: Squaring up a 160 stitch mandala :)
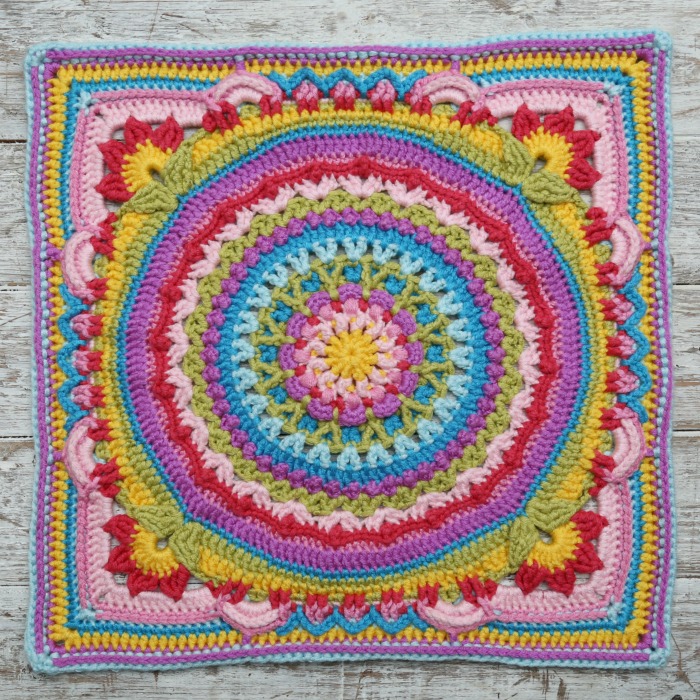
I cannot wait to see which mandalas you apply these instructions to, and hope you will share your creations using #squaringupmandalas so that we can all see them!
Look out for instructions on squaring up a 80 stitch mandala, which is next on my to-do list!!
Please remember to subscribe to my Newsletter if you would like to be kept in the loop. You can also like my Facebook page or follow me on Bloglovin, Google+, Pinterest, Twitter, or Instagram.
Happy Hooking!

This blog post contains affiliate links. I only link to products I personally use or would use. All opinions are my own.


Michelle Sanders says
Hi there
I am at trying to do round 3 of the squaring up of the mandala (160 sts).
I am confused with the explanation of how to do this. I see that it is meant to align with round 28 of sophies universe, but the directions differ. The latter suggests to being in the picot stitch, but the round three instructions say to start at one of the markers. And there are only photos for the round 28 process.
HOpe that makes sense.
any clarification would be welcomed!
thank you
ps. I am loving the mandala, i am a mandala novice!!
Jenny Lowman says
Hi Michelle. This pattern creates a smaller square in the ‘style of Sophie’ rather than a mirror image of the original Sophie pattern, if that makes sense? I would follow this set of instructions, and not the Sophie ones, as it will differ somewhat. Is that what is confusing you, maybe?
Yes, this is a mainly written pattern, as opposed to a full photo tutorial.
Michelle says
thanks Jenny.
The thing I am confused about are the first few instructions:
“Join your yarn by making a standing hdc in the marked dc of any side. Remove the SM and place it in the next dc of Round 2. Do not remove this SM until you have worked into it in Round 4. Ch 2, skip the next 2 sts, hdc in the next 2 sts. There should now be 4 dc left before the tr sts from Round 1. Ch 2. Make a Tr Cluster by working around the front posts of the 3 tr sts in Round 1. Ch 4. ”
is this the marker that was 9 sts from the corner?
And then at the end, are we meant to jump over to 3 tr? It seems so far and looks odd
Jenny Lowman says
It states at the start
“ Mark the 2 sts that each of your corners will fall over with Stitch Markers (SM2 and SM3). Count 9 sts back from the first marked st of each corner and mark that st (SM1).
SM 1 is where you will start. When you make the first corner, your 3-tr groups should fall in marked sts 2 and 3. Look at your work to see if this corner looks symmetrical. If it doesn’t, adjust your starting position and try again”
So, that would indicate that it is the marker 9 stitches back from the corner marker.
As far as I can see, there is no jump to the tr3 in the marked stitch.
I haven’t squared up a mandala with this pattern yet, I will be honest, so I can’t speak from experience. You should be able to see from the final pic on the pattern enough to count the stitches to see if yours corresponds.
Hopefully Dedri may be able to answer you a bit better. I will point her in this direction.
Dedri Uys says
Hi Michelle,
I am sorry I didn’t see your comments earlier. Let’s start at the beginning and then work from there because I’m struggling to get my head around the two questions together.
Yes, the two patterns start in different places, but the instructions are the same (except that there will be fewer stitches/repeats per side).
I am going to send you an email and then we can figure out what is confusing you :)
Dedri
Saschja Marseguerra says
Dear Dedri, My mandala has 182 stitches. What should I do? Should I decrease or increase to make it a multiple of 16? Decrease 8 to bring it to 176? I made the Impi Aneesh Mandala . Can you help? Thank you!
Dedri Uys says
Hi Saschja,
The next number that will work is 192, so I suggest increasing semi-evenly by 10 stitches to get that number. I haven’t published the instructions for a 192-mandala yet, so you will need to use a bit of maths skills to figure it out. The charts in the 128-mandala might help. Basically, you will follow the 160-mandala instructions, but add 8 stitches to each side in the centre of each side.
For example: Round 1 of the 160-mandala says:
Join your yarn by making a Standing dc in the first (marked) st. Mark this dc with a SM. Dc in the next 8 sts. Make 3 tr in the next (marked) st, ch 2, make 3 tr in the next (marked) st. This is your first corner made. Dc in the next 9 sts. Sc in the next 20 sts.
*Dc in the next 9 sts. Mark the first dc (of each side) with a SM. Make 3 tr in the next (marked) st, ch 2, make 3 tr in the next (marked) st. Dc in the next 9 sts. Sc in the next 20 sts.*
If you are making the 192-mandala, the 20 sc in bold above will become 28.
In Round 2, “Hdc in the next 3 sts. Sc in the next 8 sts. Hdc in the next 3 sts. Dc in the next 3 sts.” will become “Hdc in the next 3 sts. Sc in the next 16 sts. Hdc in the next 3 sts. Dc in the next 3 sts.”
As you go, it will become easier to spot where those extra 8 stitches (or extra repeats) need to be added. If you have any queries about the numbers for a specific round, please use the contact tab at the top of the website to send me an email.
Dedri