A month or so ago, I was playing around with stitches… specifically with Crab Stitches. I LOOOOVE Crab Stitches. I hit upon this Crab Stitch Linen Stitch or Reverse Single Crochet Linen Stitch, and I fell head over heels in love with it! It has got the prettiest woven look and creates a lovely dense fabric! I think it looks like lobster tails (especially in the burnt orange I was using at the time). To introduce you to this stitch, I have written down a pattern for three small Lobster Tail baskets. Once you get used to the technique, you can use it to create draft excluders, bags, boot cuffs, cowls… Anything that is shaped by working in a cylindrical spiral.
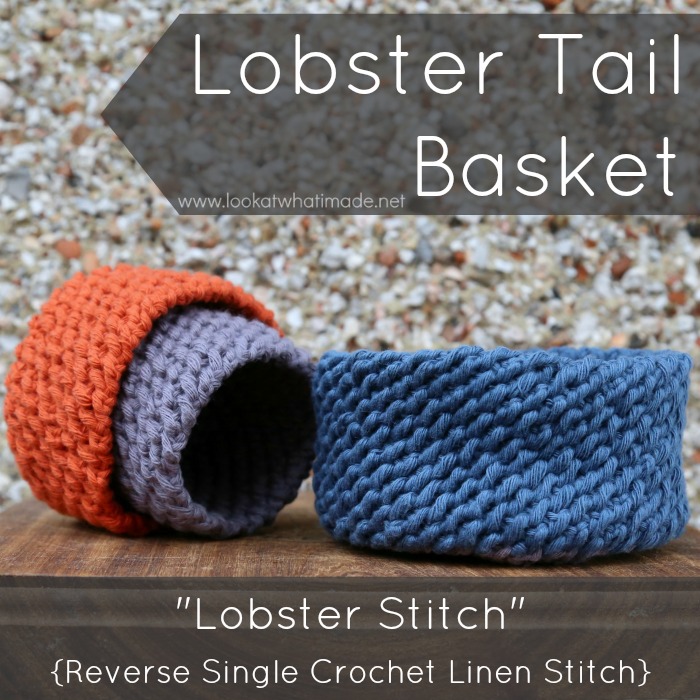
Lobster Tail Crochet Basket Pattern {3 Sizes}
©Dedri Uys 2020. All Rights Reserved.
Materials
- Scheepjes Cahlista (70% cotton/30% acrylic), 50g/75m/82yds
- Main Colour (MC) – 393 (Grey)
- Contrasting Colour 1 (CC1) – 244 (Petrol)
- Contrasting Colour 2 (CC2) – 388 (Burnt Orange)
- 4.5mm hook
Abbreviations
US Terminology Used
- Ch – Chain
- Hdc – Half-double crochet
- Rem – Remains/remaining
- Sc – Single crochet
- Sl st – Slip stitch
- SM – Stitch marker
- Sp/sps – Space/spaces
- St/sts – Stitch/stitches
Punctuation
Square Brackets [] indicate repeats. You will need to repeat the instructions between square brackets the number of times specified. This is a lower level repeat.
Parentheses () are used to indicate stitches made into the same st/sp.
Special Stitches
Crab Stitch – see Round 1.
Notes
You can make these baskets as big/high as you want to by altering the number of Base Rounds and Side Rounds. Using multiple strands held together and a 10mm hook, you can make large, sturdy baskets.
Gauge
Your base should measure 5.5cm/2.2″ after Round 3.
Size
Basket One (Petrol): 11cm/4.3” diameter and 6cm/2.3” high
- Base – 6 rounds = 10g
- Sides – 15 rounds = 28g
Basket Two (Burnt Orange): 9cm/3.5” diameter and 5.5cm/2.2” high
- Base – 5 rounds = 7g
- Sides – 13 rounds = 19g
Basket Three (Grey): 7cm/2.7” diameter and 5cm/2” high
- Base – 4 rounds = 5g
- Sides – 11 rounds = 13g
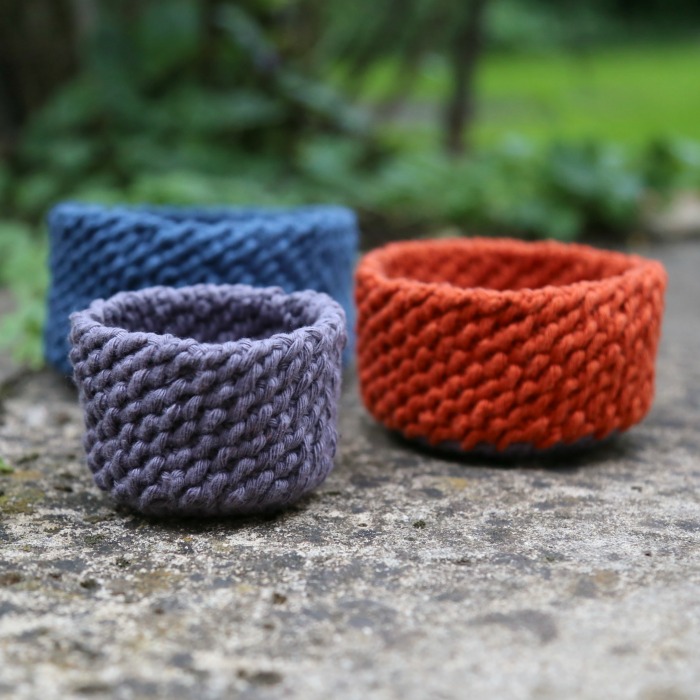
Basket One
With MC, make an adjustable ring, leaving a 10cm/4” tail.
Base
Worked in a Spiral
Round 1: Into the ring, ch 1 (doesn’t count as a st throughout), 10 hdc, join to the first hdc with a sl st. {10 hdc}
Round 2: Ch 1, make 2 hdc in each st, join to the first hdc with a sl st. {20 hdc}
Round 3: Ch 1, [2 hdc in the next st, hdc in the next st] 10 times, join to the first hdc with a sl st. {30 hdc}
Round 4: Ch 1, [2 hdc in the next st, hdc in the next 2 sts] 12 times, join to the first hdc with a sl st. {40 hdc}
Round 5: Ch 2, [2 hdc in the next st, hdc in the next 3 sts] 10 times, join to the first hdc with a sl st. {50 hdc}
Round 6: Ch 1, [2 hdc in the next st, hdc in the next 4 sts] 10 times, join to the first hdc with a sl st. {60 dc}
Fasten off and work away your ends.
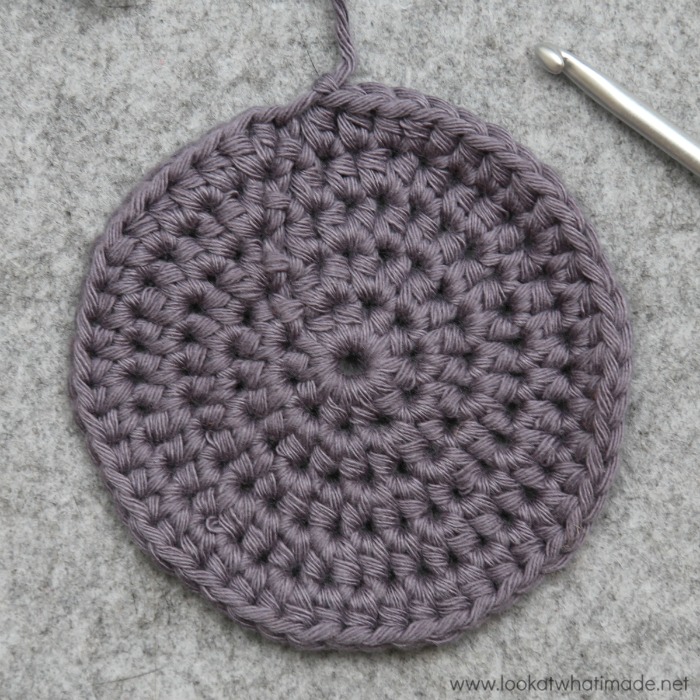
Sides
Joined in the Round.
When working with Crab Stitches (Reverse Single Crochet), you work in the opposite direction to what you usually would. If you are right-handed, therefore, you will work clockwise, not counter-clockwise. If you are left-handed, you will work counter-clockwise, not clockwise. With that established, I will continue to refer to stitches as next instead of previous.
Difficulty
Round 1
Mark the first ch-1 sp of Round 1 with a SM {Photo 11}.
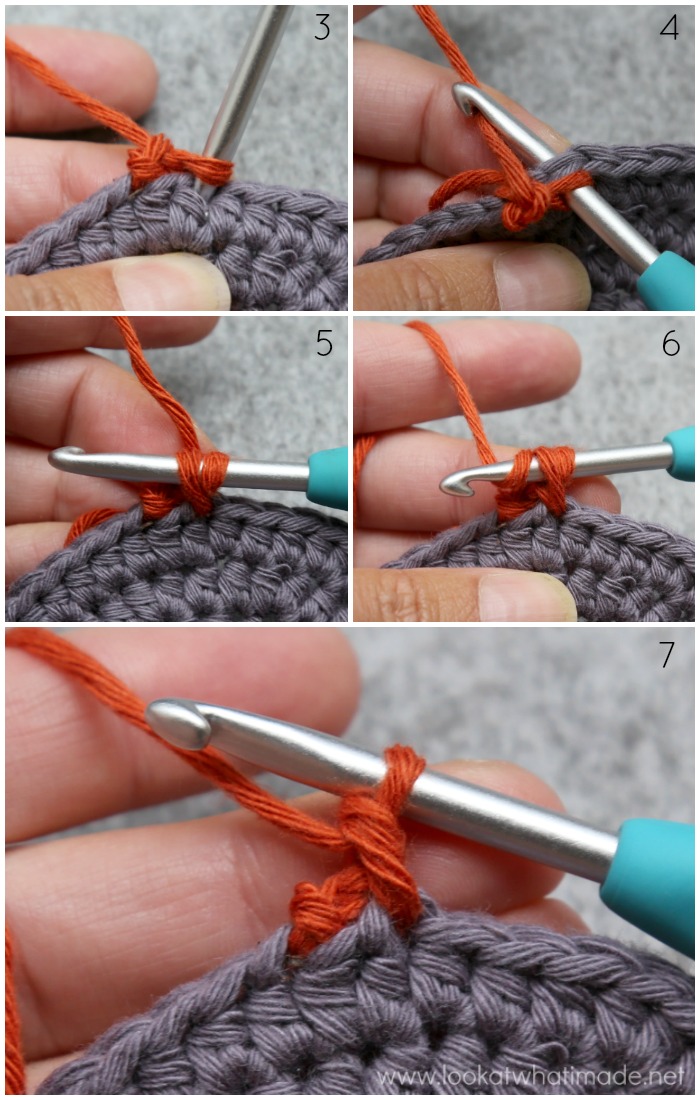
Join CC1 yarn by making a sl st in any st around {Photo 1}. Ch 1 {Photo 2} and skip the next st (in the opposite direction, as noted above).
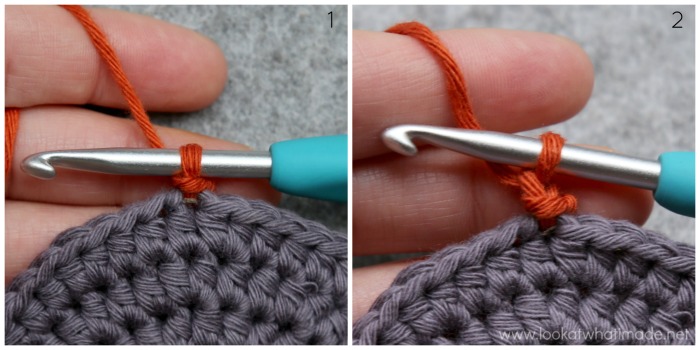
Make a Crab Stitch in the next st. To do so, swing your hook under your hand and insert it into the indicated st {Photo 3}. Yarn over {Photo 4} and pull up a loop {Photo 5}. Yarn over {Photo 6} and pull through both loops {Photo 7}. You will notice that the first loop lies behind the second loop {Photo 6}, not to the side of it like it usually would. You will therefore have to angle your hook away from you on the pull-through. This will feel odd at first, but you will soon get into the rhythm of it. Try to relax your tension a tiny bit to make things easier.
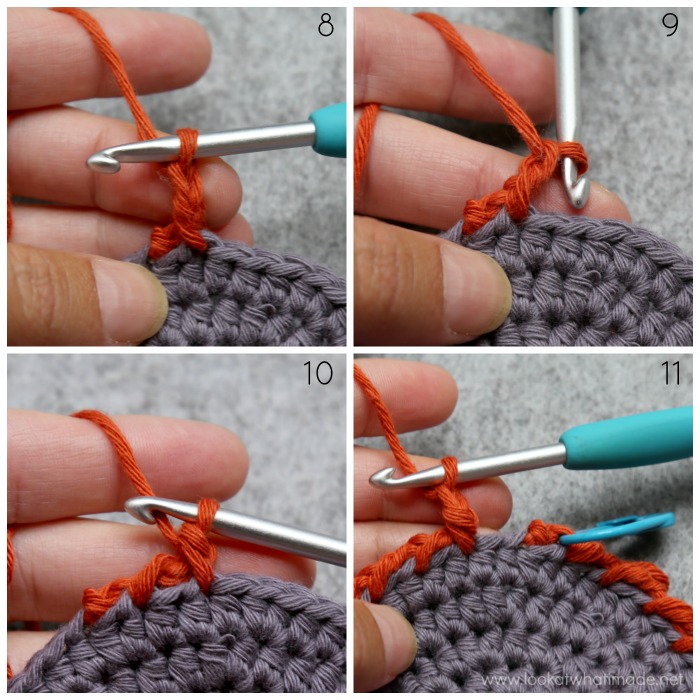
[Ch 1 {Photo 8}, skip the next st, make a Crab Stitch in the next st {Photos 9 and 10}] until 1 st rem. Ch 1, skip the last st and the next sl st {Photo 11}. {29 Crab Stitches and 30 ch-1 sps – not including first sl st}
Round 2
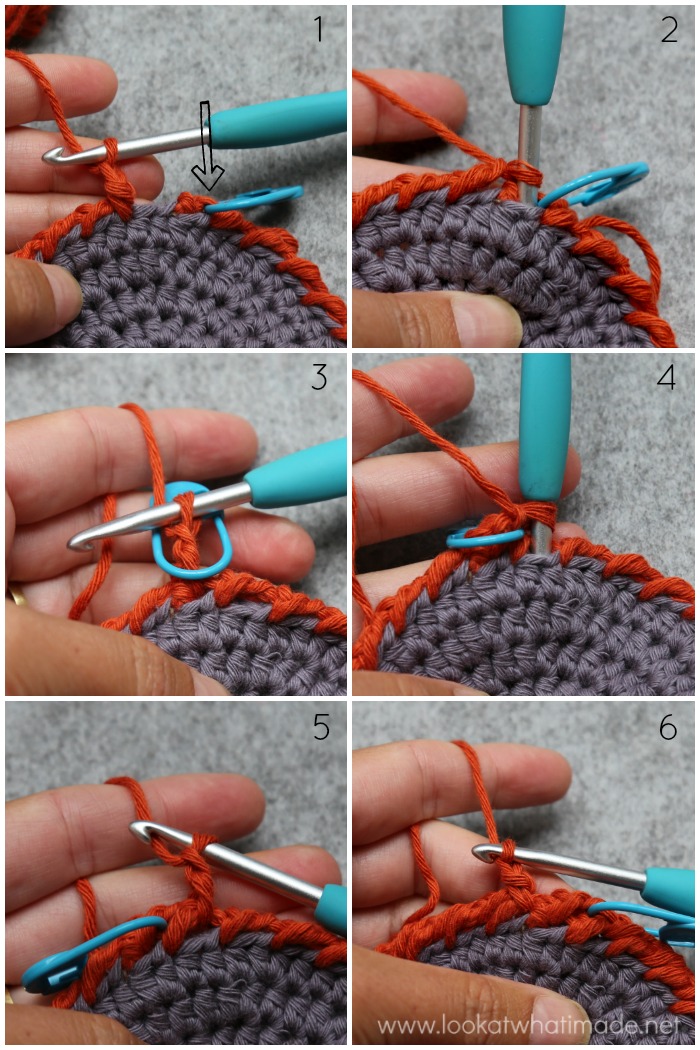
Make a Crab Stitch in the first (marked) ch-1 sp of the previous round {indicated with an arrow in Photo 1 and illustrated in Photo 2}. Ch 1 and place a SM around the last Crab Stitch {Photo 3}. This will mark the first ch-1 sp of the Round so that you can find it at the start of the next round. [Skip the next st, make a Crab Stitch in the next ch-1 sp, ch 1 {Photos 4 and 5}] until 1 st rem {Photo 6}. Skip the last st. {30 Crab Stitches and 30 ch-1 sps}
Note
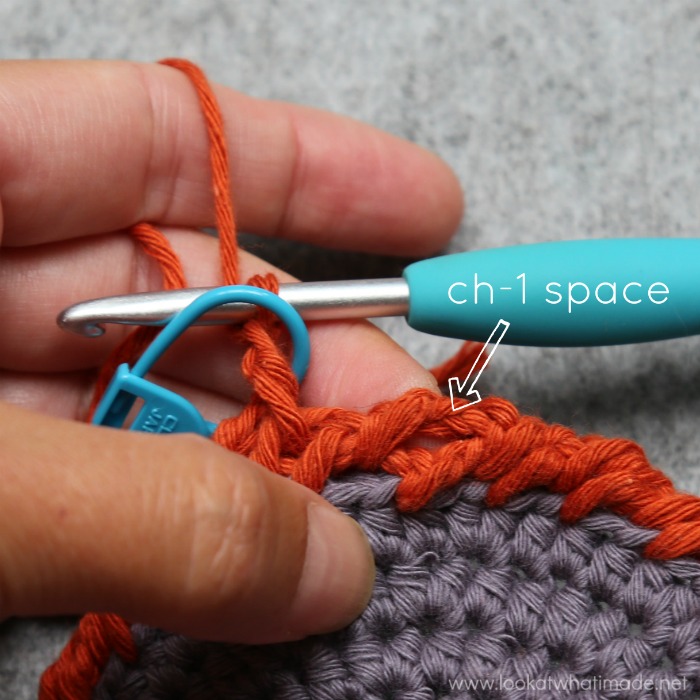
In Round 2, it was easy to spot the ch-1 sps from Round 1. From Round 3, it will be a bit more tricky to spot them. For the first few, you might have to stretch your work to see the ch-1 sps. Once you get used to working into them, though, it will become much easier.
Rounds 3 – 15
As Round 2.
Finishing Off
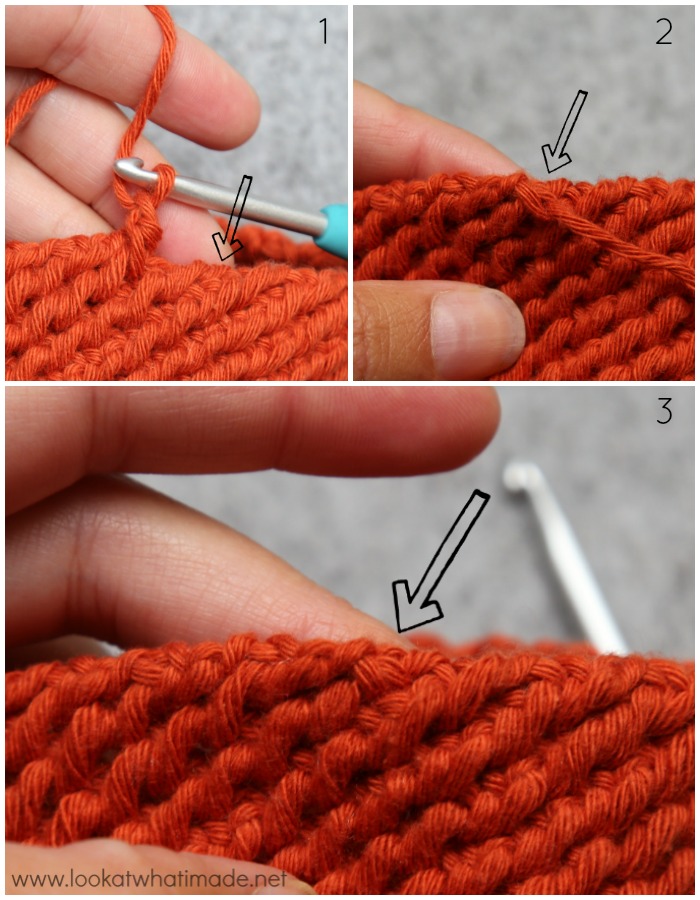
When you get to the end of the last round, sl st in the next ch-1 sp {indicated with an arrow in Photo 1 and illustrated in Photo 2}. Cut your yarn and pull it through to the inside of the work. Work away your ends. The sl st end should be virtually seamless :) {Photo 3}
Basket Two
Base
Rounds 1 – 5: With MC, as Rounds 1 to 5 of Base above. Fasten off and work away ends. {50 hdc at end of Round 5}.
Sides
Rounds 1 – 13: With CC2, as Rounds 1 – 13 of Sides above. Finish Off. {25 Crab Stitches and 25 ch-1 sps}
Basket Three
Base
Rounds 1 – 4: With MC, as Rounds 1 to 4 of Base above. Fasten off and work away ends. {40 hdc at end of Round 4}.
Sides
Rounds 1 – 11: As Rounds 1 – 11 of Sides above. Finish Off. {20 Crab Stitches and 20 ch-1 sps}
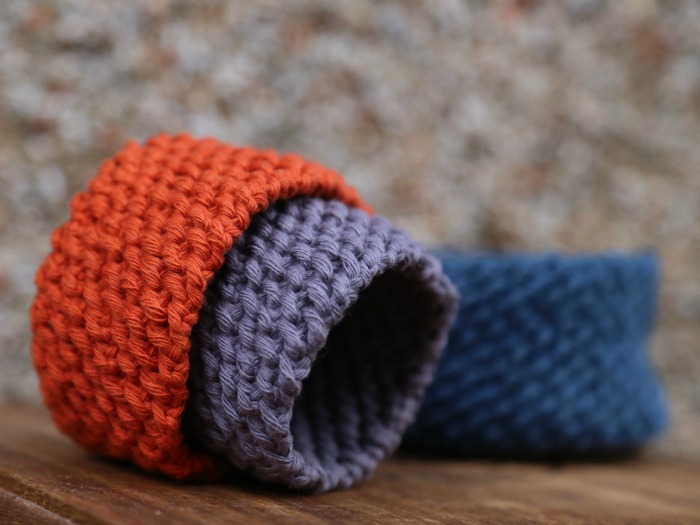
Oh, I hope you love this stitch as much as I do! If you make these baskets (or use this stitch), please use #lobsterstitch so that we can all see them.

This blog post contains affiliate links. I only link to products I personally use or would use. All opinions are my own.


Julie Bradshaw says
I just whipped one of these cuties tonight in Kureyon wool. I plan to felt it. What fun! Thanks for the free pattern and the creative inspiration. Julie
Dedri Uys says
Ooh, how did the felting go?
Soffity says
Yes, I thought that was how it was done, just wanted to clarify, thanks for the prompt reply, saw your dropping the cake video today and your laughter is infectious, also your boys are a delight, they have the best grins, esp the one with the long hair, gave me a “feel good” for the whole day.,thanks,
Dedri Uys says
:) I’m glad you enjoyed my whoopsie and the boys. They swell my heart x
Sanna Rosengren says
Hi Dedri! Thank you for your as always detailed and clear instructions. After some difficulty I got these to work quite nicely – what a lovely stitch, and the resulting texture is so thick and at the same time stretchy. I had some thinner yarn, so I thought I would give napkin rings a go in this stitch, but I’m having a hard time figuring out how to start. If I make a chain and then start with a row of sc, the result looks a bit wonky on the bottom. Is there a way to make this more symmetric-looking top and bottom, or is it necessary to start by attaching this lobster stitch to a previous piece to make it look decent? Thank you! / Sanna
PS. I started crocheting in my 50’s and like the previous commenter I learned a lot of my crochet skills by making a Sophie. Your instructions are absolutely the *best*.
Dedri Uys says
Hi Sanna,
Thank you for the lovely words :) I’ve had a bit of a play and the neatest edge seems to be if you start with multiples of 3 chains and then make the crab stitches in every third one (so that you are skipping 2 chains instead of 1) in the first round. This gives the initial chain a slightly scalloped edge like the last round. I hope you manage to find a look that works for you. This stitch doesn’t play well in most instances.
Dedri
Soffity says
These are so sweet Dedri. However I don’t quite understand how to join the first round of crab st,, Are you saying to just continue on with no join, that’s what I think you are saying but wanted to clarify. The base has a slip stitch join but the sides don’t?/? Is this correct,?
Sorry to bother you, you must get heaps of questions with obvious answers. You are one of my very favourite designers, Sophie’s universe taught me so much and I loved doing it. I really appreciate your enthusiasm, your kindness and your obvious love for your family of boys. I’m sure they look after you as well as you look after them.
Dedri Uys says
Hi Soffity :)
You’re not bothering at all. The sides are worked in a spiral without joining, so you just continue with the next round as instructed, starting in the first (marked) ch-1 sp. Please let me know if that makes sense and how you get on :)
Dedri