I designed this Kay Square for one of my yarn retreats in 2018. It is named after my friend and tester Kay Crone, and is sister to the Emma Square.
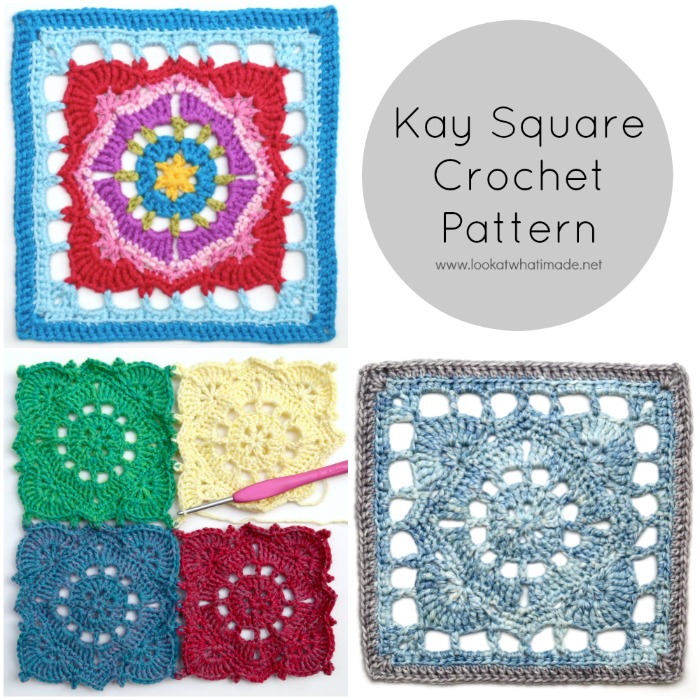
It is a fairly quick crochet square, and adding an extra round of dc will make it equivalent in final-round stitch count to most standard 12″ squares (gauge dependent).
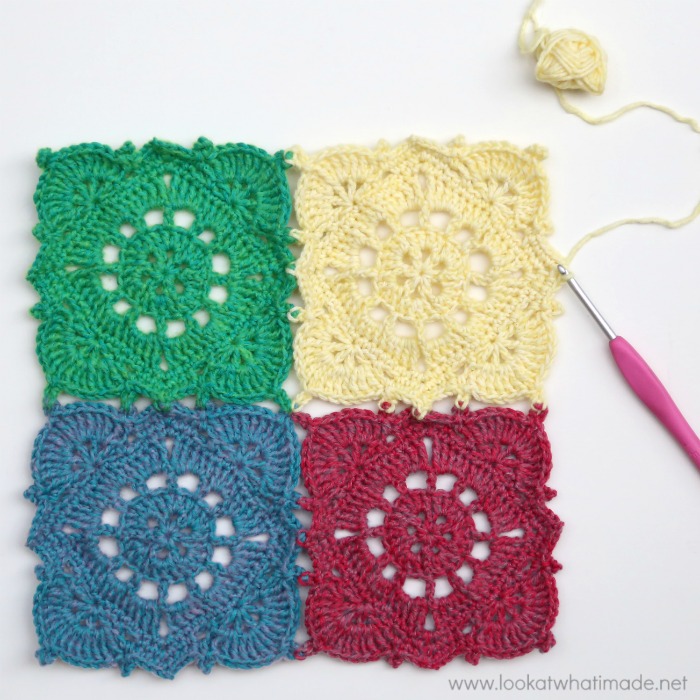
Anna Moore has created a beautiful wintery blanket featuring this square and we will be sharing the details for that soon. In the meantime, I’ve worked up two samples of the square (in Skies Heavy/Stone Washed and Chunky Monkey), as well as a few smaller Join As You Go ones.
Enjoy!
Kay Square Crochet Pattern
© Dedri Uys 2018. All Rights Reserved.
Tested by Anna Moore
Information
Resources
- Hashtag: If you share photos, please use #kaycrochetsquare so that we can find your projects and have a gleeful look.
- You can buy Scheepjes Yarn from the following retailers:
- Black Sheep Wools (International)
- Wool Warehouse (International)
- Deramores (International)
- Caro’s Atelier (Netherlands)
- Knotty House (Canada)
- More Retailers
- Add This Pattern to Your Ravelry Queue
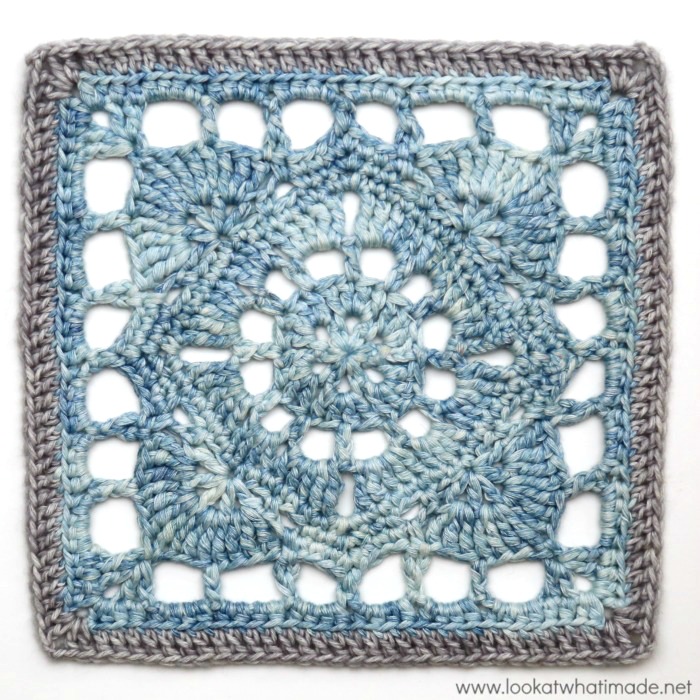
Kay Square Skies Heavy
Materials
- 3.75 mm crochet hook
- Scheepjes Skies Heavy (100% cotton), 100g/170m/186yds – Cirrocumulus (100) x 1 ball
- Scheepjes Stone Washed (78% cotton/22% acrylic), 50g/130m/142yds – Smokey Quartz (802) x 1 ball
Gauge and Size
My square measured 9cm/3.5″ at the end of Round 5, 16cm/6.3″ at the end of Round 9, and 18cm/7.1″ (blocked) at the end of Round 10.
Each square used 22g of Skies Heavy and 4g of Stone Washed.
Colour Placement
- Rounds 1 – 9: Skies Heavy Cirrocumulus (100)
- Round 10: Stone Washed (802)
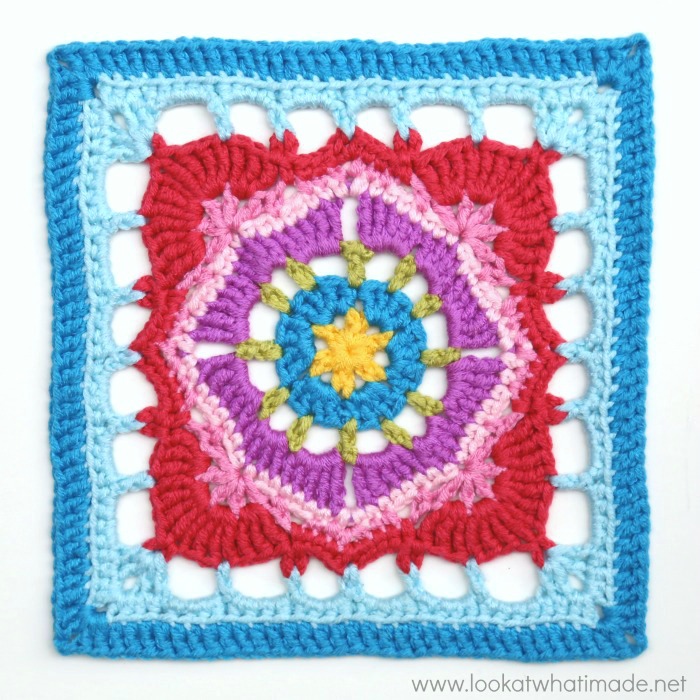
Kay Square Chunky Monkey
Materials
- 5 mm crochet hook
- Scheepjes Chunky Monkey (100% acrylic), 100g/116m/127yds
- Canary (2004) {Yellow} x 1 ball
- Blush (1130) {Light Pink} x 1 ball
- Rose (1241) {Medium Pink} x 1 ball
- Candy Apple (1083) {Dark Pink} x 1 ball
- Wild Orchid (1084) {Purple} x 1 ball
- Turquoise (1068) {Dark Blue} x 1 ball
- Chartreuse (1822) {Green} x 1 ball
- Baby Blue (1034) {Light Blue} x 1 ball
Using a 4mm crochet hook, Scheepjes Colour Crafter, and the same shade numbers as below will give you the same look on a smaller scale.
Gauge and Size
My square measured 12cm/4.7″ at the end of Round 5, 21cm/8.3″ at the end of Round 9, and 24cm/9.5″ (blocked) at the end of Round 10.
Each square used 50g of Chunky Monkey.
Colour Placement
- Round 1: Canary (2004) {Yellow}
- Round 2: Turquoise (1068) {Dark Blue}
- Round 3: Chartreuse (1822) {Green}
- Round 4: Wild Orchid (1084) {Purple}
- Round 5: Blush (1130) {Light Pink}
- Round 6: Rose (1241) {Medium Pink}
- Round 7: Candy Apple (1083) {Dark Pink}
- Round 8: Baby Blue (1034) {Light Blue}
- Round 9: Baby Blue (1034) {Light Blue}
- Round 10: Turquoise (1068) {Dark Blue}
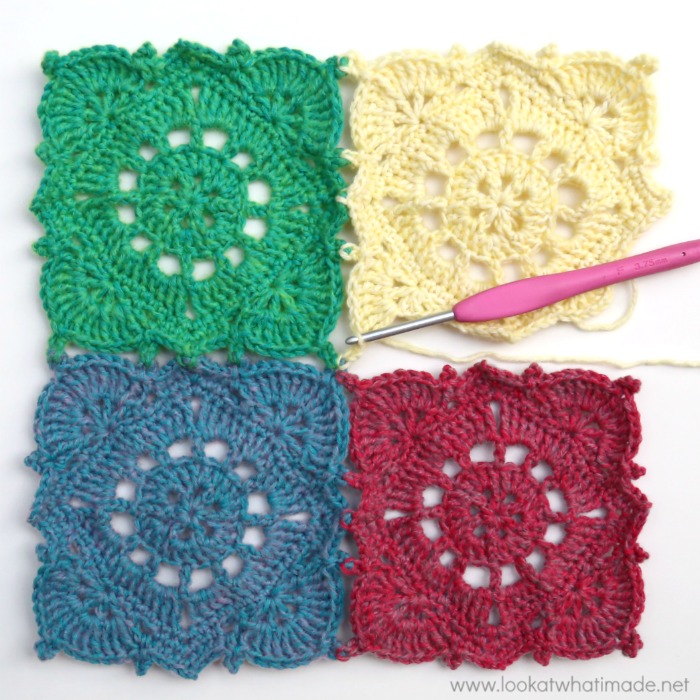
Kay Square Join As You Go Motifs
This version is created by following the pattern up to the end of Round 7 (with a slight modification) to create Join As You Go motifs. Each motif uses one Stone Washed Cutie Pie, making it perfect for using with one of the Stone Washed Colour Packs. See Join As You Go Motifs at the end of this post.
Materials
- 3.25 mm crochet hook
- Scheepjes Stone Washed Cutie Pies (78% cotton/22% acrylic), 10g/26m/28yds
Gauge and Size
My squares measured 8cm/3.1″ at the end of Round 5 and 12cm/4.7″ at the end of Round 7.
Each square used 9.5g of Stone Washed.
Abbreviations
US Terminology
- Beg – Beginning
- BLO – Back loop only
- Ch – Chain
- Dc – Double crochet
- Hdc – Half-double crochet
- Sc – Single Crochet
- Sl st – Slip stitch
- Sp/sps – Space/spaces
- St/sts – Stitch/stitches
- Tr – Treble
Punctuation
* An asterisk indicates pattern repeats. You will need to repeat all the instructions between asterisks the number of times specified.
Parentheses () indicate repeats. You will need to repeat the instructions between parentheses the number of times specified. They are also used to indicate stitches to be worked into the same st/sp.
Instructions
Round 1
Into a Magic Ring: Ch 1 (doesn’t count as a st throughout), (sc, ch 4) 6 times. Join to the first sc with a sl st. {6 sc and 6 ch-4 spaces}
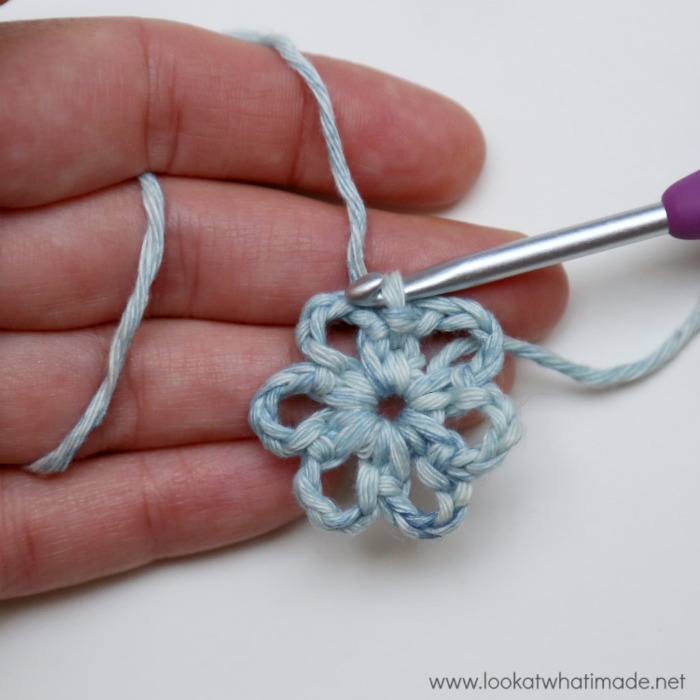
Round 2
Sl st into the next ch-4 sp. Ch 3 (counts as dc throughout), 3 dc in the same ch-4 sp. Make 4 dc in each rem ch-4 sp. Join to the top of the beg ch-3 with a sl st. {24 dc}
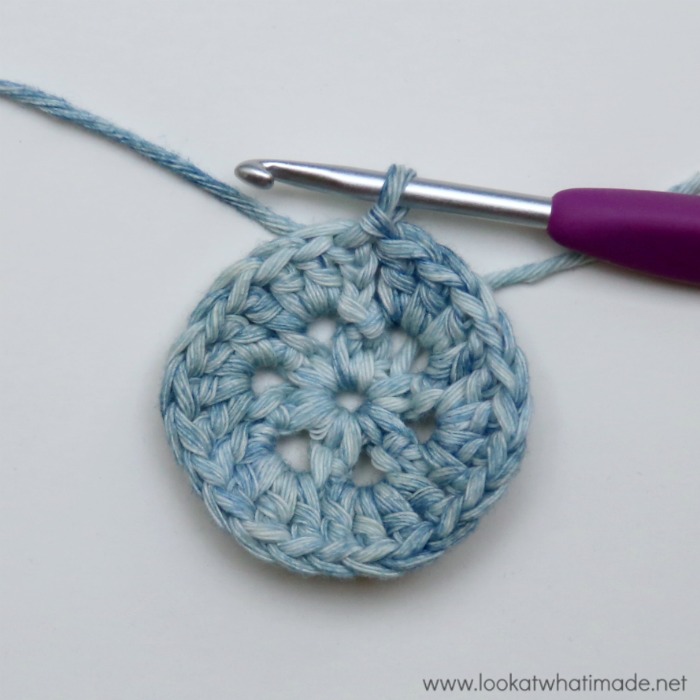
Round 3
Ch 7 (counts as dc + ch-4 sp). (Skip the next st, sc in the next st, ch 4) twice. *Skip the next st, dc in the next st, ch 4. (Skip the next st, sc in the next st, ch 4) twice.*
Repeat from * to * 2 more times. Join to the third ch of the beg ch-7 with a sl st. {8 sc, 4 dc, and 12 ch-4 sps}
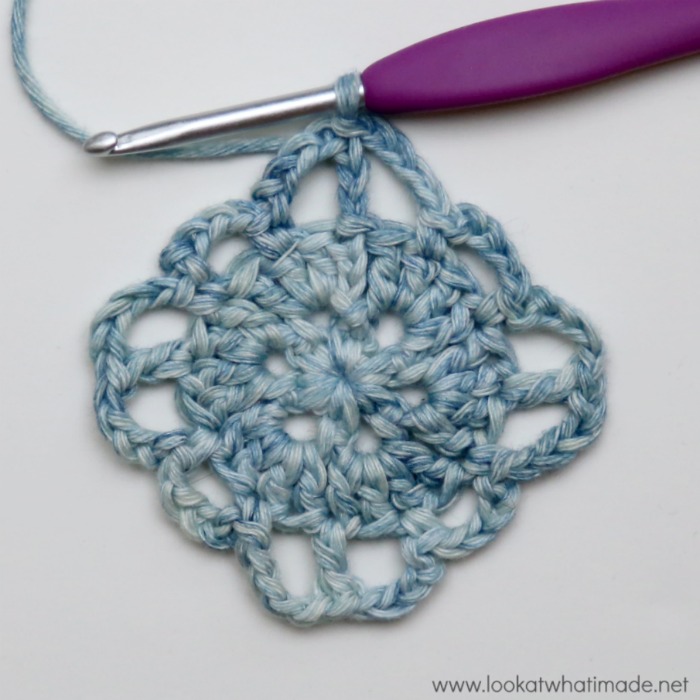
Round 4
Sl st into the next ch-4 sp. Ch 4 (counts as tr throughout). (Tr, 3 dc) in the same ch-4 sp. Make 4 dc in the next ch-4 sp. (3 dc, 2 tr) in the next ch-4 sp. *Ch 2. (2 tr, 3 dc) in the next ch-4 sp. Make 4 dc in the next ch-4 sp. (3 dc, 2 tr) in the next ch-4 sp.*
Repeat from * to * 2 more times. Join to the top of the beg ch-4 with a hdc (counts as last ch-2 sp). {10 dc and 4 tr per side, not including ch-2 corner sps}
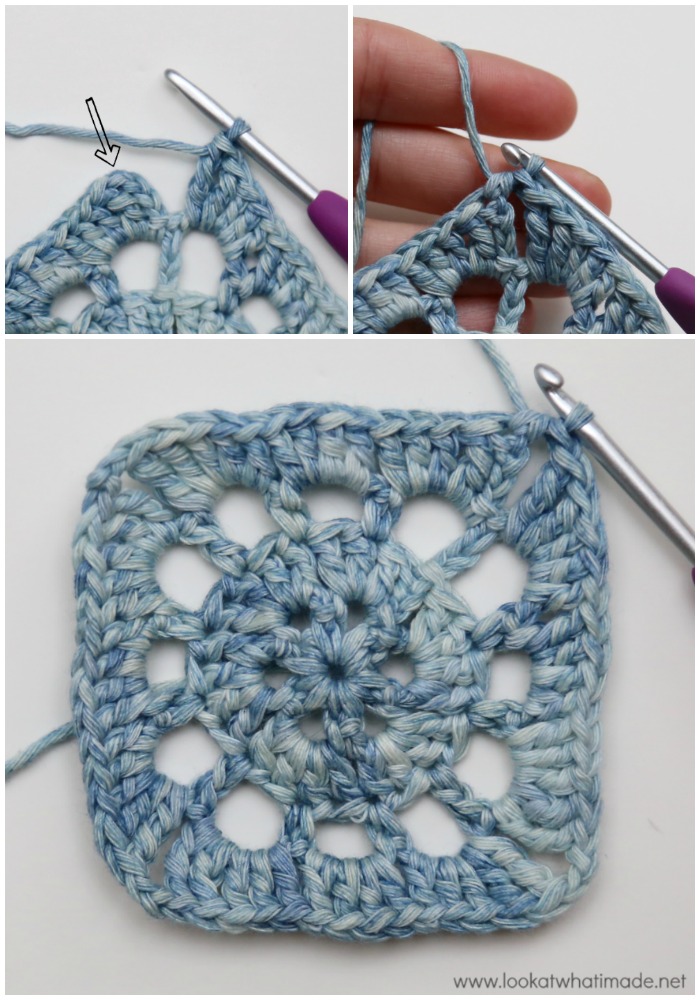
Round 5
Ch 1. *(Sc, ch 2, sc) in the ch-2 sp. Sc in the next 14 sts.* Repeat from * to * 3 more times. Join to the first sc with a sl st. {16 sc per side, not including ch-2 corner sps}
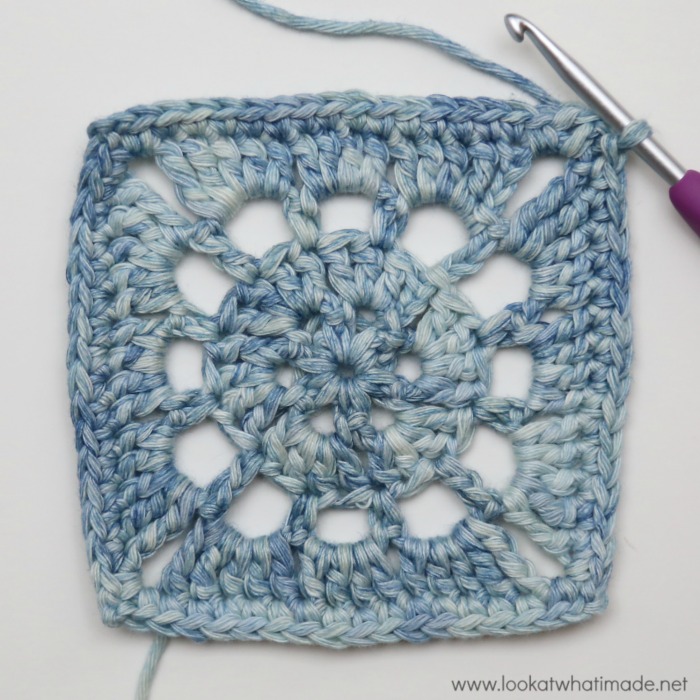
Round 6
Sl st into the ch-2 corner sp. (Ch 1, sc, ch 2, sc) in the same ch-2 sp. This is your first corner made.
*Skip the first (hidden) st. Sc in the next 2 sts. Ch 2, skip the next 2 sts, sc in the next st. Skip the next 2 sts. (Dc, ch 1) 4 times in the next st. Dc in the same st to complete a scallop. Skip the next 2 sts and sc in the next st. Ch 2, skip the next 2 sts. Sc in the last 2 sts. (Sc, ch 2, sc) in the next ch-2 corner sp.*
Repeat from * to * 3 more times, omitting the last corner on the last repeat. Join to the first sc with a sl st. {8 sc, 5 dc, 4 ch-1 sps, and 2 ch-2 sps per side, not including ch-2 corner sps}
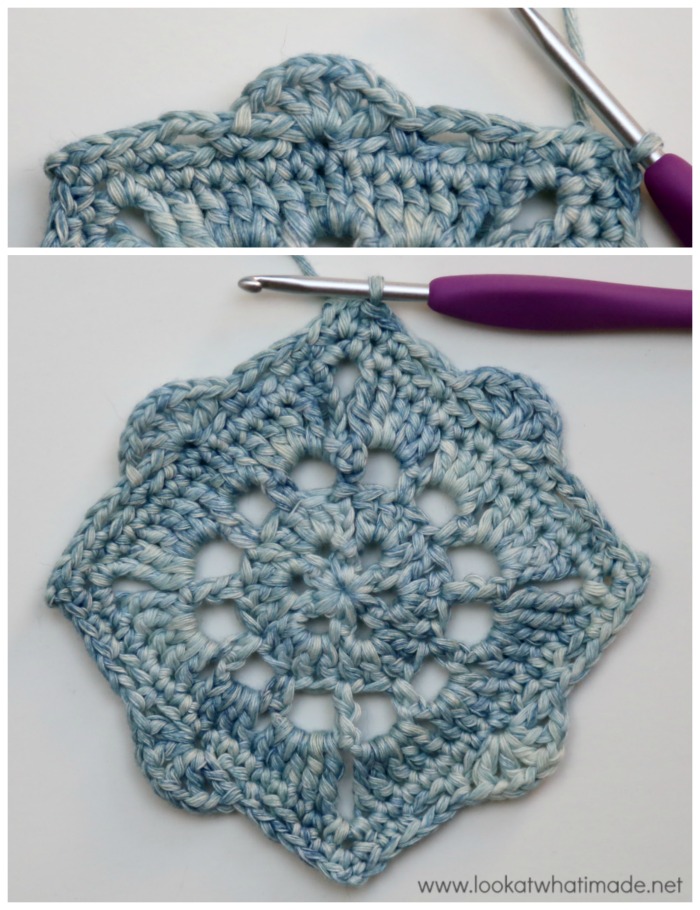
Round 7
Sl st into the ch-2 corner sp. (Ch 1, sc, ch 2, sc) in the same ch-2 sp. This is your first corner made.
*Sc in the first 3 sts, the first of which will be hidden. Sc in the next ch-2 sp. Ch 4, sl st in the last sc made to form a Picot. Make 3 tr in the next ch-1 sp. Make 4 tr in the next ch-1 sp. Ch 4, sl st in the last tr made to form a Picot. Mark this Picot with a stitch marker on the first repeat ONLY. Make 4 tr in the next ch-1 sp. Make 3 tr in the next ch-1 sp. Sc in the next ch-2 sp, ch 4, sl st in the last sc made to form a Picot. Sc in the last 3 sts. (Sc, ch 2, sc) in the next ch-2 corner sp.*
Repeat from * to * 3 more times, omitting the last corner on the last repeat. Join to the first sc with a sl st. Fasten off and work away your ends. {10 sc, 14 tr, and 3 Picots per side, not including ch-2 corner sps}
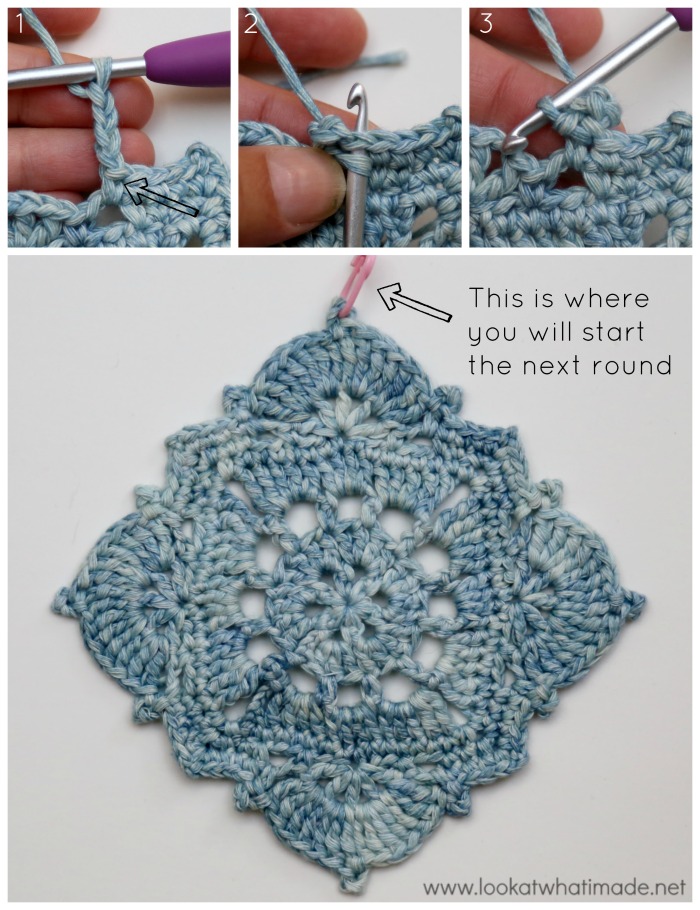
Round 8
Join your yarn by making a standing dc in the marked Picot. (Dc, ch 2, 2 dc) in the same Picot. This is your first corner made.
*Ch 4, skip the next 3 sts, dc in the next st. Ch 4, hdc in the next Picot. Ch 4, sc in the next ch-2 sp. Ch 4, hdc in the next Picot. Ch 4, skip the next 3 sts, dc in the next st. Ch 4, (2 dc, ch 2, 2 dc) in the next Picot.*
Repeat from * to * 3 more times, omitting the last corner on the last repeat. Join to the first dc with a sl st. {1 sc, 2 hdc, 6 dc, and 6 ch-4 sps per side, not including ch-2 corner sps}
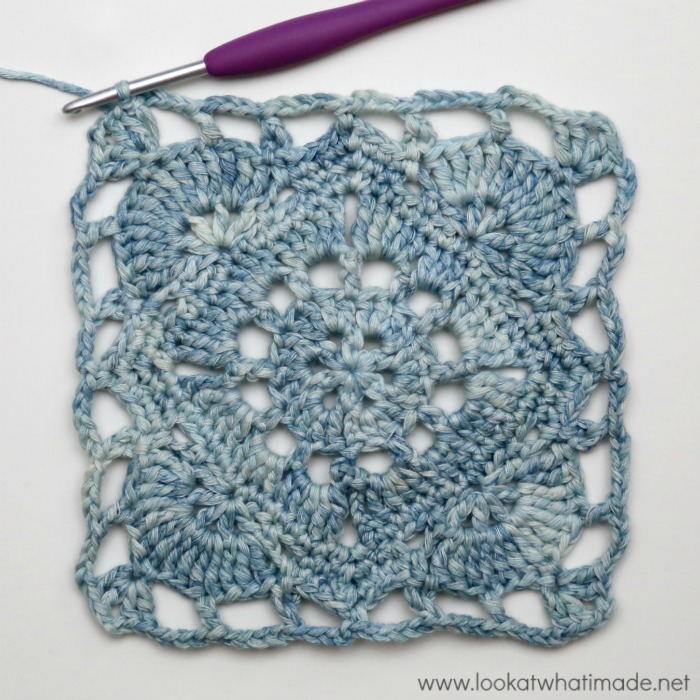
Round 9
Sl st in the next st and in the next ch-2 corner sp. Ch 2 (counts as hdc). (Hdc, ch 2, 2 hdc) in the ch-2 corner sp. This is your first corner made.
*Hdc in the first 2 sts. Make 4 hdc in each ch-4 sp. Hdc in the last 2 sts. (2 hdc, ch 2, 2 hdc) in the next ch-2 corner sp.*
Repeat from * to * 3 more times, omitting the last corner on the last repeat. Join to the top of the beg ch-2 with a sl st. Fasten off and work away your ends. {32 hdc per side, not including ch-2 corner sps}
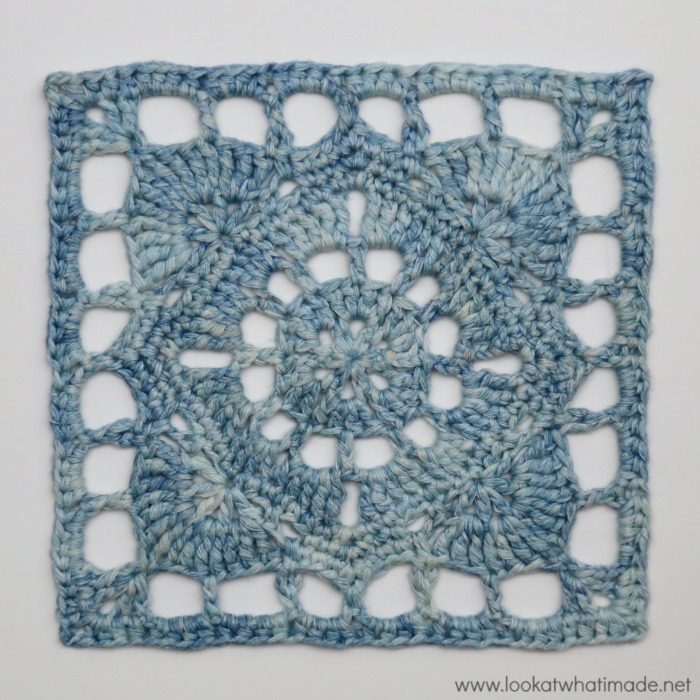
Round 10
Join your yarn by making a standing dc in any ch-2 corner sp. (Dc, ch 2, 2 dc) in the same ch-2 corner sp. This is your first corner made.
*Skip the first (hidden) st. Dc in the BLO of each of the remaining 31 sts. (2 dc, ch 2, 2 dc) in the next ch-2 corner sp.*
Repeat from * to * 3 more times, omitting the last corner on the last repeat. Join to the top of the first dc with a sl st. Fasten off and work away your ends. {35 dc per side, not including ch-2 corner sps}

Kay Square Join As You Go (YAYGO) Motifs
These instructions apply if you would like to make the smaller JAYGO motifs to create a blanket/cushion/wrap.
First Square
Make the square up to the end of Round 6. Continue with the very slightly modified Round 7 below.
Modified Round 7
Sl st into the ch-2 corner sp. (Ch 1, sc, ch 2, sc) in the same ch-2 sp. This is your first corner made.
*Sc in the first 3 sts, the first of which will be hidden. Sc in the next ch-2 sp. Ch 4, sl st in the last sc made to form a Picot. Make 3 tr in the next ch-1 sp. Make 4 tr in the next ch-1 sp. Ch 5, sl st in the last tr made to form a Picot. Make 4 tr in the next ch-1 sp. Make 3 tr in the next ch-1 sp. Sc in the next ch-2 sp, ch 4, sl st in the last sc made to form a Picot. Sc in the last 3 sts. (Sc, ch 2, sc) in the next ch-2 corner sp.*
Repeat from * to * 3 more times, omitting the last corner on the last repeat. Join to the first sc with a sl st. Fasten off and work away your ends. {10 sc, 14 tr, and 3 Picots per, not including ch-2 corner sps}
Second Square and Subsequent Squares Attached on One Side Only
Use the following instructions for all the squares that will be attached to an existing square on one side only.
Make the square up to the end of Round 6. Continue with Round 7 below.
Modified Round 7
Sl st into the ch-2 corner sp. (Ch 1, sc, ch 2, sc) in the same ch-2 sp. This is your first corner made.
*Sc in the next 3 sts, the first of which will be hidden. Sc in the next ch-2 sp. Ch 4, sl st in the last sc made to form a Picot. Make 3 tr in the next ch-1 sp. Make 4 tr in the next ch-1 sp. Ch 5, sl st in the last tr made to form a Picot. Make 4 tr in the next ch-1 sp. Make 3 tr in the next ch-1 sp. Sc in the next ch-2 sp, ch 4, sl st in the last sc made to form a Picot. Sc in the next 3 sts. (Sc, ch 2, sc) in the next ch-2 corner sp.*
Repeat from * to * once.
Sc in the next 3 sts, the first of which will be hidden. Sc in the next ch-2 sp. Ch 4, sl st in the last sc made to form a Picot. Make 3 tr in the next ch-1 sp. Make 4 tr in the next ch-1 sp.
Ch 2. Place the first square above the current square as pictured {Photo 1}. Inserting your hook from back to front, sl st into the corresponding ch-5 Picot on the first square. Ch 2 {Photo 2}. Sl st in the last tr of the current square to form a Picot {Photo 3}. Make 4 tr in the next ch-1 sp. Make 3 tr in the next ch-1 sp.
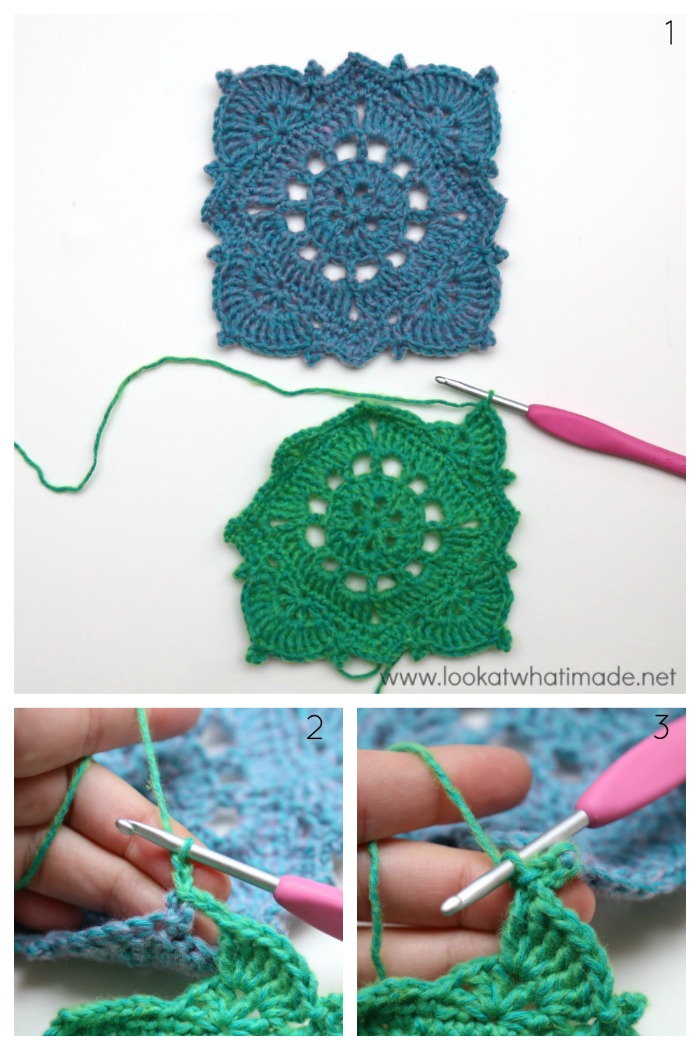
Sc in the next ch-2 sp. Ch 1, sl st into the corresponding ch-4 Picot on the first square. Ch 2, sl st in the last sc of the current square to form a Picot {Photo 4}. Sc in the next 3 sts.
Sc in the next ch-2 corner sp {Photo 5}. Sl st in the corresponding ch-2 sp on the first square. Ch 1, sc in the same ch-2 corner sp of the current square {Photo 6}.
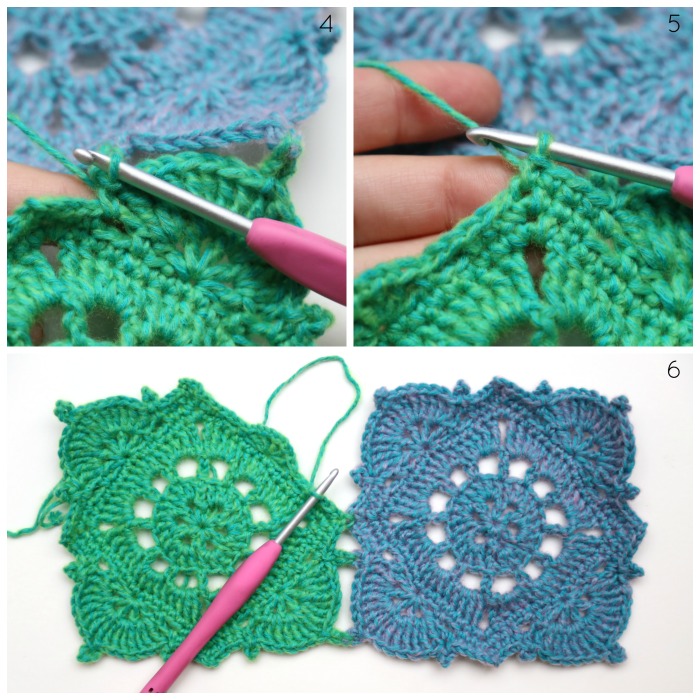
Sc in the next 3 sts, the first of which will be hidden. Sc in the next ch-2 sp. Ch 1, sl st into the corresponding ch-4 Picot on the first square. Ch 2, sl st in the last sc of the current square to form a Picot.
Make 3 tr in the next ch-1 sp. Make 4 tr in the next ch-1 sp. Ch 2. Sl st into the corresponding ch-5 Picot on the first square. Ch 2. Sl st in the last tr of the current square to form a Picot. Make 4 tr in the next ch-1 sp. Make 3 tr in the next ch-1 sp. Sc in the next ch-2 sp, ch 4, sl st in the last sc made to form a Picot. Sc in the next 3 sts.
Join to the first sc with a sl st. Fasten off and work away your ends. {10 sc, 14 tr, and 3 Picots per side, not including ch-2 corner sps}
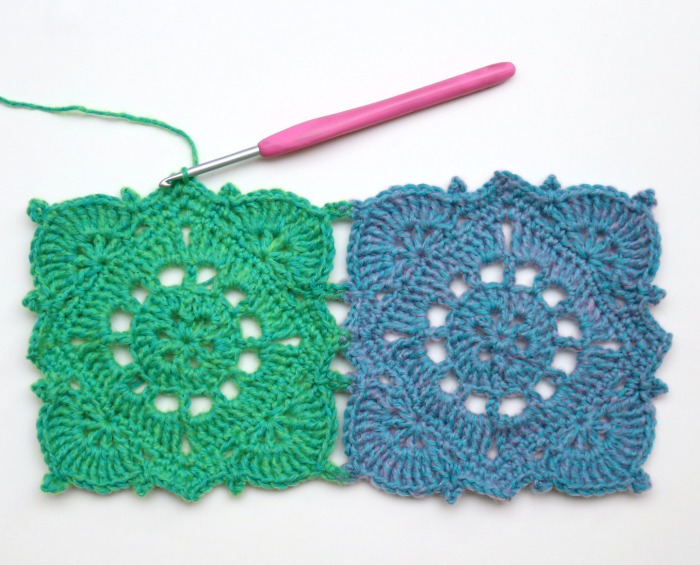
Squares Attached on Two Sides
Use the following instructions for all the squares that will be attached to existing squares on two sides.
Make the square up to the end of Round 6. Continue with Round 7 below.
Modified Round 7
Sl st into the ch-2 corner sp. (Ch 1, sc, ch 2, sc) in the same ch-2 sp. This is your first corner made.
Sc in the next 3 sts, the first of which will be hidden. Sc in the next ch-2 sp. Ch 4, sl st in the last sc made to form a Picot. Make 3 tr in the next ch-1 sp. Make 4 tr in the next ch-1 sp. Ch 5, sl st in the last tr made to form a Picot. Make 4 tr in the next ch-1 sp. Make 3 tr in the next ch-1 sp. Sc in the next ch-2 sp, ch 4, sl st in the last sc made to form a Picot. Sc in the next 3 sts. (Sc, ch 2, sc) in the next ch-2 corner sp.
Sc in the next 3 sts, the first of which will be hidden. Sc in the next ch-2 sp. Ch 4, sl st in the last sc made to form a Picot. Make 3 tr in the next ch-1 sp. Make 4 tr in the next ch-1 sp.
Ch 2. Sl st into the corresponding ch-5 Picot on the joining square. Ch 2. Sl st in the last tr of the current square to form a Picot. Make 4 tr in the next ch-1 sp. Make 3 tr in the next ch-1 sp.
*Sc in the next ch-2 sp. Ch 1, sl st into the corresponding ch-4 Picot on the joining square. Ch 2, sl st in the last sc of the current square to form a Picot. Sc in the next 3 sts.
Sc in the next ch-2 corner sp. Sl st in the corresponding ch-2 sp on the joining square. Ch 1, sc in the same ch-2 corner sp of the current square.
Sc in the next 3 sts, the first of which will be hidden. Sc in the next ch-2 sp. Ch 1, sl st into the corresponding ch-4 Picot on the joining square. Ch 2, sl st in the last sc of the current square to form a Picot.
Make 3 tr in the next ch-1 sp. Make 4 tr in the next ch-1 sp.
Ch 2. Sl st into the corresponding ch-5 Picot on the first square. Ch 2. Sl st in the last tr of the current square to form a Picot. Make 4 tr in the next ch-1 sp. Make 3 tr in the next ch-1 sp.*

Repeat from * to * once.
Sc in the next ch-2 sp, ch 4, sl st in the last sc made to form a Picot. Sc in the next 3 sts.
Join to the first sc with a sl st. Fasten off and work away your ends. {10 sc, 14 tr, and 3 Picots per side, not including ch-2 corner sps}

This blog post contains affiliate links. I only link to products I personally use or would use. All opinions are my own.


Krisztina Polyák says
Dear Dedri,
Is there a video for helping me join the squares with this “YAYGO” technique?
Please send me the link if there is.
Thanks for your help and sorry about my bad Engilsh!
Krisztina
Dedri Uys says
Hi Krisztina,
I don’t have a video for that, I’m afraid. Is there anything I can explain in a different way that might help you?