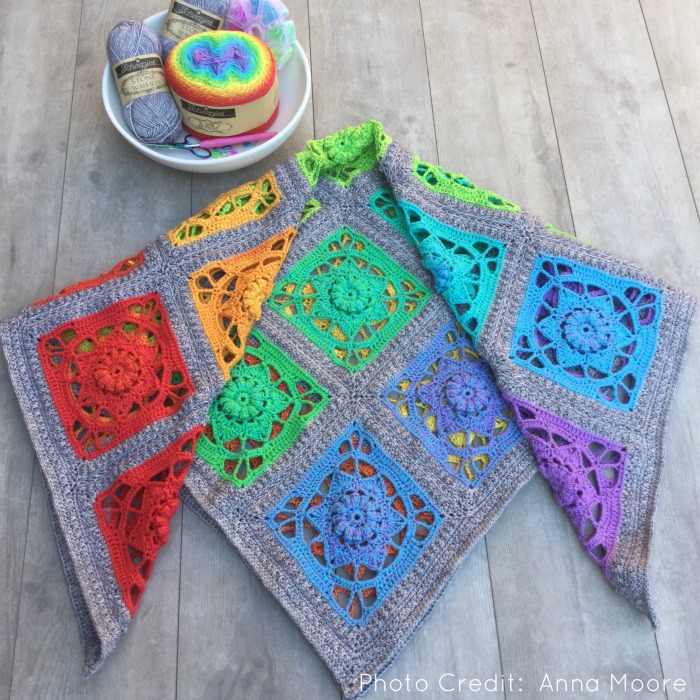
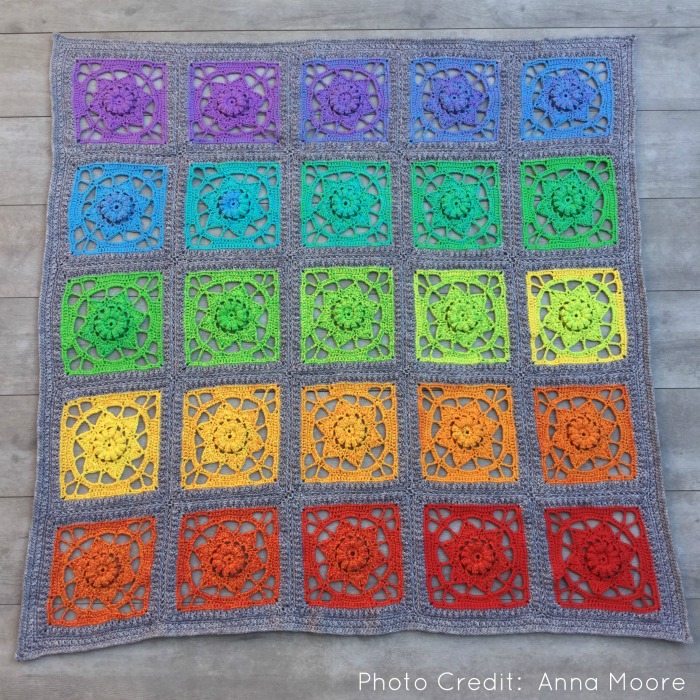
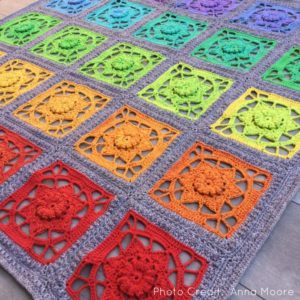
Rainbows make me all sorts of happy! If you have been following me for a while, you will know that I LOVE using lots of colours. A little while ago, I sent a copy of my Jeanette Square pattern to a lady I met through Instagram. Three weeks later, she sent me this delightful photo. What else can I say but ‘Wow!’? I love it when someone takes one of my patterns and makes it their own in such a striking way. I asked her if she would like to collaborate with me on writing a pattern for this blanket and she agreed. I am thrilled to introduce: Jeanette at Sunset, created and photographed by the lovely and talented Anna Moore.
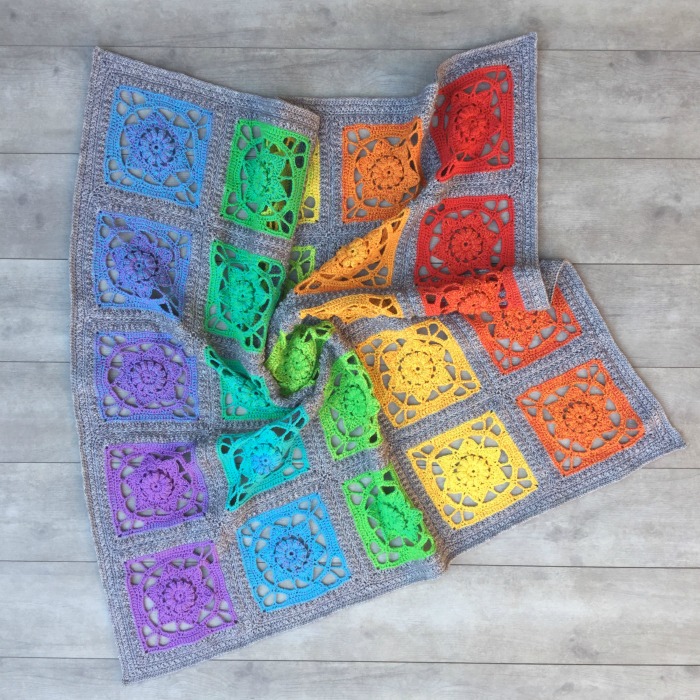
This blanket started off as a nostalgic square, designed for the April 2017 Yarn Retreat with Devon Sun Yarns. Anna took that square and turned it into a gorgeous rainbow celebration of a blanket. The squares in this blanket are named after one of my very dear friends: Aunty Jeanette. When I think of her, I remember the many cups of tea we shared at dusk; me with my 18-year-old naivety and know-it-all conviction, her with her salt-and-pepper hair and laughter like rolling thunder.
Jeanette at Sunset Pattern
© Anna Moore and Dedri Uys 2019. All Rights Reserved.
Resources
- Ravelry: Add the Pattern to your Ravelry Queue.
- Print-Friendly: You can use the Print-friendly button at the bottom of this post to save/print the pattern. You will be able to remove the parts you don’t want to print.
- Hashtag: #jeanetteatsunset or #jeanettecrochetsquare
Materials
Yarn Packs are available from my Wool Warehouse Shop HERE. They include a printed copy of the pattern.
- 3 mm crochet hook (for squares and border)
- 3.5mm crochet hook (for joining only)
- Yarn A – Whirl (60% cotton/40% acrylic), 220g/1000m/1093yds
- 2 balls of Jumpin Jelly (759)
- Yarn B – Stonewashed (78% cotton/22% acrylic), 50g/130m/142yds
- 7 balls of Smokey Quartz (802)
Abbreviations
US Terminology
- BLO – Back loop only
- Ch – Chain
- Dc – Double crochet
- Dtr – Double treble crochet
- FPsc – Front post single crochet
- Hdc – Half-double crochet
- RS – Right side
- Sc – Single crochet
- Sl st – Slip stitch
- SM – Stitch marker
- Sp/sps – Space/spaces
- St/sts – Stitch/stitches
- Tr – Treble crochet
- WS – Wrong side
Punctuation
* An asterisk indicates pattern repeats. You will need to repeat all the instructions between asterisks the number of times specified. This is a hard-core repeat and will consist of multiple instructions.
Parentheses () indicate repeats. You will need to repeat the instructions between parentheses the number of times specified. This is a lower level repeat.
Square Brackets [] are used to indicate a group of stitches to be worked in the same stitch/space.
Special Stitches
- Shell – Make 5 dc in the indicated stitch.
- Spike stitch – Insert your hook into the indicated st/sp in the row/round below. Yarn over and pull up a loop to the height of your previous st. Yarn over and pull through both loops on your hook.
- Standing stitches – Standing stitches are exactly the same as regular stitches, except that they are made ‘in air’, without being attached to a previous stitch. Start with a slip knot already on your hook and complete the stitch as normal.
Gauge and Size Per Square
| Size | Weight | |
| At the End of Round 5 (tip to tip) | 10.5cm | 7g |
| At the End of Round 9 (side to side) | 15cm | 16.5g |
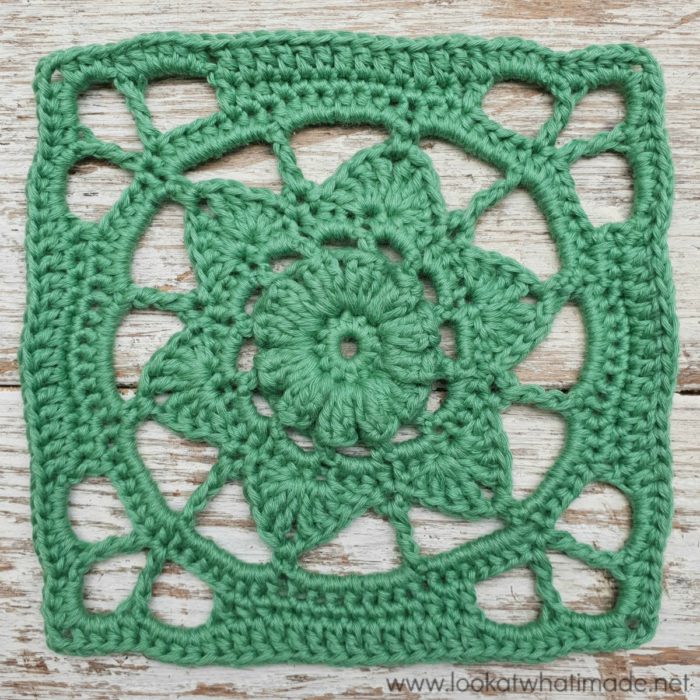
| At the End of Round 12 (side to side) | 18cm | 25g |
Please Note: If you are not able to achieve gauge, please see Notes below.
Size of Blanket
105cm x 105cm (41” x 41”)
Notes
If you find that your squares are using more than 17g of Yarn A each and you really don’t feel like you will be able to make them smaller, you might want to consider doing a 4 x 6 layout (24 squares) instead of a 5 x 5 layout (25 squares). If you choose to do that, please note that you will need to skip a stitch somewhere on every side when making Border Round 1 so that you end up with an uneven number of stitches.
If you need a little more help with this pattern, you can find a round-by-round photo tutorial for the squares HERE. Please note that Rounds 5 and 6 in the written pattern below are slightly different from the photo tutorial so that you don’t have to cut your yarn at the end of Round 5. Round 10 has also been changed to a BLO hdc round (for Jeanette at Sunset) not the dc round used in the photo tutorial.
Instructions
Jeanette Square
Make 25
Round 1
With 2 strands of Yarn A held together (working from the inside of the Whirls to the outside) and a 3mm crochet hook, make a Magic Ring. Alternatively, ch 4 and join to the first ch with a sl st to form a ring.
Into the Magic ring, ch 1 (doesn’t count as a st throughout), make 12 hdc. Join to the first hdc with a sl st. {12 hdc}
Round 2
Ch 2 (doesn’t count as a st throughout). Make a Shell in the st at the base of the ch-2. (Ch 3, make a Shell in the next st) 11 times. Ch 3 and join to the first dc with a sl st. {12 Shells and 12 ch-3 sps}
Note: When making the Shells, they will hide the next st to be worked into. Make very sure that you don’t accidentally skip any stitches and check that you have 12 Shells before you go on to the next round.
Round 3
Ch 1, make a FPsc around the first Shell. If you need help with this, please see the photo tutorial for the Jeanette Square HERE. Ch 4. (FPsc around the next Shell, ch 4) 11 times. Join to the first sc with a sl st. {12 FPsc and 12 ch-4 sps}
Round 4
Sl st into the next ch-4 sp. Ch 1, make 4 hdc in the same ch-4 sp. Make 4 hdc in each remaining ch-4 sp. Join to the first hdc with a sl st. {48 hdc}
Round 5
*Skip the next 2 sts. [2 dc, 2 tr] in the next st, which should be the last hdc of the 4-hdc group. Ch 2, [2 tr, 2 dc] in the next st, which should be the first st of the next 4-hdc group. Skip the next 2 sts, sl st in the next st, ch 3, sl st in the next st.*
Repeat from * to * 5 more times. The last sl st should fall in the st that already contains the joining sl st from the previous round. {24 dc, 24 tr, 6 ch-2 sps, and 6 ch-3 sps – not including sl sts}
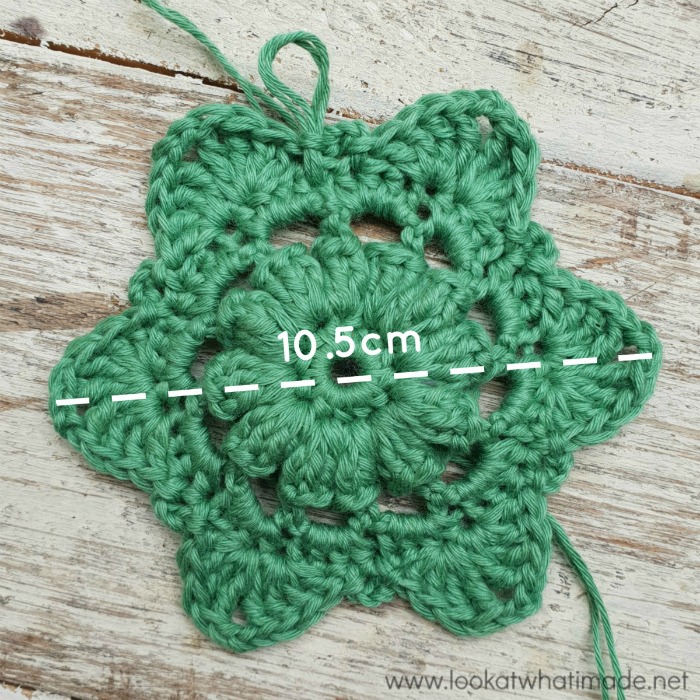
Round 6
Sl st in the next 4 sts and in the ch-2 sp. Ch 1, sc in the same ch-2 sp. (Ch 6, tr in the next ch-3 sp, ch 6, sc in the next ch-2 sp) 6 times, omitting the last sc on the last repeat. Join to the first sc with a sl st. {6 sc, 6 tr, and 12 ch-6 sps}
Round 7
Sl st into the next ch-6 sp. Ch 1, make 8 hdc in the same ch-6 sp. Mark the third hdc with a SM. Make 8 hdc in each remaining ch-6 sp. Join to the first hdc with a sl st. {96 hdc}
Round 8
Sl st in the next 2 sts. The last sl st should fall in the st that contains the SM. Ch 7 (counts as dc + ch-4 sp). Skip the next 4 sts and dtr in the next st, which should be the last hdc of the first 8-hdc group. Ch 5 and dtr in the next st, which should be the first hdc of the next 8-hdc group. This (dtr, ch-5, dtr) will form your corner. Ch 4 and skip the next 4 sts. Dc in the next st. Hdc in the next 2 sts. Sc in the next 8 sts. Hdc in the next 2 sts.
*Dc in the next st. Ch 4 and skip the next 4 sts. Dtr in the next st, ch 5, dtr in the next st (see placement references above). Ch 4 and skip the next 4 sts. Dc in the next st. Hdc in the next 2 sts. Sc in the next 8 sts. Hdc in the next 2 sts.*
Repeat from * to * 2 more times. The last 2 hdc will fall in the stitches that already contain sl sts. Join to the third ch of the beginning ch-7 with a sl st. {8 sc, 4 hdc, 2 dc, 2 dtr, and 2 ch-4 sps per side – not including ch-5 corner sps}
Round 9
Sl st into the next ch-4 sp. Ch 1, make 5 hdc in the same ch-4 sp. Hdc in the next st. *[3 hdc, ch 2, 3 hdc] in the next ch-5 sp. Hdc in the next st. Make 5 hdc in the next ch-4 sp. Dc in the next 14 sts. Make 5 hdc in the next ch-4 sp. Hdc in the next st.*
Repeat from * to * 3 more times, omitting the last 6 hdc on the last repeat. Join to the first hdc with a sl st. Fasten off and work away your ends. {18 hdc and 14 dc per side – not including ch-2 corner sps}
Round 10
I suggest that you mark the first two corner stitches of each side with st markers so that you can identify them in the next round.
Still using a 3mm crocht hook, join 1 strand of Yarn B by making a standing hdc in any ch-2 corner sp. [Hdc, ch 2, 2 hdc] in the same ch-2 sp. This is your corner made. *Skip the first (hidden) st. Hdc in the BLO of each remaining st across. [2 hdc, ch 2, 2 hdc] in the next ch-2 corner sp.*
Repeat from * to * 3 more times, omitting the last corner on the last repeat. Join to the first hdc with a sl st. This stitch will contain a stitch marker. Do not remove the stitch marker yet. Sl st into the next st, which will also contain a stitch marker. {35 hdc per side, 31 of which will be made in the BLO}
Round 11
Turn your work before you start this round so that the wrong side of your square is facing you. Bubble stitches pop to the back of your work and won’t be visible on the front if you don’t turn!
The first tr of each side will fall in the dc from Round 10 marked by the first stitch marker. The first sc of each side will fall in the dc from Round 10 marked by the second stitch marker. You can remove the stitch markers once you have made those first two stitches of every side.
When working with the WS of the previous row/round facing you, the loops of each stitch will be AFTER each post, not before (so left if you are right-handed and right if you are left-handed) . Marking these first two stitches on each side helps you identify the first two, making subsequent ones easier to identify.
With WS facing, ch 1, tr in the st at the base of the ch-1, which should contain the first SM. (Sc in the next st, tr in the next st) until you have worked into each st across. [Sc, ch 2, sc] in the ch-2 corner sp. This is your corner made. If you feel that you will need help identifying the first st of each round when you make the next round, mark the first sc of each corner with a SM.
*Tr in the first st. (Sc in the next st, tr in the next st) until you have worked into each st across. [Sc, ch 2, sc] in the ch-2 corner sp.*
Repeat from * to * 2 more times. Join to the first tr with a sl st. TURN so that the RS is once again facing you. Sl st in the next sc and in the ch-2 sp. {19 sc and 18 tr per side}
Round 12
When making this round, you might find it easier to tilt your work towards you so that you can better see the loops for each stitch. The loops have a natural tendency to point away from you, due to the sc stitches pulling the tr stitches down. If you do this, you will notice that there are big loops (tr) and small loops (sc).
With RS facing, ch 1, [sc, ch 2, sc] in the ch-2 corner sp. This is your corner made. *Sc in each st across. Every second st will fall in a tr (big loops) from the previous round. [Sc, ch 2, sc] in the ch-2 corner sp.*
Repeat from * to * 3 more times, omitting the last corner on the last repeat. Join to the first sc with a sl st. Fasten off and work away your ends. {39 sc per side}
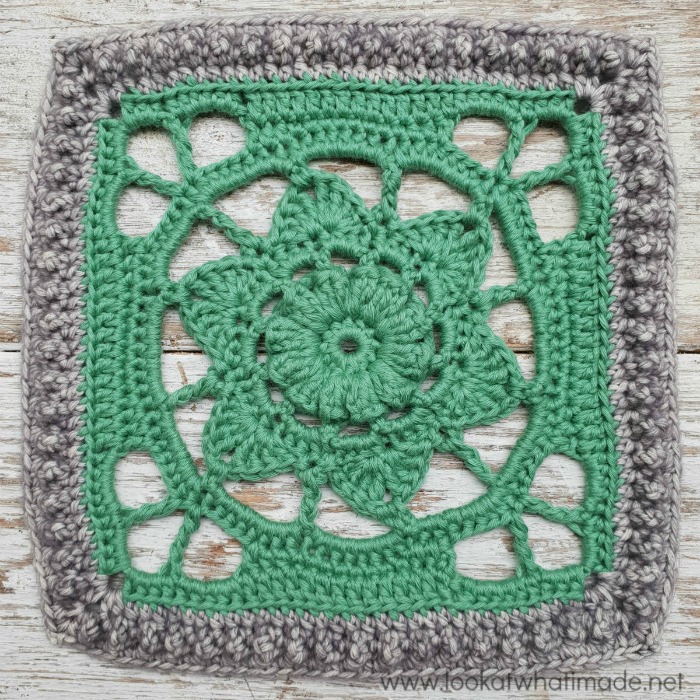
Blocking
I suggest blocking this square to make it nice and crisp. Before blocking, the square will wobble slightly. After blocking, the corner flowers will open up and the square will look much neater. 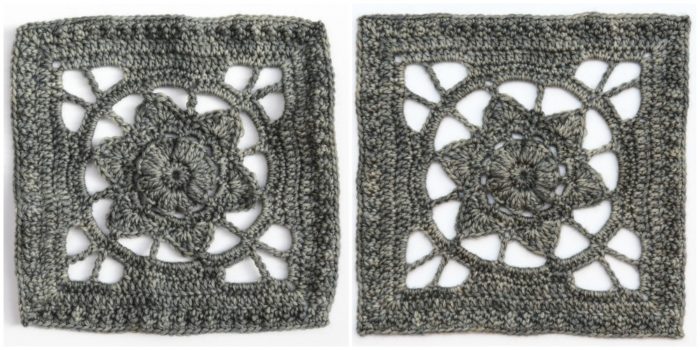
Joining Your Squares
Once you have made all 25 squares, you will need to join them to each other using Yarn B and a 3.5mm hook. You can use any joining method you prefer. We like using the (Sc, ch 1, skip 1) Join on the diagonal, working into the BLO.
Lay your squares out in rainbow order, starting with the first square top left and ending with the last square bottom right.
(Sc, ch 1, skip 1) Join
If you need more help with this type of join, you can find a photo tutorial HERE.
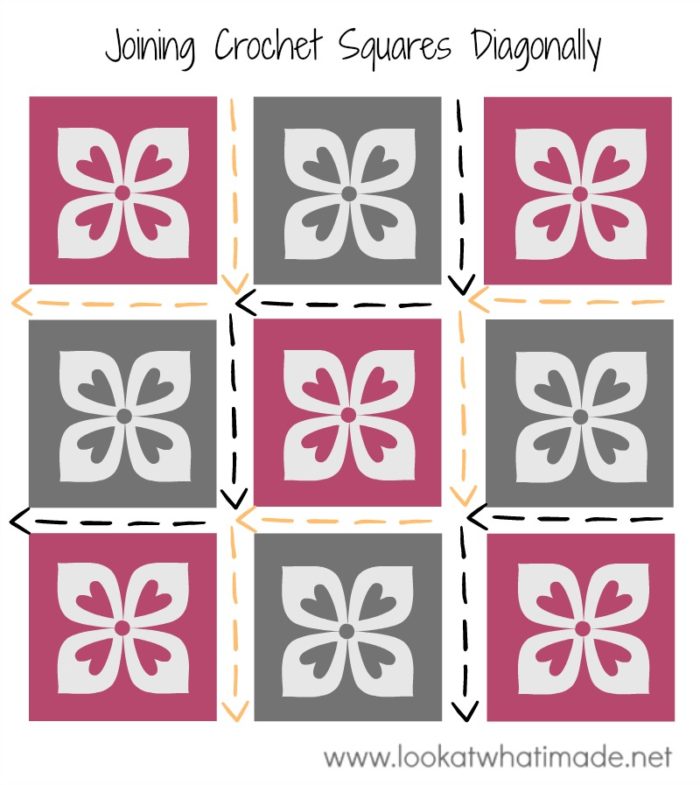
To join on the diagonal with the (Sc, ch 1, skip 1) Join, you will start with the bottom right square (bottom left if you are left-handed). You will be attaching it to the square above it first, followed by the square directly next to it.
So flip the square above the corner square (2 below) over onto the corner square (1 below) so that their right sides are facing each other. With a slip knot already on your hook and starting in the corner sp, make a sc through both layers of the ch space.
(Ch 1, skip the next st of both layers, sc through the BLO of the next st of both layers) until one st remains. Ch 1, skip the next st of both layers.
Into the corner sp: [sc, ch 1] through both layers. Unfold your squares.
Now that you have attached the square above the corner square (2 below), you need to attach the square next to it (3 below), so flip that square over onto the corner square.
Insert your hook into the corner space of the top square and then insert it into the corner space of the bottom square. Make a sc through both layers.
(Ch 1, skip the next st of both layers, sc through the BLO of the next st of both layers) until one st remains. Ch 1, skip the next st of both layers. [Sc, ch 1] in the corner sp. Fasten off and pull the ch st tight to form a little knot.
Unfold the squares again. You should have 3 squares attached to each other: two in the bottom row and one in the top row. They should look like steps. See Numbers 1-3 in the picture below.
You will now continue to add your squares in diagonal strips.
Adding the Next Diagonal ‘Strip’
Following the placement photo above, place 1 square above the top right-hand square (left, if you are left-handed). Place 1 square in the gap formed where the previous 3 squares meet. Place 1 square next to the bottom-left square (bottom-right, if you are left-handed). See Numbers 4-6 in the picture above.
Starting on the right (left, if you are left-handed), join the first 2 squares of the next strip as before. This will bring you to the ‘inside’ corner where the initial 3 squares meet. Unfold your squares and then fold the top 3 squares (2, 4, and 5 in the picture) over onto the bottom 2 so that you can attach the other side of the square.
Before you can join the next side, you need to anchor your work to the ‘inside’ corner created when you joined the first 3 squares. To do this, sl st into the ch-1 corner space created when joining the first 3 squares. When you have made the sl st, ch 1. This is your corner made.
Insert your hook into the corner space of the squares (through both layers as before) and make a sc. Continue with the (sc, ch 1, skip 1) join as before, until you have attached all 3 squares to the previous 3 squares. When you have joined the last side, fasten off as before.
Adding Subsequent Diagonal ‘Strips’
Continue adding squares in a diagonal fashion, like steps. You will always start joining top-right (top-left if you are left-handed) and end bottom-left (bottom-right if you are left-handed). When you have 5 squares along the bottom, stop adding a square to the bottom-left corner of every strip (bottom-right if you are left-handed), so that you get a straight edge. When your blanket is 5 squares long, stop adding a square to the top-right corner of every strip (top-left if you are left-handed). Continue until you have joined all the squares.
Adding the Border
When adding the first round of the border, the ch-2 corners of each square (along the edges of the blanket) will count as a st and should be worked into. Only the four ch-2 sps in the corners of the blanket will be referred to as a ch-2 corner space.
Border Round 1
With a 3mm hook, join Yarn B by making a standing sc in any ch-2 corner sp around. [Ch 2, sc] in the same ch-2 corner sp. This is your first corner made. *Sc in each st and sp across. [Sc, ch 2, sc] in the next ch-2 corner sp.* Repeat from * to * 3 more times, omitting the last corner on the last repeat. Join to the first sc with a sl st. {205 sc per side}
Border Round 2
Sl st in the next ch-2 corner sp. [Hdc, ch 2, hdc] in the same ch-2 sp. This is your first corner made. *(Ch 1, skip the next st, hdc in the next st) until 1 st remains. Ch 1 and skip the last st. [Hdc, ch 2, hdc] in the next ch-2 corner sp.* Repeat from * to * 3 more times, omitting the last corner on the last repeat. Join to the first hdc with a sl st. {104 hdc and 103 ch-1 sps per side}
Border Round 3
Sl st in the next ch-2 corner sp. [Sc, ch 2, sc] in the same ch-2 corner sp. This is your first corner made. *(Sc in the next st from Border Round 2, make a Spike stitch in the next skipped st from Border Round 1, working OVER the ch-1 sp from Border Round 2) until 1 st remains. Sc in the last st from Border Round 2. [Sc, ch 2, sc] in the next ch-2 corner sp.* Repeat from * to * 3 more times, omitting the last corner on the last repeat. Join to the first sc with a sl st. {106 sc and 103 Spike st per side}
Border Round 4
Sl st in the next ch-2 corner sp. [Hdc, ch 2, hdc] in the same ch-2 sp. This is your first corner made. *Skip the first (hidden) st. Hdc in each remaining st across. [Hdc, ch 2, hdc] in the next ch-2 corner sp.* Repeat from * to * 3 more times, omitting the last corner on the last repeat. Join to the first hdc with a sl st. {210 hdc per side}
Border Round 5
*Sl st in the top loop only of the first ch of the next ch-2 corner sp. Sl st in the top loop only of the second ch of the same ch-2 corner sp. Sl st in each st across.* Repeat from * to * 3 more times. Fasten off and work away your ends. {212 sl sts per side}
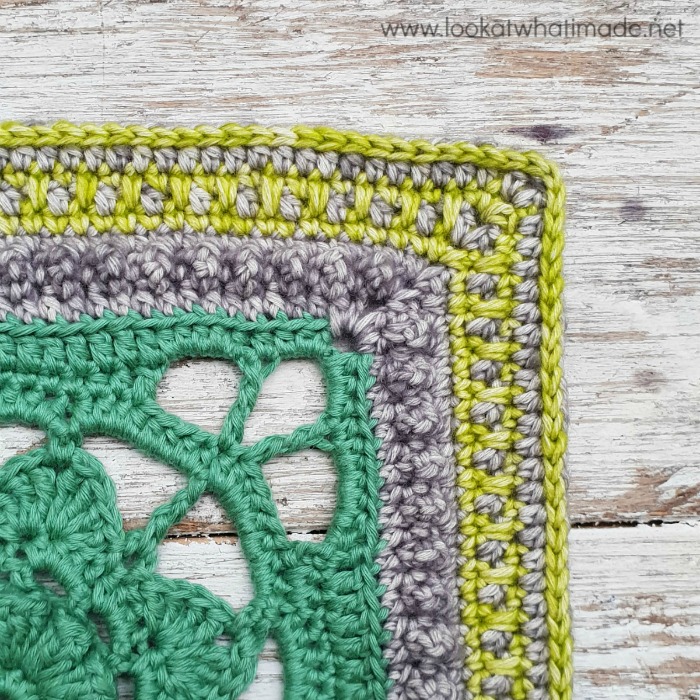
Please note that I have used contrasting colours in this photo to make stitch placement more clear.
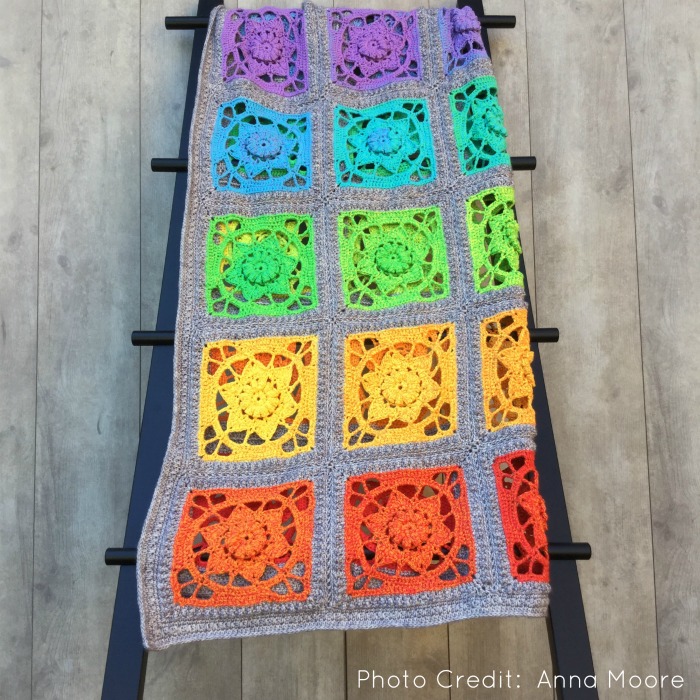
More of Anna’s Work
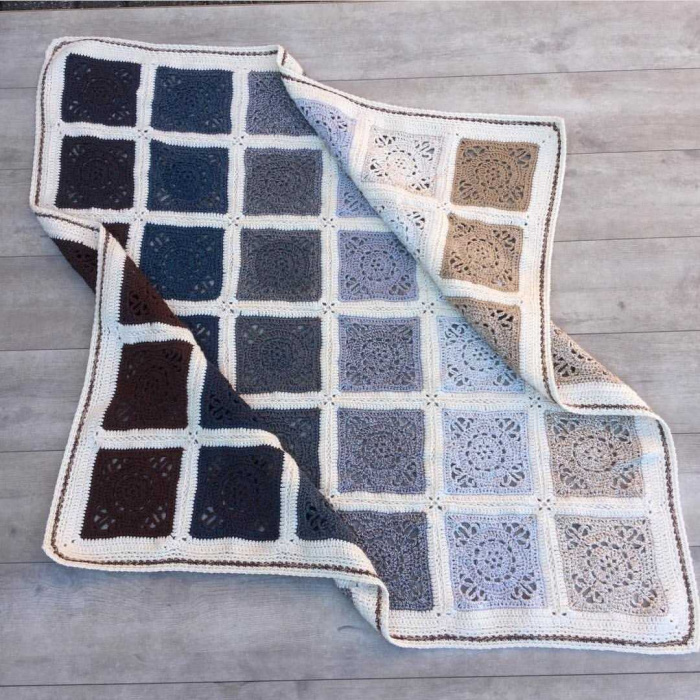
Anna has also made a gorgeous blanket out of Emma Squares, using the same technique but more earthy colours. It is worth noting that the yarn in the Jeanette yarn packs will be enough to recreate Anna’s Emma Blanket if you like the rainbow colours but prefer smaller squares. You can find the pattern for the Emma Square HERE.
If you would like to see more of Anna’s work, you can find her HERE on Instagram.
We sincerely hope that you have enjoyed making this blanket and look forward to seeing your pictures!

This blog post contains affiliate links. I only link to products I personally use or would use. All opinions are my own.


Abi says
Hello, I’ve just purchased this kit from wool warehouse. Can I just check, do I use both balls at the same time to make the squares (ie doubling the yarn?) I only have two balls so wanted to double check as it doesn’t seem like enough! Thanks for your help :)
Dedri Uys says
Hi Abi. Yes, you use both balls at the same time :) You will need to check your gauge against ours to make sure that you don’t run out of yarn. Good luck and please share some photos.
Dedri
Michelle says
Hello,
I just love this blanket and all the colors! Is there a way to make it bigger (by making more blocks or maybe larger blocks?), while maintaining the rainbow gradient? Thank you!
Jenny says
Jenny here.
Yes! You could make it by separating several cakes in to mini skeins and working the squares through as per the original pattern. That would give you more squares to let out and make a larger blanket :)
Jeanette says
Exactly how you spell my name xx
this is a must to make for me
Julilandia says
Lovely colors
Dedri Uys says
Thank you x
Sherri Winchester says
Wow, Love it.
Gillian, says
Wow my kind of blanket I love rainbow combinations.I knit/crochet blankets for a baby charity and love doing bright colours.Would it be ok to use this pattern,the blankets are not sold they go to special care units and into ambulance packs for babies born on the way to hospital.
Dedri Uys says
Yes, you are welcome to use this pattern. I hope you have fun with it.
Stephanie Powell says
LOvely blanket! I really don’t like holding 2 strands of yarn. Can this be made with only one strand? I know it will probably be a bit smaller.
Jenny says
Yes it can :)