Welcome to Part 3 of the ‘I Carry Your Heart’ Mandala. In this part, we will turn Parts 1 and 2 into a circle with a simple Pineapple border.
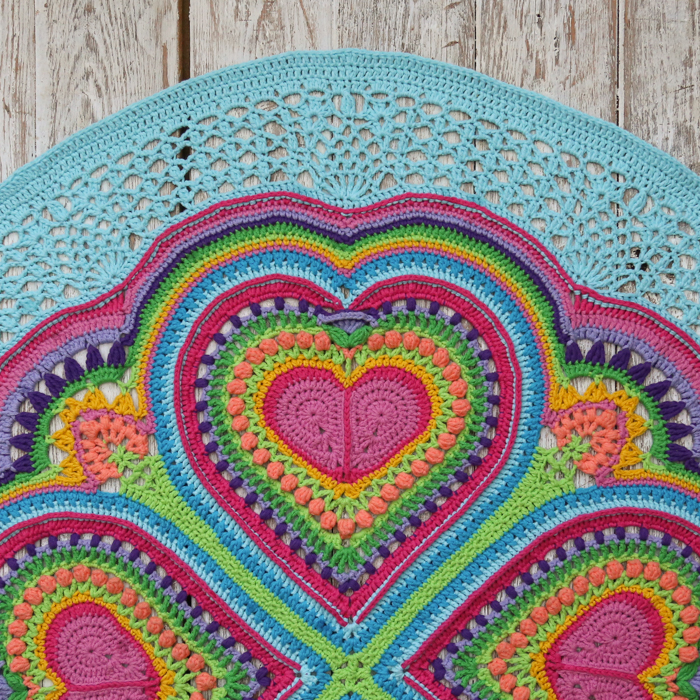
Please note that I am using Scheepjes Softfun for the tutorial photos so that it is easier to see how the rounds interact with each other.
Resources
- I Carry Your Heart Mandala Information (Materials, Size, Links to Parts 1 and 2)
- Add This Pattern to Your Ravelry Queue
- Hashtag: #iCarryYourHeartCrochet
- PDF: I will be releasing a Paid PDF for this mandala when I have shared all 3 parts. In the meantime, you can use the PDF button at the bottom of this post to save an ad-free version of Part 3 as a PDF.
Part 3 Video Tutorials
Translations
- Dutch Information Post by Michael Wassenaar
- Japanese Information Post by Masako Kawahara
Abbreviations and Special Stitches
Please see Part 1 HERE and Part 2 HERE if you need to reference any of the Abbreviations or Special Stitches we used in those parts.
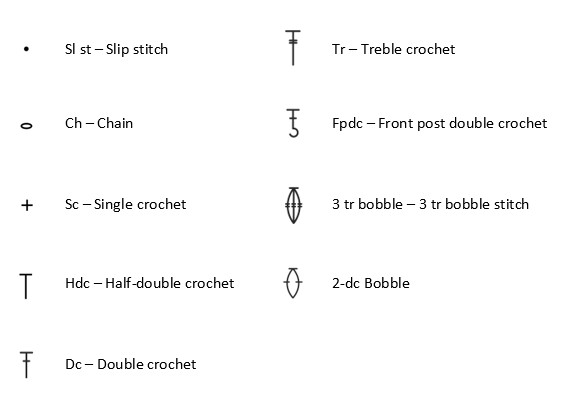
Chart Legend
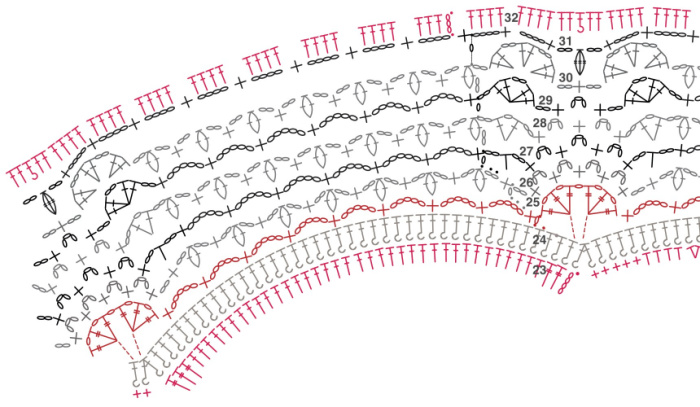
Charts by Masako Kawahara from Crochet_hmmm.
Instructions for Greyson’s Garden
You can find the chart for Rounds 25 to 32 at the end of Round 32.
Round 25
- If you are using the same colour, sl st in the next 2 sts. Ch 1, sc in the same st.
- If you are using a new colour, join your yarn by making a standing sc in the marked BPdc of the previous round.
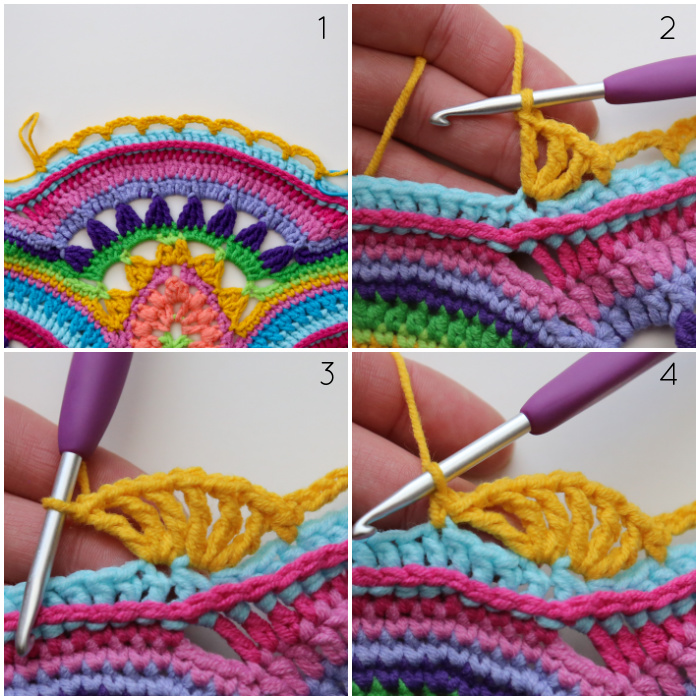
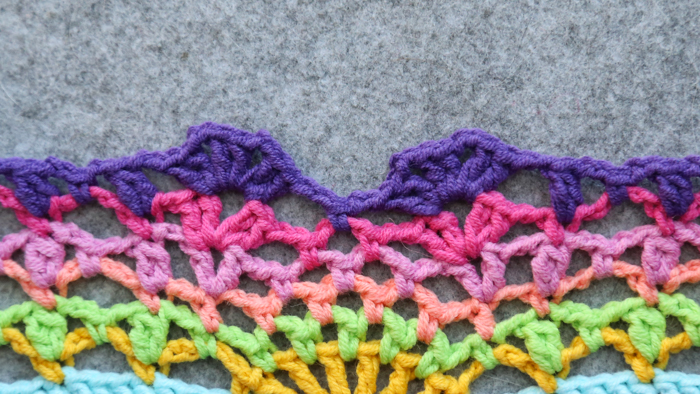
*(Ch 5, skip the next 3 sts, sc in the next st) 8 times {Photo 1}. Skip the next 3 sts. [Tr, ch 1, tr, ch 1, tr] in the next st, which should be the BPdc2tog {Photo 2}. Ch 1. [Tr, ch 1, tr, ch 1, tr] in the next st {Photo 3}. Skip the next 3 sts, sc in the next st {Photo 4}.*
Repeat from * to * 11 more times, omitting the last sc on the last repeat. Join to the first sc with a sl st.
Stitch Count Per Repeat: 9 sc, 6 tr, 8 ch-5 sps, and 5 ch-1 sps
Round 26
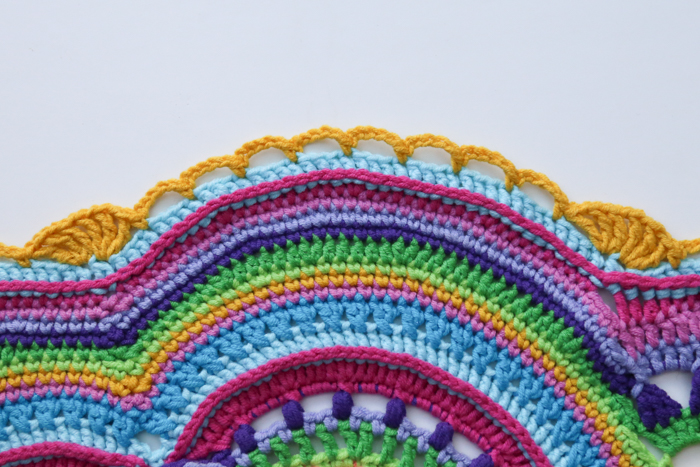
Sl st in the next 3 ch sts of the ch-5 sp. Ch 1, sc in the ch-5 sp.
*(Ch 2, make a 2-dc Bobble in the next sc. Ch 2, sc in the next ch-5 sp) 7 times. Ch 2, skip the next 2 sts, which should be the sc and the tr. Sc in the next ch-1 sp. (Ch 3, skip the next tr, sc in the next ch-1 sp) 4 times. Ch 2, skip the next 2 sts, sc in the next ch-5 sp.*
Repeat from * to * 11 more times, omitting the last sc on the last repeat. Join to the first sc with a sl st.
Stitch Count Per Repeat: 13 sc, 7 2-dc Bobbles, 4 ch-3 sps, and 16 ch-2 sps
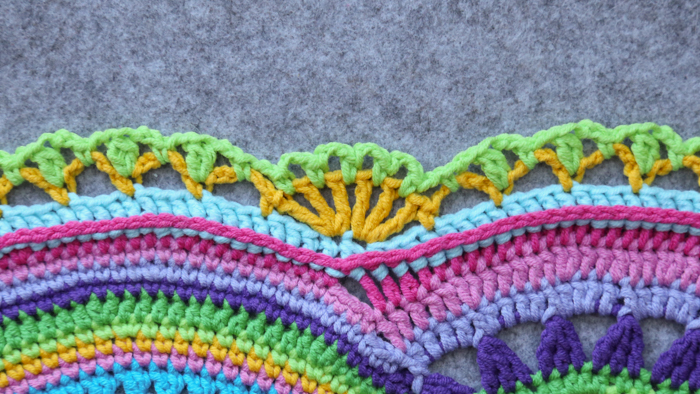
Round 27
Sl st in the next 2 ch sts and in the 2-dc Bobble. Ch 1, sc in the 2-dc Bobble.
*(Ch 5, sc in the next 2-dc Bobble) 6 times. Ch 2, hdc in the next sc. Ch 2, skip the next ch-2 sp, sc in the next ch-3 sp. (Ch 3, sc in the next ch-3 sp) 3 times. Ch 2, skip the next ch-2 sp, hdc in the next sc. Ch 2, sc in the next 2-dc Bobble.*
Repeat from * to * 11 more times, omitting the last sc on the last repeat. Join to the first sc with a sl st.
Stitch Count Per Repeat: 11 sc, 2 hdc, 6 ch-5 sps, 3 ch-3 sps, and 4 ch-2 sps
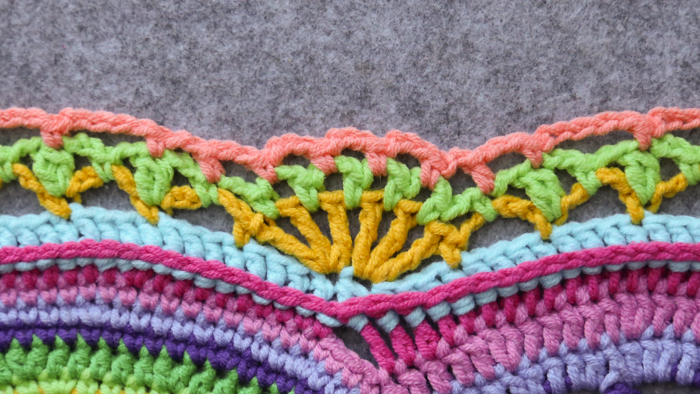
Round 28
The hdc’s from the previous round will be a little bit tricky to work into.
Ch 2 (doesn’t count as a st). Make a 2-dc Bobble in the same st as the sl st join.
*(Ch 2, sc in the next ch-5 sp. Ch 2, make a 2-dc Bobble in the next sc) 6 times. Ch 2, skip the next ch-2 sp, [dc, ch 1, dc] in the next hdc. Ch 2, skip the next ch-2 sp, sc in the next ch-3 sp. (Ch 3, sc in the next ch-3 sp) twice. Ch 2, skip the next ch-2 sp, [dc, ch 1, dc] in the next hdc. Ch 2, make a 2-dc Bobble in the next sc.*
Repeat from * to * 11 more times, omitting the last 2-dc Bobble on the last repeat. Join to the top of the first 2-dc Bobble with a sl st.
Stitch Count Per Repeat: 9 sc, 4 dc, 7 2-dc Bobbles, 2 ch-3 sps, 16 ch-2 sps, and 2 ch-1 sps
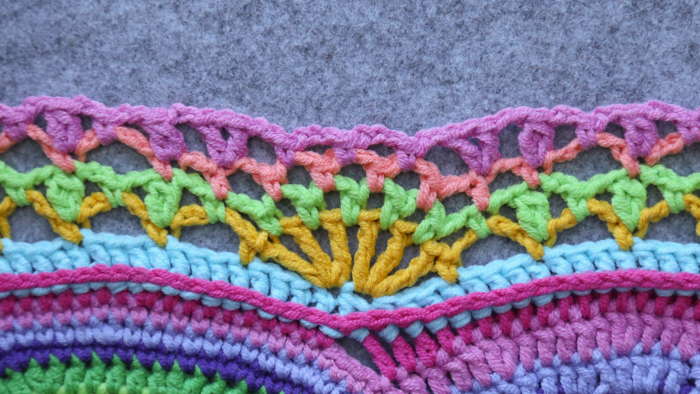
Round 29
Ch 1, sc in the same 2-dc Bobble.
*(Ch 5, sc in the next 2-dc Bobble) 6 times. Ch 2, skip the next ch-2 sp. [2 dc, ch 2, 2 dc] in the next ch-1 sp. Ch 2, skip the next ch-2 sp. Sc in the next ch-3 sp, ch 3, sc in the next ch-3 sp. Ch 2, skip the next ch-2 sp. [2 dc, ch 2, 2 dc] in the next ch-1 sp. Ch 2, skip the next ch-2 sp. Sc in the next 2-dc Bobble.*
Repeat from * to * 11 more times, omitting the last sc on the last repeat. Join to the first sc with a sl st.
Stitch Count Per Repeat: 9 sc, 8 dc, 6 ch-5 sps, 1 ch-3 sp, and 6 ch-2 sps
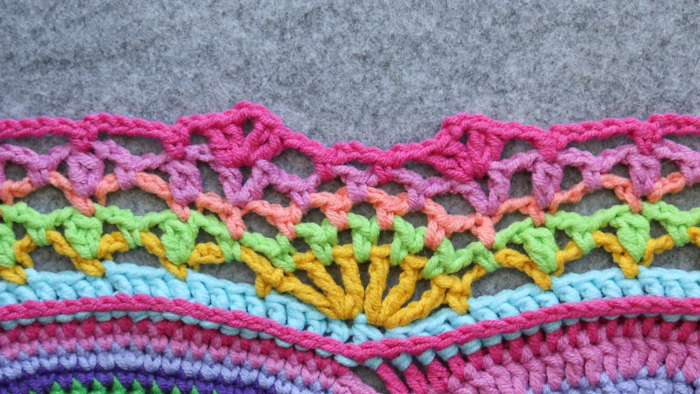
Round 30
Ch 2 (doesn’t count as a st). Make a 2-dc Bobble in the same st as the sl st join.
*(Ch 2, sc in the next ch-5 sp. Ch 2, make a 2-dc Bobble in the next sc) 6 times. Ch 2, skip the next ch-2 sp. [2 dc, ch 2, 2 dc, ch 2, 2 dc] in the next ch-2 sp. Ch 2, skip the next ch-2 sp, sc in the next ch-3 sp. Ch 2, skip the next ch-2 sp. [2 dc, ch 2, 2 dc, ch 2, 2 dc] in the next ch-2 sp. Ch 2, make a 2-dc Bobble in the next sc.*
Repeat from * to * 11 more times, omitting the last 2-dc Bobble on the last repeat. Join to the top of the first 2-dc Bobble with a sl st.
Stitch Count Per Repeat: 7 sc, 7 2-dc Bobbles, 12 dc, and 20 ch-2 sps
Round 31
Ch 1, sc in the same 2-dc Bobble.
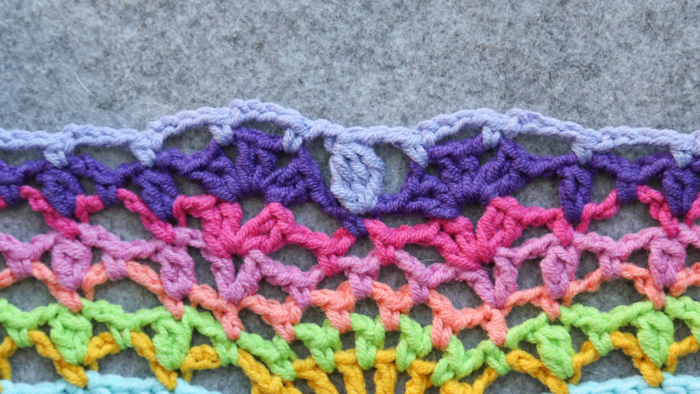
*(Ch 4, sc in the next 2-dc Bobble) 6 times. Ch 4, skip the next ch-2 sp, sc in the next ch-2 sp. Ch 4, sc in the next ch-2 sp. Ch 2, make a 3-tr Bobble in the next sc. Ch 2, skip the next ch-2 sp, sc in the next ch-2 sp. Ch 4, sc in the next ch-2 sp. Ch 4, sc in the next 2-dc Bobble.*
Repeat from * to * 11 more times, omitting the last sc on the last repeat. Join to the first sc with a sl st.
Stitch Count Per Repeat: 11 sc, 1 3-tr Bobble, 10 ch-4 sps, and 2 ch-2 sps
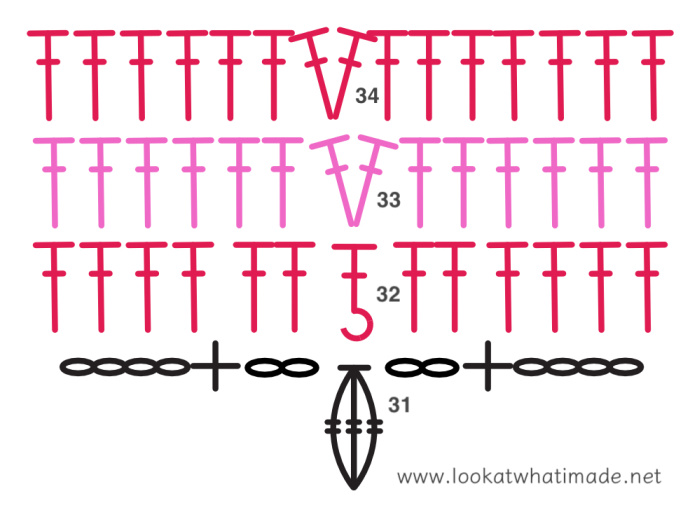
Round 32
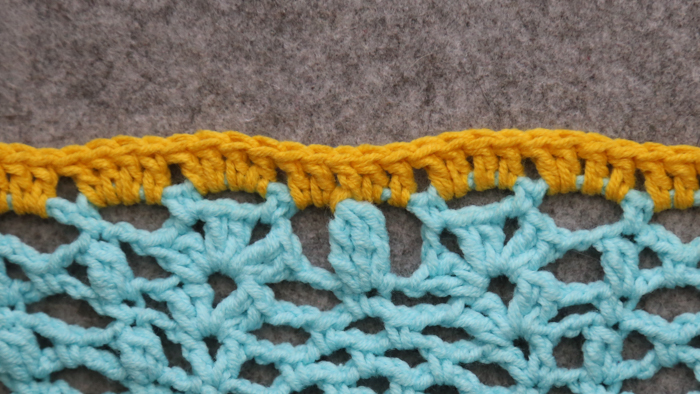
Sl st in the next ch-4 sp. [Ch 3, 3 dc] in the same ch-4 sp. (Make 4 dc in the next ch-4 sp) 7 times. Make 2 dc in the next ch-2 sp, FPdc around the next 3-tr Bobble, make 2 dc in the next ch-2 sp.
*(Make 4 dc in the next ch-4 sp) 10 times. Make 2 dc in the next ch-2 sp, FPdc around the next 3-tr Bobble, make 2 dc in the next ch-2 sp.*
Repeat from * to * 10 more times. (Make 4 dc in the next ch-4 sp) twice. Join to the top of the first dc with a sl st.
Stitch Count: 540 sts – 528 dc and 12 FPdc {44 dc, 1 FPdc per repeat}
Note
If your tension is looser than mine and your mandala already measures 72cm unblocked, you can omit the last two rounds to ensure it fits a 75cm hula hoop.
Round 33
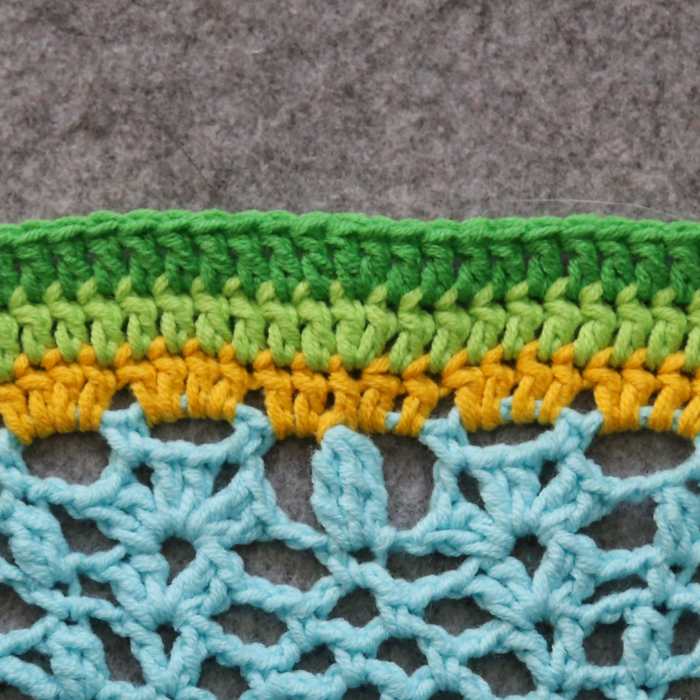
Ch 3, dc in the next 33 sts. Make 2 dc in the next st, which should be the FPdc. (Dc in the next 44 sts, make 2 dc in the next FPdc) 11 times. Dc in the last 10 sts. Join to the top of the first dc with a sl st.
Stitch Count: 552 dc
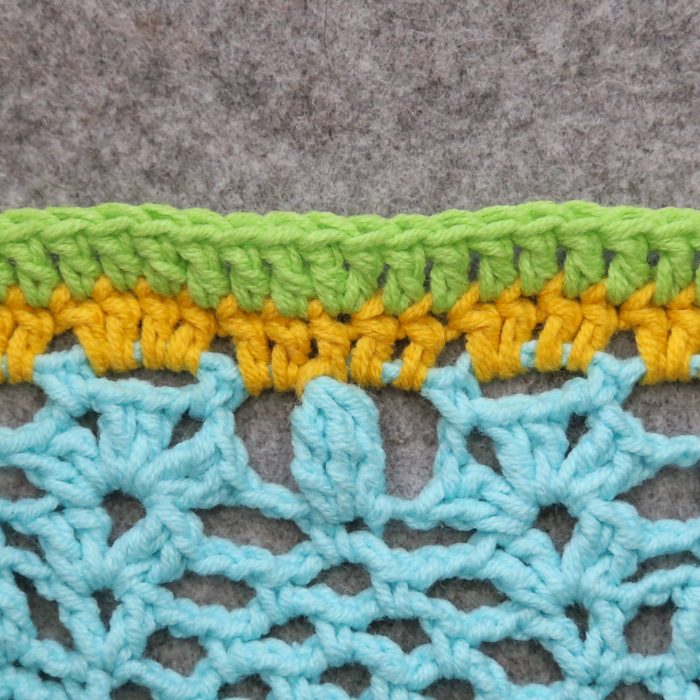
Round 34
Ch 3, dc in the next 34 sts. Make 2 dc in the next st, which should be the second dc of the increase from the previous round. (Dc in the next 45 sts, make 2 dc in the next st) 11 times. Dc in the last 10 sts. Join to the top of the first dc with a sl st. Fasten off and work away your ends.
Stitch Count: 564 dc
Attaching the Mandala to a Hoop
There are many ways to attach a mandala to a hoop. For this mandala, I chose to sew it onto the hoop, working into every third st.
Before you start attaching your mandala to the hoop, make sure that it will fit. My mandala was 72cm unblocked and 75cm blocked, which means it was perfect for a 75cm hula hoop. If your tension is looser than mine, you can omit the last two rounds above as mentioned in the ‘Note’ before Round 33. The last part does have a fair amount of stretch, so if your mandala measures 75cm unblocked, you can easily stretch it to fit a 80cm hoop.
To start, you will need a length of yarn roughly twice as long as the circumference of your hoop. Since I used a 75cm hoop, this was about 5m of yarn.
Fold the yarn in half to find the centre of the yarn and then tie it to the hoop with a double knot so that you have two 2.5m ends on either side of the knot.
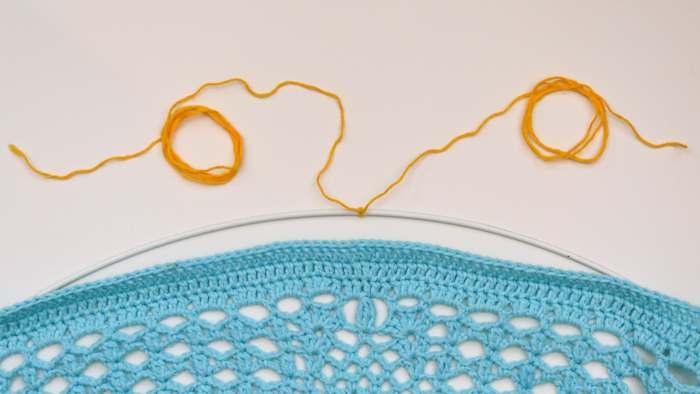
Attach the mandala to the hoop using 12 stitch markers (one at the top of every ‘Pineapple’). This will hold the mandala in place as you work. You can remove these stitch markers as you go.
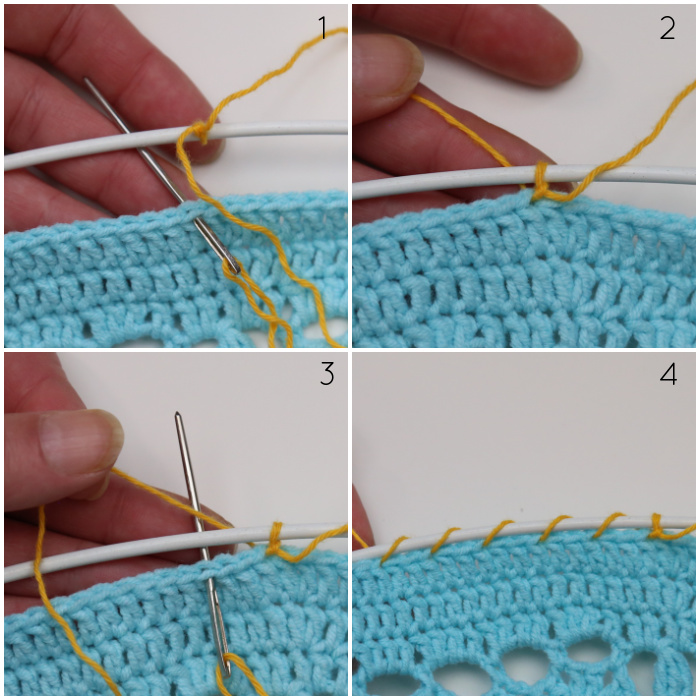
Thread one of the yarn ends onto your needle and insert it from front to back into any stitch of the last round and around the hoop {Photo 1}. Pull the yarn tight {Photo 2}. *Skip the next 2 sts, insert your needle from front to back into the next stitch and around the hoop {Photo 3}. Pull your yarn tight.*
Repeat from * to * until you have attached half of the mandala. Work your end away on the back of your work. (I usually leave this step until I have attached both halves and can assess the neatness of my join/spacing)
Thread the other yarn end onto your needle and repeat the process above, working in the opposite direction. When you get back to the point where you stopped attaching the first half, work your end away on the back of your work.
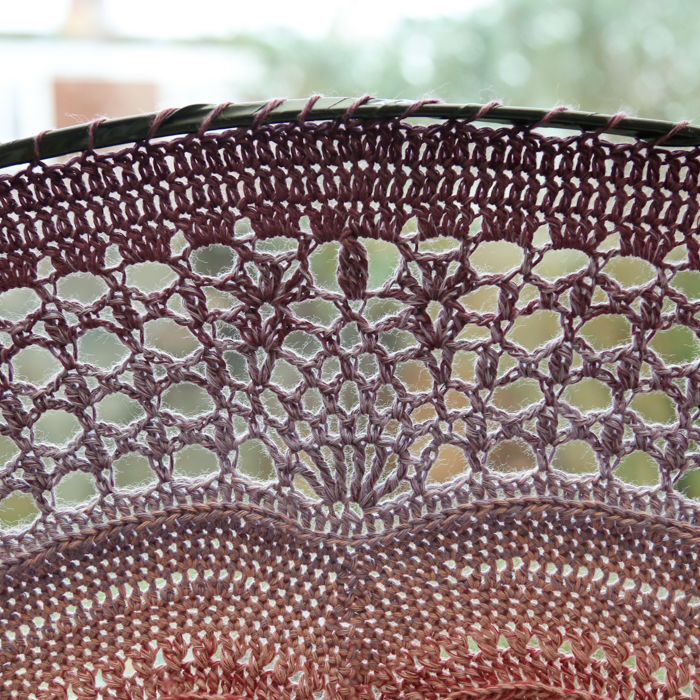
And there you go. All done!
I hope you have enjoyed making this mandala, and that you have imbued it with many loving memories! Please don’t forget to use #iCarryYourHeartCrochet if you share your work x

This blog post contains affiliate links. I only link to products I personally use or would use. All opinions are my own.


Carol Derbis says
DEDRI,
I haven’t connected with you for a very long time! When I attended the Crochet Get Together in England (2016!) you were kind enough to invite me to stay at your home before we went down to the Coast – ride with you and (I think it was Lynn?) and then I stayed with you for a day or two before I ventured into London for a few days. I’ll never forget your kindness and the warmth that I felt from you and your beautiful sons and husband! I don’t know if I ever conveyed my Gratitude to you at that time.
My life has changed dramatically – my Soul Mate, Tom, with whom I spent 22+ wonderful years in San Diego, CA, passed away in 2022, and then I was “forced” (for economic and family needs) to move to Maryland (I now live closer to my three daughters, who are so loving and devoted to me and my happiness. I’m also able to see three of my grandchildren – which I was not able to do in San Diego. My youngest grandchild (and ONLY!) granddaughter, now 11, is an exceptional dancer – I was able to attend her last Recital recently – and she was also inducted into the National Honor Society for Dance Arts! She looks like a dancer – and is excellent on stage!
I think of you and your family often – and would love to see a recent picture of your beautiful boys – who I know are growing up so very fast!
Still love your patterns! I haven’t crocheted for a long time – seems like life got in the way -= but want desperately to start again. I’ve downloaded (THANK YOU!) your beautiful “I Carry Your Heart” pattern and look forward to starting it!
Prayers for you and your family! Say Hello to Christiaan for me….he’s such a good man!
Dedri Uys says
Hi Carol! It is so good to hear from you again. I am so sorry to hear about Tom. I am glad that your new life offers you the opportunity to spend more time with your grand children, and well done to your grand daughter. that is such a huge accomplishment. I remember your visit with as much fondness as you seem to. That was such a good visit. I will pass on your regards. Take such good care of yourself!
Jay Crafter says
Thank you Dedri,
This is a beautiful design, as are all your designs. I love them all! I am looking forward to completing this part of the mandala although I shall not attach it to a hoop but wait and, when the time comes, grow it into a blanket if you would be kind enough to publish that pattern also!! Thank you. All good wishes to you and your family for 2023.
Jay x
Jenny Lowman says
There are no blanket plans for this beautiful pattern at present.