This is an extension of the original Unseen Mandala I designed three years ago. I hope you have a wonderful New Year’s Eve and that 2024 will be a year of growth, gentle learning, and blessings for you. May you find people who give you the safety to be exactly who you are, and may you shine your lights so that those who need you can find you.
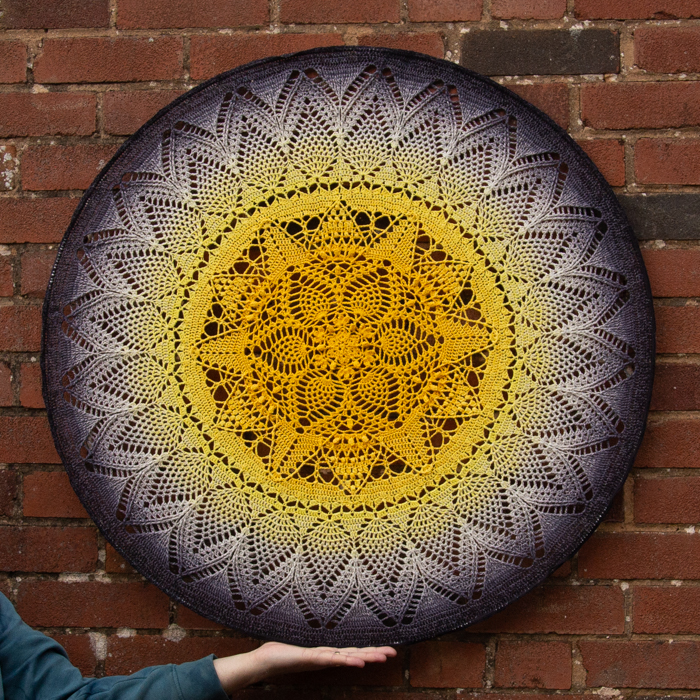
If this is the first time you’ve heard about this extension, you an read a bit more about this 3-year journey HERE.
Extended Unseen Mandala
© Dedri Uys and Scheepjes 2023. All Rights Reserved.
Tested by Minno Baarman, Sabi Bulla, Anna Moore, and Niamh Holcroft.
Charts by Dedri Uys and Masako Kawahara.
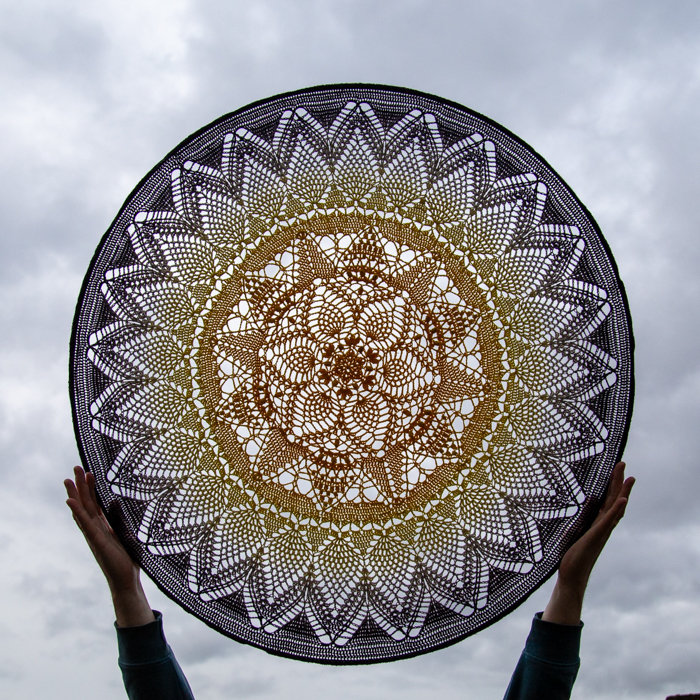
Resources
- Ravelry: Add to Your Ravelry Queue
- Hashtag: #extendedUnseenMandala
If you prefer a formatted ad-free US PDF version of this pattern, you can buy it HERE in my Ravelry Store or HERE in my Etsy Shop.
Difficulty
Intermediate.
Materials
- 3mm hook
- Scheepjes Whirl (60% cotton/40% acrylic), 215–225g/1000m/1093yds
- Dandelion Munchies (787) x 1 ball
- 85cm/33.5” florist hoop – (I purchase these ones from Etsy, and if you look at the reviews, you’ll see a photo of my Celestial mandala!)
Gauge
- At the end of Round 8, your flower should measure 11.5cm/4.5” (unblocked)
- At the end of Round 29, your mandala should measure 44cm/17.36” unblocked and 47cm/18.5” blocked. I used 58g of Whirl up to that point.
Please note that there is enough yarn to allow for a slightly looser tension. I used a 3.75mm hook to achieve the recommended gauge (because I am a very tight crocheter).
Size
85cm/33.5” in diameter (blocked/stretched on wire hoop)
I used 195g of Whirl up to the end of Round 51 and had 30g left.
Abbreviations, Punctuation, Chart Legend, and Notes
Special Stitches for Extension/Part 3
- FPtr2tog – Yarn over twice and insert your hook from front to back to front around the post of the indicated st/sp. Yarn over and pull up a loop. (Yarn over and pull through 2 loops) twice. Yarn over twice and insert your hook from front to back to front around the post of the NEXT indicated st/sp. Yarn over and pull up a loop. (Yarn over and pull through 2 loops) twice. Yarn over and pull through all 3 loops.
Instructions
Using the yarn and hook suggested above (or the size needed to obtain gauge), and working to the gauge above, complete the first 2 parts of the original Unseen Mandala:
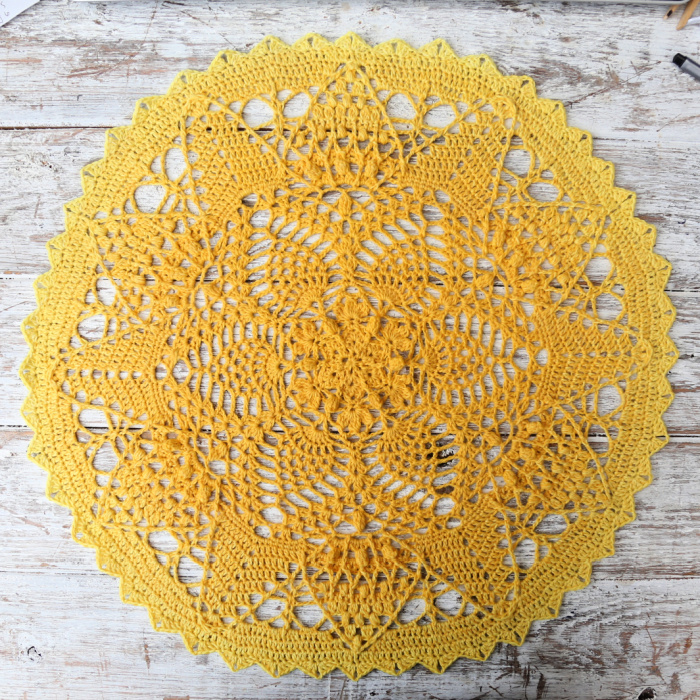
At this point, which is the end of the original mandala, I had used 58g Whirl and the mandala measured 44cm/17.36” unblocked and 47cm/18.5” blocked.
Then, continue on with the Extension/Part 3 below.
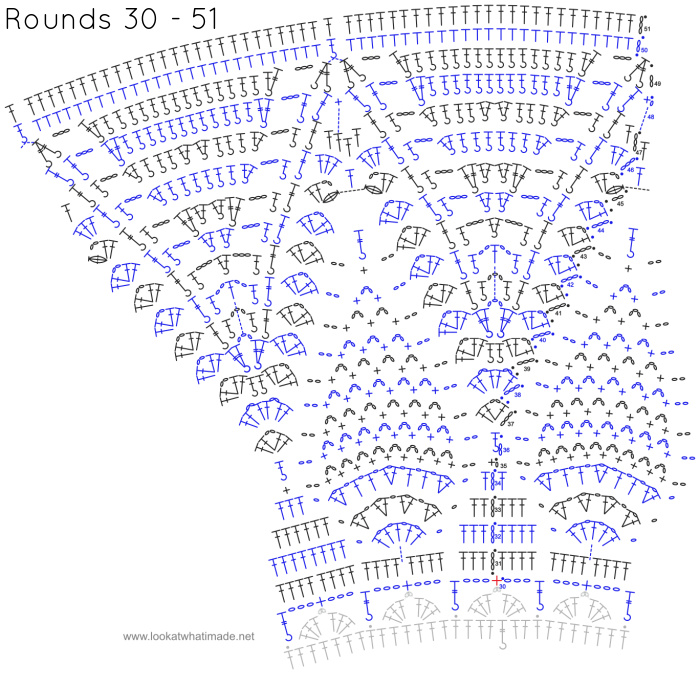
Round 30
Join your yarn by making a standing sc in the ch-2 sp above any FPtr from Round 28. (Ch 3, make a FPtr around the next sl st, ch 3, sc in the next ch-2 sp) 48 times, omitting the last sc on the last repeat. Join to the first sc with a sl st.
Stitch Count: 48 sc, 48 FPtr, and 96 ch-3 sps
Round 31
Sl st into the next ch-3 sp. Ch 3, make 3 dc in the same ch-3 sp. (Make 4 dc in the next ch-3 sp) 95 times. Join to the top of the beg ch-3 with a sl st.
Stitch Count: 384 dc
Round 32
Ch 3, dc in the next 3 sts.
(Ch 1 and skip the next 4 sts. Working between the last dc of the 4-dc group and the first dc on the next 4-dc group: [Dc, ch 1] 5 times. Skip the next 4 sts, dc in the next 8 sts) 23 times.
Ch 1 and skip the next 4 sts. Working between the last dc of the 4-dc group and the first dc on the next 4-dc group: [Dc, ch 1] 5 times. Skip the next 4 sts, dc in the last 4 sts. Join to the top of the beg ch-3 with a sl st.
Stitch Count: 312 dc and 144 ch-1 sps
Round 33
Ch 3, dc in the next 2 sts and skip the last st of the 8-dc group.
*Ch 1 and skip the next ch-1 sp. ([Dc, ch 1, dc, ch 1] in the next ch-1 sp) 4 times. Skip the last ch-1 sp. Working into the 8-dc group, skip the first st, dc in the next 6 sts, skip the last st.*
Rep from * to * 22 more times.
Ch 1 and skip the next ch-1 sp. ([Dc, ch 1, dc, ch 1] in the next ch-1 sp) 4 times. Skip the last ch-1 sp. Working into the 8-dc group that contains the first 3 dc, skip the first st, dc in the last 3 sts. Join to the top of the beg ch-3 with a sl st.
Stitch Count: 336 dc and 216 ch-1 sps
Round 34
Ch 3, dc in the next st and skip the last st of the 6-dc group.
*Ch 1 and skip the next ch-1 sp. ([Dc, ch 1, dc, ch 1] in the next ch-1 sp, [dc, ch 1] in the next two ch-1 sps) twice. [Dc, ch 1, dc, ch 1] in the next ch-1 sp. Skip the last ch-1 sp.** Working into the 6-dc group, skip the first 2 sts, dc in the next 3 sts, skip the last st.*
Rep from * to * 22 more times, and from * to ** once.
Working into the last 6-dc group that contains the first 2 dc, skip the first 2 sts, dc in the next st. Join to the top of the beg ch-3 with a sl st.
Stitch Count: 312 dc and 264 ch-1 sps
Round 35
Ch 1 (doesn’t count as a st). Sc in the same st as the sl st join.
*Skip the last dc of the 3-dc group. Ch 2, skip the next ch-1 sp. (Sc in the next ch-1 sp, ch 3) 8 times. Sc in the last ch-1 sp of the Petal. Ch 2, skip the next ch-1 sp and the first st of the 3-dc group. Sc in the next st.*
Rep from * to * 23 more times, omitting the last sc on the last repeat. Join to the top of the first sc with a sl st.
Stitch Count: 240 sc, 192 ch-3 sps, and 48 ch-2 sps
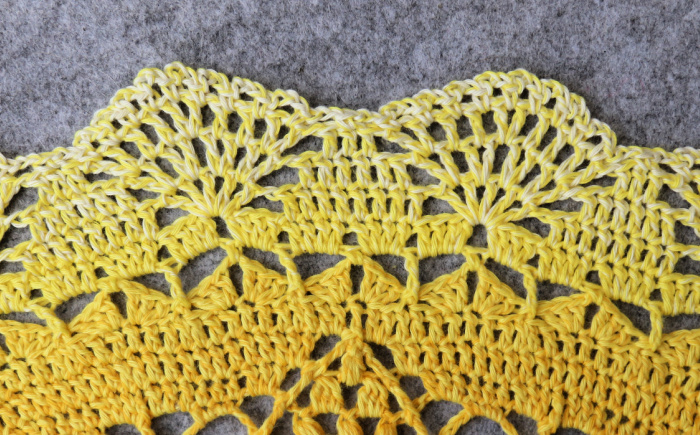
Round 36
Ch 2 (doesn’t count as a st). Make a FPdc around the same sc. *Ch 2, skip the next ch-2 sp. (Sc in the next ch-3 sp, ch 3) 7 times. Sc in the last ch-3 sp of the Petal. Ch 2, skip the next ch-2 sp. FPdc around the sc made into the 3-dc group from Round 34.*
Rep from * to * 23 more times, omitting the last FPdc on the last repeat. Join to the top of the first FPdc with a sl st.
Stitch Count: 192 sc, 24 FPdc, 168 ch-3 sps, and 48 ch-2 sps
Round 37
[Ch 3, dc, ch 2, 2 dc] in the same FPdc. *Ch 2, skip the next ch-2 sp. (Sc in the next ch-3 sp, ch 3) 6 times. Sc in the last ch-3 sp of the Petal. Ch 2, skip the next ch-2 sp.** [2 dc, ch 2, 2 dc] in the next FPdc.*
Rep from * to * 22 more times, and from * to ** once. Join to the top of the beg ch-3 with a sl st.
Stitch Count: 168 sc, 96 dc, 144 ch-3 sps, and 72 ch-2 sps
Round 38
Sl st in the next st and in the ch-2 sp. [Ch 3, dc, ch 2, 2 dc, ch 2, 2 dc] in the same ch-2 sp. *Ch 2, skip the next ch-2 sp. (Sc in the next ch-3 sp, ch 3) 5 times. Sc in the last ch-3 sp of the Petal. Ch 2, skip the next ch-2 sp.** [2 dc, ch 2, 2 dc, ch 2, 2 dc] in the next ch-2 sp.*
Rep from * to * 22 more times, and from * to ** once. Join to the top of the beg ch-3 with a sl st.
Stitch Count: 144 sc, 144 dc, 120 ch-3 sps, and 96 ch-2 sps
Round 39
Sl st in the next st and in the ch-2 sp. [Ch 3, dc, ch 2, 2 dc] in the same ch-2 sp. FPdc around each of the next 2 dc. [2 dc, ch 2, 2 dc] in the next ch-2 sp. *Ch 2, skip the next ch-2 sp. (Sc in the next ch-3 sp, ch 3) 4 times. Sc in the last ch-3 sp of the Petal. Ch 2, skip the next ch-2 sp.** [2 dc, ch 2, 2 dc] in the next ch-2 sp. FPdc around each of the next 2 dc. [2 dc, ch 2, 2 dc] in the next ch-2 sp.*
Rep from * to * 22 more times, and from * to ** once. Join to the top of the beg ch-3 with a sl st.
Stitch Count: 120 sc, 192 dc, 48 FPdc, 96 ch-3 sps, and 96 ch-2 sps
At this point, I had used 105g of Whirl and the mandala measured 64cm blocked.
Round 40
Sl st in the next st and in the ch-2 sp. [Ch 3, dc, ch 2, 2 dc] in the same ch-2 sp. Skip the next 2 dc. Make 2 FPtr around the next FPdc, ch 3, make 2 FPtr around the next FPdc. [2 dc, ch 2, 2 dc] in the next ch-2 sp.
*Ch 2, skip the next ch-2 sp. (Sc in the next ch-3 sp, ch 3) 3 times. Sc in the last ch-3 sp of the Petal. Ch 2, skip the next ch-2 sp.**
[2 dc, ch 2, 2 dc] in the next ch-2 sp. Skip the next 2 dc. Make 2 FPtr around the next FPdc, ch 3, make 2 FPtr around the next FPdc. [2 dc, ch 2, 2 dc] in the next ch-2 sp.*
Rep from * to * 22 more times, and from * to ** once. Join to the top of the beg ch-3 with a sl st.
Stitch Count: 96 sc, 192 dc, 96 FPtr, 96 ch-3 sps, and 96 ch-2 sps
Round 41
Sl st in the next st and in the ch-2 sp. [Ch 3, dc, ch 2, 2 dc] in the same ch-2 sp. Skip the next 2 dc. FPtr around the next FPtr, FPdc around the next FPtr. Ch 3, skip the ch-3 sp. FPdc around the next FPtr, FPtr around the next FPtr. [2 dc, ch 2, 2 dc] in the next ch-2 sp.
*Ch 2, skip the next ch-2 sp. (Sc in the next ch-3 sp, ch 3) twice. Sc in the last ch-3 sp of the Petal. Ch 2, skip the next ch-2 sp.**
[2 dc, ch 2, 2 dc] in the next ch-2 sp. Skip the next 2 dc. FPtr around the next FPtr, FPdc around the next FPtr. Ch 3, skip the ch-3 sp. FPdc around the next FPtr, FPtr around the next FPtr. [2 dc, ch 2, 2 dc] in the next ch-2 sp.*
Rep from * to * 22 more times, and from * to ** once. Join to the top of the beg ch-3 with a sl st.
Stitch Count: 72 sc, 192 dc, 48 FPdc, 48 FPtr, 72 ch-3 sps, and 96 ch-2 sps
Round 42
Sl st in the next st and in the ch-2 sp. [Ch 3, dc, ch 2, 2 dc] in the same ch-2 sp. Skip the next 2 dc. FPtr around the next FPtr, FPdc around the next FPdc. Ch 2, dc into ch-3 sp of Round 40, working OVER ch-3 sp of Round 41, ch 2. FPdc around the next FPdc, FPtr around the next FPtr. [2 dc, ch 2, 2 dc] in the next ch-2 sp.
*Ch 2, skip the next ch-2 sp. Sc in the next ch-3 sp, ch 3, sc in the last ch-3 sp of the Petal. Ch 2, skip the next ch-2 sp.**
[2 dc, ch 2, 2 dc] in the next ch-2 sp. Skip the next 2 dc. FPtr around the next FPtr, FPdc around the next FPdc. Ch 2, dc into ch-3 sp of Round 40, working OVER ch-3 sp of Round 41, ch 2. FPdc around the next FPdc, FPtr around the next FPtr. [2 dc, ch 2, 2 dc] in the next ch-2 sp.*
Rep from * to * 22 more times, and from * to ** once. Join to the top of the beg ch-3 with a sl st.
Stitch Count: 48 sc, 216 dc, 48 FPdc, 48 FPtr, 24 ch-3 sps, and 144 ch-2 sps
Round 43
Sl st in the next st and in the ch-2 sp. [Ch 3, dc, ch 2, 2 dc] in the same ch-2 sp.
*Skip the next 2 dc. FPtr around the next FPtr, FPdc around the next FPdc. Ch 3, skip the next ch-2 sp, make 2 FPdc around the next dc. Ch 3, skip the next ch-2 sp, FPdc around the next FPdc, FPtr around the next FPtr. [2 dc, ch 2, 2 dc] in the next ch-2 sp.
Ch 2, skip the next ch-2 sp, sc in the next ch-3 sp. Ch 2, skip the next ch-2 sp.**
[2 dc, ch 2, 2 dc] in the next ch-2 sp. *
Rep from * to * 22 more times, and from * to ** once. Join to the top of the beg ch-3 with a sl st.
Stitch Count: 24 sc, 192 dc, 96 FPdc, 48 FPtr, 48 ch-3 sps, and 96 ch-2 sps
Round 44
Sl st in the next st and in the ch-2 sp. [Ch 3, dc, ch 2, 2 dc] in the same ch-2 sp.
*Skip the next 2 dc. FPtr around the next FPtr, FPdc around the next FPdc. Ch 3, skip the next ch-3 sp. (Make 2 FPdc around the next FPdc) twice. Ch 3, skip the next ch-3 sp, FPdc around the next FPdc, FPtr around the next FPtr. [2 dc, ch 2, 2 dc] in the next ch-2 sp. Skip the next ch-2 sp, FPtr around the next sc, skip the next ch-2 sp.** [2 dc, ch 2, 2 dc] in the next ch-2 sp.*
Rep from * to * 22 more times, and from * to ** once. Join to the top of the beg ch-3 with a sl st.
Stitch Count: 192 dc, 144 FPdc, 72 FPtr, 48 ch-3 sps, and 48 ch-2 sps
Round 45
Sl st in the next st and in the ch-2 sp. Ch 2 (doesn’t count as a st). [Dc Bobble, ch 2, 2 dc] in the same ch-2 sp.
*Skip the next 2 dc. FPtr around the next FPtr, FPdc around the next FPdc. Ch 3, skip the next ch-3 sp. Make 2 FPtr around the next FPdc. (Make 2 FPdc around the next FPdc) twice. Make 2 FPtr around the last FPdc. Ch 3, skip the next ch-3 sp, FPdc around the next FPdc, FPtr around the next FPtr. [2 dc, ch 2, Dc Bobble] in the next ch-2 sp.** [Dc Bobble, ch 2, 2 dc] in the next ch-2 sp.*
Rep from * to * 22 more times, and from * to ** once. Join to the top of the first Dc Bobble with a sl st.
Stitch Count: 96 dc, 144 FPdc, 144 FPtr, 48 Dc Bobbles, 48 ch-3 sps, and 48 ch-2 sps
Round 46
Sl st in the next ch-2 sp. Ch 3, make 2 dc in the same ch-2 sp.
*Skip the next 2 dc. FPtr around the next FPtr, FPdc around the next FPdc. Ch 3, skip the next ch-3 sp. Make 2 FPdc around the next FPtr. FPdc around the next 6 sts. Make 2 FPdc around the last FPtr. Ch 3, skip the next ch-3 sp, FPdc around the next FPdc, FPtr around the next FPtr. Skip the next 2 dc. Make 3 dc in the next ch-2 sp. Dc between the next 2 Dc Bobbles.** Make 3 dc in the next ch-2 sp.*
Rep from * to * 22 more times, and from * to ** once. Join to the top of the beg ch-3 with a sl st.
Stitch Count: 168 dc, 288 FPdc, 48 FPtr, and 48 ch-3 sps
Round 47
Ch 3, dc in the next st.
*Skip the next dc. FPtr around the next FPtr, FPdc around the next FPdc. Ch 3, skip the next ch-3 sp. (Make 2 FPdc around the next FPdc. FPdc around the next 3 sts. Make 2 FPdc around the next FPdc) twice. Ch 3, skip the next ch-3 sp, FPdc around the next FPdc, FPtr around the next FPtr. Skip the next 2 dc. Dc in the next 4 sts.*
Rep from * to * 23 more times, omitting the last 2 dc on the last repeat. Join to the top of the beg ch-3 with a sl st.
Stitch Count: 96 dc, 384 FPdc, 48 FPtr, and 48 ch-3 sps
Round 48
Ch 1 (doesn’t count as a st). Sc in the same st.
*Skip the next dc. FPtr around the next 2 sts. Ch 3, skip the next ch-3 sp. Make 2 FPtr around the next FPdc. FPdc around the next 12 sts. Make 2 FPtr around the next FPdc. Ch 3, skip the next ch-3 sp, FPtr around the next 2 sts.** Skip the next 2 dc. Sc in the next dc.*
Rep from * to * 22 more times, and from * to ** once. Join to the top of the first sc with a sl st.
Stitch Count: 24 sc, 288 FPdc, 192 FPtr, and 48 ch-3 sps
Round 49
Ch 2 (doesn’t count as a st).
*FPtr2tog over the next 2 FPtr. Ch 3, skip the next ch-3 sp. (FPtr, FPdc) around the next FPtr. FPdc around the next 14 sts. (FPdc, FPtr) around the next FPtr. Ch 3, skip the next ch-3 sp, FPtr2tog over the next 2 FPtr. Skip the next sc.*
Rep from * to * 23 more times. Join to the top of the first FPtr2tog with a sl st.
Stitch Count: 384 FPdc, 48 FPtr, 48 FPtr2tog, and 48 ch-3 sps
Round 50
Sl st in the next ch-3 sp. Ch 2 (counts as hdc). Make 3 hdc in the same ch-3 sp.
*Hdc in the next 18 sts, make 4 hdc in the next ch-3 sp. FPdc around both of the FPtr2tog at the same time.** Make 4 hdc in the next ch-3 sp.*
Rep from * to * 22 more times, and from * to ** once. Join to the top of the beg ch-2 with a sl st.
Stitch Count: 624 hdc, and 24 FPdc
Round 51
Ch 3 (counts as dc). Dc in the rem 647 sts. Join to the top of the beg ch-3 with a sl st. Fasten off and work away your ends.
Stitch Count: 648 dc
At this point, your mandala is finished.
If you need a few more rounds, you can repeat Round 51 a few times. Due to the generous number of stitches in the last round, you won’t have to increase.
I repeated it once to make it easier to crochet the mandala to the hoop (see Attaching Method 2 below). This extra round used 9g of Whirl.
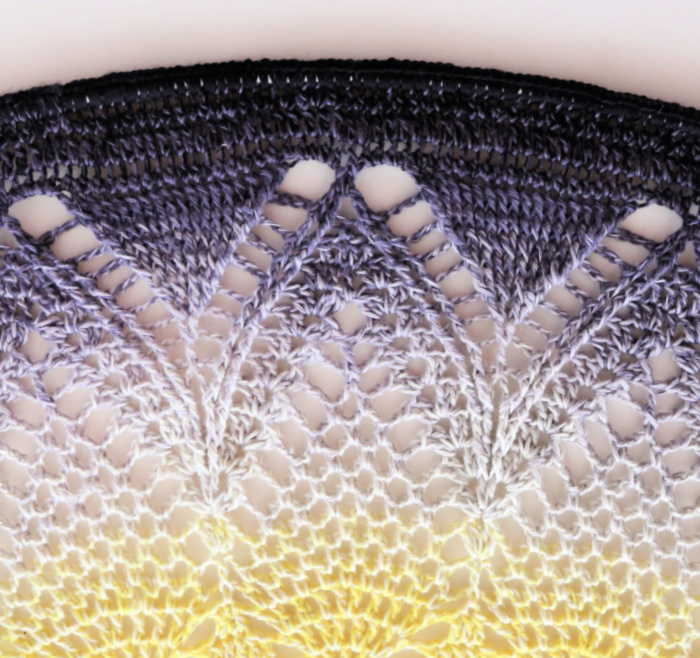
Alternatively, you can have a look at the three extra rounds my tester Sabi Bulla added to hers. You can find them HERE.
Attaching Method 1: Sewing
This is by far the easiest and quickest method!
To start, you will need 5m of yarn (roughly twice as long as the circumference of your hoop).
Fold the yarn in half to find the centre of the yarn and then tie it to the hoop with a double knot so that you have two 2.5m ends on either side of the knot.
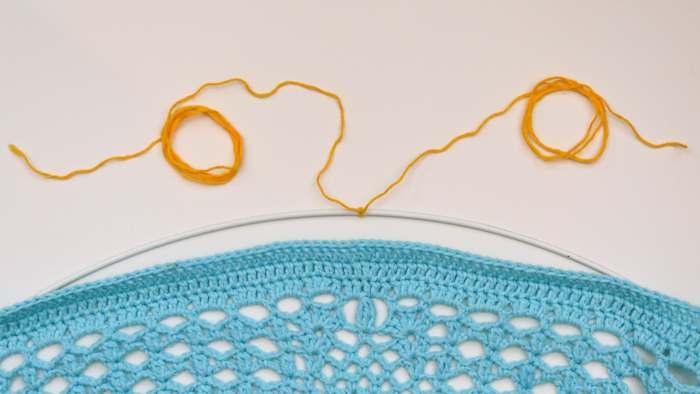
Attach the mandala to the hoop using 12 stitch markers (one at the top of every second ‘Pineapple’). This will hold the mandala in place as you work. You can remove these stitch markers as you go.
Thread one of the yarn ends onto your needle and insert it from front to back into any stitch of the last round and around the hoop {Photo 1}. Pull the yarn tight {Photo 2}. *Skip the next 2 sts, insert your needle from front to back into the next stitch and around the hoop {Photo 3}. Pull your yarn tight.*
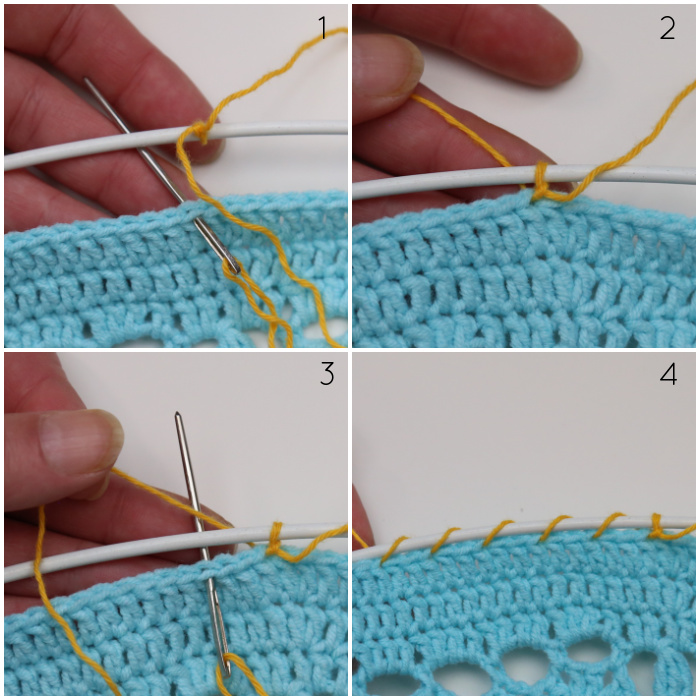
Repeat from * to * until you have attached half of the mandala. Work your end away on the back of your work. (I usually leave this step until I have attached both halves and can assess the neatness of my join/spacing)
Thread the other yarn end onto your needle and repeat the process above, working in the opposite direction. When you get back to the point where you stopped attaching the first half, work your end away on the back of your work.
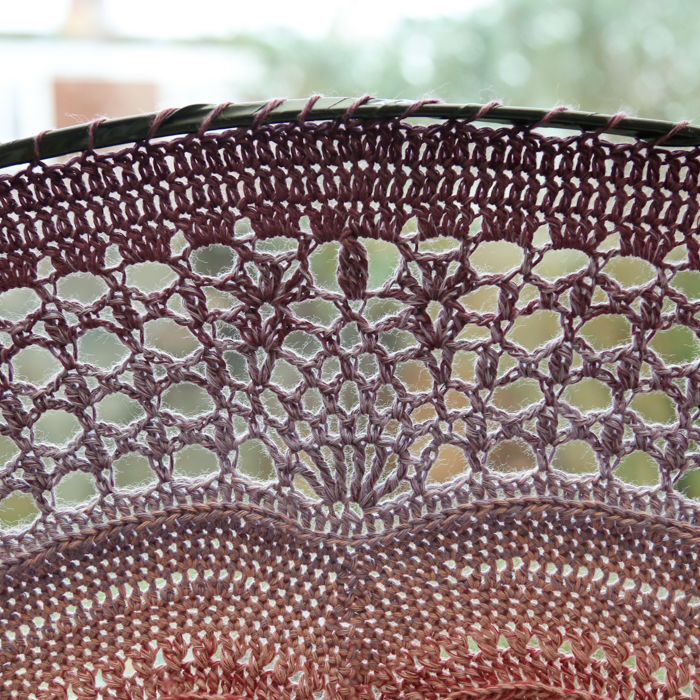
Attaching Method 2: Crochet
This method takes A LONG TIME! I don’t recommend doing it unless you have to, haha! I decided to use it because I bought a white florist hoop and I didn’t want it to show. To ensure that the white didn’t show through, I made 5 single crochets over every 3 sts. You are welcome to make 1 sc in each st around if you prefer.
Because it is fiddly crocheting around the hoop, I added an extra Round so I didn’t have to wrestle with pulling my work tight AND crocheting around the hoop.
I used 11g of Whirl for this joining round.
Attach the mandala to the hoop using 24 stitch markers. I placed the markers between Pineapples. This will hold the mandala in place as you work. You can remove these stitch markers as you go.
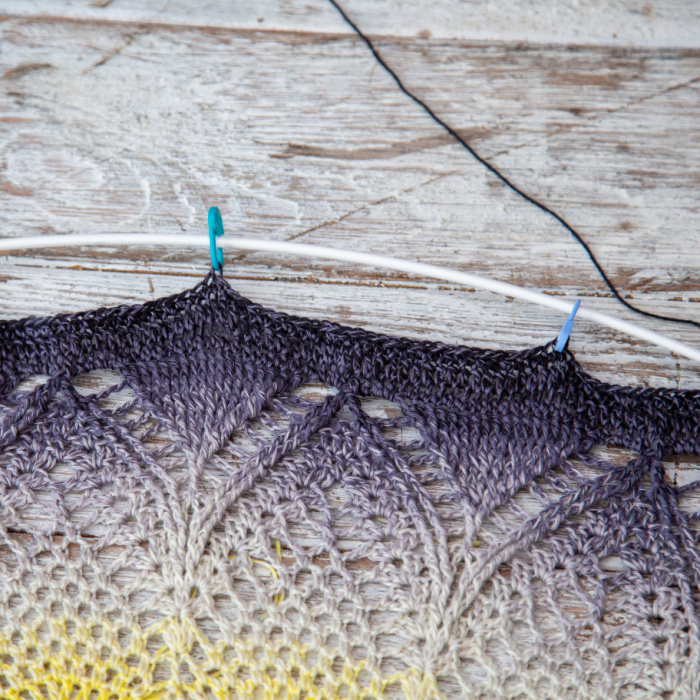
Join your yarn by making a standing sc in any st around, working OVER the hoop, here and throughout. Sc in the same st. Make 2 sc in the next st, sc in the next st. (Make 2 sc in each of the next 2 sts, sc in the next st) all the way around. When you get to the end, join to the first sc with a sl st. Fasten off and work away your ends.
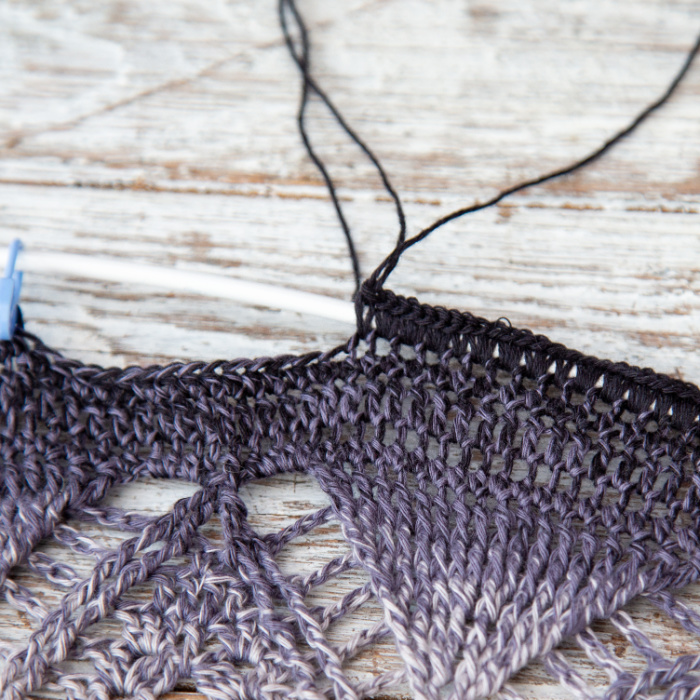
And there you have it. All done!!!


This blog post contains affiliate links. I only link to products I personally use or would use. All opinions are my own.


Kay Loftus says
Dear Dedri,
Great pattern. I have made the yellow to black as pictured for my BFF as a gift. She said gotta have it ..So, I made it. Tricky in places. Love the results.
Jenny Lowman says
So glad you enjoyed making such a lovely gift for your friend! :)
Ksenia H says
Hello,
Beautiful pattern!
I am struggling to find an 85 cm florist ring in Australia or which ships to Australia. I have tried searching LookwhatiMade fb group but no luck. Is there another place to look?
Thank you, Ksenia
Jenny Lowman says
Hi Ksenia. Have you asked the FB group members? We have a fair few from Australia.
Teresa Martin says
Hi Dedri,
Caught sight of unseen mandala on a tik Tok video and fell in love. Was reading through the part one that is listed and noticed the pic at the end of part 1 looks nothing like the pics pictured in the finished product, is there another pattern that I’m missing somewhere!
Thanks
Jenny Lowman says
Hi Teresa. The picture at the end of part one is definitely the same pattern as the finished article in this extended and unextended versions. It looks a little different most likely because part one is made in Stone Washed DK yarn, and the extended version is made in Whirl which is a much thinner yarn and also stretched out on the hoop :)
Jessica says
I really loved making this mandala. The instructions and charts were very clear and easy to follow!
I’m trying to find a hoop for my project. Unfortunately, the shop linked in the pattern doesn’t ship to the US. Would you happen to know of any shops that do? I’ve tried searching around Amazon and Etsy, but all the hoops I find are either too small in diameter (30″ and below) or are too wide to crochet anything to. Thanks for your help!
Jenny Lowman says
Can you let us know the size you need, please? That will help us in helping you if we can.
Maybe ask the question on the Facebook group so that fellow Americans can help :)
Jenny
Manu says
I’m really loving this pattern and I can’t wait to hang it on one of my walls.
I have a question about the pattern – specifically row 18. At the end it says to fasten off (to join on row 19 on the previous ch-3 space). I just wanted to double check this is also true when using a single colour? Thanks!
Jenny Lowman says
I would do as the pattern instructs, Manu. You start in a marked stitch, so I would do the saw even though you are working in just one colour.
Elaine says
How do you hang the ring on the wall without damaging your work. I finished mounting mine on my ring last night and now I cant’ figure out how to hang it on the wall without damaging my work.
Jenny Lowman says
Hi Elaine!
I would make a chain loop and attach that to the hoop, then hang it from a hook.
Barbara Ann Sulis says
This pattern is gorgeous. I have sent for the yarn in several colors
to make one. I have also made several of your continuous baby blankets. Thanks for your patterns.
Jenny Lowman says
We are happy that you are enjoying Dedri’s patterns!
jackie lloyd-jones says
dear debri
i love the way above pattern, how the yarn fades into nothing. placed in the right area of the home it will make a big feature.
i also like that the pattern can be split and again with right yarn a series could be made like planets, traveling from the sun out in space
wow
Jenny Lowman says
So glad you love the pattern, Jackie!