This crochet thimble and scissor keeper has been affectionately dubbed ‘Aunty Mary’s Thing’. This is a relatively straightforward pattern and doesn’t take long to make. In fact, I can guarantee that you can whip one up in less time than it took me to do this photo tutorial!
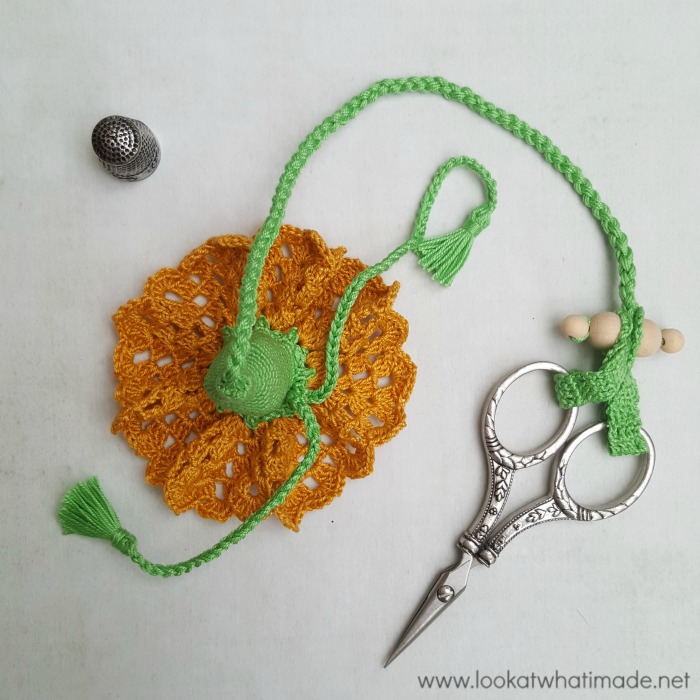
Thimble and Scissor Keeper Pictured With Thimble and Scissors from Simy’s Embroidery Gift Set
The Chatty Bit
Since I started designing, I have made some really terrific crochet friends. Two of these friends are Lynnette (who helped me make my Lydia Blanket and assisted me at last year’s Waltham Abbey Wool Show) and her mum Pat (who made the Colour Crafter Velvet version of my Namaqualand Blanket).
When they came to visit me a few months ago, Pat showed me a thimble and scissor keeper that her aunt had given to her in the seventies. I asked her what you called a thing like that and she said she didn’t know, so I said I would call it ‘Aunty Mary’s Thing’ and the name kinda stuck. We got to talking about Aunty Mary (who is 94 and an absolute delight).

Aunty Mary
The more they talked, the more intrigued I became by the stories and the ‘thing’. I don’t know quite how we reached the point of deciding that I would replicate it, but we did and 4 months later I have finally found the time to share the pattern.
Aunty Mary told me that she made the thimble and scissor keeper in the sixties when she and her husband were living in Khartoum. In that era, she says, there were many clubs for women to attend: the English club, the Greek club, the Italian club…
She went to most of these when there were dances or social functions, but it was the Italian club that she visited most often. Daily, in fact; sometimes for an hour, sometimes for two or three. The women would sit around and socialise while the nannies looked after the children. (Yes, when I asked her she said that it had been every bit as idyllic as it sounds and that they were very sad when they had to return to England in 1970). It was at this club that she made, among many other things, the thimble and scissor keeper she later gifted to Pat.
While I was working on Aunty Mary’s Thing, I watched The Marvelous Mrs. Maisel on Amazon Prime (UK/US). I know it is set in 1950s Manhattan, not 1960s Khartoum, but the stories have somehow gotten entwined in my mind and every time I look at my Aunty Mary’s Things (I’ve made two to gift), I have visions of being dressed like Mrs. Maisel and heading off to a social club for a spot of tea and crafting.
Silly how such a small item can make one forget, just for a moment, that there is still a mountain of washing to do and the kitchen floor… ugh… I better get up and go sweep it… While I do that in my pretend Mrs. Maisel dress, I will leave you to acquaint yourself with the pattern.
Enjoy!
Crochet Thimble and Scissor Keeper Pattern
“Aunty Mary’s Thing”
Please Note: this is a replication of an item made in the sixties. It was peer-taught and no written pattern exists. I do not claim this as my own idea. Thank you to Lynnette, Pat, and Aunty Mary for the wonderful journey this project has taken me on.
Add This Pattern to Your Ravelry Queue.
Materials
- Scheepjes Maxi Bonbon (100% cotton/25g/140m
- MC: 1 x Spring Green (513)
- CC: 1 x Saffron (249) – or any colour you fancy
- 1.5mm Clover Amour crochet hook (for the holder) – available as part of a set on Amazon (UK/US)
- 2mm Clover Amour crochet hook (for the flower) – available on Amazon (UK)
- Thimble
- Small Pair of Scissors
- 2 x 8 mm wooden beads*
- 2 x 12 mm wooden beads*
- For Braiding:
- 2 Pins – I am using Cohana Pins for this tutorial
- A sturdy piece of felt, a cushion, or your trouser leg (yes, really!)
*Alternatively, you can use two buttons that are small enough to fit through the button holes on the scissor keep, but large enough that they don’t fit through the central hole on the ‘stem’.
Abbreviations
US Terminology
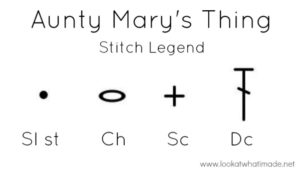
- Beg – Beginning
- Ch – Chain
- Dc – Double crochet
- Sc – Single crochet
- Sp/sps – Space/spaces
- Sl st – Slip stitch
- St/sts – Stitch/stitches
Gauge
12 sts and 13 rows per 2.5cm/1”, using sc and 1.5mm hook.
Size
Holder: 4.5cm long and 7.5cm in circumference at end of Round 22.
Notes
Sizing
You can stop the increase rounds early if your thimble holder is too wide. You can also adjust the height of the thimble holder by making more or fewer ‘straight’ rounds.
Running Stitch Marker
I suggest using a Running Stitch Marker to mark the first st of each round. This not only helps you see whether you have completed your round correctly, it also helps when counting the rounds.
To use a Running Stitch Marker, take a piece of scrap yarn and place it over your work before making the first st of the round. When you have completed the round, flick the scrap yarn back over your work before making the first st of the next round. Keep flicking it back and forth over your work at the start of each round. When working in a spiral, the running stitch marker should creep steadily to the right (left, if you are left-handed). Once done, simply pull on the scrap yarn to remove it.
Instructions
Thimble Holder
With MC and the 1.5mm hook, ch 9, join to the first ch to form a ring.
Round 1: Ch 1 (doesn’t count as a st throughout), make 12 sc into the ring. Join to the first sc with a sl st. {12 sc}
Round 2: Ch 1, sc in each st around. Join to the first sc with a sl st. {12 sc }
Round 3: As Round 2.
Round 4: Ch 1, (make 2 sc in the next st, sc in the next 3 sts) 3 times. Join to the first sc with a sl st. {15 sc }
Round 5: Ch 1, (make 2 sc in the next st, sc in the next 4 sts) 3 times. Join to the first sc with a sl st. {18 sc }
Round 6: Ch 1, (make 2 sc in the next st, sc in the next 5 sts) 3 times. Join to the first sc with a sl st. {21 sc }
Round 7: Ch 1, (make 2 sc in the next st, sc in the next 6 sts) 3 times. Join to the first sc with a sl st. {24 sc }
Round 8: Ch 1, (make 2 sc in the next st, sc in the next 7 sts) 3 times. Join to the first sc with a sl st. {27 sc }
Round 9: Ch 1, (make 2 sc in the next st, sc in the next 8 sts) 3 times. Join to the first sc with a sl st. {30 sc }
Round 10: Ch 1, sc in each st around. Join to the first sc with a sl st. {30 sc }
Rounds 11 – 19: As Round 10.
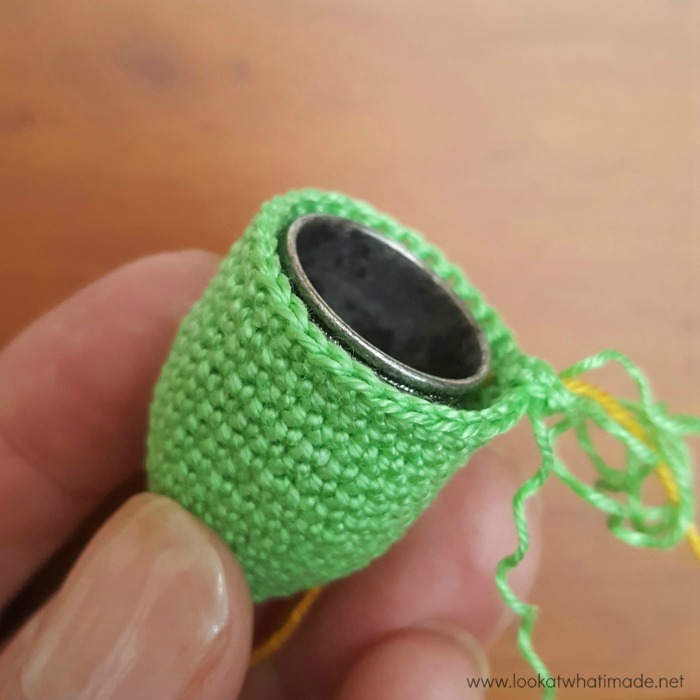
Pop your thimble into your thimble holder at the end of Round 19. The holder should reach the rim of the thimble (or be ever so slightly lower). You can add or remove rounds if you need to.
Round 20: Ch 1, (make 2 sc in the next st, sc in the next 9 sts) 3 times. Join to the first sc with a sl st. {33 sc }
Round 21: Ch 1, (make 2 sc in the next st, sc in the next 10 sts) 3 times. Join to the first sc with a sl st. {36 sc }
Round 22: Ch 1, (make 2 sc in the next st, sc in the next 8 sts) 4 times. Join to the first sc with a sl st. {40 sc }
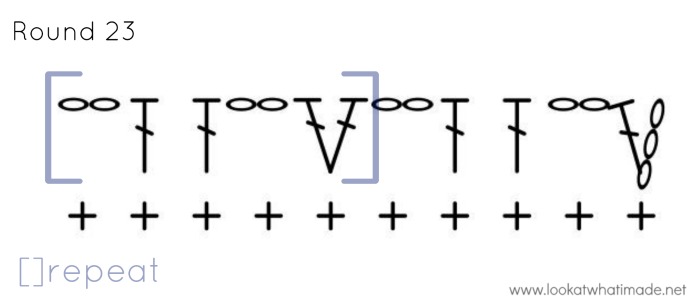
Round 23: Ch 3 (counts as dc throughout), dc in the same st. Ch 2, skip the next st. Dc in the next 2 sts, ch 2, skip the next st. (Make 2 dc in the next st, ch 2, skip the next st. Dc in the next 2 sts, ch 2, skip the next st) 7 times. Join to the top of the beg ch-3 with a sl st. Do not work away your initial end. You will need it later on. {32 dc and 16 ch-2 sps}
Flower
Round 1
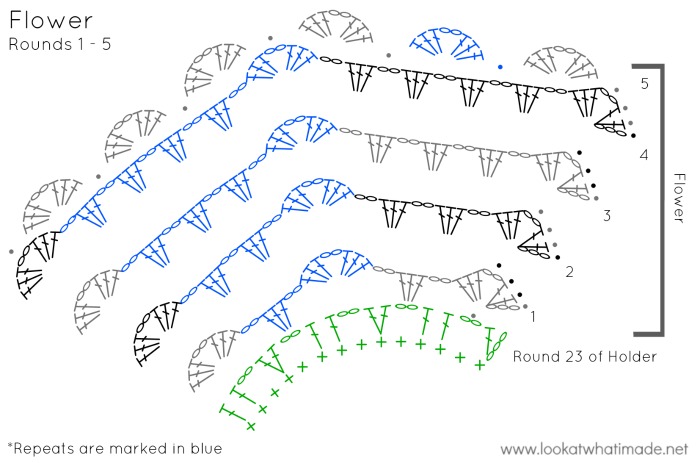
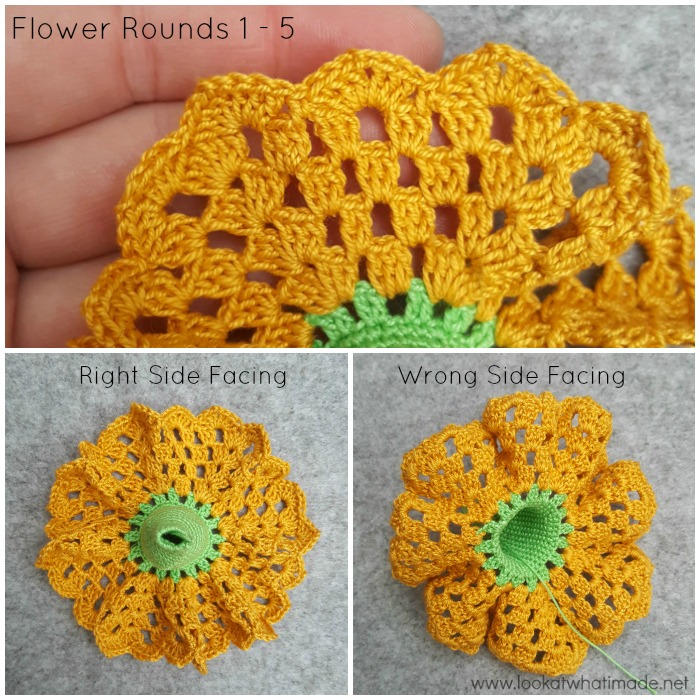
Make sure that the Right Side is facing you before you start this round. In other words, the pointy bit of the holder should be pointing towards you, not away from you.
With the 2mm hook, join CC by making a sl st in the first ch-2 sp. (Ch 3, 2dc, ch 2, 3 dc) in the same ch-2 sp. Ch 2, make 3 dc in the next ch-2 sp, ch 2. *(3 dc, ch 2, 3 dc) in the next ch-2 sp. Ch 2, make 3 dc in the next ch-2 sp, ch 2.* Repeat from * to * 6 more times. Join to the top of the beg ch-3 with a sl st. {72 dc and 24 ch-2 sps}
Round 2
Sl st into the next 2 sts and into the ch-2 sp. Ch 3. (2dc, ch 2, 3 dc) in the same ch-2 sp. (Ch 2, make 3 dc in the next ch-2 sp) twice, ch 2. *(3 dc, ch 2, 3 dc) in the next ch-2 sp. (Ch 2, make 3 dc in the next ch-2 sp) twice, ch 2.* Repeat from * to * 6 more times. Join to the top of the beg ch-3 with a sl st. {96 dc and 32 ch-2 sps}
Round 3
Sl st into the next 2 sts and into the ch-2 sp. Ch 3. (2dc, ch 2, 3 dc) in the same ch-2 sp. (Ch 2, make 3 dc in the next ch-2 sp) 3 times, ch 2. *(3 dc, ch 2, 3 dc) in the next ch-2 sp. (Ch 2, make 3 dc in the next ch-2 sp) 3 times, ch 2.* Repeat from * to * 6 more times. Join to the top of the beg ch-3 with a sl st. {120 dc and 40 ch-2 sps}
Round 4
Sl st into the next 2 sts and into the ch-2 sp. Ch 3. (2dc, ch 2, 3 dc) in the same ch-2 sp. (Ch 2, make 3 dc in the next ch-2 sp) 4 times, ch 2. *(3 dc, ch 2, 3 dc) in the next ch-2 sp. (Ch 2, make 3 dc in the next ch-2 sp) 4 times, ch 2.* Repeat from * to * 6 more times. Join to the top of the beg ch-3 with a sl st. {144 dc and 48 ch-2 sps}
Round 5
Sl st into the next 2 sts and into the ch-2 sp. (3dc, ch 2, 3 dc) in the next ch-2 sp. *Sl st in the next ch-2 sp, (3 dc, ch 2, 3 dc) in the next ch-2 sp.* Repeat from * to * 22 more times. Sl st in the next ch-2 sp, which will already contain the beginning sl st. Fasten off and work away your ends. {24 Petals – each containing (3 dc, ch 2, 3dc) – and 24 sl sts}
Stem
The stem is made by doing a four-strand round braid. I know this is a bit of a learning curve for most of you, but by the end of the braid, you should have the technique down pat. I found it very meditative trying to figure out the most fluent way to do the braid and getting used to what goes where.
If you need any help, please have a look at THIS video tutorial.
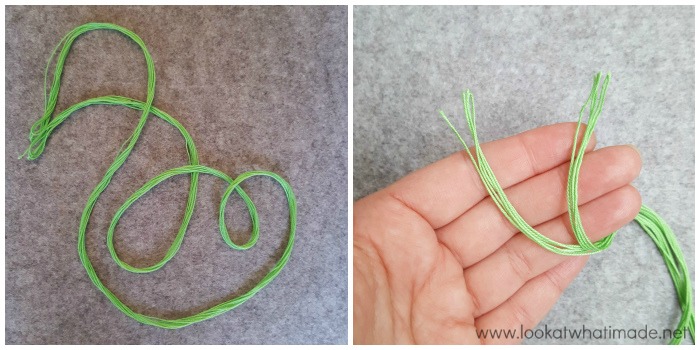
Cut ten 100cm/40” strands of MC yarn and split into two groups of 5. Place 2 pins in a sturdy piece of felt (about 5mm apart). Alternatively, place them in a cushion or your trouser leg – very carefully so that you don’t poke yourself!
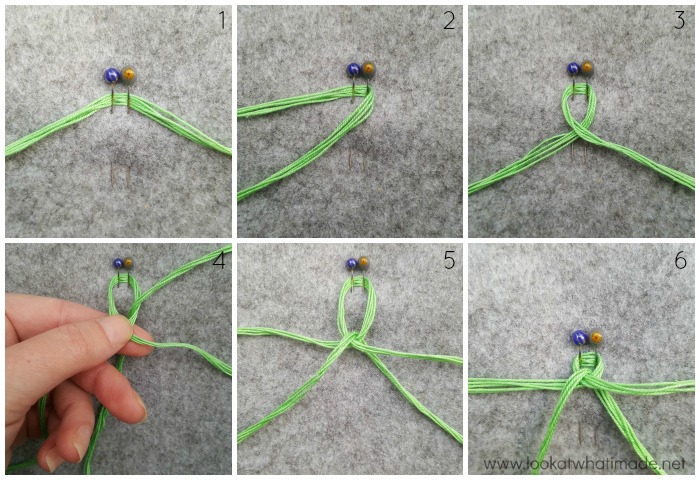
A: Locate the centre of the first group and place it over the pins so that the centre falls between the two pins {Photo 1}. Take the strand on the right and fold it to the left {Photo 2}. Take the strand on the left and fold it to the right {Photo 3}.
B: Take your second group and feed it through the middle of the loop created above {Photo 4}. Pull this strand half-way through the loop and then fold both halves so that they are pointing straight down. Take the B strand that falls to the back of the loop and move it slightly to the right. Take the B strand that falls in front of the loop and move it slightly to the left {Photo 5}. Tighten the loop formed by the A strands {Photo 6}.
I suggest using washi tape to mark your strands. This just makes it much easier to see what goes where initially. Mark them 1, 2, 3, 4, from left to right.
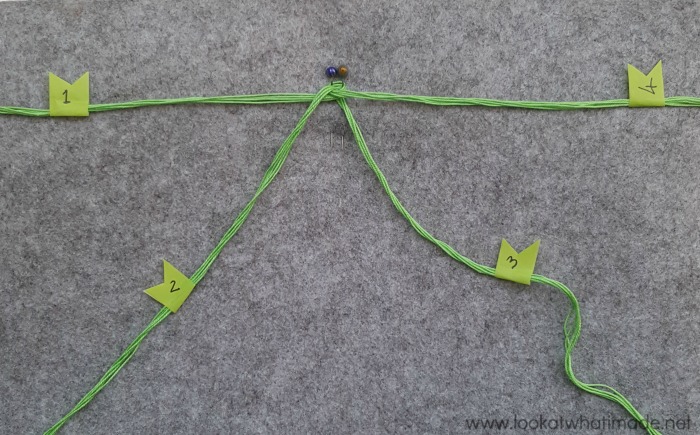
Starting the Braid
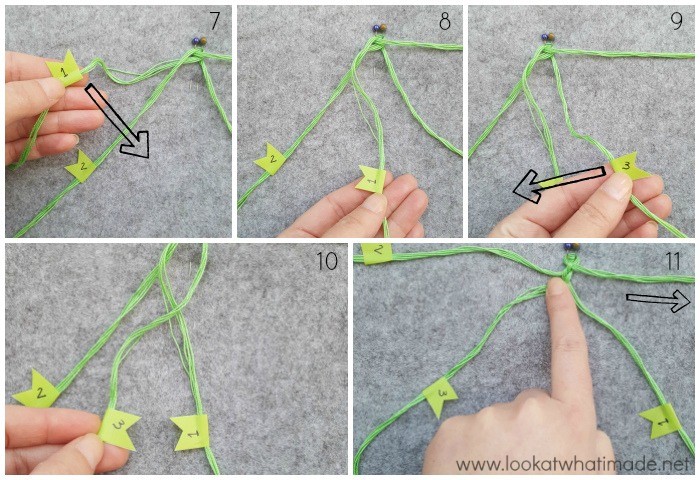
Fold 1 over 2 {Photos 7 and 8}. Fold 3 over 1 {Photos 9 and 10} and tighten. Adjust the size of the loop by pulling on 4 {Photo 11}. You don’t want a sloppy loop!
Making the Braid
You will be making the braid by going under 2 strands and back over 1 strand, starting with the strand top right, then the strand top left, then the strand top right and so on.
Fold 4 (top right) under 1 and 3 (under two strands) – Photos 12 and 13. Fold 4 over 3 (back over one strand) and tighten {Photos 14 and 15}.
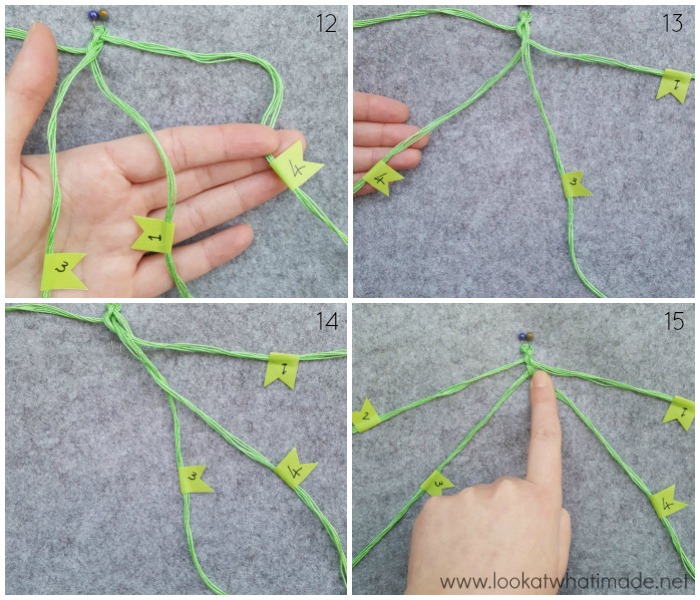
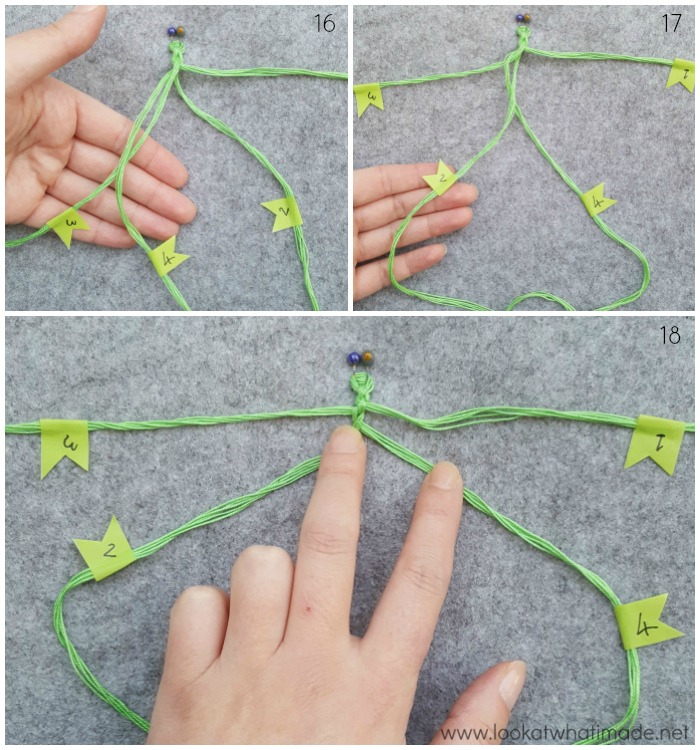
Fold 2 (top left) under 3 and 4 (under two strands) – Photo 16. Fold 2 over 4 (back over 1 strand) and tighten {Photos 17 and 18}.
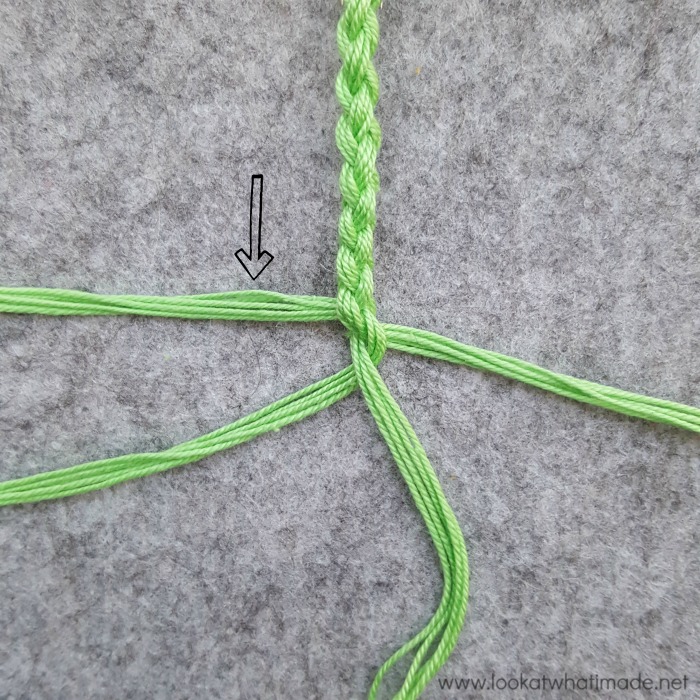
Continue like this: Top Right strand under two strands and back over 1 strand. Top Left strand under two strands and back over 1 strand.
If you get confused about which side should be braided next, stop and look at your strands. The top-most strand is the one that needs to be worked next.
Continue until you have 25cm/10″ of braid.
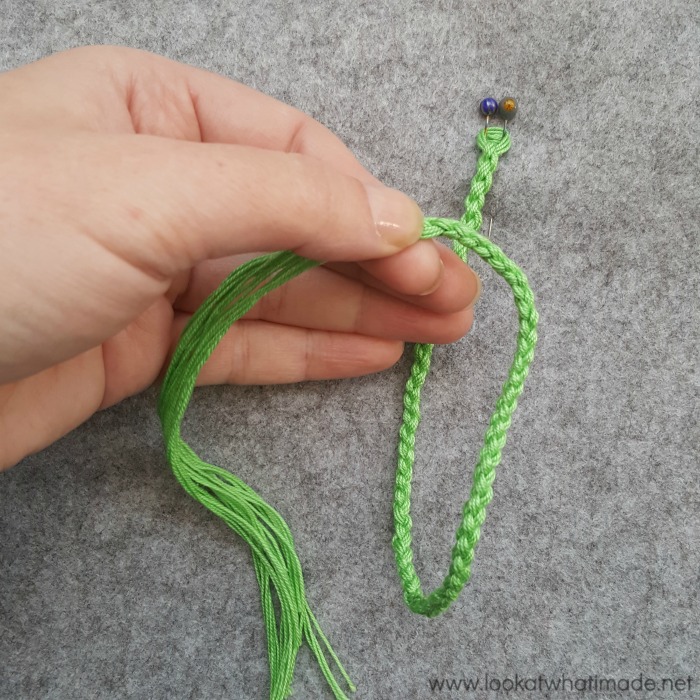
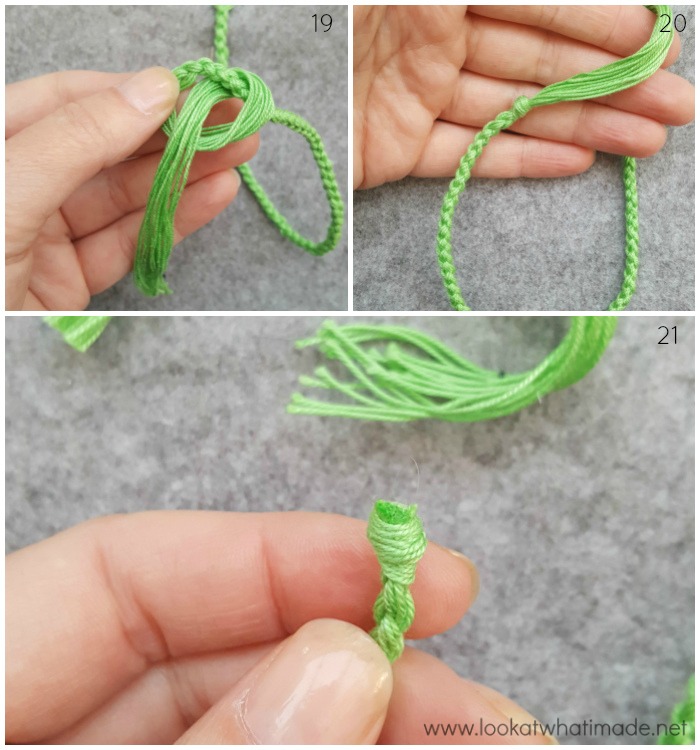
Tie with an overhand knot {Photos 19 and 20}. Tighten well, then cut your ends and remove the pins {Photo 21}. You might find it helpful to dab a small dot of superglue onto the tip of the knot.
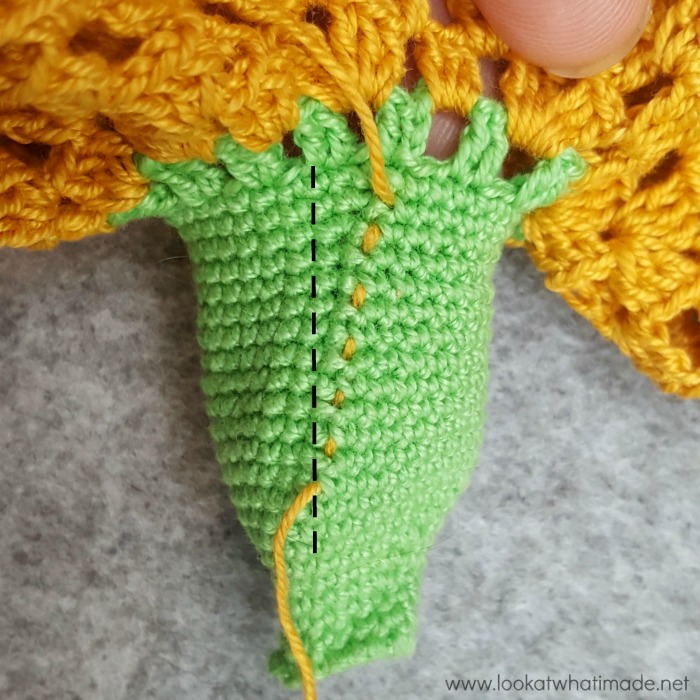
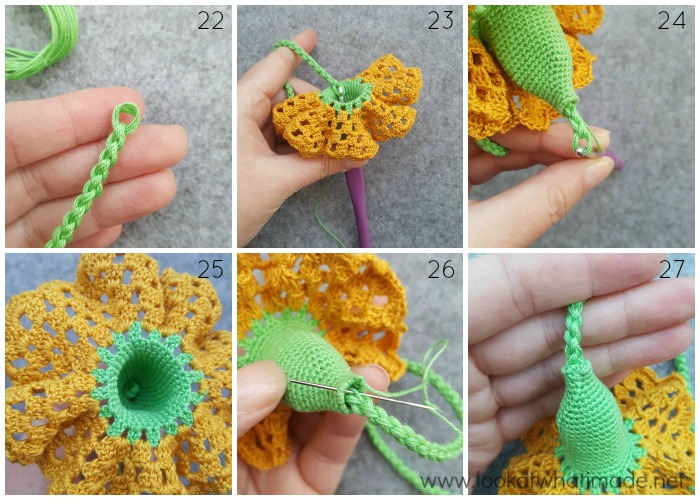
Take the stem in your hand with the initial loop easily accessible {Photo 22}. Insert any larger crochet hook into the hole at the bottom of your thimble holder, loop it through the initial loop of the stem {Photo 23}, and pull the braid through the thimble holder until the knot rests just inside the bottom of the holder {Photos 24 and 25}. Sew the knot to the inside of holder using the initial yarn end from the thimble holder {Photos 26 and 27}.
Scissor Keep Straps
First Strap
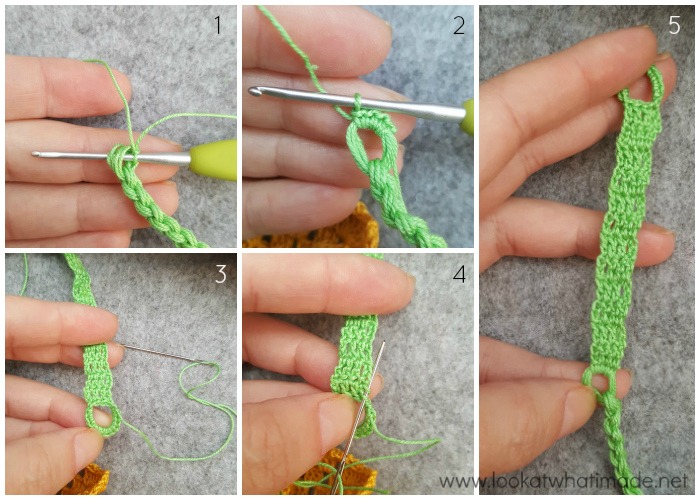
Row 1: With MC yarn, a 2mm hook, and a sl knot already on your hook, insert your hook into the loop at the bottom of the stem {Photo 1}. Sc into this loop. Make 3 more sc and turn {Photo 2}.
Row 2: Ch 3 (counts as dc throughout), dc in the next 3 sts and turn. {4 dc}
Rows 3 – 13: As Round 2.
Row 14: Ch 8. Skip the next 2 sts and sl st in the next st, which should be the top of the beginning ch-3 from the previous round. Turn. {1 ch-8 sp}
Row 15: Ch 1, make 12 sc in the ch-8 sp. Fasten off and work your ends away into the sides of Rows 13 and 12 {Photos 3 – 5}.
Second Strap
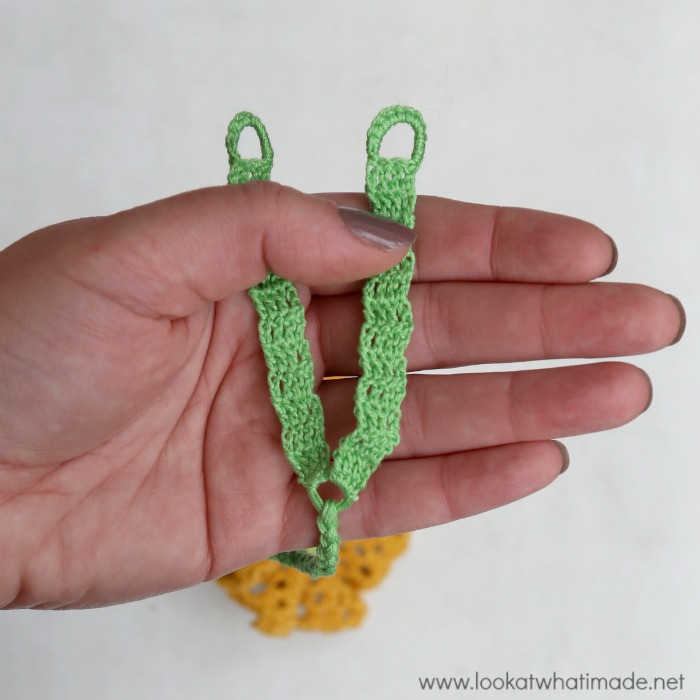
Repeat the instructions for the first strap so that you end up with two straps.
Drawstring
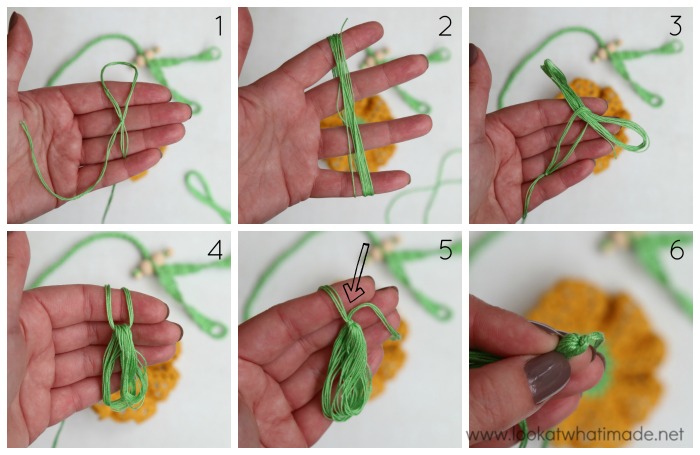
Cut 3 strands of MC, each 200cm/80” long. Holding all 3 strands together, make a slip knot but don’t pull it tight {Photo 1}.
Wrap some MC around your splayed hand ten times and cut {Photo 2}. Remove the yarn from your hands and feed this little bundle through the sl knot so that the sl knot falls in the centre of the bundle {Photo 3}. Fold the two halves of the bundle together, enclosing the yarn end from the slip knot {Photo 4}, and pull the slip knot tight {Photos 5 and 6}.
Take a 25cm/10” length of MC and wrap it around the bundle a few times to secure the tassel {Photo 7}. Knot the two ends and work them away into the top of the tassel, then down into the tassel {Photo 8}. Cut the tassel to your desired length {Photos 9 and 10}.
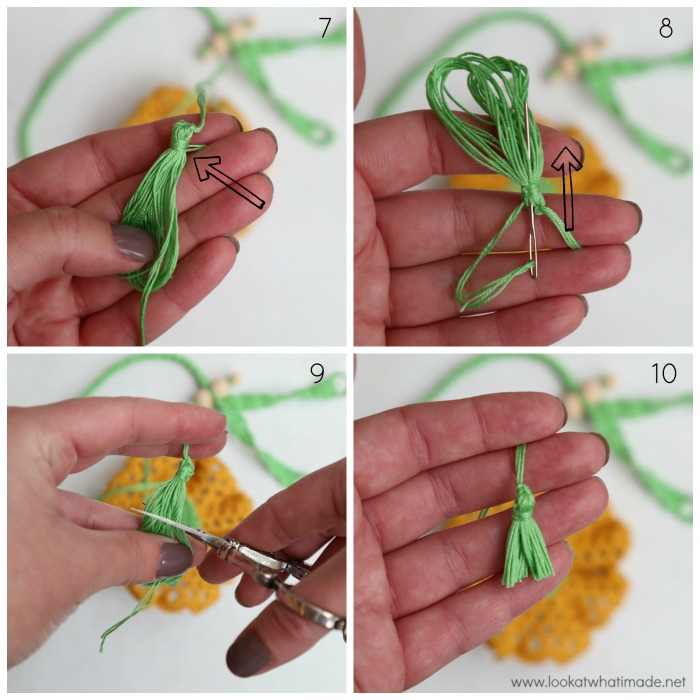
Insert your 2mm hook into the sl knot (above the tassel) and ch 100 (ish), being careful not to drop any strands. Fasten off {Photos 11 and 12}.
Thread the drawstring through the gaps in Round 23, starting from the outside and ending on the outside. This is easiest to do if you thread the end tail of yarn through a needle and use the needle. Keep the needle threaded when you are done {Photos 13 and 14}.
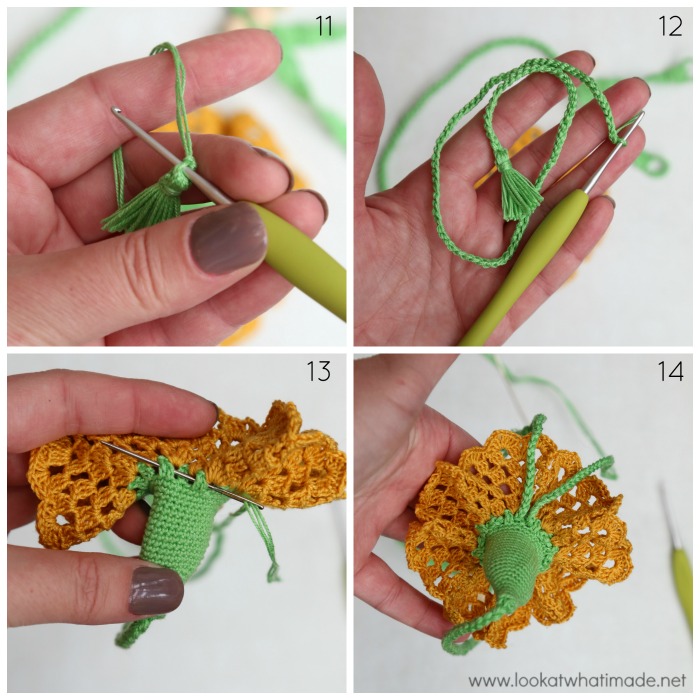
Wrap some MC around your splayed hand ten times and cut. Remove the yarn from your hands (as before). Using the end tail of yarn from the drawstring, sew around the centre of the bundle twice, securing the stitches through the last ch of the drawstring {Photo 15}.
Fold the two halves of the bundle together, enclosing the yarn end {Photo 16}. Take a 25cm/10” length of MC and wrap it around the bundle a few times to secure the tassel. Knot the two ends and work them away as before. Cut the tassel to the same length as the first tassel {Photo 17}.

Adding Buttons/Beads
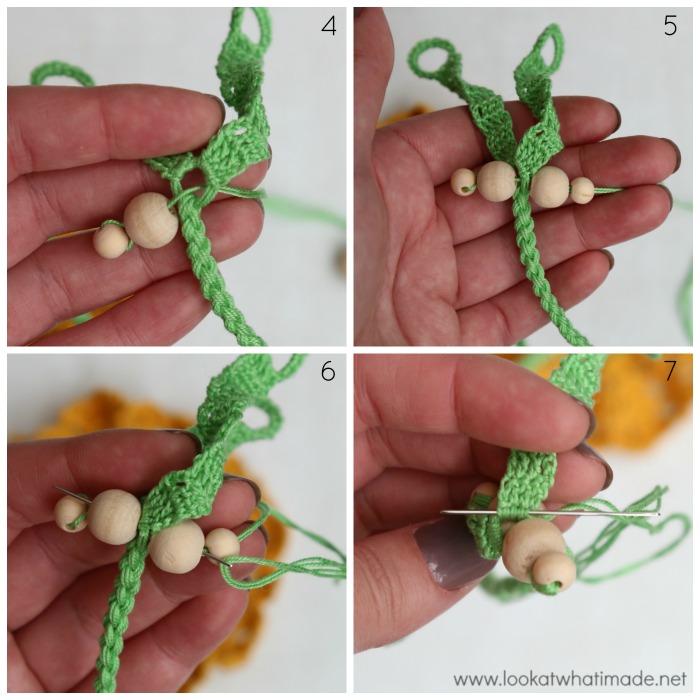
Cut a piece of MC roughly 50 cm/20” long. Thread the one end through a needle. Thread the needle through one of the 8mm wooden beads {Photo 1} and then thread the other end of the yarn through the needle so that you are working with two strands, with the bead ‘caught’ between the two strands.
Insert your needle into one of the 12mm beads and move the bead up so that it abuts the 8mm bead {Photos 2 and 3}.

Insert your needle into the hole at the bottom of the stem {Photo 4}, then insert it into the remaining 12mm bead, followed by the remaining 8mm bead. Pull tight {Photo 5}.
Working in the opposite direction, insert your needle into the 12mm bead, the central hole, and the two beads on the other side of the central hole {Photo 6}.
Work backwards and forwards like this until your beads are secure, then work your ends away into Round 1 of the Straps {Photo 7}.
Using Your Thimble and Scissor Keep
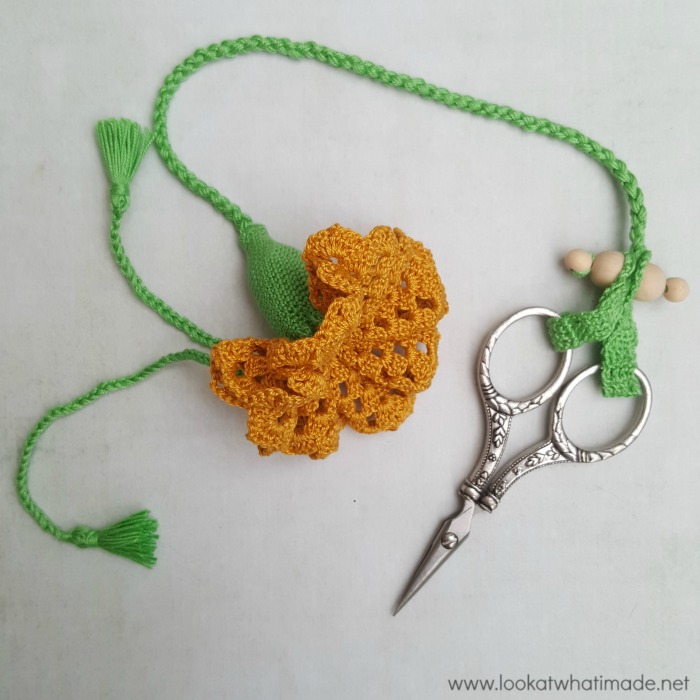
Pop your thimble into the thimble holder and pull the drawstring tight to close the ‘Flower’.
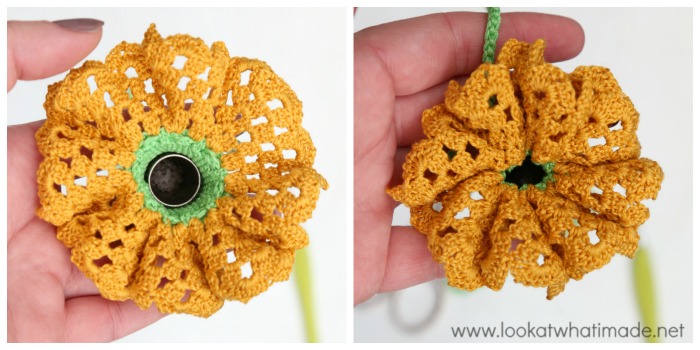
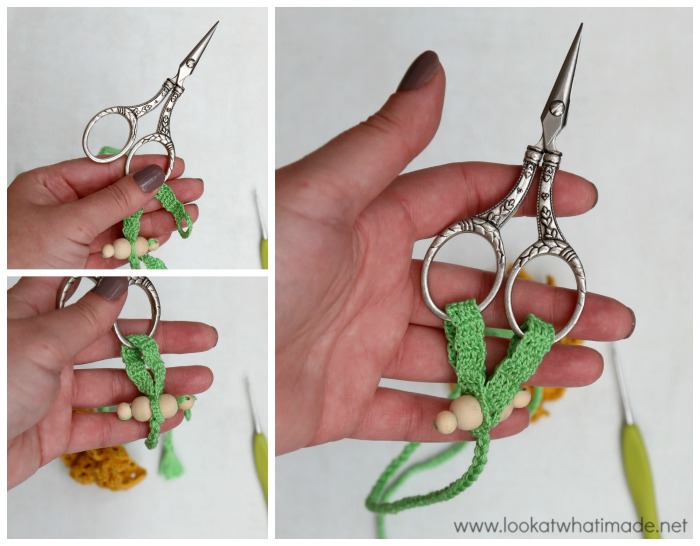
Slip one of the straps through one handle of your scissors and slip the loop over the 12mm bead. Do the same with the other strap.
And there you have it! I think this would make an excellent gift for a crafty friend. In fact, I think it would make a brilliant swapsy project! If you know of a friend who is making one, why not swap when you are done? Weaving stories and people into our projects is so important! Seeing how much Pat loves her Aunty Mary’s Thing, and listening to the stories that flow from this simple gift has yet again reminded me of that.
If you share photos of your finished project, please use #auntymarysthing so that we can see them.
Ps. This would make a wonderful accompaniment to the Ammonite Crochet Hook Roll.

This blog post contains affiliate links. I only link to products I personally use or would use. All opinions are my own.


Tana says
Absolutely Darling! Thanks for sharing the story, the idea and the pattern.
Marsha says
I love these kinds of things. I sew something quite different, but also used to hold sewing/crochet-related thingamabobs. I hang mine from a lanyard which keeps everything handy. I saw some metal & bead ones in a museum. They called them châtelaines and they were often pinned to a lady’s clothing. This one is very cute & I’m looking forward to making it!
Bruna Aguiar Melo says
That’s gorgeous!
ELIZABETH RIVERA says
Thank you for sharing this pattern. I am making it in name of your Auntie Mary and my cousin Irma. They would be good friends, it would be something my cousin would design. I love it.
Dedri Uys says
Hi Elizabeth. Enjoy making your Cousin Irma’s Thing :)
Kim says
Beautiful!
Alyce says
The story is as lovely as Aunt Mary’s Thing! I can think of a number of people to gift this to including my very own Aunt Mary.
Thanks for your happiness newsletter :-)
Dedri Uys says
Yay to Aunty Mary’s! I never had an Aunty Mary myself, but the receptionist at school when I was growing up was called Tannie Marie (the Afrikaans version). She was such an enigmatic woman, so I’m going to claim her as my Aunty Mary.
pat cooper says
Wow – looks like you did a great job on the photos and the instructions – thanks – this si adorable and I have been loosing thimbles this week so it is also timely!
Dedri Uys says
Thank you :) I think this is the first time in my life that I actually know exactly where my childhood thimble now is!
Kathleen Johnson says
I wonder if this was pinned to ones blouse like a brooch to keep supplies handy for needlework . You could also keep needles on the straps.
Dedri Uys says
Ooh, there’s an idea!
Beth Fielding says
Just lovely, Dedri! May I share the project with my thread group, Threadies? Thank you again, for you are a talented lady. Beth
Dedri Uys says
Hi Beth. Yes, please share!! And I would love to see some photos so that I can squeal right along with you x
Mariel says
Buenaa tardes Dedri…una hermosura..tierno y encantador!
Pido autorización para compattir el patron traducido y adaptado por mi con alumnas del taller dulce limeña , en villa general belgrano Cordoba Argentina.
Muchas gracias
Mi correo es [email protected]
Dedri Uys says
Hi Mariel. You are welcome to do that. I would love to see some photos if you do. Dedri
Jane McLellan says
Wow, love the thing, your story and your detailed tutorial!Thanks.
Dedri Uys says
Thank you x