These Ammonite wrist warmers are my whimsical nod to treasure hunting along the Jurassic Coast. They celebrate the gorgeous pebble beaches and the ammonites that wash up on the shore. They work up quickly and would make a brilliant gift for someone you love.
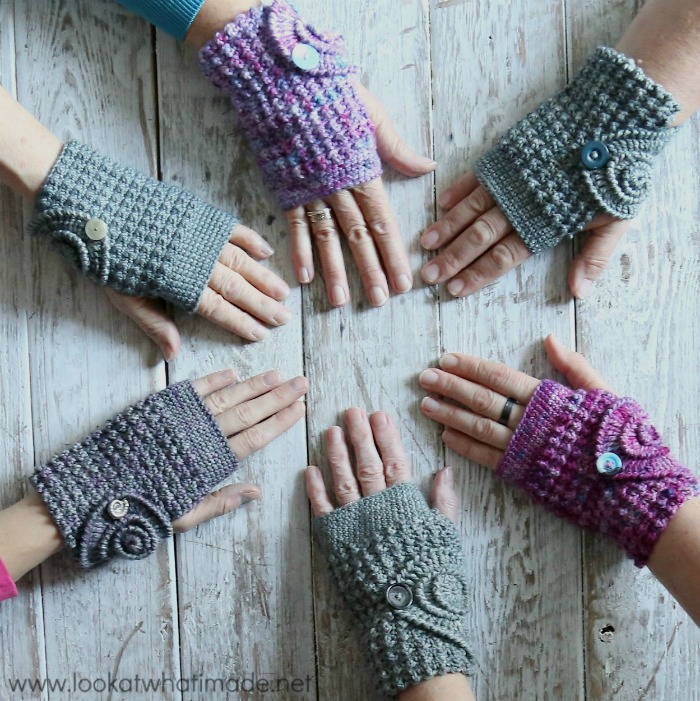
Ammonite Wrist Warmers made in Scheepjes Stonewashed and hand dyed yarn.
I know it is Christmas Eve, so I won’t blame you if you skip straight past the chatty bit to get to the pattern.
Merry Christmas from the Look At What I Made family!
Dedri
The Chatty Bit
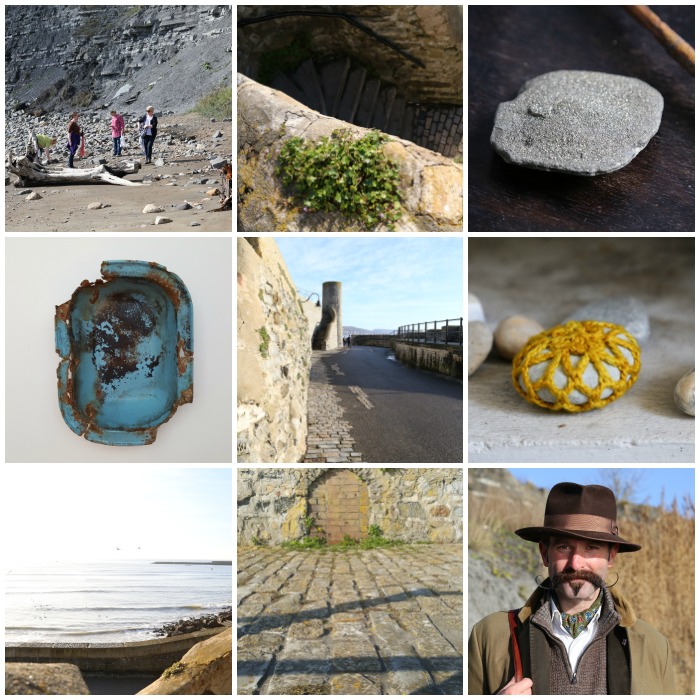
These are the pebbles (and this is the beach at Lyme Regis) that inspired the idea to use the ‘Bubble’ stitch for the body of the wrist warmers. This stitch, created by alternating single crochet and treble crochet, is my favourite textured stitch. It works especially well for things like rugs or bags.
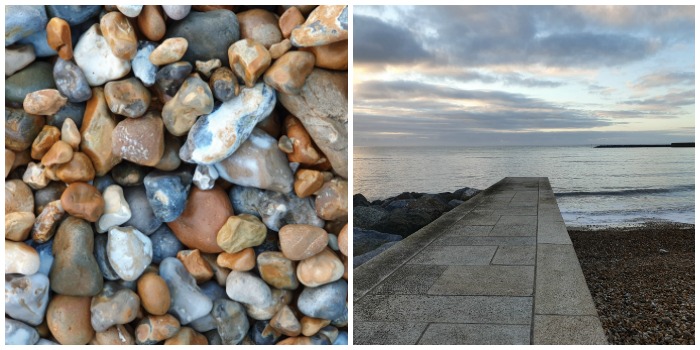
As for the idea of making an ammonite closure…
I have always had a thing for spirals and the way they celebrate the Fibonacci sequence. When I collected my first haul of ammonite treasures in 2015, I fell head over heels in love with these little beauties.
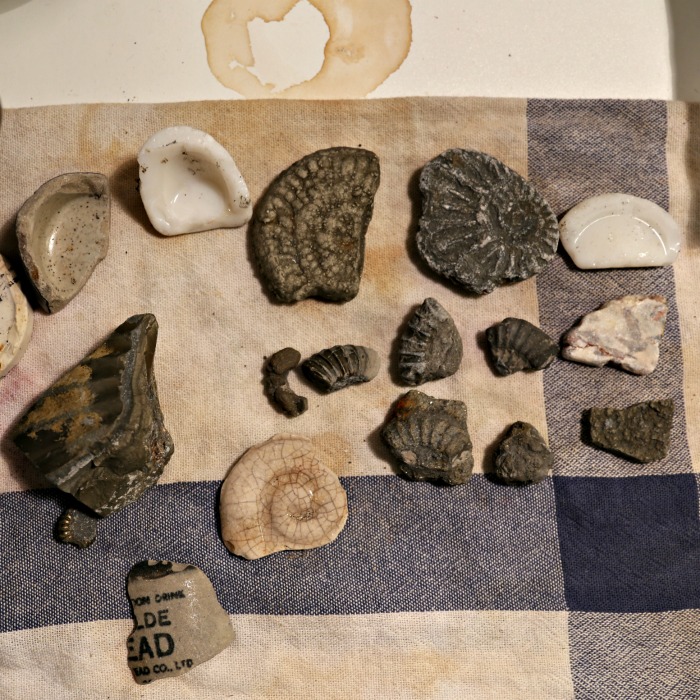
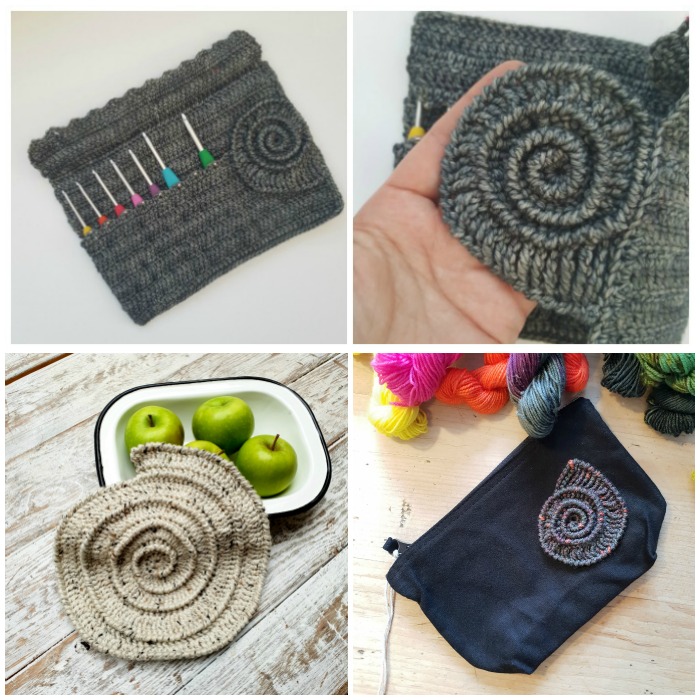
I have a whole rusty Victorian enamel pot full of them, and frequently rummage through it if I need a bit of eyeball feel-good. To date, they have inspired the Ammonite Crochet Hook Roll (my most-used make to date), the Ammonite Potholder we made at the last retreat (pattern coming soon), and some cotton bags with Ammonite appliques.
I think I just might be on a mission to stick them onto as many things as I can possibly think of :)
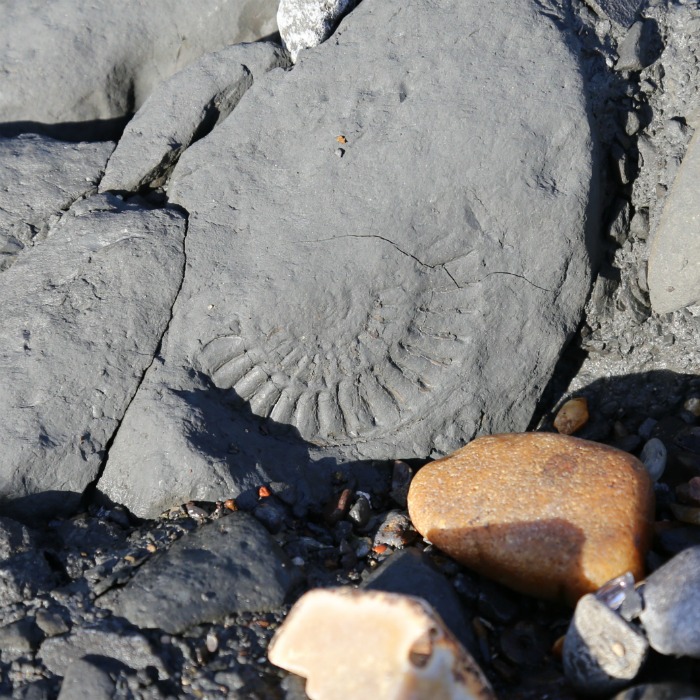
I’ve found some rather large ones too. Or, rather, evidence of large ones. The impression below was almost 50cm across!!
Every time I go to Lyme Regis, I come back with treasures. Some are moments or people; some are places and things; some are feelings. Below are just a few of the memories that have woven their way into this design.
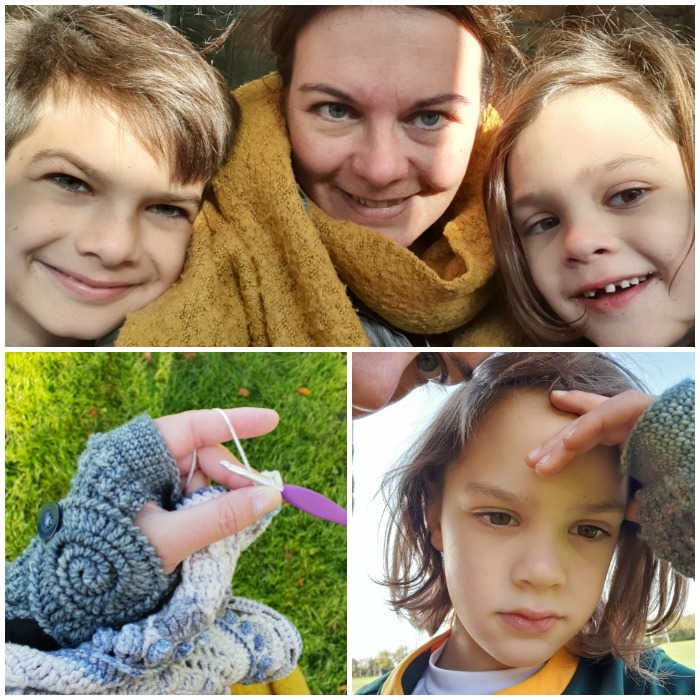
Closer to home, the wrist warmers have accompanied me on many a cold Sunday morning as I shiver my way through rugby training. A few weeks ago, Boy 3 was so cold that I took the wrist warmers off of my own freezing hands and gave them to him. They were way too big, so we took the elastic bands out of our hair and slipped them over his wrists to keep the wrist warmers in place. I will always cherish that morning :)
Hint: these wrist warmers are brilliant for if you want to crochet out and about. They don’t restrict your fingers :)
Ammonite Wrist Warmers Pattern
© Dedri Uys 2018. All Rights Reserved.
Designed for the December 2018 Yarn Retreat with Devon Sun Yarns.
Resources
- Hashtag: If you share photos, please use #ammonitewristwarmer so that we can find your projects and have a gleeful look.
PDF: You can buy a US PDF of this pattern from my Ravelry Store HERE and from My Etsy Shop HERE. This is the entire pattern, both as a written-only version and the photo tutorial version. The charts are included in both copies. Alternatively, you can use the print-friendly button at the bottom of this post to save it to PDF.
Materials
- 4mm crochet hook
- Scheepjes Stonewashed* (78% cotton/22% acrylic), 50g/130m/142yds
- 802 Smokey Quartz x 2 balls (60g used)
- 2 x buttons that fit through the space between 2 tr in Row 1 of the Ammonite – I used 17mm buttons.
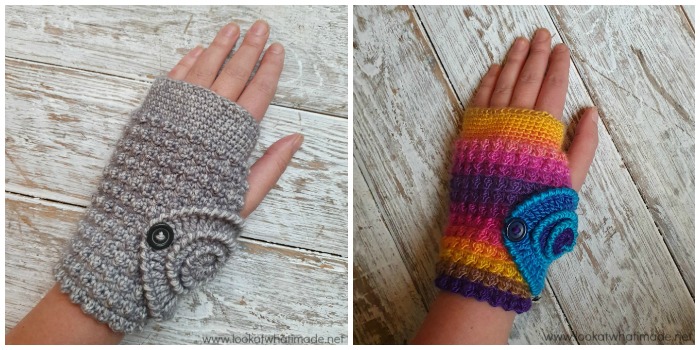
* Alternatively, you can use Scheepjes Wanderlust (100% acrylic), 100g/232m/253yds. Below (right) you can see a photo of this yarn worked up in the 457 Hawaii colourway. You will need 1 ball (66g used). Or if you have any hand dyed dk yarn, that would work really well too!
Abbreviations
US Terminology
- Ch – Chain
- Dc – Double crochet (yarn over once)
- Dtr – Double treble crochet (yarn over 3 times)
- Hdc – Half-double crochet
- Quadtr – Quadruple treble crochet (yarn over 5 times)
- Rem – Remaining/remains
- RS – Right side
- Sc – Single crochet
- Sl st – Slip stitch
- SM – Stitch marker
- St/sts – Stitch/stitches
- Tr – Treble crochet (yarn over twice)
- Ttr – Triple treble crochet (yarn over 4 times)
- WS – Wrong side
Punctuation
* An asterisk indicates pattern repeats. You will need to repeat all the instructions between asterisks the number of times specified. This is a hard-core repeat and will consist of multiple instructions.
Parentheses () indicate repeats. You will need to repeat the instructions between parentheses the number of times specified. This is a lower level repeat.
Special Stitches
Crab Stitch (Reverse Single Crochet)
Swing your hook under your hand, by twisting your wrist, and insert it into both loops of the st BEFORE the st you just worked into. Yarn over and pull up a loop. Yarn over and pull through both loops on hook.
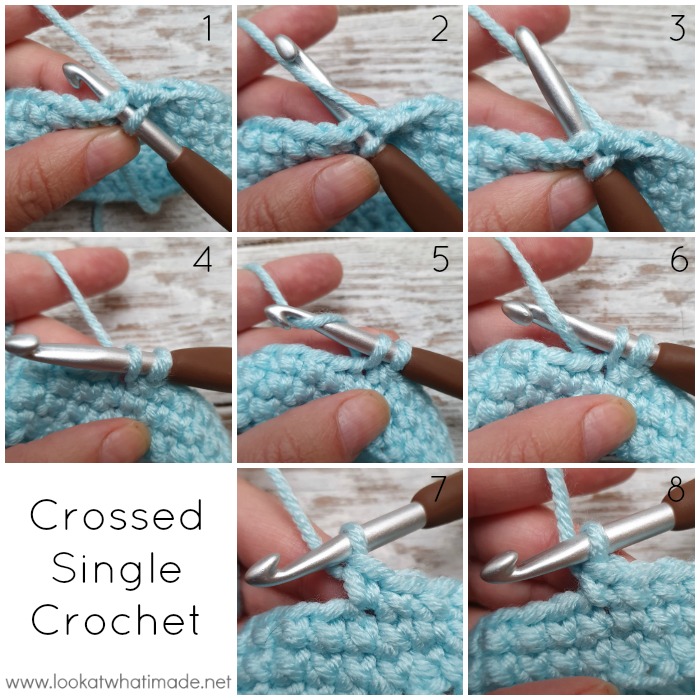
Crossed Single Crochet
Insert your hook into the indicated st {Photo 1}.
Usually, when making a single crochet, you would yarn over so that your hook is under the yarn {Photo 2}, but for a Crossed Single Crochet, you will need to yarn UNDER, which means that your hook should be above the yarn when you grab it {Photo 3}. Pull up a loop {Photo 4}.
Again, when making a regular single crochet, you would yarn over at this point {Photo 5}, but to create the Crossed Single Crochet, you will need to yarn UNDER, which means that your hook should be behind the yarn when you grab it {Photo 6}. Pull through both loops on hook.
With a regular single crochet, the ‘legs’ of the single crochet would form a V that is easily visible on the front of your work {Photo 7}. When making a Crossed Single Crochet, the legs of the V ‘cross’ each other to form an X {Photo 8}.
Do these stitches slowly and mindfully. They are quite meditative once you get into the swing of them.
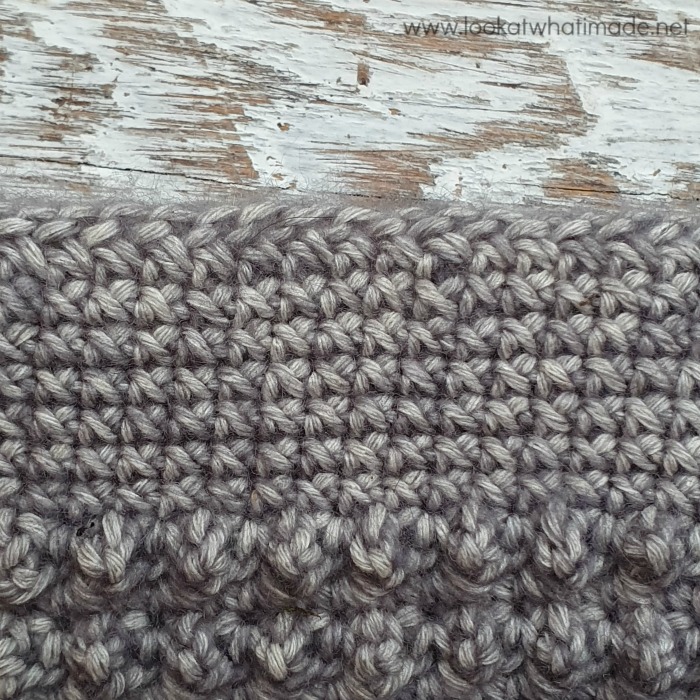
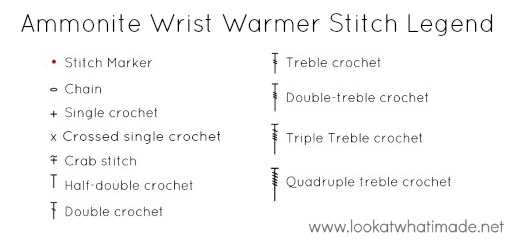
Chart Legend
Gauge
23 sts x 23 rows per 10cm/4” square, using crossed single crochet.
Size
15cm/6″ long by 10cm/4” wide (measured flat).
Adjusting the Size
These wrist warmers are highly customisable. You can make them bigger, smaller, longer, shorter…You can even use sock weight yarn or chunky yarn, as long as you adjust the number of stitches and rows as explained below. If you DO decide to use a different yarn weight, please keep in mind that the ammonite is the only part of this pattern that isn’t easy to size up or down, so you will have to wing it.
Adjusting the Width
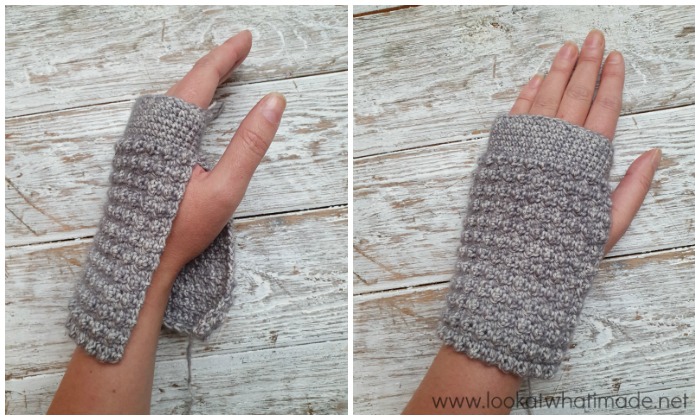
At the end of Round 1, slip the wrist warmer over your palm until it abuts your thumb. It should fit snugly but not be too tight.
- If it is too tight: Undo Round 1 and add more chains to your starting chain in multiples of two. Check the fit again at the end of Round 1 until you are happy with your fit.
- If it is too loose: Undo Round 1 and remove chains from your starting chain in multiples of two. Check fit again at the end of Round 1 until you are happy with your fit.
- If you are using a different yarn weight, make a starting chain in multiples of two until it looks like it will fit around your palm (above your thumb) and then wrap it around your hand to check that it does fit. Make Round 1 and check fit again, adjusting as explained above.
The ‘body’ of the wrist warmer is made with stitches that naturally give more width-wise stretch, so if the above measurement is correct for your palm, the rest of the wrist warmer will fit over the ‘fleshy’ part of your hand just fine.
Adjusting the Length of the ‘Palm’ Portion
- Shorter: If you are making these for a child, you might want the ‘Palm’ portion to be slightly shorter, in which case you can stop at the end of Rounds 3, 4, 5, or 6, remembering to TURN at the end of your last round.
- Longer: You might want the ‘Palm’ Portion to cover your fingers more, in which case you can repeat Round 2 until this portion is as long as you want it to be, remembering to TURN at the end of your last round.
Adjusting the Length of the ‘Body’ of the Wrist Warmer
To make the wrist-warmers longer or shorter, repeat Rows 9 and 10 until they are as long as you need them to be. Don’t forget to fasten off at the end of the last row.
Instructions
Wrist Warmers
Make 2

Note: The wrist warmers are worked in a spiral, amigurumi style, for the first 7 rounds. After that, they are worked in rows. While doing the first 7 rounds, you might find it beneficial to mark the first st of each round with a SM to help you identify the start of each round.
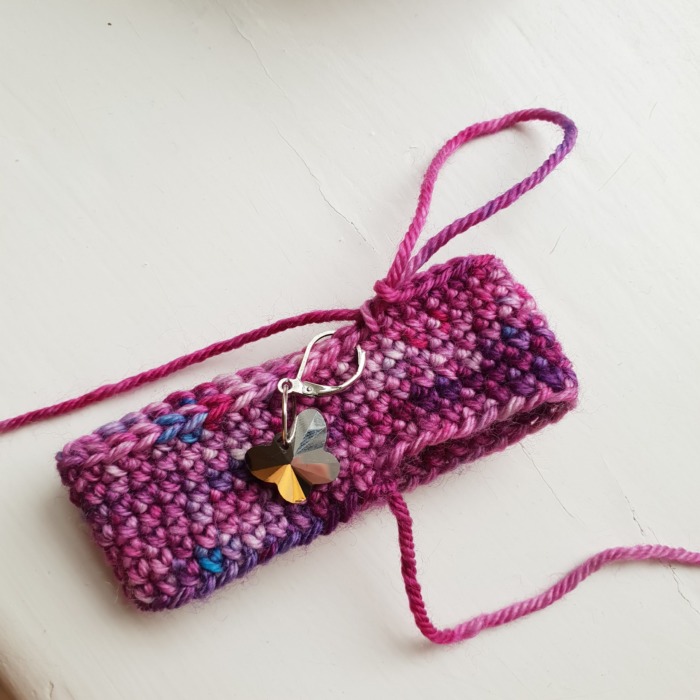
Ch 40, place SM in first ch.
Round 1: Starting in the first (marked) ch, and making sure that your chain isn’t twisted, make a Crossed sc in each ch around. {40 Crossed sc}
Round 2: Make a Crossed sc in each st around. {40 Crossed sc}
Rounds 3 – 7: As Round 2, turning at the end of Round 7.
Row 8: With WS facing, ch 1, sc in the st at the base of the ch-1. (Tr in the next st, sc in the next st) until 1 st rem. Tr in the last st. Sc in the next st, which will already contain the first st of the row. Turn. {21 sc and 20 tr}
Before doing the next row, make sure that you can identify your stitches correctly. If you turn the top of the previous row towards you, you will notice that the top loops of the stitches go: small (sc), big (tr), small, big, small, big… You want to make sure that you make the first st of the next row in the first small loops (which will be the first sc) and that you make the last st of the next row in the last small loops (last sc). If you miss either of these stitches, your edges won’t be straight. It might help you to do what I do. I focus on a repeat of two: [small, big] until I get to the end of the row, at which point I remind myself not to forget that last ‘small’.
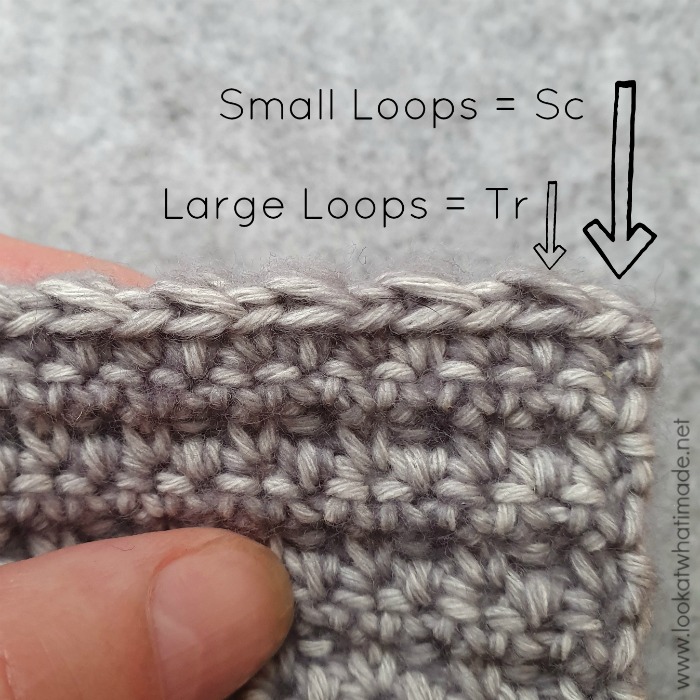
Row 9: With RS facing, ch 1, sc in each st across. Turn. {41 sc}
Row 10: With WS facing, ch 1, sc in the first st. (Tr in the next st, sc in the next st) until no sts rem. Turn. {21 sc and 20 tr}
Rows 11 – 30: As Rows 9 and 10. When you get to the end of Row 30, fasten off and work away your ends.
You will notice that there is a ‘step’ where you started the wrist warmer. When you work your end away into the remaining loops of the next chain, this ‘step’ will disappear.
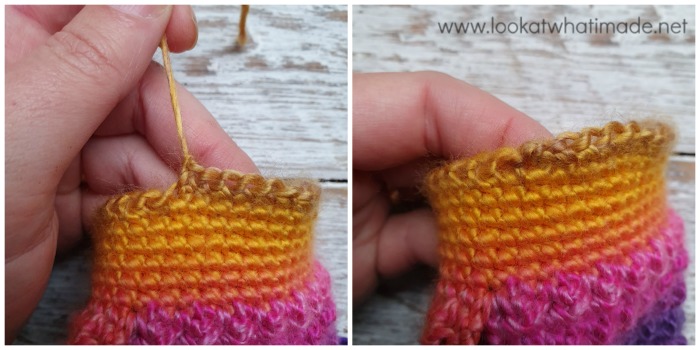
This is what your wrist warmer will look like at this point:
Making the Ammonite Closures
In order for the Ammonites to be mirror images of each other, you will make each one into a long initial chain, sewing it into a spiral once you are done.
I will walk you through crocheting them both first, and then I will show you how to complete them.
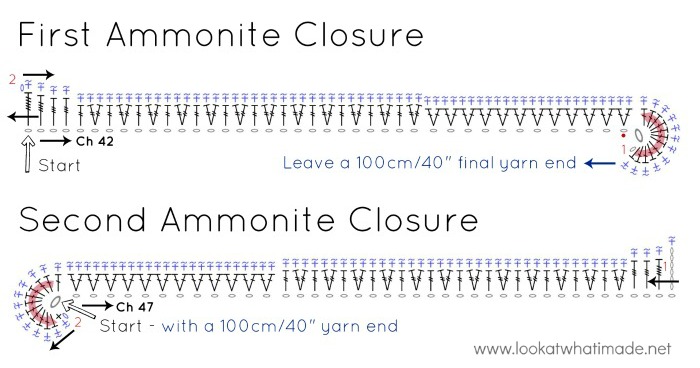
First Ammonite Closure
Ch 42. Place a SM in the third ch from the hook because it will pull tight when working into the second ch. Do not remove this SM until you are instructed to do so.
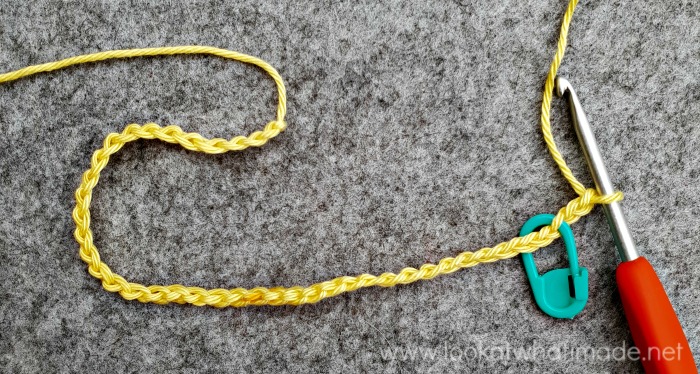
Row 1: Hdc in the second ch from the hook. Make 11 dc in the same ch. Make 2 dc in each of the next 12 ch, (2 tr in the next ch, tr in the next ch) 12 times. Dtr in the next 2 ch, ttr in the next ch, Quadtr in the last ch. {76 sts}
Row 2: Ch 1, make a Crab st in each of the 76 sts across. Fasten off, leaving a 1m end. Work your initial end away. {76 Crab sts}
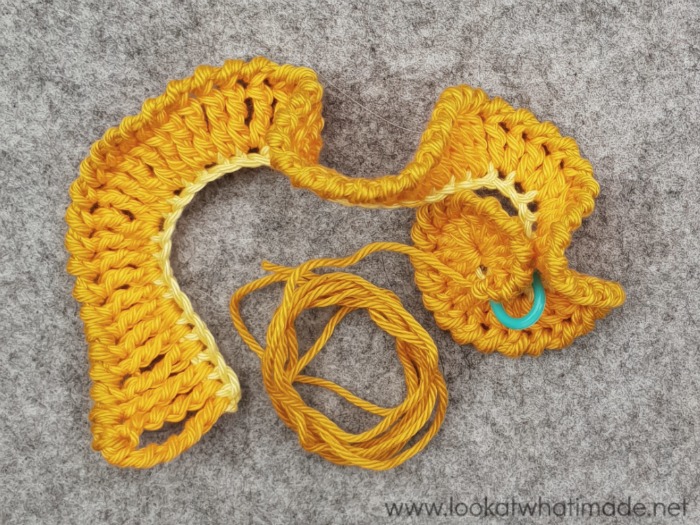
Second Ammonite Closure
Ch 47, leaving a 1m initial yarn end. I have changed colour for the last 7 ch sts (for illustration only).
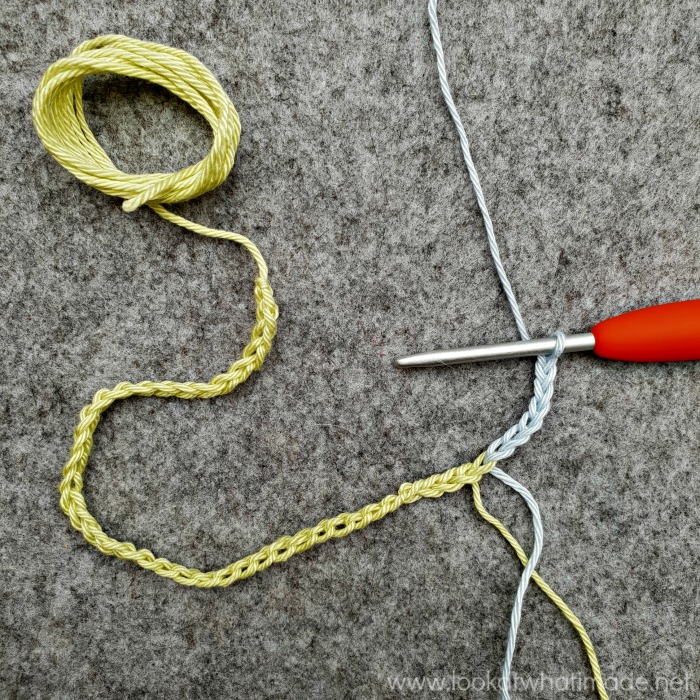
Row 1: Ttr in the 8th ch from the hook, dtr in the next 2 ch. (2 tr in the next ch, tr in the next ch) 12 times, make 2 dc in each of the next 12 ch. Make 10 dc in the last ch. (Hdc, sc) in the same ch. {76 sts}
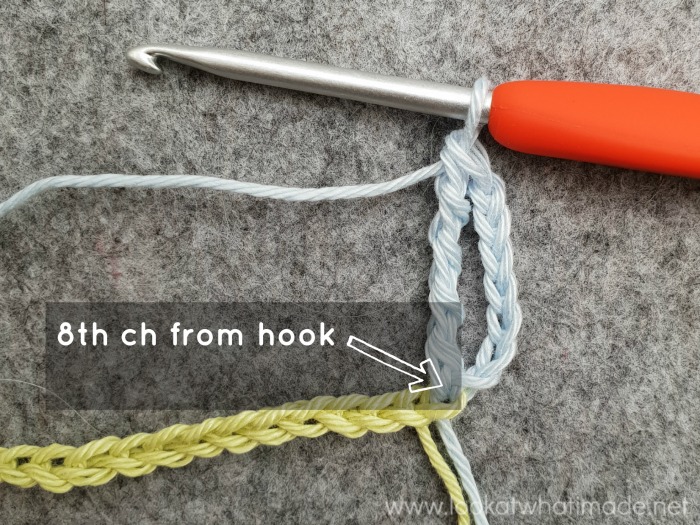
Row 2: Ch 1, make a Crab st in each of the 76 sts across. Fasten off and work away final end. {76 Crab sts}
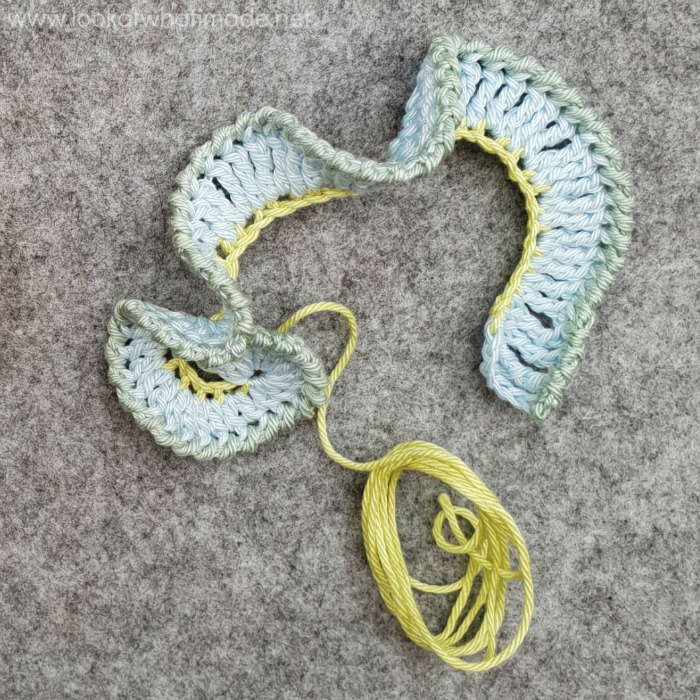
Completing the Ammonites
When completing the ammonites, you will work only into the remaining loops of the foundation chain and the stitches of Row 1. Ignore the Crab stitches. You might find it easier to flip the Crab stitches towards you so that you can see the back of Row 1. It makes it easier to see where to insert your needle.
First Ammonite
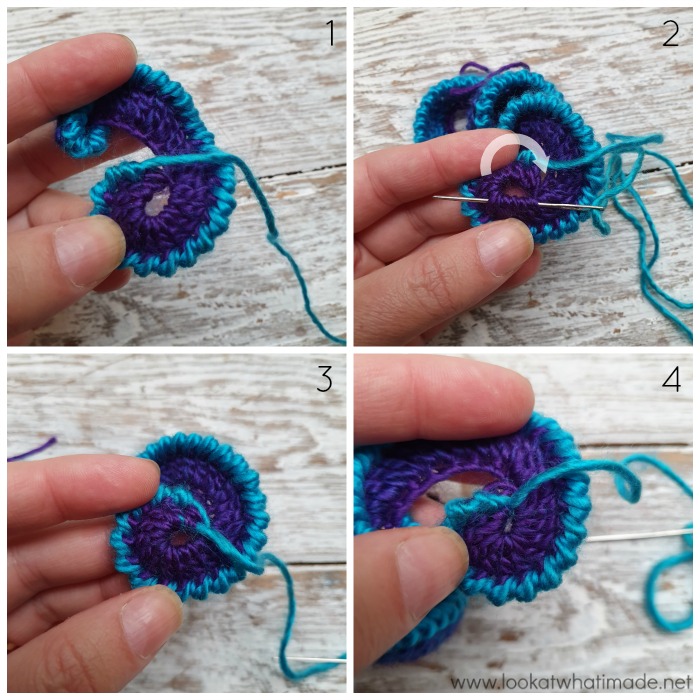
For the first Ammonite, you will be using the final yarn end to sew your ammonite together in an anti-clockwise direction (clockwise, if you are left-handed). Before you can get started, you will need to close the central hole, which you will do in a clockwise direction (anti-clockwise, if you are left-handed). Thread your needle with the final end and insert it through the bottom of all the stitches made into the second ch {Photos 2 and 3}. Pull tight to close the central hole {Photo 4}.
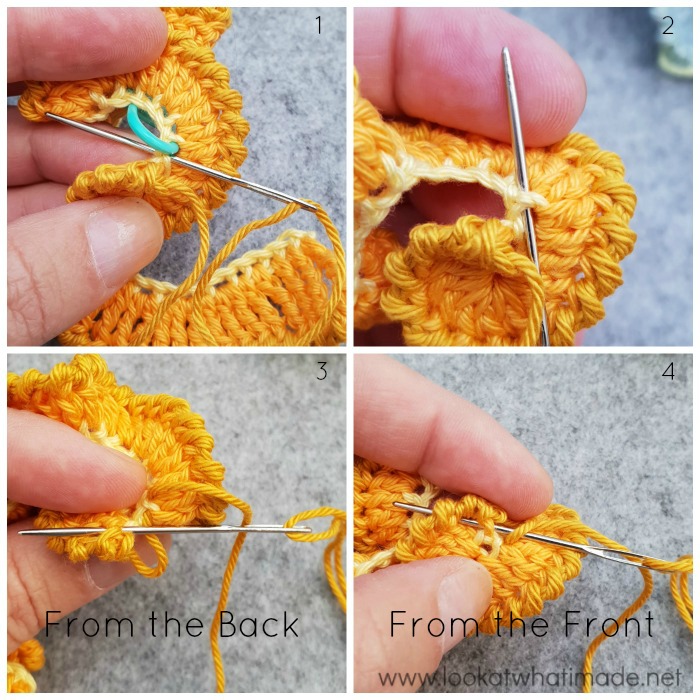
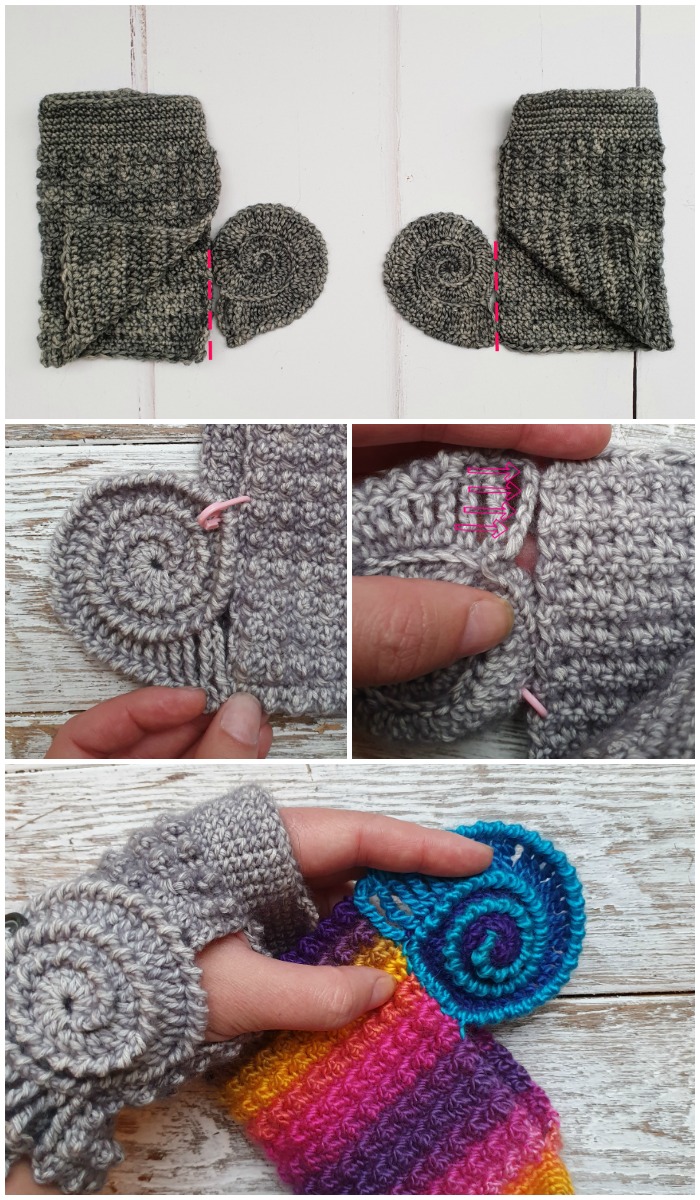
Insert your needle from front to back into both rem loops of the ch that contains the SM {Photo 1}. Remove SM. Insert it from back to front into the next ch {Photo 2}. Working into the sts of Row 1, insert your needle from back to front into the loops of the first hdc, and from front to back into the loops of the first dc {Photos 3 and 4}. Pull tight. This will create a running stitch just below the Crab stitch, securing the first hdc.
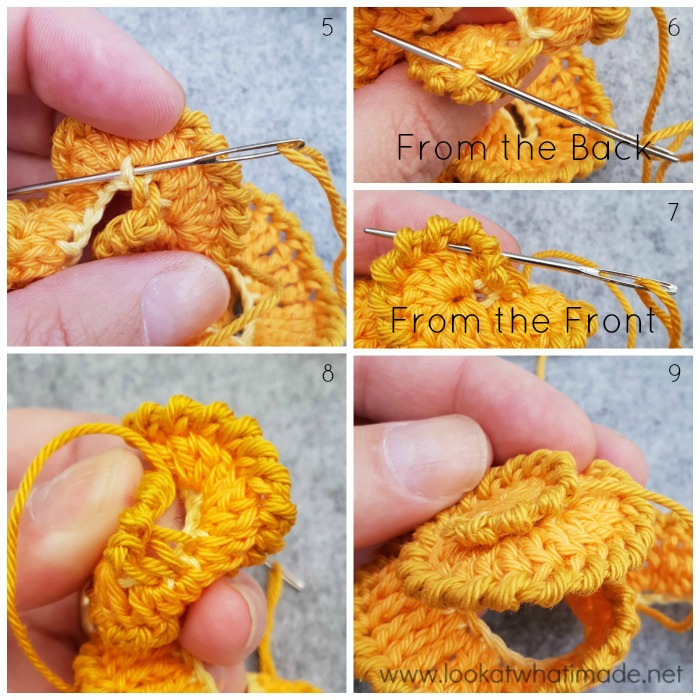
*Insert your needle into the same ch from front to back and into the next ch from back to front {Photo 5}. Insert your needle from back to front into the same st of Row 1, and from front to back into the next st {Photos 6 and 7}. Pull tight {Photos 8 and 9}.*
Repeat from * to * until you have worked into every ch. Work away your ends. Identify the next 8 sts of Row 1 and place a SM in the 8th st.
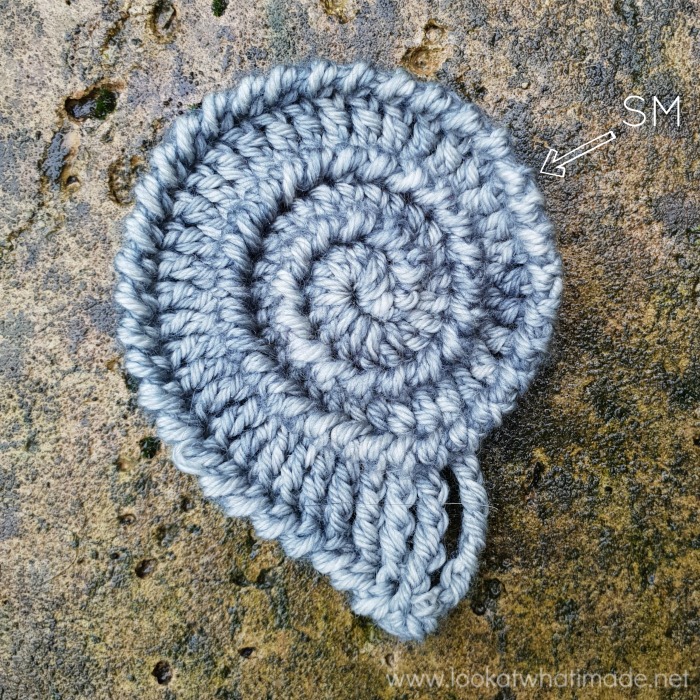
Second Ammonite
For the second Ammonite, you will be using the initial yarn to sew your ammonite together in a clockwise direction (anti-clockwise, if you are left-handed). Thread your needle with this end and insert it through the bottom of all the stitches in the last ch. Pull tight to close the central hole.
Insert your needle from back to front into both rem loops of the next available ch {Photo 1}. Then insert your needle from front to back into both loops of the last sc {Photo 2}. Pull tight.
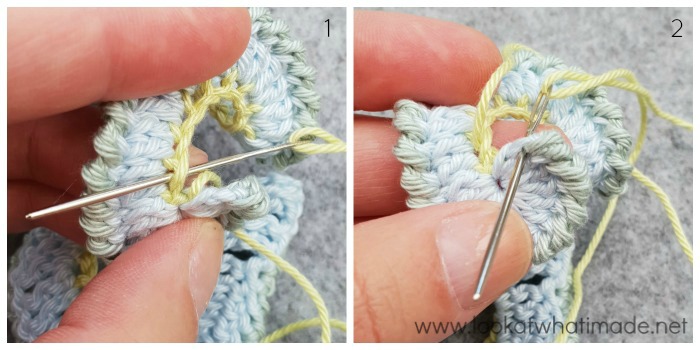
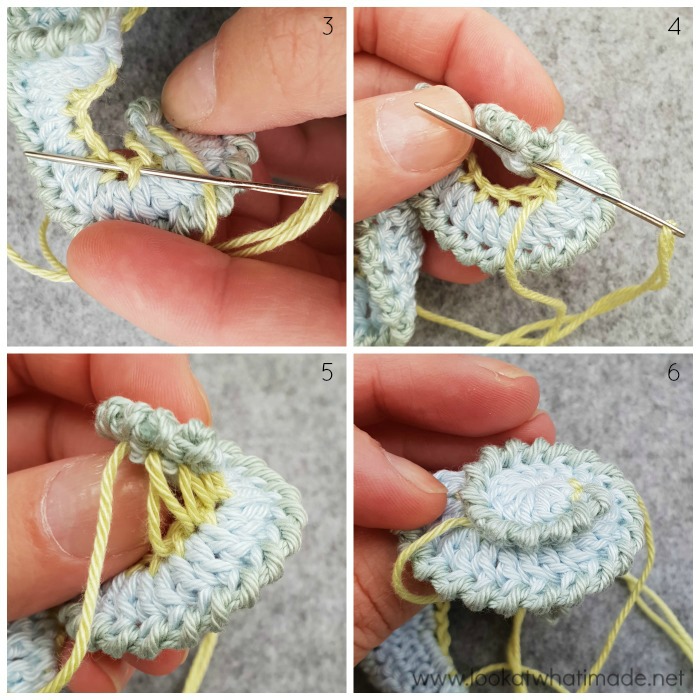
*Insert your needle into the same ch from front to back and into the next ch from back to front {Photo 3}. Insert your needle from back to front into the same st from Row 1, and from front to back into the next st {Photo 4}. Pull tight {Photos 5 and 6}.*
Repeat from * to * until you have worked into every ch. Work away your ends.
Once again, identify the 8th st away from the last sewn st and mark it with a SM.
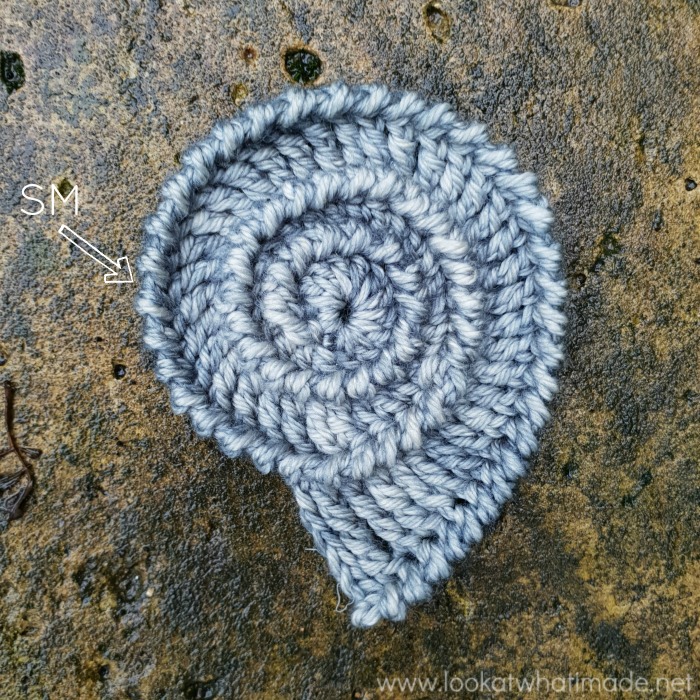
Attaching the Ammonites to the Wrist Warmers
Sew the ammonite closures to the side of the last 14 rows of each wrist warmer, placing the ammonite as shown and working into the back bumps of the last Quadtr and the next 8 sts of Row 1 of the ammonite.
Attaching the Buttons
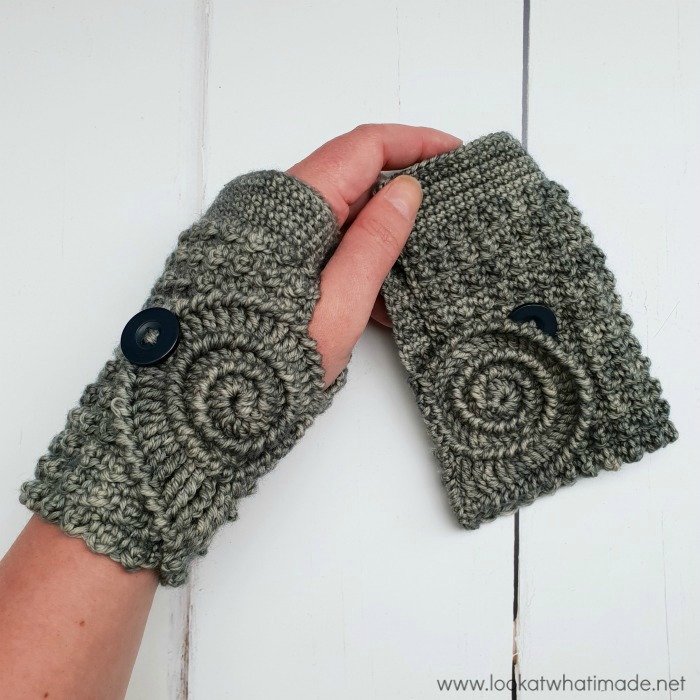
Place the wrist warmers on your hands and decide where you need to attach your buttons. It might be handy to ask a friend to help you do this as it can be a bit fiddly on your own. For me, the buttons worked best when placed over the fifth tr from the side, 7 tr sts from the bottom.
Attach the buttons and slip them through the space between any of the stitches in the last spiral round of the ammonite to close.
I hope you have enjoyed making these wrist warmers!
Merry Christmas and a fantastic new year to you all.

This blog post contains affiliate links. I only link to products I personally use or would use. All opinions are my own.


Jo says
These are great! My children love fossils and amonites so I’m going to make some of these for Christmas. Thank you!
Dedri Uys says
Ooh, I hope they like them :)
Lin says
I love this pattern but I don’t quite understand the cross-stitch , l’ve done it as you said but checked some videos to make sure it was right and they all do the first loop – hook down, but most just do an ordinary 2nd yarn over – does it matter? Is there a reason you do yarn under both times in the one stitch.? Just curious whatever it’s a nice firm band to the top of the mitt and I hope L can fathom the rest of it . Thank you!
Dedri Uys says
Hi Lin. I find that doing both yarn under makes for slightly neater crosses, but if you want to yarn over for the second one, please do :)
Kathy says
Just finished. My first crocheting adventure. The ammonite shape really appealed to me as an old maths major. Instructions were spot on except for curling the ammonite. I will make more. Thank you for a great pattern.
Doka Ali says
Love your work.. Thanks a lot my dear
Dedri Uys says
Thank you :)
Lois says
I have used this same stitch for baby blankets, which is called aligned cobblestone in my crochet book. It works up very nicely for boys or girls. I also like the seashells you made and all the color combos you used.
Dedri Uys says
Thank you Lois.
Gribouillette says
Vraiment vraiment magnifique travail de création !
Je vais essayer de comprendre les explications pour reproduire, mais cela risque d’être un peu difficile, mais je suis vraiment tentée !
Merci pour le partage. Belle année à vous.
Dedri Uys says
Thank you. I hope you manage to follow along :)
Dedri
Kathleen Fuller says
Thank you so much for this pattern. I made these yesterday and they’re lovely. I just have to find the buttons that will compliment them. The closure was fun to make! I always learn something new from your patterns. :)
Dedri Uys says
Hi Kathleen. I’m glad you like them. I wear mine all the time!
Dedri
Bethany says
My daughter has been begging for fingerless gloves, but didnt want anything bulky. These will be PERFECT done in sock wool i have. That said, Im mostly used to American terms and it looks like this might be English but i wanted to confirm so I know what Im doing with the triple crochet, ect.
Thank you so much for the beautiful design!
Dedri Uys says
Hi Bethany. The pattern is in US terms, and there are number-of-yarn-over hints in the abbreviations.
Yvonne Mobile Durrant says
Hi you have inspired me to crack on. My head is filled with so many ideas. I am a spinner weaver knitter crocheter and my poor head spins with ideas which to attempt first. The stones stitch is now in my head. Amonites I love them. Thank you Von x
Dedri Uys says
Hi Von. Wow, you are all over the yarn crafts! I’ve always wanted to try spinning and weaving. Maybe one day :)
Julie Bradshaw says
Hi Dedri,
I love knowing the story behind the ammonite design. I also want to compliment you on your great photography! Wonderful pictures of inspiring surroundings, family, but most importantly (of course) of crochet stitches and instructions. I appreciated this first in the Sophie’s Universe book, but this design is another wonderful example of what a creative person, and great instructor you are. May this next year be a little less challenging! Julie
Dedri Uys says
Hi Julie.
Thank you for that lovely comment. I try my hardest, so it is really rewarding to hear that it is enough :)
x
Patricia Jouanneaud says
Happy new year !
and Thanks warmly !
Hugs
Patricia
Carolyn says
I just went Lookatwhatimade shopping, Sweet Dedri. Love your work!!!!
Elsa says
Beautiful original work.
Jenny says
Have you made a pair yet, Elsa? They are so nice to wear :)
Jenny
Lloyd says
Dear Deidre:
Thanks for these lovely wrist warmers and detailed stitch descriptions. A Happy New Year to you and the whole family.
I have written tor old email address but recived no reply so publically I can tell you now that despite annual checkups etc, 4 months ago it was diagnosed via swift weight loss that I had metastic colon cancer that snuck in outside the colon and was not seen on endoscopys. So now I am having rather devasting chemo via a infusaport at great cost unfortunately. I am still able to crochet slowly and hoping that I cna make something to help costs. Fortunatley so far I havent had too many side effects.
Best wishes
RoyG on Ravelry
Dedri Uys says
Oh no! I am so sorry to hear that. I will go and look for the email. I would def have responded to such devastating news if I had seen it. You know that my inbox (all my inboxes, I should say) is like a black hole! I will pray for you for strength and a speedy recovery, with minimal side effects. All my love x
Dedri
Loretta says
wow what an inspiration love to try these thank you.
Loretta
Deirdre Cunningham says
Happy Christmas.
Thank you so much for these lovely wrist warmers….I’m looking forward to making them.
Jenny says
Remember to share pics with us when you have made them, Deidre!
BW Jenny :)
Barbara says
A lot more complicated than is my norm. But the looks of them make them worth making. Thank you for sharing.
Jenny says
Barbara’s, once you get the hang of them, you will want to make so many more!
BW Jenny :)
Miss T says
Trop beau! Thanks for the pattern. Merry Christmas.
Esther A Paris says
Those are beautiful! I love fossils and look forward to making these.
Simone says
I will dive into my cupboard to find my Stonewash stock so I can start today.
Merry Christmas and lots of love and joy for you and your loved ones.
Jenny says
Simone, you may find a DK yarn to be more fitting. Sock may be a little thin :)
BW Jenny