I have now updated and corrected the Crochet Slipper Pattern to make it easier to follow. I hope you enjoy making them and look forward to any feedback you might have!
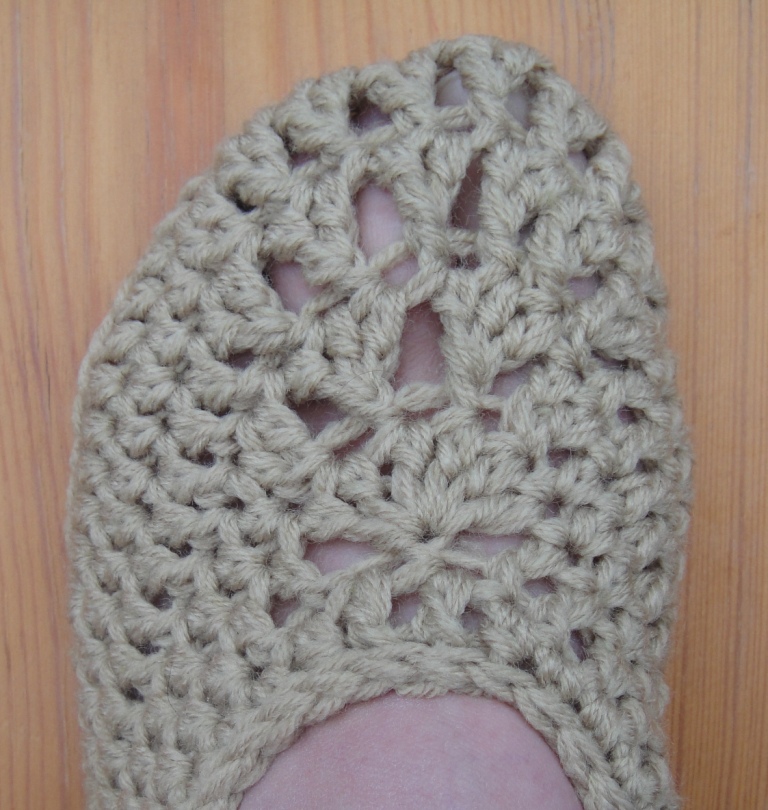
Crochet Slippers Pattern
©Dedri Uys 2011. All Rights Reserved.
These slippers are worked in the round, starting with the soles. If you would like to print this pattern, please use the Print Friendly button below this post.
Size
Unfortunately this pattern is still only available in one size. You can always go down a hook size to make them slightly smaller (or up a hook size to make them slightly bigger).
- UK – size 6 – 7
- US – size 8.5 – 9.5
- European 39 – 40
They are roughly 22.5 cm (9″) from toe to heel and will stretch at least an inch.
Materials
These slippers can be made with 2 strands of double knit (light worsted weight/#3) yarn OR 1 strand of worsted weight (#4) yarn. Using 2 strands of double knit yarn will yield a more dense slipper than using 1 strand of worsted weight, but the size will be the same. You can find the amounts needed for both options below.
- Yarn:
- Option A: 100 g Double knit yarn (2 strands together) – l recommend Stylecraft Special Dk or Scheepjeswol Softfun Denim
- Option B: 80 g Worsted weight yarn (1 strand) – I recommend Stonewashed XL
- 5mm Crochet hook (US 9/I UK 5) – I recommend Clover Amour Crochet Hooks
- Yarn needle – I use these Susan Bates Finishing Needles
Abbreviations
US Terminology Used.
See THIS COMPARATIVE CHART if you need help with any of the terminology.
Instructions
To start: Chain 22.
Round 1
Working into the top loop only of each ch st: make 2 sc’s in the second chain from the hook. Sc in the next 9 stitches, hdc in the next st, dc in the next 8 st’s. Make 2 dc’s in the next st and then make 4 dc’s in the last st.
Continuing around, and working into both remaining loops of each ch st: make 2 dc in the next st. Dc in the next 8 st’s, hdc in the next st, and sc in the next 9 st’s. Make 2 sc’s in the last st. Place a piece of scrap yarn over your work before making the first st of the next round. This will act as a running stitch marker.
Stitch Count: 48 st’s {22 sc’s, 2 hdc’s, and 24 dc’s}
Round 2
You are going to continue working in a spiral, so do not join or turn your work.
Make 2 sc’s in the first st of the previous round. Sc in the next st. Make 2 sc’s in the next st. Sc in the next 9 st’s. Hdc in the next st and dc in the next 8 st’s. Make 2 dc’s in each of the next 6 st’s. Dc in next 8 st’s, hdc in the next st. Sc in the next 9 st’s. Make 2 sc’s in the next st, sc in the next st, make 2 sc’s in the last st.
Flick your piece of scrap yarn back over your work before making the first st of the next round.
Stitch Count: 58 st’s {28 sc’s, 2 hdc’s, and 28 dc’s}
Round 3
Make a sc in the first st of the previous round. Make 2 hdc’s in the next st, hdc in the next 2 st’s, make 2 hdc’s in the next st. Hdc in the next 19 st’s. (Make 2 hdc’s in the next st, hdc in the next st) five times. Make 2 hdc’s in the next st and hdc in the next 19 st’s. Make 2 hdc’s in the next st, hdc in the next 2 st’s, make 2 hdc’s in the next st.
Flick your piece of scrap yarn back over your work before making the first st of the next round.
Stitch Count: 69 st’s {1 sc, and 68 hdc’s}
Round 4
Hdc in the first 2 st’s of the previous round. Make 2 hdc’s in the next st. Hdc in the next 3 st. Make 2 hdc’s in the next st. Hdc in the next 20 st’s. (Make 2 hdc’s in the next st, hdc in the next 2 st’s) five times. Make 2 hdc’s in the next st. Hdc in the next 20 st’s. Make 2 hdc’s in the next st. Hdc in the next 3 st’s. Make 2 hdc’s in the next st. This should bring you back to your stitch marker. Hdc in the next st, sc in the next st and sl st in the next st. These extra stitches should bring you just past the middle of the back of the heel. Fasten off and work away your tails of yarn.
Stitch Count: 80 hdc’s – including the 2 extra stitches, but not the sl st}
The next 7 rounds will make up the body of the slipper.
Round 5
Join your new yarn by making a sl st in the back loop only (blo) of the stitch that contains the sl st bind-off of the sole. Ch 2 (counts as your first hdc). Working in the back loops only for this round: hdc in every stitch around. Join to the top of the beginning ch-2 with a sl st.
Stitch Count: 78 hdc’s
Round 6
Ch2 (counts as your first hdc). Hdc in the next 30 st’s. Dc2tog. Tr2tog x 6. Dc2tog. Hdc in the next 31 st’s. Join to the top of the beginning ch-2 with a sl st.
Stitch Count: 70 st’s {62 hdc’s, 2 dc’s, and 6 tr’s}
Round 7
Ch2 (counts as your first hdc). Hdc in the next 20 st’s. Dc in the next 8 st’s. Tr2tog x 6. Dc in the next 8 st’s. Hdc in the next 21 st’s. Join to the top of the beginning ch-2 with a sl st.
Stitch Count: 64 st’s {42 hdc’s, 16 dc’s, and 6 tr’s}
Round 8
Ch2 (counts as your first hdc). Hdc in the next 26 st’s. Dc2tog. Tr3tog x 2. Dc2tog. Hdc in the next 27 st’s. Join to the top of the beginning ch-2 with a sl st.
Stitch Count: 58 st’s {54 hdc’s, 2 dc’s, and 2 tr’s}
Round 9
Ch2 (counts as your first hdc). Hdc in the next 24 st’s. Hdc2tog. Dc6tog. Ch 1. This ch-1 will make the dc6tog appear neater. Hdc2tog. Hdc in the next 23 st’s. Join to the top of the beginning ch-2 with a sl st.
Stitch Count: 51 st’s {48 hdc’s, 2 dc’s, and 1 tr’s}
Round 10
Ch2 (counts as your first hdc).Hdc in the next 4 st’s. Hdc2tog. Sc in the next 16 st’s. Hdc in the next 4 st’s. Skip the ch-1 that you used to close the dc6tog. Hdc in the next 4 st’s. Sc in the next 16 st’s. Hdc2tog. Hdc in the last 2 st’s. Join to the top of the beginning ch-2 with a sl st.
Stitch Count: 49 st’s {32 sc’s and 17 hdc’s}
Round 11
Sl st in each of the 49 st’s around. Fasten off and work away your tails of yarn.


Remember to subscribe to my newsletter if you would like to be kept in the loop. You can also like my Facebook page or follow me on Bloglovin or Google+.
Happy Hooking!


Christine says
I love this pattern. Thank you Is there any chance you have patterns for smaller sizes?
Dedri Uys says
Hi Christine. Unfortunately, I don’t. Sorry!
lillian says
these are beautiful, can’t wait to try these.
Debbie Childers says
Thank you so much for such a beautiful pattern, but I was wondering do you make the same soles for both feet.
Dedri Uys says
Hi. I do make the same soles for both feet. They stretch and mold quite well.
Robin Chavez says
This pattern is so easy to follow, great directions. I learned at a very early age to do exactly what the directors say without thinking about it and it will work out, my mom taught me that, lol. I’ve sometimes hesitated and thought that doesn’t sound right, but it always was. Thsnk you so much for making such an easy beautiful slipper, and sharing the pattern with us for free. I live on a fixed Income and I appreciate your kindness, I see beautiful slipper patterns and cant afford to buy them , but this pattern is the best one and you give it freely. Thank you very much
Oh and I’ve made my granddaughters the same skipper by going down on the size of hook and they turn out just right. Even 2 sizes down, same stitch count and number of rows. Thank you again
Dedri Uys says
Hi Robin. I’m really pleased that you enjoyed this pattern so much! Thank you :)
Kari says
Hi there. I am having trouble with round 6. How do you turn the 78 stitches from round 5 into 70 in round 6?? There is always a surplus of stitches at the end of round 6 and too large a gap to just close off the round. Help!
Dedri Uys says
There is a dc2tog (so you lose a stitch), then 6 tr2tog (lose 6 more sts), then another dc2tog (lose another st), so that is 8 stitches less than the previous round.
Anna says
Beautiful pattern well written.
I try and success right at the first time.
Thank you very much for sharing.
Laura Kilpatrick says
Fantastic well written pattern that is beautiful! Thank you so much! I have made two pairs so far and chose to double the sole on the second pair.
Nadia says
Hi there,
Round 4’s stitch count is not adding up for me. I only end up with 69 stitches not including the stitches after the marker. I’m about 6 short from my marker.
Please check and help if possible.
Jenny says
Nadia, when Dedri comes back I am sure she will be able to help. If I get the chance, I will make up a slipper to where you are and see what I come up with.
Jenny :)
Mattison says
These slippers are beautiful. Easy to make, the only difficulty of mine was knowing where I was slip stitching.
Was I to slip stitch into the 2nd chain or into the top of the chain (in the first stitch).
Thanks. Found your site from doing SOPHIE! Love it!!
Dedri Uys says
Hi,
You don’t need to slip stitch to join the rounds. The rounds are worked in a spiral, so the first stitch of each round falls in the first stitch of the previous round (unless otherwise stated).