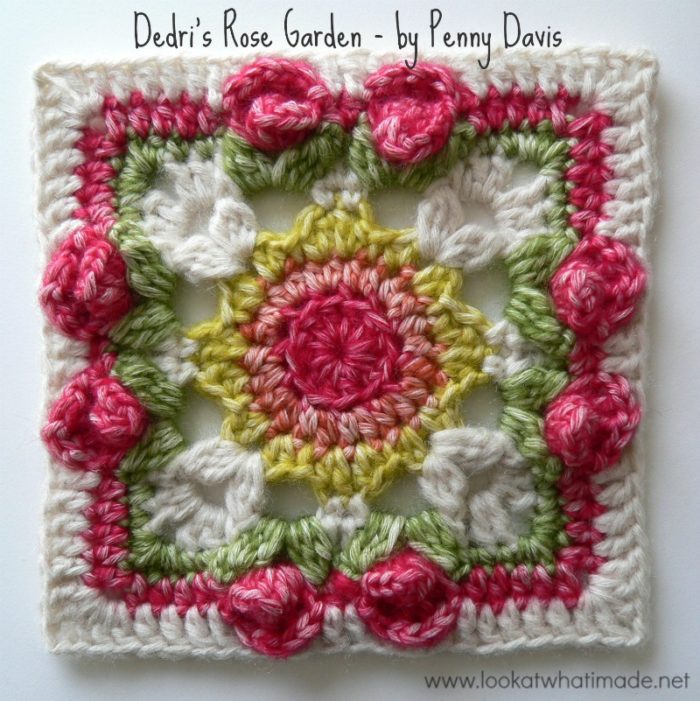
Due to popular demand, I bring you Penny Davis’ crochet square, which she has decided to call Dedri’s Rose Garden. I am a little bit shy about having this square named after me (on a blog that already screams “Look At Me!”), but it is Penny’s design, so she got to choose the name.
This square is a modification of the Lydia square, which was offered as an option for “growing” Sophie’s Universe into a rectangle. Penny has used the Roses from Part 7 of Sophie’s Universe to liven the square up a bit.
I am honoured and proud to present Penny’s square to you. Thank you, Penny!
This is my first time working with the “skinny” Stonewashed. I still prefer the Stonewashed XL, because I am just a bigger-is-better kinda gal, but I love the density with which the regular Stonewashed works up, and the colours…well…you know I love those!
Dedri’s Rose Garden Square
©Penny Davis and Dedri Uys 2015. All Rights Reserved. Please see Terms of Use.
- Add This Pattern to your Ravelry Queue
- Use the Print Friendly button at the bottom of this post if you would like to print/save this tutorial.
Translations
- Dutch Translation by Dianne Baan
- French Translation by Sandra Larvin
Size
11 cm (Just over 4”)
Please Note: If you use Cotton 8 to make this square, it will come out smaller (10 cm/4”).
Materials
- 3.25 mm Crochet Hook (US D/3 UK 10) – I use Clover Amour Hooks
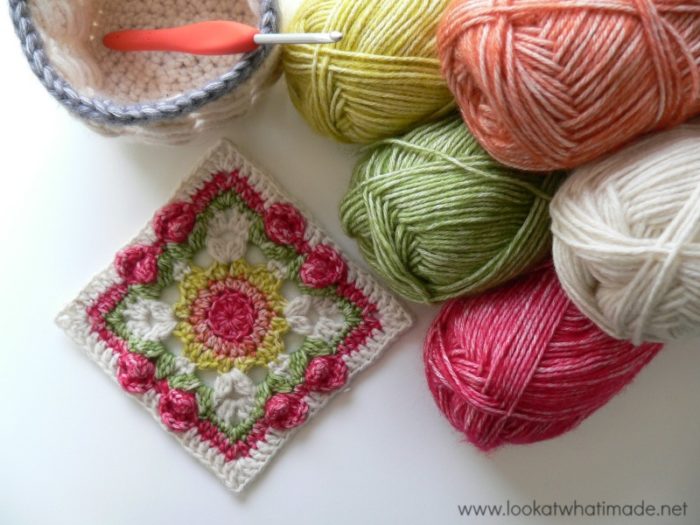
- Scheepjeswol Stonewashed (4 Ply /#2) – about 50 meters per square. I used Red Jasper, Coral, Lemon Quartz, Moonstone, and Canada Jade.
- Yarn needle
I just love my Tiny Cable Stitch Basket, which has been made using Stonewashed XL.
Abbreviations
- BLO – Back loop only
- Ch – Chain
- Dc – Double crochet
- Fpdc – Front post double crochet
- Hdc – Half-double crochet
- Sc – Single crochet
- Sl st – Slip stitch
- St/st’s – Stitch/stitches
- * – Repeat instructions between asterisks the amount of times specified. This is a hardcore repeat and will consist of multiple instructions.
- () – Repeat instructions between parentheses the amount of times specified. This is a lower level repeat.
Special Stitches
- Cluster : Dc3tog – see this tutorial.
- Bobble Stitch: Yarn over and insert your hook into the indicated stitch. Yarn over and pull up a loop. Yarn over and pull through 2 loops – 2 loops on your hook. Yarn over and insert your hook into the same stitch. Yarn over and pull up a loop – 4 loops on your hook. Yarn over and pull through 2 loops – 3 loops on your hook. Yarn over and insert your hook into the same stitch. Yarn over and pull up a loop – 5 loops on your hook. Yarn over and pull through 2 loops – 4 loops on your hook. Yarn over and pull through all 4 loops. See this tutorial.
Special Stitch Combinations
Leaves
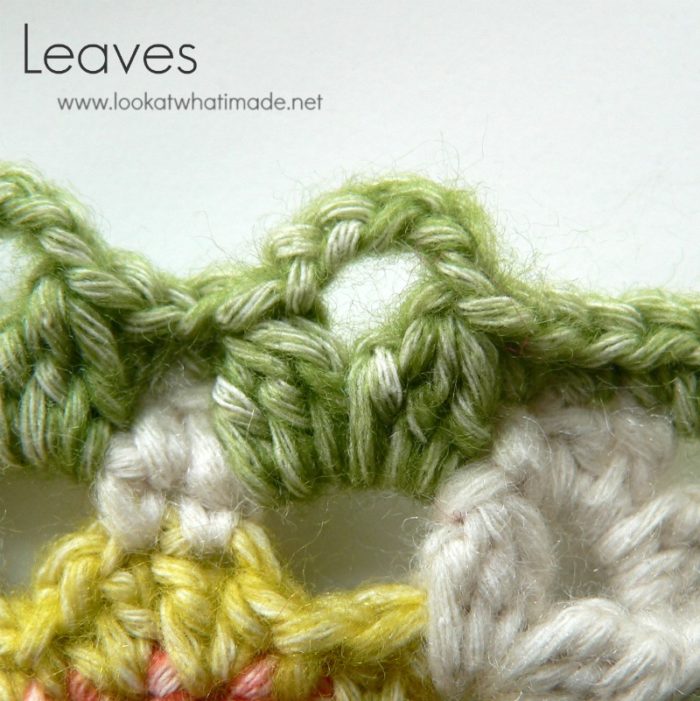
Working in front of the ch-3 space from Round 5, make a Bobble in the ch-3 space from Round 4. Ch 5 and make a Bobble in the same ch-3 space.
Roses
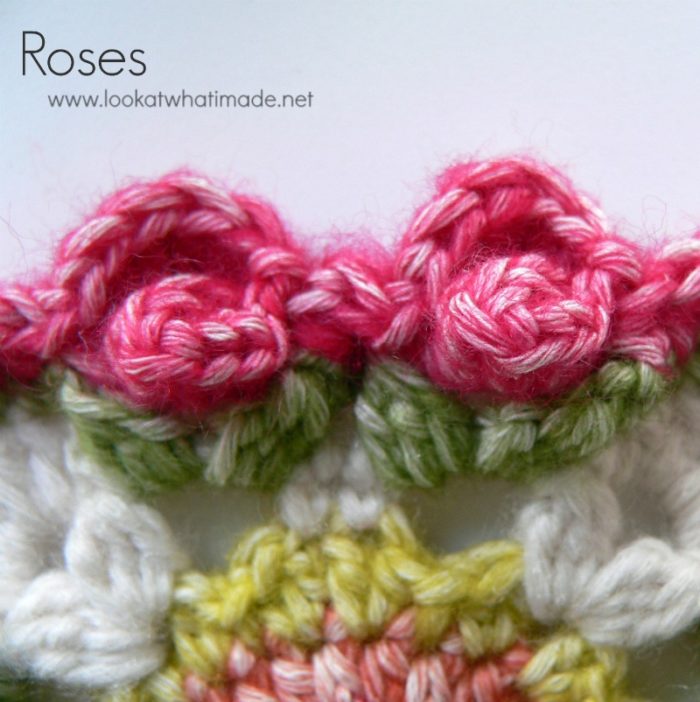
Pull the ch-3 space from Round 5 through the ch-5 space from Round 6. Working only into the ch-3 space, make (2 sc’s, 3 hdc’s, 3 dc’s). This will be a tight squeeze! Bring the last stitch around the back of your work and join to the first sc with a sl st, forming a ring. Let’s call this a modified popcorn.
(Sc, hdc, 3 dc, hdc) into the ch-5 space from Round 6, which should be behind the modified popcorn. To finish the rose, make a sc into the ch-3 space from Round 5, again making sure to work in front of the ch-5 space. This will be a bit tricky.
There is a step-by-step photo tutorial for the roses at the start of Round 59 in Part 7 of Sophie’s Universe.
Instructions
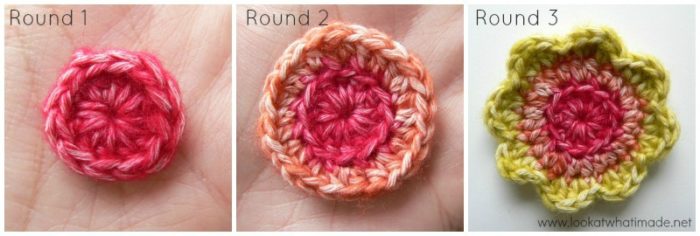
Round 1
This round is just a standard double crochet circle.
Into a magic ring: ch 3 (this counts as your first dc). Make 11 dc’s into the ring. Join to the top of the beginning ch-3 with a sl st. If you are going to change colours for the next round, consider using the invisible join instead.
If you are not familiar with working into a magic ring, this video tutorial by Tamara from Moogly is very good. Please remember, when working into a magic ring you HAVE to work away your initial tail very well. If you just cut it, your whole project might unravel!
Stitch count: 12 dc’s
Round 2
Join your new colour by making a standing half-double crochet in the blo of any stitch around. Make another hdc in the blo of the same stitch. Make 2 hdc’s in the blo of each of the remaining 11 st’s.
Stitch count: 24 hdc’s
Round 3
- If you are using the same colour, (hdc, dc) in the stitch after the sl st join. (Dc, hdc) in the next stitch.
- If you are using a new colour, join your yarn by making a sl st into the same st as the sl st join (Photo 1). (Hdc, dc) in the next stitch. (Dc, hdc) in the next stitch.
*Slip stitch in the next stitch. (Hdc, dc) in the next stitch. (Dc, hdc) in the next stitch.* Repeat from * to * 6 more times. Join by making a sl st in the same stitch as the initial sl st.
Fasten off and work away your tails of yarn.
Stitch count: 40 st’s – including sl st’s {16 dc’s, 16 hdc’s, and 8 sl st’s – not including the initial sl st to join}
Round 4
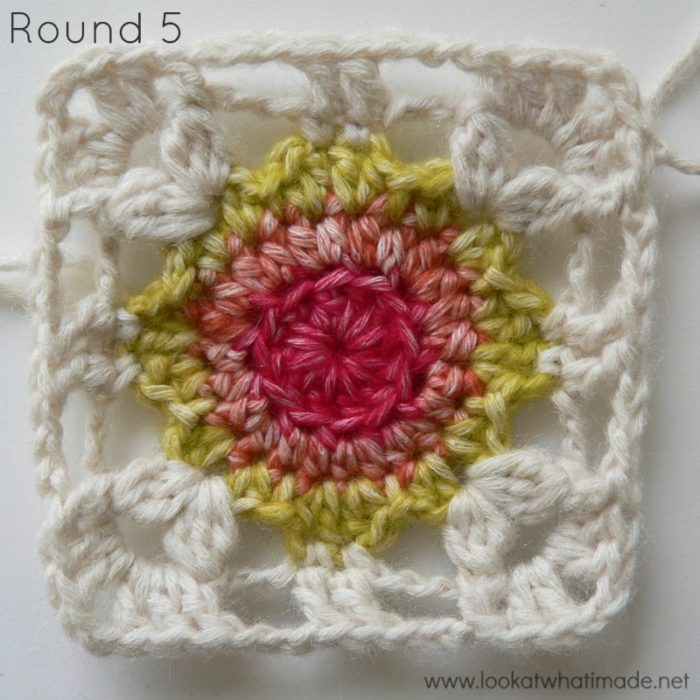
Join your yarn by making a standing single crochet in the second dc of any petal.
*Ch 3. (Bobble Stitch, ch 4, Bobble Stitch) between the 2 dc’s of the next petal. This is your corner made. Ch 3. Sc in both dc’s of the next petal.*
Repeat from * to * 3 more times, omitting the last sc on the last repeat. Join to the top of the first sc with a sl st.
Fasten off. Leave your tails until you have made the next round as it will be easier to work them away then.
Stitch counts:
- Total: 16 st’s, 8 ch-3 spaces and 4 ch-4 corner spaces {8 Bobble Stitches and 8 sc’s}
- Per Side: 4 st’s and 2 ch-3 spaces {2 Bobble Stitches and 2 sc’s}
Round 5
Dedri’s Edit: I suggest making a ch-4 instead of a ch-3 (where indicated), otherwise you will find the roses a bit tricky to make.
Join your new yarn by making a standing double crochet in any ch-4 corner space. (Dc, ch 2, 2 dc) in the same ch-4 corner space. This is your corner made.
*Make a fpdc around the next Bobble Stitch. Ch 3 and skip the next ch-3 space. Dc in the next 2 sc’s. Ch 3 and skip the next ch-3 space. Make a fpdc around the next Bobble Stitch. (2 dc, ch 2, 2 dc) in the next ch-4 space.*
Repeat from * to * 3 more times, omitting the last corner on the last repeat. Join to the top of the beginning ch-3 (or the standing double crochet) with a sl st.
Stitch counts:
- Total: 24 dc’s, 8 fpdc’s, 8 ch-3 spaces, and 4 ch-2 corner spaces
- Per Side: 6 dc’s, 2 fpdc’s, and 2 ch-3 spaces
Round 6
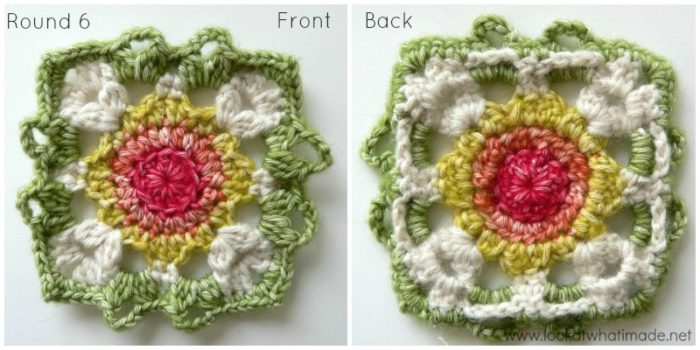
See Leaves under Special Stitch Combinations above.
Join your new yarn by making a standing single crochet in any ch-2 corner space. (Sc, ch 2, 2 sc) in the same ch-2 corner space. This is your corner made.
*Sc in the next 3 st’s. Make Leaves. Sc in the next 2 st’s. Make Leaves. Sc in the last 3 st’s. (2 sc, ch 2, 2 sc) in the next ch-2 space.*
Repeat from * to * 3 times, omitting the last corner on the last repeat. Join to the top of the standing sc with a sl st.
Stitch counts:
- Total: 48 sc’s, 8 Leaves – each containing 2 Bobbles and a ch-5 space, and 4 ch-2 corner spaces
- Per Side: 12 sc’s and 2 Leaves – each containing 2 Bobbles and a ch-5 space
If you take a look at the photo below, you will see that the ch-3 spaces are behind your work. This is extremely important, otherwise you won’t be able to make your roses in the next round!
Round 7
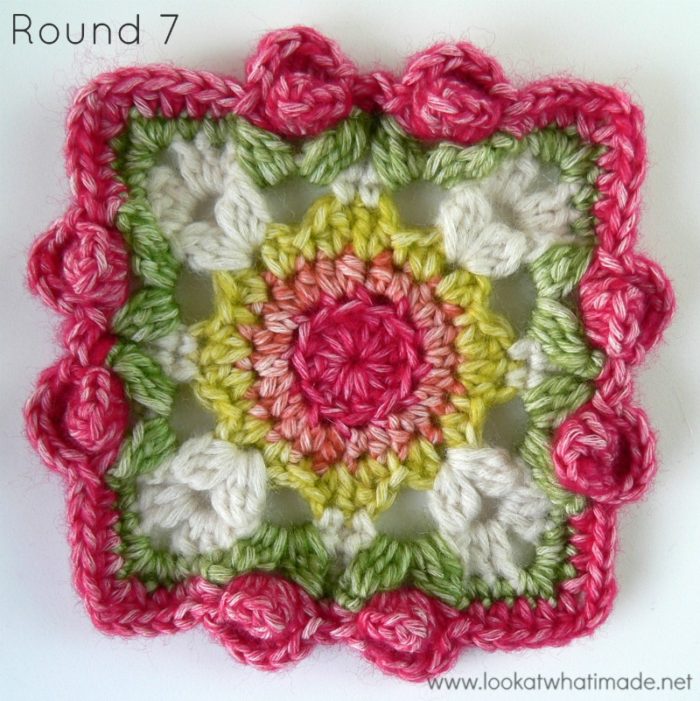
- See Roses under Special Stitch Combinations above.
- Do not hdc in the top of the leaves from the previous round. In other words, skip ALL the Bobble “Leaves”.
Join your yarn by making a standing half double crochet in any ch-2 corner space. (ch 2, hdc) in the same ch-2 corner space. This is your corner made.
*Skip the first (hidden) st. Hdc in the next 4 sc’s. Make a rose in the next ch-3/ch-5 space. Hdc in the next 2 sc’s. Make a rose in the next ch-3/ch-5 space. Skip the first sc after the last leaf, which will be hidden anyway, and hdc in the last 4 sc’s. (Hdc, ch 2, hdc) in the next ch-2 space.*
Repeat from * to * 3 more times, omitting the corner on the last repeat.
Stitch counts:
- Total: 48 hdc’s, 8 Roses, and 4 ch-2 corner spaces
- Per Side: 12 hdc’s and 2 Roses
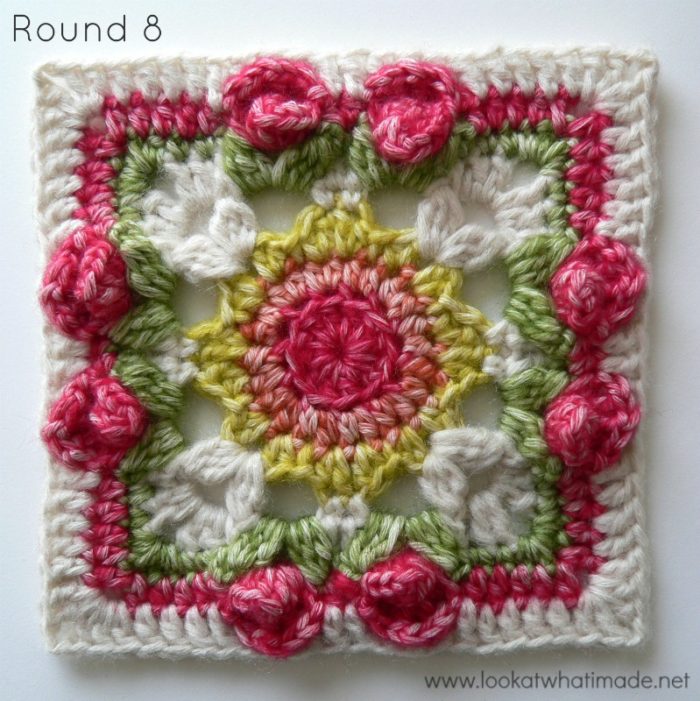
Round 8
Dedri’s Note: When working into the back of the Roses, I suggest working around the back posts.
Join your yarn by making a standing double crochet in ch-2 any corner space. (Dc, ch2, 2 dc) in the same ch-2 space. This is your first corner made.
*Taking care not to skip the first hidden stitch, dc in next 5 st’s. Working into the back of the Rose, hdc in the first hdc, sc in the centre dc, hdc in the last hdc. Dc in next 2 hdc’s. Working into the back of the second Rose, hdc in the first hdc, sc in the centre dc, hdc in the last hdc. Dc in last 5 hdc’s. (2 dc, 2 ch, 2 dc) in next ch-2 space.*
Repeat from * to * 3 more times, omitting the corner on the last repeat. Fasten off and work away your tails of yarn. Block your square so that your edges are nice and neat.
If you are going to use foam squares to block on, consider buying these Interlocking Foam Exercise Mats. They are similar to these Knitter’s Pride Lace Blocking Mats, but cheaper. You will also need some of these Clover Fork Blocking Pins (although regular old sewing pins work just as well).
Stitch counts:
- Total: 88 st’s and 4 ch-2 corner spaces {64 dc’s, 16 hdc’s, and 8 sc’s}
- Per Side: 22 st’s {16 dc’s, 4 hdc’s, and 2 sc’s}

This blog post contains affiliate links. I only link to products I personally use or would use. All opinions are my own.



Lorraine Shakespeare says
Hi Dedri
I have just completed Sophie’s Universe which I’ve absolutely loved doing. However I ran out of wool which was a pain. Luckily I purchased the Lydia pack and used wool from there.
I followed Ester who became like a friend visiting having tea and making the blanket. I loved every minute.
I have now passed this onto all my crocheting friends who I’m sure will love to make the blanket.
Thank you again
Dedri Uys says
Hi Lorraine. I’m glad to hear you liked doing it. Lucky for you that you had bought the Lydia pack so could continue. I have discovered that I crochet tighter than 80 percent of the crocheting population. I’m curious to know how much larger your blanket was than mine…
Carolyn says
Hi, Dedri!
First of all, thank you so very much for sharing this beautiful pattern! I’m appropriately making it for my Aunt Rosie, an older lady who will be delighted with the colors. :)
Now I have a funny question: When I printed this out, there was a glossary of stitches and instructions at the end. However, I chose not to print those pages at the time. Now that I’ve decided I want them after all, I can’t find them in the “Printer Friendly” version you offer here! Any idea what I’m missing?
Thanks in advance for any help…you can email me, if you kindly would.
Dedri Uys says
Hi Carolyn, I am not sure what you mean by ‘glossary of stitches’at the end. The special stitches are always listed at the start of the pattern. Could you have another look and see if that is what you meant? Everything you need to make this pattern is either included here or linked to. I hope you find it!
Rozy says
Hi I am so in love with this pattern and want to turn it into a blanket and mix this square with your lydia blanket squares.
However, the yarn is different of both and now I am in doubt whether to stick to one type of yarn for all squares , but than which one and what colours would you advise me to use to gain the same very lovely effect? Or would it also be a beautiful outcome if I would mix the yarns in one blanket and follow your originals? What to do? Can you please help me out here and advise what you think would be best?
Thanks a million and I admire your creativity and nice work!
Dedri Uys says
Hi Rozy. The squares should be the same size (or very similar if using the same yarn for both). I have not considered an alternative colourway for the Penny’s Rose Garden Square, but I am sure that you can use the same colours and yarn as for Lydia with very good results.
I am looking forward to seeing what you decide to do.
Rozy says
Hi I am so in love with this pattern and want to turn it into a blanket and mix this square with your lydia blanket squares.
However, the yarn is different of both and now I am in doubt whether to stick to one type of yarn for all squares , but than which one and what colours would you advise me to use to gain the same very lovely effect? Or would it also be a beautiful outcome if I would mix the yarns in one blanket and follow your originals? What to do? Can you please help me out here and advise what you think would be best?
Thanks a million and I admire your creativity and nice work!
Dedri Uys says
Hi Rozy, I am not sure exactly what you are asking. If you use the same yarn for both squares, they will be the same size. If I had to choose one, I would go with Stonewashed, and I would use a 4 mm hook instead so that both squares drape nicely.
Lianne Loos says
What a pretty square , I could not wait so long for the dutch translation .
So started already …. and I made it … so proud of my self.
And of course I thank you , for the fabulous way you explane the pattern
Lianne Loos
Diane says
As always your work is beautiful. After working on Sophie, my crochet confidence is so much improved. I am attempting patterns I would have never thought of doing before. Thanks again!!!
Diane
Dedri Uys says
Thank you, Diane. Comments like yours makes every minute spent on the project worth while. x
KATHIE SOLUS says
I am a self-taught craft woman. In my 20’s I taught myself how to crochet. My first project was a granny square baby blanket. It turned out well and I was very proud of it. Have been crocheting ever since.
I want to thank you for sharing this beautiful rose square that I will not call a ‘granny square’. It is awesomely beautiful and the directions are impeccably written. I can’t wait to shop for the yarn to begin my rose square.
It is my wish that you have a wonderfully lovely day.
Dedri Uys says
Hi Kathie. It is my pleasure to share this design with you. Penny has done a wonderful job on it. Have a great day too x
wilma lizamore says
100% Beautifull very nice
Tina says
I am in tears reading your closing entry! I am far from finishing, but have my Deramores arsenal ready! I wish I could HUG all those that picked up a crochet hook and entered this happy place with me. Words cannot say how enlightening this experience has been. Till me meet again Dedri..
cindyzs/freespiritczs says
love this!!! as a newb to crocheting, i must say, “there are those that should be writing patterns and those who should not.” YOU my dear, SHOULD!!!!- i only needed to refer to the detailed pics a few times to make sure i was understanding what i was reading! you did a marvelous job!!! Thank you for that! i did find a couple errors/something i need explanation for? but all in all one of the best patterns i have read and understood!!!
1) rnd 5- fpdc around the bobble stitches as written looks like it is only on 4 of them, as i understood it. after doing rnd 6, the pic looked like it was around all 8 bobble stitches. please clarify, thanks
2) count is incorrect (which i heavily rely upon to make sure i am doing things right!) on rnd 6.
3) rnd 8 would have loved to seen a couple of pics showing how to do the stitches on the rose and how it looked from the back. would love to see how it was written compared to Dedri’s note about how to work it, would be very helpful!!
THANK YOU AGAIN so very much! i have not participated in any CALs yet or the Sophie’s universe, so many wonderful designs, but am saving and pinning them till i get some yarn. right now i am frogging projects to try other things, then frog to do the next one! lots of practice that way, lol :D but do take pics so i can make them again someday!! this was so much fun and now i really want to do the other ones!! :) Penny please keep writing great patterns!! what a joy! :) God bless!!
Dedri Uys says
Hi,
In round 5 it does tell you to make a fpdc around 2 bobbles on each side, so that gives you 8. Please can you clarify where you are only seeing 4 fpdc’s?In Round 6, can you tell me where the error is, as I am not spotting it.
In the Rose Instructions there is a link to the tutorial in Sophie’s Universe that shows you how to make the roses step by step.
I hope that helps.
Dedri
cindyzs/freespiritczs says
sorry, the way it is written and the way i interpreted it was your fpdc in bobble then going to the ch 3 sp, etc… sounded like the bobble next to the 1st one fpdc’d was skipped. like i said a newb and after i was done and saw the pics, i realized i shoulda done the second bobble stitches! dont remember now the total counts i came up with, i was probably wrong anyway? and i did see the pics, but dont recall seeing the back on the roses…now i dont know, as i am confused, lol :D!!! THE MAIN THING WAS I WAS PAYING YOU GUYS A **COMPLIMENT**!!! it was a great pattern and very well written and I APPRECIATE IT VERY MUCH! :)
in any ch-4 corner space. (Dc, ch 2, 2 dc) in the same ch-4 corner space. This is your corner made.
*Make a fpdc around the next Bobble Stitch. Ch 3 and skip the next ch-3 space. Dc in the next 2 sc’s. Ch 3 and skip the next ch-3 space. Make a fpdc around the next Bobble Stitch. (2 dc, ch 2, 2 dc) in the next ch-4 space.*
Dedri Uys says
Thank you :)
Dedri Uys says
Thank you. I appreciate the compliment.
Mary DuBois says
Would love to get crochet creations from you.
Sharon Weberling says
I love making squares and this one is beautiful!
Diane says
thank you for a beautiful pattern, can’t wait to start.
Sandhya Kulkarni says
What a lovely page i found out.
Thrilled to try crockett work
April says
I’m so thrilled and grateful to have found this site and signed up for your newsletter. I find the talent and work exquisitely beautiful in color and unique pattern styles.Unbelievably awakening my souls creativity backup again…
Dedri Uys says
Thank you, April :)
Pam Beeching says
Just when you think things can’t possibly get any prettier, up pops this! Perfect name too.
Rachel says
simply beautiful
Dedri Uys says
Thank you, Rachel :)
Jane Gordon-Clark says
Such a pretty variation and so delicate.
Kelly says
What a pretty square! I love the roses on Sophie’s Universe…I just finished my first one and want to do a black/white/grey/red one like several listed on Ravelry. :D Enabler! Thank you, thank you.
Penny Davis says
This is just brilliant Dedri, I could not have imagined this design looking so beautiful when I first made it. Thanks for sharing this pattern with The Universe it makes me happier than you could know to see it here.
I look at your lovely pictures and feel that my own squares don’t do justice to it now lol…..
And thanks for inspiring me to even try to create this adaptation to use in Sophies Universe…
Also thanks to all the people in the facebook group hosting the CAL for their wonderful messages and support of this square….