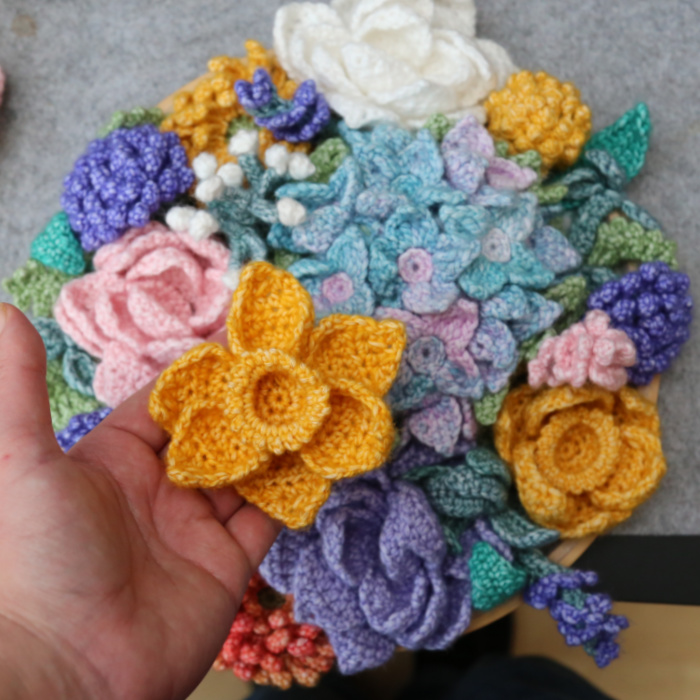
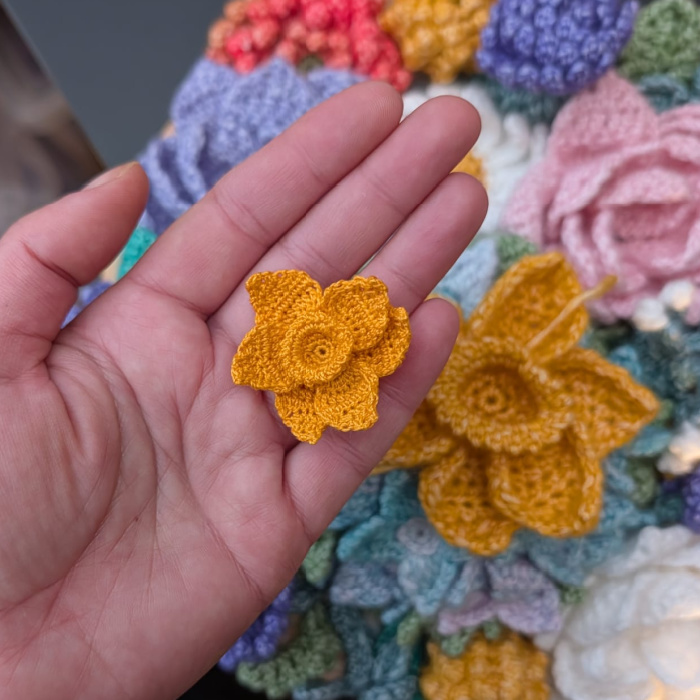
In this tutorial, I will show you how to make a crochet daffodil. It forms part of my Lucy Wall Bouquet crochet flower series, where I have been slowly creating a collection of crocheted flowers that can be combined to make a cheerful wall display or tactile cushion, with lots of little textures to explore with your hands. You can even use them to create a crochet flower bouquet (if you add some stems, of course). It is the perfect way to bring a little spring indoors.
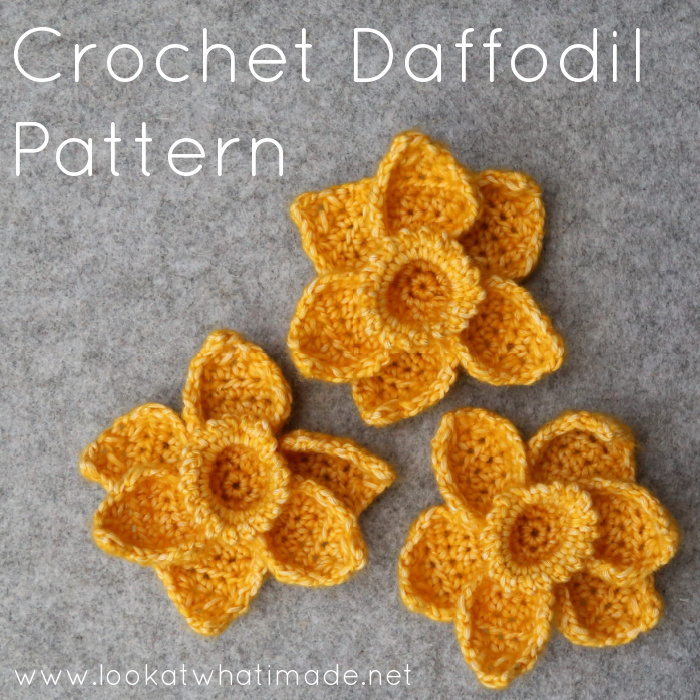
A simple crochet daffodil pattern from my Lucy Wall Bouquet flower series.
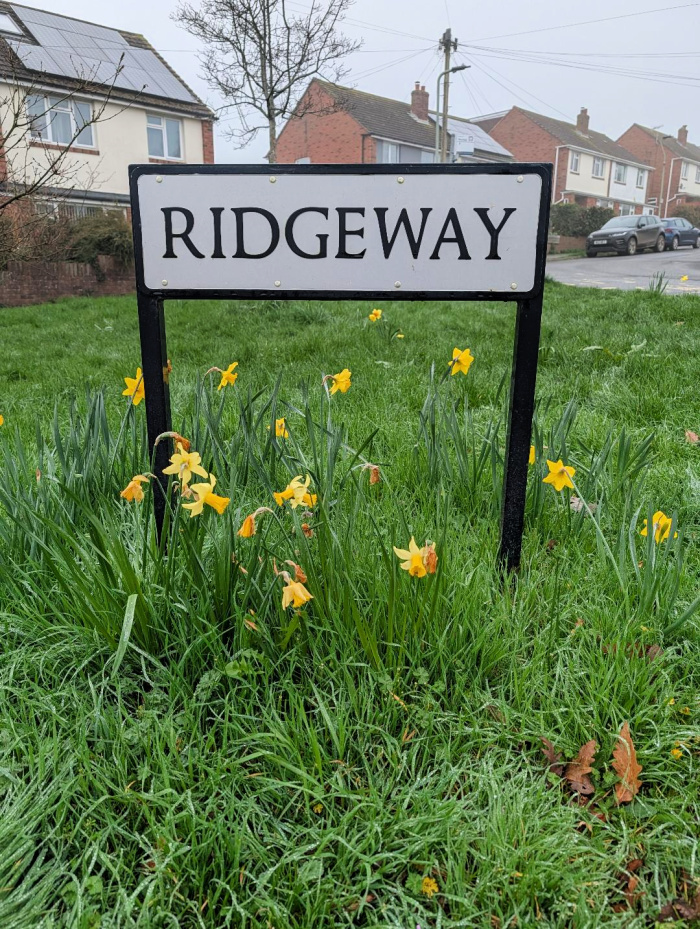
It is currently the season for daffodils here in the UK, and they may well be the flower that fills me with the most joy. Each year, they promise that warmth will soon return to the air, even as I traipse across frozen grass trying to avoid the icy pavement on my way down the misty hill. There is something wonderfully uplifting about these little pops of yellow, especially when the year begins – like this one did – with months of rain, dull grey skies, and a sense of endless sameness.
So yes, I have always celebrated these happy little flowers, but this year perhaps even more so than usual.
Which makes it a particular joy to share a crochet daffodil pattern with you today.
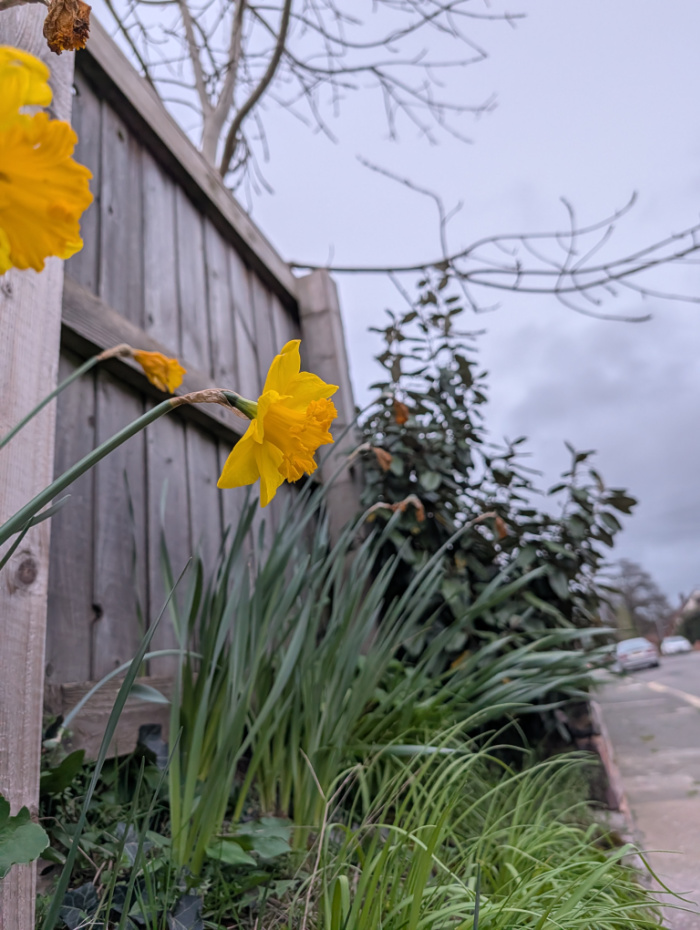
Over the last decade, I have amassed a surprising collection of daffodil photos. Here are just some of them…

They tend to catch my eye wherever I go – in gardens, along country roads, tucked into parks, or bravely growing in unexpected places. I love the way they gather in little clusters, nodding in the breeze as if they are sharing a secret.
This little collection grows right outside our house, and I love being greeted by them as I walk past. Sometimes they are the very first bright thing I see on a grey morning.
Daffodils are often seen as a symbol of new beginnings, which reminded me of the New Beginnings Clutch I designed years ago. Naturally, I disappeared down a rabbit hole to revisit that post, only to realise – with a little jolt – that we will be celebrating five years of living in Exeter exactly one month from today. If you want to jump down the rabbit hole with me, you can find that post (and the New Beginnings Clutch pattern) HERE.
I’ve always wanted to try my hand at micro crochet, so I made a daffodil using a 1mm crochet hook and thick sewing thread (I think it’s meant for jeans). I know that’s not nearly as micro as some people go, but it was the smallest hook my hands (and eyes) could manage. I love how it turned out, but it was a fiddly business! I think I need one of those magnifying lamps if I am going to attempt this again, so if you have any recommendations, please let me know :)
And now, if you’d like to make a daffodil of your own, here is the pattern. Whether you add it to a wall bouquet, a cushion, a twiddle muff, or simply make one as a cheerful standalone flower, I hope it brings you a bit of the same quiet joy these real daffodils bring each spring.
Crochet Daffodil Pattern
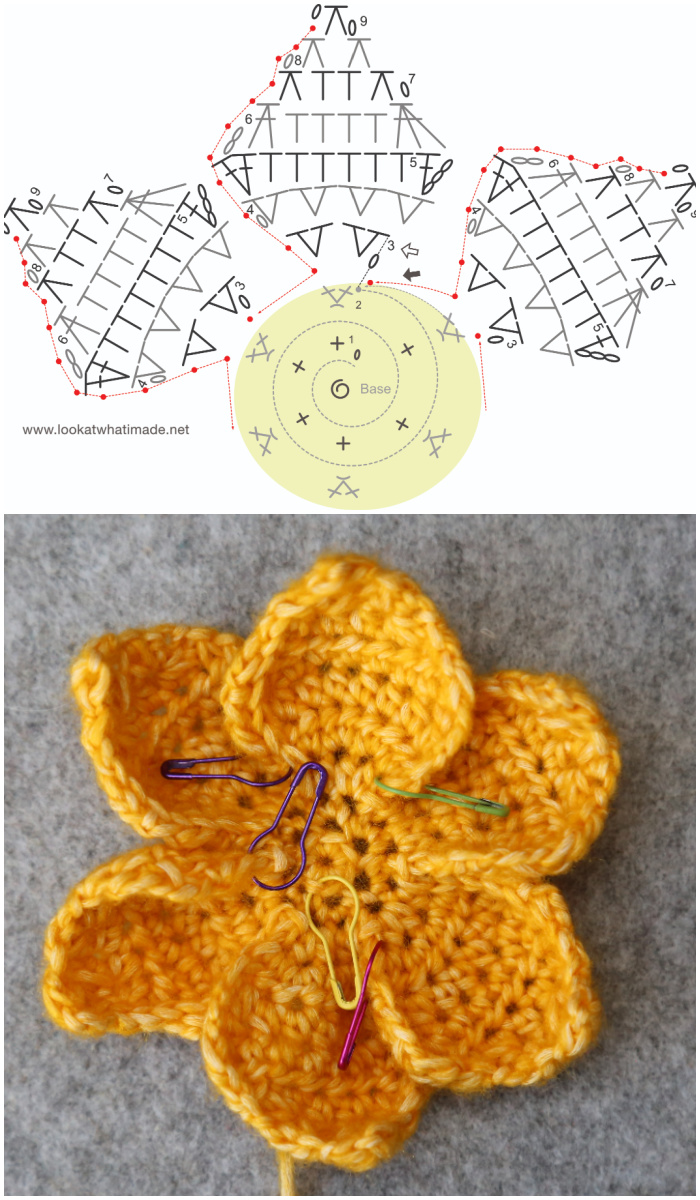
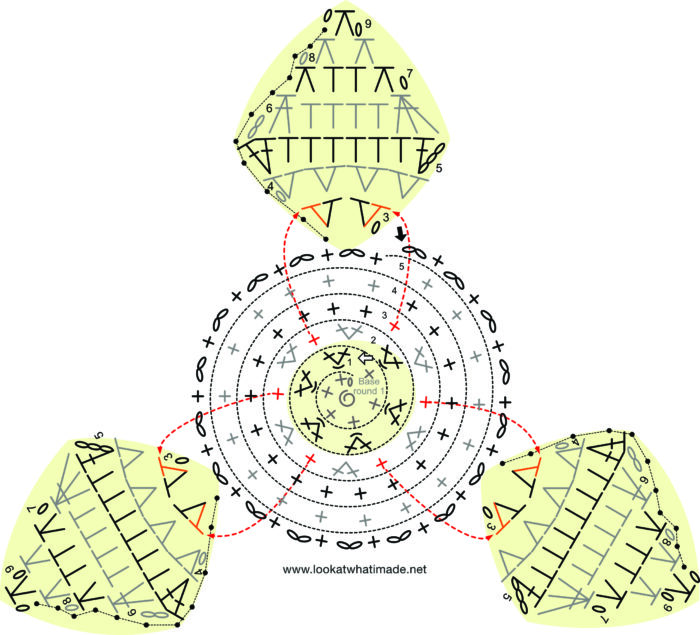
This free pattern is presented as a photo tutorial, with charts by the talented Masako Kawahara from Crochethmmm. If you have any problems with the instructions, please look at the Video Tutorials listed below.
Resources
- Other Patterns in this Crochet Flower Series (as they become available)
- Video Tutorials:
- Instagram: #crochetDaffodilLAWIM
Abbreviations
US Terminology
- BLO – Back loop only
- Ch – Chain
- Dc – Double crochet
- Dc2tog – Double crochet two together
- Dc3tog – Double crochet three together
- FLO – Front loop only
- Hdc – Half-double crochet
- Hdc2tog – Half-double crochet two together
- RS – Right side
- Sc – Single crochet
- Sl st – Slip stitch
- SM – Stitch marker
- St/sts – Stitch/stitches
- WS – Wrong side
- [] – Stitches to be worked into the same st/sp
- * – Repeat instructions between asterisks the number of times specified
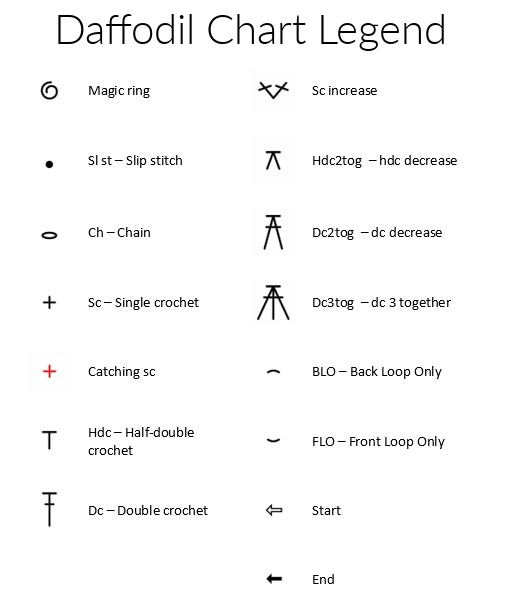
Chart Legend
Materials
- 4mm crochet hook (I use Clover Amour, available HERE on Amazon)
- Yarnsmiths Pebble Haze DK (50g/145m; 33% acrylic, 67% cotton) – available from Wool Warehouse HERE.
- Yellow – 2C110 Yellow Amber
Note
For my Lucy Wall Bouquet, I made 1 Daffodil. It weighed approximately 7.5g when finished.
Instructions
Base
Worked in a Spiral.
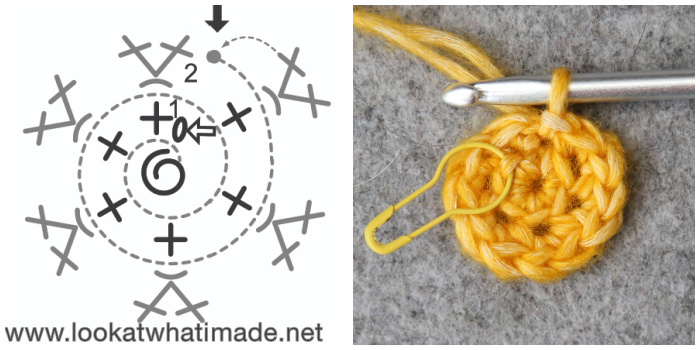
Round 1
Leave a 15cm/6” end at start. You will use this end to sew your Daffodil to your Bouquet.
Into a magic ring, ch 1 (doesn’t count as a st throughout), make 6 sc, marking FLO of first st with a SM. {6 sc}
Round 2
Make 2 BLO sc in each st around. Join to the first sc with a sl st (through both loops). {12 BLO sc}
Petals
These Petals will be made in rows, one at a time.
Important: When making the first, third, and fifth Petals, please mark the first and last hdc of Row 3 with a SM, leaving those SM in place until instructed to remove them. I find it easiest to mark them once I’ve completed Row 4.
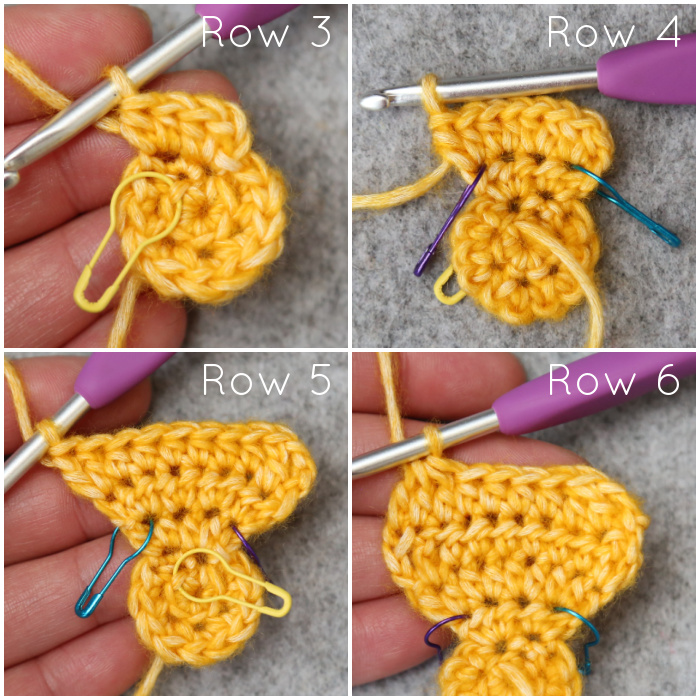
Row 3
Ch 1, make 2 hdc in the same st as the sl st, make 2 hdc in the next st, turn. {4 hdc}
Row 4
With WS facing, ch 1, make 2 hdc in each of the 4 sts, turn. {8 hdc}
Row 5
With RS facing, ch 3 (counts as dc throughout). Make a dc in the same st, hdc in the next 6 sts, make 2 dc in the last st, which may be a bit fiddly to get into, turn. {6 hdc and 4 dc}
Row 6
With WS facing, ch 2, skip the st at the base of the ch-2, dc2tog over the next 2 sts (this counts as a dc3tog throughout). Hdc in the next 4 sts, dc3tog over the last 3 sts, turn. {4 hdc and 2 dc3tog}
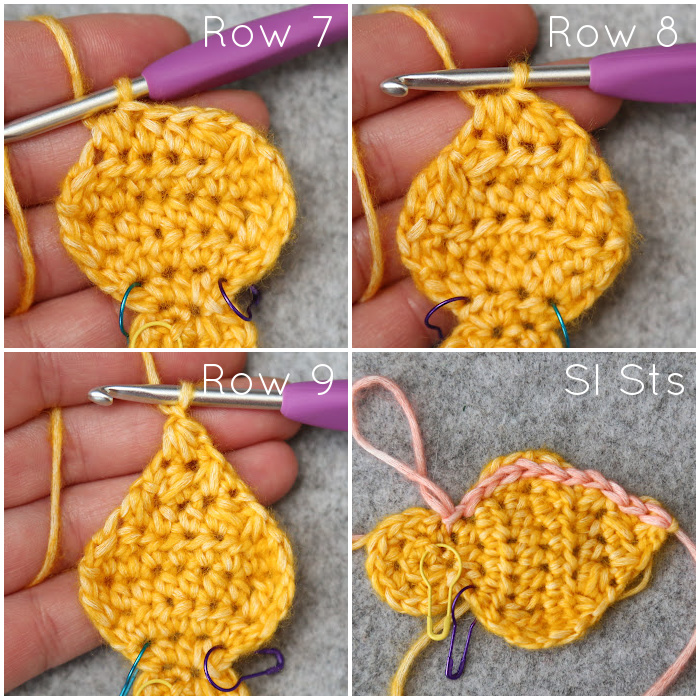
Row 7
With RS facing, ch 1, hdc2tog over the first 2 sts, hdc in the next 2 sts, hdc2tog over the last 2 sts, turn. {2 hdc and 2 hdc2tog }
Row 8
With WS facing, ch 1, hdc2tog twice, turn. {2 hdc2tog}
Row 9
With RS facing, ch 1, hdc2tog, ch 1. {1 hdc2tog}
To finish the Petal, sl st all the way down the side of the Petal and into the last ‘used’ sc from Round 2. You can just wing this (neatly).
Alright, if you insist on exact placement of sl sts…
Sl st as follows:
- Side of Row 9
- Top of Row 8, turning ch-1 of Row 8
- Side of Row 7
- Top of Row 6, side of Row 6
- Top of Row 5, side of Row 5
- Top of Row 4
- Top of Row 3
- In the last used sc from Round 2
This will give you 11 sl sts.
IMPORTANT: Sl st in the next st of Round 2.
You have now made your first Petal. Make 5 more Petals so that you end up with 6 Petals in total, omitting that last sl st on the last repeat. Fasten off and work away this end.
Middle Bit (Corona)
Worked in a Spiral.
Round 1
This round will be fiddly. Before starting this part, I like to fold the 3 unmarked Petals to the back of my work and pin them together with a SM, neatly out of the way.
Join your yarn by making a standing sc in the marked FLO from Round 1 of the Base and remove the SM. Make a sc in the same FLO. Make 2 sc in the FLO of the next 5 sts from Round 1. {12 FLO sc}
Round 2
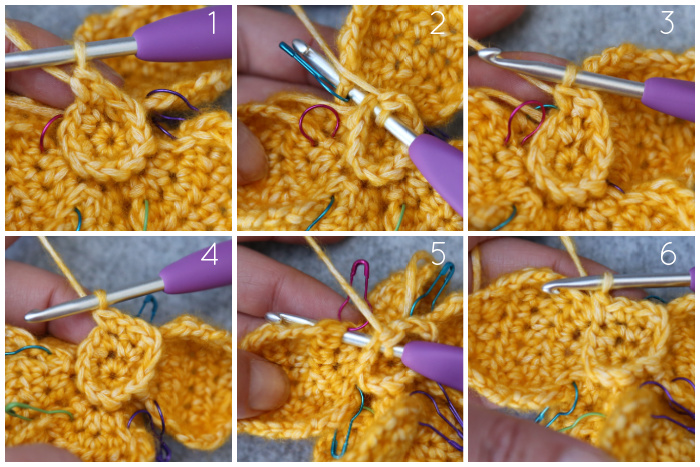
In this round, you will ‘catch’ the first, third, and fifth Petal by working into the marked hdc sts from Row 3 of the Petals. We will ignore the other three Petals (which you have hopefully pinned to the back).
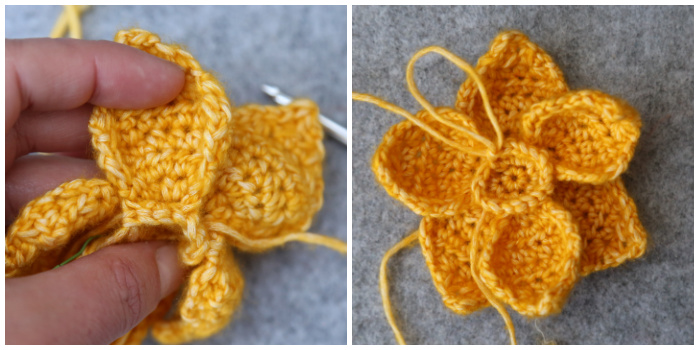
Make 2 sc in the standing sc of Round 1 of the Corona {Photo 1}. Sc in the next st AND the last (marked) hdc of Row 3 of the first Petal together {Photos 2 and 3}.
*Make 2 sc in the next st {Photo 4}, sc in the next st AND the first (marked) hdc of Row 3 of the next Petal together {Photos 5 and 6}. Bring your yarn to the front of the Petal**. Make 2 sc in the next st, sc in the next st AND the last (marked) hdc of Row 3 of the Petal together.*
Repeat from * to * once and from * to ** once. {18 sc}
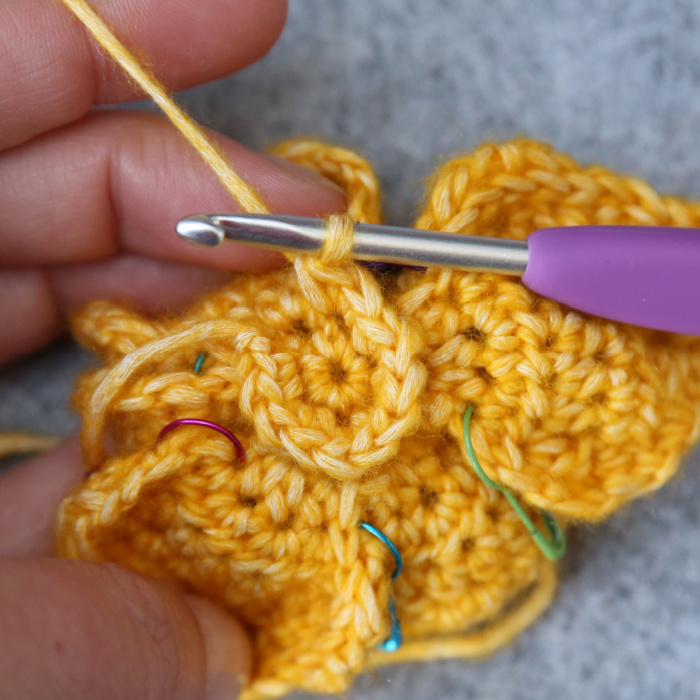
Here you can see what it looks like when you ‘catch’ those first and last hdc sts on three of the Petals. You will notice that three of them lie to the front (caught), while the other three lie behind those three (not caught). She may be a bit scrumpled up at this point.
Round 3
Sc in each of the 18 sts around. {18 sc}
Round 4
As Round 3.

Round 5
[Sc, ch 2] in each of the 18 sts around {Photo 1}. Cut your yarn, leaving a 15cm/6” end, and pull on your hook to pull this end all the way through the last ch.
Thread your needle with this end and insert your needle from front to back into the loops of the first sc of the round {Photo 2}. Then insert your needle from back to front into the last ch {Photo 3} and pull tight {Photo 4}. Anchor your yarn by inserting your needle from bottom to top into the closest horizontal loop you can find (on the outside of the Corona) – Photo 5.
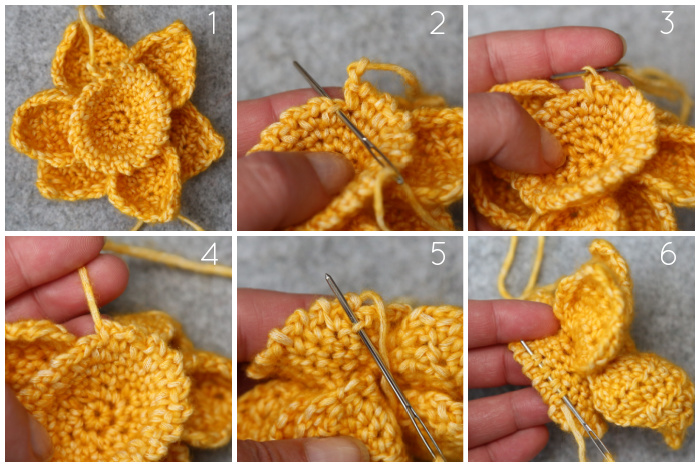
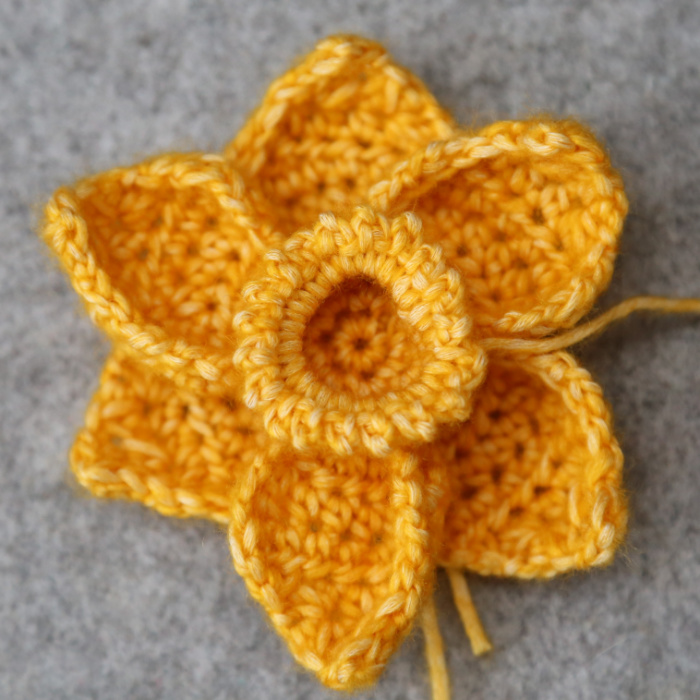
Now work your end away by inserting it through the bottom of all the sc sts from Round 5 {Photo 6}. Once you have worked through the bottom of all the sc sts, pull on your yarn so that the top of the Corona closes up (see below). It is up to you how tightly you want the Corona to close. Once you are happy with the shape of your Corona, secure the end by working back and forth a couple of times, then cut the remaining yarn close to your work.
You can now work away all your ends except the long initial yarn end, which you will use to sew your daffodil onto your bouquet.
I hope you have had fun making this daffodil, and that it will bring you a little burst of sunshine whenever the weather turns grey.
I am aiming to share the Hydrangea next, although it looks more likely that the Craspedia will come first because that tutorial is almost finished.
More Crochet Flowers for Your Bouquet
More crochet flowers are on the way!

This blog post contains affiliate links. I only link to products I personally use or would use. All opinions are my own.


