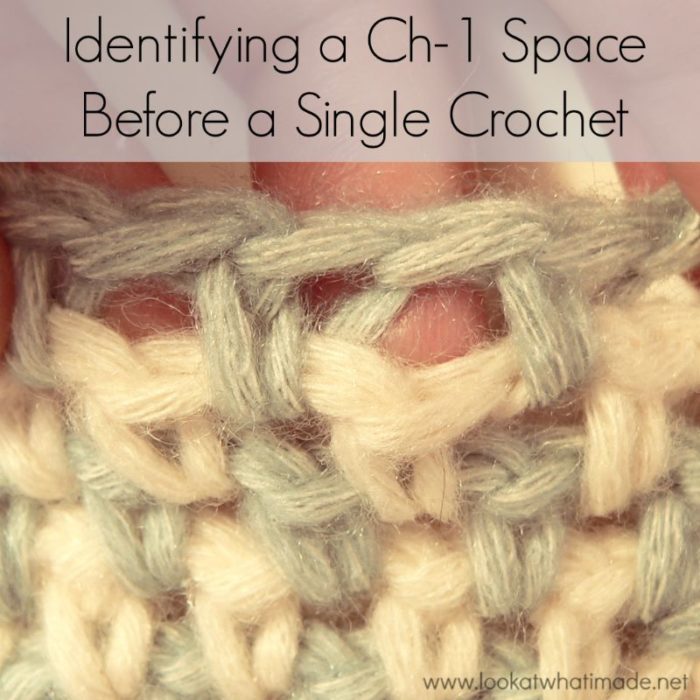
Occasionally you will have to work into a ch-1 space directly in front of a single crochet. If you are not familiar with your stitch anatomy this can cause a lot of frustration. Today I am going to show you how to distinguish between the single crochet and the ch-1 space.
Please note that this tutorial is written specifically for patterns that use (ch-1, sc) stitch combinations (like the corners of some of the rounds of Sophie’s Universe, or any Linen Stitch pattern).
The best way to see where you need to insert your hook is to pull on your last row/round so that it stretches and opens up the stitches. The post of each single crochet consists of 2 ‘legs’ or posts on the front of your work, and 2 ‘legs’ or posts on the back. When you pull on your work like this, you will see that one of the back vertical posts stretches diagonally.
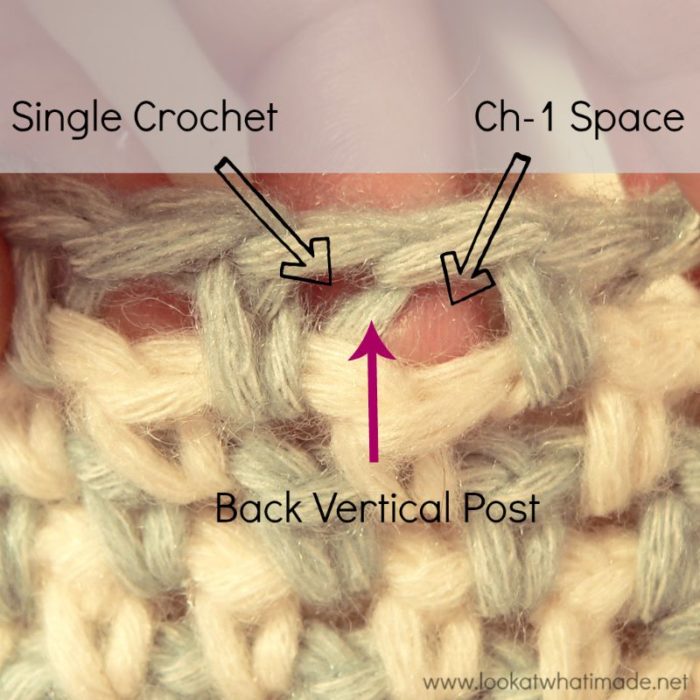
The space to the right of this back vertical post is your ch-1 space. You should insert your hook to the right of the back vertical post to work into this ch-1 space. If you are left-handed, this space will be to the left of the back vertical post.
The space to the left of this back vertical post is your single crochet. You should insert your hook to the left of this back vertical post to work into the single crochet. If you are left-handed, the single crochet will be to the right of the back vertical post.
If you would like some more information on stitch anatomy, see my post about Corners and the Elusive Hidden Stitch.

This blog post contains affiliate links. I only link to products I personally use or would use. All opinions are my own.


E S says
I just want to add my thanks! As a beginner, I kept skipping that hole for the sc because the sc in ch sp seems to be half a stitch ahead. I have the same issue with front-post double crochet (fpdc). You almost need to dig to find that sc hole… :)
Bernadette Tessmer says
I am making a washcloth pattern that reads like this:
*Sc2tog inserting your hook into the first sc and next ch-1 space*ch 1, sc 2 tog
inserting your hook in the next st and ch-1 sp; repeat *across, ch 1, sc in the final st.
ch 1 and turn.
This is suipposed to be an easy pattern and I have crocheted for a few years now
but cannot get this to work. Also the first row before this row reads
Beginning in 2nd ch from your hook, sc 2tog, “ch1, sc2tog and repeat to end of row.
My first row comes out curly each time I try. Please help. Patten is named Compress
Washcloth.
Jenny Lowman says
Bernadette, I am not familiar with this particular pattern you speak of, but I would trust the pattern, as many project can curl to start with and straighten out as they progress. Some may just need blocking after finishing.
J
Lori Davis says
“Pole in the dark”. Well that just about sums up my crochet career! Lol. Thank you for this simple clarification!
Lori Davis says
*poke
Ashley says
I just wanted to leave a note to say that this was extremely helpful. I was stuck on what should be a pretty simple project. I just needed a visual of what to aim for, and now everything is completely clear. Thank you!
Dedri Uys says
Hi Ashley,
I am really glad you found this post useful.
Linda Shackelford says
These instructions were a lifesaver. Thank you so much for the detailed diagrams and notations. It couldn’t have been clearer and my porch blanket pattern is now back on track and looks great!
Denise says
Hi Dedri,
Is there a symbol for “sc into chain-space”?
Thank you!
Dedri Uys says
Hi Denise.
Usually it is just the + (for SC) above the chain from the previous round.
Rhonda says
I’m so confused, pattern example:
*skip next(dc, ch1-space, Sc, ch1-space) 2dc-Vstitch into next ch-space of the V stitch of previous row” repeat 59 times.
I thought I understood this but the next row isn’t working out right and I think my problem is not understanding what is meant by “ch1-space”
Could you please help me?
Dedri Uys says
Hi Rhonda. Could you email me written-out instructions for the previou row, the current row, and the next row so that I can have a look at the pattern for you? You can use the contact me tab at the top of my website to do this.
Dedri
Denise says
Hi Rhonda,
You have to do your “V-Stitch” in the middle of the V-Stitch of previous row.
“V-Stitch” is dc – ch1 sp – dc, so on the next row you do the V-Stitch (dc – ch1 sp – dc) into that ch1 sp in the middle of the V.
Liza Heider says
Thank you! I now have to undo my entire project. I knew something wasn’t right! So glad I found this.
Lori says
Thanks so much for making this so simple! I’ve been crocheting for several years, simply guessing where to stick my hook!! Now maybe my projects won’t look so bad!
Dedri Uys says
You are very welcome :) I hope you find it useful going forward ;)
ann says
this may save my crochet life – thank you!!
Dedri Uys says
Haha, I’m glad you’re enthusiastic about it. It’s a small but invaluable lesson :)
Dara says
Dear Dedri
Thank you soooooo much. I do learn how to deeply embed in my love”Crochet” with the great tutorials you kindly post.
You just entered a new horizon of art to me and surely to many other fans.
I wish you happiness and health forever.
Dara from Iran
Dedri Uys says
Thank you, Dara :)
Barbara says
Awesome! I would always rather see the technical explanation then the usually poke it the dark I have survived on.
thank you soooo much!
Dedri Uys says
Lol. I tend to do the poke-in-the-dark too, but I figured it would be easier if people knew what they were aiming for :)
Andrea says
I think the paragraph re the single crochet is a typo…. If it’s not, I am TOTALLY confused.
Dedri Uys says
Andrea, the post hasn’t updated. It should say to the left for the single crochet. Thank you for flagging it up, and for keeping an eye on it for me x