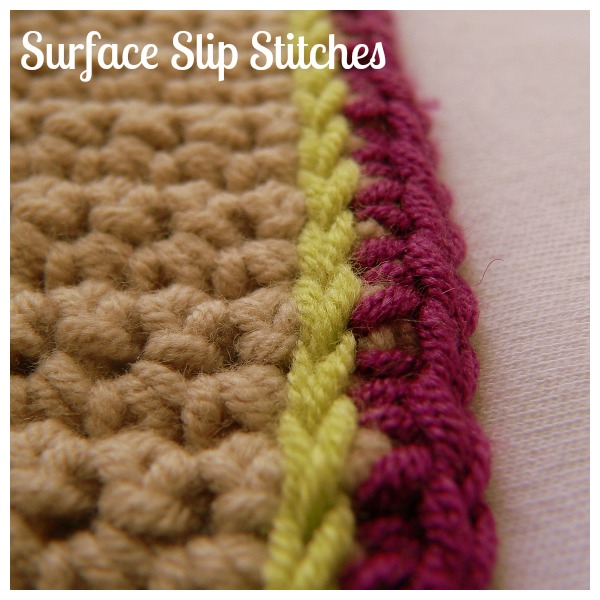
 Surface Slip Stitches are probably the easiest way to pretty up a project. They are basically just slip stitches worked through the “fabric” of your crochet work.
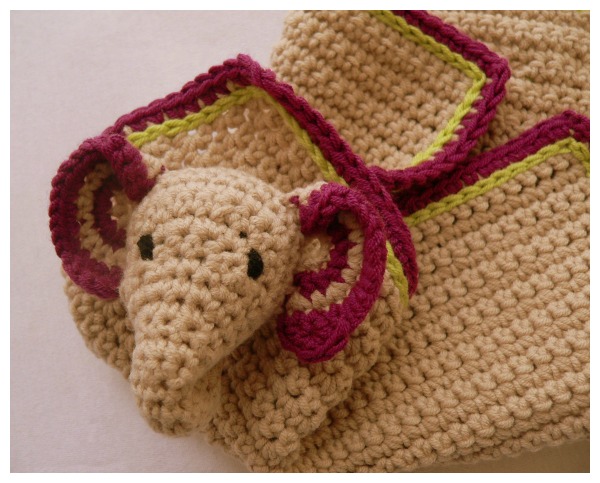
When I was updating the pattern for my Crochet Elephant Comfort Blanket, I realized that I didn’t really like the finish caused by working a round of contrasting colour single crochet all around the blanket. And then it hit me that I could hide the “ugly” by using surface slip stitches.
I think it made a massive difference. In fact, I was so pleased with the effect that I wanted to share this simple little trick with you.
Of course this is a bit like re-inventing the wheel, because every knows about surface crochet, don’t they? Well, I’ve known about it for years, yet I have only used it a handful of times. Do not ask me why! Every time I use it I think: “Man, I should totally use this more!!!”
Surface crochet is a little bit like Baby in Dirty Dancing. Everyone puts it in a corner. But when it gets taken OUT of the corner…AMAZINGNESS!
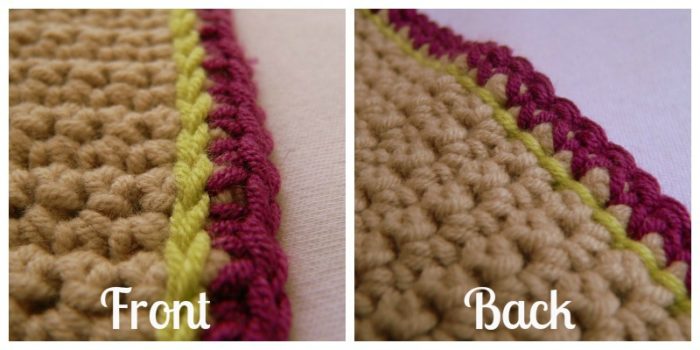
Using Surface Slip Stitches gives you a pretty chain running along the front of the work, almost like embroidery chain stitch. On the back of the work the surface stitches form a line of stitching, almost as if you have used a sewing machine.
How To Make Surface Slip Stitches
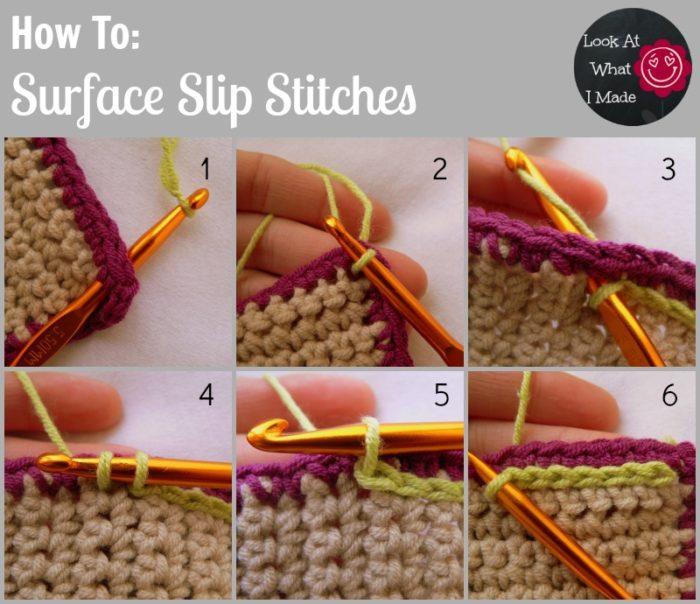
The first thing to remember with surface slip stitches is that the yarn is always to the back of your work. Please note that this does not apply to surface single crochet, which is another animal for another day.
- Insert your hook through your work wherever you want to start your surface slip stitches. For the next step you can just pull up a loop of yarn, but I prefer starting with a slip knot, because it ads security to the starting stitch. I hate having to control tension on the working yarn AND the tail of yarn. So once you’ve inserted your hook through your work, I place a slip knot onto your hook. This slip knot needs to be behind your work, not in front of it.
- Pull up a loop.
- Insert your hook into the next “hole”. This can either be the next stitch or the next row. It all depends on what direction you decide to go in.
- Yarn over and pull through your work…
- …then pull through the loop on your hook, completing your slip stitch.
Keep repeating these steps until your design is complete. Bind off and work away your tails of yarn. If you are going to use it to work around a blanket, as I have done, continue around until you get back to the first surface slip stitch. Slip stitch into the first slip stitch and bind off, working away your tails of yarn.
Although I have used it to hide an ugly edge, surface slip stitches have SO many more uses.
You can:
- Outline designs to make them POP!
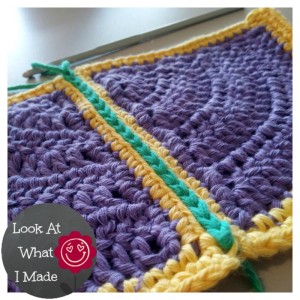
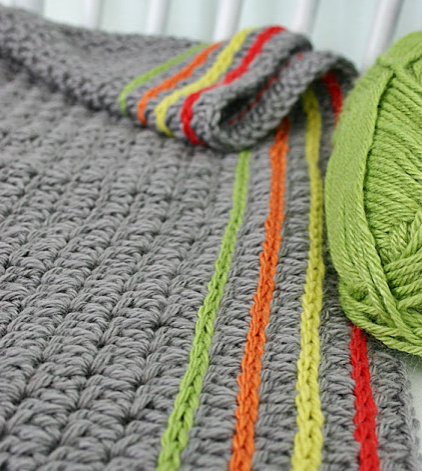
- Use surface slip stitches to add coloured stripes to a monotone blanket (see picture and link below).
- “Draw” designs on your finished crochet project.
You can also use surface slip stitches to join granny squares together, giving you a completely flat seam! You can read more about joining granny squares with the “Zipper” method here.
Although I don’t actually use the term surface slip stitch in the tutorial for the “zipper” method, that is exactly what it is. Consequently it takes a little bit longer to do than most other methods, but I LOVE the way it yields a completely flat seam.
If you find my instructions confusing, don’t give up. Tamara from Moogly has an excellent video tutorial.
Featured Favourite
This blanket (by Susan Carlson from Felted Button) is just gorgeous. For simple, elegant and FUN, this has to be my favourite application of surface slip stitches as a design element. Who knew grey could be so happy!
I have used this photo with permission from Susan and if you click on it, it will take you to her post about the blanket.
Remember to subscribe to my newsletter if you would like to be kept in the loop. You can also like my Facebook page or follow me on Bloglovin or Google+.
Happy Hooking!



Heather says
Thank you! This was the exact explanation I needed.
Jenny Lowman says
Yay! You’re welcome :)
Nancy Massie says
I learned how to do surface slip stitch as a way to stiffen the brim of sun hats. It’s a very useful stitch for so many applications.
Tracy says
A huge thank you!! Sparked all kinds of ideas. After over a decade, I began a crochet blanket. The beginning looks like heck (That’s putting it lightly!) as I was terribly out of practice. I’ve got hundred of hours into my creation, and except for the first section, I love it. I’m going to employ your technique along with another idea I had, croche some hearts, then use a combination of running slip stitch decoration & using that same stitch appliqué those hearts, hopefully it will look more like a piece of art & less like a humongous failure. Thanks again! (Fingers crossed)
Dedri Uys says
Hi Tracy.
I am sure it doesn’t look as bad as you think it does and I really like your heart applique idea. I hope it turns out even better than you hope it will x
Sheila Hoffman says
I have done slip stitches but not a surface slip stitch, will give it a try on the next baby blanket I do.
Shai says
Thank you for posting this! I keep returning time and again to remind myself how to get started on those occasions when I want to use surface slip stitches on my work. Your post is straightforward which is very helpful. :)
Dedri Uys says
Hi Shai. Thank you. Your website is lovely! I’ve just had a little visit with my cup of tea.
Sam says
Hi! I’m making a very large no-sew fleece blanket (big enough for a full-size mattress) and I was looking for a way to secure the two layers of the fleece together in the middle of the blanket instead of just at the edges. Do you think that several stripes of surface slip stitches would work well for this? I am already quite familiar with crocheting so that’s not a problem for me. Thanks!
Dedri Uys says
I am sure it will, as long as you use one of those hooks with the very sharp point so that it will go through the fleece with ease.
Donna says
This stitch is a Chain Stitch in Embroidery. I have been seeing more and more Embroidery Stitches used in Crochet but using the crochet hook not a needle. They make Crochet more elegant.
Dedri Uys says
Hi Donna
There are indeed many similarities between embroidery and crochet. The bullion stitch, for example, is very similar to the french knot in construction.
sue says
Hello Dedri
I find some of my squares look like the back of the work and some look like the front of the square.
How do you hold them so they all look the same?
Sue
Dedri Uys says
Hi Sue…do you mean how do you identify the front of the squares?
When working in the round as in these squares, there will be a definite front and back, because you are not turning at the end of every round.
On the front the stitches will look “smooth” and the yarn will twist around the posts of the longer (hdc, dc, tr, etc.).
On the back the stitches will look “knobbly”. The posts of the longer stitches will look as if they have tiny knots in them.
If you are finding that some of your rows are front-facing and some are back-facing, you are probably turning at the end of every round or accidentally turning when you pick your work back up after putting it down for a while.
As a rule of thumb, the loops of the last round should lie on top of your work when the front is facing you. These loops should form a little chain of V-s. If you cannot see the chain of v-s, you are holding the square with the wrong side facing.
I am not sure if this answers your question. Please contact me again if I’ve got the wrong end of the stick.
Dedri
Malathie says
Thank you Dedri:)
Katy says
Thank you so much for telling us about this stitch, Dedri – I’d never heard of it – but then, I’ve only been crocheting for 15 months! :)
This is something I’m definitely going to try when I join together the squares I’m making for my soon-to-be-born granddaughter – I think it will really make a much lovelier finish to the joins :)
Dedri Uys says
Pleased you like it, Katy. Happy Thanksgiving to you ;)
Vera says
Your works are amazing!
Love them! :)
Dedri Uys says
Thank you, Vera