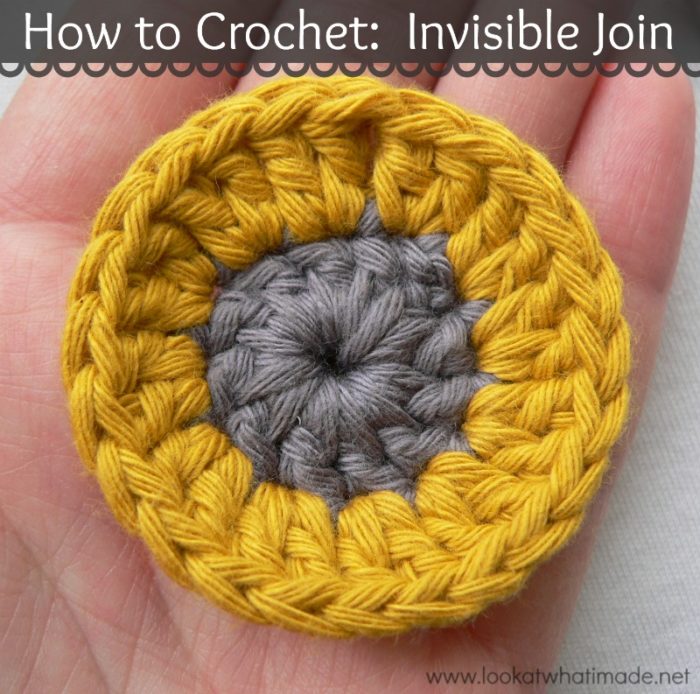
The invisible join is amazing when working in the round and changing colours at the end of each round. It takes a few seconds longer, but the upside is that it places a needle in your hand, so you might as well work away your tails as you go. Not so nice while you are busy crocheting, but SUPER nice once you have finished and there are no tails mocking you.
You don’t have to be an advanced crocheter to use the invisible join, but you DO need to be able to “read” your stitches. By that I mean that you have to be able to identify the first and second stitches of a round.
The invisible join is basically a “false” stitch that lies over the top of your beginning chain or your first standing stitch. It replaces this first stitch so that you do not end up with a sl st join (visible or not) and thus an extra stitch.
How to Use the Invisible Join with a Starting Chain
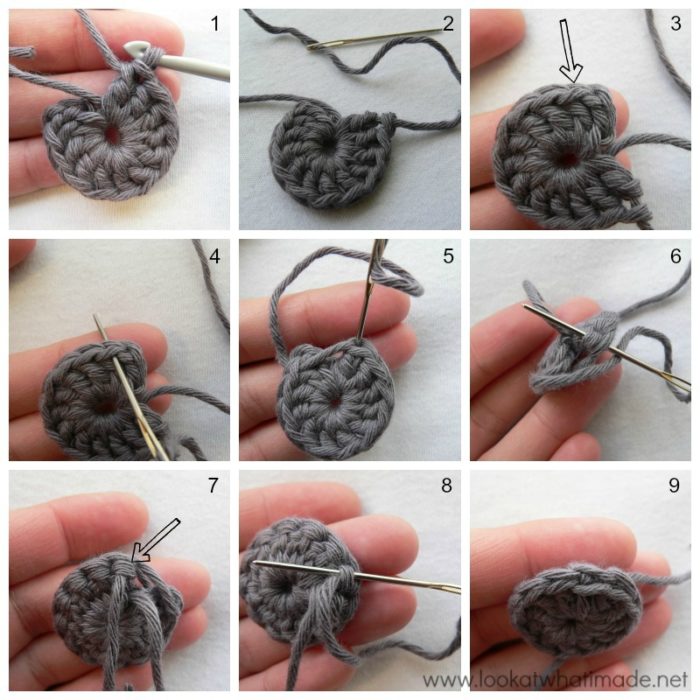
Example: Into a magic ring, ch 3 (counts as your first dc) and make 11 dc’s into the ring. Join to the top of the beginning ch-3 with a sl st.
We are going to replace the sl st join with an invisible join.
Once you have made all the required stitches of the round (Photo 1), cut your yarn, leaving about a 4″ (10 cm) tail, and pull this tail all the way through the top of the last stitch made – see Photo 2. Now pick up your yarn needle *shudder* and thread it with the tail of yarn (Photo 2).
Locate the top of the first st after the initial chain stitches (in this case the first dc). If you need help identifying which loops belong to which stitch, you can see this tutorial, which touches on the anatomy of stitches when working in the round. Once you have located this first stitch (Photo 3), insert your needle under both top loops of this stitch (Photo 4). Pull the yarn tight, but not too tight (Photo 5).
Insert your needle into the top of the last stitch made. You want to insert it straight down into the eye formed by the loops (Photo 5). Make sure that you insert your needle through the horizontal loop behind the stitch as well (Photo 6). Pull your yarn through. This will form a “false” stitch (see Photo 9). Make sure that you don’t pull it too tight. You want this “false” stitch to be more or less the same size as your other stitches.
To secure this stitch, insert your needle from top to bottom into the horizontal loop behind the stitch (indicated with an arrow in Photo 7 and illustrated in Photo 8). Pull the yarn through. Now work away your tails of yarn.
How to Use the Invisible Join with a Standing Stitch
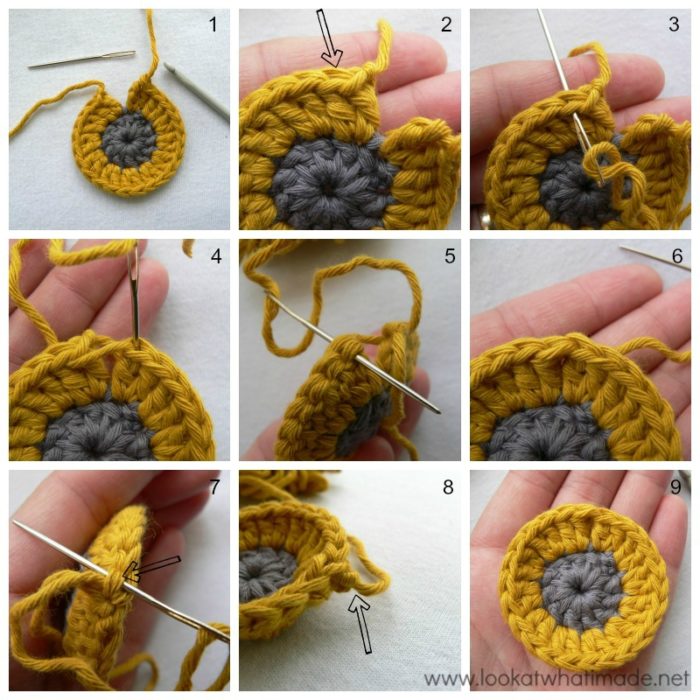
Example: Start in the first stitch of the previous round (see Note below) with a standing double crochet. Make a dc in the same stitch. Make 2 dc’s in each of the remaining 11 st’s. Join to the top of the standing double crochet with a sl st.
We are going to replace the sl st join with an invisible join.
Once you have made all the required stitches of the round (Photo 1), cut your yarn, leaving about a 4″ (10 cm) tail. Now pick up your yarn needle *shudder* and thread it with the tail of yarn.
Locate the top of the second stitch (in this case the second dc – illustrated with an arrow in Photo 2). If you need help identifying which loops belong to which stitch, you can see this tutorial, which touches on the anatomy of stitches when working in the round. Once you have located this first stitch (Photo 3), insert your needle under both top loops of this stitch (Photo 3). Pull the yarn tight, but not too tight (Photo 4).
Insert your needle into the top of the last stitch made. You want to insert it straight down into the eye formed by the loops (Photo 4). Make sure that you insert your needle through the horizontal loop behind the stitch as well (Photo 5). Pull your yarn through. This will form a “false” stitch (see Photo 6). Make sure that you don’t pull it too tight. You want this “false” stitch to be more or less the same size as your other stitches.
To secure this stitch, insert your needle from top to bottom into the horizontal loop behind the stitch (indicated with an arrow in Photo 7). Pull the yarn through. Now work away your tails of yarn.
When using the invisible join with any standing stitch, you will end up with a little flappy drifting stitch (Photo 8). This is because you have essentially replaced the first stitch with a “false” stitch. This stitch will pull flat and disappear when you work away your tails.
Traditional Slip Stitch Join
Joining to a Starting Chain
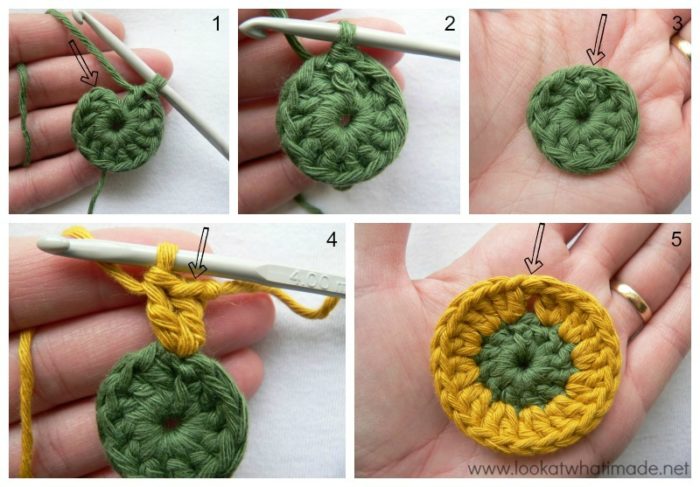
Example: Into a magic ring, ch 3 (counts as your first dc) and make 11 dc’s into the ring. Join to the top of the ch-3 with a sl st.
Once you have made all the required stitches of the round (Photo 1), join to the top of the beginning ch-3 with a sl st (indicated with an arrow in Photo 1 and illustrated in Photo 2). Joining in this way gives you an extra stitch in the form of the back end of the sl st join. This stitch is never referred to and it is never counted unless the designer specifically instructs you to work into it. If you look at Photo 3 closely, however, you will see that there are actually 13 sets of “loops”. The 13th set of loops belong to the sl st join (indicated with an arrow in Photo 3).
When designing patterns that call for joining in the round, I prefer to skip the first stitch and work into the back end of the slip stitch join instead. It works really well for tubular items like baskets and rugs, where the placement of increases does not matter as much, and yields a very clean seam. You can read more about that here.
Joining to a Standing Stitch
Example: Start in the same stitch as the sl st join (see Note below) with a standing double crochet. Make a dc in the same stitch (Photo 4). Make 2 dc’s in each of the remaining 11 st’s. Join to the top of the standing double crochet with a sl st (indicated with an arrow in Photo 4 and illustrated in Photo 5).
In Photo 5 above you can see that the sl st once again forms an extra set of “loops”. Notice the gap caused by the sl st join from the first round? When joining with a sl st you will always get a gap like this. Even if you pull the sl st towards the back of your work, you will still get a little space.
Invisible Join vs Slip Stitch Join
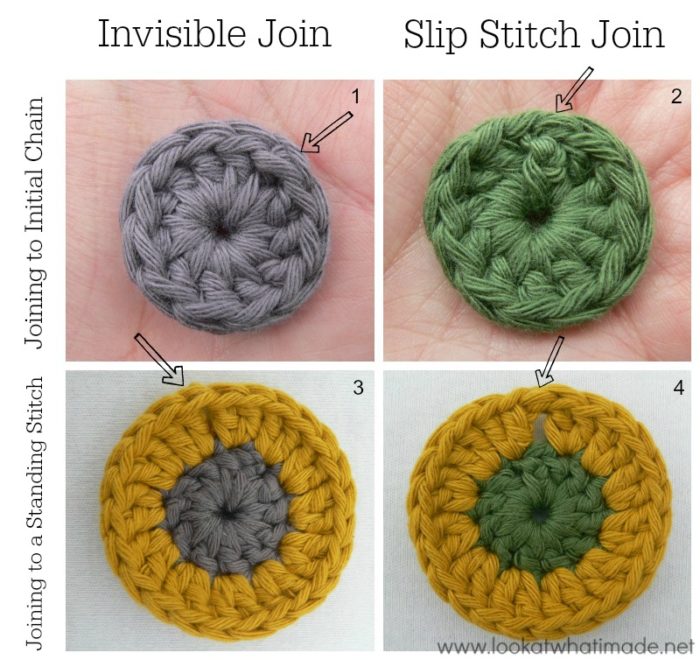
Below you will find a side-by side comparison of the two methods. In the photos on the left the arrow indicates the “false” stitch created by the invisible join. In the photos on the right the arrow indicates the sl st join.
Note: Substituting the Slip Stitch Join with the Invisible Seam
You can use the invisible join in any pattern that calls for the traditional sl st join. You just have to understand the anatomy of your stitches.
When using an invisible join, the “false” stitch replaces the sl st AND the first stitch of the round, be this the beginning ch or a standing stitch.
Where a pattern asks you to do anything in the same stitch as the sl st join, you will do it in this “false” stitch instead.
“Ch 1 and sc in the same stitch as the sl st join”, for example, will become: “Sc in the first stitch of the previous round (which will be the “false” stitch).
Related Tutorials/Patterns
- Pardon Me, but Your Slip Stitch is Showing by Mr. Micawber’s Recipe for Happiness – this tutorial uses a crochet hook to pull the yarn through for those of you who absolutely refuse to pick up that yarn needle.
- Video Tutorial: Seamless Finishing When Working in the Round by Tamara from Moogly.
- Pattern: Spoke Mandala by Winkieflash – this pattern uses the invisible join. It also has clear photos of how to do the invisible join.
More Crochet Tutorials
- Corners and the Elusive Hidden Stitch
- How to Crochet Dc3tog Clusters
- How to Crochet the K-Stitch
- How to Crochet the Linen Stitch
Remember to subscribe to my newsletter if you would like to be kept in the loop. You can also like my Facebook page or follow me on Bloglovin or Google+.
Happy Hooking!



Rene says
OMG !! I am also 65 & have been crocheting
Since I was 18 & have never seen this type of joining!! I love it!! Thanks so much I will be using your method from now on!!❤️