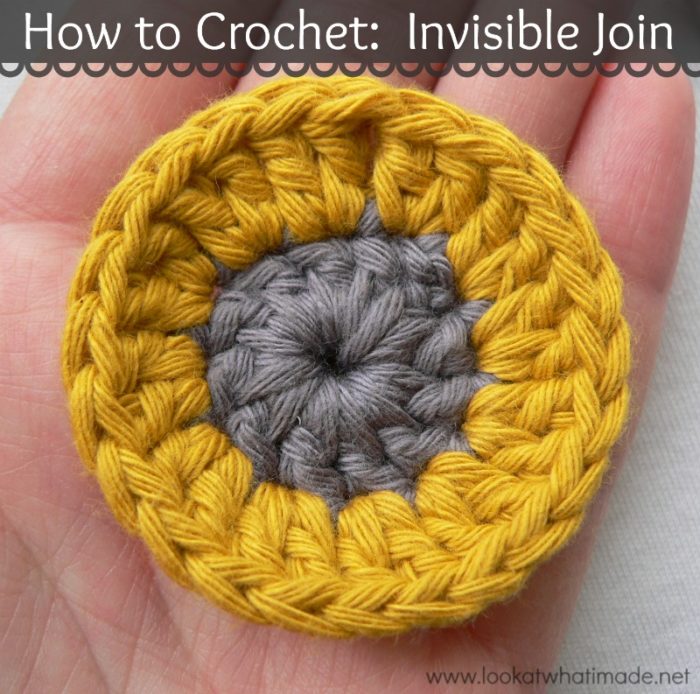
The invisible join is amazing when working in the round and changing colours at the end of each round. It takes a few seconds longer, but the upside is that it places a needle in your hand, so you might as well work away your tails as you go. Not so nice while you are busy crocheting, but SUPER nice once you have finished and there are no tails mocking you.
You don’t have to be an advanced crocheter to use the invisible join, but you DO need to be able to “read” your stitches. By that I mean that you have to be able to identify the first and second stitches of a round.
The invisible join is basically a “false” stitch that lies over the top of your beginning chain or your first standing stitch. It replaces this first stitch so that you do not end up with a sl st join (visible or not) and thus an extra stitch.
How to Use the Invisible Join with a Starting Chain
Example: Into a magic ring, ch 3 (counts as your first dc) and make 11 dc’s into the ring. Join to the top of the beginning ch-3 with a sl st.
We are going to replace the sl st join with an invisible join.
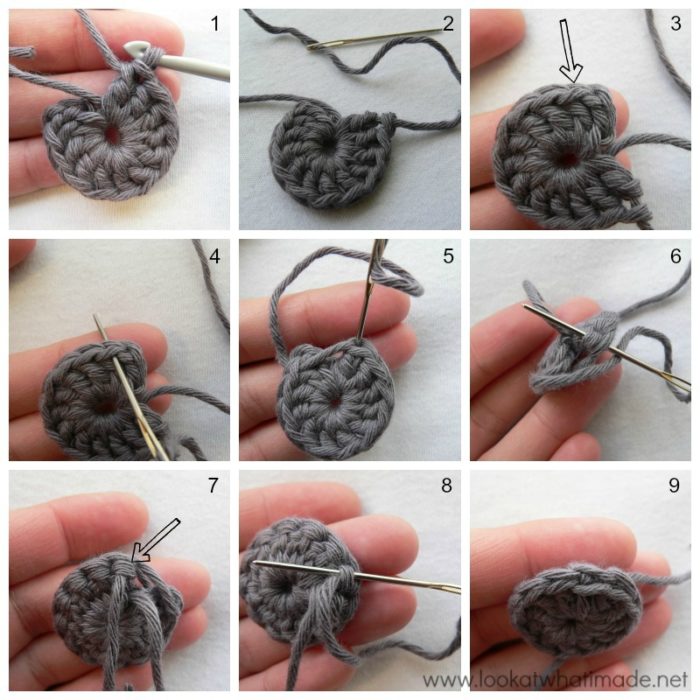
Once you have made all the required stitches of the round (Photo 1), cut your yarn, leaving about a 4″ (10 cm) tail, and pull this tail all the way through the top of the last stitch made – see Photo 2. Now pick up your yarn needle *shudder* and thread it with the tail of yarn (Photo 2).
Locate the top of the first st after the initial chain stitches (in this case the first dc). If you need help identifying which loops belong to which stitch, you can see this tutorial, which touches on the anatomy of stitches when working in the round. Once you have located this first stitch (Photo 3), insert your needle under both top loops of this stitch (Photo 4). Pull the yarn tight, but not too tight (Photo 5).
Insert your needle into the top of the last stitch made. You want to insert it straight down into the eye formed by the loops (Photo 5). Make sure that you insert your needle through the horizontal loop behind the stitch as well (Photo 6). Pull your yarn through. This will form a “false” stitch (see Photo 9). Make sure that you don’t pull it too tight. You want this “false” stitch to be more or less the same size as your other stitches.
To secure this stitch, insert your needle from top to bottom into the horizontal loop behind the stitch (indicated with an arrow in Photo 7 and illustrated in Photo 8). Pull the yarn through. Now work away your tails of yarn.
How to Use the Invisible Join with a Standing Stitch
Example: Start in the first stitch of the previous round (see Note below) with a standing double crochet. Make a dc in the same stitch. Make 2 dc’s in each of the remaining 11 st’s. Join to the top of the standing double crochet with a sl st.
We are going to replace the sl st join with an invisible join.
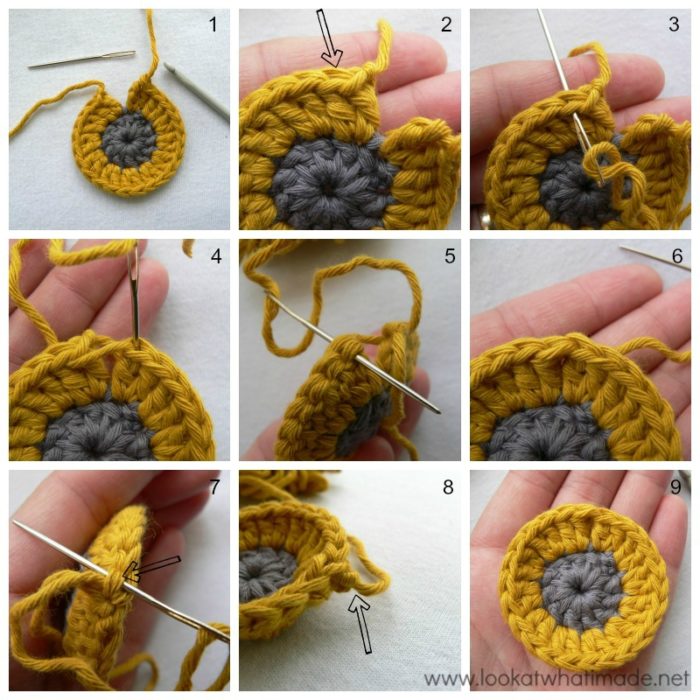
Once you have made all the required stitches of the round (Photo 1), cut your yarn, leaving about a 4″ (10 cm) tail. Now pick up your yarn needle *shudder* and thread it with the tail of yarn.
Locate the top of the second stitch (in this case the second dc – illustrated with an arrow in Photo 2). If you need help identifying which loops belong to which stitch, you can see this tutorial, which touches on the anatomy of stitches when working in the round. Once you have located this first stitch (Photo 3), insert your needle under both top loops of this stitch (Photo 3). Pull the yarn tight, but not too tight (Photo 4).
Insert your needle into the top of the last stitch made. You want to insert it straight down into the eye formed by the loops (Photo 4). Make sure that you insert your needle through the horizontal loop behind the stitch as well (Photo 5). Pull your yarn through. This will form a “false” stitch (see Photo 6). Make sure that you don’t pull it too tight. You want this “false” stitch to be more or less the same size as your other stitches.
To secure this stitch, insert your needle from top to bottom into the horizontal loop behind the stitch (indicated with an arrow in Photo 7). Pull the yarn through. Now work away your tails of yarn.
When using the invisible join with any standing stitch, you will end up with a little flappy drifting stitch (Photo 8). This is because you have essentially replaced the first stitch with a “false” stitch. This stitch will pull flat and disappear when you work away your tails.
Traditional Slip Stitch Join
Joining to a Starting Chain
Example: Into a magic ring, ch 3 (counts as your first dc) and make 11 dc’s into the ring. Join to the top of the ch-3 with a sl st.
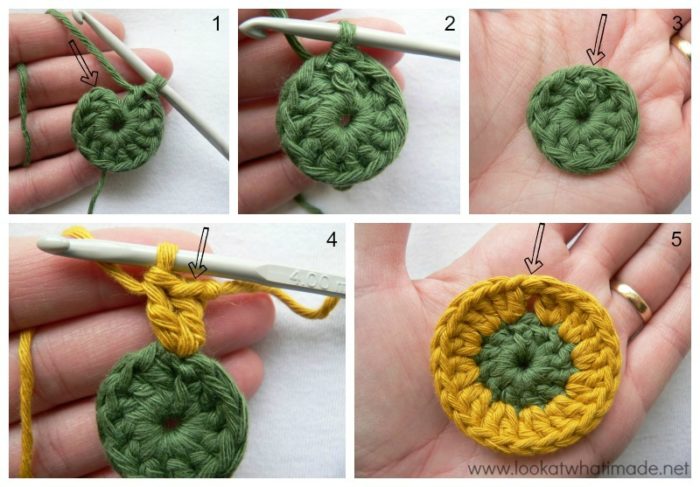
Once you have made all the required stitches of the round (Photo 1), join to the top of the beginning ch-3 with a sl st (indicated with an arrow in Photo 1 and illustrated in Photo 2). Joining in this way gives you an extra stitch in the form of the back end of the sl st join. This stitch is never referred to and it is never counted unless the designer specifically instructs you to work into it. If you look at Photo 3 closely, however, you will see that there are actually 13 sets of “loops”. The 13th set of loops belong to the sl st join (indicated with an arrow in Photo 3).
When designing patterns that call for joining in the round, I prefer to skip the first stitch and work into the back end of the slip stitch join instead. It works really well for tubular items like baskets and rugs, where the placement of increases does not matter as much, and yields a very clean seam. You can read more about that here.
Joining to a Standing Stitch
Example: Start in the same stitch as the sl st join (see Note below) with a standing double crochet. Make a dc in the same stitch (Photo 4). Make 2 dc’s in each of the remaining 11 st’s. Join to the top of the standing double crochet with a sl st (indicated with an arrow in Photo 4 and illustrated in Photo 5).
In Photo 5 above you can see that the sl st once again forms an extra set of “loops”. Notice the gap caused by the sl st join from the first round? When joining with a sl st you will always get a gap like this. Even if you pull the sl st towards the back of your work, you will still get a little space.
Invisible Join vs Slip Stitch Join
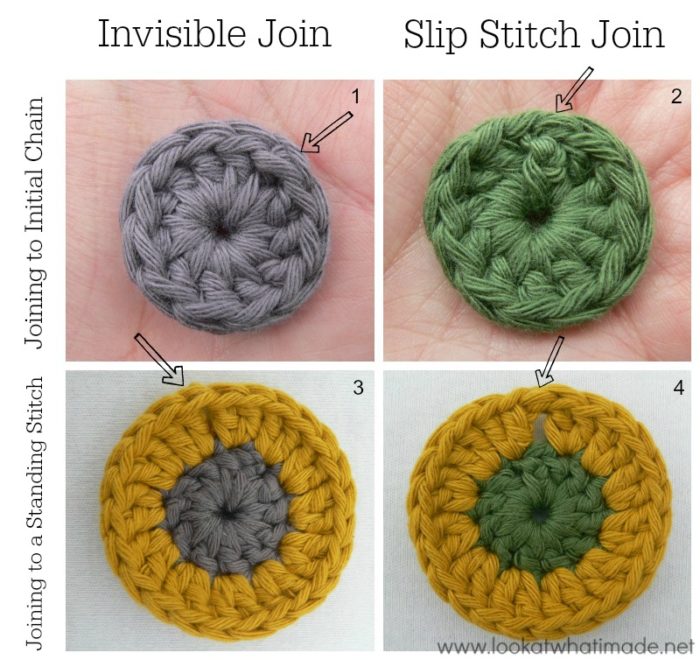
Below you will find a side-by side comparison of the two methods. In the photos on the left the arrow indicates the “false” stitch created by the invisible join. In the photos on the right the arrow indicates the sl st join.
Note: Substituting the Slip Stitch Join with the Invisible Seam
You can use the invisible join in any pattern that calls for the traditional sl st join. You just have to understand the anatomy of your stitches.
When using an invisible join, the “false” stitch replaces the sl st AND the first stitch of the round, be this the beginning ch or a standing stitch.
Where a pattern asks you to do anything in the same stitch as the sl st join, you will do it in this “false” stitch instead.
“Ch 1 and sc in the same stitch as the sl st join”, for example, will become: “Sc in the first stitch of the previous round (which will be the “false” stitch).
Related Tutorials/Patterns
- Pardon Me, but Your Slip Stitch is Showing by Mr. Micawber’s Recipe for Happiness – this tutorial uses a crochet hook to pull the yarn through for those of you who absolutely refuse to pick up that yarn needle.
- Video Tutorial: Seamless Finishing When Working in the Round by Tamara from Moogly.
- Pattern: Spoke Mandala by Winkieflash – this pattern uses the invisible join. It also has clear photos of how to do the invisible join.
More Crochet Tutorials
- Corners and the Elusive Hidden Stitch
- How to Crochet Dc3tog Clusters
- How to Crochet the K-Stitch
- How to Crochet the Linen Stitch
Remember to subscribe to my newsletter if you would like to be kept in the loop. You can also like my Facebook page or follow me on Bloglovin or Google+.
Happy Hooking!



Sandra says
I will.turn 65 yrs old in 4 days. I have been crocheting since I was 16 yrs old. Book after book of patterns. This is the first time I have ever heard of invisible joining. Wonderful! Now I blush when I look down at my work. Thank you! My great-grandchildren will not have blankets nor booties & bonnets with that ugly joining showing. Thank you for your instructions.
Dedri Uys says
Happy Birthday, Sandra. I hope it was a fantastic day. I just love how there is always something new to learn. It makes life so interesting :)
Nicole says
Super idea. But could you send a german desription, pls?
Jenny says
Sorry Nicole. We don’t have any translations available for this tutorial.
BW Jenny and Dedri
Cp says
Thank you so much for this. I just have begun using standing stitches, but I had no great way of joining them. Your method solves my problem.
Elaine says
With the “false stitch” that is made, it seems to add one more stitch to my circle. Am I doing it wrong?
Dedri Uys says
Hi Elaine. Are you joining to the second stitch when you are making your invisible join?
Patty Love says
Hi, Dedri! Love your invisible join. As one of the other posters said, you add a couple of steps that are missing in other people’s directions, which makes your instructions perfect. One question: On a U.S. sc and larger stitches, it’s easy to put your needle through that horizontal loop in the back. But in the pattern I’m working on, I have a ch3 as my last stitch in the round, so there’s no horizontal loop. I threaded the tail through the “back bumps” of each chain stitch, but this is not attractive. If you pull too tight, it looks … well … too tight. If you don’t pull tight enough, the tail loosens when you stitch over the chain in the next row—no matter how well you secure the tail. Any tips? Thanks s great technique and all you do for the crochet community!
Dedri Uys says
That’s a good question, and something I’ve been meaning to address for a while as it keeps cropping up when I do workshops.
If my last st is a ch, I insert my needle down into the chain as I would if it were a ‘regular’ st and then I insert it from back to front below the loops of the first st of the round and then from front to back below the loops of the second st (like sewing a running st). I tighten it just enough so that the invisible join isn’t sloppy, and then I work my yarn away as normal.
I hope that makes sense.
Dedri
Patty Love says
Thanks, Dedri! Going forward makes much more sense than going backward, as I was doing. Can’t wait for my next square that has this problem so I can try it!
Dedri Uys says
Let me know how you go and I might be able to guide you over Skype.
Kathleen Goggins says
This is so cool! Thanks, I use it all the time when working rounds.
Judy Louey says
I wish I had seen this tutorial on seamless join earlier . I will definitely be using this method in future even if it means taking time to work with a needle. I’ve had so much hassle with the slip stitch joint when making my granny squares with unsightly bumps and not knowing where to place my hook. Thank you for sharing this.
Dedri Uys says
Hi Judy. If you think about it, you have to work your ends away at some point anyway, so doing it while you are busy with the invisible join isn’t really any extra hassle :)
Sandra Leigh. says
Newbie here. Great tutorial on a great technique. I get it, but after working in the tail with the needle I don’t understand how to start the next color on the next row, and where. Help. Thanks. Sandra.
Dedri Uys says
Hi Sandra. If you use the invisible join, you will start your next round in the ‘fake’ stitch you just created. It replaces the top of the first stitch. The neatest way to start is with a standing stitch. Tamara Kelly from Moogly has a great video tutorial for making standing stitches.
Alexandra says
Dear Dedri, does it mean that if we use the sama colour we should go on with the slip stitch? Therefore the gap will shop and there is a noticeable horizontal line made by the sl st. I am making mandala and it there is always a problem especially on the first and second row.
Dedri Uys says
When you are working in the round with one colour and you are required to join at the end of every round, you will finish each round with a sl st. If it is a simple pattern, the join will show, yes. If it is a complex pattern with lots of surface detail (back post/front post/bobbles/popcorns), the join shouldn’t show as much. My friend made Sophie in a single colour and her joins are not visible at all. If it bothers you a lot, you can use the invisible join and fasten off at the end of every round, but that will give you a lot of tails to work away.
Robyn says
I’m having a hard time with the center of the magic ring…it is opening up rather than staying tight and closed. Do you have a suggestion as to how to keep it tight?
Jenny says
When making a magic ring you really need to finish it off when working in the end of the yarn, Robyn. I work my tail round the inside if the stitches in the magic ring back and forth at least three or four times, or more, to ensure it stays good and tight :)
Jnanasalin says
I used to use a single loop of yarn for a magic ring. If I make a double loop and crochet over both strands the ring stays closed after I pull it tight.
Margaret says
I love the invisible join but have one question. On the linen stitch square do you join in the ch 1 space in the corner or go over one more stitch to the second sc?
Dedri Uys says
Hi Margaret. I join to the ch-1 when making the invisible join. The ‘invisible join stitch’ replaces the top of the first sc.
Gleda says
Dedri, your invisible join tutorial is excellent! I’ve been using an invisible join for quite a while, but you add a couple of steps that make it better. Thank you so much!
Dedri Uys says
Thank you, Gleda :)
Katie C says
Hi Dedri! Your tutorial on the Invisible Join helped me SO MUCH! I have tried a number of things to make my projects look a little better quality, but I am always left with that UGLY knot or bump. So this Invisible Join is literally a lifesaver for me! I just posted a link to this page in one of my blog posts because it was just so helpful to me that I wanted other people to be able to learn too :) Thanks again!
Dedri Uys says
Hi Katie. Your puff scrubbies are perfect. Elegant and whimsical :)
pamela tomkinson says
Hi Dedri, I have studied your information on the Invisible joins and I am just wanting to clarify a couple of things. I got nervous because you said “make sure you know which stitch to join to and which stitch to start the new round”. It seems that in both the two directions you gave, 1. Join to starting chain 2. join to standing stitch, they both basically start in the 2nd stitch in, from either the starting chain or the other a standing stitch, from the beginning of the round. But other than that It seems the that the process is the same?
I am confused about which stitch to start the next round in though. Do I start in the fake new stitch and create my new standing stitch there? I think that is what you said but it seems like it might not hold??
And it seems that when working in the round in order to not get sl. st joins you have stop and and do this invisible join every round.? Or do you only use it when you change color? In the above answer you gave to Kati I was trying to understand your response which I think explains my question, but I didn’t know what,” so st join “meant, or what “which moves your last st. to the back of the so st join” meant? Sorry for asking so many ???s Thanks For any help you have time to give. Pam T
Dedri Uys says
Pamela, hi.
If you use the invisible join, you always join to the second stitch so that the new fake stitch lies over the top of the first stitch (or over the top of the starting chain). You will make your standing stitch in this fake stitch.
You can only use this join when changing colours or cutting your yarn. If I am using the same colour, I sl st into the indicated stitch and go from there.
You need to work your tail of yarn away after making the invisible join, or at least finish if off as suggested in the tutorial. If you only pull the yarn through and leave it, without sewing around the back of the stitch once, it won’t hold.
“so st join” is a typo for sl st join. I was explaining to Kati what would happen if you didn’t join to the first st with a sl st, or started in the second stitch, which does not apply to you and cannot be use with Sophie, because it would throw every round off by one stitch.
I hope that helps.
Pamela Tomkinson says
Thanks You that helps a lot!!!
Carrie says
Wonderful San has a tutorial on how to reduce the dreaded ends (see here: http://www.loopsan.com/uncategorized/how-to-carry-your-yarn-in-a-granny-square/). I LOVE both technics, I’ve used them both on all of the CAL blocks :)
Dedri Uys says
Thanx, Carrie. I was looking for that link the other night and couldn’t find it. I realize now that I scrolled right past it without realizing what it was x
nicola jarvis says
im a newbie and have made a blanket from squares, but ive got stuck and wonder if you could help, the square i am lost on is a circle, then i dont know how to make it into a square, so that i can join it to the other squares. im sure its easy, ive gone at it over and over but not getting it right so im obviously not there yet. i know i have to increase and create a corner but which ever way im doing it it doesnt look right. if you could help that would be great, thanks
Dedri Uys says
Nicola, if you use the Contact Me form at the top of my website, you can send me an email with more details (how many st’s in the last round of the circle, for instance) or a link to the pattern. I will gladly help you!
Barbara says
\what a great idea.
Eileen says
Why use a needle? I use a smaller crochet hook and pull the tail through. :)
Dedri Uys says
To each his own :) I like sewing the tails away as I go, mainly because I have to so the photos and cluttered with tails :)
CARMEN says
Buen día. Yo esta unión solo la hacia al final del trabajo, buena idea hacerla en todas las vueltas. Me gustaría saber como lo haces en la unión de un nuevo color.
Gracias por todo.
Un saludo,
Carmen
Kati says
I love this! I have a baseball hat pattern that I think I will have to rework and give this as an option to avoid the horrible seam down the side of the hat! I will completely give you credit for it of course and a link in my blog!!!! Thanks you so much for sharing!
Dedri Uys says
Hi, Kati. it works really well for colour changes, but if you are not changing colours at the end of a round, you might consider keeping the so st join for those rounds. If you make your first stitch in the sstitch after the sl st join, which moves your last st to the back of the so st join, and then join with a so st to first st of the round, it gives a lovely neat seam. Does that make sense?